by Lex Hegt | Jan 8, 2019 | BizTalk Community Blogs via Syndication
So, you have installed BizTalk360 and you are eager to start using it! But, BizTalk360 is such a feature-rich product, that you might find it hard to get started and implement BizTalk360 in a proper way.
In this blog post, we will give you some tips and guidelines, which will be of help when you are setting up BizTalk360. You can also use the article if you have already set up some of the features in BizTalk360 and want to make sure that you did not miss anything important.
Note: BizTalk360 has a To Do list which contains a number of tasks, you could do to make full use of the product. You will find this To Do list under Settings => To Do List. See also, this article.
This blog post is separated in the following sections:
- Optimizing the BizTalk360 environment
- Benefit from automated monitoring
Optimizing the BizTalk360 environment
Once you have installed the product, there are a few things you must do, before you are able to use the product. Furthermore, you can also perform some tasks to optimize the environment. Let’s have a look at these tasks:
- Activate the license (required)
- Adding BizTalk environments to BizTalk360 (required)
- Remove unused BizTalk features from the BizTalk360 UI
- Create User Access Policies
- Create efficient dashboards
We will have a somewhat more detailed look at these tasks.
Activate the license
After finishing the installation of BizTalk360, the installer starts the product in your default browser. Once started, BizTalk360 will ask you to provide the license. If you have purchased a license, you now can provide the details of this license. Depending if the server on which BizTalk360 has been installed has internet connectivity, the process of applying the license will be a bit different.
Adding BizTalk environments to BizTalk360
After applying the license, you will be able to access the BizTalk environment, for which you purchased the license.
In case you have purchased BizTalk360 licenses for multiple BizTalk environments, there are two options on how to access these BizTalk environments from BizTalk360:
- A separate installation of BizTalk360 for each BizTalk environment
- Using one BizTalk360 instance for multiple BizTalk environments
It is totally up to you how you want to access your BizTalk environments from BizTalk360, although the two mentioned approaches both have their pros and cons. To sum up a few:
- it is handy to have multiple BizTalk environments in the same instance of BizTalk360. But, there is the risk that you think that you are stopping artefacts in your Test environment, while you were actually doing it in the Production environment
- with separate BizTalk360 instances for your BizTalk environments, it is less likely that you stop artefacts or terminate instances in the wrong environment. But, it might be hard to memorize the URL’s of the different BizTalk360 installations
If you plan to have multiple BizTalk environments in the same instance of BizTalk360, it is good to know that, to prevent confusion, you can achieve the following:
- give each environment a friendly name
- colour code each environment
Read this article in our Documentation portal on how to maintain environments in BizTalk360. The article mentions, amongst others, how to provide a friendly name and a colour code.
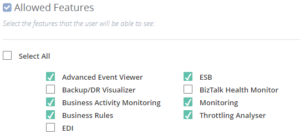
Remove unused BizTalk features from the BizTalk360 UI
One of the primary design goals of BizTalk360 is to consolidate all the tools and portals you might need to operate your BizTalk environment. Just to mention a few of such portals, the product contains features to access BAM views, the ESB Exception Framework, the Business Rules Composer, EDI, etc.
However, within your organization, you might not use all these BizTalk features. Still, they show up in the BizTalk360 user interface.
Of course, you can use User Access Policies to prevent these features to show up, but then the Super User (for which no fine-grained user access policy needs to be set up) will still view these unused features.
To prevent these unused features from showing up, you can simply disable them for the environment. This way, the BizTalk360 user interface is more focused on your BizTalk environment.
Check this article in our Documentation portal and under Allowed Features turn on/off the appropriate features.
Create User Access Policies
After the installation of the product, an User Access Policy has been created for the user who installed the product. However, it is likely that more people will use the product. To provide each user, which the access to BizTalk360 they need, it is best to create User Access Policies for each user.
You can start with giving your fellow BizTalk administrators access to BizTalk360. But when you feel confident, you can also give people outside the BizTalk Admin team access to the product.
With the fine-grained capabilities of the User Access policies, you can, for example, can give your:
- Support Engineers read-only access to BizTalk360
- Business users access to portals like BAM, EDI, ESB, BRE, etc.
Access is always in a secure and audited way. In this
blog post we describe how you can approach setting up access with BizTalk360.
Create efficient dashboards
The Operations Dashboard is the entry point of BizTalk360. This Dashboard can contain a different kind of widgets of which the goal is to immediately show useful information about the well-being of your BizTalk environment.
The widgets on the Operations Dashboard are fully customizable in terms of:
- number of widgets
- size of the widgets
- location of the widgets
- refresh interval of the widgets
In case the default collection of widgets does not completely fulfil your requirements, you can create Custom Widgets, enabling you for example to show the output of (BizTalk360) API calls or SQL queries.

The Documentation portal contains more information on how to set up and use the Operations Dashboards. It also contains articles about creating Custom Widgets.
Benefit from automated monitoring
The main reason you purchased BizTalk360 might very well be the monitoring capabilities of the product, so you are probably interested in setting this up as soon as possible.
Setting up monitoring in BizTalk360, consists of two steps, which are:
- create Alarms – to configure HOW you want to monitor
- manage Mappings – to configure WHAT you want to monitor
Create Alarms to configure HOW you want to monitor
The first step is to create an alarm. With BizTalk360, alarms come in a few different flavours:
- Threshold alarms – for monitoring whether artefacts are in the expected state
- Health alarms – for receiving Daily check reports at configurable days/times
- Data Monitoring alarms – for monitoring the processing of messages through BizTalk
- Consolidated alarms – any combination of the 3 above mentioned alarm types
Besides stuff like giving an alarm a name and configuring how you want to be notified, depending on the alarm type, you can configure multiple other settings. So, again, with configuring these properties you are only configuring how you want to monitor.
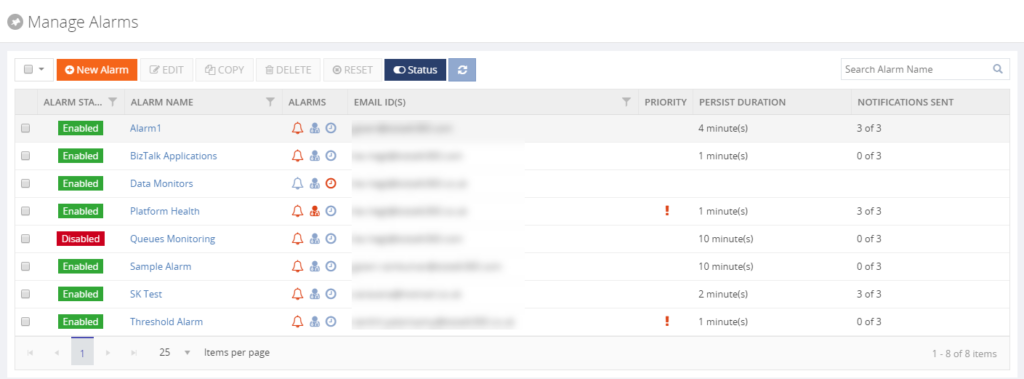
Read the Understanding Alarms article in the Documentation portal for more information about the different alarm types and on how to create an alarm.
Note: you probably want to receive notifications via email. For BizTalk360, to be able to send email notifications, you need to configure an SMTP server. Read this article on how to set this up.
Manage Mappings to configure WHAT you want to monitor
After creating an alarm, you will add mappings to it, to start monitoring the required artefacts. With BizTalk360, there is a huge set of artefacts you can monitor. Think of for example (this is not the full list):
- BizTalk Applications – Send Ports, Receive Locations, Orchestrations, Service instances
- Host instances – in/out process, clustered
- Host Instance Throttling – generic or detailed
- BizTalk Servers/SQL Servers – Disks, Event Logs, NT Services, CPU, Memory
- BizTalk Server Availability – via Ping or Telnet
- SQL Server Instances – SQL Server Agent Jobs, SQL Queries
- HTTP Endpoints – REST, SOAP
- FILE Endpoints – FILE, FTP, SFTP, FTPS
- Queues – MSMQ, IBM MQ, Azure ServiceBus Queues
- BizTalk Health Monitor – Critical and Non-critical Errors and Warnings
Depending on the type of the artefact, you can monitor for its state (like Stopped/Started/etc.) or Warning/Error thresholds.
Although you are completely free in how you set up monitoring, we normally recommend making a distinction between monitoring the BizTalk platform and the BizTalk applications.
- Platform alarms – these contain mappings to stuff like the Host Instances, the SQL Server Agent jobs, Host Throttling, Server resources etc.
- BizTalk Application alarms – these alarms contain mappings to BizTalk application artefacts (Receive/Send Ports, Orchestrations and Service Instances) and relevant endpoints (HTTP/HTTPS, FILE, FTP/SFTP/FTPS, etc.)
Note: Did you know that BizTalk360 has a feature which is called Auto-Correct? This feature enables you to automatically (try) to bring artefacts back to the expected state, after entering the wrong state. This feature, which can be a real time-saver, works for the following components:
- BizTalk Applications – Receive Locations, Orchestrations and Send Ports
- BizTalk Platform – Host Instances
- Windows Server – Windows NT Services
- SQL Server – SQL Server Jobs
- Microsoft Azure – Logic Apps
Read more about this feature in the Documentation portal.
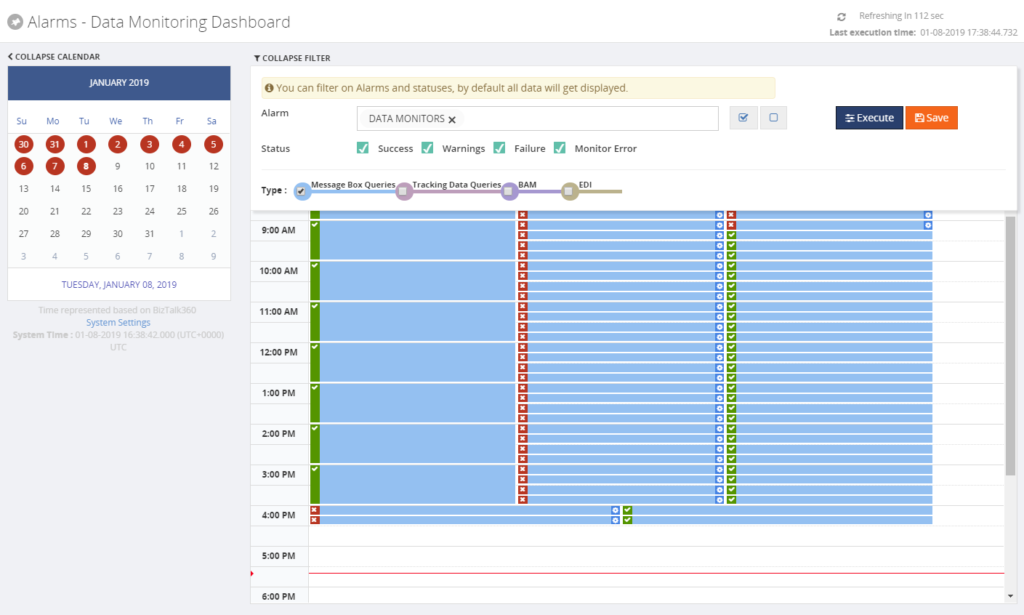
Data Monitoring
Besides artefact monitoring, BizTalk360 also allows you to monitor the processing which is taking place through BizTalk. The concept of Data Monitoring allows you to monitor activity around sources like the MessageBox, Tracking data, BAM data, EDI data, ESB data, Logic Apps and Even Log entries. Data Monitoring comes with the Data Monitoring Dashboard. This calendar-like dashboard shows the historic runs of all the configured Data Monitors. This dashboard will make it easy to address questions about whether certain processing did take place.
Without going in too much detail, with Data Monitoring you can cover scenarios like:
- monitoring whether batches you expect at a particular time, really arrive in BizTalk and become processed
- you may want to automatically terminate service instances, like Routing Failures, which you frequently receive
- you may want to automatically resume service instances because the messages could not be transmitted due to a temporary network failure
These are only a few of the scenarios you can think of. If you want to read more about the concept of Data Monitoring, consult the Documentation portal.
Implementing BizTalk360 can be a multi-step process
You must have noticed that, once you have purchased and installed BizTalk360, there is a lot to go for. In this blog post, we only mentioned a number of features which are considered the most important to implement after installing the product.
However, there are way too many features in the product to cover in a single blog post. Given the number of features in the product, it makes sense to make implementation of BizTalk360 a multi-step process. This way, your BizTalk360 implementation can grow with your requirements and the requirements of your organization.
If you need help with implementing BizTalk360 or want to receive some more tips, feel free to contact us at
[email protected].
We love to hear from you and we want you to take the full benefit of your purchase!
Happy administering!
Author: Lex Hegt
Lex Hegt works in the IT sector for more than 25 years, mainly in roles as developer and administrator. He works with BizTalk since BizTalk Server 2004. Currently he is a Technical Lead at BizTalk360. View all posts by Lex Hegt
by Sandro Pereira | Dec 13, 2018 | BizTalk Community Blogs via Syndication
Welcome back to another entry on my blog post series about “BizTalk Server Tips and Tricks” for developers, administrators or business users and I couldn’t resist on speaking about a topic that normally divides BizTalk developers and BizTalk administrators: Tracking Data!
Problem
Normally Developers have in their environments Full tracking Enabled, why? Because it’s easier to debug, troubleshoot, analyze or validate and see if everything is running well or simply, what is happening with their new applications.
The important question is: Do Developers remember to disable tracking before they put the resources in production?
No! And actually… they don’t care about that! Is not their task to do it or control it. And if you ask them, you should always have them enabled! Sometimes, to be fair, they don’t know the right configurations that should be applied to production.
This can be an annoying and time-consuming operation. It will be the same as asking developers to change their way of being, and for them to remember each time they export an application to disable the Tracking data properties can be a big challenge… or even impossible!
Solution (or possible solutions)
My advice is, if you are a BizTalk Administrator, let them be happy thinking they are annoying you and take back the control of your environment by yourself.
These tasks can be easily automated and configured by easily creating or using PowerShell.
You should disable all Tracking or enable just the important settings at the application level. You may lose 1 day developing these scripts, but then you do not need to worry anymore about it.
As an example, with this script: BizTalk DevOps: How to Disable Tracking Settings in BizTalk Server Environment, you can easily disable all tracking settings for all the artefacts (orchestrations, schemas, send ports, receive ports, pipelines) in your BizTalk Server Environment
# Disable tracking settings in orchestrations
$Application.orchestrations |
%{ $_.Tracking = [Microsoft.BizTalk.ExplorerOM.OrchestrationTrackingTypes]::None }

# Disable tracking settings in Send ports
$disablePortsTracking = New-Object Microsoft.BizTalk.ExplorerOM.TrackingTypes
$Application.SendPorts |
%{ $_.Tracking = $disablePortsTracking }

# Disable tracking settings in Receive ports
$Application.ReceivePorts |
%{ $_.Tracking = $disablePortsTracking }

# Disable tracking settings in pipelines
$Application.Pipelines |
%{ $_.Tracking = [Microsoft.BizTalk.ExplorerOM.PipelineTrackingTypes]::None }

# Disable tracking settings in Schemas
$Application.schemas |
    ?{ $_ -ne $null } |
    ?{ $_.type -eq "document" } |
    %{ $_.AlwaysTrackAllProperties = $false }
This can easily be edited by you to disable only one application or you can configure the right tracking setting that you want for your applications and environment.
If you are working with BizTalk Server 2016…
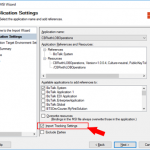
In previous versions of BizTalk Server, tracking settings were automatically imported with the rest of the application bindings. However, if you are working with BizTalk Server 2016, you have a new feature that allows you to have a better control while importing your BizTalk Applications: Import Tracking Settings.

If you are importing an MSI file, on the “Application Settings” tab, you will have a checkbox “Import Tracking Settings” that allows you to say: I don’t want to import the tracking from DEV or another environment in which the MSI was generated from.


If you are importing a Binding file you will also have this same option:


Of course, if you want to properly define the correct or minimum tracking settings of your application, you need to do it manually or, once again, using a PowerShell script to accomplish that.

Quick, simple and practical.

Stay tuned for new tips and tricks!
Author: Sandro Pereira
Sandro Pereira is an Azure MVP and works as an Integration consultant at DevScope. In the past years, he has been working on implementing Integration scenarios both on-premises and cloud for various clients, each with different scenarios from a technical point of view, size, and criticality, using Microsoft Azure, Microsoft BizTalk Server and different technologies like AS2, EDI, RosettaNet, SAP, TIBCO etc. View all posts by Sandro Pereira

by Sandro Pereira | Dec 9, 2018 | BizTalk Community Blogs via Syndication
There are simple BizTalk Server installations and then there are some quite annoying BizTalk Server topologies and complex configurations which tend to give rise to the appearance of diverse types of errors: SQLNCLI11 ole db provider not found in the system. It’s one of the most recent I’ve found.
Let me contextualize the appearance of this error.
To simplify I have 5 machines in my environment:
- 2 SQL Server’s in a cluster and SSO Master Secret Server in a cluster
- 2 BizTalk Server’s
- And 1 IBM WebSphere MQ Server and with only BizTalk Server 2016 MQSeries Agent installed
I successfully installed:
- BizTalk Server 2016 Cumulative Update 5 (CU5) in the SSO Master Secret Server’s
- And BizTalk Server Feature Pack 3 with CU5 on BizTalk Server’s
Nevertheless, while I was trying to install BTS2016 CU5 on the MQ Server I got the following error:
Ole db providers : SQLOLEDB, MSDataShape, ADsDSOObject, MSDASQL, MSDASQL Enumerator, SQLOLEDB Enumerator, MSDAOSP
SQLNCLI11 ole db provider not found in the system.
TLS1.2 support requires SQL Server 2012 Native client 11.0 must be installed on all BizTalk machines. Install SQL Server Native client 11.0 before applying the update.
To download and install Microsoft SQL Server 2012 Native Client 11.0, see this Microsoft Download Center webpage. https://www.microsoft.com/en-us/download/details.aspx?id=50402&751be11f-ede8-5a0c-058c-2ee190a24fa6=True
Aborting installation of this update.
Please try after installing SQL Server 2012 Native client 11.0.
Cause
Unfortunately, to install BizTalk Server CU5 and I guess previous ones there is this default requirement that you need to have: SQL Server 2012 Native client 11.0 installed in the server.
In fact, for the BizTalk Server 2016 MQSeries Agent to work properly this component is not required. This is a validation requirement of the CU5.
Solution
The solution is quite simple:
After you install the SQL client you will be able to successfully apply the BizTalk Server 2016 CU5.
Author: Sandro Pereira
Sandro Pereira lives in Portugal and works as a consultant at DevScope. In the past years, he has been working on implementing Integration scenarios both on-premises and cloud for various clients, each with different scenarios from a technical point of view, size, and criticality, using Microsoft Azure, Microsoft BizTalk Server and different technologies like AS2, EDI, RosettaNet, SAP, TIBCO etc. He is a regular blogger, international speaker, and technical reviewer of several BizTalk books all focused on Integration. He is also the author of the book “BizTalk Mapping Patterns & Best Practices”. He has been awarded MVP since 2011 for his contributions to the integration community. View all posts by Sandro Pereira
by Sandro Pereira | Dec 7, 2018 | BizTalk Community Blogs via Syndication
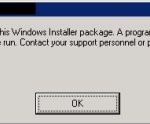
There is something special when you find a solution or possible solution to an annoying error message (for not using another type of language) and this is one of these cases: There is a problem with this Windows Installer package!
This error occurred each time my team was trying to install a BizTalk Application on a non-developer environment: Test or QA. And the full error description was:
There is a problem with this Windows Installer package. A program run as part of the setup did not finish as expected. Contact your support personnel or package vendor.

And “Contact your support personnel or package vendor”? What a ****, It is me! I am the support personnel and package vendor/creator… you still write these kinds of error messages?
Cause
Unfortunately, this error may be caused by several reasons, but some places may tell you that this problem can be related to:
- The package is actually corrupted, you should export again and import it – not really like to a happen or solve it
- The fact of the destination location does not exist – that is not true, because the installation will create the directories;
- Invalid drive letter – again it is not true because the MSI will not go further on the wizard if that happens
To correctly diagnose the problem and find the cause of the problem you should consult the Event Viewer of the BizTalk Server in which you are trying to install the MSI. Normally you will find more details about the cause of the error.
The most common will be:
- The Installation Path that you are providing in the wizard along with the name of the assemblies will have more than 256 characters.
By default, the installation folder will be:
- C:Program Files (x86)Generated by BizTalkname of the BizTalk Application
That is:
- 46 characters for the default folder “C:Program Files (x86)Generated by BizTalk”
- Adding, more or less, 15 characters for the BizTalk Application name folder
Will give you a total of 195 characters to be used in the assembly’s names. Which normally is enough.
Solution
Once again, in this case, the solution is very simple:
- ·Change the installation folder to a small path like:
By providing a small path, my team was able to successfully install the MSI.
Author: Sandro Pereira
Sandro Pereira lives in Portugal and works as a consultant at DevScope. In the past years, he has been working on implementing Integration scenarios both on-premises and cloud for various clients, each with different scenarios from a technical point of view, size, and criticality, using Microsoft Azure, Microsoft BizTalk Server and different technologies like AS2, EDI, RosettaNet, SAP, TIBCO etc. He is a regular blogger, international speaker, and technical reviewer of several BizTalk books all focused on Integration. He is also the author of the book “BizTalk Mapping Patterns & Best Practices”. He has been awarded MVP since 2011 for his contributions to the integration community. View all posts by Sandro Pereira
by Sowmiya Subramanian | Dec 6, 2018 | BizTalk Community Blogs via Syndication
We are super excited to welcome our new release version of BizTalk360, v8.9.5. Here is a blog which explains the new feature introduction of Send Port Groups Monitoring in BizTalk360 v8.9.5.
One of the most powerful and overlooked features in BizTalk Server is Send Port Groups, helps to route a single message to more than one destination. A Send Port Group is a collection of send ports that BizTalk Server can use to send the same message to multiple destinations in one configuration. Now, you can monitor Send Port Groups in BizTalk360.
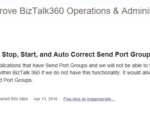
Customer Feedback
As you already know, Monitoring is the core functionality of BizTalk360. With this functionality, you can monitor all the BizTalk artefacts except the Send Port Groups in the earlier versions of BizTalk360.
In BizTalk360, we aim at improving the product and adding new features based on customer feedback and business scenarios. The Feedback portal is one such platform for the customers to provide their suggestions, which can be voted upon by other customers if they feel that these ideas fit in their business requirements as well. It’s based on the priority of voting; the features and enhancements get picked up for development. One such feedback was Send Port Groups monitoring on BizTalk applications.
Hence, we have chosen Send Port Groups monitoring for one of the features in this release.
Send Port Groups Monitoring in BizTalk360
Send Port Groups is a “key” feature of BizTalk Server’s “Publish and Subscribe” architecture, where a publisher can have more than one subscriber.
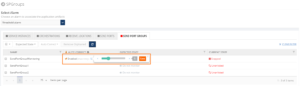
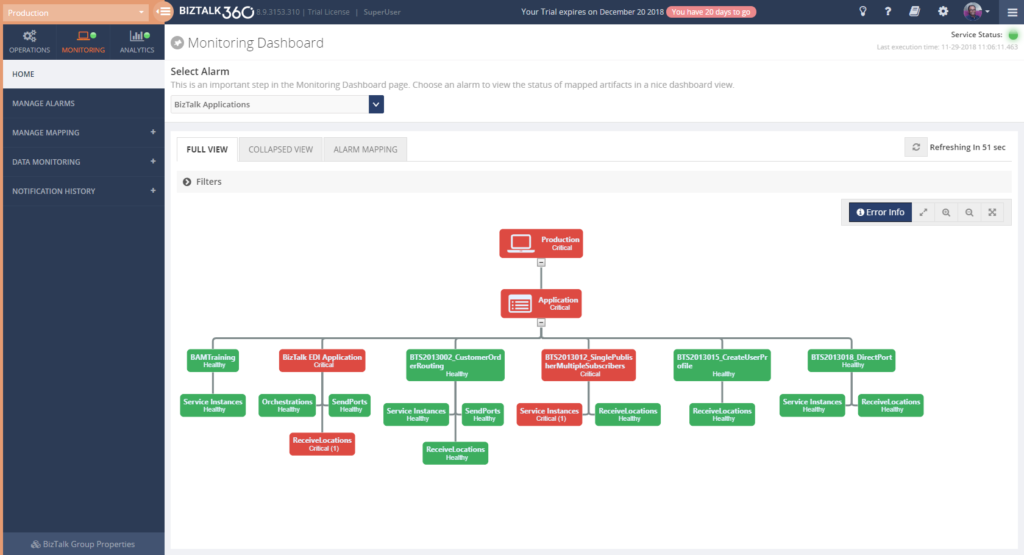
User Scenario: Let’s say you need to map an inbound XML document to three different outbound formats and send each outbound document to a different system. All that’s required is a Send Port Group and a simple Filter Expression. The Send Port Group handles the Filter Expression with each Send Port using its own map! If any of the three transmissions fail, you can resubmit the failed message without resending the other two documents. The user may have one or more Send Port Groups. It can be hard to monitor your Send Port Groups manually. Now with the support of BizTalk360, you can monitor the Send Port Groups easily! In BizTalk360, we have included the Send Port Groups for monitoring for each BizTalk Application. The user can monitor the Send Port Groups by mapping with the alarm as below.
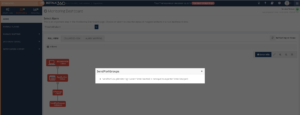
The Send Port Group can go down for some situation; you can monitor the artifact in such situation by configuring the expected state in BizTalk360. When the current state is not equal to expected state, the user will get notified through an alert, as shown below.
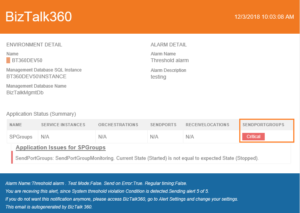
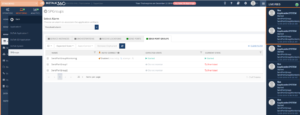
The same error and status will be displayed in the Monitoring dashboard and in the Errors and warning section as seen below.
Auto Healing functionality for the Send Port Groups
By any chance, when the Send Port Group artefact goes down for some specific reason, you need not to log in to the BizTalk server to make it up again. BizTalk360 Auto Correct feature will get it back to the expected state automatically with the Auto correct option. For this, the user needs to enable Auto Correct for the configured Send Port Groups.
If in case the system is not able to Auto Correct Send Port Groups to its expected state i.e., when all the attempts to auto correct have failed, then the user will receive a down alert. For each attempt, the user will get notified with the detailed status information of auto correction operation that has happened on a Send Port Group. With this information, the user can get a clear picture of what is happening with the state of the Send Port Group.
User Scenario: In BizTalk, the user cannot Start or Stop the Send Port Group from “unenlisted’ state when all the associated Send Ports are in “Unenlisted” state.In such scenario, there is a chance that the auto-healing may get failed to heal the Send Port Group from the “unenlisted” state to expected state and the auto correct attempts will get failed since the associated Send Ports gets “Started” or “Stopped” state.
Once all the maximum attempts failed, then the user will get intimated through down alert as “Maximum auto corrects attempts have been exhausted”.
Intelligent auditing
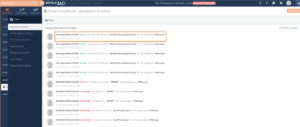
BizTalk360 has very good intelligent auditing capabilities that will help administrators to find out “Who did what in the environment”. When the auto-healing is successful, it gets tracked at the Send Port Group level under “Application Activities” in Governance and Auditing section.
Live Activity Recorder
BizTalk360 has excellent Live activity tracking feature which helps you to govern user actions efficiently without compromising on regular activities. You can view the Live recording of all the user activities through the “Live Feed” on each successful auto healing of Send Port Groups.
This feature will be available in our upcoming release of BizTalk360 v8.9.5. Stay tuned to monitor and maintain the Send Port Groups easily through auto healing functionality.

by Sandro Pereira | Dec 4, 2018 | BizTalk Community Blogs via Syndication
Happy to introduce my first guest blog author: Peter Vervoorn from Virtual Green. Peter is a very experienced integration specialist. He has been working in ICT since 1995 and was a co-founder of Axon Olympus (now part of the Codit Group). Until his sabbatical in 2014 he headed the team of consultants at Axon Olympus as Technical Director. During his sabbatical in Thailand, he lost over 50 kilos and currently, he divides his time between Thailand and The Netherlands. He is a specialist with (Microsoft) Integration Tools and Technologies like BizTalk Server, Windows 10 IoT, Node-RED and is also involved in developing industrial automation prototypes.
Peter reach me with this funny, a bit unusual but quite interesting scenario: Calling multiple Disassemblers in a Receive pipeline, and I challenge him to be my first guest blog author on my blog. Challenge that he gladly accepted.
Situation
You receive a zip file, containing several files to extract. The extracted files should be disassembled too. (Possibly because they are in flat file format, or you want to call the XmlDisassembler to set the message type.)
Problem
Although the disassemble stage in the receive pipeline can contain multiple components, only the first component (matching the message) will be executed.
Solution
Create a new disassembler component, which will handle calling the sequential disassembler components.
The implementation of the Disassemble method is very easy, just call the initial component in the sequence.
The GetNext method is where it becomes a bit more interesting. Here we would have to extract all the messages from the first stage and feed them to the second stage. Note that it is not possible to create a single instance for the second stage and keep feeding it messages; each message requires its own instance of the component.
To do this, we have to create a new instance of the second stage component. Then we set the required properties (e.g., with values from the property bag.) Then we call the Disassemble method on the component. Next, we call GetNext to retrieve all messages and queue them.
The remainder of the implementation is for dequeening the messages.
Code
In the sample code below, all the usual methods (Load, Save, Validate, etc.) are not shown. Only the two relevant methods are shown. Also, all the plumbing has been removed for brevity/clarity.
[ComponentCategory(CategoryTypes.CATID_PipelineComponent)]
[ComponentCategory(CategoryTypes.CATID_DisassemblingParser)]
[System.Runtime.InteropServices.Guid("YOUR-GUID-HERE")]
public class MultiDisassembler : IBaseComponent, IPersistPropertyBag, IComponentUI, IDisassemblerComponent
{
    private ExtractorComp extractPC = new ExtractorComp();
    private Queue<IBaseMessage> messages = null;

    public void Disassemble(IPipelineContext pContext, IBaseMessage pInMsg)
    { extractPC.Disassemble(pContext, pInMsg); }

    public IBaseMessage GetNext(IPipelineContext pContext)
    {
        if (messages == null)
        {
            messages = new Queue<IBaseMessage>();
            IBaseMessage msgS1 = null;
            while ((msgS1 = extractPC.GetNext(pContext)) != null)
            {
                XmlDasmComp  xmlDasmPC = NewXmlDasmWithPropertiesSet();
                xmlDasmPC.Disassemble(pContext, msgS1);
                IBaseMessage msgS2 = null;
                while ((msgS2 = xmlDasmPC.GetNext(pContext)) != null)
                { messages.Enqueue(msgS2); }
            }
        }

        if (messages.Count > 0)
        { return messages.Dequeue(); }
        return null;
    }
    //...
    //Missing Code
}
Tips
- You can add more stages, as required;
- If necessary, you can inspect a message and choose to either enqueue it directly or use a different component to disassemble that message.
(An example would be a zip file containing a mix of XML files and nested zip files)
- In the above sample, all messages are queued when the GetNext method is called the first time. Another possibility is getting the next message in a just-in-time fashion. This requires a bit of additional work as you have to do additional housekeeping and handle possible empty messages.
- Often you see a disassembler also implementing IComponent. This is not required if only the DisassemblingParser attribute is set.
THIS SAMPLE CODE IS PROVIDED “AS IS”, WITHOUT WARRANTY OF ANY KIND.
 BizTalk Server Recipe: Calling multiple Disassemblers in a Receive pipeline (2 KB)
Microsoft | TechNet Gallery
BizTalk Pipeline Components Extensions Utility Pack
The pipeline component is available on BizTalk Pipeline Components Extensions Utility Pack project, that is a set of custom pipeline components (libraries) with several custom pipeline components that can be used in received and sent pipelines, which will provide an extension of BizTalk out-of-the-box pipeline capabilities.
The project is available on BizTalk Server Open Source Community repository on GitHub (https://github.com/BizTalkCommunity), and everyone can contribute with new pipeline components that can be extended or improve the existing BizTalk Server capabilities.

You can download BizTalk Pipeline Components Extensions Utility Pack from GitHub here:
BizTalk Pipeline Components Extensions Utility Pack
GitHub
Author: Sandro Pereira
Sandro Pereira lives in Portugal and works as a consultant at DevScope. In the past years, he has been working on implementing Integration scenarios both on-premises and cloud for various clients, each with different scenarios from a technical point of view, size, and criticality, using Microsoft Azure, Microsoft BizTalk Server and different technologies like AS2, EDI, RosettaNet, SAP, TIBCO etc. He is a regular blogger, international speaker, and technical reviewer of several BizTalk books all focused on Integration. He is also the author of the book “BizTalk Mapping Patterns & Best Practices”. He has been awarded MVP since 2011 for his contributions to the integration community. View all posts by Sandro Pereira
by Sandro Pereira | Nov 30, 2018 | BizTalk Community Blogs via Syndication
Following my last post and continuing on the pain points of BizTalk Server infrastructure tasks migration, I end up founding another interesting error: WCF-Custom Reason: System.ArgumentException: An item with the same key has already been added.
Again, we indeed did more than a simple migration, we take this opportunity to improve our solutions and/or BizTalk Server environment to update our applications to the new the new available features. In terms of WCF-SAP Adapter, we are no longer using traditional RFC and we will be starting using SAP .NET Connector (NCo). Despite WCF-SAP adapter will continue to support both the RFC SDK and the SAP .NET Connector, SAP has announced deprecation of its classic RFC SDK (no longer be supported after March 31, 2016) and because of that, it should be used anymore.
While trying to connect our BizTalk Server Receive Location to SAP in order to listen to incoming messages, we initially got this error message:
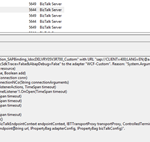
The Messaging Engine failed to add a receive location “WcfReceiveLocation_SAPBinding_IdocDELVRY05V3R700_Custom” with URL “sap://CLIENT=400;LANG=EN;@a/SERVERNAME/00?ListenerGwServ=sapgw00&ListenerGwHost=LISTENERHOST&ListenerProgramId=BTS_LIST&RfcSdkTrace=False&AbapDebug=False ” to the adapter “WCF-Custom”. Reason: “System.ArgumentException: An item with the same key has already been added.
at System.ThrowHelper.ThrowArgumentException(ExceptionResource resource)
at System.Collections.Generic.Dictionary`2.Insert(TKey key, TValue value, Boolean add)
at Microsoft.Adapters.SAP.NCo.RfcServerConnection.Open(RfcClientConnection conn)
at Microsoft.Adapters.SAP.SAPInboundContract.InitializeRfcServerConnectionNCo(String connectionArguments)
at Microsoft.Adapters.SAP.SAPInboundContract.StartListener(String[] listenerActions, TimeSpan timeout)
at Microsoft.ServiceModel.Channels.Common.Channels.AdapterChannelListener`1.OnOpen(TimeSpan timeout)
at System.ServiceModel.Channels.CommunicationObject.Open(TimeSpan timeout)
at System.ServiceModel.Dispatcher.ChannelDispatcher.OnOpen(TimeSpan timeout)
at System.ServiceModel.Channels.CommunicationObject.Open(TimeSpan timeout)
at System.ServiceModel.ServiceHostBase.OnOpen(TimeSpan timeout)
at System.ServiceModel.Channels.CommunicationObject.Open(TimeSpan timeout)
at Microsoft.BizTalk.Adapter.Wcf.Runtime.WcfReceiveEndpoint.Enable()
at Microsoft.BizTalk.Adapter.Wcf.Runtime.WcfReceiveEndpoint..ctor(BizTalkEndpointContext endpointContext, IBTTransportProxy transportProxy, ControlledTermination control)
at Microsoft.BizTalk.Adapter.Wcf.Runtime.WcfReceiver`2.AddReceiveEndpoint(String url, IPropertyBag adapterConfig, IPropertyBag bizTalkConfig)”.

Cause
What I found out was that this error was somehow related to the error reported in my previous post: BizTalk Server WCF-SAP Adapter: SAP.Middleware.Connector.RfcCommunicationException: LOCATION CPIC (TCP/IP) on local host BTSSERVERNAME with Unicode, ERROR service ‘?’ unknown.
The reason why I’m saying that is that each time I restarted the BizTalk Server Host Instances, the error that I got the first time I try to enable the port was this service ‘?’ unknown error. Afterward, whenever I tried to enable this port, I would receive this new error:
- System.ArgumentException: An item with the same key has already been added
Why this is happening for me is a mix of a small bug and consistency, let me explain better:
- Why consistency? This because in fact, you cannot have two SAP Receive Locations listening to the same SAP endpoint/SAP Listener Program Id.
- Actually, this should be when this error would normally occur.
- Why a small bug? Because in fact there isn’t any Receive location enable for that specific SAP endpoint/SAP Listener Program Id. What is happening is that despite the error and the receive location became automatically disable it somehow stores in memory that SAP endpoint/SAP Listener Program Id
Solution
The solution is very simple and stupid:
- Restart the host instance that is running that Receive Location
After that, this problem goes away, but make sure you solve all the problems, or this may happen again.
Author: Sandro Pereira
Sandro Pereira lives in Portugal and works as a consultant at DevScope. In the past years, he has been working on implementing Integration scenarios both on-premises and cloud for various clients, each with different scenarios from a technical point of view, size, and criticality, using Microsoft Azure, Microsoft BizTalk Server and different technologies like AS2, EDI, RosettaNet, SAP, TIBCO etc. He is a regular blogger, international speaker, and technical reviewer of several BizTalk books all focused on Integration. He is also the author of the book “BizTalk Mapping Patterns & Best Practices”. He has been awarded MVP since 2011 for his contributions to the integration community. View all posts by Sandro Pereira
by Lex Hegt | Nov 29, 2018 | BizTalk Community Blogs via Syndication
In this blog post, we will explain how different stakeholders within your organization can be involved in operating the BizTalk environment and managing BizTalk interfaces, by smartly, but safely deploy BizTalk360.
The BizTalk Administrators – the primary users of BizTalk360
Primarily, BizTalk360 will mainly be used by BizTalk administrators. They will use the product in their day to day operations and will probably be the ones who firstly receive notifications of threshold violations and daily health check reports.
These administrators are responsible for the day to day operations of the BizTalk group(s) and will be the main group of users of BizTalk360. Therefore, they need all the authorizations so they will have Super User accounts in BizTalk360. They will also be responsible for creating and maintaining User Access Policies.
After installation of the product, they will set up alarms for the BizTalk platform and the BizTalk applications it contains and receive notifications which are generated by the alarms.
 The way they configure monitoring of their BizTalk environments with BizTalk360, might evolve like this:
- Basic Threshold/Health Check monitoring with email notification
- BizTalk Platform – Monitor platform components like Host Instances, SQL Server jobs, NT Services, BizTalk Health Monitor
- BizTalk Applications – Monitor application artifacts like Receive Locations, Orchestrations, Send Ports, Instance states
- Advanced Environment Monitoring
- Endpoints – Monitor web services, queues, file shares, FTP sites, Azure services
- Data monitoring – Monitor interface processing, automate resuming and terminating of service instances
- Enterprise notification channels – Receive notifications via HP Operations Manager, Slack, ServiceNow, Microsoft Teams, Webhook, PowerShell
In case of any issues, the (team of) BizTalk administrators will fix these issues themselves, or they contact other stakeholders to discuss how the issues need to be fixed.
Improve your business processes by extending the reach of BizTalk360
The power of BizTalk360 lies in the fact that it provides a rich user interface with many different dashboards for many different purposes, both from a technical and a functional perspective. In contrast with the tools which come out-of-the-box with BizTalk Server, all the capabilities in BizTalk360 are protected by User Access Policies and Auditing. This enables you to give any person exactly that set of permissions that they need to be able to do their job.
When the BizTalk administrators feel comfortable with the product and with BizTalk administration in general, or when the organization requires it, BizTalk360 can be deployed to other parts of the IT department or business departments.
Involve stakeholders by sending notifications and providing access to BizTalk360
By sending alerts to stakeholders directly, you improve information management as your BizTalk Administrators don’t need to send separate emails or contact these stakeholders based on issues that have occurred.
Although in many cases, email will be the primary means of sending notifications from BizTalk360, the product also contains the following Notification channels:
• Microsoft Teams
• ServiceNow
• Slack
• PowerShell
• Webhook
These channels can be configured on each BizTalk360 alarm and enable you to receive the notifications where it is most convenient for you. You can also use a simple to use SDK to develop your own custom Notification channel. Read more about Notification channels in our Documentation Portal.
But you can go even further, BizTalk360 allows you to give stakeholders secure and limited access to BizTalk360. This kind of access can reach from read-only access to particular parts of the BizTalk platform to the capability to act on certain issues.
Deployment of BizTalk360 to your organization can be done in the pace you and your organization feel comfortable with. By sending notifications to the stakeholders and provide access to BizTalk360, you can keep the stakeholders informed of any issues, improve the availability of your business processes and meanwhile spreading the workload between all the stakeholders.
Think of the following scenarios which could be achieved:
- Sending alerts to the help desk – This enables the help desk engineers to analyze any issues at hand and take countermeasures
- Informing your administrators directly of any issues – Think of your System Administrators or DBA’s who receive alerts about server or database issues
- Automated creation of support tickets in your ticketing system – This takes away the need to have an administrator to do it manually
- Inform business users of issues – Think of batches which are not processed (non-events) or faulty processing of their messages
- Provide access to dashboards/portals – Give your stakeholders access to portals like the BAM portal, ESB portal, Business Rules Composer, (Data) Monitoring/Analytics dashboard, etc. etc.
Identifying stakeholders
When it comes to deploying BizTalk360 throughout an organization, you can identify the following roles:
- IT Support personnel
- SQL Server DBA’s, System Administrators and BizTalk developers
- Business Users
Let’s have a look at the roles mentioned above and their potential responsibilities with regards to BizTalk Server/BizTalk360.
IT Support personnel
To have a good eye watching on your BizTalk environment, you could involve the IT Support staff of your organization. Depending on your organization, they might be available 24/7. So it makes sense to send notifications of unexpected behavior happening on the platform level, as they might be able to act before BizTalk Administrators can. Besides sending them notifications, you could give the IT Support staff read-only access to BizTalk, so they can explore any issues and maybe help you fix them, while you might be at home, having weekend.
SQL Server DBA’s, System Administrators and BizTalk developers
Since operating BizTalk involves more than just the BizTalk Server product itself, but also components like SQL Server databases and all kind of Windows Server components, you might consider involving System Administrators and SQL Server DBA’s in BizTalk operations by sending them notifications which might be relevant for them.
A few examples are:
- SQL Server Administrators can receive notifications in case the BizTalk related SQL Server jobs fail
- System Administrators can receive notifications when the BizTalk servers are running out of disk space
- BizTalk Developers can receive notifications in case issues arise with upgraded or newly deployed BizTalk applications
As a next step, you might give these administrators and developers access to BizTalk360. This ranges from providing read-only access to particular features to giving them full operational access to the parts of their interest.
 If you give any of the stakeholders access to BizTalk360, it is also helpful to use the BizTalk360 Knowledge Base. When you properly maintain the Knowledge Base, your support people will have the help they need at their fingertips and be able to solve known issues quickly.
The Knowledge Base associates Knowledge Base articles to Service Instances, EventLog entries, ESB Exceptions, and Throttling data. Read more about its capabilities in our Documentation portal.
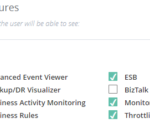
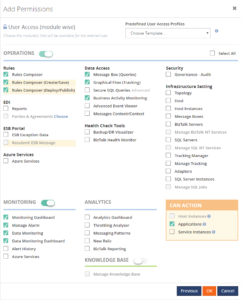
You might consider providing System Administrators, SQL Server DBAs and BizTalk developers with the following authorizations:
- System Administrators
- Advanced Event Viewer
- BizTalk Health Monitor
- Topology
- Host/Host Instances
- BizTalk/SQL Servers
- Manage BizTalk/SQL NT Services
- Tracking Manager
- Adapters
- Backup/DR Visualizer
- SQL Server DBA’s
- Secure SQL Queries
- Advanced Event Viewer
- BizTalk Health Monitor
- Message Boxes
- SQL Servers
- Manage SQL NT Services
- SQL Server Instances
- Manage SQL Jobs
- Backup/DR Visualizer
- BizTalk developers
- MessageBox queries (with/without access to content/context)
- Tracking Queries
- Advanced Event Viewer
- Tracking Manager
- Secure SQL Queries
- BAM portal
- ESB Exception portal
- EDI Reports
- Messaging Patterns
Business Users
This category of users might exist both inside as outside your organization. Depending on that, it will differ how they are involved in managing the interfaces. Normally, they will not take part in managing the BizTalk platform itself.
Internal business users can be informed about the processing, by providing them with notifications of disruptions in the processing of their interfaces, i.e., inform them of suspended instances, transmission failures, and failing process monitoring.
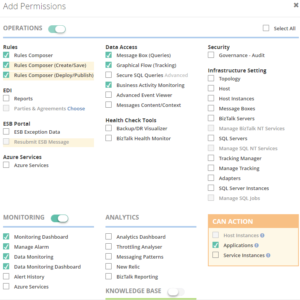
When you want to give business users access to BizTalk360, you can think of the following features:
– Specific BizTalk applications
– Message Box (Queries)
– Graphical Flow (Tracking)
– Business Rules Composer
– EDI Reports, parties and agreements
– ESB Portal
– Business Activity Monitoring
– Messages Content/Context
– Secure SQL Queries
In case external business users are involved in certain interfaces, you might send them the same notifications as internal business users. As the external business users will be outside your organization, you normally will not give them access to the BizTalk360 User Interface.
Conclusion
We often see, that BizTalk Server is considered as a black box and deep BizTalk knowledge is needed to be able to find out what’s all happening inside that box. By using BizTalk360, we make it easy to gain that insight, even with little BizTalk expertise. Furthermore, by deploying BizTalk360 outside the BizTalk administrators team, you can give your middleware a face and achieve much more transparency about all the processing taking place in your BizTalk environment.
By using BizTalk360 outside the admin team, it is easier to notify other stakeholders by sending them notifications directly from BizTalk360. Even further, besides sending notifications to these stakeholders within (or outside) your organization, you can give people (limited) access to BizTalk360. This way they can view for themselves how all the processing is taking place or check the wellbeing of the environment, without the need of contacting the BizTalk Administrators team.
All in all, it must be clear, that by extending the use of BizTalk360 outside the admin team, you will have a better ROI of the product. If you would like to know more about how BizTalk360 can help your organization to manage your BizTalk Server middleware platform, feel free to contact us.
Author: Lex Hegt
Lex Hegt works in the IT sector for more than 25 years, mainly in roles as developer and administrator. He works with BizTalk since BizTalk Server 2004. Currently he is a Technical Lead at BizTalk360. View all posts by Lex Hegt
by Sandro Pereira | Nov 28, 2018 | BizTalk Community Blogs via Syndication
I’m currently migrating a BizTalk Server infrastructure from BizTalk Server 2013 R2 to BizTalk Server 2016, this is a simple task to do in terms of BizTalk Server Applications, or BizTalk Server solutions. However, migrating or in fact, creating a new environment always brings challenges in terms of connectivity and/or proper configurations. SAP.Middleware.Connector.RfcCommunicationException: LOCATION CPIC (TCP/IP) on local host BTSSERVERNAME with Unicode, ERROR service ‘?’ unknown error is one of this cases!
We indeed did more than a simple migration, we toked this opportunity to improve our solutions and/or BizTalk Server environment to update our applications to the new the new available features. In terms of WCF-SAP Adapter, we are no longer using traditional RFC and we will be starting using SAP .NET Connector (NCo). Despite WCF-SAP adapter will continue to support both the RFC SDK and the SAP .NET Connector, SAP has announced deprecation of its classic RFC SDK (no longer be supported after March 31, 2016) and because of that, it shouldn’t be used anymore.
While trying to connect our BizTalk Server Receive Location to SAP in order to listen to incoming messages, we initial got this error message:
The Messaging Engine failed to add a receive location “IN_WCF_SAP_LISTENER_BTS” with URL “sap://CLIENT=400;LANG=EN;@a/SERVERNAME/00?ListenerGwServ=sapgw00&ListenerGwHost=LISTENERHOST&ListenerProgramId=BTS_LIST&RfcSdkTrace=False&AbapDebug=False” to the adapter “WCF-Custom”. Reason: “SAP.Middleware.Connector.RfcCommunicationException:
LOCATION CPIC (TCP/IP) on local host BTSSERVERNAME with Unicode
ERROR service ‘?’ unknown
TIME Fri Nov 23 13:47:22 2018
RELEASE 721
COMPONENT NI (network interface)
VERSION 40
RC -3
DETAIL NiErrSet
COUNTER 3
at SAP.Middleware.Connector.RfcServer.DoStart(Boolean logErrors)
at SAP.Middleware.Connector.RfcServer.Start()
at Microsoft.Adapters.SAP.NCo.RfcServerConnection.Open(RfcClientConnection conn)
at Microsoft.Adapters.SAP.SAPInboundContract.InitializeRfcServerConnectionNCo(String connectionArguments)
at Microsoft.Adapters.SAP.SAPInboundContract.StartListener(String[] listenerActions, TimeSpan timeout)
at Microsoft.ServiceModel.Channels.Common.Channels.AdapterChannelListener`1.OnOpen(TimeSpan timeout)
at System.ServiceModel.Channels.CommunicationObject.Open(TimeSpan timeout)
at System.ServiceModel.Dispatcher.ChannelDispatcher.OnOpen(TimeSpan timeout)
at System.ServiceModel.Channels.CommunicationObject.Open(TimeSpan timeout)
at System.ServiceModel.ServiceHostBase.OnOpen(TimeSpan timeout)
at System.ServiceModel.Channels.CommunicationObject.Open(TimeSpan timeout)
at Microsoft.BizTalk.Adapter.Wcf.Runtime.WcfReceiveEndpoint.Enable()
at Microsoft.BizTalk.Adapter.Wcf.Runtime.WcfReceiveEndpoint..ctor(BizTalkEndpointContext endpointContext, IBTTransportProxy transportProxy, ControlledTermination control)
at Microsoft.BizTalk.Adapter.Wcf.Runtime.WcfReceiver`2.AddReceiveEndpoint(String url, IPropertyBag adapterConfig, IPropertyBag bizTalkConfig)”.
The receive location “IN_WCF_SAP_LISTENER_BTS_ DV” with URL “sap://CLIENT=400;LANG=EN;@a/SERVERNAME/00?ListenerGwServ=sapgw00&ListenerGwHost=LISTENERHOST&ListenerProgramId=BTS_LIST&RfcSdkTrace=False&AbapDebug=False” is shutting down. Details:”The Messaging Engine failed while notifying an adapter of its configuration. “.
 on local host BTSSERVERNAME with Unicode, ERROR service '?' unknown")
Cause
The first thing you need to know is that this error is not related to the fact that we are now using the SAP .NET Connector (NCo). This error will still occur if you change back to the classic RFC.
The basic steps if of course to see if we have connectivity and proper access to SAP, and because we were in DEV environment a good way to test this is to Add WCF-SAP Adapter Metadata to a BizTalk Project inside Visual Studio
- In your Visual Studio BizTalk project, in Solution Explorer, right-click your project, click Add, and then click Add Generated Items.
You will have the same look and fill as creating a Receive Port on the Administrative Console with the advantage of being able to navigate the under the SAP object structure. This way you can test connectivity and access to the proper resources.
In our case, everything worked well. We were able to connect and generate the schemas.
However, all of this is not enough. For the WCF-SAP adapter to work properly in runtime you also need to configure, somewhere in the BizTalk Server machine the TCP port where the SAP adapter will be looking for these connections, because this property is not exposed through the BizTalk Server WCF-SAP Adapter GUI port (send or receive) configuration.
 on local host BTSSERVERNAME with Unicode, ERROR service '?' unknown: WCF-SAP Port Configuration")
In our case, the .NET Connector need to know the port of the message server. This is also very common to happen in load balancing situations.
Solution
In order to specify this TCP port, you need to modify the ‘services’ file in each BizTalk Server machine, normally in:
- C:Windowssystem32driversetcservices
To include the following entry:
MSHOST 1234/tcp # SAP ENV System Message Server Port
Where:
- MSHOST is your Gateway server, in our case sapgw00
- And 1234 is your message server port, in our case: 3300
 on local host BTSSERVERNAME with Unicode, ERROR service '?' unknown: solution")
Just for curiosity, BizTalk isn’t the only that will use these values and this ‘services’ file. SAPGUI will also use these same values when connecting to SAP systems.
After we did this configuration, we were able to connect and start receiving messages from our SAP system.
Author: Sandro Pereira
Sandro Pereira lives in Portugal and works as a consultant at DevScope. In the past years, he has been working on implementing Integration scenarios both on-premises and cloud for various clients, each with different scenarios from a technical point of view, size, and criticality, using Microsoft Azure, Microsoft BizTalk Server and different technologies like AS2, EDI, RosettaNet, SAP, TIBCO etc. He is a regular blogger, international speaker, and technical reviewer of several BizTalk books all focused on Integration. He is also the author of the book “BizTalk Mapping Patterns & Best Practices”. He has been awarded MVP since 2011 for his contributions to the integration community. View all posts by Sandro Pereira
by Senthil Kumar Palanisamy | Nov 21, 2018 | BizTalk Community Blogs via Syndication
Introduction
The process of BizTalk Application deployment is a complex, time consuming and repetitive task. Microsoft BizTalk Server comes with capabilities to create deployment packages. However, the MSI packages you create with the out-of-the-box features of BizTalk Server have some shortcomings which lead to deployments which are error-prone.
BizTalk Deployment Framework
The BizTalk Deployment Framework (BTDF) covered these deployment issue.
- Deploy complex BizTalk solutions containing BizTalk artifacts but also for example SSO settings, ESB itineraries and SQL Server scripts, with no human intervention
- Consolidate all environment-specific configuration and runtime settings into one, easy-to-use Excel spreadsheet
Maintain a single binding file that works for all deployment environments
- Make automated deployment a native part of the BizTalk development cycle, then use the same script to deploy to BizTalk servers
To eliminate the manual process, organization’s start to adopt the DevOps practice. In this article, we will see how the BizTalk360 API’s are helpful in a BizTalk environment monitoring while deploying BizTalk Applications using Azure CI/CD Pipelines.
Deploy BizTalk Applications with Azure Pipelines
Microsoft has introduced automated deployment of BizTalk Applications in BizTalk Server 2016 Feature Packs. In BizTalk Server 2016 Feature Pack 1, automatic deployment and application lifecycle management (ALM) experience was introduced. Automatic deployment process has been improved with the release of BizTalk Server 2016 Feature Pack 2.
- Within Visual Studio for each project, set the Application Name of your BizTalk application
- In addition to using an agent-based deployment, you can also use deployment groups to deploy your BizTalk applications to multiple servers
- In the release task, you can install the BizTalk application, and enter the BizTalk management computer, and the path to the deployment package
Azure Pipelines (CICD)
With Automated build/release definitions you can set up the CI or CICD Pipelines based on environment (Development/QA/Staging/Production):
- Continuous Integration (CI) : Set up build task definitions rules to the VSTS Source code base
- Continuous Integration Continuous Deployment (CICD) : Configure both build task definition and release task definition to automate the build and test process
If you are new to Azure CI/CD Pipeline go through this article Configure automatic deployment with Visual Studio Team Services in BizTalk Server
Deployment Build Definitions
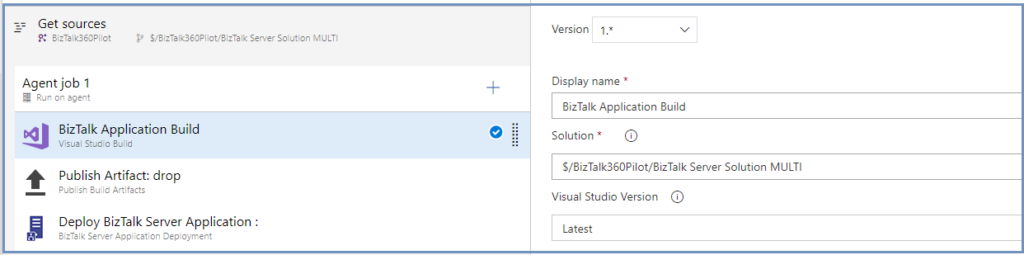
In the BizTalk Application deployment process, you can create the following build/release definitions:
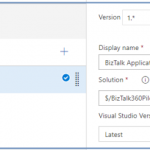
- Visual Studio Build
The build and release definitions are Visual Studio Team Services tasks, and should be done by a VSTS admin. The build definition builds your project within your git or VSTS repository, and the release definitions deploys it to your BizTalk Server environment
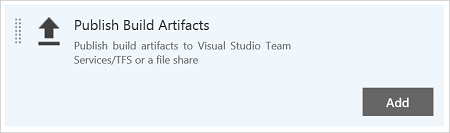
- Publish Build Artifacts
In Publish Build Artifacts stage configure the Path to publish (Application Project Folder)
- Deploy BizTalk Server Application
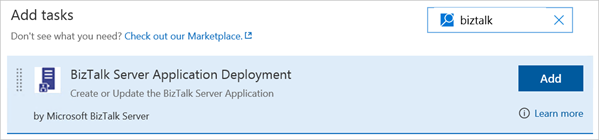
A BizTalk Server application deployment build definition operation has three options available
- Create new BizTalk Application: Deploys a new application, if the application already exists, it uninstalls the current applications (full stop), and installs the new application. If continuous integration is enabled, it automatically redeploys the application when it is updated in the repository
- Update an existing BizTalk Application: Appends changes, such as schemas, to an already running application. It does not require a full redeploy of the application
- Install BizTalk Server Application: Install the application, enter the BizTalk management computer name and the deployment package path
BizTalk360 API’s in CI/CD
Customer Scenario: In Build pipeline stages the customer wants to utilize the BizTalk360 API to set the Stop Alert for Maintenance in a BizTalk environment. Once after the new build is deployed to BizTalk Server and then user wants to configure newly deployed artifacts to monitor in BizTalk360. As the last step revoke the Stop Alerts in BizTalk360 Application.
We can use the following steps in Build definitions to achieve the above scenario;
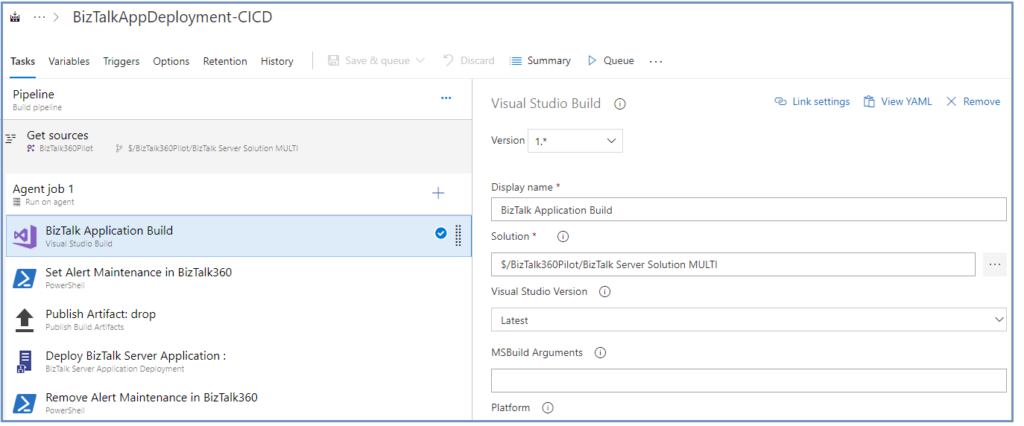
- Visual Studio Build (explained above)
- Set Stop Alert for Maintenance
BizTalk360 customers can take advantage of using the BizTalk360 API’s to set the alert maintenance during the BizTalk Application deployment.
Create the PowerShell Script stage to call the SetAlertMaintenance API method to set the BizTalk environment under the maintenance. Assign the PowerShell Script full path
SetAlertMaintenance.ps1
$Request = '{
  "context": {
    "callerReference": "SAMPLE_REFERENCE",
    "environmentSettings": {
      "id": "DC45E848-E485-41D7-92E5-7C9932D43CB8"
    }
  },
  "alertMaintenance": {
    "comment": "BizTalk Deploy",
    "maintenanceStartTime": "2018-11-22T15:26:37.000",
    "maintenanceTimeUnit": 0,
    "maintenanceTimeLength": 2,
    "isActive": false,
    "expiryDateTime": ""
  }
}'
$Request
$body = ConvertFrom-Json -InputObject $Request
$body
$RepsonseSet = Invoke-RestMethod -Uri http://biztalk360webserver/Services.REST/AlertService.svc/SetAlertMaintenance -Method Post -ContentType "application/json" -Body $body -UseDefaultCredentials
$RepsonseSet
Set Alert Maintenance API returns the alert maintenance object with maintenance Id (out parameter). You can refer this maintenance Id, when revoking the maintenance in the below step.
- Publish Build Artifacts (explained Above)
- Deploy BizTalk Server Application
Once after BizTalk Application deployment is completed, next step you can configure the newly artifacts to monitor. For creating BizTalk360 alarms and BizTalk Application mappings during deployments with BTDF, you could consider to BT360Deploy command-line tool. Use this GitHub project to setup pipeline stage.
- Remove the Stop alert for Maintenance
After the deployment of BizTalk Applications, the maintenance mode of BizTalk environment must be revoked in BizTalk360. To achieve this step, create a PowerShell Script stage and assign the PowerShell Script path(RemoveMaintenance.ps1)
$RequestRem = '{"context":{"callerReference":"SAMPLE_REFERENCE","environmentSettings":{"id":"DC45E848-E485-41D7-92E5-7C9932D43CB8"}},"maintenanceId":"308d8b2c-b3e0-4024-b600-845113b06b80"}'

Invoke-RestMethod -Uri  http://biztalk360webserver/BizTalk360/Services.REST/AlertService.svc/RemoveAlertMaintenance -Method Post -ContentType "application/json" -Body $RequestRem -UseDefaultCredentials

Summary
Automation of Build and/or Deployment will be helpful to reduce the turnaround time. Hopefully, this article has provided insight in how you can setup the BizTalk Application Deployment automation and how you can utilize BizTalk360 API’s to stop alert during deployment and how to set up monitoring of the newly deployed BizTalk Artifacts.
Get started with the free 30 days trial. For any queries/feedback please write to us [email protected].
Author: Senthil Kumar Palanisamy
Senthil Kumar Palanisamy is the Technical Lead at BizTalk360 having 14 years of experience in Microsoft Technologies. Worked various products across domains like Health Care, Energy and Retail. View all posts by Senthil Kumar Palanisamy


 on local host BTSSERVERNAME with Unicode, ERROR service '?' unknown")
 on local host BTSSERVERNAME with Unicode, ERROR service '?' unknown: WCF-SAP Port Configuration")
 on local host BTSSERVERNAME with Unicode, ERROR service '?' unknown: solution")