There was a lot of inconsistent and incorrect information about the BizTalk WCF-SAP Adapter installation process and how it works, especially in old versions of the adapter where there was a need to use the classic RFC library to connect to SAP.
Fortunately for us, this process is now simpler and more direct, and this is due specifically to two points:
The Classic RFC Library has been discontinued and is no longer supported (support ended on March 21, 2016). All customers should, if not already using, the “new” SAP .NET Connector (NCo)
Notice that the BizTalk Adapter Pack WCF-SAP adapter has been re-engineered to use SAP .NET Connector instead of the classic SAP RFC SDK. The SAP .NET Connector is available through the ConnectorType property within the WCF-SAP binding. This feature is available from BizTalk Server 2013 and above.
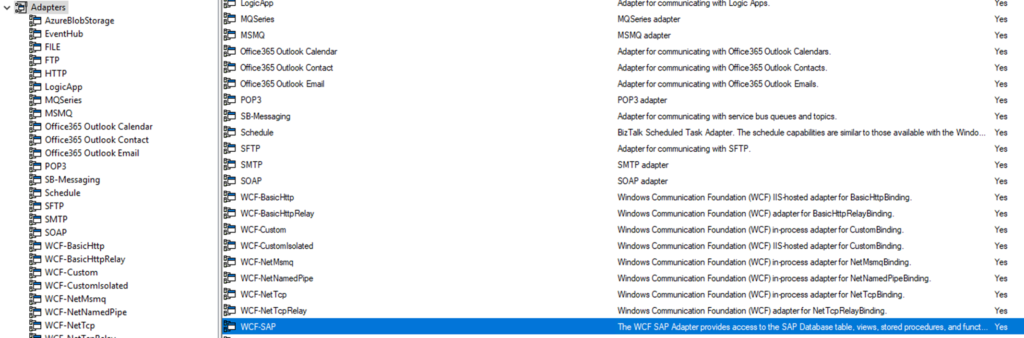
On BizTalk Server 2020, the Microsoft BizTalk Adapter Pack x86 and x64 are now installed with the default installation process. That means that the WCF-SAP adapter is already registered on the server and present on the BizTalk Server Administration Console.
However, that does not mean that everything is ready for you to be able to use this adapter. Unfortunately, you still need to install the SAP Connector for Microsoft .NET available for you to download through the SAP Service Marketplace.
Notice that, like any other adapter, the 64-bit version of the SAP Connector for Microsoft .NET is optional, but if you have a 64-bit BizTalk environment and you want to run it under a 64-bit Host Instance, then you need to also install both versions of the SAP Connector for Microsoft .NET.
BizTalk Server 2020: Step-by-Step WCF-SAP Adapter installation guide
By reading this whitepaper, decision-makers should have more information on the following areas:
Pre-requirements resources that are necessary and how to install them
Register the adapter in BizTalk Server Administration Console
As you most likely are aware, when a document is received by a BizTalk Server adapter, the adapter creates a BizTalk message for the document. The BizTalk message contains the document that was received as well as a message context. The message context is a container for various properties that are used by BizTalk Server when processing the document. Each property in the Message Context is composed of three things, a name, a namespace, and a value.
Message context properties are added to the message context throughout the lifetime of the message as it passes through the BizTalk Server. These properties:
Are either extracted from the message itself, for example, order id or shipment number
Or added by pipelines and adapters at the receive location, for example, transport name or receive port name
There are mainly two benefits of this context:
The first is to provide the various components of BizTalk, an easy access to these properties, without having to parse the message
The second is to support content-based routing.
There are two different types of message context properties used by BizTalk as described below:
Distinguished Fields
Property Fields.
In this whitepaper, you will learn the key differences between Distinguished and Property Fields but most importantly you will have access to a complete list of known property schema and properties used internally by the BizTalk Server out-of-the-box components.
What’s in store for you?
This whitepaper will give you a detailed understanding of the following:
BizTalk Message Context Properties
What are Property fields and how to promote properties?
What are distinguished fields and how to create a distinguished field?
Summary of differences between Property Fields and Distinguished Fields
System property schema and properties
Error Report property schema and properties
Legacy schema and properties
Microsoft BizTalk XLANGs BTXEngine schema and properties
Message Tracking schema and properties
BizTalk Framework Schema and Properties
MIME-SMIME Property Schema and Properties
XML and Flat File Property Schema and Properties
File adapter property schema and properties
FTP Adapter Property Schema and Properties
HTTP Adapter Property Schema and Properties
MQSeries Adapter Property Schema and Properties
MSMQ Adapter Property Schema and Properties
POP3 Adapter Property Schema and Properties
SMTP Adapter Property Schema and Properties
SFTP Adapter Property Schema and Properties
SOAP Adapter Property Schema and Properties
SQL Adapter Property Schema and Properties
WCF Adapters Property Schema and Properties
Windows SharePoint Services Adapter Property Schema and Properties
Azure Service Bus Adapter Property Schema and Properties
Azure Blob storage Adapter Property Schema and Properties
Azure Event Hubs Adapter Property Schema and Properties
Office 365 Outlook Calendar Adapter Property Schema and Properties
Office 365 Outlook Contact Adapter Property Schema and Properties
Office 365 Outlook Email Adapter Property Schema and Properties
SharePoint Online Adapter Property Schema and Properties
Microsoft BizTalk Accelerator for HL7 (BTAHL7) Property Schema and Properties
How to write or promote properties in the context of a messages through the BizTalk API
Historically, deploying BizTalk Server solutions across environments is or can be a complicated process depending on how complex is your solution. There are many ways to deploy BizTalk artifacts for example:
Importing them as part of an application by using the Deployment Wizard (from a .msi file), importing them using BTSTask.exe – this is the default way to deploy across environments.
You can replace and use allow BTSTask, and PowerShell scripts.
Or deploy them from Visual Studio – this is the default way to deploy to your development environment.
Throughout the years, the BizTalk Server Community created an open-source deployment framework called Deployment Framework for BizTalk (BTDF) – https://github.com/BTDF/DeploymentFramework. The Deployment Framework for BizTalk is an easy-to-use toolkit for deploying and configuring your BizTalk solutions. In reality, BTDF is an MSBuild project with custom MSBuild tasks and it can be customizable according to customer BizTalk project needs, it is also extensible. This framework brings new capabilities and advantages to deploying BizTalk Server solutions, but it also has limitations or disadvantages.
Microsoft has introduced automated deployment of BizTalk Applications in BizTalk Server 2016 Feature Packs using Azure DevOps (previously called Visual Studio Team Services – VSTS). In BizTalk Server 2016 Feature Pack 1, automatic deployment and application lifecycle management (ALM) experience was introduced. The automatic deployment process has been improved with the release of BizTalk Server 2016 Feature Pack 2. These features were only available on the Enterprise edition of BizTalk Server 2016.
BizTalk Server 2020 brings all these functionalities out-of-the-box across all editions: Enterprise, Standard, Development, or Branch.
To accomplish this, we need basically 3 main steps:
BizTalk Server: Add a BizTalk Server Application project to your Visual Studio solution.
DevOps: Create a build agent.
DevOps: Create a Build and release Azure Pipeline.
This whitepaper will address and explain how you can implement CI/CD oriented to BizTalk Server using Azure DevOps Pipelines.
In this whitepaper, Pedro Almeida and I will provide a detailed introduction to CI/CD. It teaches how to Create a project collection. Learn how to prepare the visual studio for projects end to end. A well-defined pipeline. Helps you understand how to save development time by thinking long-term since it is a low-cost, high-return scenario.
What’s in store for you?
This whitepaper will give you a detailed understanding of the following:
An introduction to:
What is a CI/CD Pipeline?
What are CI/CD Pipelines?
What is Azure DevOps?
Create an organization or project collection in Azure DevOps
Create a project in Azure DevOps
Preparing your Visual Studio BizTalk Server project for CI/CD
Creating a BizTalk Server Deployment Project
Add the application project
Making your Bindings dynamic for deployment
Configure the BizTalkServerInventory JSON template
This time I decided to create a brand new component called the Message Archive Pipeline Component.
For those who aren’t familiar with it, the BizTalk Pipeline Components Extensions Utility Pack project is a set of custom pipeline components (libraries) with several custom pipeline components that can be used in receive and sent pipelines. Those pipeline components provide extensions of BizTalk’s out-of-the-box pipeline capabilities.
Message Archive Pipeline Component
The Message Archive Pipeline Component is a pipeline component that can be used to arch incoming/outgoing messages from any adapters into a local or shared folder. It is very identical and provides the same capabilities as the already existing BizTalk Server Local Archive pipeline component:
It can be used in any stage of a receive pipeline or send pipeline;
It can be used in multiple stages of a receive pipeline or send pipeline;
It provides an option for you to specify the location path for where you want to save the message: local folder, shared folder, network folder.
It can be used from any adapter:
If the adapter provides the ReceivedFileName property promoted like the File adapter or FTP adapter the component will take this value into consideration and save the message with the same name;
Otherwise, it will use the MessageID, saving the file with the MessageID has its name without extension.
So what are the differences between them?
The significant differences between these two components are that the Message Archive Pipeline Component allows you to:
Set the filename using macros like %datetime%, %ReceivePort%, %Day%, etc.
For example, %ReceivePort%_%MessageID%.xml
Set the archive file path once again using macros:
for example C:BizTalkPortsArchiveARCHIVE%Year%%Month%%Day%
If you don’t want to overwrite existing files, you can specify an additional Macro to distinguish them.
For example _%time%
You can set up this component for high performance using forward-only streaming best practices.
In short, this means developing your pipeline components so that they do their logic either as a custom stream implementation or by reacting to the events available to you through the Microsoft.BizTalk.Streaming.dll stream classes. Without ever keeping anything except the small stream buffer in Memory and without ever seeking the original stream. This is best practice from the perspective of resource utilization, both memory and processor cycles.
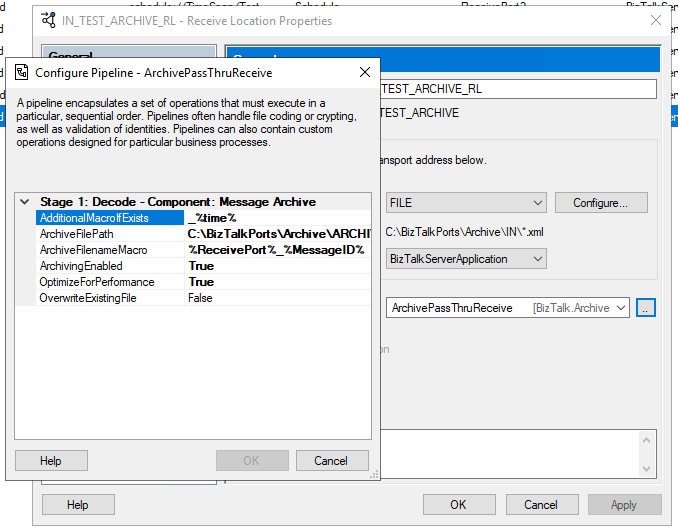
This is the list of properties that you can set up on the archive pipeline component:
Property Name
Description
Sample Values
OverwriteExistingFile
Define if the archive file is to be overwritten if already exists
true/false
ArchivingEnabled
Define if the archive capabilities are enabled or disabled
true/false
ArchiveFilePath
Archive folder path. You can use macros to dynamically define the path.
C:Archive%Year%%Month%%Day%
ArchiveFilenameMacro
File name template. If empty the source file name or MessageId will be used. You can use macros to dynamically define the filename.
%ReceivePort%_%MessageID%.xml
AdditionalMacroIfExists
If a file already exists and OverwriteExistingFile is set to false, a suffix can be added. If empty the MessageId will be used. You can use macros to dynamically define this suffix.
_%time%
OptimizeForPerformance
Setting to apply high performance on the archive
true/false
Available macros
This is the list of macros that you use on the archive pipeline component:
Property Name
Description
%datetime%
Coordinated Universal Time (UTC) date time in the format YYYY-MM-DDThhmmss (for example, 1997-07-12T103508).
%MessageID%
Globally unique identifier (GUID) of the message in BizTalk Server. The value comes directly from the message context property BTS.MessageID.
%FileName%
Name of the file from which the File adapter read the message. The file name includes the extension and excludes the file path, for example, Sample.xml. When substituting this property, the File adapter extracts the file name from the absolute file path stored in the FILE.ReceivedFileName context property. If the context property does not have a value the MessageId will be used.
%FileNameWithoutExtension%
Same of the %FileName% but without extension.
%FileNameExtension%
Same of the %FileName% but in this case only the extension with a dot: .xml
%Day%
UTC Current day.
%Month%
UTC Current month.
%Year%
UTC Current year.
%time%
UTC time in the format hhmmss.
%ReceivePort%
Receive port name.
%ReceiveLocation%
Receive location name.
%SendPort%
Send port name.
%InboundTransportType%
Inbound Transport Type.
%InterchangeID%
InterchangeID.
How to install it
As always, you just need to add these DLLs on the Pipeline Components folder that in BizTalk Server 2020 is by default:
In this particular component, we need to have this DLL:
BizTalk.PipelineComponents.MessageArchive.dll
How to use it
Like all previous, to use the pipeline component, I recommend you to create a generic or several generic pipelines that can be reused by all your applications and add the Message Archive Pipeline Component in the stage you desire. The component can be used in a stage of the receive and send pipelines.
Download
THIS COMPONENT IS PROVIDED “AS IS”, WITHOUT WARRANTY OF ANY KIND.
You can download Message Archive Pipeline Component from GitHub here:
For those who are not familiar, this project is a set of custom pipeline components (libraries) with several custom pipeline components that can be used in received and sent pipelines, which will extend BizTalk’s out-of-the-box pipeline capabilities.
Receive Location Name Property Promotion Pipeline Component
Receive Location Name Property Promotion Pipeline Component is a simple pipeline component to promote the Receive Location Name (ReceiveLocationName) property to the context of the message. Several BizTalk Server context properties are not promoted by default with BizTalk Server, which means that they are not available for routing.
One such property is the ReceiveLocationName property. While the ReceivePortName property is available in the BTS namespace, the ReceiveLocationName property is not promoted. It cannot be used for routing nor access it from inside an orchestration.
My team and I kept that behavior creates this project as a proof-of-concept to explain how you can promote properties to the context of the message.
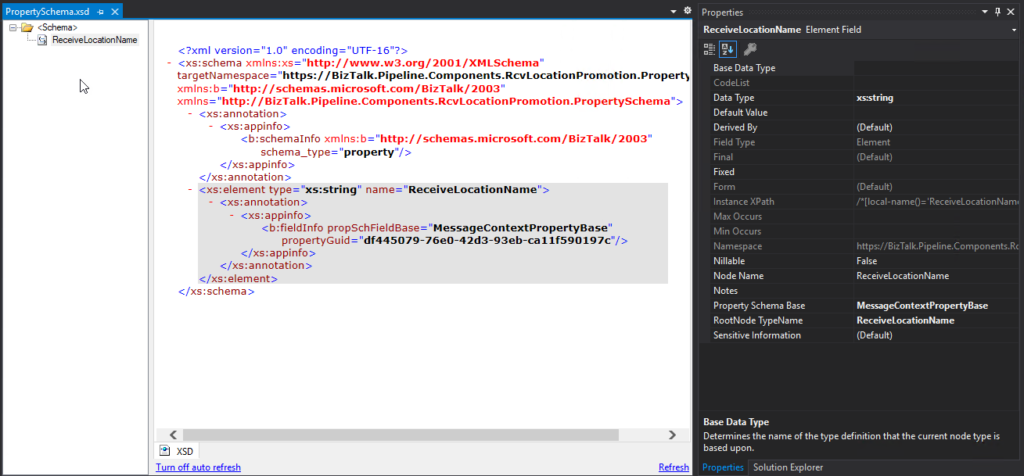
Create a Property schema
To promote properties to the context of the message, we will need a Property Schema with these properties. In our case, we will add only one property called: ReceiveLocationName.
Property Name
Date Type
Property Schema Base
ReceiveLocationName
xs:string
MessageContextPropertyBase
Note: A MessageContextPropertyBase property means that the XPath may or may not exist.
Create a Pipeline Component
To actually promote the properties to the context of the message, we need to create a pipeline component to do the trick.
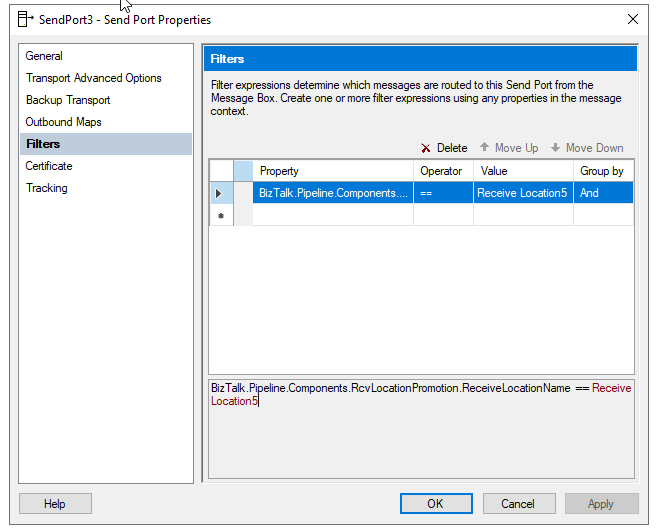
Once you deploy the property schema and a receive pipeline component containing the Receive Location Name Property Promotion Pipeline Component, you can start to apply Content-based routing using the Receive Location Name.
Download
THIS COMPONENT IS PROVIDED “AS IS”, WITHOUT WARRANTY OF ANY KIND.
You can download Receive Location Name Property Promotion Pipeline Component from GitHub here:
For those who are pt familiar, this project is a set of custom pipeline components (libraries) with several custom pipeline components that can be used in received and sent pipelines, which will extend BizTalk’s out-of-the-box pipeline capabilities.
BizTalk PDF2Xml Pipeline Component
BizTalk PDF2Xml Pipeline Component is, as the name mentioned, a decode component that transforms the content of a PDF document to an XML message that BizTalk can understand and process. The component uses the itextsharp library to extract the PDF content. The original source code was available on the CodePlex (pdf2xmlbiztalk.codeplex.com). Still, I couldn’t validate who was the original creator. So, the component first transforms the PDF content to HTML, and then using an external XSLT, will apply a transformation to convert the HTML into a know XML document that BizTalk Server can process.
My team and I kept that behavior, but we extended this component and added the capability also to, by default, convert it to a well know XML without the need for you to use an XSTL transformation directly on the pipeline.
How does this component work?
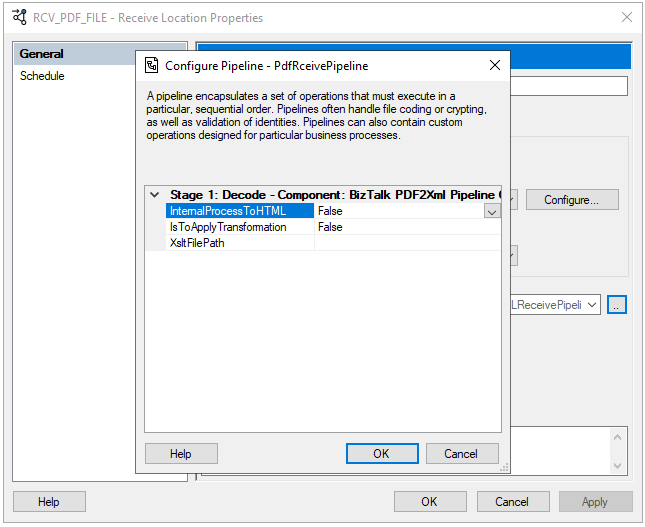
This is the list of properties that you can set up on the PDF2XML pipeline component:
Property Name
Description
Sample Values
InternalProcessToHTML
Value to decide if you want the component to transform the PDF content to HTML or XML
True/False
IsToApplyTrasnformation
Value to decide if you want to apply a transformation on the pipeline component or not
True/False
XsltFilePath
Path to an XSLT transformation file
C:transfmymap.xslt
Once you pass the PDF by this component and depending on how you configure it, the outcome can be:
All PDF content in an HTML format;
All PDF content in an XML format;
Part of the PDF content on an XML format (if you apply a transformation)
Unfortunately, on my initial tests, this component works well with some PDF files, but others simply ignore its content. Nevertheless, I make it available as a prof-of-concept.
Download
THIS COMPONENT IS PROVIDED “AS IS”, WITHOUT WARRANTY OF ANY KIND.
You can download BizTalk PDF2Xml Pipeline Component from GitHub here:
Wow… what a 2+ years journey. Writing a book during the pandemic phase and dealing with all aspects of the book was a challenger, and for that, I have to say thank you to Tom Canter and Lex Hegt for taking this journey with me and thank you Kovai and Saravana for supporting us!
I was also surprised that the book was released today because today was also the day I got back to the office and provided a copy of the book to my team! A lucky coincidence! Thanks, Pedro Almeida and Diogo Formosinho, for the support during these last years.
And of course, I have to say thanks to the people that also make part of this book: Mandi Anez Ohlinder for writing the foreword, Steve Lemkau, and JoAnn Een for reviewing it!
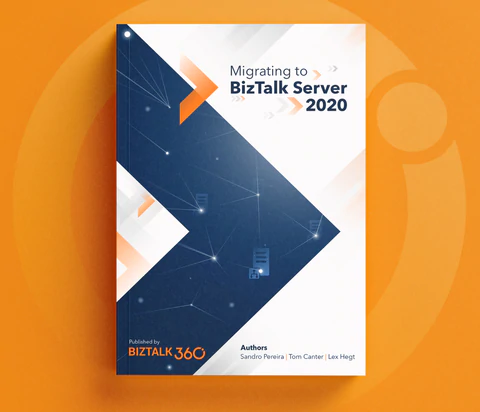
Migrating to BizTalk Server 2020
This book is intended to be a valuable resource for managers, architects, developers, testers, and administrators involved in migrating BizTalk Server platforms and solutions running on previous versions toward BizTalk Server 2020. It will provide practical recipes and strategies that will help them enhance and strengthen their knowledge in this sensitive and sometimes complicated upgrade process.
This book is a “mini” bible to migrate your BizTalk Server to the last version of the product covering all most aspects of this topic:
Overview of BizTalk Server 2020: will provide the reader with a full overview of BizTalk Server 2020, the latest version of the product, addressing topics like what are the main components and core features, what is new, what was deprecated or removed from this version and hardware and Software requirements & supported versions as well
Migration Drivers (why upgrade to BizTalk Server 2020): Many companies have this idea that upgrading to newer versions of BizTalk Server can be challenging, and they tend to skip certain version upgrades to minimize the effort and the costs. This chapter aims to address and discuss the main reasons why you should migrate from the previous version of the BizTalk Server to this latest version
Preparing for Your Upgrade: There are specific tasks, considerations, and components standard in each platform migration, but in the end, every BizTalk Server migration is different from each other. This chapter will go thru the Evaluate, Plan, and Implement (EPI) approach, providing you a path for completing your upgrade in a controlled and timely manner, focusing on the key considerations that need to be taken into account when planning your migration
In-place upgrade: Despite in-place migration or BizTalk Server upgrade is not supported in all scenarios, and in most cases, not recommended in production environments. It is still a valid option. This chapter will outline the key considerations that need to be taken into account when planning an in-place migration of your BizTalk Server environment
Migrating to BizTalk Server 2020 (side-by-side): Side-by-side migration is probably the most common migration path used. And once we decided on this approach, we need to understand and clarify all the steps that need to be performed to migrate from your previous BizTalk Server version to BizTalk Server 2020. his chapter will discuss the steps around setting up the new platform, making you aware of challenges that come with maintaining multiple (live) environments, and providing you will all the tips and recommendations for you to migrate your BizTalk solutions peacefully and transparently. After completing this chapter, you will be aware of and understand what will be involved in a migration process and the efforts required for each component
Migrating to Azure: This last chapter covers the key takeaways that you need to consider before deciding to migrate or move your on-premiss BizTalk Server machines to Azure Infrastructure as a Service (IaaS). When you can and can’t move, why you should move and what will be required. While not the focus of this book, this chapter will also briefly look at the BizTalk Server solution migration process to Azure Integration Services. Highlighting what will be possible or not, the difficulties you might encounter, and some approaches they could use to make this transition as simple as possible
Where can I order the book?
For now, the book is available for you can order the book online at Shopify here:
Finally, to my wife Fernanda and my children Leonor, Laura e José, my life would be empty and meaningless without all your hugs, jokes, crying to demand attention, affection, and all our other crazy things. Thanks for being part of my life.
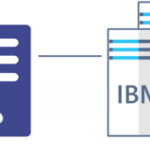
At their core, mainframes are high-performance computers with large amounts of memory and processors that process billions of simple calculations and transactions in real-time. The mainframe is critical to commercial databases, transaction servers, and applications that require high resiliency, security, and agility
Microsoft Host Integration Server (HIS) technologies and tools enable enterprise organizations to integrate existing IBM host systems, programs, messages, and data with new Microsoft server applications.
HIS allows IT administrators to securely and efficiently connect new systems to existing systems using industry-standard High-Performance Routing (HPR) and Transmission Control Protocol (TCP) over Internet Protocol (IP). This reduces operating expenses and total cost of ownership while supporting existing and new computing workload.
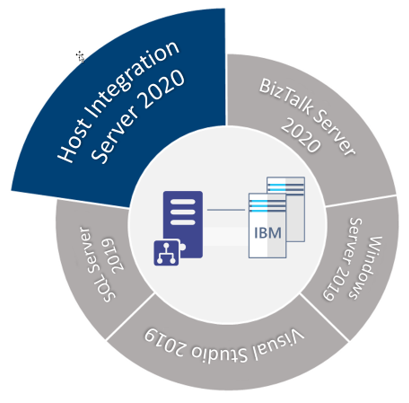
HIS 2020 is available in one technology package licensed as additional software to the core editions of Microsoft BizTalk Server 2020.
This whitepaper will discuss a step-by-step guideline – how to install and configure Host Integration Server 2020 on a BizTalk Server standalone environment running Windows Server 2020.
What’s in store for you?
This whitepaper will give you a detailed understanding of the following:
Install Host Integration Server 2020
Configure Host Integration Server 2020
Install Host Integration Server 2020 Cumulative Updates
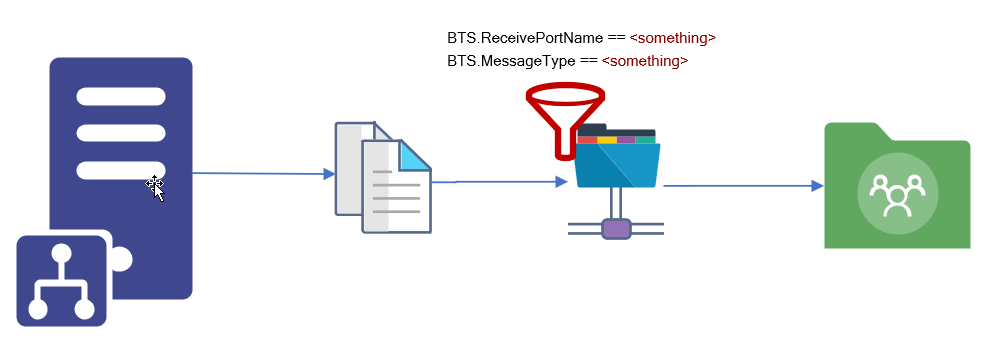
We usually see two implementation cases when dealing with unwanted or obsolete messages:
They get suspended on BizTalk Server – not that common, at least in the long run. We may see this earlier when these types of messages are encountered.
or a common way to solve these situations is to create a send port to filter these types of messages and send them to a support folder in BizTalk Server hard drive or a shared location.
Of course, this last option should be considered as a backup plan that can work as intended if you have good control and clean best practices like creating a scheduling task that cleans these messages from the hard drive from time to time. Otherwise, your hard drive becomes full at some point, and more critical issues will arise.
BizTalk Server Void Adapter
The BizTalk Server Void adapter is a simple way to easily discard all unwanted messages from your BizTalk Server environments instead of getting suspended or sent to a hard drive support folder.
This custom send adapter for BizTalk Server discards outgoing messages – sends messages to nowhere – into the void! Without the need for external jobs (like scheduling tasks) or added cleaning concerns.
How to install it?
If you want to install the BizTalk Server FILE-RADITZ Adapter, you need to:
Place the folder BizTalkVoidAdapter on any location on your BizTalk Server box. I will recommend to put it in:
C:Program Files (x86)
Note: if you put in any other path you need to modify the VoidAdapter.reg file
Access the folder and double-click on the VoidAdapter.reg file
This will register the adapter to run under 32-bit host instances. To make it available also for 64-bits, you need to:
Click Start
Type %windir%SysWoW64cmd.exe in the search box and press enter
Run the same adapter registry (.reg) file from this command prompt
Now you just need to add this adapter to the BizTalk Server Administration Console:
Open BizTalk Administration Console by pressing the Windows key to switch to the Start menu, type BizTalk Server Administration or BizTalk, click the BizTalk Server Administration option from the Search window.
In the console left tree, expand BizTalk Server Administration > BizTalk Group > Platform Settings and then Adapters.
In the Adapter Properties
In the Name box, type a descriptive name for this adapter.
Void
In the Adapter combo box, select the adapter from the drop-down that you want to add.
Void
In the Description box, type a description for the adapter (this is optional).
The BizTalk Server Void adapter is a simple way to easily discard all unwanted messages from your BizTalk Server environments instead of getting suspended or sent to a hard drive support folder.
Click OK to complete the process of adding the adapter.
Note: If you want to use the Event Viewer to track/log the discarded messages you should first create the Log Name and Log Source. This way the tracking data will not be registered in the Application Log but instead in a custom log. To do that you can use the PowerShell provided on the runtime folder: mngt-Create-Event-Source.ps1.
Where can you use it?
This version available on GitHub is currently compiled on .NET 4.6 and optimized for BizTalk Server 2020. Nevertheless, you can take this code and compile it in other versions of .NET and BizTalk Server. It will be 100% compatible.
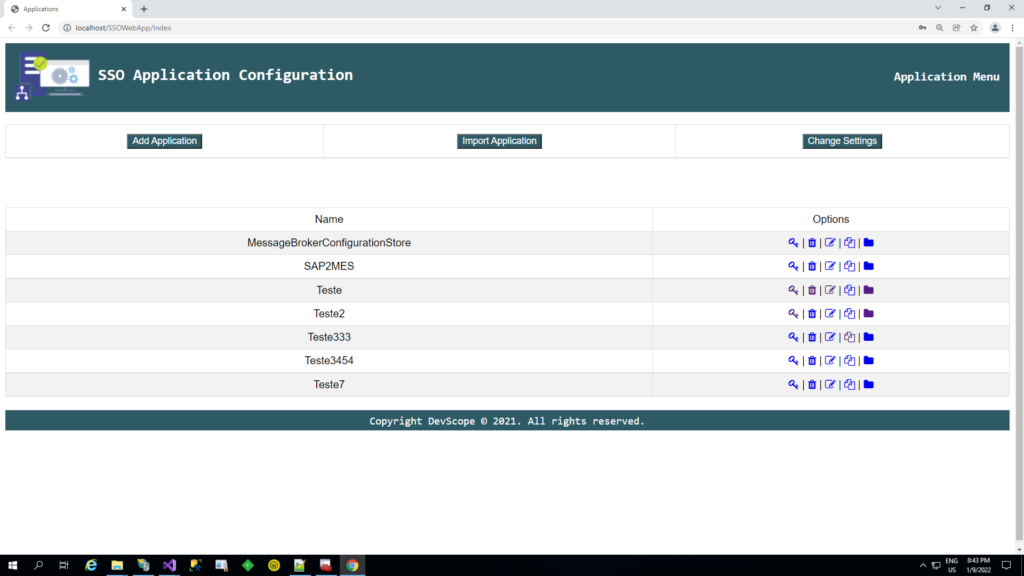
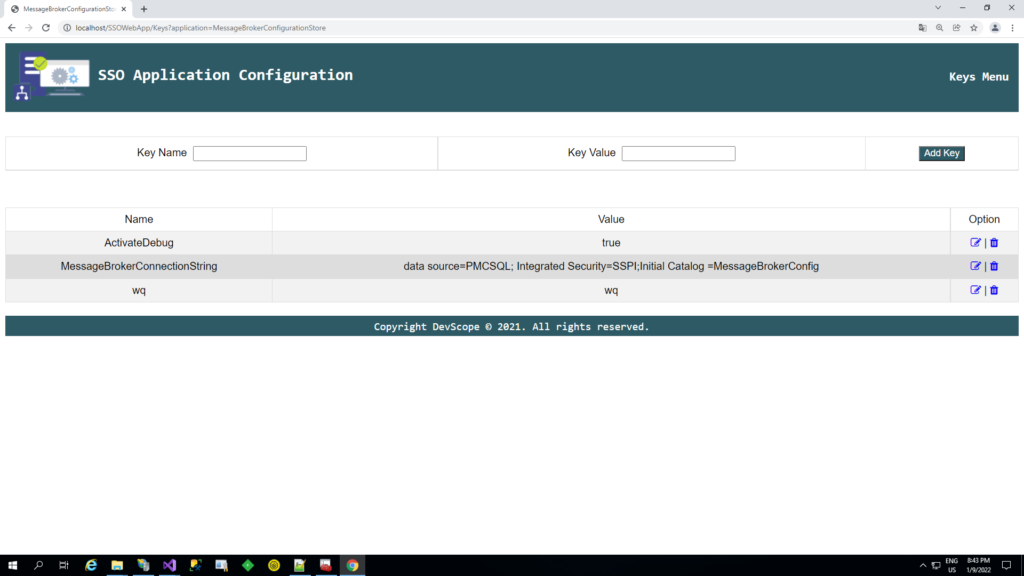
It’s been some time since I created the BizTalk ServerSSO Application Configuration tool. The tool is available for several versions of BizTalk Server. It provides the ability to add and manage applications, add and manage key-value pairs in the SSO database, and import and export configuration applications to be deployed to different environments.
However, and although I love this tool, there is a significant limitation. It is a Windows application tool. So, most of the time, we need remote access to the BizTalk Server machines to access the tool to be able to read or change these values inside the SSO Applications.
To bypass this limitation, we create a Web version of this tool. The tool has almost the same features available as the traditional windows tool:
You can securely export and import Application configurations and it is compatible with MSFT SSO snap-in;
You can duplicate Applications (copy and past);
You can rename Applications;
You can easily add new key-values;
You can edit key-values;
Other versions
This tool is also available in the format of Windows Application for the following BizTalk Server versions: