by Sunny Sharma | Feb 28, 2017 | BizTalk Community Blogs via Syndication
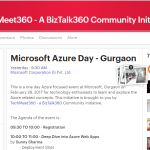
After the success of organizing events in Coimbatore and Bengaluru under the TechMeet360 branding, BizTalk360 organized its first event in Gurgaon on February 26th (Sunday). The event “Microsoft Azure Day – Gurgaon” was a full day session on Microsoft Azure technologies.
Microsoft Azure Day – 26th Feb 2017
There were about 77 registrations for this event on Meetup, and 28 attendees turned up on a Sunday morning ready to learn something new.
Azure Web Apps – Deep Dive
The sessions started off at 10:30 am with my session on Azure Web Apps – Deep Dive.
It was a learn by doing workshop. In the first few minutes, I covered topics about WebJobs, Deployment Slots, Application Insights, Continuous Delivery, Traffic Manager and then went ahead with full-on demos. The session was very interactive and got stretched for two and a half hours long, on audience demand. It was so much fun and learning together as everyone was very interested.
After the first session, it was time for a much needed lunch. Many thanks to Microsoft for sponsoring our lunches, courtesy Subway :-).
We all missed Dhananjay Kumar as he fell sick and couldn’t join us for the event (as a speaker). We wish him a “Speedy Recovery” 🙂
After lunch, at 2:00 PM, Abhimanyu K Vatsa started his talk on Azure CDN. Abhimanyu discussed about the Fundamentals of Azure CDN, it’s feature and how to use it.
Azure CDN – Accelerated Availability & Performance
The Azure CDN session concluded with a live demo and was appreciated by everyone.
Learn building Nano Services using Azure Functions
I took the podium one more time and presented on Azure Functions. This session discussed the features, reliability, scalability with a couple of quick demos.
We did some Q&A where I shared some curated links from internet helpful for Azure Certifications preparations. The list is available here on my github repo here: AzureCertification Prep Guidelines
We had some nice goodies, courtesy BizTalk360. We did a raffle and distributed them among the attendees. The raffle round was much fun as everyone was on high to recall everything we discussed throughout the day and answer first! The Best part of the Day!
We concluded the event at 4:30 pm with cheerful good byes! Thank you all the attendees for making it happen. Special Thanks to Deepak Rajendran for the accommodation and all the support throughout the event.
See you all in next event! Happy Learning 🙂
Author: Sunny Sharma
Sunny Sharma works at BizTalk360 as a Senior Software Engineer. He is a Microsoft MVP – having 6 years of experience in development using Microsoft .NET technologies. View all posts by Sunny Sharma

by Sandro Pereira | Feb 22, 2017 | BizTalk Community Blogs via Syndication
After the success of the first year, TUGA IT is back for its second edition on May 18-20 at Microsoft Portugal’s Headquarters in Lisbon. This is one of the broadest and largest IT conferences in Portugal, covering topics like SharePoint, Office 365, Data Platform, Azure, Integration (BizTalk, API Management, App Service, Logic Apps, IoT, Functions, …) and Programming I a 3-day conference is organized by TUGA Association with the involvement of several technical communities and Microsoft MVPs, in which I fit. TUGA Association, a non-profit association whose main purpose is to promote knowledge, is also behind events such as SharePoint Saturday and SQL Saturday.
The Call for Speakers is now open until March 1st, 2017. So, if you’re interested in delivering a session, hurry up and follow these steps:
- Register on the website as a speaker
- Login to website using the account you have just registered
- Submit your sessions
There are already several sessions submitted to the event but I encourage everyone, whether they are MVPs, Microsoft product group or community member enthusiasts, who want to talk about the following topics:
- BizTalk Server 2016: new capabilities, open source tools or frameworks, …
- Logic Apps and Enterprise Integration Pack
- Building reliable and scalable cloud messaging and hybrid integration solutions with Service Bus
- Event Hubs
- IoT
- API Management
- Hybrid Integration using BizTalk Server and Logic Apps, or connecting to on-prem resources using the On-Premise Gateway
- Microsoft Flow
Or other related Integrate topic, to submit a session on the Integration track, everyone can have a shot to speak in one of the best IT conferences in Portugal.
The organization is preparing a lot of new stuff for this second edition, but it is still too early for announcements. Stay tuned!
Author: Sandro Pereira
Sandro Pereira lives in Portugal and works as a consultant at DevScope. In the past years, he has been working on implementing Integration scenarios both on-premises and cloud for various clients, each with different scenarios from a technical point of view, size, and criticality, using Microsoft Azure, Microsoft BizTalk Server and different technologies like AS2, EDI, RosettaNet, SAP, TIBCO etc. He is a regular blogger, international speaker, and technical reviewer of several BizTalk books all focused on Integration. He is also the author of the book “BizTalk Mapping Patterns & Best Practices”. He has been awarded MVP since 2011 for his contributions to the integration community. View all posts by Sandro Pereira
by Eldert Grootenboer | Dec 6, 2016 | BizTalk Community Blogs via Syndication
In this post, I will show how we can use Visual Studio to write Azure Functions and use these in our Logic Apps. Azure Functions, which went GA on November 15th are a great way to write small pieces of code, which then can be used from various places, like being triggered by a HTTP request or a message on Service Bus, and can easily integrate with other Azure services like Storage, Service Bus, DocumentDB and more. We can also use our Azure Functions from Logic Apps, which gives us powerful integrations and workflow, using the out of the box Logic Apps connectors and actions, and placing our custom code in re-usable Functions.
Previously, our main option to write Azure Functions was by using the online editor, which can be found in the portal.
However, most developers will be used to develop from Visual Studio, with its great debugging abilities and easy integration with our source control. Luckily, earlier this month the preview of Visual Studio Tools for Azure Functions was announced, giving us the ability to write Functions from our beloved IDE. For this post I used a machine with Visual Studio 2015 installed, along with Microsoft Web Developer Tools and Azure 2.9.6 .NET SDK.
After this, our first step will be to install Visual Studio Tools for Azure Functions.
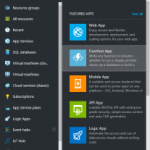
Now that the tooling is installed, we can create a new Azure Functions project.
Our project will now be created, and we can start adding functions to it. To do so, rightclick on the project, choose Add, and the New Azure Function…. This will load a dialog where we can select what type of function we want to create. To use an Azure Function from a Logic App, we need to create a Generic Webhook.
For each function we add to our project, a folder will be created with its contents, including a run.csx where we will do our coding, and a function.json file containing the configuration for our Function.
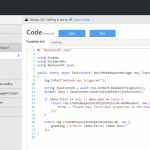
For this sample, let’s write some code which receives a order JSON message, and returns a message for the order, accessing the subnodes of the json message.
#r "Newtonsoft.Json"

using System;
using System.Text;
using System.Net;
using Newtonsoft.Json;

public static async Task<object> Run(HttpRequestMessage req, TraceWriter log)
{
    string jsonContent = await req.Content.ReadAsStringAsync();
    dynamic data = JsonConvert.DeserializeObject(jsonContent);

    var toReturn = new StringBuilder($"Company name is {data.Order.Customer.Company}.");

    foreach (var product in data.Order.Products)
    {
        toReturn.Append($" Ordered {product.Amount} of {product.ProductName}.");
    }

    return req.CreateResponse(HttpStatusCode.OK, new { greeting = toReturn });
}
|
As you can see, by using the dynamic keyword, we can easily access the JSON nodes.
Debugging
Now one of powers of Visual Studio is it’s great debugging possibilities, and we can now debug our Function locally as well. The first time you will start your Function, you will get a popup to download the Azure Functions CLI tools, accept this and wait for the tools to be downloaded and installed.
Once installed, it will start a local instance of your Function, and as we created a Generic Webhook Function, give you an endpoint where you can place your message.
Using a tool like Postman, we can now call our function, and debug our code, a great addition for more complex functions!
Deployment
Once we are happy with how our Function is working, we can deploy it to our Azure account. To do this, rightclick the project, and choose Publish…. A dialog will show, where we can choose to publish to a Microsoft Azure App Service. Here we can select an existing App Service or create a new one.
Update any settings if needed, and finally clock Publish, and your Function will be published to your Azure account and will be available for your applications. If you make any changes to your Function, just publish the updated function and it will overwrite your existing code.
Now that we have published our Function, let’s create a Logic App which uses this function. Aagain, you could do this from the portal, but luckily there is also the possibility these days to create them from Visual Studio. Go to Tools and choose Extensions and Updates. Here we download and install the Azure Logic Apps Tools for Visual Studio extension.
Now that we have our extension installed, we can create a Logic App project using the Azure Resource Group template.
This will show a dialog with various Azure templates, select the Logic App template.
Now rightclick the LogicApp.json file, and choose Open With Logic App Designer, and select and account and resource group for your Logic App.
This will load the template chooser, where we can use an predefined template, or create a blank Logic App, which we will use here. This will open the designer we know from the portal, and we create our logic app. We will use a HTTP request as our trigger. If you want, you can specify a JSON schema for your message, which can be easily created with http://jsonschema.net/. Now lets add an action which uses our Function, by clicking New step and Add an action. Use the arrow to show more options, and choose Show Azure Functions in the same region. Now select the function we created earlier.
For this example we will just pass in the body we received in our Logic App, but of course you can make some serious integrations and flows with this using all the possibilities which Logic Apps provide. Finally, we will send back the output from our function as the response.
Deployment
Rightclick on your project, and choose Deploy and selecty the resource group you selected earlier. Edit your parameters, which will include any connection settings for resources used in your Logic App as well. Once all your properties have been set, click OK to start the deployment.
Note that is you get the error The term ‘Get-AzureRmEnvironment’ is not recognized as the name of a cmdlet, function, script file, or operable program. you might have to restart your computer for the scripts to be loaded in correctly.
Now that your logic app is deployed, you can use Postman on your Logic App endpoint, and you will see the output from your Azure Function.
The code with this post can be found here.

by Eldert Grootenboer | May 16, 2016 | BizTalk Community Blogs via Syndication
Last week I attended Integrate 2016 in London, the biggest Microsoft integration event this year, organized by BizTalk360. The outcome was almost 400 attendees, and there were sessions from the Microsoft Product Group, industry leaders and MVP’s.
The major take-away I have from the event, is that Microsoft now has a great vision on the future of integration, which I felt was missing the last couple of years. Now though, they recognize that even though the cloud is a great asset, on premise is not going away for a long time. Also Microsoft has now officially announced that their on-premise integration solution will be BizTalk, which has not been getting a lot of love lately.
This means BizTalk will be getting adapters which will allow it to be easily integrated with the cloud, like Service Bus (which we already have) and Logic Apps, allowing it to consume Logic Apps and the cloud connectors.
Also we will be getting connectors in Azure which will allow us to easily connect from Logic Apps to BizTalk, giving us a true solid hybrid experience.
Microsoft has a very wide offering with Azure, and now with BizTalk and Logic Apps in the center of their integration offering, things are really starting to get together. We can use BizTalk for our on-premise applications and Logic Apps for our cloud applications, but there is much more. For example, we can use Azure Functions to create small re-usable pieces, which we can use stand-alone, or from Logic Apps. The Service Bus stack can be used for our messaging needs or IoT scenarios. For exposing and managing our API’s, including those provided by Azure Functions and Logic Apps, we have API Management to our disposal. And there’s many more services we can use to build and complement on our scenarios.
As for our B2B and EAI, Microsoft will introduce a premium pack on Logic Apps called Enterprise Integration Pack, which will be able to handle your EDI requirements, including TPM etc.
As you can tell from my blog posts, I am a big IoT fan, and I really think this will be one of the major growth enablers for us integrators. It was good to see that a lot of sessions at Integrate 2016 were on this subject as well, including announcements from the Service Bus team. For example the Premium tier has been announced for Service Bus, which will allow larger messages, isolation and dedicated resources. Also we heard that both Service Bus and Event Hubs will be coming to on-premise with the Azure Stack. Looking at the numbers for the Service Bus stack just keeps amazing me.
Integrate 2016 was once again an amazing event for me, I had a lot of fun catching up with old friends, making new friends, hearing all this great new news, and seeing love Microsoft is once again showing for us integrators. For anyone working in the Microsoft integration space, I can only recommend attending these events as well.
For those who want to read some more recaps, here are some of my favorites.
Steef-Jan Wiggers
A solid vision for integration – Day 1 Integrate 2016
Kent Weare
Integrate 2016 – Day 1 Recap
Integrate 2016 Wrap-up
Gijs in ‘t Veld
Integrate 2016 – highlights from the Microsoft product team sessions
Rob Fox
Integrate 2016 – Day 1 Recap
Wrapping up Integrate 2016
Codit
Integrate 2016 – Day 1
Integrate 2016 – Day 2
Integrate 2016 – Day 3
BizTalk360
INTEGRATE 2016 – A Recap of Day 1 & Announcements from the Product Group
Updates on Azure Service Bus – INTEGRATE 2016 Day 2
by Eldert Grootenboer | Apr 23, 2016 | BizTalk Community Blogs via Syndication
In my my previous post, I showed how we can use a WebJob to process a Service Bus queue and store the data in an Azure SQL database. This was pretty simple to set up, but it did require a good understanding of how to connect with these and process the data. Sometimes however we just want to do a quick integration without needing to set up all this plumbing. Recently Microsoft announced a new feature called Azure Functions, with now makes this possible. Azure functions can be used to create a small function which can run stand-alone, or be called from other applications, for example from a logic app, as has been described here by Sandro Pereira. Azure Functions provide out of the box connections for triggers, input and output to a lot of other Azure features, including Event Hubs, Service Bus, Azure Storage and DocumentDB. In this post I will show how we can process our message from the queue we created in this blogpost, and store it in an Azure Storage table. We will start by creating a new Function App in the portal.
Fill out the fields as specified. In case we allready have other App Services, we can run the Function in the same App Service Plan we are using for these by choosing Classic App Service Plan. However if we want the true cloud experience, it can also be run in a Dynamic App Service Plan, in which case Azure will provide all of the necessary resources when needed, and it will only cost us when our code is actually running.
Once the Function has been deployed, we can find it under App Services. Let’s create a new function in our Function App we just created. There’s either the possibility to start from scratch, or to use one of the premade templates.
We will create a function from scratch for this demo. Click on New Function, and select the ServiceBusQueueTrigger – C# template.
Now we can set up our function. We can either choose to use an existing queue, or if we specify a name for a queue which is not in the selected namespace yet, it will be created for us. We will select the queue we created earlier. When creating the connection to our Service Bus namespace, we have to use credentials with Manage permissions.
Once this simple setup has been done, click Create and we will see a Code editor in our browser with the outline for our function. As you will see, by default this function expects a string from our queue, however we are sending in a BrokeredMessage. Luckily, we can reference any namespace from our function as well. There are a couple of options to import namespaces. In our function, we will want to import the Microsoft.ServiceBus.Messaging namespace, which is part of the WindowsAzure.ServiceBus package. As this package is available from NuGet, we will use this to add the reference. Start by creating a project.json file, and add the following code, which will add a reference to version 2.7.6 of the package.
{
    "frameworks": {
        "net46":{
            "dependencies": {
                "WindowsAzure.ServiceBus": "2.7.6"
            }
        }
    }
}
|
Now we will use Kudu to upload the project.json file. The Kudu for our Function App can be reached on https://YOURAPP.scm.azurewebsites.net/. Go to the CMD Debug Console, and navigate to D:homesitewwwroot. Now we can drag and drop our project.json file here to upload it.
Going back to our Function App’s console, we will now see that the NuGet package we just added is being restored.
Now that we have added this NuGet package, we can reference the Microsoft.ServiceBus.Messaging from our code, and use the BrokeredMessage class in our incoming parameters.
Now that we have our input set up, we will add our output. Open the Integrate tab, and click New Output. Select Azure Storage Table as output, and set up the properties. We will let the function create a table for us, and we will use the shipname as a partition key.
To save our object to the Azure Storage Table, we have to create a class which will be used to map the data. Add the following class after the function. Be sure to include the PartitionKey and RowKey fields, as these are required when writing to Azure Table Storage. The other fields will hold the data we receive from our queue.
public class ErrorWarning
{
    public string PartitionKey { get; set; } // Required for writing to table storage
    public string RowKey { get; set; } // Required for writing to table storage
    public string CreatedDateTime { get; set; }
    public string ShipName { get; set; }
    public string Message { get; set; }
}
|
We also have to add a parameter to the function’s input parameters. When working with Azure Table Storage, this has to be an ICollector holding instances of the class we just created. Make sure to use the Table parameter name we just specified as name of the parameter. Once this is done, we can start implementing our function’s body. We will start by writing the data to the log, followed by creating an instance of our ErrorWarning class with the data we just received from the queue. We will then add this data to the Azure Table Storage.
public static void Run(BrokeredMessage myQueueItem, ICollector<ErrorWarning> queuesAndWarningsStorageTable, TraceWriter log)
{
    log.Verbose($"C# ServiceBus queue trigger function processed message: {myQueueItem.Properties["time"]}, {myQueueItem.Properties["ship"]}, {myQueueItem.Properties["exceptionMessage"]}");

    var item = new ErrorWarning {
        PartitionKey = myQueueItem.Properties["ship"].ToString(),
        RowKey = Guid.NewGuid().ToString(),
        CreatedDateTime = myQueueItem.Properties["time"].ToString(),
        ShipName = myQueueItem.Properties["ship"].ToString(),
        Message = myQueueItem.Properties["exceptionMessage"].ToString()
    };

    queuesAndWarningsStorageTable.Add(item);

    log.Verbose($"Added item {item.PartitionKey} to the table");
}
|
Now click Save and we will see our function is being compiled.
Now whenever a message is being placed on the queue, our Azure Function will pick it up, process the data, and place it into our Table Storage.