In this post, I will show how we can use Visual Studio to write Azure Functions and use these in our Logic Apps. Azure Functions, which went GA on November 15th are a great way to write small pieces of code, which then can be used from various places, like being triggered by a HTTP request or a message on Service Bus, and can easily integrate with other Azure services like Storage, Service Bus, DocumentDB and more. We can also use our Azure Functions from Logic Apps, which gives us powerful integrations and workflow, using the out of the box Logic Apps connectors and actions, and placing our custom code in re-usable Functions.
Previously, our main option to write Azure Functions was by using the online editor, which can be found in the portal.
However, most developers will be used to develop from Visual Studio, with its great debugging abilities and easy integration with our source control. Luckily, earlier this month the preview of Visual Studio Tools for Azure Functions was announced, giving us the ability to write Functions from our beloved IDE. For this post I used a machine with Visual Studio 2015 installed, along with Microsoft Web Developer Tools and Azure 2.9.6 .NET SDK.
After this, our first step will be to install Visual Studio Tools for Azure Functions.
Now that the tooling is installed, we can create a new Azure Functions project.
Our project will now be created, and we can start adding functions to it. To do so, rightclick on the project, choose Add, and the New Azure Function…. This will load a dialog where we can select what type of function we want to create. To use an Azure Function from a Logic App, we need to create a Generic Webhook.
For each function we add to our project, a folder will be created with its contents, including a run.csx where we will do our coding, and a function.json file containing the configuration for our Function.
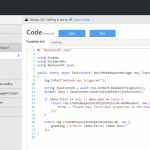
For this sample, let’s write some code which receives a order JSON message, and returns a message for the order, accessing the subnodes of the json message.
#r "Newtonsoft.Json" using System; using System.Text; using System.Net; using Newtonsoft.Json; public static async Task<object> Run(HttpRequestMessage req, TraceWriter log) { string jsonContent = await req.Content.ReadAsStringAsync(); dynamic data = JsonConvert.DeserializeObject(jsonContent); var toReturn = new StringBuilder($"Company name is {data.Order.Customer.Company}."); foreach (var product in data.Order.Products) { toReturn.Append($" Ordered {product.Amount} of {product.ProductName}."); } return req.CreateResponse(HttpStatusCode.OK, new { greeting = toReturn }); } |
As you can see, by using the dynamic keyword, we can easily access the JSON nodes.
Debugging
Now one of powers of Visual Studio is it’s great debugging possibilities, and we can now debug our Function locally as well. The first time you will start your Function, you will get a popup to download the Azure Functions CLI tools, accept this and wait for the tools to be downloaded and installed.
Once installed, it will start a local instance of your Function, and as we created a Generic Webhook Function, give you an endpoint where you can place your message.
Using a tool like Postman, we can now call our function, and debug our code, a great addition for more complex functions!
Deployment
Once we are happy with how our Function is working, we can deploy it to our Azure account. To do this, rightclick the project, and choose Publish…. A dialog will show, where we can choose to publish to a Microsoft Azure App Service. Here we can select an existing App Service or create a new one.
Update any settings if needed, and finally clock Publish, and your Function will be published to your Azure account and will be available for your applications. If you make any changes to your Function, just publish the updated function and it will overwrite your existing code.
Now that we have published our Function, let’s create a Logic App which uses this function. Aagain, you could do this from the portal, but luckily there is also the possibility these days to create them from Visual Studio. Go to Tools and choose Extensions and Updates. Here we download and install the Azure Logic Apps Tools for Visual Studio extension.
Now that we have our extension installed, we can create a Logic App project using the Azure Resource Group template.
This will show a dialog with various Azure templates, select the Logic App template.
Now rightclick the LogicApp.json file, and choose Open With Logic App Designer, and select and account and resource group for your Logic App.
This will load the template chooser, where we can use an predefined template, or create a blank Logic App, which we will use here. This will open the designer we know from the portal, and we create our logic app. We will use a HTTP request as our trigger. If you want, you can specify a JSON schema for your message, which can be easily created with http://jsonschema.net/. Now lets add an action which uses our Function, by clicking New step and Add an action. Use the arrow to show more options, and choose Show Azure Functions in the same region. Now select the function we created earlier.
For this example we will just pass in the body we received in our Logic App, but of course you can make some serious integrations and flows with this using all the possibilities which Logic Apps provide. Finally, we will send back the output from our function as the response.
Deployment
Rightclick on your project, and choose Deploy and selecty the resource group you selected earlier. Edit your parameters, which will include any connection settings for resources used in your Logic App as well. Once all your properties have been set, click OK to start the deployment.
Note that is you get the error The term ‘Get-AzureRmEnvironment’ is not recognized as the name of a cmdlet, function, script file, or operable program. you might have to restart your computer for the scripts to be loaded in correctly.
Now that your logic app is deployed, you can use Postman on your Logic App endpoint, and you will see the output from your Azure Function.
The code with this post can be found here.