by community-syndication | Apr 4, 2011 | BizTalk Community Blogs via Syndication
NetTcpBinding is often assumed to offer the best performance of all WCF bindings. When working on WCF implementations, I often hear from developers argue about the performance benefits that their solution gain by usingnettcp endpoints but rarely see any…(read more)
Blog Post by: gsusx
by community-syndication | Apr 4, 2011 | BizTalk Community Blogs via Syndication
In our previous part we’ve installed our Domain Controller and not to say the least one of the most vital servers within our to set up Server Environment. This post will mainly focus on setting up the Active Directory Accounts… Read more ›
Blog Post by: Ren%u00e9 Brauwers
by Rene Brauwers | Apr 4, 2011 | BizTalk Community Blogs via Syndication
In our previous part we’ve installed our Domain Controller and not to say the least one of the most vital servers within our to set up Server Environment.
This post will mainly focus on setting up the Active Directory Accounts which will be used throughout the other upcoming parts.
So let’s get started.
Planning security groups, user accounts and service accounts
Like every installation and configuration it is essential to have an overview of the things you would like to accomplish before implementing them, well the same rules apply here; therefore below an overview of the required Security groups, user accounts and service accounts.
Security Groups
-
- BizTalk Application Users
- BizTalk Isolated Host Users
- BizTalk Server Administrators
- BizTalk Server B2B Operators
- BizTalk Server Operators
- BizTalk Bam Portal Users
- SSO Administrators
- SSO Affiliate Administrators
- IIS_IUSRS
Service Accounts
- srvc-bts-trusted
[Service account used to run BizTalk Isolated host instance (HTTP/SOAP)]
- srvc-bts-untrusted
[Service account used to run BizTalk In-Process host instance which access In-Process BizTalk host instance (BTNTSVC)]
- srvc-bts-sso
[Service account used to run Enterprise Single Sign-On Service which accesses the SSO database]
- srvc-bts-rule-engine
[Service account used to run Rule Engine Update Service which receives notifications to deployment/undeployment policies from the Rule engine database]
- srvc-bts-bam-ns
[Service account used to run BAM Notification Services which accesses the BAM databases]
- srvc-bts-bam-ap
[Application pool account for BAMAppPool which hosts BAM Portal Web site]
- srvc-sql-agent
- srvc-sql-engine
- srvc-sql-analysis
- srvc-sql-reporting
- srvc-sql-integration
User Accounts
- usr-bts-install
- usr-bts-bam
- usr-bts-admin
- usr-bts-operator
- usr-bts-b2b-operator
- usr-bts-sso-admin
- usr-bts-sso-affiliate
Accounts – Security Group mapping
BizTalk Application Users
Contains service accounts for the BizTalk In-Process host instance in the host that the BizTalk Host Group is designated for.
Accounts
BizTalk Isolated Host Users
Contains service accounts for the BizTalk Isolated host instance in the host that the Isolated BizTalk Host Group is designated for.
Accounts
BizTalk Server Administrators
Contains users/groups that need to be able to configure and administer BizTalk Server.
Accounts
- Domain Admin
- usr-bts-admin
BizTalk Server B2B Operators
Contains user/groups that will perform all party management operations
Accounts
- Domain Admin
- usr-bts-b2b-operator
BizTalk Server Operators
Contains user/groups that will monitor solutions.
Accounts
- Domain Admin
- usr-bts-operator
BizTalk Bam Portal Users
Everyone group is used for this role by default.
Accounts
SSO Administrators
Contains service accounts for Enterprise Single Sign-On service.
Contains users/groups that need to be able to configure and administer BizTalk Server and SSO service.
Contains accounts used to run BizTalk Configuration Manager when configuring SSO master secret server.
Accounts
- Domain Admin
- srvc-bts-sso
- usr-bts-sso-admin
SSO Affiliate Administrators
Contains account used for BizTalk Server Administrators
Accounts
- Domain Admin
- usr-bts-sso-affiliate
IIS_IUSRS
This built-in group has access to all the necessary file and system resources so that an account, when added to this group, can seamlessly act as an application pool identity.
Accounts
- srvc-bts-trusted
- srvc-bts-bam
- srvc-bts-bam-ap
Adding security groups, user accounts and service accounts
Now that we have a clear overview of all the required security groups, user and service accounts it´s time to actually add them to our Active Directory.
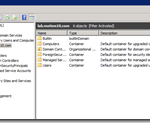
Fire up your Domain Controller Server, and in your Server Manager open up “Roles” –> “Active Directory Users and Computers” and click on your domain
Setting up BizTalk Organizational Unit
Add a new Organizational Unit and name called “BizTalk”, do this by “right clicking” on your domain –> “New” –> “Organizational Unit”
Enter the name of the new ‘Organizational Unit Object”, ensure to check “Protect container from accidental deletion” and press “OK”
Select the just created “Organizational Unit BizTalk” and a new group, do this by “right clicking” your “BizTalk Organizational Unit” –> “New” –> Group
Enter the name of the group, ensure the “Group Scope” is “Global” and the “Group Type” is “Security”. Once done press “OK”
Now add the following Security Groups, by repeating the 2 previous mentioned steps:
- BizTalk Isolated Host Users
- BizTalk Server Administrators
- BizTalk Server B2B Operators
- BizTalk Server Operators
- BizTalk Bam Portal Users
- SSO Administrators
- SSO Affiliate Administrators
You should end up with the following groups within your “BizTalk Organizational Unit”
Now select the just created “Organizational Unit BizTalk” and two new “Organizational Units” named:
- Service Accounts
- User Accounts
Do this by “right clicking” your “BizTalk Organizational Unit” –> “New” –> “Group” and filling out the required details (ensure to check “Protect container from accidental deletion”). You should end up with the following 2 new “Organization Units” within the “BizTalk” Organizational Unit”
Now select the just created “Organizational Unit Service Accounts” and add the following “Users”
- srvc-bts-trusted
- srvc-bts-untrusted
- srvc-bts-sso
- srvc-bts-rule-engine
- srvc-bts-bam
- srvc-bts-bam-ns
- srvc-bts-bam-ap
[Repeat the following steps for each new “User” mentioned above]
Do this by “right clicking” your “Service Accounts Organizational Unit” –> “New” –> “User”
Fill out the “First Name”, “Full Name”, “User logon name” and press “next”
Assign a “Password”, ensure to uncheck “User must change password at next logon” and ensure to check “User cannot change password” and check “Password never expires”. Once done select “Next” and “Finish”
Eventually you should end up with the following users within your “Service Accounts Organizational Unit”
Now select the “Organizational Unit User Accounts” and add the following “Users”
- usr-bts-install
- usr-bts-admin
- usr-bts-operator
- usr-bts-b2b-operator
- usr-bts-sso-admin
- usr-bts-sso-affiliate
[Repeat the following steps for each new “User” mentioned above]
Do this by “right clicking” your “User Accounts Organizational Unit” –> “New” –> “User”
Fill out the “First Name”, “Full Name”, “User logon name” and press “next”
Assign a “Password”, ensure to uncheck “User must change password at next logon” and ensure to check “User cannot change password” and check “Password never expires”. Once done select “Next” and “Finish”
Eventually you should end up with the following users within your “User Accounts Organizational Unit”
Setting up Sql Server Organizational Unit
Now it’s time to set up the SQL Server Organizational Unit; this will be done exactly the same way as mentioned in “Setting up BizTalk Server Organizational Unit”. Below I will summarize what to create.
Add new organizational unit “Sql Server”
Within the “SQL Server” organizational unit add new organizational unit named “Service Accounts”
Add the following user accounts to the Organizational unit “Service Accounts”
- srvc-sql-agent
- srvc-sql-engine
- srvc-sql-analysis
- srvc-sql-reporting
- srvc-sql-integration
Adding users to designated security groups
Well we are almost there. Next thing on our list is to assign the created users to the correct Security group. For this you will need to open your previously created “BizTalk Organizational Unit”.
Further instructions on how to achieve this, are listed below; sorted by Security Group
Group: BizTalk Application Users
Right click on the “Biztalk Application Users group” and select properties, select the “members tab” and then press “Add…”
Now select “Advanced…”
Ensure that your location is set to your domain, and in the “Common Queries” section add the value “srvc-bts” in the “Name starts with” textbox and select “Find Now”
Select the following account “srvc-bts-untrusted” and press “OK”
Select “OK”
Select “OK”
Group: BizTalk Isolated Host Users
Repeat the steps as mentioned in “Group: BizTalk Application Users”, but this time you will select the “srvc-bts-trusted” account.
Group: BizTalk Server Administrators
Repeat the steps as mentioned in “Group: BizTalk Application Users”, but this time you will select the following accounts (note; leave the common Queries Filter blank, this way you will see all accounts)
- “Domain Admins” group
- usr-bts-admin “user account”
Group: BizTalk Server B2B Operators
Repeat the steps as mentioned in “Group: BizTalk Application Users”, but this time you will select the following accounts (note; leave the common Queries Filter blank, this way you will see all accounts)
- “Domain Admins” group
- usr-bts-b2b-operator “user account”
Group: BizTalk Server Operators
Repeat the steps as mentioned in “Group: BizTalk Application Users”, but this time you will select the following accounts (note; leave the common Queries Filter blank, this way you will see all accounts)
- “Domain Admins” group
- usr-bts-operator “user account”
Group: BizTalk Bam Portal Users
Repeat the steps as mentioned in “Group: BizTalk Application Users”, but this time you will select the following accounts (note; leave the common Queries Filter blank, this way you will see all accounts)
Group: SSO Administrators
Repeat the steps as mentioned in “Group: BizTalk Application Users”, but this time you will select the following accounts (note; leave the common Queries Filter blank, this way you will see all accounts)
- “Domain Admins” group
- srvc-bts-sso “service account”
- usr-bts-sso-admin “user account”
Group: SSO Affiliate Administrators
Repeat the steps as mentioned in “Group: BizTalk Application Users”, but this time you will select the following accounts (note; leave the common Queries Filter blank, this way you will see all accounts)
- “Domain Admins” group
- usr-bts-sso-affiliate “user account”
Group: IIS_IUSRS
Open op the “Builtin Organizational Unit” and double click on the “IIS_IUSRS” group
Select the “Members” tab and press “Add…”
Add following accounts (note; leave the common Queries Filter blank, this way you will see all accounts)
- “Domain Admins” group
- “BizTalk Isolated Host Users” group
- srvc-bts-bam “service account”
- srvc-bts-bam-ap “service account”
Closing Note
This sums up part 3 SQL & BizTalk Active Directory Accounts, in part 4 we will make the necessary preparations for the SQL en BizTalk failover Cluster set ups, which will include:
- Installing the required Roles and Features
- Setting up the File Server and assigning storage to the SQL & BizTalk Clusters.
Until next time
Cheers
René

by community-syndication | Apr 3, 2011 | BizTalk Community Blogs via Syndication
I was recently in New Zealand speaking to a couple user groups and I presented a “data enrichment” pattern that leveraged Microsoft’s Workflow Services. This Workflow used the BizTalk Adapter Pack to get data out of SQL Server and then used the BizTalk Mapper to produce an enriched output message. In this blog post, I’ll […]
Blog Post by: Richard Seroter
by community-syndication | Apr 1, 2011 | BizTalk Community Blogs via Syndication
Welcome to the second part of in s multi-series post with regards to the A-Z on how to setup a BizTalk Server 2010 High Availability scenario in a lab environment. In this part we will start with an essential server… Read more ›
Blog Post by: Ren%u00e9 Brauwers
by Rene Brauwers | Apr 1, 2011 | BizTalk Community Blogs via Syndication
Welcome to the second part of in s multi-series post with regards to the A-Z on how to setup a BizTalk Server 2010 High Availability scenario in a lab environment.
In this part we will start with an essential server installation being the basic installation of your Windows Server 2008 r2 Domain Controller, without this server you will not be able to setup your Multi-Server BizTalk High Availability Lab environment.
Well let’s get on with it, shall we.
Prerequisites
A fresh Windows Server 2008 R2 Hyper-V Image; if you need help with Hyper-V go and check out this link http://blogs.virtualizationadmin.com/davis/tag/hyper-v-how-to/
I’d recommend that you use at least the following hardware settings:
Let’s get started by firing up your Hyper-V Image
Personalize your server
Before we start we will change the “Computer Information” by means of assigning it a fixed IP, giving it a logical name.
Open the “Server Manager” and select “Change System Properties”
Add a Computer Description, and afterwards press “Change”
Now change the computer name and press “Ok” and then reboot your Server
Assign the Server Role
Once your server is online again, open up the “Server Manager”, select “Roles” and then click “Add Roles”
Follow the onscreen instructions until you get to the screen in named “Select Server Roles”, select “Active Directory Domain Services” and when asked to add any required features press “Add Required Features” and then press “Next” until you see the Install button. At this point Click on “Install”
Once the installation has ended, press the “close” button
Install Active Directory (1)
At this point we should have all required roles and features installed, which should enable us to proceed with the actual installation of the “Active Directory Domain”
Now go to “Start” and in the search bar type “dcpromo” and hit “enter”
On the welcome screen, press “next” until you reach the “Choose a Deployment Configuration” screen. Select “Create a new domain in a new forest” and press “next”
Now enter a Fully Qualified Name for the to be created Root Domain and once done select “next” (in my scenario I’ve chosen “lab.motion10.com”)
Now you will have to choose the “Forest Functional Level”, as we are setting up our environment using only Windows Server 2008R2 servers, we can select the “Windows Server 2008 R2 “ level. Once done, select “next”
After a little while you will be presented with the “Additional Domain Controller Options” screen in which you should check the “DNS server” option. Once done, select “next”
In case your computer has a Dynamic assigned IP, you will be presented the option to choose between the option to “leave it as it be” or “manually assign an IP”. In our scenario we will assign a Fixed IP
Assign a Fixed IP to your Domain Controller
In order to assign a fixed IP you will need to make changes to your “Internet Network Adapter”. In order to do so, “click” on “Start” and in the search box type “network and sharing center “ and hit “enter”
Now “click” on “Change adapter settings”
Now you will be presented with an overview of the available network adapters, make sure you choose the adapter which you configured in your Hyper-V “Virtual Network Manager” as being of the type “Internal”, in my case that would be the adapter named Internal (more info can be read here: http://www.howtonetworking.com/server/hyper-v15.htm)
Select your adapter and “right click” on it and select “properties”.
Now select “Internet Protocol Version 4 (TCP/IPv4) and click on “properties”
Now enter an IP Address and Subnet Mask (leave the other options as they are) and select “ok” and then “close”
Install Active Directory (2)
Go back to the Active Directory Installer, and select “next” again in the “Additional Domain Controller Options” screen.
In case you have multiple Network Adapters and one or more of them are still assigned a Dynamic IP, you will be presented again with the option to choose between the “leave it as it be” or “manually assign an IP”. Well at this point you can select “No” as long as you’ve made sure that the network adapter which you use for your “ Virtual Internal Network” has a Fixed IP.
After a few seconds, you most likely will be presented with an other warning. In my case I’ve chosen to ignore it and selected “yes”
On the next screen, change the settings if you feel like it or leave them as they are. Once done select “next”
Now we are almost at the end of the installation process, but first we have to assign the “Domain Administrator” password viagra a vendre quebec. Enter a password and select “next” and follow it with another selection of the “next” button
At this point Active Directory will be installed, and once finished it will reboot (as I’ve checked the “Reboot on completion” option.
Closing Note
This sums up part 2 installing Active Directory, in part 3 the fun will start as we will configure Active Directory and add all the required SQL Server and BizTalk security groups, user and service accounts.
Until next time
Cheers
René
by community-syndication | Apr 1, 2011 | BizTalk Community Blogs via Syndication
Just a big thank you to everyone involved. And a big congratulations to all other great MVPs that got awarded or re-awarded today.
Wondering what the MVP award is all about? Read more here, I’ve pasted a short part of that site here:
The MVP Award recognizes exceptional technical community leaders from around the world who voluntarily share their deep, real-world knowledge about Microsoft technologies with others.
Now that sounds so much bigger then me, but I wove to do my best to do my part.
Blog Post by: Johan Hedberg
by community-syndication | Mar 31, 2011 | BizTalk Community Blogs via Syndication
In previous post I yesterday I wrote that new BizTalk 2010 exam is out. And you may figure how to prepare as in preparation material nothing is mentioned.Let’s look at what skills are measured. In a nutshell these topics are:
- Configuring messaging architecture (setup, manage ports, configure adapters, implement messaging solutions);
- Developing BizTalk Artefacts (building orchestrations, create schema’s, maps and pipelines);
- Debugging and Exception Handling (debug orchestrations, validate and test artefacts like schema’s, maps, pipelines);
- Integrating Web Services and Windows Communication Foundation (WCF) Services (WCF Adapters);
- Implementing Extended Capabilities (this is the BAM, BRE, RFID and EDI part);
- Deploying, Tracking, and Supporting a BizTalk Solution (Installation in different kinds of scenario’s, deployment of applications, bindings).
You can find a lot of resources that can help in preparation through BizTalk Development Center like the BizTalk tutorials for EAI and EDI. These tutorials can beneficial for preparing on topics Messaging architecture and extended capabilities. There are more video’s and webcasts found here. Another great set of materials to use of preparation are BizTalk Server 2010 Training Kit you can download.To be able to use these materials you will need a BizTalk environment, developer edition can be downloaded for free using documentation to be able to set up an environment. You might have to get OS, database and so on (dependencies for BizTalk) either through MSDN or by downloading evaluation editions. If you need training you could go to local training center to follow a course or go for online training through quicklearn (with possible of sample/demo training for BizTalk Server 2010). For BizTalk 2010 RFID there are also tutorials available. Finally you could browse internet and find recent posts on BizTalk Server 2010, WCF, EDI, etcetera. You will need some time depending on your skill and experience to prepare for this exam. If you do I wish you success and perhaps these links can be useful in your preparation.
Cheers!
Technorati: biztalk server 2010
by community-syndication | Mar 30, 2011 | BizTalk Community Blogs via Syndication
FOREWORD Welcome! Most likely you’ve googled, binged, yahoo-ed in an attempt to find some more information with regards on how to setup a BizTalk High Availability environment. Probably you have run into the same issue, being; not finding a complete… Read more ›
Blog Post by: Ren%u00e9 Brauwers

by Rene Brauwers | Mar 30, 2011 | BizTalk Community Blogs via Syndication
FOREWORD
Welcome! Most likely you’ve googled, binged, yahoo-ed in an attempt to find some more information with regards on how to setup a BizTalk High Availability environment. Probably you have run into the same issue, being; not finding a complete walkthrough covering prepping, installing and configuring the complete environment which includes
Well this is your lucky day; during the next few weeks I’ll be posting a multi-part series covering just all of the above and more. However please be aware that the walkthrough I’ll be posting is intended for a Lab Environment and is not intended to be used one-on-one while setting up your Acceptance or Production environment. Although you will find that most of the walkthroughs will assist you with doing so. So let’s get started with the first Part!
Preparing your Lab environment
Planning is an essential part when you want to create a BizTalk High Availability environment, so please make note of the following ‘recipe’ as it will list the required actions you need to perform in order to successfully set up your BizTalk High Availability Environment.
Global Network Environment overview
Below you will see a global overview with regards to the Lab Environment we will be creating.
As you can see it consists of the following servers:
One of the things you will notice is the fact that we will not use NLB for BizTalk (ah well I might cover this in another separate blog post in the near future). Not using an NLB brings a long some challenges, but more on that in a future post as well.
Groceries
Before we can actually start with installing the servers within our LAB environment, we need to make a list of all the requirements (Groceries) which will be needed; this way we will not run into any problems later on which might cause us to start all over. Note: As we are actually setting up a complete environment, I have chosen to virtualize everything; this includes SQL Server and as you might be aware it is actually not recommended to Virtualize SQL Server; but hey this is a Lab Environment… So what do you actually need?
Physical Machine Requirements
Basic Software Requirements (download from MSDN)
Environment Basic Configuration
The following section will globally explain how to initially set up your servers, and lists other requirements which you should take into account (like IP Addresses)
Basic Configuration for Hyper-V Manager
Basic Virtual Server Configurations
In total we will be creating 6 virtual machines; below you will find an overview on how I configured my different Virtual Servers
Hardware
NIC Configuration
Below information describing how I configured the NIC’s which have been assigned to each and every server
<a href=”http://blog.brauwers viagra pharmacie france.nl/wp-content/uploads/2011/03/image3.png”>
- External Network Adatper VLAN ID = 1
- In order to have Internet Access; I’ve bridged my actual NIC (on the host OS) with the Virtual ‘External Network Adapter’
IP Number reservations
During the installation & Configuration of the different clusters and servers there will be a need to assign IP Addresses below you will find an overview of all the IP Addresses I’ve used. In total I’ve used 10 IP addresses.
Windows Server 2008R2 IP Configuration
All servers run on Windows Server 2008R2 SP1 Enterprise and are joined to the dev.motion10.com domain. (The next part in these series will exactly explain how to setup a Domain Server). Below an overview of the assigned IP’s off each server.
I’ve only configured the TCP/IPv4 properties of the Internal Network Adapter (see Basic Configuration for Hyper-V Manager) and I disabled TCP/IPv6
Note: all servers will use the 255.255.255.0 Subnet and have 192.168.8.1 configured as default gateway and Preferred DNS Server. The only exception to this is the Domain Server (actually 192.168.1.1) I did not configure a default gateway nor a preferred DNS server for it.
Cluster & Cluster Resource reserved IP Addresses
All servers run on Windows Server 2008R2 SP1 Enterprise and are joined to the dev.motion10 domain. (The next part in these series will exactly explain how to setup a Domain Server). Below an overview of the assigned IP’s off each server.
SQL Server Failover Cluster
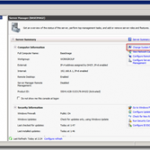
Please note that below mentioned information, at this point, might look like abracadabra but this will be cleared up in one of the future parts which deals with configuring the SQL Failover cluster
Please note: The above screenshot is taken of a different cluster as the one mentioned throughout these articles, but it should give you an expression of what a Failover Cluster looks like
BizTalk Server Failover Cluster
Please note that below mentioned information, at this point, might look like abracadabra but this will be cleared up in one of the future parts which deals with configuring the BizTalk Failover cluster
Please note: The above screenshot is taken of a different cluster as the one mentioned throughout these articles, but it should give you an expression of what a Failover Cluster looks like
Closing Note
Well this part mostly focused on the different ingredients you will need in order to setup your BizTalk High Availability environment. In the next part we will be setting up our DOMAIN Controller and I’ll show how to hook all your servers up to this domain. I hope you enjoyed reading this post, and feel free to leave any comments or remarks. No one is perfect…
Cheers
René