by community-syndication | Sep 5, 2012 | BizTalk Community Blogs via Syndication
The SQL Server agent job “Backup BizTalk Server” will not delete the generated backup files automatically. The job does clear the backup history table in the database, but it will never delete the backup files from the disk. Which will of course result in the disk to fill up eventually and the backup job will fail from then on.
Here’s a simple stored procedure to call from the “Backup BizTalk Server” job in the “Clear Backup History” step. Just follow these steps:
- Open SQL Server management Studio
- Open a new query window and connect to the BizTalkMgmtDb database
- Execute this script to add a new stored procedure called sp_DeleteBackupHistoryAndFiles
USE [BizTalkMgmtDb]
GO
SET ANSI_NULLS ON
GO
SET QUOTED_IDENTIFIER ON
GO
ALTER PROCEDURE [dbo].[sp_DeleteBackupHistoryAndFiles] @DaysToKeep smallint = null, @UseLocalTime bit = 0

AS
 BEGIN

 set nocount on

  IF @DaysToKeep IS NULL OR @DaysToKeep <= 0
  RETURN

     /*
        Only delete full sets
        If a set spans a day such that some items fall into the deleted group and the other don't don't delete the set

        Delete history only if history of full Backup exists at a later point of time
        why: history of full backup is used in sp_BackupAllFull_Schedule to check if full backup of databases is required or not.
        If history of full backup is not present, job will take a full backup irrespective of other options (frequency, Backup hour)

    */

  declare @PurgeDateTime datetime

  if (@UseLocalTime = 0)
    set @PurgeDateTime = DATEADD(dd, -@DaysToKeep, GETUTCDATE())
  else
    set @PurgeDateTime = DATEADD(dd, -@DaysToKeep, GETDATE())

  DECLARE DeleteBackupFiles CURSOR

  FOR SELECT 'del "' + [BackupFileLocation] +  case right(BackupFileLocation,1) when '\' then '' else '\' end + [BackupFileName] + '"' FROM [adm_BackupHistory] [h1]
    WHERE     [BackupDateTime] < @PurgeDateTime
    AND    [BackupSetId] NOT IN ( SELECT [BackupSetId] FROM [dbo].[adm_BackupHistory] [h2] WHERE [h2].[BackupSetId] = [h1].[BackupSetId] AND [h2].[BackupDateTime] >= @PurgeDateTime)
    AND EXISTS( SELECT TOP 1 1 FROM [dbo].[adm_BackupHistory] [h2] WHERE [h2].[BackupSetId] > [h1].[BackupSetId] AND [h2].[BackupType] = 'db')

  DECLARE @cmd varchar(400)

  OPEN DeleteBackupFiles

   FETCH NEXT FROM DeleteBackupFiles INTO @cmd

  WHILE (@@fetch_status <> -1)
  BEGIN
            IF (@@fetch_status <> -2)
            BEGIN

                        EXEC master.dbo.xp_cmdshell @cmd, NO_OUTPUT

                        delete from [adm_BackupHistory] WHERE CURRENT OF DeleteBackupFiles

                        print @cmd
            END

            FETCH NEXT FROM DeleteBackupFiles INTO @cmd
  END

  CLOSE DeleteBackupFiles

  DEALLOCATE DeleteBackupFiles

  END
- 5.Modify the “Clear Backup History” step of the Backup BizTalk Server job to call sp_DeleteBackupHistoryAndFiles, instead of calling the stored procedure sp_DeleteBackupHistory
- Make sure xp_cmdshell for the SQL Server instance is enabled. this will be disabled by default. To enable this, execute following SQL script:
EXEC master.dbo.sp_configure 'show advanced options', 1

RECONFIGURE

EXEC master.dbo.sp_configure 'xp_cmdshell', 1

RECONFIGURE
This stored procedure is made for BizTalk Server 2010.
Because with the release of BizTalk 2010 there have been changes to the sp_DeleteBackupHistory stored procedures. They added a parameter to the stored procedure to use local time and changed the query to prevent the deletion of the history from the last full backup set forward.
For older versions of BizTalk you should use this script instead:
CREATE PROCEDURE [dbo].[sp_DeleteBackupHistoryAndFiles] @DaysToKeep smallint = null
AS
BEGIN
set nocount on
  IF @DaysToKeep IS NULL OR @DaysToKeep <= 0
  RETURN
/*
  Only delete full sets
  If a set spans a day such that some items fall into the deleted group and the other doesn't, do not delete the set
*/

DECLARE DeleteBackupFiles CURSOR
FOR SELECT 'del "' + [BackupFileLocation] + '\' + [BackupFileName] + '"' FROM [adm_BackupHistory]
WHERE  datediff( dd, [BackupDateTime], getdate() ) >= @DaysToKeep
AND [BackupSetId] NOT IN ( SELECT [BackupSetId] FROM [dbo].[adm_BackupHistory] [h2] WHERE [h2].[BackupSetId] = [BackupSetId] AND datediff( dd, [h2].[BackupDateTime], getdate() ) < @DaysToKeep )
DECLARE @cmd varchar(400)
OPEN DeleteBackupFiles
FETCH NEXT FROM DeleteBackupFiles INTO @cmd
WHILE (@@fetch_status <> -1)
BEGIN

            IF (@@fetch_status <> -2)
            BEGIN
                        EXEC master.dbo.xp_cmdshell @cmd, NO_OUTPUT
                        delete from [adm_BackupHistory] WHERE CURRENT OF DeleteBackupFiles
                        print @cmd
            END

            FETCH NEXT FROM DeleteBackupFiles INTO @cmd
END

CLOSE DeleteBackupFiles
DEALLOCATE DeleteBackupFiles
  END
GO
Source: http://www.biztalkbill.com/Home/tabid/40/EntryId/81/Update-to-Stored-Procedure-to-delete-Backup-BizTalk-Server-SQL-Agent-backup-files.aspx
by stephen-w-thomas | Sep 5, 2012 | Stephen's BizTalk and Integration Blog
Are you experienced with Microsoft Azure? Have you tried the Free 90-Day trial? Have you activated the Virtual Machine Preview Feature? Are you up and running with BizTalk Server 2010 R2 CTP in an Azure Virtual Machine?
If you answered NO to any of these questions then this video is for you!
If you are a BizTalk Developer and you are not using or looking at Microsoft Azure now is a great time to jump into what Azure has to offer!
Why? Because with the Azure Hosted Virtual Machines the days of downloading the right SQL version, Visual Studios version, CAB package, and other prerequisites are OVER! All the time consuming work has been done for you. All you need to do is select the BizTalk Gallery image and be on your way to running BizTalk in a dedicated. isolated environment.
This video is a follow up to my blog post yesterday on Setting Up BizTalk 2010 R2 CTP in an Azure Virtual Machine using the Gallery.
This video walks through the following:
- Creating a new Azure 90-day Free Trial Account
- Adding the Virtual Machine Preview Feature to your new account
- Creating a new Virtual Machine running BizTalk Server 2010 R2 CTP
- Downloading the Remote Desktop connection
- Connecting and using the new Virtual Machine
Watch the video now on YouTube or see below for other play options.
[View:http://www.youtube.com/watch?v=YfdyaZ1hWyI]
Click below to live play the video in your browser or download the video.
by stephen-w-thomas | Sep 4, 2012 | Videos
Are you experienced with Azure? Have you tried the Free 90-Day trial? Have you activated the Virtual Machine Preview? Are you up and running with BizTalk Server 2010 R2 CTP in an Azure Virtual Machine?
If you answered NO to any of these questions then this video is for you!
This video is a follow up to my blog post yesterday on Setting Up BizTalk 2010 R2 CTP in an Azure Virtual Machine using the Gallery.
This video walks through the following:
- Creating a new Azure 90-day Free Trial Account
- Adding the Virtual Machine Preview Feature to your new account
- Creating a new Virtual Machine running BizTalk Server 2010 R2 CTP
- Downloading the Remote Desktop connection
- Connecting and using the new Virtual Machine

by community-syndication | Sep 4, 2012 | BizTalk Community Blogs via Syndication
Since a couple of days Microsoft enabled Windows Azure users to create Virtual Machines, which are based on BizTalk 2010 R2 CTP. This is great, because it offers those users to have a preview at that release, combined with some of the new related products, like SQL Server 2012 and .NET 4.5.
However, given the screenshot below, which was taken from the BizTalk 2010 R2 Installation Wizard, it looks like Microsoft expected to release the next version of Visual Studio sooner 🙂

by stephen-w-thomas | Sep 3, 2012 | Stephen's BizTalk and Integration Blog
BizTalk 2010 R2 CTP is now publicly available as a template inside the Azure Virtual Machine Gallery. BizTalk 2010 R2 CTP supports Windows 8, Windows 8 Server, SQL 2012, and Visual Studio 2012 (this is the only supported version of Visual Studios).
What does having a Virtual Machine Gallery for BizTalk mean to you? If you have an Azure account you can be up and running with BizTalk 2010 R2 CTP in no time at all. Even if you do not have an account yet – it is simple to get a free 90-day trial. Here is what you need to do.
What you need:
- Windows Live Account – to log into Azure
- Mobile Phone (land line might work also) – to receive a verification code
- Valid Credit Card – to check identity, nothing will be charged to the card
Disclaimer: Links and images are valid as of 9-3-2012 and for a US based account sign up.
If you already have an Azure Account go to Step 2.
Step 1: Sign up for a free 90-day Azure trial account
1. Go to: http://www.windowsazure.com/en-us/pricing/free-trial/
2. Click on the “try it free*” green box in the top left of the page
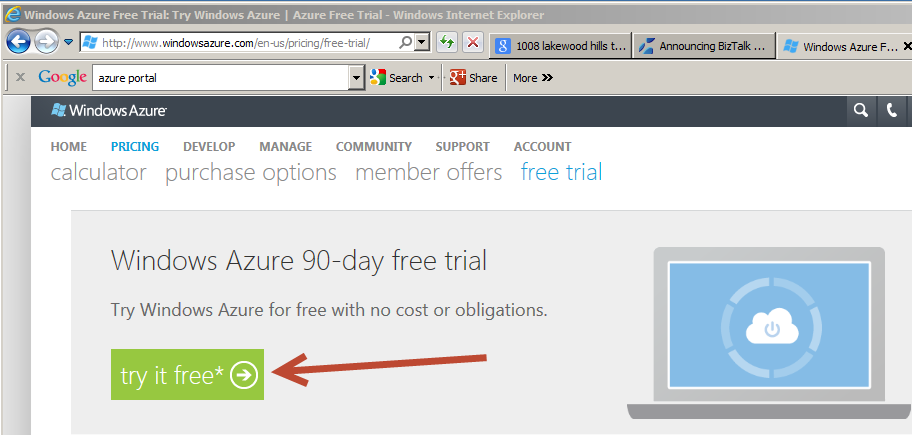
3. Sign in with your Windows Live Account
4. If you are new to Azure, you should get presented with a 90-Day Free Trial offer that includes Cloud Services, Storage, SQL Database, Data Transfer, and Websites. You will need a valid credit card and mobile phone to activate this trial.
5. Click on the arrow on the bottom right to continue to the next screen.
6. On this screen you will be asked to validate your mobile phone number. This can be done via text or voice. Click “Verify Code” once you enter the code to continue. Once validated, click the arrow on the bottom right to continue.
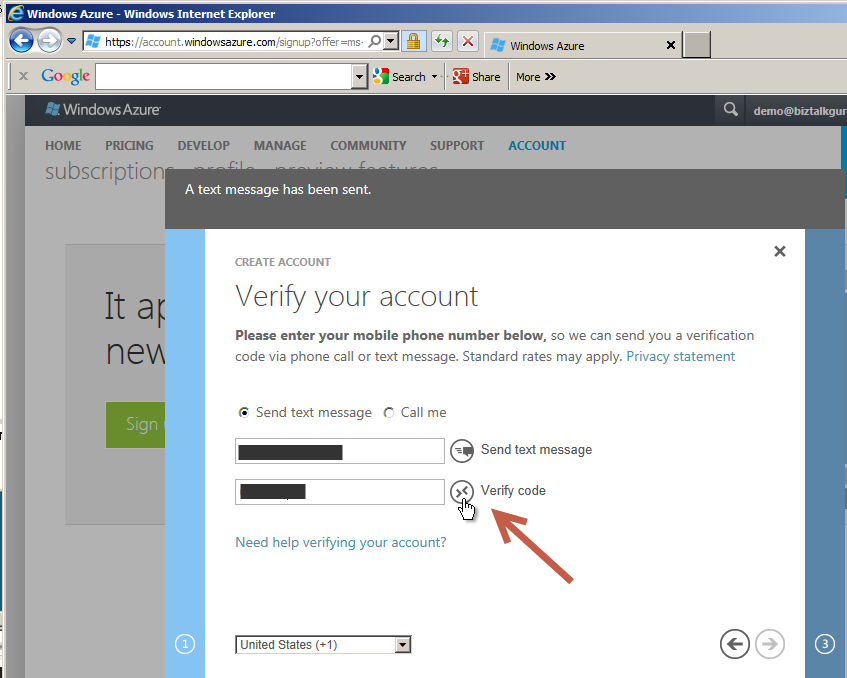
7. The next screen asks for credit card details. This is used for identification purposes. Enter your credit card details and check the arrow on the bottom right to continue.
8. In a few moments your subscription will be activated and you will be re-directed to the Main Azure Account page.
If you have already enabled Virtual Machine Preview go to Step 3.
Step 2: Enable Virtual Machine Preview for your Azure Account
1. As of this blog post, Virtual Machines are in Preview mode. This means it is not full production so strange things can happen like services can go up and down more often, but you are not charged for the features. Because of this, Virtual Machines need to be enabled for a specific subscription.
2. On the Main Azure Account page, click on the “preview features” link on the top middle of the screen.
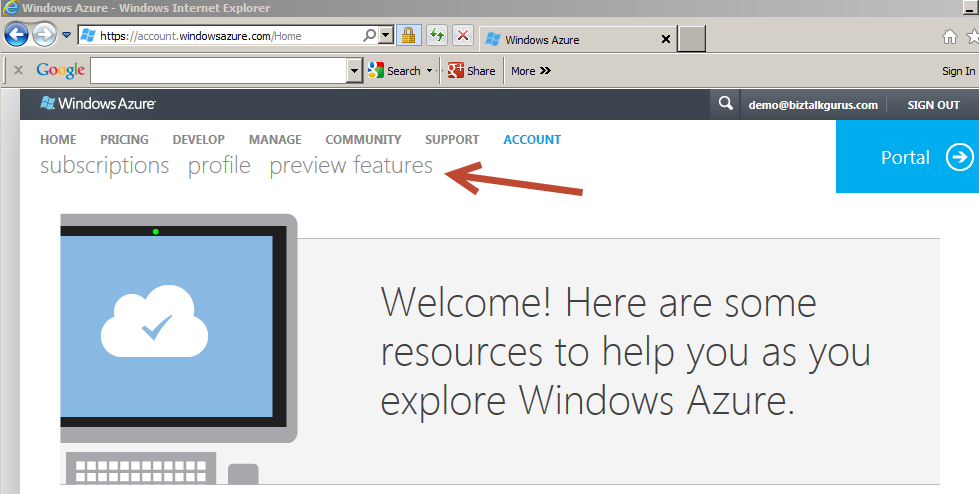
3. This lists all the available features that are in preview mode. Scroll down to the Virtual Machines & Virtual Networks section. Click on “try it now”. You will get a pop-up to select what subscription to apply this to. Select the 3-Month Trial Subscription. If you have more than one subscription, you need to enable Virtual Machines on each of the subscriptions you want to use them on.
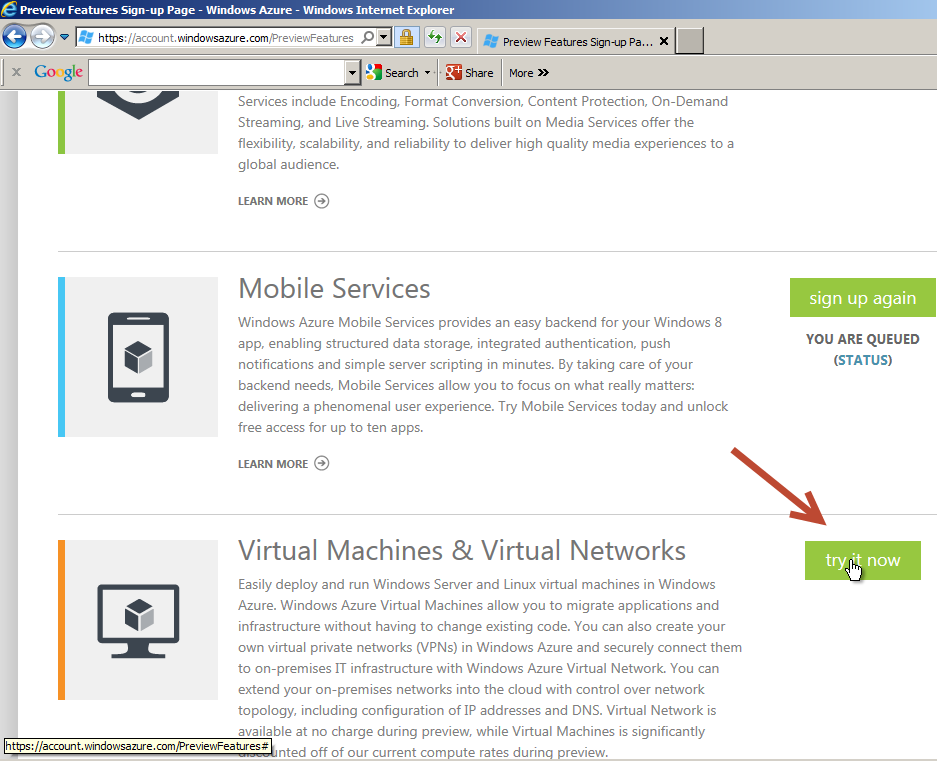
4. It will take a few moments for the process to complete. Once completed, the page will refresh. Select “Portal” on the top right.
5. You will see a screen about being redirected to the Preview Portal. This is the correct place to manage Virtual Machines. You will want to get back to classic Azure Portal for features already live in production like the Service Bus.
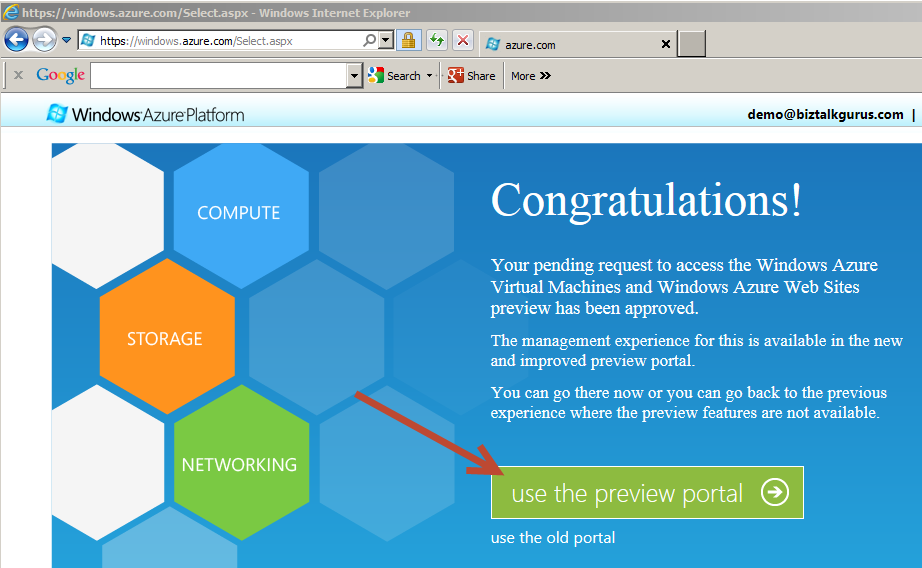
Step 3: Create a BizTalk 2010 R2 CTP Virtual Machine
1. Once you are inside the Preview Portal, select Virtual Machines on the left. Then select “Create A Virtual Machine”.
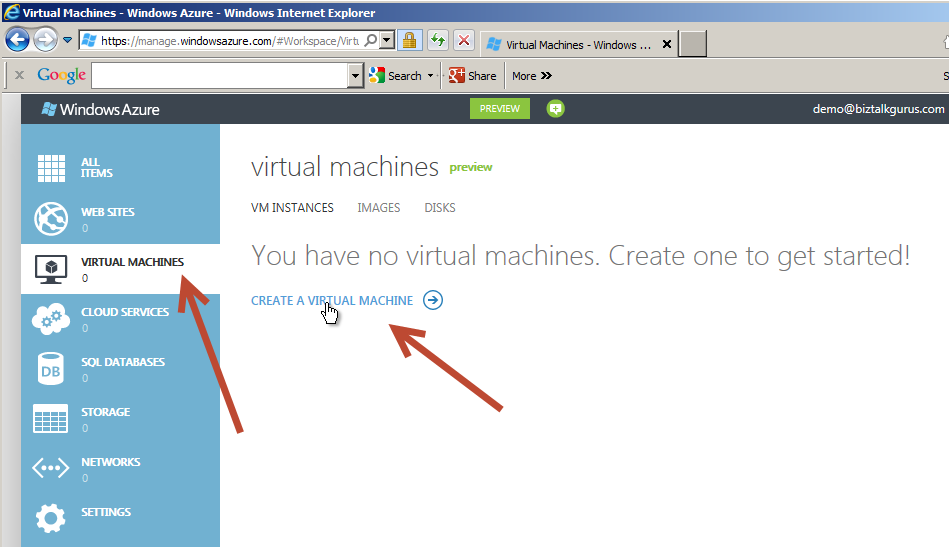
2. On the New Virtual Machine window, select “From Gallery”.
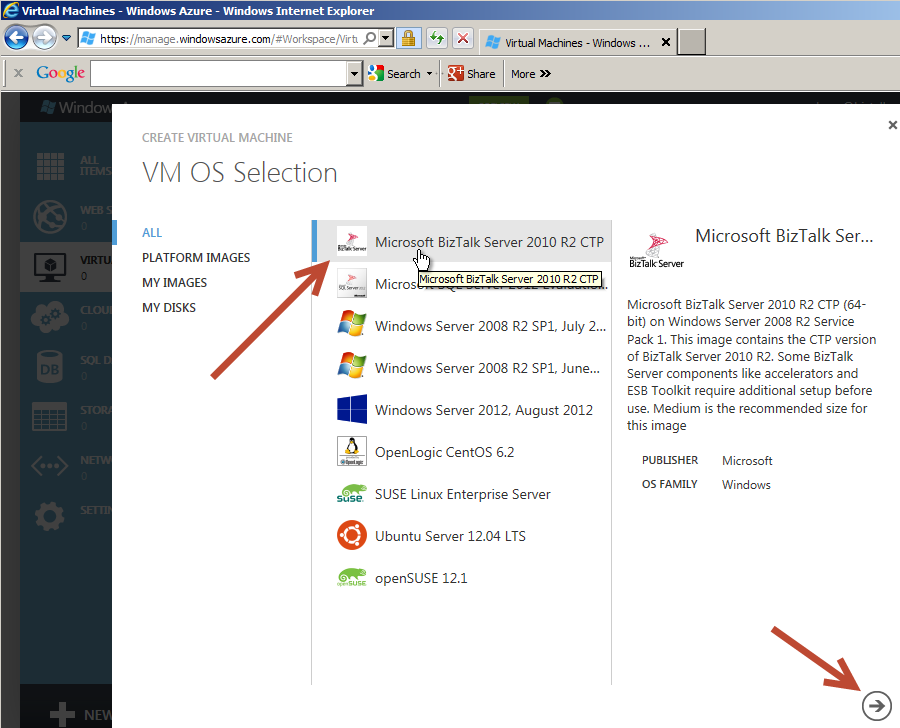
3. The Gallery lists pre-built templates for quickly creating Virtual Machines. Select “Microsoft BizTalk Server 2010 R2 CTP” and click the arrow on the bottom right to continue.
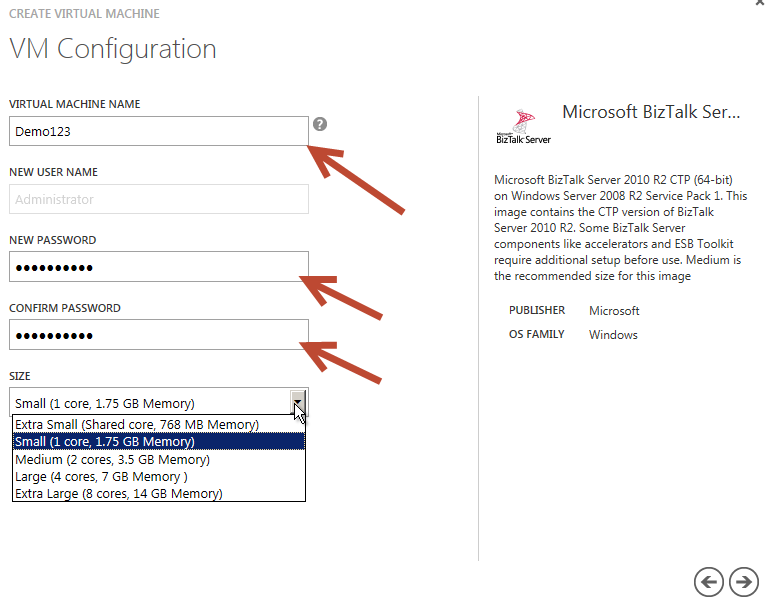
4. The next screen allows you to set the Virtual Machine Name, Admin Password, and select the Size. In this case, the name is Demo123. This does not need to be globally unique to all the Microsoft Virtual Machines. Since this is Preview, you are not charged for usage so the default Small Size is ok for now. Later, once you need to pay for usage you might want to adjust this as needed. Select the arrow on the bottom right to continue.
5. On the next screen, you need to set the Globally Unique DNS name. This is how you will connect to the Virtual Machine using Remote Desktop. In this case, the name is “demo123swt”. You also have the option to set the Region for the Virtual Machine if the default is not the best for you. Click the arrow on the bottom right to continue.
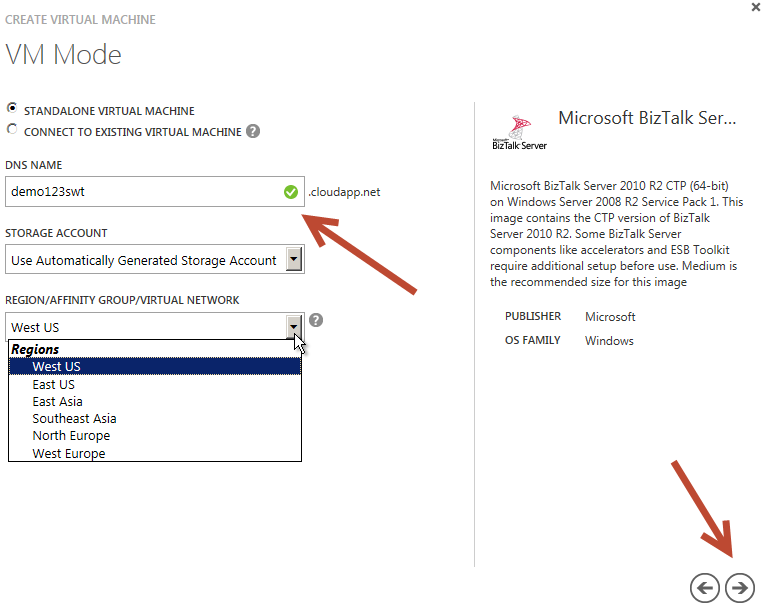
6. On the VM Options page, just leave the default of None. This setting could allow your Virtual Machine to be replicated to other datacenters, but since this is just a demo we want to keep it simple. Remember, once live you would be charged more for replication and redundancy. Click the check mark on the bottom right to complete the Virtual Machine setup.
7. You will now be redirected back to the Preview Portal page while the Virtual Machine is provisioned. This will take several minutes. Once complete, click on the Virtual Machine row and it should start automatically. If not, use the Restart link at the bottom to start the Virtual Machine. When the Connect link is available, click on it. This will download a pre-configured Remote Desktop link to this Virtual Machine.
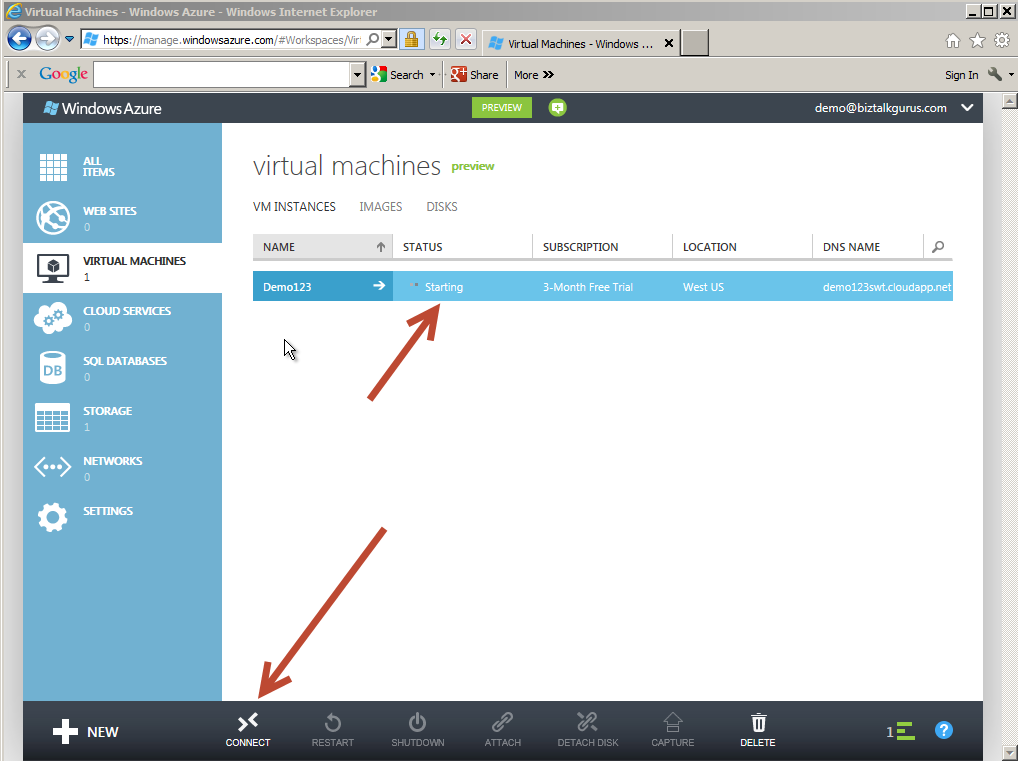
8. Launch the Remote Desktop connection to connect to the Virtual Machine. Use the Admin Password you created in item 4 above.
9. Once you connect to the Virtual Machine, BizTalk 2010 R2 CTP is installed but not configured. You will need to run through the configuration to create your BizTalk Server runtime environment. SQL 2012 and Visual Studios 2012 are already installed on your Virtual Machine. The design time of BizTalk inside Visual Studios is ready for use without any configuration.
10. That is it! Now you can enjoy your BizTalk 2010 R2 CTP Virtual Machine!
Watch for a quick How-To Video of setting up a BizTalk Sever 2010 R2 CTP Virtual Machine coming in the next few days.

by community-syndication | Sep 2, 2012 | BizTalk Community Blogs via Syndication
I’ve been working on a BizTalk solution which includes a scenario in which I am receiving envelope messages that are to be debatched in a receive pipeline using an XML Disassembler pipeline component, correlating the debatched messages which will be of different message types to relevant orchestrations where they will once again be batched up […]
Blog Post by: Johann

by community-syndication | Sep 1, 2012 | BizTalk Community Blogs via Syndication
Some colleagues of mine called me over for some advice on a problem they were having in a BizTalk orchestration the other day. They were using a message assignment shape to set the bodies and context properties for a multi-part message which contained two parts which were to be sent out over SMTP on a […]
Blog Post by: Johann
by community-syndication | Aug 31, 2012 | BizTalk Community Blogs via Syndication
So over the years I’ve had my share of “meltdowns” or failures in BizTalk. I pretty much feel like I’ve seen them all, and I would like to contribute some of the errors and solution to this problems, call it a teaser since there is a lot, this will be the first post in a
Blog Post by: Tord Glad Nordahl

by community-syndication | Aug 31, 2012 | BizTalk Community Blogs via Syndication
I have just been looking at http://blogs.msdn.com/b/biztalk_server_team_blog/archive/2012/08/29/getting-started-with-biztalk-server-2010-r2-ctp-in-windows-azure-virtual-machines.aspx to understand some of the new features. I am not going to wax on about any of the new features here because other people are already doing a good job at this (See http://blogs.msdn.com/b/biztalk_server_team_blog/archive/2011/12/08/biztalk-server-2010-r2.aspx) but I want to highlight how refreshing it is to preview a new product […]
Blog Post by: mbrimble
by community-syndication | Aug 31, 2012 | BizTalk Community Blogs via Syndication
When choosing a color in the properties window in visual studio, there is the possibility to choose from so called System Colors. An example for this is the color ‘Window’, which is the default for a textbox.
Now, I tried to set the BackColor of a Textbox programmatically back to this system color ‘Window’. Turned out not to be as easy as I thought it would be.
I tried things like Color.? … I hoped to find the color in this namespace, or even a System subsection for the systemcolors. Nothing to be found however.
Nor was there any namespace like System.Color to be found.
But how can these system colors be set from C# code than?
Well, one way turned to be using this command:
System.Drawing.Color.FromKnownColor(KnownColor.Window)
And, as you’d expect, the KnownColor enumeration contains all of the other user-definable colors.
Or even an easier method to achieve this is
System.Drawing.SystemColors.Window

