
by community-syndication | Sep 25, 2012 | BizTalk Community Blogs via Syndication
I’ve been doing some work with APIs lately and finally had the chance to dig into the ASP.NET Web API a bit more. While it’s technically brand new (released with .NET 4.5 and Visual Studio 2012), the Web API has been around in beta form for quite a bit now. For those of us who […]
Blog Post by: Richard Seroter
by community-syndication | Sep 25, 2012 | BizTalk Community Blogs via Syndication
| One of the most famous wiki engines is MediaWiki; You may not know its name, but you may know Wikipedia which is running it! |
Un des moteurs de wiki les plus connus est MediaWiki. Vous ne connaissez peut-%u00eatre pas son nom, mais vous pouvez avoir entendu parler de Wikipedia qui l’utilise comme moteur ! |
| Let’s see how to install such a Wiki on Windows Azure Web Sites. |
Voyons comment installer un tel Wiki sur Windows Azure Web Sites. |
| The free open source software can be downloaded from the following Url: |
Ce logiciel open source et gratuit peut %u00eatre t%u00e9l%u00e9charg%u00e9 depuis l’URL suivante : |
http://www.mediawiki.org/wiki/Download
| The file is mediawiki-1.19.2.tar.gz which can be uncompressed on Windows with a tool like 7-Zip. So let’s unblock and ungzip the file. |
Le fichier est mediawiki-1.19.2.tar.gz qui, sur Windows, peut %u00eatre d%u00e9compress%u00e9 avec l’outil 7-Zip. D%u00e9blocons et d%u00e9compressons le fichier t%u00e9l%u00e9charg%u00e9. |
| Once I get the files locally, I can upload to a Windows Azure Web Site. For that, I need to create a new Windows Azure Web Site with a MySql database, by using the http://manage.windowsazure.com Windows Azure portal. |
Une fois que j’ai les fichiers localement, je peux les charger vers une site Web Windows Azure. Pour cela, j’ai besoin de cr%u00e9er un site Windows Azure et sa base MySql, en utilisant le portail Windows Azure %u00e0 http://manage.windowsazure.com. |
| It is possible to reset the deployment credentials. The other parameters are available for copy from the portal. |
Il est possible de r%u00e9initialiser le mot de passe servant au d%u00e9ploiement. Les autres param%u00e8tres de d%u00e9ploiement peuvent %u00eatre copi%u00e9s depuis le portail. |
| Those parameters can be pasted in an FTP client such as FileZilla. I’ll use that tool to copy the PHP files to the newly created Windows Azure Web Site. |
Ces param%u00e8tres peuvent ensuite %u00eatre coll%u00e9s dans un client FTP tel que FileZilla. C’est %u00e0 partir de cet outil que je copierai les fichiers PHP vers le nouveau site Web Windows Azure. |
| It is now possible to navigate to the site. The url can be found in the Windows Azure portal. |
A ce stade, il est possible de naviguer vers le site. L’Url peut %u00eatre trouv%u00e9e dans le portail Windows Azure. |
| the MySql database parameters can be found in the configure tab. |
Les param%u00e8tres de la base MySql sont disponibles dans l’onglet “configure”. |
| The parameters can be copied from the connection string and pasted to the configuration web page |
Les param%u00e8tres peuvent %u00eatre copi%u00e9s de la cha%u00eene de connexion et coll%u00e9s dans la page de configuration |
| This generates a php settings file that I can download |
Cela g%u00e9n%u00e8re un fichier PHP de param%u00e9trage que je peux t%u00e9l%u00e9charger |
| the file should then be uploaded to the site, under the root |
le fichier peut ensuite %u00eatre charg%u00e9 dans le site, juste sous la racine |
| then, I can browse the site |
Je peux ensuite aller sur le site |
| In order to change the logo, besides uploading the file with FTP, PHP code needs to be changed. This can be done very easily by using WebMatrix. |
De fa%u00e7on %u00e0 changer le logo, outre le fait de charger l’image elle-m%u00eame par FTP, il faut changer du code. Cela peut %u00eatre fait tr%u00e8s facilement avec WebMatrix. |
| When asked about local installation, I just click cancel in order to have the remote view only, then I edit the right file with WebMatrix editor and save. |
Quand je me vois poser la question %u00e0 propos d’une installation du site en local, je clique sur “Cancel” (annuler) de fa%u00e7on %u00e0 n’avoir que la vue du site distant. Puis j’%u00e9dite le bon fichier dans WebMatrix avant de sauvegarder. |
| the site is functional. I can start modifying the content of the wiki. |
Le site est fonctionnel. Je peux modifier le contenu du wiki |
Benjamin
Blog Post by: Benjamin GUINEBERTIERE
by community-syndication | Sep 25, 2012 | BizTalk Community Blogs via Syndication
My personal favorite among publishers on integration is celebrating it’s 1000th title. “Join the celebration” and register before September the 30th to receive a suprise gift.
More info on the PacktPub site.
Blog Post by: Mikael Sand

by community-syndication | Sep 24, 2012 | BizTalk Community Blogs via Syndication
Over the past couple years I have had the chance to work with Packt on two BizTalk titles:
- BizTalk: Line of Business Systems Integration
- MCTS: BizTalk 2010 Certification Guide
During this time Packt has been very active in producing high quality BizTalk books but that is not all. They are about to release their 1000th book which is definitely an impressive milestone. As part of this celebration, Packt has a special offer that they have extended to the public. Please click on the image below for more information.
by community-syndication | Sep 24, 2012 | BizTalk Community Blogs via Syndication
This is the third post in a series where I discuss integrating BizTalk 2010 R2 CTP with the Azure Service Bus. In Part 1 I discussed BizTalk receiving a message from a Service Bus Queue. In Part 2 I expanded on the scenario that I described in Part 1 but added support for Brokered Messaging Properties. In this post I am going to switch gears and have BizTalk send messages to a Service Bus Queue.
Scenario
In my previous posts, I have focused on Power Outage scenarios as this is an industry that I am very familiar with. In Post 2, I discussed situations where we may have critical customers and we want Power Outage incident tickets, when critical customers are involved, to have a higher priority. Whenever you are dealing with Critical Customers you generally have dire circumstances for getting their power restored as quickly as possible. Whether you are dealing with Hospital,s where people could die, or Oil and Gas operations where being down may result in revenue losses in the hundreds of thousands of dollars per hour (or more). Often times, Power Delivery organizations will have Major Account Representatives (or MAR for short). These people are responsible for maintaining business relationships with these types of customers to ensure service levels and expectations are being met.
In Part 2, we left off delivering messages to a Work Order Management system that can dispatch these trouble events to field operations staff to address. We created two separate paths: one for regular customers and one for critical customers. The intention of this post is to have the Work Order Management system provide a message back to BizTalk that BizTalk can push to an “Estimated Time of Restore” queue. A MAR account application can then subscribe to these events. Having this information at the MAR’s fingertips will allow them to contact the customer to give them the bad, or good, news.
Service Bus Client
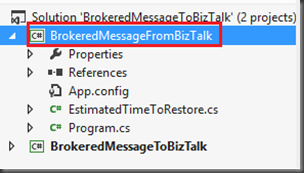
- A new C# console application has been added to our solution from the previous posts called BrokeredMessageFromBizTalk.
- Next we are going to add a class called EstimatedTimeToRestore. It looks an awful lot like our PowerOut class from our previous scenario with the major difference being the RestoreTime property.
using System;
using System.Collections.Generic;
using System.Linq;
using System.Text;
using System.Threading.Tasks;
namespace BrokeredMessageFromBizTalk
{
public class EstimatedTimeToRestore
{
public string CustomerName;
public string PhoneNumber;
public string Address;
public DateTime RestoreTime;
}
}
- Below is the code that I have placed in Program.cs. I do have a section of code commented out that will allow us to write out an instance of EstimatedTimeToRestore to disk. We will want a copy of this file so that we can use it within BizTalk to generate an XSD schema.
using System;
using System.Collections.Generic;
using System.Linq;
using System.Text;
using System.Threading.Tasks;
using System.IO;
using System.Runtime.Serialization;
using Microsoft.ServiceBus;
using Microsoft.ServiceBus.Messaging;
namespace BrokeredMessageFromBizTalk
{
class Receiver
{
const string QueueName = “<queue_name>”;
static string ServiceNamespace = “<your_namespace>”;
static string IssuerName = “owner”;
static string IssuerKey = “<your_key>”;
static void Main(string[] args)
{
//Uncomment this code if you want to write an instance of your data class to disk
//EstimatedTimeToRestore etr = new EstimatedTimeToRestore();
//etr.Address = “1 Calgary Way”;
//etr.CustomerName = “General Hospital”;
//etr.PhoneNumber = “403-1234567”;
//etr.RestoreTime = DateTime.Now;
//using (FileStream writer = new FileStream(“c:/temp/ETRfile.xml”,FileMode.Create, FileAccess.Write))
//{
// DataContractSerializer ser = new DataContractSerializer(typeof(EstimatedTimeToRestore));
// ser.WriteObject(writer, etr);
//}
//Create instance of tokenProvider using our credentials
TokenProvider tokenProvider = TokenProvider.CreateSharedSecretTokenProvider(
Receiver.IssuerName, Receiver.IssuerKey);
Uri uri = ServiceBusEnvironment.CreateServiceUri(“sb”, Receiver.ServiceNamespace, string.Empty);
MessagingFactory messagingFactory = MessagingFactory.Create(uri, tokenProvider);
QueueClient qc = messagingFactory.CreateQueueClient(Receiver.QueueName, ReceiveMode.ReceiveAndDelete);
BrokeredMessage bm;
while ((bm = qc.Receive(new TimeSpan(hours: 0, minutes: 0, seconds: 5))) != null)
{
var data = bm.GetBody<EstimatedTimeToRestore>(new DataContractSerializer(typeof(EstimatedTimeToRestore)));
Console.WriteLine(String.Format(“An estimated time of restore {0} has been received for {1}”, data.RestoreTime, data.CustomerName));
}
}
}
}
- Most of this code is nothing that you haven’t seen before as part of SDKs or other Blog posts out there. The one line that you do need to be aware where we serialize the message that was pulled off of the Queue into an instance of our EstimatedTimeOfResponse class. This allows us to use a typed response. You may recall from Post 1 and 2 that we were using this same Serializer when pushing messages to the Queue so that BizTalk will be able to receive typed messages from the Queue. The process is no different on the receive side.
var data = bm.GetBody<EstimatedTimeToRestore>(new DataContractSerializer(typeof(EstimatedTimeToRestore)));
Creating PowerRestoreQueue
In our previous examples, we had the client application ensure that our Queue existed prior to putting a message in it. This time around we are going to use the Azure Service Bus Portal to perform this operation.
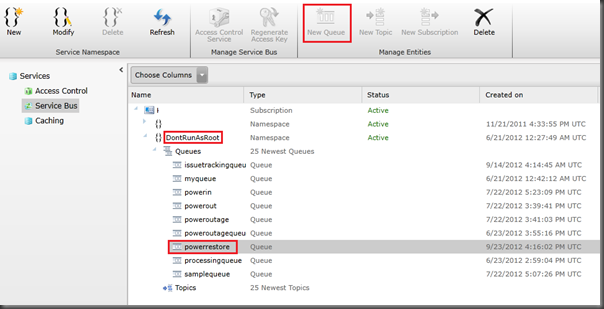
As of this writing, all Service Bus configuration occurs within the “old” portal. To add a queue, select your namespace and then click on the New Queue button. You will then need to provide a name and configure optional properties, if so desired, and then click the OK button. You will then see the queue has been added successfully. For the purpose of this example we are going to use a name of powerrestore.
Modifying BizTalk Solution
- Once again we are going to want to generate a typed XSD schema based upon the sample file that was generated by our Queue Client Code. We can do so by:
- Right mouse clicking on BizTalk project (PowerOutage) – Add – Add Generated Items.
- When prompted, click on the Generate Schemas label and then click the Add button.
- Select Well-Formed XML from the Document type dropdown and then we need to provide the name of our sample file. Click OK to proceed.
- We now need to re-deploy our BizTalk application by right mouse clicking on our Solution and clicking Deploy Solution.
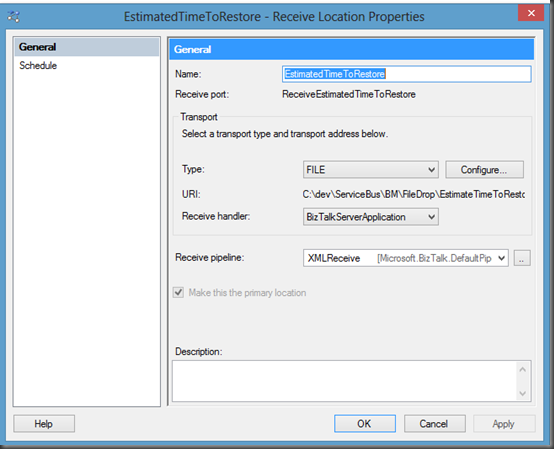
- Within the BizTalk Administration Console we need to now add a Receive Port and Receive location. There isn’t anything super special about this Receive Location. We will use the FILE Adapter, the XML Receive Pipeline and will use a local file system URI. Do make a note of the Receive Port Name as we will use it as a filter in our Send Port that we are about to create.
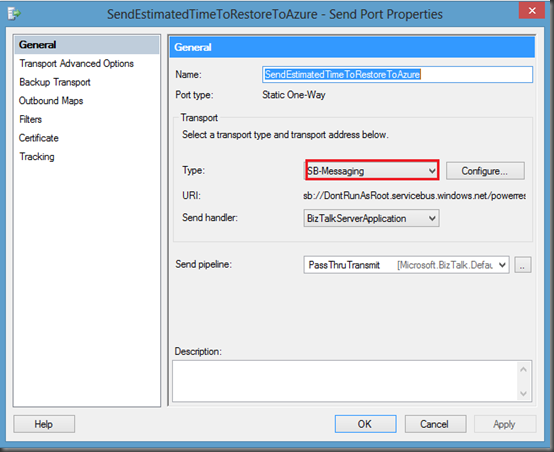
- Create a new Send Port using the new SB-Messaging Adapter and specify the PassThruTransmit Send pipeline.
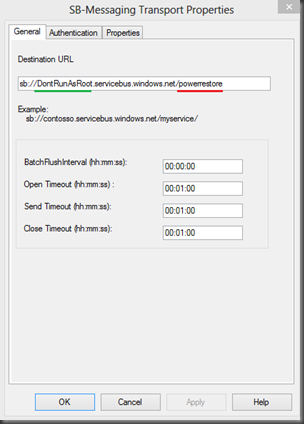
- Click the Configure button. We now need to specify our Destination URL including our Namespace(underlined in green) and the name of our queue (underlined in red).
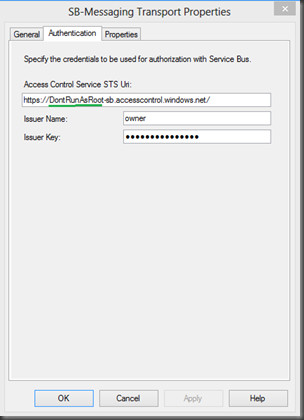
- Next, click the Authentication tab and modify the Access Control STS URI. We need to provide our namespace (underlined in green). Be sure to leave the –sb string after the namespace.
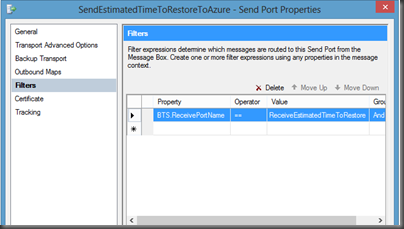
- Lastly, we need to create a Filter so that when BizTalk receives a message from our Receive Port, that we previously configured, that we send it to the Azure Service Bus queue. To do this we need to click on Filters and then select the BTS.ReceivePortName property while specifying our Receive Port Value Name.
Testing our Solution
In order to test our application, we will focus on the BizTalk aspects first.
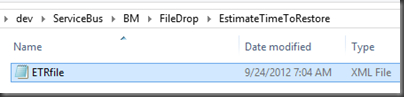
- We will want to drop our sample XML file, that we previously generated from our Queue client, and drop it in our BizTalk receive location folder:
- BizTalk will now pick up this file and deliver it to our Service Bus Queue.
- Next, we can start up an instance of our Queue Client. We will soon discover that our message has been dequeued and that our console application has been updated informing us that an updated Estimated time of restore has been provided for us.

Conclusion
Once again, a very seemless experience when taking your existing BizTalk skills and using them to create Cloud or Hybrid solutions. The only real area that you need to be concerned with is the Serializing of messages that you are putting or pulling from the queue.
This series will continue, I have a few other areas that I plan on exploring related to Azure Service Bus and BizTalk integration. Stay tuned…

by community-syndication | Sep 24, 2012 | BizTalk Community Blogs via Syndication
I had to change a username from mabri0 to svc_biztalk within the DB2 adapter. After I did this the DB2 adapter failed to connect anymore. I tried to test the connection using the Data Access Tool. It gave and error when trying to add the username and password, namely "The username is invalid or contains […]
Blog Post by: mbrimble

by community-syndication | Sep 24, 2012 | BizTalk Community Blogs via Syndication
Last week I read Cloudonomics by Joe Weinman and found it to be the most complete, well-told explanation of cloud computing’s value proposition that I’ve ever read. Besides the content itself, I was blown away by the depth of research and deft use of analogies that Weinman used to state his case. The majority of […]
Blog Post by: Richard Seroter
by community-syndication | Sep 24, 2012 | BizTalk Community Blogs via Syndication
Working with an integration to the ERP system Dynamic NAV from Microsoft I had a request to be able to put large text into a blob (image) field as Dynamic NAV in the version that I was integrating to couldn’t create large (over 250 characters) in other way than in a blob field.
It is easy to put text into the field. You just do a cast to image field like this:
declare @longtext varchar(1000)
set @longtext = ‘very long text and so on….’
update tableX set imagetext = cast(@longtext as image)
where id = 1
If you want to extract the text again from the field is a bit more complicated, but isn’t that hard once you know it. You first have to convert it to varbinary and then you can convert it to varchar. Like this:
select convert(varchar(1000), convert(varbinary(1000),imagetext) from firstdb.dbo.tableX where id = 1
A weird thing that I experienced working in SQL Server Management Studio was if a ran this query when I am working (like “use firstdb”) in the database, the local special characters was returned without any problems. If I instead was in the master database (like “use master”) and executed the query it return some different characters when it came to the locale special characters. As far as I can tell the collation was the same in both the databases.
by community-syndication | Sep 24, 2012 | BizTalk Community Blogs via Syndication
A few weeks back I posted a
story on the TechNet Wiki blog regarding the increasing number of BizTalk community members contributing to the TechNet Wiki. One of them is
Rajasekhar.R, who is a young BizTalk talent from India. So today’s story is on him.
Rajasekhar.R is 21 Years Old, and lives in
Coimbatore(
TamilNadu – South India), which has a beautiful climate all over the year and is located near
OOTY (Queen of the Hills).
He has completed his B.Tech Information Technology (UG) June’11 and started his career in the Technology BizTalk server as a IT Analyst at Cameron Manufacturing India Pvt Ltd since Aug’2011.
At Cameron
Rajasekhar has had the opportunity to work on the entire BizTalk Application Life Cycle; from designing the technical specifications to supporting the application. He has gained experience in installing and configuring the BizTalk server, where he has faced his first challenges. He learned a lot from that first experience.
From that point on he developed complex live financial data processing applications that integrated with SAP, and .Net web services. Finally he learned about deployment of applications and supporting them. He is basically an all-round BizTalk professional now like many of us.
Rajasekhar’s experience with BizTalk and I quote:
“BizTalk Server, it is really a wonderful product by Microsoft and I love to work with it. I have gained a lot of experience working in BizTalk and I got the chance to grasp some knowledge in other technologies like SAP, Web services, and so on.”
and on his learning experience:
“I am a type of person, where I like to fail, because when I fail I have a opportunity to get experienced and expertise in that thing ( which suits for our entire life) FAIL Stands for First Attempt In Learning.”
Rajasekhar in his spare time
likes to chat with his friends, browse social networks and play chess and tennis. He likes to watch Cricket and his favorite team is
INDIA, and favorite player is
Adam Gilchrist (Australia).
I like to thank for his contributions and his time.
by community-syndication | Sep 23, 2012 | BizTalk Community Blogs via Syndication
Introduction
When for example a send port fails in BizTalk, both the message and the service instance show up in the BizTalk Administration Console as being suspended. When the destination is wrong you can change it and resume the message but when the ESB Management Portal is used to monitor the behavior of applications, you cannot resume a message because you can only resubmit a message to an on-ramp. The resubmitted message does not contain any of the context properties of the original message. But is it possible to change the ESB Management Portal a bit so failed messages can be resumed from the ESB Portal?
The following endpoints are suitable for resubmission:
- WCF On-Ramp. This endpoint is the ESB Itinerary Services WCF on-ramp and is available only for XML files. The portal Web.config file defines the URL for this on-ramp.
- SOAP On-Ramp. This endpoint is the ESB Itinerary Services ASMX on-ramp and is available only for XML files. The portal Web.config file defines the URL for this on-ramp.
- Any receive location using the BizTalk HTTP adapter. This option is available for XML files and flat files.
The ESB.ItineraryServices ASMX on-ramp expects an ESB itinerary in the SOAP header. In order to test if the ASMX on-ramp accepts also a partially processed itinerary I used the Itinerary Test Client to submit a message and a partially processed itinerary to this on-ramp.
Steps
First I’ve created an itinerary with 2 messaging services. The Transform Service transforms the incoming message but he Routing Service has a resolver that has a wrong destination folder.
The state of the services in the itinerary are all “Pending” when the itinerary is exported to a file.
The created itinerary can be tested with the Itinerary Test Client that is located in the ESB Toolkit sample applications.
The Esb.Itinerary.Test.exe tool is located in \Source\Samples\Itinerary\Source\ESB.Itinerary.Test\bin\Debug
When the “Enable routing for failed messages” check box in the Send Port is selected, the failed message is picked up by the ESB Management Portal.
The failed itinerary is saved in the “ItineraryHeader” context property off the message.
All the context properties of a failed message are saved in the ContextProperty table in the EsbExceptionDb database. I’ve extracted the itinerary from the database and saved it to a .XML file.
The error occurred in the send port and because a send port is also a service in an itinerary, the attributes in the ServiceInstance element are set to the “DynamicPort” send port.
To make it work I had to change the attributes in the ServiceInstance element and set it to the ESB.Services.Routing service because Dynamic Send Ports do not contain a fixed destination address, only a pipeline.
When the altered itinerary is send to the ESB.ItineraryServices ASMX on-ramp with Itinerary Test Client, the ESB.Services.Routing service is skipped because his state is already “Complete”
Conclusion
So it is possible to resubmit a processed itinerary to an Onramp! You only have to change the ESB Management Portal a bit to make it work,. ( –;
Happy Coding!



