by community-syndication | Oct 10, 2012 | BizTalk Community Blogs via Syndication
The new Windows Azure Management Portal now supports Service Bus management and monitoring. This is one of the new improvements of the new portal. This will a mean a new experience for the user compared to the older management portal based on Silverlight. The functionality remains similar as per creating a namespace, creating queues and topics.
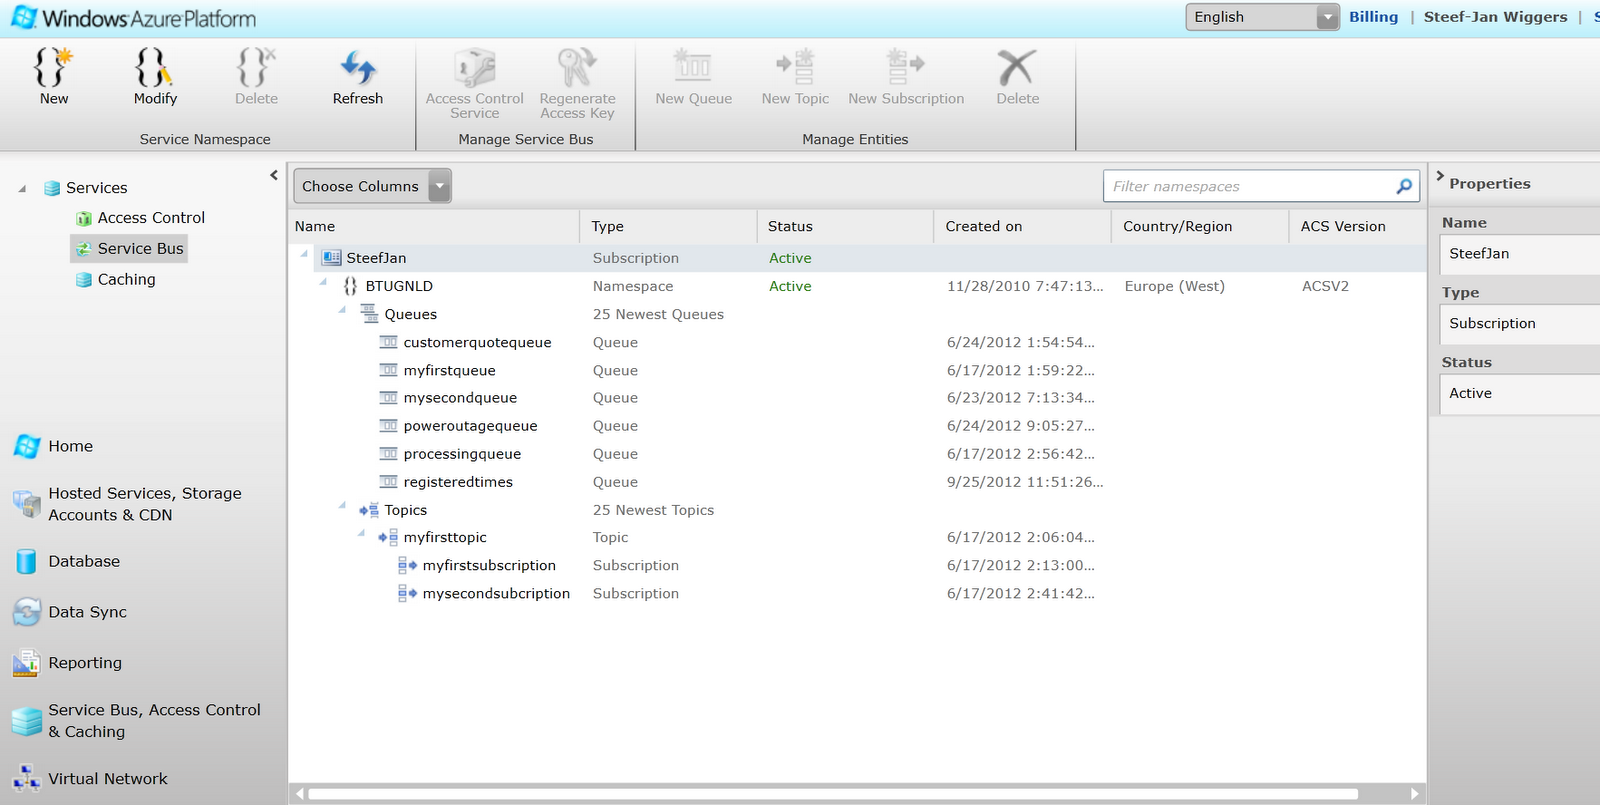
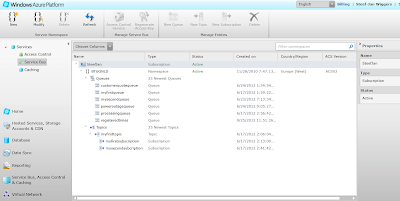
Above you see a screenshot of Service Bus management in the old portal and below a screenshot for the new portal.
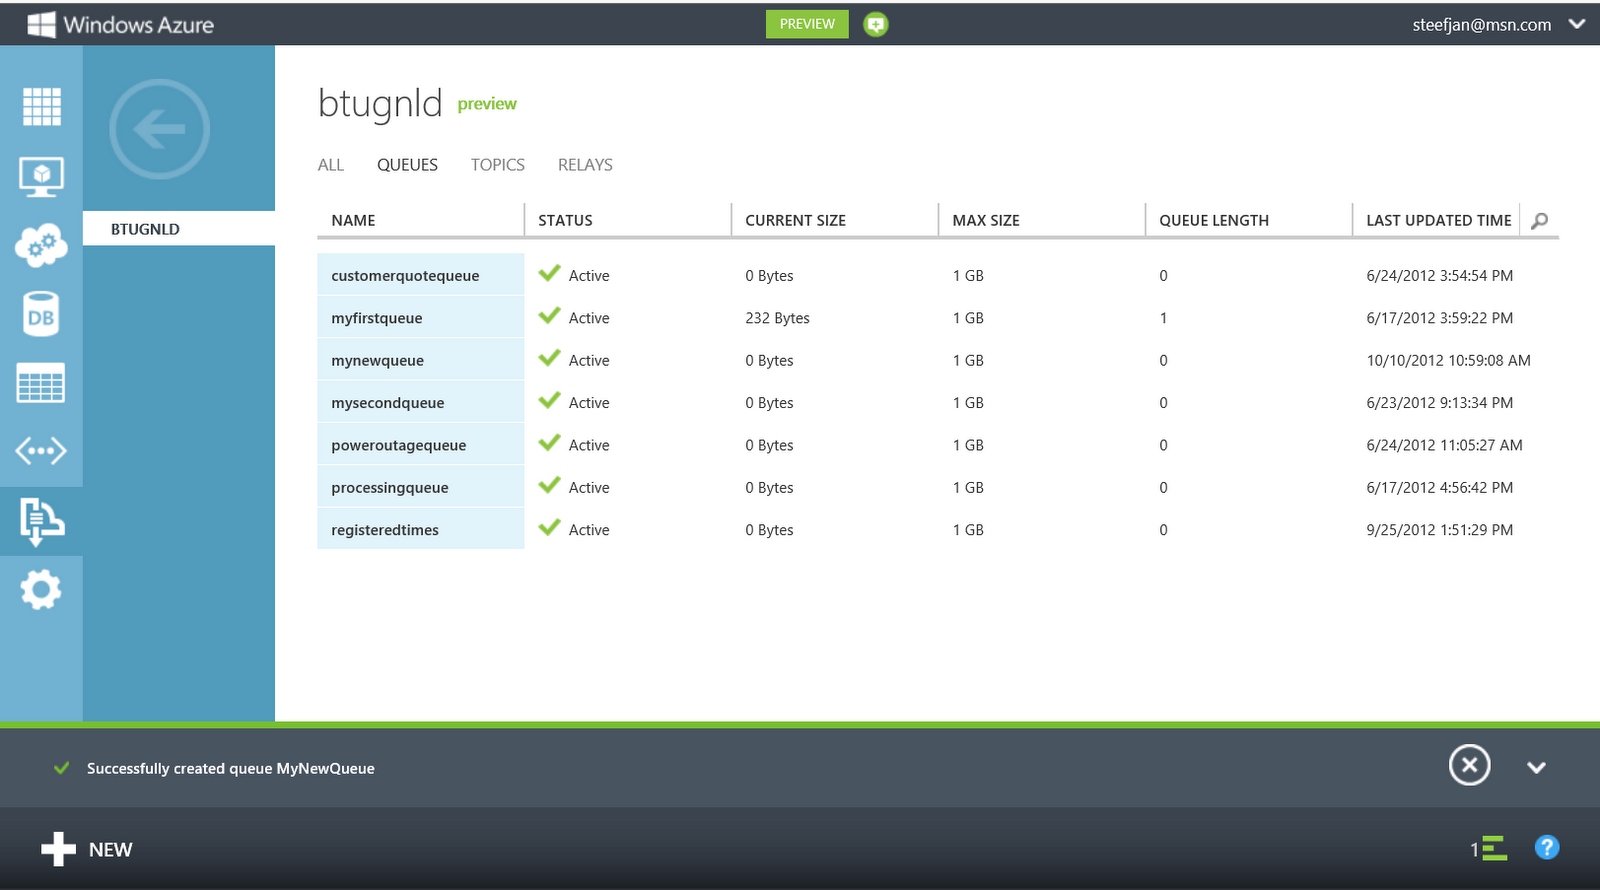
As you can see the look and feel is totally different. The ALL tab gives an overview of all the Queues, Topics, and Relays. Compared to the old portal the relays are now visible. Queues, topics and relays can be viewed separately by clicking the its tab. For instance the relay tab in my case will show the relays.
You will find more on working with relays using the new portal through Trying Out the New Windows Azure Portal Support for Relay Services blog post by Richard Seroter. On each tab you will find + NEW button on the left hand corner below. If you click NEW a dialog will appear.
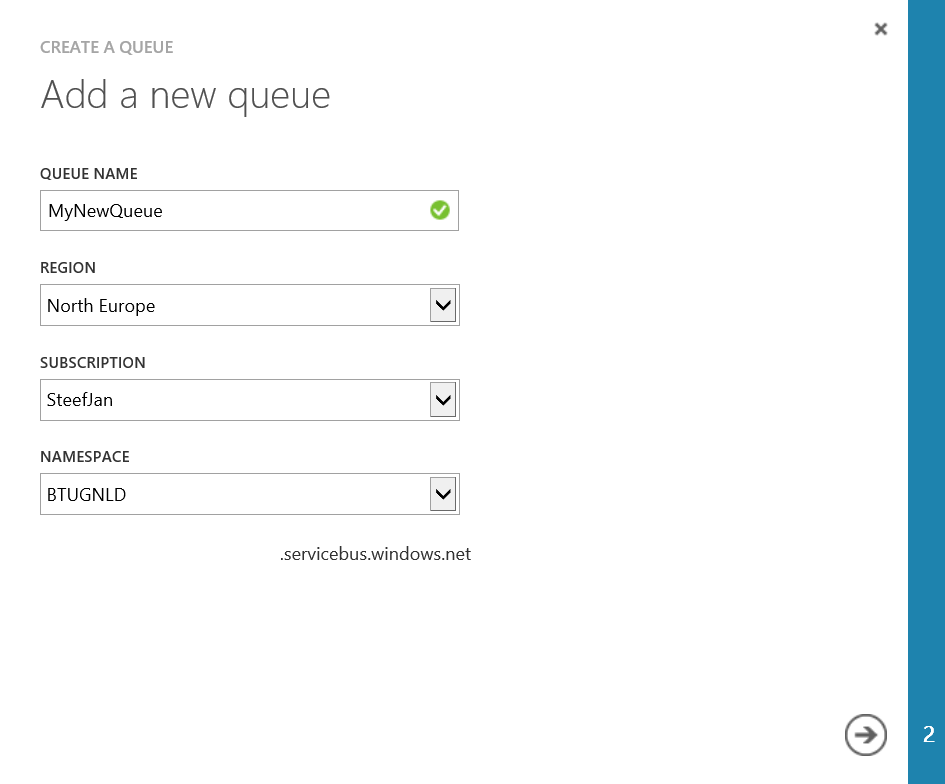
Now you have to ability to create a new queue, topic or relay. You can create a new queue for instance through QUICK CREATE with default settings or CUSTOM CREATE with custom settings. If you for instance want to create a custom queue you can click CUSTOM CREATE. A Wizard will start and you will have to fill in a Queue name, region (i.e. data center), subscription (one you create when signing up for Azure) and Namespace (which can be created through Service Bus service view by clicking CREATE button in menu below).
Next step is configuring the queue by determining the max size, message time to live, move messages to dead letter queue, lock duration, duplication detection and enable session.
If you now click the check mark button the queue will be provisioned.
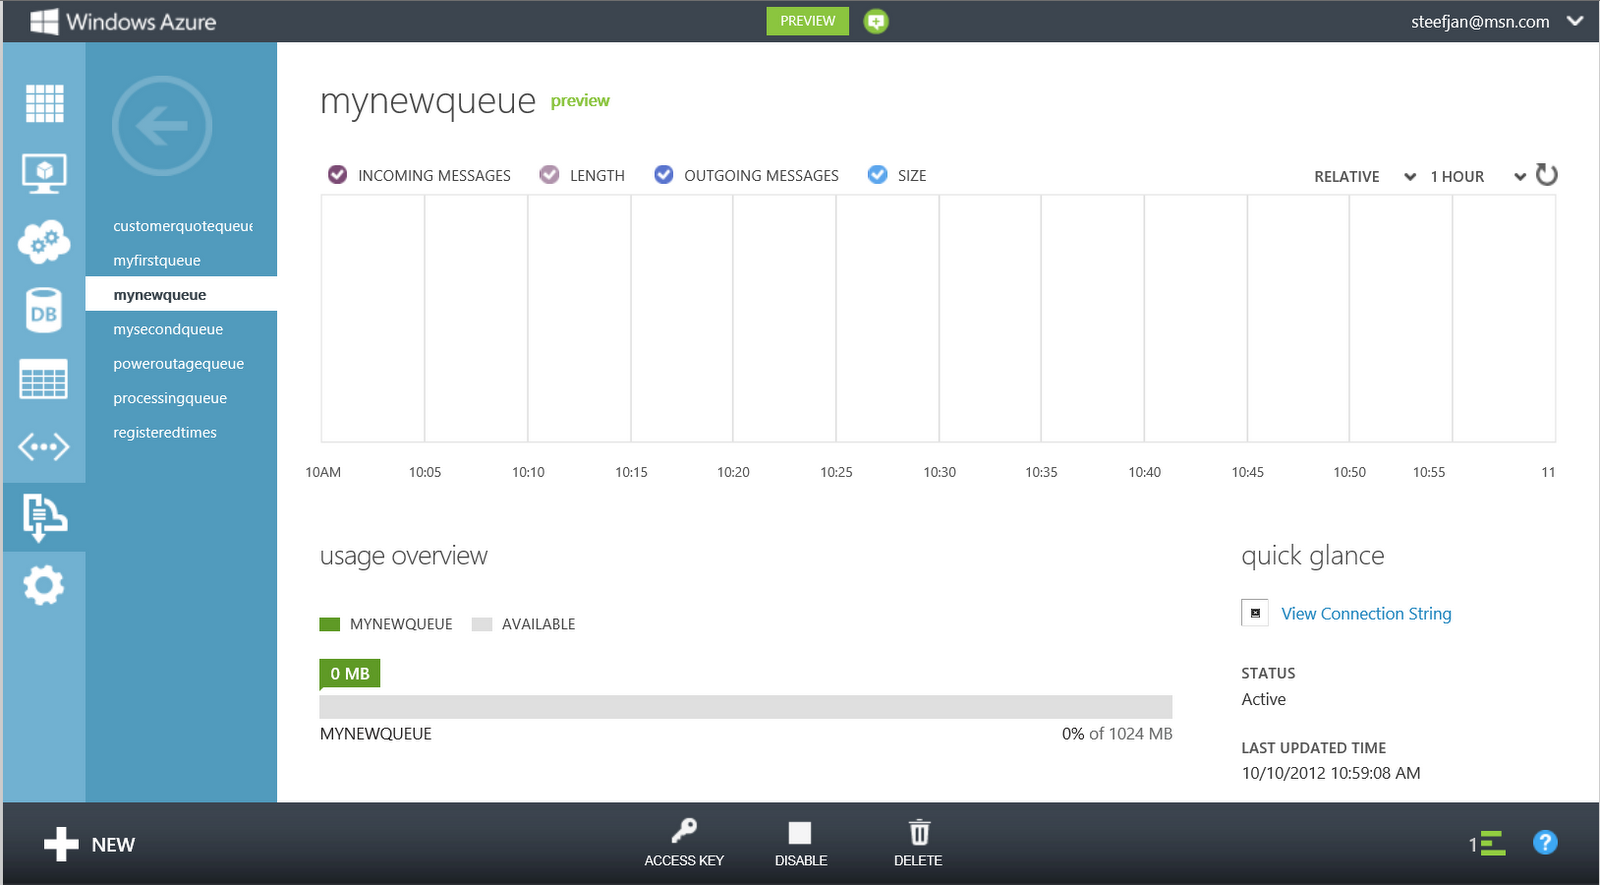
As you can see the queue is created and visible in the portal. You can click the newly created queue and see some characteristics in a dashboard.
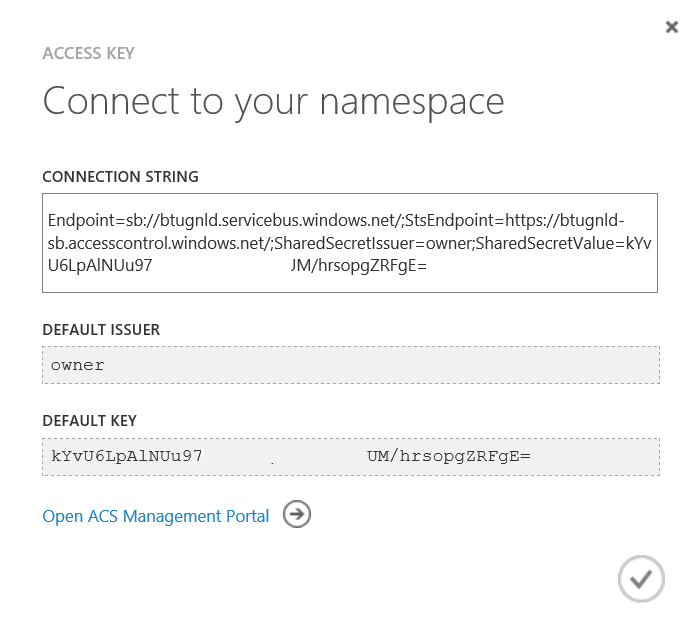
You have to ability now to view the connection string of the queue, delete, disable it or view the access key. By click the access key a dialog will pop up showing you the connection string, default issuer, default key and link to ACS Management Portal.
The walkthrough above showed you how to create and manage a newly created queue. For creating a topic the steps are similar. For relays see Richard’s post. As you can see new portal gives you a new user experience, yet same functionality and new enhancements compared to the old portal.
Finally I also like to point out that you can also manage the service bus through Visual Studio 2012, or Service Bus Explorer. I did a comparison between the too in my Visual Studio Service Bus Explorer versus Standalone Service Bus Explorer blog post.
Cheers,
Steef-Jan
by community-syndication | Oct 9, 2012 | BizTalk Community Blogs via Syndication
Here is a list of enhancements to Application Pools in IIS 8.
Start Mode
A few web applications take a significant amount of time to start up. IIS by default only launches a worker process when the first request for the web application is received. So for the web applications that require a longer time to initialize, users might see slow responses.
For such applications it is a good idea to launch the worker process as soon as IIS is started. The application pools have a startMode setting which when set to AlwaysRunning launches the worker process for the application pool as soon as IIS is started.
IIS 8 provides you this setting in the Application Pool Settings UI.
This feature is also available in IIS 7.5, but you will have to edit the applicationHost.config directly to enable this feature.
<applicationPools>
<add name="DefaultAppPool" startMode="AlwaysRunning" />
CPU Throttle
IIS 7.5 and earlier have a CPU monitoring feature that you could use to terminate a worker process, when its CPU usage goes beyond a certain limit. Its very useful in shared hosting scenarios.
In IIS 8 this feature has been enhanced. You can now instead of terminating the worker process, throttle it.
The KillW3wp will terminate the worker process like IIS 7.5. But if set to Throttle or ThrottleUnderLoad instead of terminating the worker process it will limits its CPU usage to the value set.
This is an application pool setting, so the limit you set applies to all the worker processes (web garden) of an application pool. So for an application pool with 5 worker processes, if the value for limit is set to 50000 the combined CPU usage of all the 5 worker processes is throttled at 50%.
Process Affinity Mask (64 Bit)
The UI now also exposes the smpProcessorAffinityMask2 metabase key. This is used when you enable the Processor Affinity setting.
Generate Process Model Event Log Entries
The logEventOnProcessModel metabase setting controls if an event has to be written when an application pool is shutdown because it was idle.
<applicationPools>
<add name="DefaultAppPool" startMode="OnDemand">
< processModel logEventOnProcessModel="IdleTimeout" />
When set to True an event similar to the one below is logged in the System Event Log when WAS shutdown the application pool.
Blog Post by: Shinva

by community-syndication | Oct 9, 2012 | BizTalk Community Blogs via Syndication
December 2011 almost a year ago I wrote a blog post for TechNet Wiki on Windows Azure- and Server AppFabric. Now on the Server part a cookbook has been released written by fellow Microsoft Integration MVP Rick G. Garibay and Microsoft Architect Hammad Rajjoub. I know both Rick and Hammad (both very active community leaders) have done a great job. Windows Server AppFabric can be viewed as a part of the Microsoft Integration Stack together with BizTalk, SQL Server and Azure ServiceBus. For lightweight integration Windows Server AppFabric together with WF (Windows Workflow) and WCF (Windows Communication Foundation) can be a right fit within your enterprise without using the more scalable, robust BizTalk Server or Windows Azure Service Bus.
The eBook Contest
I have teamed up with Packt Publishing and am organizing a give away especially for you my blog readers. All you need to do is send me an email with your view on Microsoft integration at SteefJan @ msn dot com and you might win a free copy of Microsoft Windows Server AppFabric Cookbook. Three lucky winners stand a chance to win an e-copy of the book. This contest will end at end of this month 31 October. Lucky winners will be announced on 1st of November.
Overview of Microsoft Windows Server AppFabric Cookbook
This book will enable you to:
Download, install, configure and get up and running with Windows Server AppFabric quickly
Learn how to take advantage of distributed caching for providing high performance and elastic scale on-premise today
Take advantage of the enhanced hosting capabilities that Windows Server AppFabric has to offer including Auto-Start and a greatly simplified configuration experience
Enable support for long-running composite applications that are resilient and fault-tolerant while maximizing computing resources
Gain insight into the health of your composite applications seamlessly, both proactively and when something goes wrong
Learn how to scale Windows Server AppFabric by leveraging farm deployments
My View on the book
What I like about Packt cookbooks is that it provides you as professional practical guidance on how to leverage the technology. This book focusses on Windows Server AppFabric or as it is now named AppFabric for Windows Server. This technology is a set of integrated technologies that makes it easier to build, scale, and manage Web and composite applications that run on IIS. I believe this book will tell you the complete story on how to use this technology, how to set it up and how to create robust, and state-of-the-art solutions on it. To conclude I think the content of this book will be very valuable for WF/WCF developer and also for us Microsoft integration guys.
Cheers,
Steef-Jan
by community-syndication | Oct 9, 2012 | BizTalk Community Blogs via Syndication
BizTalk allows you to use several macros for defining a file name in a biztalk send port.
The following table lists the supported macros and describes how the File send handler replaces them.
| Macro name |
Substitute value |
| %datetime% |
Coordinated Universal Time (UTC) date time in the format YYYY-MM-DDThhmmss (for example, 1997-07-12T103508). |
| %datetime_bts2000% |
UTC date time in the format YYYYMMDDhhmmsss, where sss means seconds and milliseconds (for example, 199707121035234 means 1997/07/12, 10:35:23 and 400 milliseconds). |
| %datetime.tz% |
Local date time plus time zone from GMT in the format YYYY-MM-DDThhmmssTZD, (for example, 1997-07-12T103508+800). |
| %DestinationParty% |
Name of the destination party. The value comes from the message context property BTS.DestinationParty. |
| %DestinationPartyQualifier% |
Qualifier of the destination party. The value comes from the message context property BTS.DestinationPartyQualifier. |
| %MessageID% |
Globally unique identifier (GUID) of the message in BizTalk Server. The value comes directly from the message context property BTS.MessageID. |
| %SourceFileName% |
Name of the file from which the File adapter read the message. The file name includes the extension and excludes the file path, for example, Sample.xml. When substituting this property, the File adapter extracts the file name from the absolute file path stored in the FILE.ReceivedFileName context property. If the context property does not have a value-for example, if a message was received on an adapter other than the File adapter-the macro will not be substituted and will remain in the file name as is (for example, C:\Drop\%SourceFileName%).
Note
Correct implementation of this macro requires that the output message is the same message as the received message.
|
| %SourceParty% |
Name of the source party from which the File adapter received the message.
Note
Correct implementation of this macro requires that the output message is the same message as the received message.
|
| %SourcePartyQualifier% |
Qualifier of the source party from which the File adapter received the message.
Note
Correct implementation of this macro requires that the output message is the same message as the received message.
|
| %time% |
UTC time in the format hhmmss. |
| %time.tz% |
Local time plus time zone from GMT in the format hhmmssTZD (for example, 124525+530). |
NOTE
The File send handler does not replace the macros with a value if any of the following are true:
- The corresponding system property is not set.
- The macro is misspelled.
- The value for the macro contains symbols that are not valid in the file name.
Using Macros in SMTP Headers
There are however some restrictions when using the macros in SMTP headers.
See this post for more details on this matter.
Below is a short overview of the use of macros in SMTP headers.
| Macro |
Description |
For use with To |
For use with CC |
For use with Subject |
| %MessageID% |
Globally unique identifier (GUID) of the message in BizTalk Server. The value comes from the message context property BTS.MessageID. |
No |
No |
Yes |
| %datetime_bts2000% |
UTC date time in the format YYYYMMDDhhmmsss, where sss means seconds and milliseconds (for example, 199707121035234 means 1997/07/12, 10:35:23 and 400 milliseconds). |
No |
No |
Yes |
| %datetime% |
UTC date time in the format YYYY-MM-DDThhmmss (for example, 1997-07-12T103508). |
No |
No |
Yes |
| %datetime.tz% |
Local date time plus time zone from GMT in the format YYYY-MM-DDThhmmssTZD, (for example, 1997-07-12T103508+800). |
No |
No |
Yes |
| %time% |
UTC time in the format hhmmss. |
No |
No |
Yes |
| %time.tz% |
Local time plus time zone from GMT in the format hhmmssTZD (for example, 124525+530). |
No |
No |
Yes |
| %SourceParty% |
Name of the source party from which the File adapter received the message. |
No |
No |
Yes |
| %SourcePartyQualifier% |
Qualifier of the source party from which the File adapter received the message. |
No |
No |
Yes |
| %DestinationParty% |
Name of the destination party. The value comes from the message context property BTS.DestinationParty. |
Yes |
Yes |
Yes |
| %DestinationPartyQualifier% |
Qualifier of the destination party. The value comes from the message context property BTS.DestinationPartyQualifier. |
No |
No |
Yes |
Source: http://msdn.microsoft.com/en-us/library/aa578022(v=bts.20).aspx

by stephen-w-thomas | Oct 9, 2012 | Downloads
This tool is intended to get you moving in the right direction and not intended to solve all your problems out of the box. You will need to use the Windows Azure REST API Reference guide when working with this tool.
I have provided a few sample Request Body templates for Creating a Hosted Service, Creating an Azure Storage Account, Adding a Virtual Machine Disk, and Creating a Virtual Machine (note to create a VM is a multi-step process, see below). Others can easily be added by using the online reference guide.
To use this sample tool you need to configure some basic information inside the App.Config file. You need to set the path to your management certificate, your subscription id, and the path to the folder location of your POST bodies.
    <!--  Enter the full path to the Windows Azure Management Certificate. More details at http://msdn.microsoft.com/en-us/library/windowsazure/ee460782.aspx -->
    <add key='CertificatePath' value='C:\DemoFolder\yourcert.cer'/>

    <!-- Subscription ID for the account and must match Management Certificate -->
    <add key='Subscription' value='your account id' />

    <!--  Default folder location of REST API Post Bodies.  This exists to save time selecting the Post Body file. -->
    <add key='PostBodiesFolder' value='C:\DemoFolder\WindowsAzureRESTApiHelper\WindowsAzureRESTApiHelper\RESTAPIBodies\'/>
How to Use this Sample Tool
1. Once the App.config is setup simply launch the tool. It was built with Visual Studios 2010 but should upgrade to 2012 without issues.
2. Select one of the GET, POST, or DELETE radio buttons.
3. Select your basic action from the drop down or paste in your URL into the text box.
4. Click on “Make A REST Service Call” to complete your request.
5. If you are doing a POST, you will be prompted to select the body of your request.
6. If you do a POST or a DELTE that is an asynchronous process a Request ID is returned in the Response Header. The tool will detect this and auto populate a URL to check the result of the request.
7. You can keep clicking the “Make REST Service Call” button to check the results of the submitted operation until it is competed.
It is that simple!!! Like I said before, this tool is intended to be a starting point for someone new to working with the Windows Azure REST API’s.
Other useful pieces of information
1. To create a new Virtual Machine you need to do the following: First, create the Service using Create Hosted Service. Second, you can use the Quick Create using that Service to create the Virtual Machine.
2. If you plan to work with Virtual Machines using the API, read this blog post about the URLs.
3. If you run into issues the best way to confirm the URL and Post Body is to perform the actions using PowerShell with Fiddler running. This will show the URL and exact Post Body.
by stephen-w-thomas | Oct 9, 2012 | Stephen's BizTalk and Integration Blog
Windows Azure has a few different, somewhat disjointed, toolsets available to create new artifacts and maintain existing ones. The best known is the Web Portal. Very quickly when working with the web portal you discover the portal is not able to do all the tasks needed to support development and maintenance. This brings into play Windows Azure PowerShell Commands, a .Net SDK, and REST API.
If you are new to working with the Windows Azure REST API or if you are looking for sample code working with the Windows Azure REST API, this tool can help you.
This tool is intended to get you moving in the right direction and not intended to solve all your problems out of the box. You will need to use the Windows Azure REST API Reference guide when working with this tool.
I have provided a few sample Request Body templates for Creating a Hosted Service, Creating an Azure Storage Account, Adding a Virtual Machine Disk, and Creating a Virtual Machine (note to create a VM is a multi-step process, see below). Others can easily be added by using the online reference guide.
Download: Windows Azure REST API Sample Tool
To use this sample tool you need to configure some basic information inside the App.Config file. You need to set the path to your management certificate, your subscription id, and the path to the folder location of your POST bodies.
    <!--  Enter the full path to the Windows Azure Management Certificate. More details at http://msdn.microsoft.com/en-us/library/windowsazure/ee460782.aspx -->
    <add key='CertificatePath' value='C:\DemoFolder\yourcert.cer'/>

    <!-- Subscription ID for the account and must match Management Certificate -->
    <add key='Subscription' value='your account id' />

    <!--  Default folder location of REST API Post Bodies.  This exists to save time selecting the Post Body file. -->
    <add key='PostBodiesFolder' value='C:\DemoFolder\WindowsAzureRESTApiHelper\WindowsAzureRESTApiHelper\RESTAPIBodies\'/>
.csharpcode, .csharpcode pre
{
font-size: small;
color: black;
font-family: consolas, “Courier New”, courier, monospace;
background-color: #ffffff;
/*white-space: pre;*/
}
.csharpcode pre { margin: 0em; }
.csharpcode .rem { color: #008000; }
.csharpcode .kwrd { color: #0000ff; }
.csharpcode .str { color: #006080; }
.csharpcode .op { color: #0000c0; }
.csharpcode .preproc { color: #cc6633; }
.csharpcode .asp { background-color: #ffff00; }
.csharpcode .html { color: #800000; }
.csharpcode .attr { color: #ff0000; }
.csharpcode .alt
{
background-color: #f4f4f4;
width: 100%;
margin: 0em;
}
.csharpcode .lnum { color: #606060; }
How to Use this Sample Tool
1. Once the App.config is setup simply launch the tool. It was built with Visual Studios 2010 but should upgrade to 2012 without issues.
2. Select one of the GET, POST, or DELETE radio buttons.
3. Select your basic action from the drop down or paste in your URL into the text box.
4. Click on “Make A REST Service Call” to complete your request.
5. If you are doing a POST, you will be prompted to select the body of your request.
6. If you do a POST or a DELTE that is an asynchronous process a Request ID is returned in the Response Header. The tool will detect this and auto populate a URL to check the result of the request.
7. You can keep clicking the “Make REST Service Call” button to check the results of the submitted operation until it is competed.
It is that simple!!! Like I said before, this tool is intended to be a starting point for someone new to working with the Windows Azure REST API’s.
Download: Windows Azure REST API Sample Tool
Other useful pieces of information
1. To create a new Virtual Machine you need to do the following: First, create the Service using Create Hosted Service. Second, you can use the Quick Create using that Service to create the Virtual Machine.
2. If you plan to work with Virtual Machines using the API, read this blog post about the URLs.
3. If you run into issues the best way to confirm the URL and Post Body is to perform the actions using PowerShell with Fiddler running. This will show the URL and exact Post Body.

by community-syndication | Oct 8, 2012 | BizTalk Community Blogs via Syndication
Scott Guthrie announced a handful of changes to the Windows Azure Portal, and among them, was the long-awaited migration of Service Bus resources from the old-and-busted Silverlight Portal to the new HTML hotness portal. You’ll find some really nice additions to the Service Bus Queues and Topics. In addition to creating new queues/topics, you can […]
Blog Post by: Richard Seroter
by community-syndication | Oct 8, 2012 | BizTalk Community Blogs via Syndication
I recently found myself in need of adding a username and password to a BizTalk 2010 application binding file. By default, WCF bindings at least, do not save any password currently assigned to a WCF-Custom send port when you export the application bindings from within Management Console. In order to add a password to a […]
Blog Post by: Kevin Morillo
by community-syndication | Oct 8, 2012 | BizTalk Community Blogs via Syndication
A few days ago I was troubleshooting an odd error in one of our pipe delimited flat file outputs from a map. The application was just migrated from BizTalk 2004 to BizTalk 2010, and had developed a unique problem. This file was showing what seemed like random carriage returns in the output flat file.
After ruling […]
Blog Post by: Kevin Morillo
by stephen-w-thomas | Oct 8, 2012 | Stephen's BizTalk and Integration Blog
Some enhancements were made this weekend to the Windows Azure Preview Portal. With these enhancements is the addition of Service Bus features and I think the ability to create Containers inside a Storage Account. I do not remember that being in place before.
As it relates to Virtual Machines I noticed the following two changes:
1. When you Capture An Image from an existing Virtual Machine you get a notice saying the Virtual Machine will be deleted.
2. When you delete a DISK you are now giving the option to also delete the underlying blob storage vhd associated with that DISK. This is a nice, money saving feature.
On a side note, it seems the ability to create and capture an Image is no longer working. I have been trying since Friday with no luck. It was working a few weeks ago. So if you are trying to create an Image you may run into issues.