by community-syndication | May 9, 2015 | BizTalk Community Blogs via Syndication
I have done a lot of BizTalk-SharePoint Integration in the past and ran into a situation recently that surprised me. There wasn’t an easily identifiable resolution online so I have decided to document this for the benefit of others.
Background
We have a process that requires a user to approve a financial summary document in SharePoint. Once the document has been approved, BizTalk will then fetch the details behind those financial transactions, from another source system, and send them to SAP.
In the past I have leveraged SharePoint views as a way for BizTalk to pickup messages from a SharePoint document library. The way to achieve this is to rely upon meta data that can be populated within a SharePoint document library column.
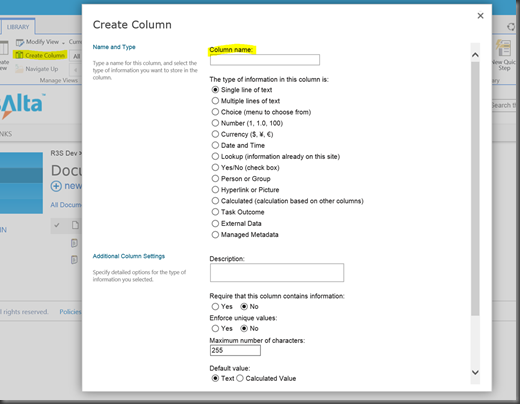
Adding a custom column to a document is very simple. Under the library tab we will discover the Create Column label. We can simply click this button and then add a column and related properties as required.
With our custom column created, we can now create a view for BizTalk to “watch”. In our example we were dealing with an approval workflow. We can create our custom column called Status and then when BizTalk initially publishes this financial summary document(for users to approve), we can use the SharePoint adapter to populate this column with a value of Pending. After a user has reviewed the document, that Status value can be changed to Approved.
Since we don’t want BizTalk to move Pending documents we will create a view that will only show Approved documents. To create a custom View we can once again click on the Library tab and then click on Create View

For our purposes a Standard View will be sufficient.

We need to provide a View Name and can also indicate where we want this column to be positioned.
Tip – In my experience I have experienced odd behavior with spaces in the name of SharePoint entities. My advice is to avoid spaces in names where possible.

Lastly, since we only want Approved documents to show up in this field we need to add a filter.
Within our filter we want to Show items only when the following is true:
Status is equal to Approved

We can now save our view and test it. To test it we will upload two documents. One will have the Status of Approved and the other will have a Status of Pending. When we click on All Documents we should see both documents.

When we click on our view for BizTalk, which in this case is called BizTalkMoveView we will only see our Approved document.

From a SharePoint perspective we are good and we can now create our SharePoint Receive Location in BizTalk. For the purposes of this blog post I am using a Send Port Subscription; I will receive the message from SharePoint and then send it to a File folder.
In our BizTalk Receive Location configuration we are going to use the Client OM which in this case is the SharePoint Client Object API. This allows us to communicate with SharePoint without having to install any agents on a SharePoint Server.
We also need to configure our SharePoint Site URL, Source Document Library URL and View Name

When we enable our Send Port and Receive Location we should receive 1 file in our File Folder right? WRONG! Both files were picked up and moved to our file folder even though we have a View enabled.

If we go back to SharePoint we will discover both documents are gone.

Issue
The issue is that for some reason, BizTalk 2013 is not using/respecting the View Name property that is available in the Receive Location Configuration.
Resolution
The resolution is to install BizTalk 2013 CU 2. The download and more details about CU2 can be found here.
Before you install, the recommended approach from Microsoft is:
- Stop all host instances
- Stop SQL Server Agent which is responsible for running the internal BizTalk jobs
- Perform a Database Backup
Running the CU2 exe is pretty straight forward and only takes a couple minutes. I wasn’t prompted for a reboot but decided to go that route regardless.
After applying the CU, I uploaded two documents again. One had a Status of Approved while the other had a Status of Pending.

Our BizTalkMoveView is also displaying our file correctly

When we enable our Receive Location we will discover that only our Approved file has moved.


Our document that was in a Pending state remains in SharePoint as expected.

Conclusion
BizTalk 2013 was the first version that had support for the SharePoint Client Object model. So I am not sure if this bug only impacts when you are using the Client OM within the BizTalk Receive Location. I do know that in previous versions of BizTalk that this was not an issue. However those versions of BizTalk relied upon the SharePoint Adapter Service being installed on the remote SharePoint Server. Using the Client OM is the way to go as it also allows you to communicate with SharePoint Online/Office365.

by shadabanwer | May 4, 2015 | BizTalk Community Blogs via Syndication
This article is to demonstrate how to skip create BizTalk Application using BTDF. By default the btdf project will call the target “DeployAppDefinition”. This target is responsible to create BizTalk Application when it is not exists in the Admin Console, otherwise it throw an error when the application is found.
In my current project we were require to only deploy the version assemblies for the particular application without removing the BT application.
I came up with the below BTDF Project which is using the custom target to call DeployAppDefinition which checks for the existence of the application and do not remove if exists.
I need to create this variable in the property group “<SkipRemoveApp>True</ SkipRemoveApp > “ and used it in the DeployAppDefinition target.
<!– Skip BizTalk application definition –>
<Target Name=”DeployAppDefinition” Condition=”‘$( SkipRemoveApp)’ == ‘False’”>
<Exec Command=”BTSTask.exe AddApp -ApplicationName:"$(BizTalkAppName)" -Description:"$(ProjectName)"” />
<AddAppReference ApplicationName=”$(BizTalkAppName)” AppsToReference=”@(AppsToReference)” Condition=”%(Identity) == %(Identity) and ‘@(AppsToReference)’ != ”” />
</Target>
Below is the complete btdf project. Please let me know if anyone having a different approach.
<?xml version=”1.0″ encoding=”utf-8″?>
<!–
***************************************************
**** DEPLOYMENT STEPS *****************************************************************************************************
This deployment package will only add BizTalk resources to the existing application.
***************************************************************************************************************************
–>
<Project xmlns=”http://schemas.microsoft.com/developer/msbuild/2003″
DefaultTargets=”Installer”
ToolsVersion=”4.0″
TreatAsLocalProperty=”SkipUndeploy”> <!– **** Add this so this variable is accessible on this target file ****–>
<PropertyGroup>
<Configuration Condition=”‘$(Configuration)’ == ””>Debug</Configuration>
<Platform Condition=”‘$(Platform)’ == ””>x86</Platform>
<SchemaVersion>1.0</SchemaVersion>
<ProjectName>ESB.ReferenceSystems.P</ProjectName>
<ProjectVersion Condition=”‘$(ProjectVersion)’ == ””>1.1</ProjectVersion>
<ProjectVersion Condition=”‘$(ProjectVersion)’ != ””>$(ProjectVersion)</ProjectVersion>
<IncludeSchemas>False</IncludeSchemas>
<IncludeOrchestrations>False</IncludeOrchestrations>
<IncludeTransforms>False</IncludeTransforms>
<IncludePipelines>False</IncludePipelines>
<IncludeComponents>False</IncludeComponents>
<IncludePipelineComponents>False</IncludePipelineComponents>
<IncludeCustomFunctoids>False</IncludeCustomFunctoids>
<IncludeVocabAndRules>False</IncludeVocabAndRules>
<IncludeVirtualDirectories>False</IncludeVirtualDirectories>
<IncludeMessagingBindings>False</IncludeMessagingBindings>
<IncludeDeploymentTest>False</IncludeDeploymentTest>
<Includelog4net>False</Includelog4net>
<IncludeSSO>False</IncludeSSO>
<IncludeEsbItineraries>False</IncludeEsbItineraries>
<IncludeBam>False</IncludeBam>
<IncludeInstallUtilForComponents>False</IncludeInstallUtilForComponents>
<UsingMasterBindings>True</UsingMasterBindings>
<RequireXmlPreprocessDirectives>False</RequireXmlPreprocessDirectives>
<ApplyXmlEscape>True</ApplyXmlEscape>
<IncludeSettingsSpreadsheetInMsi>True</IncludeSettingsSpreadsheetInMsi>
<SkipIISReset>True</SkipIISReset>
<SkipHostInstancesRestart>False</SkipHostInstancesRestart>
<StartApplicationOnDeploy>True</StartApplicationOnDeploy>
<EnableAllReceiveLocationsOnDeploy>False</EnableAllReceiveLocationsOnDeploy>
<StartReferencedApplicationsOnDeploy>False</StartReferencedApplicationsOnDeploy>
<UseIsolatedAppDomain>False</UseIsolatedAppDomain>
<EnableBizTalkExtendedLogging>False</EnableBizTalkExtendedLogging>
<EnableBizTalkAssemblyValidation>False</EnableBizTalkAssemblyValidation>
<EnableBizTalkCorrelationValidation>False</EnableBizTalkCorrelationValidation>
<EnableBizTalkSchemaValidation>False</EnableBizTalkSchemaValidation>
<SkipAddApp>True</SkipAddApp>
</PropertyGroup>
<PropertyGroup>
<!– Properties related to building an MSI for server deployments –>
<!– BizTalk App Version Upgrade –>
<!– For each new product release to be deployed to your BizTalk servers: –>
<!– 1) Increment ProductVersion –>
<!– 2) Generate a new GUID and update ProductId with the new GUID –>
<!– This allows the new MSI to automatically uninstall (not undeploy!) the old MSI and install the new one. –>
<ProductVersion Condition=”‘$(ProductVersion)’ == ””>1.0.1</ProductVersion>
<ProductVersion Condition=”‘$(ProductVersion)’ != ””>$(ProductVersion)</ProductVersion>
<ProductId Condition=”‘$(ProductId)’ == ””>A66F460E-7B65-4330-843B-477251BF3AEC</ProductId>
<ProductId Condition=”‘$(ProductId)’ != ””>$(ProductId)</ProductId>
<!– BizTalk App Version Upgrade –>
<ProductName>ESB.ReferenceSystems.P for BizTalk</ProductName>
<Manufacturer></Manufacturer>
<PackageDescription>ESB.ReferenceSystems.P</PackageDescription>
<PackageComments>ESB.ReferenceSystems.P</PackageComments>
<!– NEVER change the ProductUpgradeCode. –>
<ProductUpgradeCode>A87DEA9B-53B5-4A30-85E3-71F5C698D203</ProductUpgradeCode>
<IsInTFSBuildMode Condition=”Exists(‘$(OutDir)$(Configuration)ESB.ReferenceSystems.P.SubmissionProcessAPI.Schemas.dll’)”>True</IsInTFSBuildMode>
</PropertyGroup>
<!– Under TFS Team Build, set CustomizableOutDir property to true in TFS 2005/2008/2010 UpgradeTemplate. –>
<!– With a workflow build, copy the default template then modify the MSBuild task for the solution build. Set OutDir to blank and –>
<!– CommandLineArguments to String.Format(“/p:SkipInvalidConfigurations=true;TeamBuildOutDir=””{0}”” {1}”, BinariesDirectory, MSBuildArguments). –>
<PropertyGroup Condition=”‘$(Configuration)’ == ‘Debug’”>
<DeploymentFrameworkTargetsPath>$(MSBuildExtensionsPath)DeploymentFrameworkForBizTalk5.0</DeploymentFrameworkTargetsPath>
<OutputPath Condition=”‘$(TeamBuildOutDir)’ == ””>binDebug</OutputPath>
<OutputPath Condition=”‘$(TeamBuildOutDir)’ != ””>$(TeamBuildOutDir)</OutputPath>
<DeployPDBsToGac>false</DeployPDBsToGac>
</PropertyGroup>
<PropertyGroup Condition=”‘$(Configuration)’ == ‘Release’”>
<DeploymentFrameworkTargetsPath>$(MSBuildExtensionsPath)DeploymentFrameworkForBizTalk5.0</DeploymentFrameworkTargetsPath>
<OutputPath Condition=”‘$(TeamBuildOutDir)’ == ””>binRelease</OutputPath>
<OutputPath Condition=”‘$(TeamBuildOutDir)’ != ””>$(TeamBuildOutDir)</OutputPath>
<DeployPDBsToGac>false</DeployPDBsToGac>
</PropertyGroup>
<PropertyGroup Condition=”‘$(Configuration)’ == ‘Server’”>
<DeploymentFrameworkTargetsPath>Framework</DeploymentFrameworkTargetsPath>
<!– Get our PDBs into the GAC so we get file/line number information in stack traces. –>
<DeployPDBsToGac>true</DeployPDBsToGac>
</PropertyGroup>
<ItemGroup>
<PropsFromEnvSettings Include=”SsoAppUserGroup;SsoAppAdminGroup” />
</ItemGroup>
<ItemGroup>
<AdditionalFiles Include=”Deployment.config”>
<LocationPath>.</LocationPath>
</AdditionalFiles>
</ItemGroup>
<ItemGroup>
<!–<AppsToRemove Include=”ESB.ReferenceSystems.P” />–>
</ItemGroup>
<!– !!! TODO !!! –>
<Import Project=”$(DeploymentFrameworkTargetsPath)BizTalkDeploymentFramework.targets” />
<!–
The Deployment Framework automatically packages most files into the server install MSI.
However, if there are special folders that you need to include in the MSI, you can
copy them to the folder $(RedistDir) in the CustomRedist target.
To include individual files, add an ItemGroup with AdditionalFiles elements.
–>
<!–
The Targets below are to enable undeploy during the TFS build when not deployed – Bill Chesnut
–>
<!– **** PRE DEPLOYMENT SECTION ******************************************************************************************–>
<!– **********************************************************************************************************************–>
<!– **** The BTDF out of the box calls this target before it deploys the application ****–>
<!– **** Set the “SkipUndeploy” to false so that we can undeploy the application before deployment ****–>
<!– **** Then call the Custom Deploy Target to add the undeployment step ****–>
<!– **********************************************************************************************************************–>
<Target Name=”CustomDeployTarget”>
<PropertyGroup>
<SkipUndeploy>false</SkipUndeploy>
</PropertyGroup>
<CallTarget Targets=”CustomDeploy” />
</Target>
<!– **********************************************************************************************************************–>
<!– **** This target is called from CustomDeployTarget ****–>
<!– **** DeployAppDefinition is an out of the box target which will skip the check for Add Application ****–>
<!– **** CustomUndeployApp is the custom target created to undeploy the application ****–>
<!– **** CustomDeployAssemblyTarget is the custom target to Add the BizTalk Assemblies ****–>
<!– **********************************************************************************************************************–>
<Target Name=”CustomDeploy” DependsOnTargets=”$(CustomDeployTargetDependsOn)” />
<PropertyGroup>
<!– CustomDeploy depends on this CustomDeployTargetDependsOn –>
<CustomDeployTargetDependsOn>
DeployAppDefinition;
CustomDeployAssemblyTarget;
</CustomDeployTargetDependsOn>
</PropertyGroup>
<!– Skip BizTalk application definition –>
<Target Name=”DeployAppDefinition” Condition=”‘$(SkipAddApp)’ == ‘False’”>
<Exec Command=”BTSTask.exe AddApp -ApplicationName:"$(BizTalkAppName)" -Description:"$(ProjectName)"” />
<AddAppReference ApplicationName=”$(BizTalkAppName)” AppsToReference=”@(AppsToReference)” Condition=”%(Identity) == %(Identity) and ‘@(AppsToReference)’ != ”” />
</Target>
<Target Name=”CustomDeployAssemblyTarget” DependsOnTargets=”$(CustomDeployAssemblyTargetDependsOn)” />
<PropertyGroup>
<!– CustomPostDeployTarget depends on this CustomPostDeployTargetDependsOn –>
<CustomDeployAssemblyTargetDependsOn>
AddBizTalkResources;
</CustomDeployAssemblyTargetDependsOn>
</PropertyGroup>
<!– **********************************************************************************************************************–>
<!– **** This target is responsible for adding all the biztalk resources into the application resources and is called ****–>
<!– **** from CustomDeployAssemblyTarget ****–>
<!– **********************************************************************************************************************–>
<Target Name=”AddBizTalkResources” DependsOnTargets=”$(AddBizTalkResourcesDependsOn)” />
<PropertyGroup>
<!– AddBizTalkResources depends on this AddBizTalkResourcesDependsOn –>
<AddBizTalkResourcesDependsOn>
AddBizTalkAssembliesToBizTalkResources;
</AddBizTalkResourcesDependsOn>
</PropertyGroup>
<!– **********************************************************************************************************************–>
<!– **** This target is responsible for adding the BizTalk assemblies into the application resources and is called ****–>
<!– **** from AddBizTalkResources ****–>
<!– **********************************************************************************************************************–>
<Target Name=”AddBizTalkAssembliesToBizTalkResources”>
<Message Text=”In AddBizTalkAssembliesToBizTalkResources.-2″/>
<Exec
Command=”BTSTask.exe AddResource -Type:BizTalkAssembly -Source:"..SubmissionProcessAPI.SchemasbinDebugESB.ReferenceSystems.P.SubmissionProcessAPI.Schemas.dll" -ApplicationName:"$(BizTalkAppName)" -Overwrite -Options:GacOnAdd,GacOnImport,GacOnInstall”
Condition=”‘$(DeployBizTalkMgmtDB)’ == ‘true’ ” />
</Target>
</Project>
by Nick Hauenstein | May 1, 2015 | BizTalk Community Blogs via Syndication
As shown today in Ilya Grebnov, and Stephen Siciliano’s Build 2015 Session titled simply “Logic Apps”, there is now (as of the 29th actually) a nice project template for creating a deployment project containing a Logic App with separate per-environment parameters files. The deployment project is really scoped higher than the Logic App itself, it is instead a definition for an Azure Resource Group to be provisioned by Azure Resource Manager.
Selecting the project template (found in the Cloud category as Azure Resouce Group) launches a dialog asking for the type of resource(s) that you would like the resource group project to start with. There are two resource types that include Logic Apps: Logic App, and Logic App and API App.
Once created, the project (like any other Cloud Deployment Project up to this point) contains a PowerShell script to perform the actual deployment, along with a helper executable named AzCopy.exe. However, in addition to that, we not only get a file describing the deployment of an App Service Plan, Gateway, API App, and Logic App, we also get a parameters file — initially for a dev environment, but it is a step in the right direction and shows how to make it happen.
How do we know that this parameters file will be used? Well the parameters file itself is actually a parameter within the Deploy-AzureResourceGroup.ps1 deployment script, and the default is to use dev:
Inside, you will find the parameters apiAppName, gatewayName, logicAppName, and svcPlanName.
The definition for the Logic App itself is contained deep within the LogicAppAndAPIApp.json file (starting around line 271 in my test shown here):
It consists of a recurrence trigger (polling very hour) that invokes an operation with id of getValues on the deployed API App and outputs an array containing the value of the readValues property on the body of the API App response. I guess that’s the “Hello World” of the Logic App world, eh?
Code where Code Belongs
This represents a big step in the right direction for the team building Logic Apps. It’s putting code where code belongs, in the best IDE ever made and backed by proper source control. It also cleanly separates logic and configuration, enabling multiple environments.
However, without a visual editor, and an/or an quick/easy way to resolve API App ids from the marketplace, it’s going to be tough to build more complex flows in this fashion. I would also like to see the deployment spread across files. Imagine a resource group with multiple Logic Apps (a receive pipeline style Logic App, a process orchestration-style Logic App and a send pipeline style Logic App), working with that in one giant file would be a little bit painful.
In theory, there is a concept of a definitionLink to the body of the workflow itself (so as to not include it directly within the deployment script), but that’s not what the project template will give you:
That’s All From Build
I know that I wrote a lot for each of the major BizTalk events over the last 6 months, but for Build 2015, I’m going to keep it short and sweet and to the point. I’m juggling a lot of really cool things right now that I’m excited to share with you as soon as they’re ready. So stay tuned!
As a side note, BizTalk Server on-premise is going to be getting some love over the next year as well. Another major version is in the works, and you’d better bet that I’m going to be all over that as well.


![WCF-SAP Adapter: Finding the document specification by message type [IDOC Message Type] failed. Verify the schema deployed properly.](https://pixel.wp.com/b.gif?host=sandroaspbiztalkblog.wordpress.com&blog=16199969&post=5201&subd=sandroaspbiztalkblog&ref=&feed=1)
