
by stephen-w-thomas | Sep 26, 2012 | Downloads
Basic Steps for Cross Account VHD Copy:
- Shut down your Virtual Machine.
- Delete your Virtual Machine.
- Delete the associated Image or Disk inside the Virtual Machine Portal. This does not remove the underlying blob of the vhd.
- Copy the blog from one storage account to another.
- Add your vhd back and recreate the virtual machine.
Known Issues (per my research) with VHD Copying– make sure you understand these issues and limitations. I assume most are related to preview issues.
- If you copy a vhd that is Leased (configured as an Image or Disk inside the Virtual Machine Portal) the Source Disk will become unusable.
- If you copy a vhd that is Leased (configured as an Image or Disk inside the Virtual Machine Portal) the Destination Disk will likely not work. I would say about 75% of the time they do not work. I just re-tested this tonight and they worked.
- Copying from one data center to another seems to be as slow as downloading the file.
- When downloading the file, make sure you do not close the form or the download will stop.
- Copy Status does not seem to be working. I either get NULL or Pending all the time. Probably a user error on my part…. The best way to find out if the copy is complete is to check the file size on the destination. It is 0 MB until the copy is complete.
Features:
- Visual view of vhds contained inside a Storage Account
- Simple, one click Delete of vhds
- Simple, one click Lease Break of vhds (for orphaned vhds – see more here)
- One click download of a vhd, tested to work with Hyper-V (downloads at a rate of about 3 MB/sec)
- Support for easily making a copy of a VHD within the same Azure account
- Support for making a vhd copy across Window Azure Accounts within the same region within a few seconds
- Support for making a vhd copy to any account in any region (slow when out of region)
- Prevents you from making a copy of a vhd with an existing Lease
- Uses the Windows Azure Storage API version 1.7.1 (github)
Advanced Features (with REST API Management Certificate):
- Visual view of all vhds contained inside a single Windows Azure Account
- See a “***” by vhds inside the Source storage account
- List all custom user images inside a single Windows Azure Account
Missing Features (i.e. items I hope to add later):
- Ability to upload a vhd
- Ability to get details on an Image
Quick How-To’s:
How to work with just one Storage Account:
Set just a Source Configuration inside the app.config file. I also have a check box for “source only” that will try to auto determine what you want to do. The default is Source Only.
How to Copy a vhd into the same account:
Inside the app.config file for the tool, set the Source and Destination to the same Storage Account.
How to Copy a vhd into another account in the same region (inter-account or cross-account):
Inside the app.config file for the tool, set the Source to the Storage Account that has the source vhd and set Destination to Storage Account that you want for the Destination. The destination container vhds does not need to exist. The tool will create it for you. Click “Copy”. The Destination list should refresh and the copy already be compete. You will know it is complete when the size of the vhd is not 0.
How to Copy a vhd cross region:
Inside the app.config file for the tool, set the Source to the Storage Account that has the source VHD and set Destination to Storage Account that you want for the Destination. The destination container vhds does not need to exist. The tool will create it for you. Select a vhd in the List box that is not lease. Change the vhd name if you wish. Click “Copy”. Click on “List All VHDS” on the top right until you see the file size of the Destination change from 0 to the size of the VHD. This will take a long time, up to 8 hours. I would not close the form until I have confirmed it was completed.
How to Download a Source vhd:
Inside the app.config file for the tool, set the Source to the Storage Account that has the source VHD. Click on “List All VHDS”. Select the VHD you want to download inside the List Box. Click on “Download”. You will be prompted for the download location. Make sure you have enough disk space. Leave the tool open until you see a Completed notice on the top right of the tool. This will take up to 8 hours. Do not close the form or the download will stop.
How to Break a Lease or Delete a vhd on the Source or Destination:
Inside the app.config file for the tool, set the Source and Destination to the Storage Accounts that has the VHDS. Click on “List All VHDS”. Using the List Box, select a single vhd from the list. Click on “Break VHD Lease” to break the existing lease or “Delete VHD” to delete the vhd. Note: this operations are not undoable. Using these incorrectly can result in loss of data or vhds.

by stephen-w-thomas | Sep 19, 2012 | Stephen's BizTalk and Integration Blog
I have been spending a lot of time the past few weeks working with the Windows Azure Virtual Machines that are currently available as a Preview Feature.
The ability to be up and running with a custom hosted Virtual Machine in a matter of minutes without any extra onsite hardware costs still amazes me, although this concept has been around for a while now. It is ever better that I can use the Virtual Machine for a few hours and then throw it away at a net cost to me of only a few cents.
As part for creating and removing over 50 Windows Azure Virtual Machines I ran into two main issues. I wanted to share those issues and the work around I have found for them.
Issue 1: Orphaned Windows Azure Virtual Machine Disks. These are listed under the Virtual Machines area of the preview portal, under Disks. These are Disks that say they are attached to a Virtual Machine that has already been deleted. I see this happen in about 1 in 15 Virtual Machines that I create and then delete.
FIX: The best way to deal with orphaned disks is to use PowerShell to delete them.
Install and configure Azure PowerShell according to this article. At a high level, you will need to download Azure PowerShell, create a management certificate, upload the certificate, download your account publishing settings, and install them into Azure PowerShell. It might sound like a lot of work but it takes less than 10 minutes.
Once complete, open PowerShell and run Get-AzureDisk. This will lists all the Virtual Machine Disks in your account. It uses your account details from the publishing settings file you imported and authentication is done via the management certificate.
To remote the orphaned disks, run Remove-AzureDisk yourDiskName as shown below.

Issue 2: When you try to delete a vhd blob you receive the following error: “A lease conflict occurred with the blob https://StorageName.blob.core.windows.net/vhds/YourVHDName.vhd”.
FIX: This is talked about in the forms and they list a PowerShell script for taking care of this issue. I was unable to get the PowerShell script to work but was able to get the lease broken using the Azure SDK 1.7.1 (on github).
Once you have a reference to the Azure SDK 1.7.1, it has a method called BreakLease on the CloudBlob class. The code to break the lease in C# is shown below. See the form post above for more details on VB and how to use the Azure SDK 1.7.1.
// Create the blob client using the Accounts details in App.Config
CloudStorageAccount sourceStorageAccount = CloudStorageAccount.Parse(CloudConfigurationManager.GetSetting("SourceStorageConnection"));
// Create the blob client using the Accounts above
CloudBlobClient sourceBlobClient = sourceStorageAccount.CreateCloudBlobClient();
// Retrieve reference to a previously created container
// Rename "vhds" as needed. Can be used to read from any container.
CloudBlobContainer sourceContainer = sourceBlobClient.GetContainerReference("vhds");
CloudBlob sourceBlob = sourceContainer.GetBlobReference(VHDNAME.vhd);
// Create Timespan to allow the Lease to remain, in this case 1 second
TimeSpan breakTime = new TimeSpan(0, 0, 1);
// Call BreakLease (Available in 1.7.1)
sourceBlob.BreakLease(breakTime);
Use caution though, make sure you remove the Lease on the right blob otherwise bad and unexpected things will happen. At the very least, you will need to re-create the Virtual Machine from scratch.
I am working on a simple tool that will help copy, move, and delete VHDs as well as breaks the lease if you wish. This tool will be available in the next few days.
by stephen-w-thomas | Sep 19, 2012 | Stephen's BizTalk and Integration Blog
I have been working with Windows Azure Virtual Machines for a few weeks now. As of this blog post, the preview feature is running six locations currently: West US, East US, East Asia, Southeast Asia, North Europe, and West Europe.
One of the things I like about Windows Azure is the world-wide presence. When I select Quick Create for a Virtual Machine, I am able to decide what location to host my Virtual Machine so I can ensure this is some place close to me. Today I might be in Seattle but tomorrow I might be in London. I have the option to select what works best for me at any given time.
Here are a few items I think are worth pointing out.
I found that when using Quick Create to create a new Virtual Machine, I am not able to specify a storage location in the event that I have an existing location I would like to use to store the VHD. A new storage location in the format of portalvhds* will be created for me. The plus side is if you have an auto created location already, all other Quick Create Virtual Machines will use that location. The name of the auto created storage account is not the same across regions.
When using From Gallery, I have a few more options. For Microsoft supplied Images, I have the ability to use a pre-created storage account or have a new one created for me.
If I select Use Automatically Generated Storage Account, I then have the ability to select the Region (i.e. the datacenter) to host the Virtual Machine and Storage Account.
If I select an existing Storage Account, I no longer have the ability to select the Region.
I have been creating and using custom images for a while now and always wondered when I went to use a custom image, why I cannot change the Region I want the Virtual Machine to run at.
And now it all makes total sense!
You cannot create a Virtual Machine in a different Region than your storage container used for the Image or VHD. When selecting an existing storage account in the Gallery, using an existing custom image, or an existing VHD – in these cases the location of the Virtual Machine depends on the location of the underlying storage account.
The location of the Image or Disk is shown on the screen when selecting the image using the From Gallery creation option.
How to ensure you are running in the region / datacenter you want to be running in?
If you want your Virtual Machine to be running in a different region you will need to move the Image or VHD to that region first before creating a Virtual Machine using that resource. Either download and re-upload or copy it to via the API’s. Watch out, at 30 GB to 50 GB a piece this can get “expensive” quickly (for 50 GB VHD Zone 1 – $6.00 US to download). Inside the same datacenter, even across accounts, moving VHD currently do not have bandwidth charged.
Watch for more to come related to moving VHD from one location to another for use with Virtual Machines. I have a tool in the works that should help with this process.
by stephen-w-thomas | Sep 9, 2012 | Stephen's BizTalk and Integration Blog
This is a follow-up to my post and video on Creating a BizTalk 2010 R2 CTP Virtual Machine in Windows Azure.
I hope most of you have reviewed my earlier posts on Creating a Windows Azure Virtual Machine running BizTalk Server 2010 R2 CTP. So now what?
You can create a Syspreped image of the Virtual Machine to be used over and over again to create new BizTalk instances. This would be very handy if you wanted to role this out to 20 new developers on a project (more detail on this here) with all the required software already installed. These images show up under Virtual Machines – Images.
Another option is Windows Azure allows you to download the Virtual Machine to run locally in Hyper-V or VMware 8 (not tested this with the new VMware 9 but it should work as outlined below). This could be useful to work locally on a plane or if you do not want to pay for bandwidth and operation costs for the Virtual Machine. Just remember, once you run locally you lose some of the benefits of the cloud like using cloud computing resources and having VHD replication.
The Virtual Hard Disk created for BizTalk 2010 R2 CTP is 50 GB. When downloading this from your storage account, you will be charged (or counted against your quota) for the bandwidth.
CAUTION: With the free 3-month Trial of Windows Azure you only get 20 GB of region specific outbound bandwidth. Downloading a VHD created in Azure will take 50 GB. The download will complete (at least mine did) but soon after your account will be locked and you will need to either start paying for overages (note once you remove the spending limit cap you can not add it back) or wait until next month to keep using some Azure features. Once I removed the spending limit, I was charged $1.45 for the 32 GB of overage.
LICENSING: I am not even going to begin to speculate on the licensing terms of the Virtual Machine you download and run locally for Windows Azure.
Downing the VHD from Windows Azure
Here are the steps to download your VHD.
1. Ensure you have everything you want installed and copied to your Virtual Machine.
2. Shut down the Virtual Machine.
3. Locate the VHD storage location and disk name used by the Virtual Machine you want to download. Look under the Virtual Machine setting under Disks.
4. You can also find the VHD’s under the storage account. Drill down into the storage account created when you created the Virtual Machine. Click on Containers. You will see VHDS. Drill down into this for a list of VHDs. Make sure you know what disk you want to download if you have more than one.
5. While under the Storage Account used by the Virtual Machine, click on Manage Keys on the bottom.
6. Use the key information to connect to the Storage Account using a client tool. I used CloudXplorer by ClumsyLeaf software. You will need the Storage Account Name and Primary or Secondary Access Key.
7. Below is the view from the client once you are connected to your Storage Account.
8. Select the VHD you want to download and right-click. Save to someplace you have 50 GB of free space.
9. Wait, wait, and wait. my downloads ran at 2.5 MB/sec.
10. Six hours or so later you will have your VHD locally. Once you have the VHD, you can decide if you want to use it with Hyper-V or VMware 8+.
Using the VHD with Windows Hyper-V
Once you download the VHD, setting it up inside Hyper-V is as easy as adding the VHD to a new Virtual Machine.
1. Create a new Virtual Machine using Hyper-V. Select the amount of local RAM you want to use.
2. On the Connect Virtual Hard Disk screen, select “use an Existing Virtual Hard Disk”. Select the disk you downloaded.
3. Click Finish. It is that simple. You are now running locally with Hyper-V.
Using the VHD with VMware 8
First off, I am by no means a VMware expert. These are the steps I used to get the Windows Azure VHD to work inside VMware 8 but it is possible someone else has a better, simpler way to go about this. I will say, from my experience, the Virtual Machine experience in Hyper-V is much better than in VMware for VHD’s downloaded from Windows Azure. I keep having screen re-sizing issues in VMware for some reason.
The VHD downloaded from Windows Azure needs to be converted to VMware format, VMDK. I used a tool called WinImage for this. They offer a free 30-day evaluation.
Once converted, simply setup a new Virtual Machine in VMware and select the newly converted disk. Detailed steps are below.
1. Open VMware 8 and select File, New Virtual Machine. Select Custom (advanced) and click Next.
2. Leave the default Hardware compatibility of Workstation 8.0 selected, click Next.
3. Select “I will install the operation system later”. Click Next.
4. Select Microsoft Windows – Version Windows Server 2008 R2 x64. Click Next.
5. Name your Virtual Machine and set the Location.
6. Select the number of Processors and Cores. This will be based on your existing system resources. Click Next.
7. Select the amount of RAM, again based on your available system resources. Click Next.
8. Select your Network Type, I generally use NAT for running a local Virtual Machine. Click Next.
9. Select LSI Logic SAS as the SCSI Controller. Click Next.
10. On select a disk, select “Use an existing virtual disk”. Select the VHD you downloaded and converted from Windows Azure. Click Next.
11. Click Finish on the next screen.
12. Once you start the Virtual Machine, make sure you install the VMware Tools.
by stephen-w-thomas | Sep 5, 2012 | Stephen's BizTalk and Integration Blog
Are you experienced with Microsoft Azure? Have you tried the Free 90-Day trial? Have you activated the Virtual Machine Preview Feature? Are you up and running with BizTalk Server 2010 R2 CTP in an Azure Virtual Machine?
If you answered NO to any of these questions then this video is for you!
If you are a BizTalk Developer and you are not using or looking at Microsoft Azure now is a great time to jump into what Azure has to offer!
Why? Because with the Azure Hosted Virtual Machines the days of downloading the right SQL version, Visual Studios version, CAB package, and other prerequisites are OVER! All the time consuming work has been done for you. All you need to do is select the BizTalk Gallery image and be on your way to running BizTalk in a dedicated. isolated environment.
This video is a follow up to my blog post yesterday on Setting Up BizTalk 2010 R2 CTP in an Azure Virtual Machine using the Gallery.
This video walks through the following:
- Creating a new Azure 90-day Free Trial Account
- Adding the Virtual Machine Preview Feature to your new account
- Creating a new Virtual Machine running BizTalk Server 2010 R2 CTP
- Downloading the Remote Desktop connection
- Connecting and using the new Virtual Machine
Watch the video now on YouTube or see below for other play options.
[View:http://www.youtube.com/watch?v=YfdyaZ1hWyI]
Click below to live play the video in your browser or download the video.
by stephen-w-thomas | Sep 4, 2012 | Videos
Are you experienced with Azure? Have you tried the Free 90-Day trial? Have you activated the Virtual Machine Preview? Are you up and running with BizTalk Server 2010 R2 CTP in an Azure Virtual Machine?
If you answered NO to any of these questions then this video is for you!
This video is a follow up to my blog post yesterday on Setting Up BizTalk 2010 R2 CTP in an Azure Virtual Machine using the Gallery.
This video walks through the following:
- Creating a new Azure 90-day Free Trial Account
- Adding the Virtual Machine Preview Feature to your new account
- Creating a new Virtual Machine running BizTalk Server 2010 R2 CTP
- Downloading the Remote Desktop connection
- Connecting and using the new Virtual Machine

by stephen-w-thomas | Sep 3, 2012 | Stephen's BizTalk and Integration Blog
BizTalk 2010 R2 CTP is now publicly available as a template inside the Azure Virtual Machine Gallery. BizTalk 2010 R2 CTP supports Windows 8, Windows 8 Server, SQL 2012, and Visual Studio 2012 (this is the only supported version of Visual Studios).
What does having a Virtual Machine Gallery for BizTalk mean to you? If you have an Azure account you can be up and running with BizTalk 2010 R2 CTP in no time at all. Even if you do not have an account yet – it is simple to get a free 90-day trial. Here is what you need to do.
What you need:
- Windows Live Account – to log into Azure
- Mobile Phone (land line might work also) – to receive a verification code
- Valid Credit Card – to check identity, nothing will be charged to the card
Disclaimer: Links and images are valid as of 9-3-2012 and for a US based account sign up.
If you already have an Azure Account go to Step 2.
Step 1: Sign up for a free 90-day Azure trial account
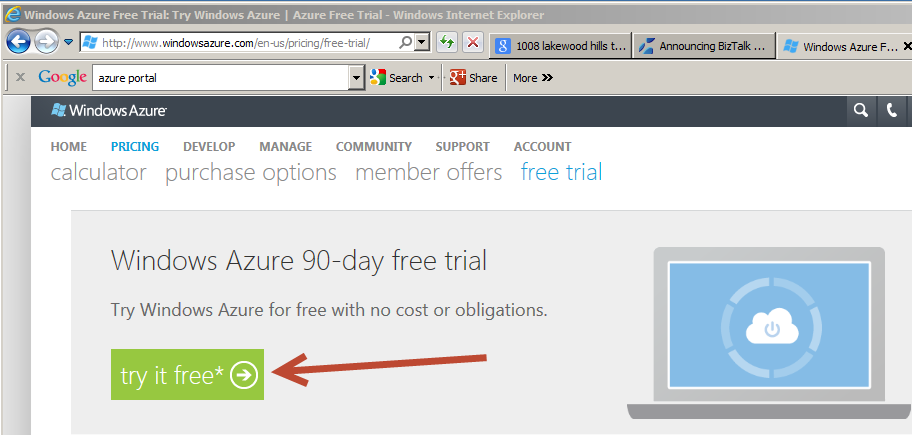
1. Go to: http://www.windowsazure.com/en-us/pricing/free-trial/
2. Click on the “try it free*” green box in the top left of the page
3. Sign in with your Windows Live Account
4. If you are new to Azure, you should get presented with a 90-Day Free Trial offer that includes Cloud Services, Storage, SQL Database, Data Transfer, and Websites. You will need a valid credit card and mobile phone to activate this trial.
5. Click on the arrow on the bottom right to continue to the next screen.
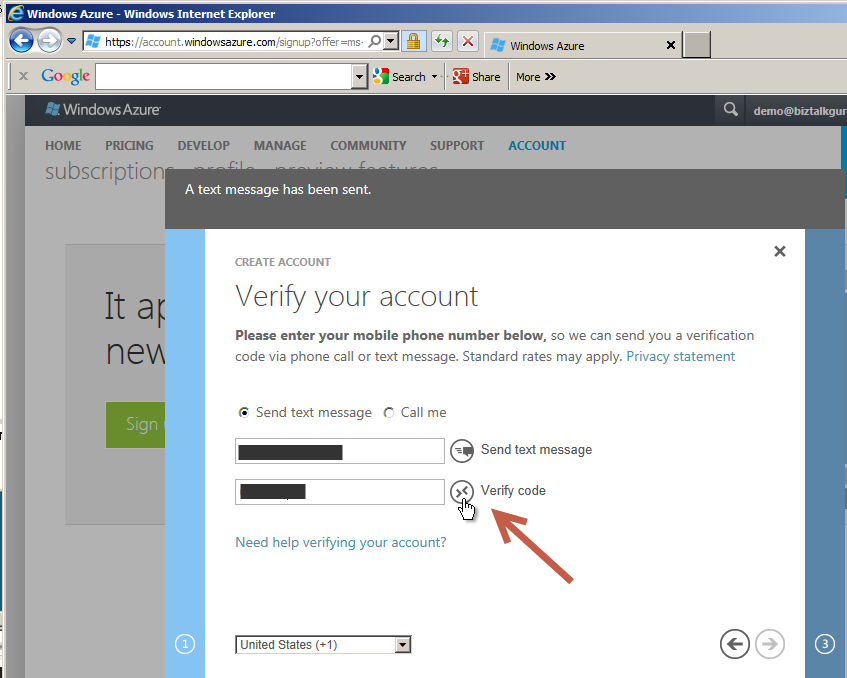
6. On this screen you will be asked to validate your mobile phone number. This can be done via text or voice. Click “Verify Code” once you enter the code to continue. Once validated, click the arrow on the bottom right to continue.
7. The next screen asks for credit card details. This is used for identification purposes. Enter your credit card details and check the arrow on the bottom right to continue.
8. In a few moments your subscription will be activated and you will be re-directed to the Main Azure Account page.
If you have already enabled Virtual Machine Preview go to Step 3.
Step 2: Enable Virtual Machine Preview for your Azure Account
1. As of this blog post, Virtual Machines are in Preview mode. This means it is not full production so strange things can happen like services can go up and down more often, but you are not charged for the features. Because of this, Virtual Machines need to be enabled for a specific subscription.
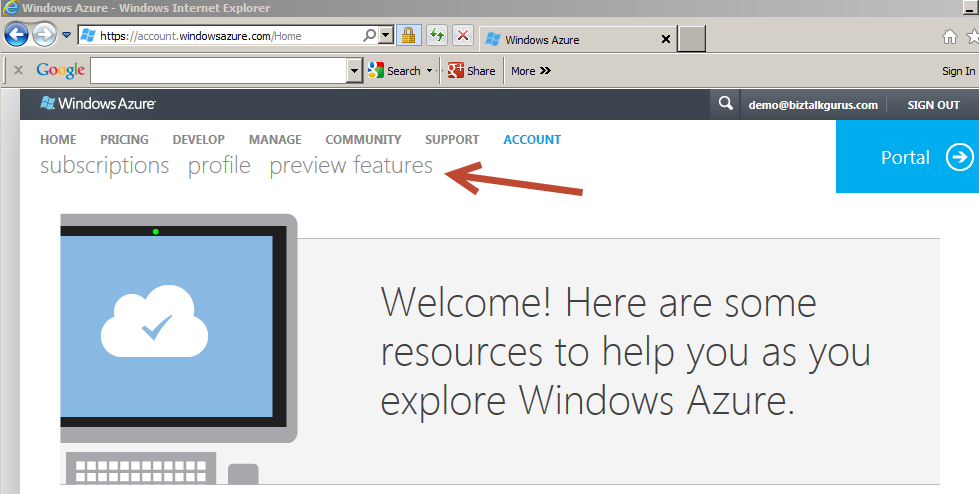
2. On the Main Azure Account page, click on the “preview features” link on the top middle of the screen.
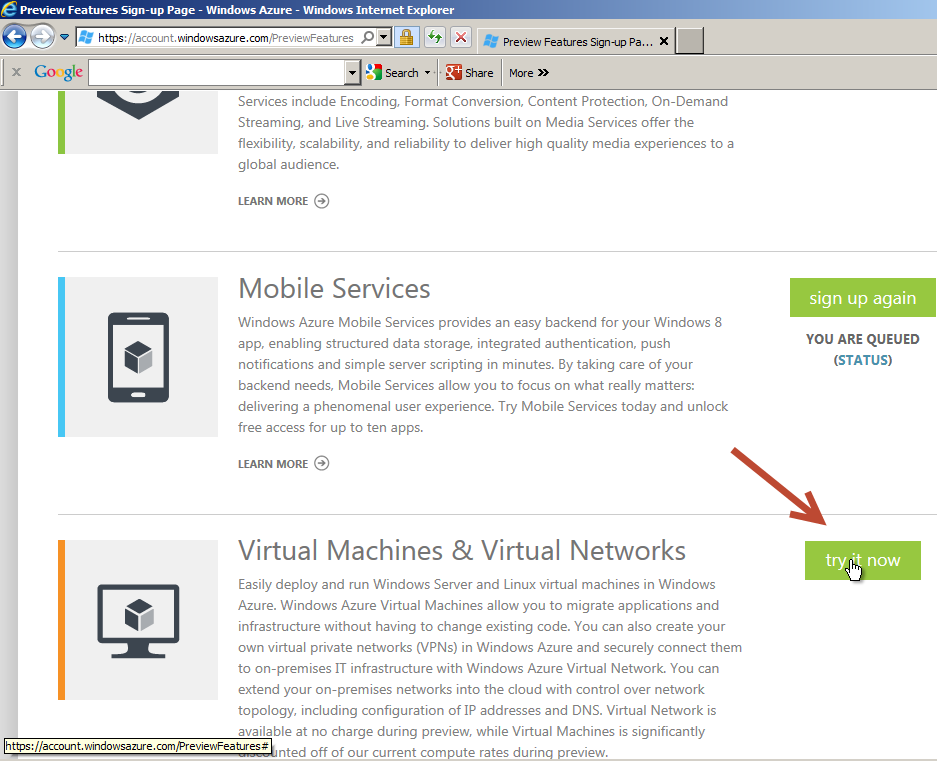
3. This lists all the available features that are in preview mode. Scroll down to the Virtual Machines & Virtual Networks section. Click on “try it now”. You will get a pop-up to select what subscription to apply this to. Select the 3-Month Trial Subscription. If you have more than one subscription, you need to enable Virtual Machines on each of the subscriptions you want to use them on.
4. It will take a few moments for the process to complete. Once completed, the page will refresh. Select “Portal” on the top right.
5. You will see a screen about being redirected to the Preview Portal. This is the correct place to manage Virtual Machines. You will want to get back to classic Azure Portal for features already live in production like the Service Bus.
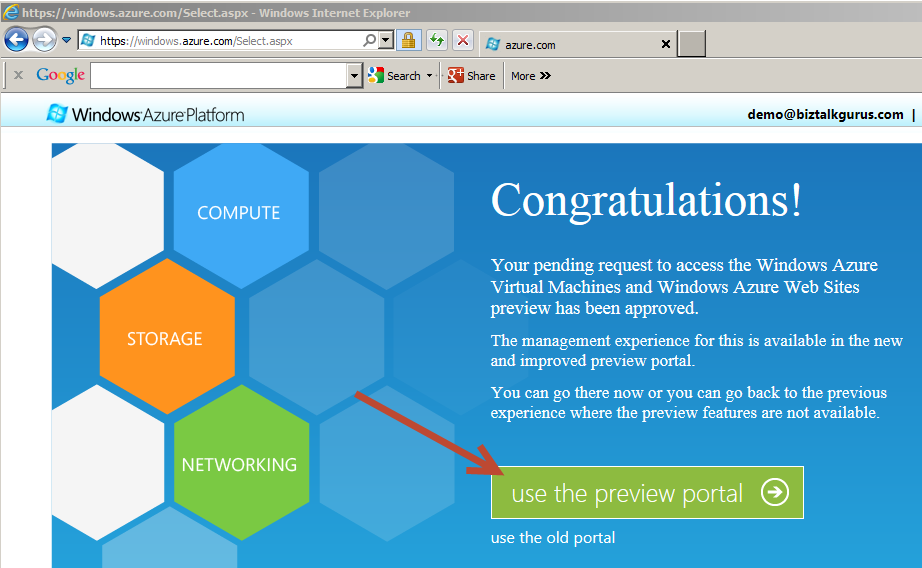
Step 3: Create a BizTalk 2010 R2 CTP Virtual Machine
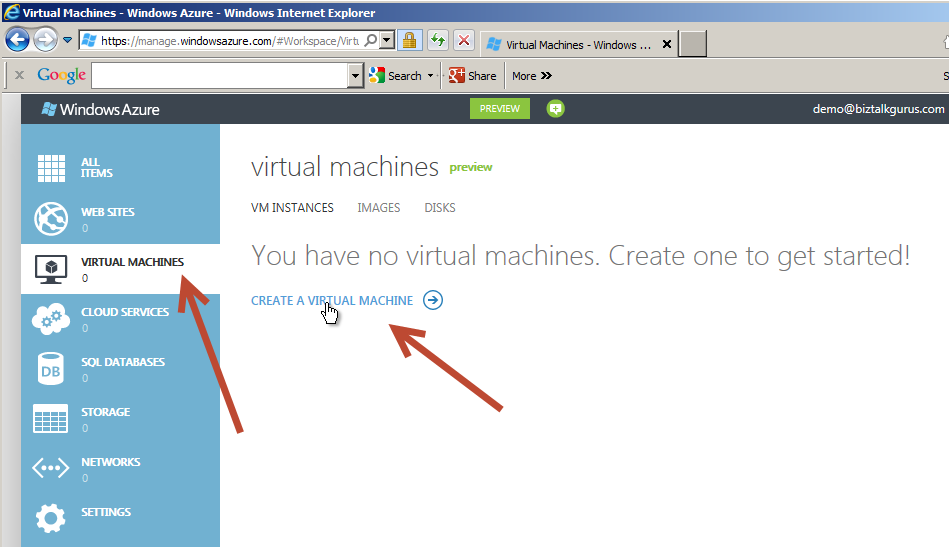
1. Once you are inside the Preview Portal, select Virtual Machines on the left. Then select “Create A Virtual Machine”.
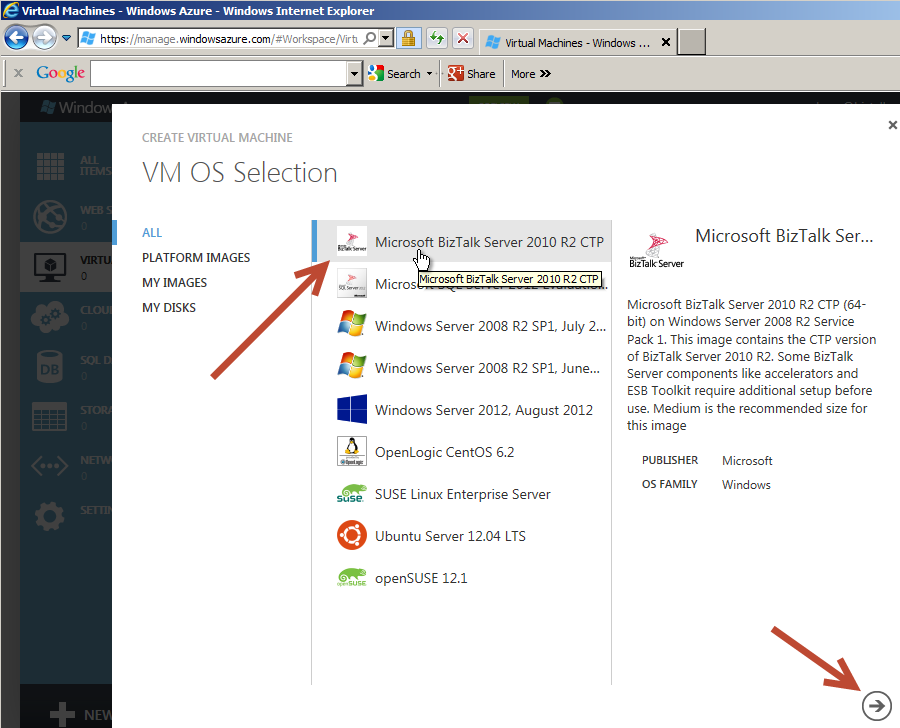
2. On the New Virtual Machine window, select “From Gallery”.
3. The Gallery lists pre-built templates for quickly creating Virtual Machines. Select “Microsoft BizTalk Server 2010 R2 CTP” and click the arrow on the bottom right to continue.
4. The next screen allows you to set the Virtual Machine Name, Admin Password, and select the Size. In this case, the name is Demo123. This does not need to be globally unique to all the Microsoft Virtual Machines. Since this is Preview, you are not charged for usage so the default Small Size is ok for now. Later, once you need to pay for usage you might want to adjust this as needed. Select the arrow on the bottom right to continue.

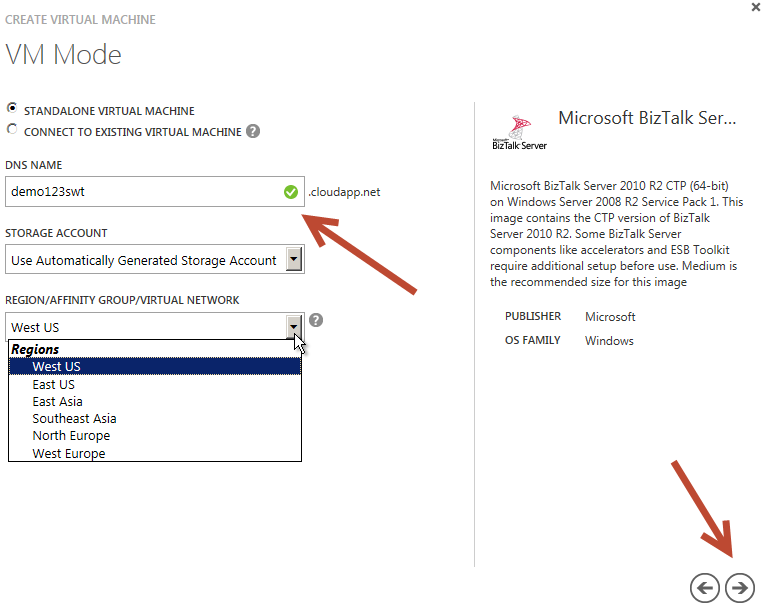
5. On the next screen, you need to set the Globally Unique DNS name. This is how you will connect to the Virtual Machine using Remote Desktop. In this case, the name is “demo123swt”. You also have the option to set the Region for the Virtual Machine if the default is not the best for you. Click the arrow on the bottom right to continue.
6. On the VM Options page, just leave the default of None. This setting could allow your Virtual Machine to be replicated to other datacenters, but since this is just a demo we want to keep it simple. Remember, once live you would be charged more for replication and redundancy. Click the check mark on the bottom right to complete the Virtual Machine setup.
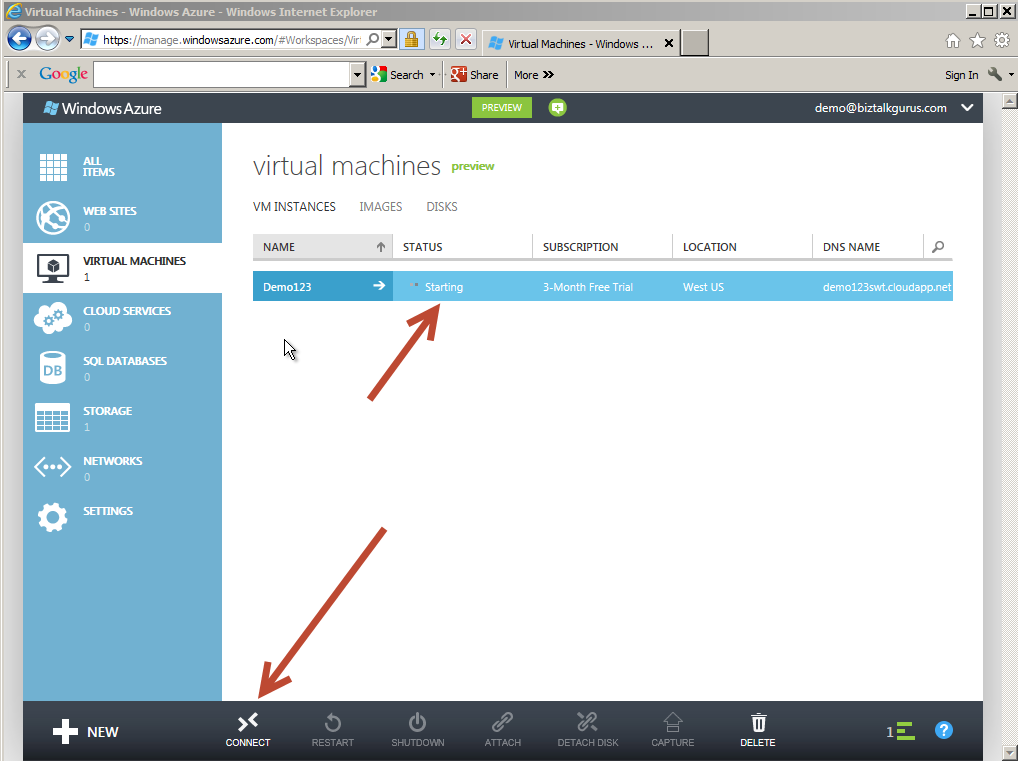
7. You will now be redirected back to the Preview Portal page while the Virtual Machine is provisioned. This will take several minutes. Once complete, click on the Virtual Machine row and it should start automatically. If not, use the Restart link at the bottom to start the Virtual Machine. When the Connect link is available, click on it. This will download a pre-configured Remote Desktop link to this Virtual Machine.
8. Launch the Remote Desktop connection to connect to the Virtual Machine. Use the Admin Password you created in item 4 above.
9. Once you connect to the Virtual Machine, BizTalk 2010 R2 CTP is installed but not configured. You will need to run through the configuration to create your BizTalk Server runtime environment. SQL 2012 and Visual Studios 2012 are already installed on your Virtual Machine. The design time of BizTalk inside Visual Studios is ready for use without any configuration.
10. That is it! Now you can enjoy your BizTalk 2010 R2 CTP Virtual Machine!
Watch for a quick How-To Video of setting up a BizTalk Sever 2010 R2 CTP Virtual Machine coming in the next few days.
by stephen-w-thomas | Jul 9, 2012 | Stephen's BizTalk and Integration Blog
Many times on larger BizTalk projects developers need to share working inside Projects and Orchestrations. This means at some point you will have conflicts. While Visual Studios offers the option to Auto-Merge files, I have not seen this done successfully with BizTalk Orchestrations.
Here are 5 simple rules for simplifying and streamlining large scale BizTalk Orchestration Development.
- Rule #1 – Do not use the default Operation Name on Orchestration Ports
- When using Direct Routing Port out of an Orchestration, by default only two properties are routable. Those are MessageType and Operation. If you leave Operation as the default value of Operation_1 all the Ports created will be the same.
- Operation is one of the most important properties that can be used for routing so make sure it is useful.
- Rule #2 – Always set up Port Types the right way the first time around
- If using Direct Routing, always use Direct Routing locally. I see a lot of Specify Now or Specify Later that turns into Direct Routing later on. This causes Binding File changes and could mask errors in routing.
- Rule #3 – Define all your messages as Multi-Part messages
- Eventually, the message type of a message used inside the Orchestration will need to change. Ensuring all Messages are setup as Multi-Part messages will make this change trivial as compared to having to change break port connections, change port types, update and message variables.
- Rule #4 – Ensure each developer has the same folder structure for testing locally
- This helps simplify changes to binding files. If all the developers use the same structure, a common set of development binding files can be stored in TFS.
- Rule #5 – Smaller units of work
- Try to break Orchestrations into small units of work and leverage the Call Orchestration shape. This allows more than one person to work on larger processes and ensures simplified testing. Just ensure the performance hit of using the Call Orchestration is going to be acceptable. While I have not done the testing myself, I think it is a very optimized call and not something I would be worried about in most cases
by stephen-w-thomas | May 18, 2012 | Stephen's BizTalk and Integration Blog
I have known Steef-Jan Wiggers for many years now. He is a fellow BizTalk Server MVP and one of the sharpest BizTalk guys I know. So of course I was excited when I found out he was working on a solo BizTalk book.
His book is a cookbook-style book named BizTalk Server 2010 Cookbook by Packt Publishing. I like this style of book because it contains smaller units of examples related to a specific area or to solve a specific problem.
This book covers areas like setup, patterns, error handling, AppFabric connect, administration, and testing. They are all easy to follow and it contains great illustrated examples.
This book is available on Amazon (currently with an awesome Kindle price of under $26) and online at Packt.com.
Packt is currently running some great specials at the Packt Microsoft Carnival.
While combing through some blogs today, I found two recent blog posts related to the book I co-authored, Applied Architecture Patterns on the Microsoft Platform. One was by Buck Woody and the other by Mark Brimble. It is great to see great comments on our book almost 2 years after it was published. With Packt’s Microsoft Sale, now is a great time to pick up our book along with the BizTalk Cookbook.
Here is a little known fact – I did not write any of the BizTalk content for our book – I did all of the AppFabric, Service Bus, and SharePoint sections! Um, you all probably already knew that from the poor grammar and I am sure some spelling errors.
Here is your chance to win a copy of Steef’s new book. As runner-up prizes, I have copies of Dan Rosanova’s BizTalk 2010 Patterns and Pro BAM in BizTalk 2009. This will be a Facebook & Twitter only contest that will start next week.
To get the details next week just like us on Facebook or Follow us on Twitter.
by stephen-w-thomas | May 17, 2012 | Stephen's BizTalk and Integration Blog
First off, thanks for all the great suggestions of missing blogs from the BizTalkGurus.com Blog Feed!
I will be working on getting those site included into the feed with the next release that should happen in the next week.
Now for the winners!
Grand Prize of a copy of Microsoft BizTalk Server 2010 Patters book by Dan Rosanova goes to Mark Brimble.
Runner up prize of a copy of Pro Business Activity Monitoring in BizTalk 2009 signed by BOTH authors goes to Stuart Brierley.
Thanks again for all the great feedback and look for more books give-a-ways in the next few days.