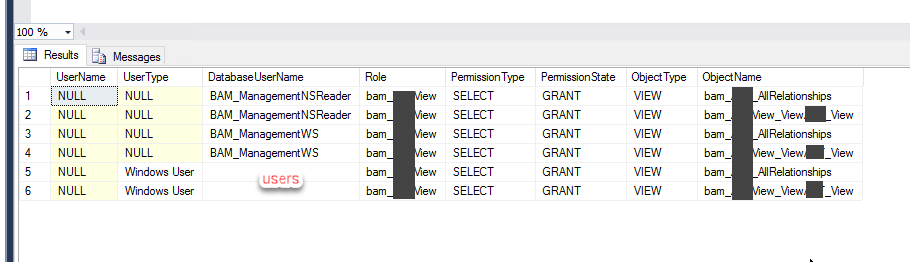
While organizing my vast resources in my hard drive, I recently found out, polished, and improved two SQL Server queries that allow us to check the users and groups with access to BAM resources.
These are simple SQL Queries, but they are essential for maintaining your environment under control, security, and privacy standards compliance.
Generally, BizTalk Server is compatible with all the privacy standards-compliant like GDPR or FIPS. BizTalk Server is a messaging broker that doesn’t capture or store any data on its system other than for the time needed to complete business processes and connect and route messages to their target systems. However, because you can process messages and/or communicate with systems that contain sensitive data (personal data), you must have some good practices in BizTalk Server Applications to comply with privacy standards.
Business Activity Monitoring (BAM) is a collection of tools that allow you to manage aggregations, alerts, and profiles to monitor relevant business metrics (called Key Performance Indicators, or KPIs). It gives you end-to-end visibility into your business processes, providing accurate information about the status and results of various operations, processes, and transactions so you can address problem areas and resolve issues within your business. But it is also a component that can capture data from the messages passing by the systems, and some of these data can be sensitive – that shouldn’t happen, but it can happen.
So, it is always good in terms of security, control, documentation, and in some cases, privacy to know which users can access BAM data.
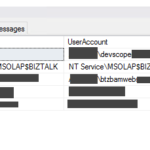
BizTalk Server: SQL Query to list all Users with access to BAMPrimaryImport database
This is a simple SQL Server Query that provides a list of all users that has access to the BAMPrimaryImport database.
THIS SQL SCRIPT IS PROVIDED “AS IS”, WITHOUT WARRANTY OF ANY KIND.
Monitoring a BizTalk Server environment can sometimes be a complex task due to the infrastructure and complexity layers behind the BizTalk Server. Apart from that, the administrator teams need to monitor all the applications deployed to the environment.
Ideally, the administration team should use all monitoring tools at their disposal, whether they are included with the product, such as BizTalk Server Administrative console, Event Viewer, HAT, or BAM. But the main problem with these tools is that:
They need manually intervention.
Almost all of them requires remote access to the environment.
When an administrator must manually check each server or application by events that may have occurred, that is not a very efficient and effective way to allocate the team’s time nor to monitor the environment.
Of course, they can also use other monitoring tools from Microsoft, such as Microsoft System Center Operation Manager (SCOM), or third-party monitoring solutions such as BizTalk360. These tools should be able to read events from all layers of the infrastructure and help the administration team to take preventive measures, notifying them when a particular incident is about to happen, for example, when the free space of a hard drive is below 10%. Furthermore, they should allow the automation of operations when a specific event occurs, for example, restart a service when the amount of memory used by it exceeds 200MB, thereby preventing incidents or failures, without requiring human intervention.
But the question is: and if you don’t have these tools?
You can archive these tasks in several ways. Many people create custom web portals to emulate some of the most basic tasks of the admin console. One of my favorite options is using a mix of PowerShell, schedule tasks, and/or Azure Services like Logic Apps and Functions. But today I will show you a different or alternative way:
Create a Windows Service to monitor suspended Instances and automatically terminate them
Note: of course, this solution can be expanded to other kinds of stuff or add new funcionalities.
BizTalk Monitor Suspend Instance Terminator Service
This is a Windows Service that will be continually monitoring BizTalk Server for specific suspended messages (with an interval of x seconds/minutes/hours defined on code) and termites them automatically.
This tool allows you to configure:
The type of suspended messages you want to terminate
Terminate without saving the messages or saving them to a specific folder before terminating them.
These configurations are made on the app config of the service:
I recently brought some old BizTalk Server resources back to life, like the BizTalk Server WCF-Loopback Adapter or File-Z Adapter. And I have been working on several more resources. So today, it is a pleasure to bring back to life again an old tool created by my friend Thiago Almeida (LinkedIn, Twitter) back in the day he was a BizTalk Server developer:
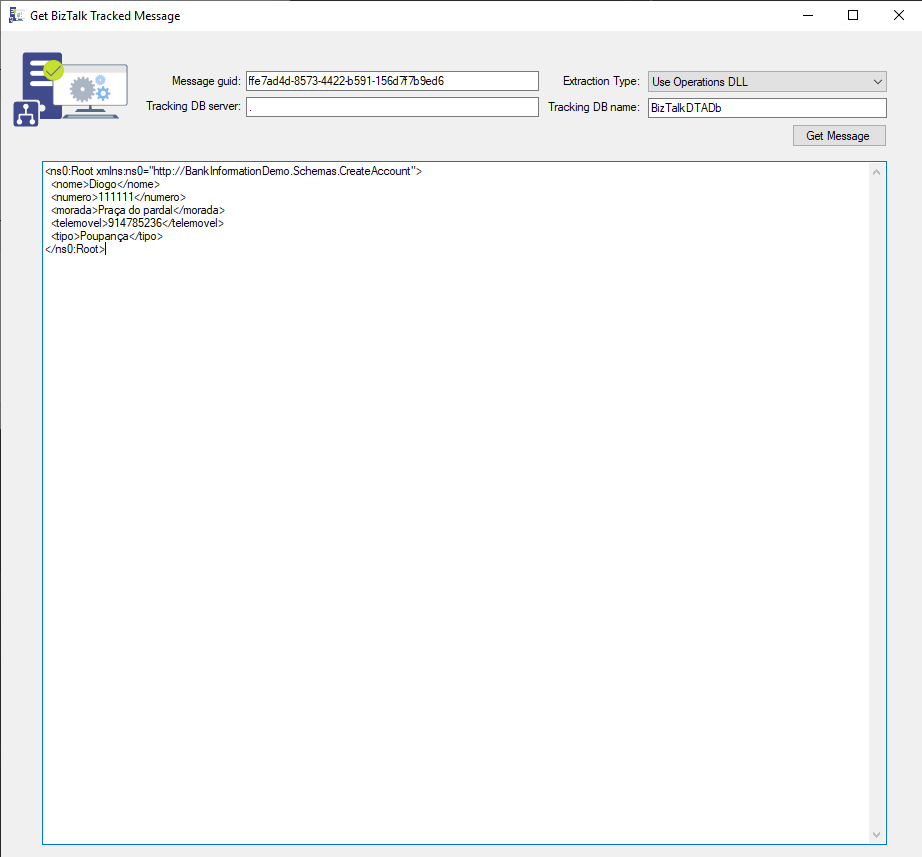
Get Tracked Message tool
This tool allows you to programmatically extract a message body from the BizTalk tracking database using 3 possible ways, as Thiago Almeida mentioned in his original blog post:
Operations DLL: this method uses the Microsoft.BizTalk.Operations assembly. This is pretty straightforward. You add a reference to Microsoft.BizTalk.Operations.dll and use the GetTrackedMessage of the BizTalkOperations class. You can also get to the message context using this method. This method is only available for BizTalk Server 2006 and late.
SQL: this method uses the bts_GetTrackedMessageParts stored procedure inside the tracking database expects the message GUID and will return the compressed message data. We can then use reflection to invoke the Decompress method of Microsoft.BizTalk.Message.Interop.CompressionStreams class inside Microsoft.BizTalk.Pipeline.dll to decompress the data returned from SQL.
And WMI: this method uses the WMI MSBTS_TrackedMessageInstance.SaveToFile method to save the instance to disk. This was the popular method in BizTalk Server 2004 since there were no operations DLL back then.
As some of you know, the body and context of messages in BizTalk are compressed, and rightfully so. However, the actual compression and decompression code are hidden inside an assembly called BTSDBAccessor.dll. This DLL, the BizTalk Database Accessor, is unmanaged and does a lot of work for BizTalk, including accessing the BizTalk databases to send and receive messages.
The application has only one form and expects the following parameters:
The message guid of the message you want to extract.
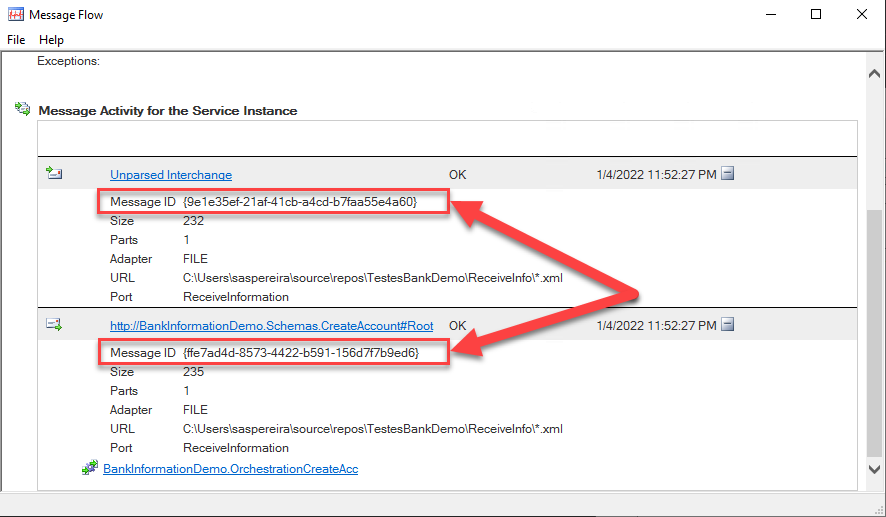
You can get this value for example, from the Message Flow
The extraction type (Use Operations DLL, Use SQL, Use WMI)
Tracking DB server (the BizTalk server name)
Tracking DB name (the BizTalk Tracking database name)
Credits
Thiago Almeida | Linkedin | The original craetor of this tool.
Diogo Formosinho | Linkedin | Member of my team and that help me migrate this tool and that add a more modern look to the tool.
Download
THIS TOOL IS PROVIDED “AS IS”, WITHOUT WARRANTY OF ANY KIND.
You can download the BizTalk Server GetTrackedMessage tool from GitHub here:
After I delivered 21 lectures last year, it is time to start the 2022 season in a “new place” (it is virtual): Chicago! The M365 Chicago Virtual Conference brought to you by VEEAM is a free online (in Microsoft Teams), one-day event on Friday, January 14, 2022. The event will run from 8:30 am ~ 4:30 pm Central Time. ?
Microsoft 365 specialists, Cloud IT administrators, Power Platform administrators, end-users, architects, developers, and other professionals that work with Microsoft Collaboration or Cloud Technologies will meet to share the latest information for working with anything and everything related to Microsoft 365 and Power Platform.
“M365 Below in Chicago!” is a community-led event dedicated to educating and engaging members of the technical community. The event draws upon the expertise of IT Professionals, Microsoft MVPs, Developers, Solution Architects, and other experts who come together to share their real-world experiences, lessons learned, best practices, and general knowledge with other like-minded individuals.
You will find sessions on different subjects like:
Teams
Power Platform
Employee Experience (Microsoft Viva)
SharePoint, OneDrive, Office, and Yammer
User Adoption & Productivity
M365 Security and Compliance
See the full event schedule here: Full schedule.
I choose to submit a session to this event, and I’m honored to be accepted as a guest speaker on a session about Power Automation: A new set of Best practices, tips and tricks. My session will take place at 03:00 pm according to UTC+0 on the Water Tower Power Platform room.
Power Automation: A new set of Best practices, tips and tricks
As I mentioned before, my session will be all about best practices and small tips and tricks that we can apply to our Power Automate flows. For those reasons, I would like to invite you to join me at the M365 Below in Chicago! virtual event on Friday, January 14, 2022.
Session name: Power Automation: A new set of Best practices, tips and tricks
Abstract: A brand new set of tips and tricks and best practices that you should know for being more productive and building more reliable and effective Power Automate flows. This is not an introduction session anymore. Instead, this session will go through a list of 10 new best practices, tips, and tricks addressing advanced topics like deployment, dynamic connectors configurations, etc.
Join us and reserve your presence at the M365 Below in Chicago! virtual event on Friday, January 14, 2022, it is free!
2021 wasn’t the year we all desire to be, COVID-19 pandemic is still present, but overall it was a good year for my family and me. We manage to be safe and well, which is the most important. Because we use our homes more and more, renovations at home continue to happen during 2021 to continue to build our dream house:
It was a year we all got vaccinated, and that allowed us to have more freedom, so we were able to safely visit Portugal (our country) and take a deserved vacation away from the hustle of the city or the most tourist places:
But without exaggeration! Homeworking, or working in all possible crazy situations and from literally everywhere, was still present:
And I decide not to do any in-person events. Instead, I did 21 online events and kept friends close by doing a lot of video calls!
My Blog has still solid numbers and growing every year…
The numbers of my blog kept solid in terms of visitors and new content, and 2021 was again a very productive year:
Publish 77 new posts on my blog;
One more publisher: Pedro Almeida
More than 375,328 visits to my blog.
Coming from 210 countries across the world in the past year (and more than 15,137 cities).
And the countries that most visited my blog are once again the United States, followed by India, the United Kingdom, and this time Australia
Not bad if we compare to previous years:
2020: 392,535 visits, 214 countries, 92 new posts
2019: 431,000visits, 207countries, 43 new posts
2018: 246,381 visits, 194 countries, 70 new posts
2017: 210,000 visits, 167 countries, 63 new posts (migrate to a new blog)
2016: 318,576 visits, 190 countries, 50 new posts
2015: 350,000 visits, 184 countries, 79 new posts
2014: 310,000 visits, 183 countries, 52 new posts
2013: 200,000 visits, 176 countries, 79 new posts
2012: 170,000 visits, 171 countries, 102 new posts
2011: 91,000 visits, 61 new posts
I want to say thanks to all my readers. I appreciate all the visits to my blog, and thanks for your support. And a big thanks to my team at DevScope:
Attractionsin 2021
These are the top 10 posts that got the most views in 2021:
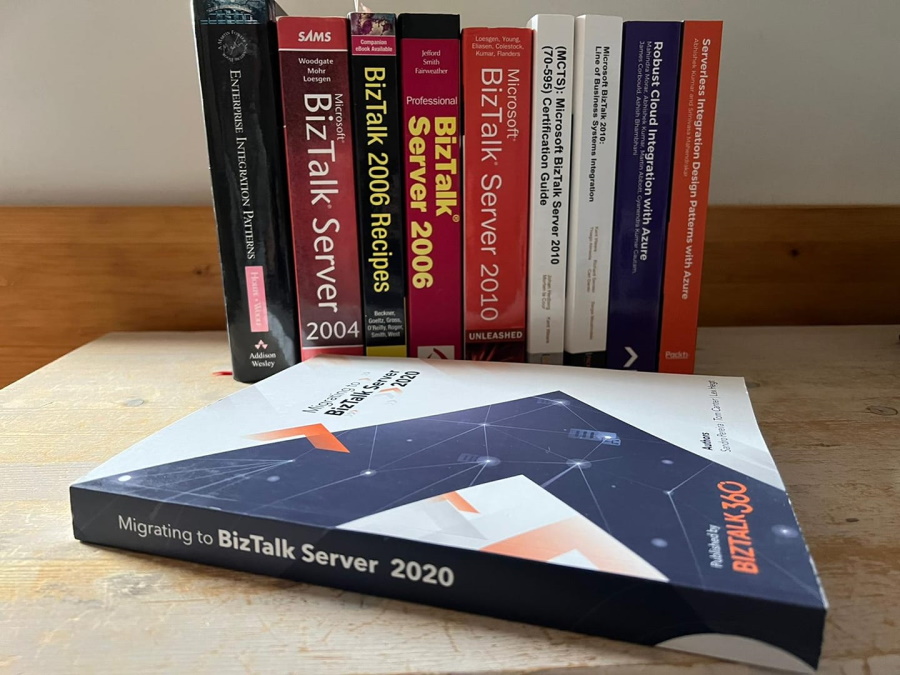
2021 was also the year I finished my second book: Migrating to BizTalk Server 2020. This time with the help of good friends: Tom Canter and Lex Hegt.
The book is almost available! Unfortunately, we had some setbacks with printing books and shipping (Brexit), but I’m confident it will become available by the end of this month (January 2022).
Open Source Contributions…
Continue to improve the existing GitHub contributions and add new ones. Here are some samples:
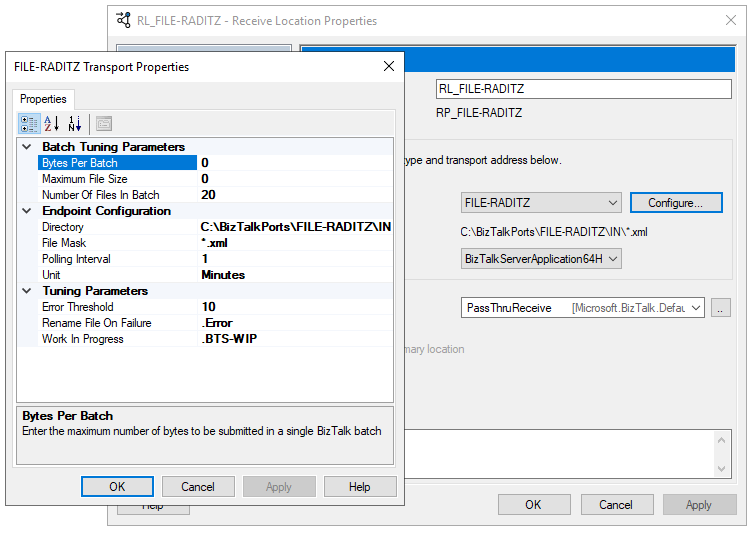
BizTalk Server File-RADITZ Adapter: The File-RADITZ adapter is kind of the arch-enemy of the File-Z Adapter, this adapter doesn’t pick up or process empty (zero-byte) files.
BizTalk Server WCF-Loopback Adapter: The Loopback adapter is simply a two-way send adapter that, in its essence, returns a copy of the outbound message.
BizTalk Server SSO Application Configuration CLI: Unfortunately, there is no command line tool to allow you to script the deployment SSO Application Configurations or perform CI/CD thru DevOps. This tool is designed to address this gap allowing you to: you can securely import Application configurations by using this CLI application
PowerShell Runbook: Find Broken Azure API Connections: This PowerShell Runbook will look at all of the API Connections in all resource groups present in a specific Azure Subscription and provide a list of all broken API Connections.
Function App: Find Broken Azure API Connections: This PowerShell Function App will look at all of the API Connections in all resource groups present in a specific Azure Subscription and provide a list of all broken API Connections.
API Connections Status Report: This PowerShell script will look at all of the API Connections in all resource groups present in a specific Azure Subscription and providen their currenct status.
Find Orphaned Azure API Connectors: This PowerShell script will look at all of the API Connections in all resource groups present in a specific Azure Subscription and then inspect every Logic App in your resource group to check if the API Connections are being used or not. The goal of this script, of course, is to identify orphaned API Connections in a single Resource Group quickly and effectively.
And if you think I stayed and contribute only to my blog, you are very wrong I perform several other publications outside my blog:
Publish 9 guest blog posts on Serveless360 about Azure Integration Services on topics like Logic Apps, API Management, Azure App Configuration, and Power Automate.
However, that is not all! I still was able to deliver 21 virtual sessions in several conferences and User Groups worldwide on topics like BizTalk Server, Logic Apps, and Power Automate:
Azure User Group Portugal | January 13, 2021 | Logic Apps: Development experiences
101 Talk Arena | January 14, 2021 | 101 Talk Arena with Sandro Pereira: What about integration now?
Microsoft Integrate Conference DACH 2021 | January 21, 2021 | Logic Apps: Anywhere, Everywhere
Azure Lowlands | January 29, 2021 | How to create robust monitor solutions with PowerShell, Azure Functions and Logic Apps
Global Automation Bootcamp 2021 | February 6, 2021 | Power Automation: Best practices, tips and tricks
Virtual Scottish Summit 2021 | February 19, 2021 | Power Automation: Best practices, tips and tricks
Global Power Platform Bootcamp 2021 – Münsterland | February 19, 2021 | Power Automate: Best practices, Tips and Tricks
Webinar: PowerTalk by Atea | February 22, 2021 | Power Automate: Best practices, Tips and Tricks
Global Integration Bootcamp 2021 – Virtual | February 25, 2021 | Logic App (Preview): The new kid on the block
Power Platform Virtual Conference | March 12, 2021 | Power Automate: Best practices, Tips and Tricks
Global Azure Lüdinghausen 2021 | April 16, 2021 | Logic App (Preview): The new kid on the block
Global Azure Portugal 2021 | April 16, 2021 | Logic App (Preview): The new kid on the block
DeveloperWeek Europe 2021 | April 26, 2021 | The most important Best practices you need to know to develop Azure Logic Apps
Microsoft 365 Virtual Marathon | April 26, 2021 | Logic Apps: Best practices, Tips and Tricks
Power Platform 24 | May 5, 2021 | How to create robust monitor solutions with PowerShell and Power Automate
Bizz Summit ES | June 4, 2021 | Power Automation: Best practices, tips and tricks
Dutch Microsoft Cloud Call | June 5, 2021 | Logic Apps: Best practices, Tips and Tricks
We wish you a Merry Christmas We wish you a Merry Christmas We wish you a Merry Christmas and a Happy New Year!
We are entering the 3rt pandemic year. We are in a better position, the vaccination is helping minimize the impact of this pandemic, but there is still a long way to go. This makes his holiday season even more important because we never know what tomorrow will be, so on this Christmas, I hope you all can spend time with your close family and friends in the safest way you can. And if you are like me, with three young kids, then it’s all about creating happy memories that will last a lifetime, and we need it more than ever!
And once again, my sincere wishes for a Merry Christmas and a Happy New Year to all my readers, friends, customers, partners, coworkers, my amazing Integration Team at DevScope (Pedro Almeida and Diogo Formosinho – you guys rock!), to all Microsoft Integration and Azure Community (BizTalk Server, Logic Apps, API Management, Service Bus, and so on), MSFT Product Groups, all the Portuguese Communities, my MVP “family” and of course to my beautiful family.
Thanks in advance for all the support and encouragement given throughout another year – 11 years as MVP. I couldn’t make it without you guys!. It was, once again, an incredible year for me, on both a personal and professional level, and I hope that the next will be a year filled with new challenges. I promise that I will continue to share knowledge, hoping to help someone.
May this festive season sparkle and shine, may all of your wishes and dreams come true, and may the new year be made of great happiness. Merry Christmas to you and your entire family, and a happy new year!
Recently I developed a custom file adapter called FILE-Z adapter that I blogged on the BizTalk360 blog. This is an adapter created from the original idea of my dear friend Nino Crudele. It is a custom File adapter capable of reading empty files.
You can see his original blog post here: BizTalk and zero byte file. And you can download the FILE-Z adapter here: FILE-Z adapter GitHub page.
But while I was searching about this adapter, I found an interesting blog post from Yan (Pamela) Yang where she described a different scenario. Some systems can create empty files without locking them. Then, they grab the files again and write some data to them. However, this behavior may cause problems with the default BizTalk Server FILE adapter. For example, the adapter may grab the file AFTER the system creates the empty file, but BEFORE the system attempts to write to it, causing integration issues. Or, in other cases, we may not want to pick up that empty files.
You may also know that the native FILE adapter released with BizTalk grabs and deletes all zero-byte (empty) files without triggering any associated processes. Instead, it logs a warning or error saying that:
The FILE receive adapter deleted the empty file “dir:<folder><file-name>” without performing any processing.
This behavior, according to Microsoft, is by design. Though you can argue that it is not consistent how different adapters treat empty files, e.g., FTP adapter can transfer empty files with no problem.
The File-RADITZ adapter is, kind of, the arch-enemy of the File-Z Adapter. This adapter doesn’t pick up or process empty (zero-byte) files. Instead, it leaves the empty files in the original folder.
I decided to create or recreate this adapter based on Yan Yang scenario just for fun and for mentoring how you can create your custom File adapter by making use of:
DotNet File Adapter sample source code that was available on previous versions of the BizTalk Server SDK
This adapter can be used as a Receive Adapter or as a Send Adapter.
Why the name File-RADITZ?
Well, I named the other adapter FILE-Z because it meant to mean File-Zero, but in reality, because I was a massive fan of Dragon Ball Z :). As I mentioned before, this adapter is, kind of, the arch-enemy of the File-Z Adapter. So, making the idea for a better name, I named it based on a memorable Dragon Ball villain: Raditz, that was one of the first enemy encounters in Dragon Ball Z.
How to install it?
If you want to install the BizTalk Server FILE-RADITZ Adapter, you need to:
Place the folder BizTalkFileRADITZAdapter on any location on your BizTalk Server box. I will recommend to put it in:
C:Program Files (x86)
Note: if you put in any other path you need to modify the StaticAdapterManagement.reg file
Access the folder and double-click on the StaticAdapterManagement.reg file
This will register the adapter to run under 32-bit host instances. To make it available also for 64-bits, you need to:
Click Start
Type %windir%SysWoW64cmd.exe in the search box and press enter
Run the same adapter registry (.reg) file from this command prompt
Now you just need to add this adapter to the BizTalk Server Administration Console:
Open BizTalk Administration Console by pressing the Windows key to switch to the Start menu, type BizTalk Server Administration or BizTalk, click the BizTalk Server Administration option from the Search window.
In the console left tree, expand BizTalk Server Administration à BizTalk Group à Platform Settings and then Adapters.
In the Adapter Properties
In the Name box, type a descriptive name for this adapter.
FILE-RADITZ
In the Adapter combo box, select the adapter from the drop-down that you want to add.
FILE-RADITZ
In the Description box, type a description for the adapter (this is optional).
BizTalk Server File Adapter that is able to process all files except empty (zero byte) files.
Click OK to complete the process of adding the adapter.
Where can you use it?
This version available on GitHub is currently compiled on .NET 4.7.2 and optimized for BizTalk Server 2020. Nevertheless, you can take this code and compile it in other versions of .NET and BizTalk Server. It will be 100% compatible.
Download
THIS ADAPTER IS PROVIDED “AS IS”, WITHOUT WARRANTY OF ANY KIND.
You can download the BizTalk Server FILE-RADITZ Adapter from GitHub here:
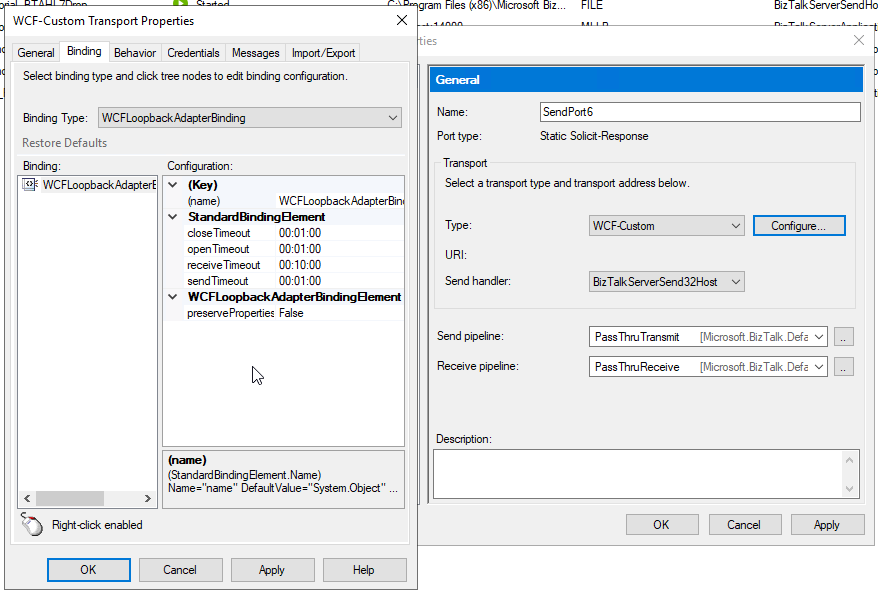
Unfortunately, some good BizTalk Server resources have disappeared over these years, and they are no longer available. A lot of these resources are custom adapters. One of these adapters was the BizTalk WCF Loopback Adapter initially developed by synthesis consulting (I think), providing back then the source code.
What is the WCF-Loopback Adapter?
The Loopback adapter is simply a two-way send adapter that, in its essence, returns a copy of the outbound message. This capability can be used in several situations or scenarios:
One of them is to replace the need to call pipelines inside an orchestration. Calling pipelines inside orchestrations is a good option, but it complicates the logic of the orchestrations with loops and expressions. You’ll also end up repeating the “code” for each message type/orchestration.
And when it comes back in without the overhead of some repository.
I was recently doing a proof-of-concept at a client, and I needed to invoke a receive pipeline inside the orchestration. That approach worked fine, but it feels like a static black hole that you don’t know is there, and if there is a need to apply any changes, you need to redeploy the orchestration. You cannot simply modify a setting on the pipeline. So, I decide to use the Loopback adapter to recreate the same experience implementing a different approach. Unfortunately, this adapter was no longer available for download, and all the references were wiped out from the face of the Earth. Luckily, I had some old print screens on my vast list of internal resources, and I decided to create a new version of this WCF adapter (king of re-creating) and make this WCF adapter available again.
It was also a good training experience to create a WCF Adapter.
How to install it?
This is a WCF adapter, so installing this adapter is the same as installing any other BizTalk Server WCF extension. And you have two options:
Using the machine.config files – This is the most complicated option, but it is the one I prefer to use;;
Or using the availability of registring WCF extensions on the receive and send handlers will not explain this approach.
You can choose to register this WCF adapter to run under 32-bit host instances, 64-bit host instances, or of course, both.
Open the machine.config present on the folder: C:WindowsMicrosoft.NETFrameworkv4.0.30319Config
I will also recomend, not mandatory, to change also the machine.config present on the folder: C:WindowsMicrosoft.NETFrameworkv2.0.50727CONFIG
To run under 64-bit host instances
Open the machine.config present on the folder: C:WindowsMicrosoft.NETFramework64v4.0.30319Config
I will also recomend, not mandatory, to change also the machine.config present on the folder: C:WindowsMicrosoft.NETFramework64v2.0.50727CONFIG
Restart the services.
Where can you use it?
This version available on GitHub is currently compiled on .NET 4.7.2 and optimized for BizTalk Server 2020. Nevertheless, you can take this code and compile it in other versions of .NET and BizTalk Server. It will be 100% compatible.
Download
THIS ADAPTER IS PROVIDED “AS IS”, WITHOUT WARRANTY OF ANY KIND.
You can download the BizTalk Server WCF-Loopback Adapter from GitHub here:
Today I’m going to go over how we solved a real scenario from one of our PowerBI Portal clients. For those who aren’t familiar with it, PowerBI Portal is a web tool that allows organizations to host an unlimited number of Power BI reports and dashboards on an online portal, and give access to it to any number of users, regardless of being in their organization or even having a Power BI account. PowerBI Portal is mainly used by organizations looking to share data with their clients, partners and suppliers, but there have been numerous entrepreneurial cases of people using it as a platform, selling their clients access to the portal or charging for the time they spent on PowerBI Portal.
Other interesting points about PowerBI Portal are the tool’s double layer of row-level security (user and role), which allows data managers to specify who has access to what, and the ability to only consume Power BI Embedded capacity when there’s activity on the platform, which can severely reduce an organization’s consumption bill.
Finally, it’s worth mentioning how flexible the PowerBI Portal API is, allowing for custom solutions such as the one we’ll cover in this blog post.
Challenge
Our PowerBI Portal client wanted a daily report of the top 10 vendors that accessed their organization’s portal along with the most viewed dashboards/reports to better understand how the tool was being used and by whom. The PowerBI Portal API is actually very powerful and straightforward to use, but it didn’t have this capability out-of-the-box so we proactively extend the product’s capabilities by using Azure Integration Services.
This proof-of-concept will explain how you can extend the product by using the existing APIs and creating a fancy Power BI access on the PowerBI Portal audit report.
Create Function App
If you don’t have yet a Function App with the .NET runtime stack created, the first step is to create one, and for that, you need to:
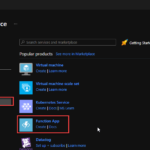
From the Azure portal menu or the Home page, select Create a resource.
In the Create a resource page, select Compute > Function App.
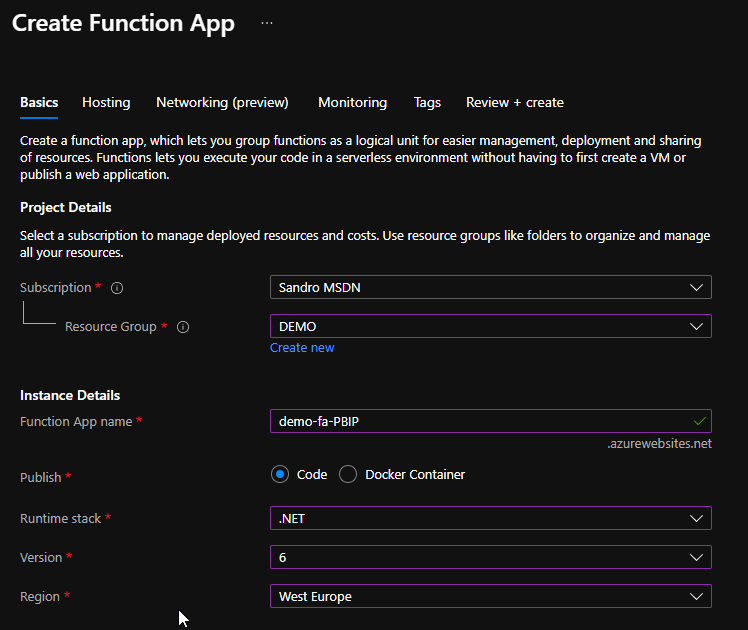
On the Create Function App Basics page, use the following function app settings:
Subscription: Select the subscription under which this new function app is created.
Resource Group: Select an existing Resource Group or create a new one in which your function app will be created.
Function App name: Name that identifies your new function app.
Publish: Select Code.
Runtime stack: Select the option .NET
Version: Choose the version of your installed runtime, in this case, 6
Region: Choose a region near you or near other services your functions access.
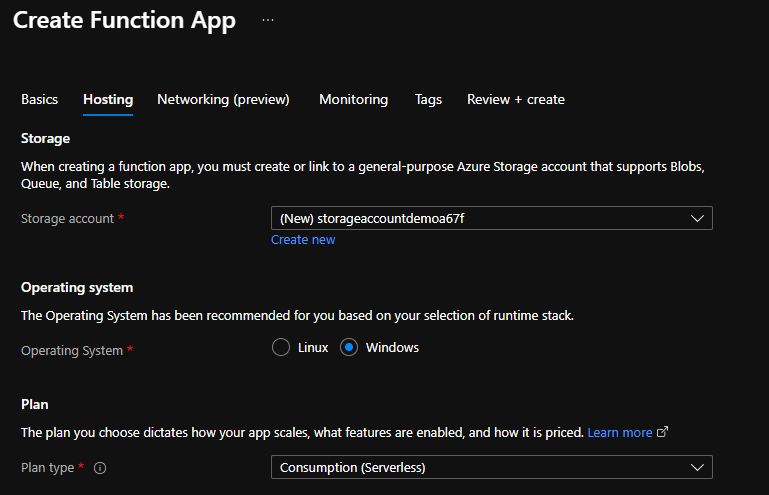
Select Next : Hosting. On the Hosting page, enter the following settings:
Storage Account: Create a storage account used by your function app or select an existing one
Operating system: I choose to use Windows since I’m feeling more comfortable with it.
Plan: Hosting plan that defines how resources are allocated to your function app. In this case, you need to select the Consumption plan.
You can customize the other option according to your intentions or leave the default values. For this demo, we will now select Review + create to review the app configuration selections.
On the Review + create page, review your settings, and then select Create to provision and deploy the function app.
Create HTTP trigger function
The next step is to create two HTTP trigger Function:
FA_Audit_Top10Reports
FA_Audit_Top10USers
For that we need to:
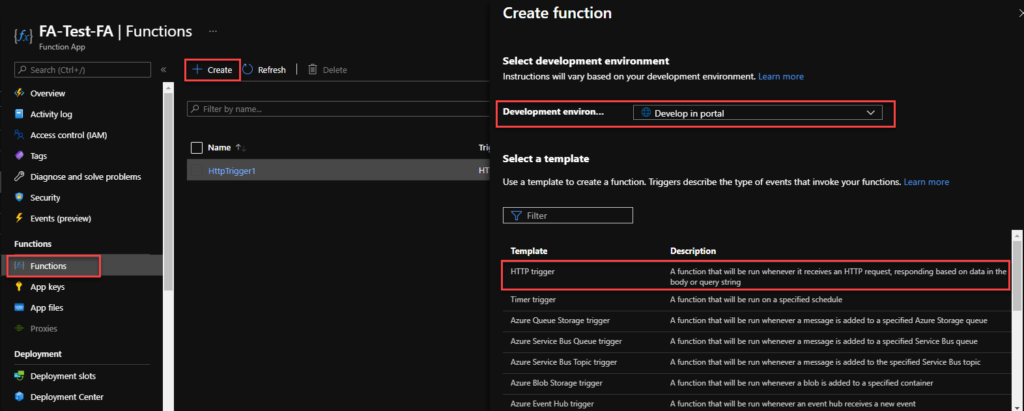
From the left menu of the Function App window, select Functions, then select Create from the top menu.
From the Create Function window, leave the Development environment property as Develop in portal and select the HTTP trigger template.
Under Template details give a proper name for New Function, and choose Function from the Authorization level drop-down list, and then select Create.
On the FA_Audit_Top10Reports window, select Code + Test, then on the run.ps1 file add the following code:
This function will return a list of top 10 reports in a HTML table format
...
string requestBody = new StreamReader(req.Body).ReadToEnd();
JArray data = (JArray)JsonConvert.DeserializeObject(requestBody);
var apiReport = new JArray();
var groups = data
.GroupBy(s => s["name"])
.Select(s => new
{
Dashboard = s.Key,
Count = s.Count()
})
.OrderByDescending(s=> s.Count).Take(10);
...
Note: this is a small part of the code. Click on the button below to download a simplified version of the source code from the overall solution.
On the FA_Audit_Top10USers window, select Code + Test, then on the run.ps1 file add the following code:
This function will return a list of top 10 users in a HTML table format
...
string requestBody = new StreamReader(req.Body).ReadToEnd();
JArray data = (JArray)JsonConvert.DeserializeObject(requestBody);
var apiReport = new JArray();
var groups = data
.GroupBy(s => s["userEmail"])
.Select(s => new
{
User = s.Key,
Count = s.Count()
})
.OrderByDescending(s=> s.Count).Take(10);
...
Note: this is a small part of the code. Click on the button below to download a simplified version of the source code from the overall solution.
Finally, we need to create a scheduling Logic App to trigger the monitoring Function and notify if any API Connection is broken. To simplify the solution, we will be using the Azure Portal to create also the Logic App.
From the Azure portal menu or the Home page, select Create a resource.
In the Create a resource page, select Integration > Logic App.
On the Create Logic App Basics page, use the following Logic app settings:
Subscription: Select the subscription under which this new Logic app is created.
Resource Group: Select an existing Resource Group or create a new one in which your Logic app will be created.
Type: The logic app resource type and billing model to use for your resource, in this case we will be using Consumption
Consumption: This logic app resource type runs in global, multi-tenant Azure Logic Apps and uses the Consumption billing model.
Standard: This logic app resource type runs in single-tenant Azure Logic Apps and uses the Standard billing model.
Logic App name: Your logic app resource name, which must be unique across regions.
Region: The Azure datacenter region where to store your app’s information. Choose a region near you or near other services your Logic app access.
Enable log analytics: Change this option only when you want to enable diagnostic logging. The default value in No.
When you’re ready, select Review + Create. On the validation page, confirm the details that you provided, and select Create.
After Azure successfully deploys your app, select Go to resource. Or, find and select your logic app resource by typing the name in the Azure search box.
Under Templates, select Blank Logic App. After you select the template, the designer now shows an empty workflow surface.
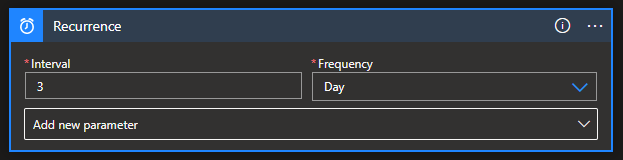
In the workflow designer, under the search box, select Built-In. From the Triggers list, select the Schedule trigger, Recurrence.
In the trigger details, provide the following information:
Interval: 1
Frequency: Day
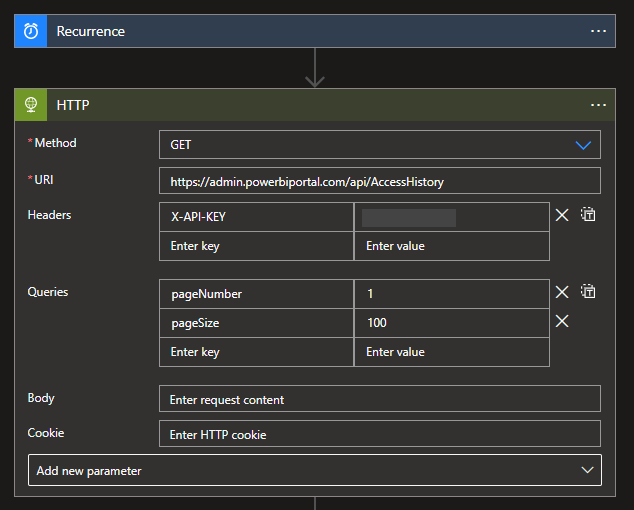
Under the Recurrence trigger, select New step.
Select New step. In the search box, enter HTTP, and from the result panel select the HTTP, HTTP action and provide the following information:
Headers: you need to create the X-API-KEY with your access token
Queries: you need to specify two query parameters:
pageNumber: 1
pageSize: 100
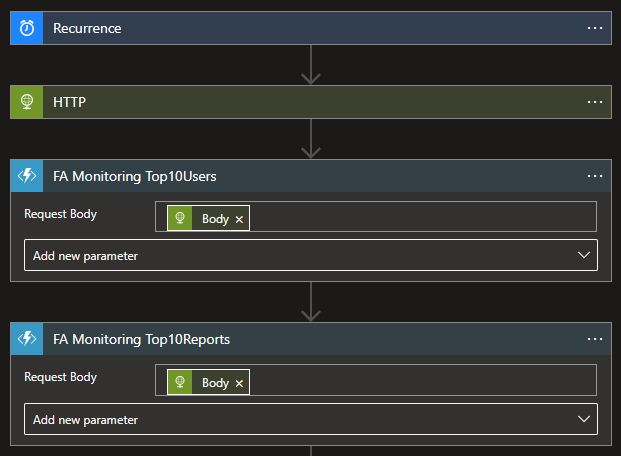
Select New step. In the search box, enter Azure Functions, and from the result panel select the Azure Functions, select the Function App that contains the Functions we create above and then select the FA_Audit_Top10Users function and provide the following information
Request Body: Result body of the HTTP action – @{body(‘HTTP’)}
Do the same steps, this time for the FA_Audit_Top10Reports function
Select New step. In the search box, enter Variables, and from the result panel select the Variables, Initialize variable action and provide the following information:
Name: varEmailBody
Type: String
Value: provide the HTML email body template and add the result of the functions to that template
Note: this is a small part of the HTML body template code. You should customize it according to your needs.
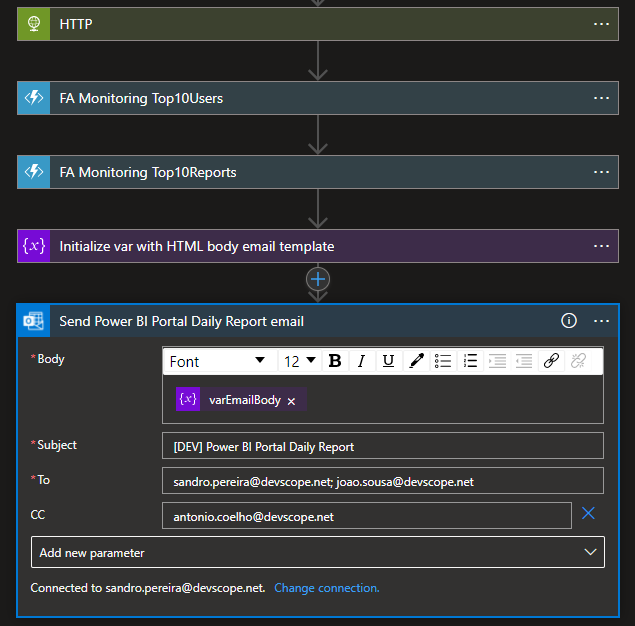
And finally, select New step. In the search box, enter Office 365 Outlook, and from the result panel select the Office 365 Outlook, Send an email (v2)action and provide the following information:
Body: varEmailBody – @{variables(‘varEmailBody’)}
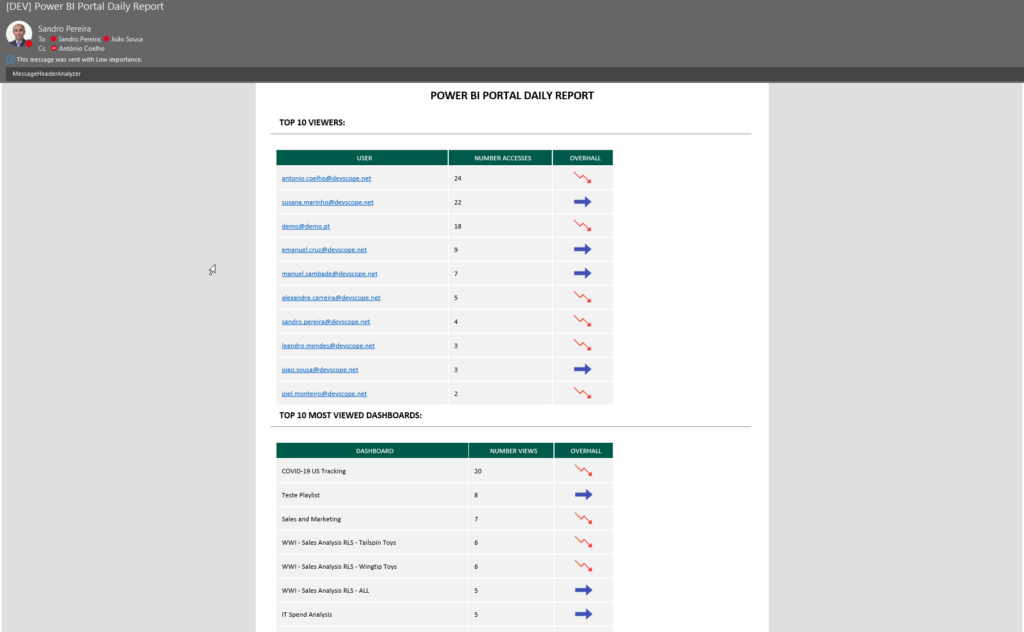
Subject: [DEV] Power BI Portal Daily Report
To: list of your email addresses.
The result, once you try to execute the Logic App, will be a fancy HTML email:
More about Power BI Portal
PowerBI Portal is a web tool that allows users to embed any number of Power BI reports and dashboards on a portal with their organization’s layout, that can be shared with whoever they want, regardless of being in their organization or even having a Power BI account. Know more about it here.
We finally reach the last part of this small blog season on monitoring the status of your Azure API Connections. We start by using a simple PowerShell script locally on our machine to progress to an automated way using Azure Function Apps and Logic Apps. I mentioned in my last post that this previous option had a considerable handicap associated with costs since we couldn’t use the Consumption plan, and instead, we had to use an App Service plan.
Today we will go to address the best solution in my personal opinion:
Using a Schedule PowerShell Runbook on an Automation Account to check the Azure API Connection status
And once again, using a Logic App, this time with an HTTP- When a HTTP request is received trigger, to notify the internal support team if any findings (broken API Connections) were detected.
Note: the Logic App will only be triggered if the Runbook detects/find any non-coherent situations.
Solution 3: Using Automation Account and Logic App
Create Automation Account
The first step, if you don’t have an Automation account yet, is to create one, and for that, you need:
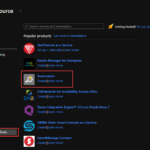
From the Azure portal menu or the Home page, select Create a resource.
In the Create a resource page, select IT & Management Tools > Automation.
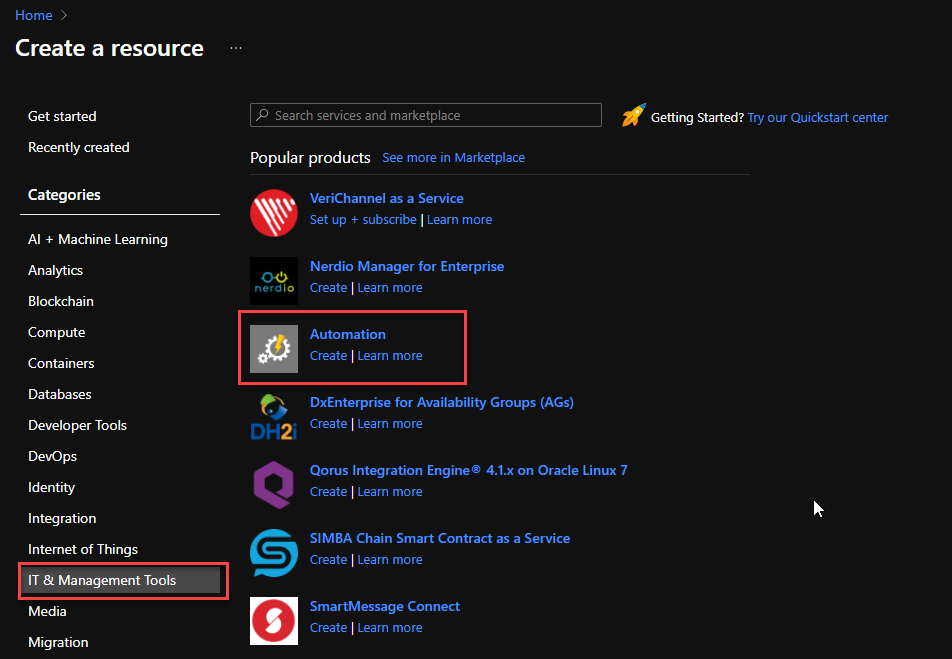
On the Create an Automation Account Basics page, use the following settings:
Subscription: Select the subscription under which this new Automation Account will be created.
Resource Group: Select an existing Resource Group or create a new one in which your Automation Account will be created.
Automation account name: Name that identifies your new Automation Account.
Region: Choose a region near you or near other services your Automation Account access.
You can customize the other option according to your intentions or leave the default values. For this demo, we will now select Review + create to review the app configuration selections.
On the Review + create page, review your settings, and then select Create to provision and deploy the Automation Account.
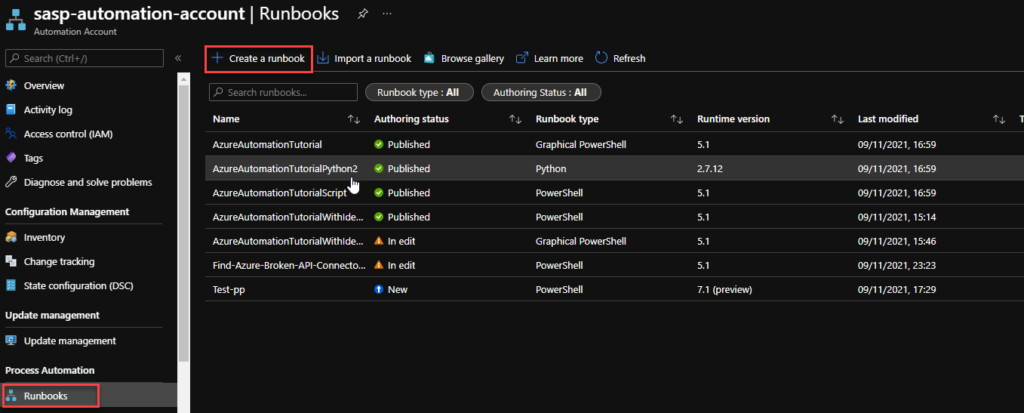
Create Automation PowerShell runbook
The next step is to create a PowerShell runbook. For that, you need to:
From the left menu of the Automation Account window, select Runbooks, then select Create a runbook from the top menu.
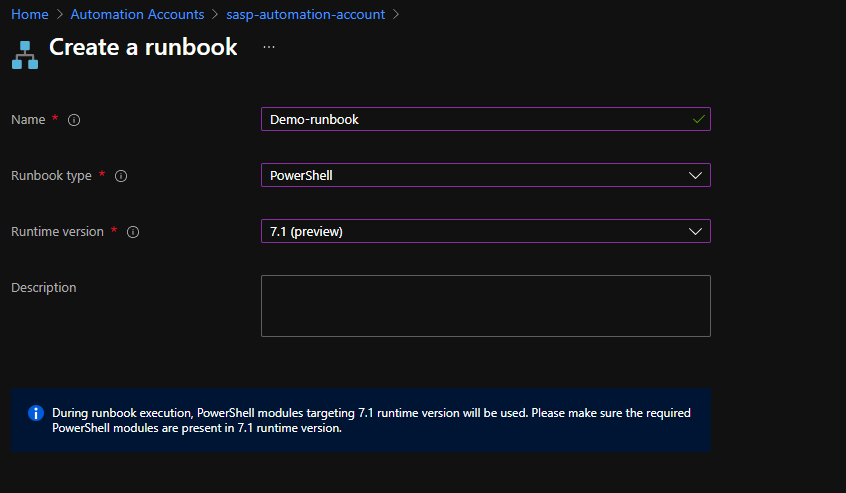
From the Create a runbook window, use the following settings:
Name: Name the runbook
Runbook type: From the Runbook type drop-down menu, select PowerShell.
Runtime version: From the Runtime time drop-down menu, select 7.1 (preview).
Description: Provide a description for this runbook (not mandatory filed)
Finally if everything works properly you can publish the runbook.
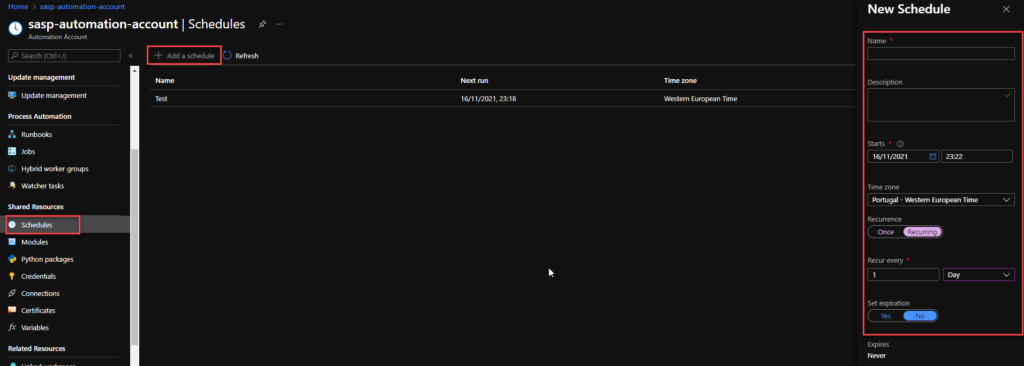
Now we need to schedule the runbook. For that, we need:
From the left menu of the Automation Account window, select Schedules, then select Add a schedule from the top menu.
From the New Schedule window, use the following settings:
Name: Name of the Schedule
Description: Provide a description for this schedule (not mandatory filed)
Starts: Datetime to start the schedule
Time zone: Time zone configured for this schedule, in my case Portugal – Western European Time
Recurrence: Select whether the schedule runs once or on a reoccurring schedule by selecting Once or Recurring. We are going to use Recurring
If you select Once, specify a start time and then select Create.
If you select Recurring, specify a start time.
Recur every: select how often you want the runbook to repeat. Select by hour, day, week, or month. In hour case, 1 per day
Set expiration: Leave the default property, No.
When you’re finished, select Create.
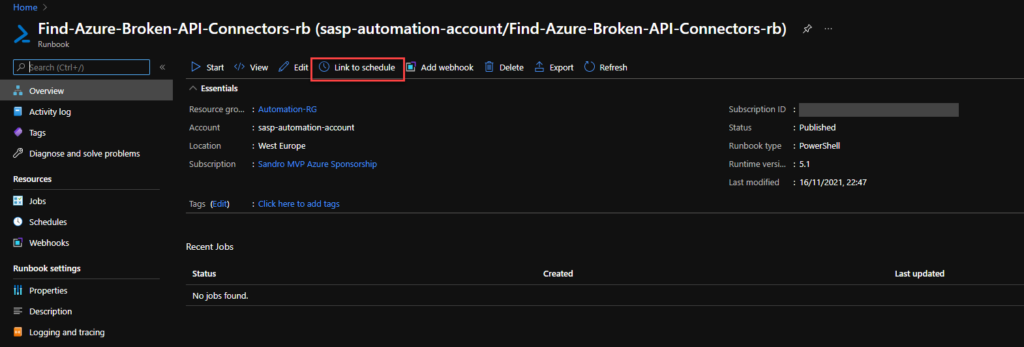
Now that we have our runbook and our schedule created, we need to bind these two, and for that, we need to:
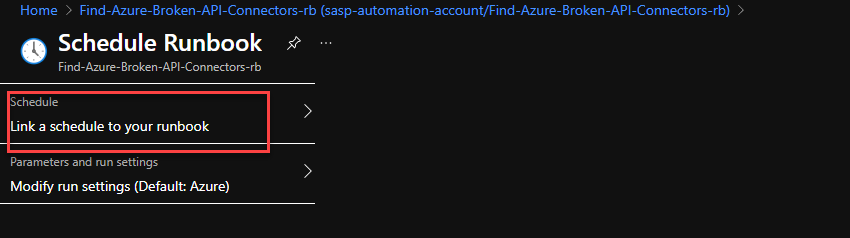
Access to the previous runbook the we create above, and on the runbook page select Link to schedule
On the Schedule Runbook page, select Link a schedule to your runbook.
On the Schedule page, select the schedule we create above from the schedule list
And then select OK.
Create a Logic App
Finally, we need to create a Logic App with an HTTP- When a HTTP request is received trigger to notify if any API Connection is broken. To simplify the solution, we will be using the Azure Portal to create also the Logic App.
Note: once again, the Logic App will only be triggered if the Runbook detects/finds any non-coherent situations..
To accomplish that, we need to:
From the Azure portal menu or the Home page, select Create a resource.
In the Create a resource page, select Integration > Logic App.
On the Create Logic App Basics page, use the following Logic app settings:
Subscription: Select the subscription under which this new Logic app is created.
Resource Group: Select an existing Resource Group or create a new one in which your Logic app will be created.
Type: The logic app resource type and billing model to use for your resource, in this case we will be using Consumption
Consumption: This logic app resource type runs in global, multi-tenant Azure Logic Apps and uses the Consumption billing model.
Standard: This logic app resource type runs in single-tenant Azure Logic Apps and uses the Standard billing model.
Logic App name: Your logic app resource name, which must be unique across regions.
Region: The Azure datacenter region where to store your app’s information. Choose a region near you or near other services your Logic app access.
Enable log analytics: Change this option only when you want to enable diagnostic logging. The default value in No.
When you’re ready, select Review + Create. On the validation page, confirm the details that you provided, and select Create.
After Azure successfully deploys your app, select Go to resource. Or, find and select your logic app resource by typing the name in the Azure search box.
Under Templates, select Blank Logic App. After you select the template, the designer now shows an empty workflow surface.
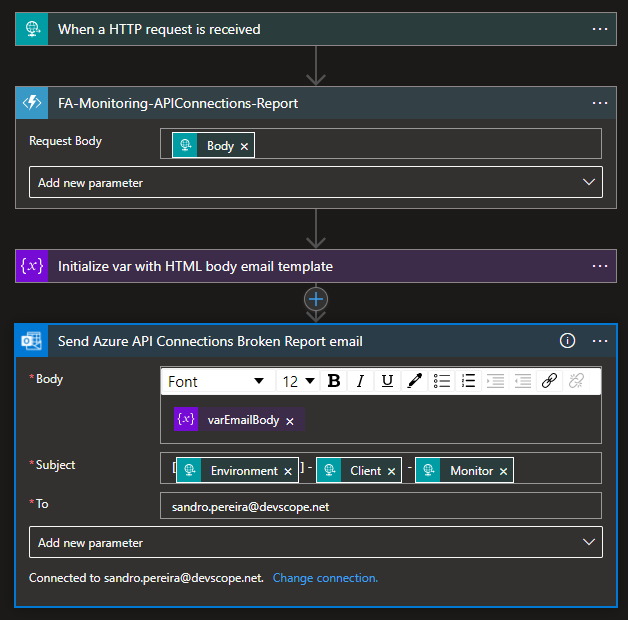
In the workflow designer, under the search box, select Built-In. From the Triggers list, select the Request connector, and the When a HTTP request is received trigger.
Use the following sample payload to generate the schema
Then we be using the following actions to notify the support team:
Choose an Azure function: I’m calling and Azure Function to transform the list of broken API’s in a HTML table.
Set variable: I’m setting the varEmailBody with my default HTML email body Template and add the HTML table that the Azure Function returned
Send an email (v2) – Office 365 Outlook: To send the email to the support team
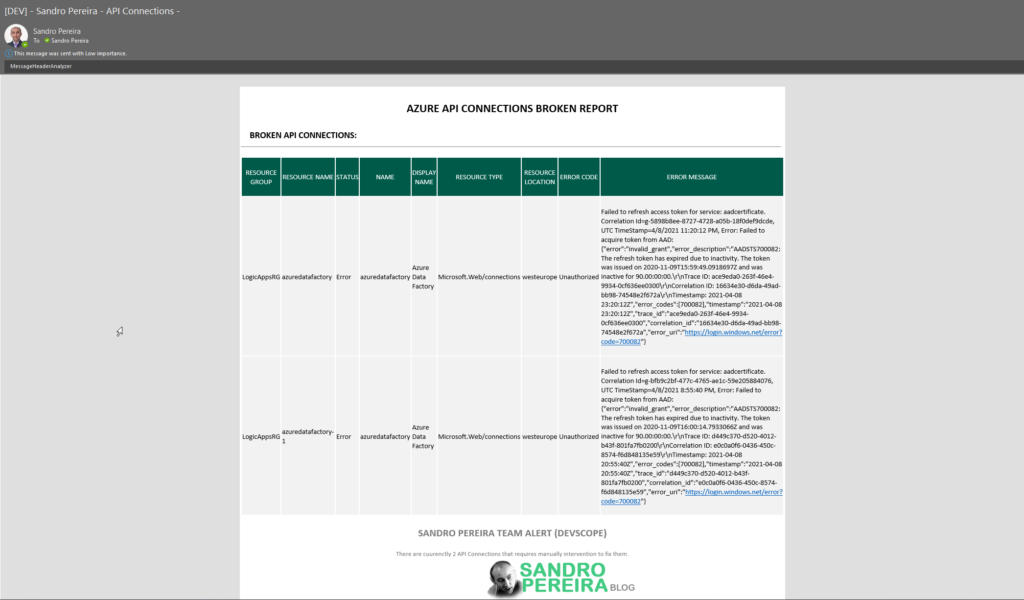
The result, once you try to execute the Logic App, will be a fancy HTML email:
Although this approach required quick learning about Azure Automation, that was quite simple, and for me, this is the best approach in terms of cost and architecture design.