
by Lex Hegt | Feb 2, 2018 | BizTalk Community Blogs via Syndication
This blog is a part of the series of blog articles we are publishing on the topic “Why we built XYZ feature in BizTalk360”. Read the main article here.
Why do we need this feature?
SOAP & REST based Web Services are one of the most used technologies in integration scenarios. In the last few years, the need for HTTP based communication with external vendors/systems has increased significantly. Pretty much it became a norm to expose the API’s of the system for external consumption. Examples: Salesforce API, Microsoft Graph API for Office365 and so on. Also, the companies want to reuse their legacy system as much as possible internally and they expose them as internal web services.
BizTalk Server offers great support for HTTP(S) based web services, both on the Receive and the Send side of interfaces.
When you are integrating multiple endpoints via HTTP(s), it is important to know whether the web services are available, responsive, returning expected values etc., to be able to communicate with them and to support the business process.
What are the current challenges?
The use of web services (web endpoints) comes into play on both receive side and send side in BizTalk Server. Both comes with its own significance and it’s important to monitor them.
Receive Side web services
BizTalk Server allows you to publish schemas and orchestrations as WCF services, which are then published in the IIS web server on the BizTalk Server. In case, you have multiple BizTalk servers in the same BizTalk group, you can set up an NLB (Network Load Balancing) cluster to achieve Load Balancing and High Availability.
The published WCF services are associated with Receive Locations. As a result, if something is wrong with a particular WCF service, for example, the Application Pool in IIS is down, the Receive Location will automatically be set to Disabled.
If the Receive Location/Port is down, then it won’t accept any incoming messages via this channel. Therefore, it’s important to make sure it’s up and running all the time.
Send Side web services
On the outgoing side, you configure either HTTP, SOAP, REST, BizTalk Send port to connect to external web endpoints. If something is wrong with the external web endpoints, the state of the Send Port will remain the same inspite of the state of the external web endpoint.
So, to be able to know the actual state of the web endpoint, the well-being of the endpoint will have to be monitored and checked. This helps to be sure that when a real request to the web endpoint is made, that the actual endpoint can be accessed and the request is properly being processed.
When a web service is down and requests are being sent to that web service, the failing requests will lead to suspended messages in BizTalk, resulting in an interruption of the business process and some work for the BizTalk administrator to have the issue solved and to resume the suspended messages.
An external web service can be down for a variety of reasons.
- Internal web server/service issues – you might get for example the famous, though non-informative, HTTP 500 return codes
- Certificate issues – expired certificates, incorrectly configured or unaccepted client certificates
- Firewall issues – web server/service cannot be contacted at all due to wrongly configured firewall rules
- Flooding – there’s more work than the web server/service can handle
All this kind of errors will lead to unavailability of the web endpoint and interruptions of the business process. This is exactly what we want to prevent, and as it is impossible for a BizTalk administrator to manually monitor web endpoints 24/7, it is way more efficient to have monitoring in place.
How BizTalk360 solves this problem?
For monitoring the physical HTTP web endpoints, BizTalk360 offers Advanced Web Endpoint Monitoring. Once set up, this feature will periodically fire requests against the web service which is being monitored and report any issues identified.
The feature is quite rich and offers, amongst others, support of:
-
- HTTP and HTTPS web services (REST/SOAP)
- Using Gateway proxies
- Providing credentials
- GET and POST methods
- Multiple content types like
- providing custom
- HTTP headers
- GET parameters
- POST payload
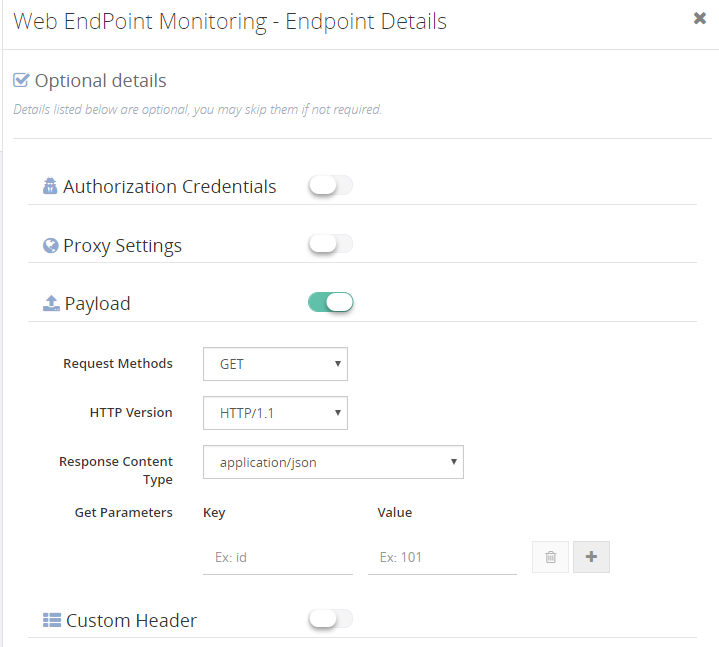
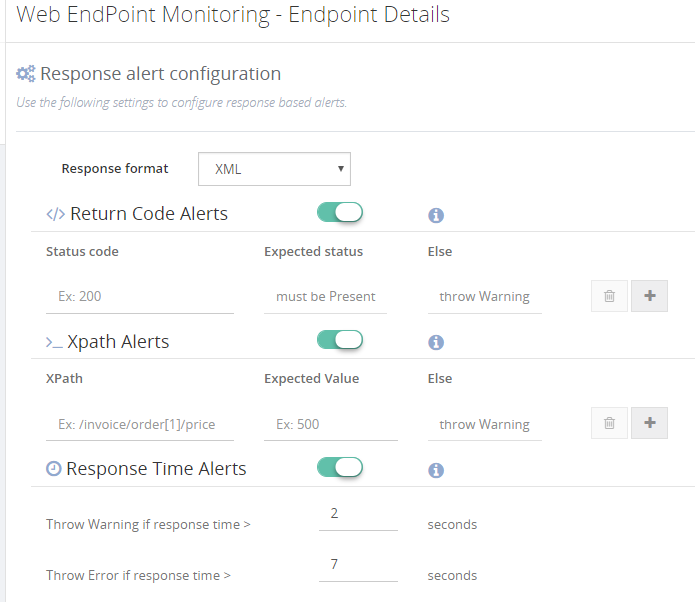
These features allow you to monitor for example HTTP return codes (200 is okay, 500 is warning/error). But you can also check for certain keywords to exist in the XML/JSON response message, by entering XPath/JSON queries.
You can even monitor for response times of the web service, as this might be an indication that the web service is under stress.
So with the Advanced Web Endpoint Monitoring feature of BizTalk360, you will be able to cover pretty much all the web endpoint monitoring scenarios, whether these web services reside inside your organization or outside and whether these services use XML or JSON.
Conclusion
To underline the importance of web endpoint monitoring, let’s shortly discuss the often forgotten concept of Chain Monitoring.
It is a bit of a human behavior, to just focus on your own work and systems, meanwhile forgetting the impact of your work on other systems.
A simple example: a Technical/Functional Application administrator is responsible for the administration of a CRM system. On a day to day basis, he is very busy with functional questions, which results in not always having the overview of the health of the web services of his CRM system, while these services received data on a regular base from an ERP system, via BizTalk Server.
It was with this kind of scenario where we have experienced that the BizTalk administrator who was using BizTalk360 and had set up Web Endpoint Monitoring, was notified by BizTalk360 of problems with a web endpoint. The administrator contacted the owner of the web endpoint, who was not yet aware of the issue! The issue was solved by the owner of the web service and no interruption of the business process took place.
The above example was based on a scenario which really took place in one of our customer and a very clear example of the purpose of Advanced Web Endpoint monitoring.
If you want to read more on the nitty/gritty of the Advanced Web Endpoint Monitoring feature in BizTalk360, please read this article.
Get started with a Free Trial today!
If you are struggling with the above mentioned challenges, why not give BizTalk360 a try. It takes about 10 minutes to install on your BizTalk environments and you can witness and check this feature on your own BizTalk Environments. Get started with the free 30 days trial.

Author: Lex Hegt
Lex Hegt works in the IT sector for more than 25 years, mainly in roles as developer and administrator. He works with BizTalk since BizTalk Server 2004. Currently he is a Technical Lead at BizTalk360. View all posts by Lex Hegt

by Lex Hegt | Jan 25, 2018 | BizTalk Community Blogs via Syndication
This blog is a part of the series of blog articles we are publishing on the topic “Why we built XYZ feature in BizTalk360”. Read the main article here.
Why do we need this feature?
To be able to do his job, a BizTalk administrator needs to know what kind of processes flow through the BizTalk environment. This insight can be used for a number of purposes, like:
- analysis and/or debugging of issues
- learning/training purposes
- documentation purposes
One of the features which can be used to better understand the processes in BizTalk is the Tracking queries which can be accessed through the BizTalk Administration Console. These queries provide insight on which messages and orchestrations have been processed by BizTalk. From the Tracking queries, it is also possible to have some insight on the message flow.
What are the current challenges?
The major problem with the message flow which can be shown in BizTalk Admin console is that it is very textual and doesn’t allow you to show the entire flow. This makes understanding the processes in BizTalk a time-consuming task.
Another disadvantage is that when somebody accesses the tracking queries in the BizTalk Admin console, confidential information might be revealed to unauthorized people.
How BizTalk360 solves this problem?
BizTalk360 offers a lot of features to provide insight in BizTalk processes. One of these features is the Graphical Message Flow viewer.
As with the Tracking queries in the BizTalk Admin console, the Graphical Message Flow viewer depends on tracking data. So, to start using the Graphical Message Flow viewer, you start with creating a Tracking query in BizTalk360.
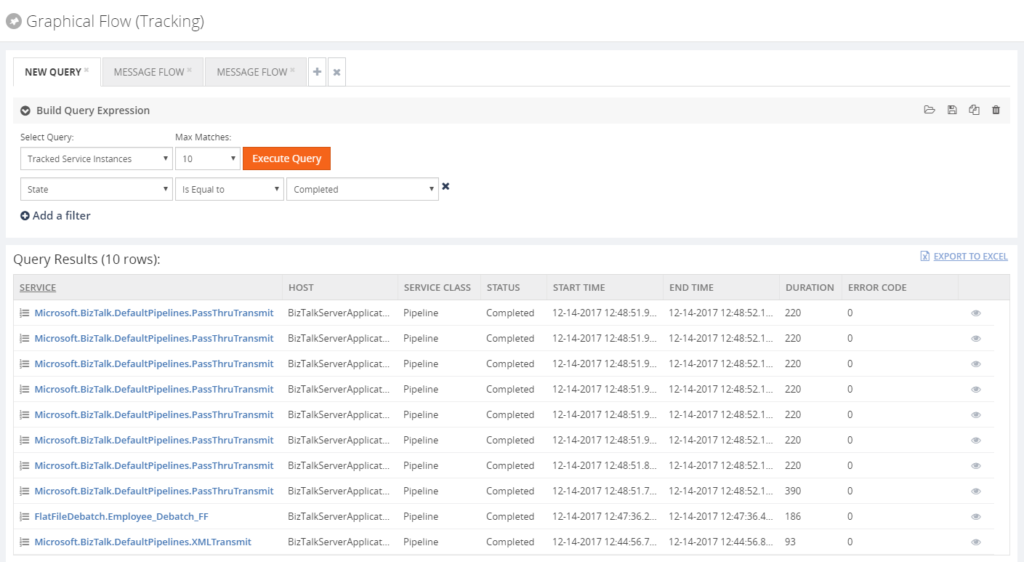
As you can see from the Build Query Expression part of the screen, you can create the same kind of queries as in the BizTalk Administration console. You can also save your tracking queries for later use. These queries are stored in the BizTalk360 database, so you always have them at hand. Whereas with the BizTalk Admin console, your queries are stored to the file system which can make it harder to retrieve them, especially when you have multiple BizTalk servers.
Details of the tracked service instances can be viewed by simply clicking the eye icon in the most right column of the grid.
The first column of the results grid shows the name of the service as a hyperlink. By clicking the hyperlink, the Graphical Message Flow for the service instance will be shown.
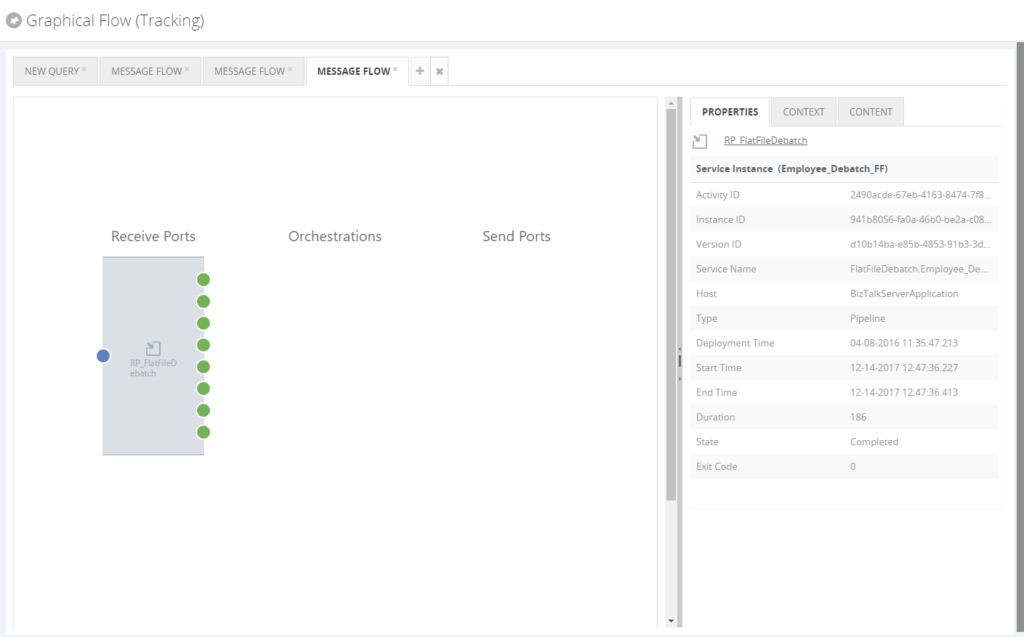
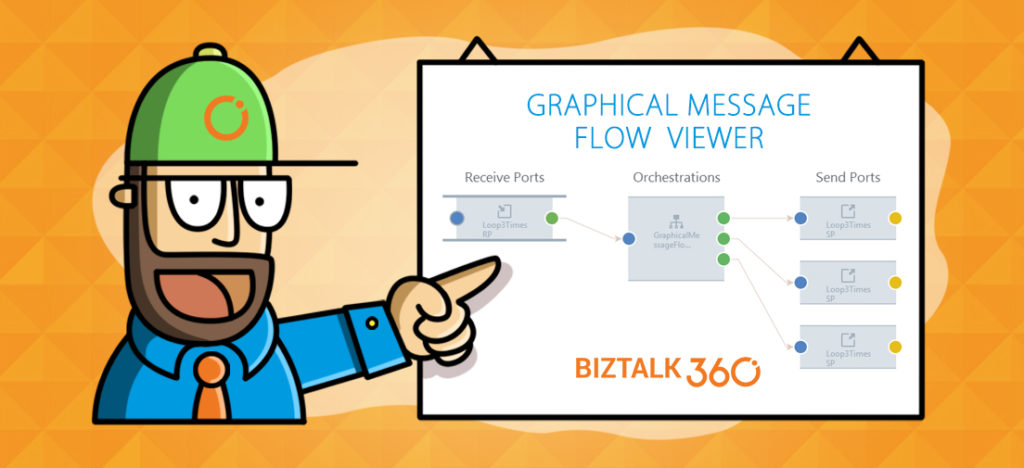
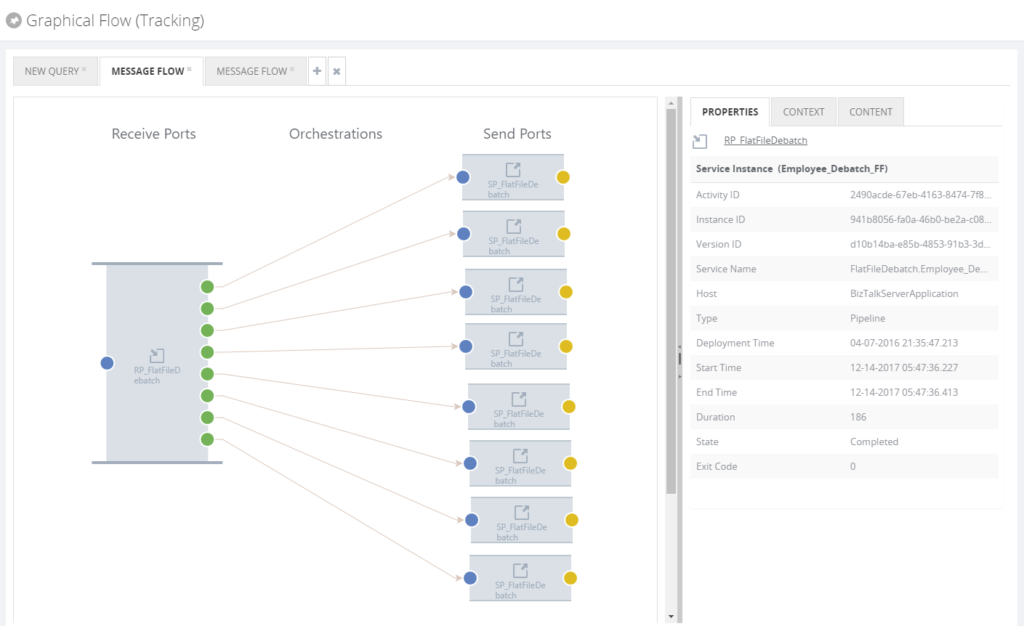
The Graphical Message Flow viewer shows the service instance as a shape and depending on the type of artifact, then it will appear under the Receive Port, Orchestration or Send Port label. The blue dot in the shape reflects the receive side of a message at the artifact, while the green dots reflect that the message has been sent out of the artifact. In the above screenshot, one message has been received and multiple messages have been sent out, depicting a debatching scenario.
Besides the graphical shape of the service instance, also all kind of properties of the service instance is shown. You can even directly navigate to the BizTalk artifact in its BizTalk application, by simply clicking the provided hyperlink.
Also, the related service instances can be viewed, depicting the complete message flow. This can be done by clicking the subsequent green dots.
Depending on the amount of tracking turned on for the artifacts and whether the user is authorized in BizTalk360, message context and content information can be viewed in the pane at the right of the screen.
The Graphical Message Flow viewer is a very useful feature and it is likely that BizTalk administrators will use it on a near day to day basis.
Get started with a Free Trial today!
Download and try BizTalk360 on your own environments free for 30 days. Installation will not take more than 5-10 minutes.

Author: Lex Hegt
Lex Hegt works in the IT sector for more than 25 years, mainly in roles as developer and administrator. He works with BizTalk since BizTalk Server 2004. Currently he is a Technical Lead at BizTalk360. View all posts by Lex Hegt

by Lex Hegt | Jan 24, 2018 | BizTalk Community Blogs via Syndication
This blog is a part of the series of blog articles we are publishing on the topic “Why we built XYZ feature in BizTalk360”. Read the main article here.
Why do we need this feature?
In their day to day operations, BizTalk administrators will regularly need to check the status of different BizTalk artifacts. There might be multiple reasons to do so, amongst which are:
- Artifacts being in the wrong state (a Receive Location being Disabled, instead of Enabled)
- The configuration of an artifact needs to be checked for analysis of an issue
- The state of artifacts needs to be persisted, because of an upcoming deployment
To access the actual state and configuration of BizTalk artifacts, BizTalk administrators need to use a Remote Desktop connection to access the BizTalk server and start the BizTalk Server Administrator Console. The BizTalk Administrator console is not very helpful in finding the needed artifact(s) as the console has no or only limited search functionality.
What are the current challenges?
Besides the fact that BizTalk administrators will not always have access to RDP, because they might not be at their own desk, the Administration console is not very helpful, when certain artifact(s) need to be found. For example, the Admin console has:
- no or limited search feature (depending on the BizTalk Server version)
- no state persisting feature
No or limited search feature
In versions older than BizTalk Server 2016, there are just browse features per artifact type, which can make it quite time-consuming to find the artifact(s) you are looking for.
With BizTalk Server 2016, Microsoft introduced a Search feature. However, that feature is limited to search only for the name of any artifact. So for example, it is not possible to search for the URI or the transport type of an artifact.
No state persisting feature
Besides taking screenshots, there is no feature to store the status of the artifacts. Taking screenshots will help a bit, but it is not very practical. Reason for that is because not all artifacts (of the same type) for which you want to persist the state might fit on the same screen. Therefore, you’ll have to make multiple screen shots and store them in for example a Word document, which decreases the usability.
How BizTalk360 solves this problem?
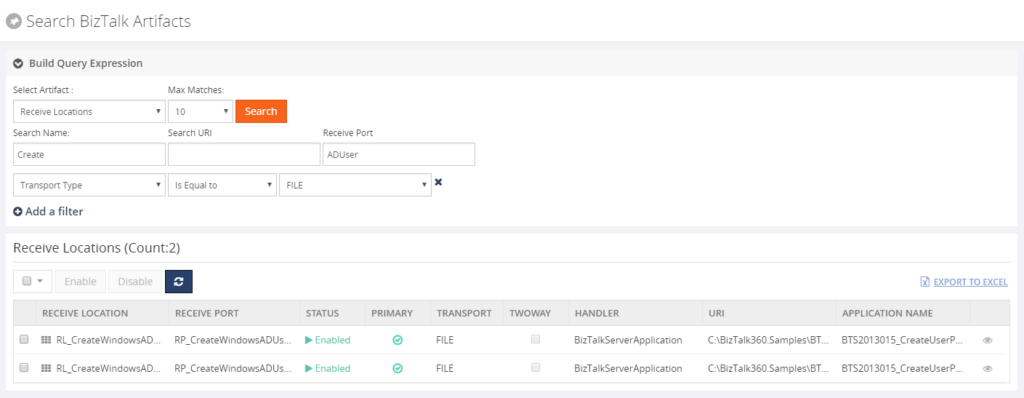
To address all the mentioned problems, BizTalk360 has the Search Artifacts feature. The Search Artifacts feature allows you to search for BizTalk artifacts in one single screen. Depending on the kind of artifact, you can search and filter for different properties of that kind of artifact. For example, for Receive Locations and Send ports, you can search and filter for:
- Name of the artifact
- The URI of the artifact
- Application where the artifact resides
- The status of the artifact (Enabled/Disabled or Started/Stopped/Unenlisted)
- Host name which processes the artifact
- Transport Type of the artifact
When you have searched for certain artifacts, BizTalk360 shows the results in a grid. Depending on the kind of artifact, this result grid will show the most important data for that kind of artifact.
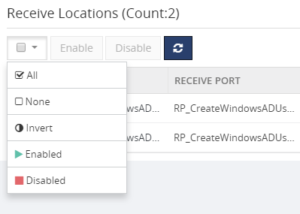
You can also, directly, action on a single artifact or on multiple artifacts. In case of Receive Locations for example, you can immediately Enable or Disable one or multiple Receive Locations from the grid. BizTalk360 shows a handy drop down box to select artifacts, depending on their state.
Further, you can access the properties of a certain artifact by clicking the eye icon which appears in the last column of the grid.

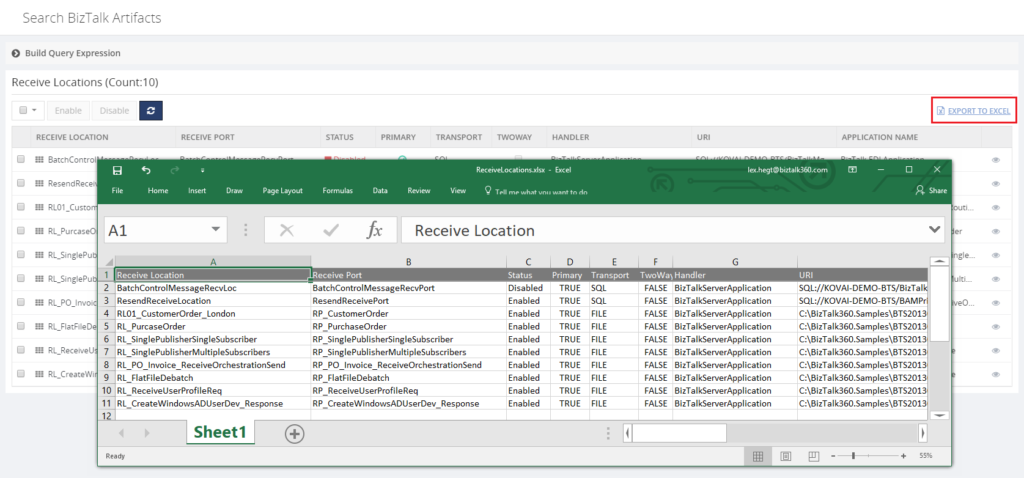
Another handy feature is the ability to export the entire result grid to Excel. This feature is especially handy in case you are preparing the deployment of BizTalk application(s) and you want to persist the current state of the artifacts, as the state might be changed by the deployment package(s).
 All in all, the Search feature in BizTalk360 not only saves time in the day to day operations of a BizTalk administrator, but it will also make him or her look better, when a business user arrives at his or her desk with a quick question on the state of a particular artifact!
Get started with a Free Trial today!
Download and try BizTalk360 on your own environments free for 30 days. Installation will not take more than 5-10 minutes.

Author: Lex Hegt
Lex Hegt works in the IT sector for more than 25 years, mainly in roles as developer and administrator. He works with BizTalk since BizTalk Server 2004. Currently he is a Technical Lead at BizTalk360. View all posts by Lex Hegt

by Lex Hegt | Jan 18, 2018 | BizTalk Community Blogs via Syndication

This blog is a part of the series of blog articles we are publishing on the topic “Why we built XYZ feature in BizTalk360”. Read the main article here.
Why do we need this feature?
As a BizTalk Administrator, it is critical to constantly have a good overview of the health of the BizTalk environments for which the BizTalk Administrator is responsible. To be able to consider the health of BizTalk Groups, it does not stop by knowing whether all ports and orchestrations are started. There are so many other aspects which are relevant to get the full picture of the health. Think of, for example, the state of the Host Instances and SQL Server jobs, the number of suspended service instances, all kind of Windows services, ESB Exceptions, EDI transactions, etc.
It would take BizTalk Administrators a lot of their precious time to constantly check the actual health status of all these different artifacts.
What are the current challenges?
One of the main challenges with the out-of-the-box tooling of BizTalk Server is that it is not possible to have the needed information available in one view. To get that overview you need to look into multiple screens and browse through multiple applications. For example, multiple screens of the BizTalk Server Administration console, SQL Server Management Studio, the portal of the ESB toolkit, Remote Desktop sessions to access the Windows server, etc.
At BizTalk360, we think this is far from efficient as it would take the BizTalk Administrators too much time just to get the overview information. In our opinion, BizTalk Administrator should spend his time on better things, than constantly going from one console to another, just to find out the current health of the system.
How BizTalk360 solves this problem?
BizTalk360 has the concept of Dashboards. These highly customizable Dashboards can show different types of data. Amongst these dashboards are:
- The Operations Dashboard
- The ESB Dashboard
- The EDI Dashboard
- The Monitoring Dashboard
- The Data Monitoring Dashboard
- The Analytics Dashboard
On a number of dashboards, you can add widgets from the collection of widgets that are provided by BizTalk360, or you can create your own widgets and add them to the dashboards. In certain cases, certain data can be viewed from different kinds of dashboards. For example, the EDI and ESB dashboards contain widgets which can be shown on their own dashboard, but also on the Operations Dashboard.
In most cases, the Operations Dashboard will be the first screen a BizTalk Administrator will see, after he has opened BizTalk360.
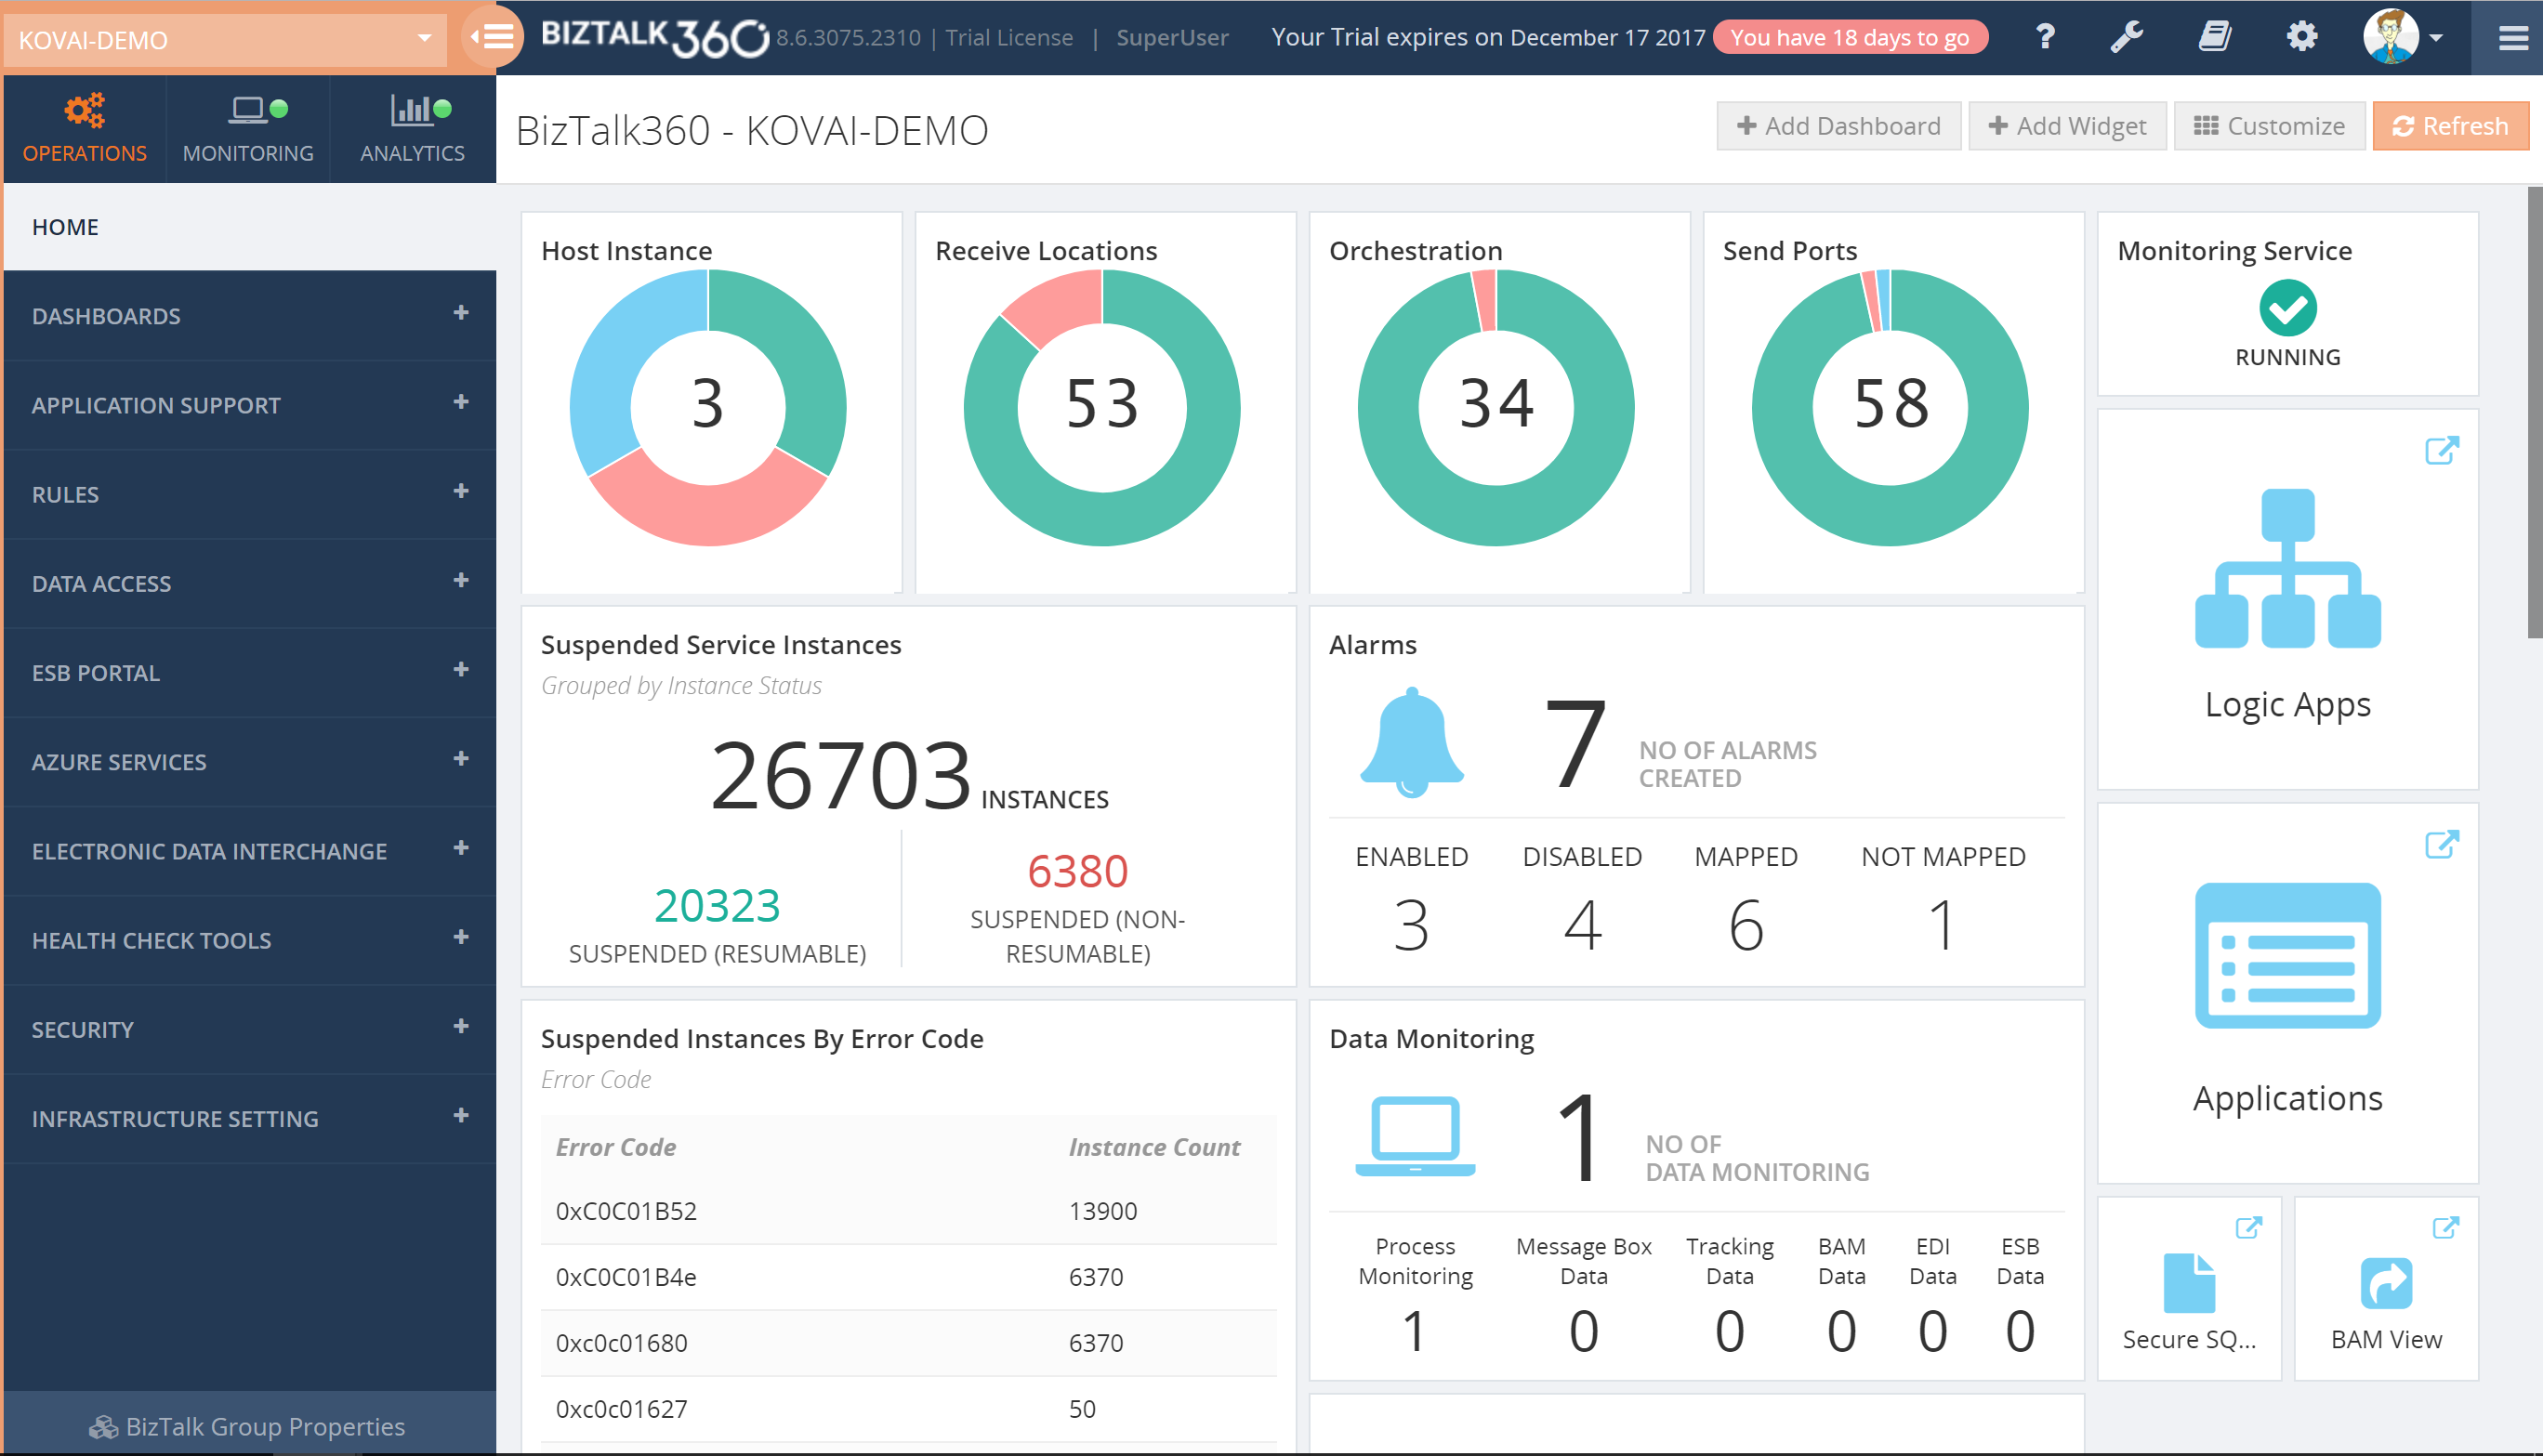
The Operations Dashboard, by default, already shows a number of widgets, but BizTalk Administrators can completely modify the layout of that dashboard to suit their needs. If the collection of widgets, which comes out of the box, is not enough, BizTalk360 allows administrators to create Custom widgets and add them to your dashboard. Besides the widgets, the Operations Dashboard can also contain pinpoints which are like shortcuts and provide you with easy access to all the different screens of the application.
Additionally, you can also create multiple dashboards if you like, to fit multiple purposes. For example, say, you can have Dashboards for particular interfaces or setting them up for different kind of roles.
Download and Try BizTalk360 Free for 30 days today!
Download and try BizTalk360 on your own environments free for 30 days. Installation will not take more than 5-10 minutes.

Author: Lex Hegt
Lex Hegt works in the IT sector for more than 25 years, mainly in roles as developer and administrator. He works with BizTalk since BizTalk Server 2004. Currently he is a Technical Lead at BizTalk360. View all posts by Lex Hegt
by Lex Hegt | Jan 7, 2018 | BizTalk Community Blogs via Syndication
A new year has just began and at BizTalk360 we are excited to find out what 2018 will bring us as a company. We are delighted that we will release more versions of our flagship product BizTalk360, further evolve ServiceBus360 and bring new products like Atomic Scope and Document360.
Year in review
In this article however, we want to look back at what 2017 brought from a Microsoft Integration space perspective. Although we did not see a new version of BizTalk Server, we did see new features arrive for BizTalk Server 2016, by means of the two feature packs which have been released. Of course, we have also seen new CU’s appear for the currently supported BizTalk Server versions, which are 2013, 2013R2 and 2016.
Note however, that in case you are on BizTalk Server 2013 or 2013 R2, mainstream support will end July 10th, this year! So you should consider upgrading to BizTalk Server 2016. As migrating to another BizTalk platform is not something to take lightly, Microsoft offers the BizTalk Migration tool. Read more about this tool later in this article.
An important move Microsoft made last year, was embracing the Open Source community. Of course, also in the Logic Apps and related technologies a lot has happened. Keep on reading, when you want to read about most important developments in Microsoft Integration space.
BizTalk Server 2016 Feature Packs
The concept of Feature Packs is new to BizTalk Server. The idea of bringing Feature Packs is to bring new features once they are ready, instead of having to wait until the next major release.
For BizTalk Server, these packs can be installed on top of (only) BizTalk Server 2016 and bring new functionality, without breaking existing functionality. As far as we know, there are no plans to bring Feature Packs for other BizTalk version than 2016.
Last year Microsoft brought 2 Feature Packs for BizTalk Server 2016. Let’s have a look at both.
Feature Pack 1
This first Feature pack was released on April 26th. It could only be installed on top of the base version of BizTalk Server 2016 (3.12.774.0), so you could not install it after you have applied any CU’s for BizTalk Server 2016. This issue his been fixed on September 21st, when Microsoft released a version of FP1 which was compatible with Cumulative Update 3 (KB4039664), the most recent CU at that time.
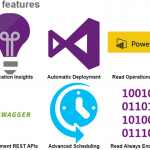
Feature Pack 1 added the following features to BizTalk Server 2016:
Deployment
- Deploy with VSTS – Enable Continuous Integration to automatically deploy and update applications using Visual Studio Team Services (VSTS)
- New management APIs – Manage your environment remotely using the new REST APIs with full Swagger support
Analytics
- Application Insights – Tap into the power of Azure for tracking valuable application performance and to better understand your workflow
- Leverage operational data – View operational data from anywhere and with any device using Power BI
Runtime
- Support for Always Encrypted – Use the WCF-SQL adapter to connect to SQL Server secure Always Encrypted columns
- Advanced Scheduling – Set up advanced schedules for Receive Locations using the new capabilities with Feature Pack 1
More information on Feature Pack 1 can be found here: https://blogs.biztalk360.com/microsoft-biztalk-server-2016-feature-pack-1/
Download Feature Pack 1 here: https://www.microsoft.com/en-us/download/details.aspx?id=55100
Feature Pack 2
This pack was released on November 21st and can be installed immediately on top of the BizTalk Server 2016 Cumulative Updates 1, 2 and 3 and Feature Pack 1.
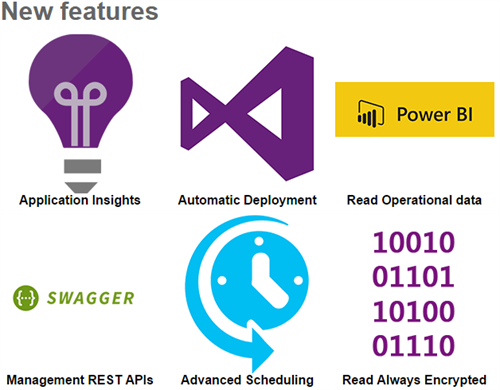
In this Feature Pack, the following features were brought:
Deployment and Administration
- Application Lifecycle Management with VSTS – Using Visual Studio Team Services, you can define multi-server deployments of BizTalk Server 2016, and then maintain those systems throughout the application lifecycle.
- Backup to Azure Blob Storage – When deploying BizTalk Server to Azure VMs, you can backup BizTalk Server databases to Azure blob storage.
Server Runtime
- Adapter for Service Bus v2 – When using the Service Bus Adapter, you can utilize Azure Service Bus Premium for enterprise-scale workloads.
- Transport Layer Security 1.2 – Securely deploy BizTalk Server using industry-standard TLS 1.2 authentication and encryption.
- API Management – Publish Orchestration endpoints using Azure API Management, enabling organizations to publish APIs to external, partner and internal developers to unlock the potential of their data and services.
- Event Hubs – Using the new Event Hub Adapter, BizTalk Server can send and receive messages with Azure Event Hubs, where BizTalk Server can function as both an event publisher and subscriber, as part of a new Azure cloud-based event-driven application.
Analytics and Reporting
- Event Hubs – Send BizTalk Server tracking data to Azure Event Hubs, a hyper-scale telemetry ingestion service that collects, transforms, and stores millions of events.
- Application Insights – When preparing BizTalk Server to send tracking data to Application Insights, released in FP1, you can use the new Azure sign-in dialog to simplify configuration and named instances of SQL Server.
More information on Feature Pack 2 can be found here: https://blogs.biztalk360.com/microsoft-biztalk-server-2016-feature-pack-2-released/
Download Feature Pack 2 here: https://www.microsoft.com/en-us/download/details.aspx?id=56262
Cumulative updates
In 2017, Microsoft also brought a number of Cumulative Updates for the different versions of BizTalk Server. See below for an overview which contains links to the download pages:
BizTalk Server 2013
NOTE: this version is going out of mainstream support July 10th, 2018
July 28th, 2017 – Cumulative Update package 6 (build 3.10.359.2) – KB4032678
BizTalk Server 2013 R2
NOTE: this version is going out of mainstream support July 10th, 2018
May 8th, 2017 – Cumulative Update package 6 (build 3.11.280.2) – KB4020020
October 12, 2017 – Cumulative Update package 7 (build 3.11.285.2) – KB4038891
BizTalk Server 2016
January 26, 2017 – Cumulative Update package 1 (build 3.12.796.2) – KB3208238
May 26, 2017 – Cumulative Update package 2 (build 3.12.807.2) – KB4021095
September 1, 2017 – Cumulative Update package 3 (build 3.12.815.2) – KB4039664
Embracing Open Source
In September Microsoft announced that BizTalk Server has joined the Open Source community. This is motivated by the increased commitment that Microsoft wants to provide a better product to their customers.
So far, Microsoft has open sourced the following:
- all schemas which are shipped with the product. These are over 3500 files, which are divided over the following standards:
- EANCOM
- EDIFACT
- HIPAA
- HIX
- X12
- the BizTalk Migration tool. This tool is developed to simplify the following migrations:
- BizTalk Server 2010 to BizTalk 2013R2
- BizTalk Server 2013R2 to BizTalk 2016For Host Integration Server
For Host Integration Server (HIS), Microsoft has provided a PowerShell script that helps creating .hidx files, which are used by the HIS runtime to communicate with the backend systems.
The repository which contains above mentioned stuff, can be found at GitHub:
https://github.com/Microsoft/Integration/
Microsoft’s intention is to continue their open source commitment. Community contributions are more than welcome and can contain artifacts like Schemas, Samples, Adapters, pipeline components or anything else you feel the community can take advantage of.
Azure Integration updates
It is amazing to see what’s all happening on Azure Integration! The Logic Apps team regularly post their updates on YouTube. At our blog, we publish recaps of these updates. Below is a picture of the entire Microsoft Pro Integration team on a bright, sunny Friday morning at Gold Coast, Australia, during #MSAUIgnite.

See below, just a couple of all the developments which have taken place:
Logic App-adapter – this adapter enables you to receive or send messages from BizTalk Server 2016 to your Logic Apps, via the On-Premise Data Gateway
Numerous improvements to the Logic Apps Designer – just a few which are worth to mention: editing Azure Functions directly from Logic Apps, generating JSON schema from sample payload, Parallel creation in the designer, use of Webhooks in Foreach loops, use of variables, batch processing, advanced scheduling of Logic App execution
Cognitive Vision APIs – to be able to use the OCR capability to understand the characters and text within an image
Azure Event Grid – The newest and hottest kid in town; technical preview version was released by Microsoft on August 16th
Azure Event Grid Connectors for Logic Apps – Of course the Event Grid offering is accompanied with a connector
More than 80 new SaaS adapters – few of the added connectors are: Azure Table Storage, Cognitive Services, Outlook – webhook trigger, SQL – dynamic schema for stored procedures, Azure Container Instances , Pitney Bowes Data Validation, Log Analytics Data Collector, ServiceNow, Skype for Business, LinkedIn, Azure Security Center Trigger, MySQL (R/W)
You can follow the Logic Apps team yourself, via their YouTube channel: http://aka.ms/logicappslive
The most recent recap of the Logic Apps update can be found here:
https://blogs.biztalk360.com/azure-logic-apps-monthly-update-november-2017/
What can we expect in 2018?
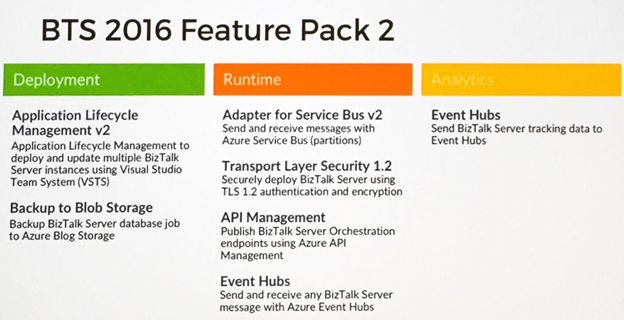
Of course Microsoft will keep on bringing new and exciting features and improvements. What we currently know is that we can expect a new feature pack for BizTalk Server 2016, being Feature Pack 3. But also on the Azure side we can expect new stuff and enhancements of existing features.
BizTalk Server 2016 Feature Pack 3
During the first half year, we can expect the release of BizTalk Server 2016 Feature Pack 3. What we currently know, is that we can expect multiple Office 365 adapters, with the following capabilities:
- Send and receive messages using Office 365 e-mail
- Set and update appointments using Office 365 schedules
- Define people and groups using Office 365 contacts
Further, we can expect:
- Web authentication – authenticate with Azure Active Directory and OAuth using Microsoft Enterprise Single Sign-On
- Advanced Scheduling – Set up recurrence on BizTalk Server receive locations with greater precision using hours, minutes, second
Besides that, Microsoft will keep on bringing CU’s for the supported BizTalk Server versions, including the final CU’s for BizTalk 2013 and 2013R2.
Further, Microsoft is also working on BizTalk Server vNext, so we can also expect CTP’s (Community Technology Previews), which will lead to a new release of BizTalk Server and more Feature Packs. However, a timeline towards a new release of BizTalk Server is not yet made public.
Azure Integration
In Azure, we can expect of course more adapters. The Logic Apps team has already mentioned amongst others: SOAP Passthrough, Office365 Excel, K2, Kronos, Citrix ShareFile and PostgreSQL.
We’ll also see more improvements in the designer. Features like Complex Conditions within the designer, Configurable lifetime and Degrees of parallelism for split-on and request triggers have already been mentioned by the team.
All in all, we can conclude that 2017 has been an awesome year for Microsoft Integration and we can expect that 2018 will be a fantastic year as well!
INTEGRATE 2018
You can get to know more about these updates directly from the Microsoft Product Group at INTEGRATE 2018. The dates and the venue for the event has been finalized. The website will be going live by this week. Stay tuned!
Author: Lex Hegt
Lex Hegt works in the IT sector for more than 25 years, mainly in roles as developer and administrator. He works with BizTalk since BizTalk Server 2004. Currently he is a Technical Lead at BizTalk360.
View all posts by Lex Hegt

by Lex Hegt | Nov 30, 2017 | BizTalk Community Blogs via Syndication
| Application Health |
| Application Health |
 |
 |
|
All products deal with core Application Health scenarios very well. Nagios loses points for less visibility when determining the health of an application. |
| Platform Health |
| Host Instance Availability |
|
|
|
All products deal with Host Instance health scenarios. Good visibility exists when determining the health of a Host instance. The higher rank goes to BizTalk360, because of the Auto-correct feature, for which customization is needed with Nagios and SCOM. |
| Host Throttling |
|
|
|
All products provide capabilities when it comes to determining Host Throttling, although in case of Nagios, it will be monitoring of PerfMon counters. BizTalk360 however, provides a more comprehensive experience and allows you, besides Host Throttling monitoring, to historically go back to determine exactly when and why BizTalk was throttling. |
| Single Sign On Service availability |
|
|
|
All products provide suitable functionality in this area. BizTalk360 gets the higher mark as it also has an Auto correct feature, which tries to bring the SSO service in the expected state, after a failure |
| Monitoring SQL Agent Jobs |
|
|
|
All applications do provide this support. BizTalk360 provides a very friendly user experience, whereas SCOM provide deeper functionality that is found in the SQL Server Management Pack.
Nagios takes the lower ranking as complex customization is needed. |
| Core Infrastructure Monitoring |
|
|
|
Nagios and SCOM provide more Core Infrastructure Monitoring, but since we are keeping this relevant to BizTalk, BizTalk360 provides enough visibility to support a BizTalk environment and earns a top score as well. |
| BizTalk Health Monitor Integration |
 |
|
|
BizTalk Health Monitor (BHM) integration is part of BizTalk360’s core offering and is very easy to setup. No integration exists between BizTalk Health Monitor and Nagios and SCOM. Custom development is required in order to provide this functionality. |
| Log/Database Query Monitoring |
|
|
|
All products receive partial scores for these features. Currently BizTalk360 provides no capability around parsing log files. It does provide support for SQL Server databases, but not others. Nagios and SCOM both provide support for both Log and Database Monitoring. The downside is that these features often require custom scripts to be written in order to support the requirement. SCOM loses marks on the usability aspects of implementing these functions, while Nagios loses marks as a separate product will be needed for Log monitoring. |
| Analytics |
|
|
|
Nagios has no BizTalk oriented analytics.
SCOM uses a data warehouse for reporting and long-term data storage. Because of the extended reporting capabilities, though not easy to use, SCOM gets the higher grade.
BizTalk360 provides a customizable Analytics Dashboard and many widgets give insight in the performance and processing of messages through BizTalk. |
| Operating Environment |
| Process Monitoring |
|
|
|
This is a core feature in BizTalk360 that detects when something is supposed to happen but does not. An example is not receiving a file from a trading partner when you expect to. Your environment can be completely healthy, but if the trading partner does not provide the file, traditional Monitoring techniques used by SCOM will not detect this. BizTalk360 will detect this scenario and send the appropriate notifications. |
| Maintenance Mode/Negative Monitoring |
|
|
|
Nagios supports Scheduling down time, but has no Negative monitoring for BizTalk Server resources.
Both SCOM and BizTalk360 provide functionality in these areas. BizTalk360 provides complete coverage whereas SCOM is only providing partial coverage.
SCOM is able to handle the Maintenance Mode requirements, but not the complete Negative Monitoring requirements. While a SCOM administrator can provide an override when it comes to a Host Instance or Receive Location, if someone starts or enables that BizTalk Service no notifications are generated. |
| Synthetic Transactions |
|
|
|
Nagios has support for Synthetic Transactions and other types of web site monitoring.
SCOM does provide additional features like running Synthetic Transactions from different servers within the environment. SCOM also provides deeper interrogation of these downstream applications by using .Net Application Performance Monitoring.
BizTalk360 provides good capabilities that will satisfy most requirements. Besides checking for expected HTTP return codes, it is also possible to fire custom requests and check for certain responses/response times. |
| Miscellaneous |
| Integration with other popular Monitoring Platforms |
|
|
|
SCOM provides broad integration with many other Monitoring Platforms and Service Desk applications.
BizTalk360 integrates with HP Operations Manager, Slack, ServiceNow, Microsoft Teams and provides a simple and elegant way of doing so. One could also develop custom Notification Channels to integrate with other Service Desk applications.
Nagios has slightly less features in this area and therefore gets the lower score |
| Composite Dashboards |
|
|
|
All products provide this capability. BizTalk360 gets a higher grade for the simplicity of the tool.
In order to build these types of Dashboards within SCOM, you need to be an advanced user of the system. Nagios Dashboards are not BizTalk oriented |
| Web based User Interfaces |
|
|
|
All products provide Web based interfaces. BizTalk360 gets the top grade because administrators can perform most of their BizTalk related activities with just BizTalk360, while with Nagios/SCOM they also need access to tools like BizTalk Admin Console, SQL Server, Event Viewer, Performance Monitor, portals, etc. |
| Summary Reports |
|
|
|
Nagios has all kind of reports, but these are not BizTalk oriented
SCOM does not provide a holistic report out of the box. In order to get this type of reports out of SCOM, you need to custom build a report.
BizTalk360 provides a scheduled Summary Report that will give subscribers an indicator that their environment is Healthy. This gives users a confirmation that everything is operating as expected within the environment. |
| Governance |
|
|
|
Nagios and SCOM provide both user management, but the no BizTalk operations can be done from these users.
BizTalk360 provides a much finer grained approach to Governance and Auditing. |
| Knowledgebase |
|
|
|
Nagios doesn’t have a Knowledge Base, but both SCOM and BizTalk360 include the ability to build up a Company Knowledge base.
SCOM also includes a Product Knowledge base provided by the BizTalk Product Group so it gets the higher score in this area.
BizTalk360 provides the capability to associate KB articles to certain events, like error codes of suspended instances etc. and therefore also deserves the highest rank. |

by Lex Hegt | Jun 27, 2017 | BizTalk Community Blogs via Syndication
During the second day of Integrate 2017, Jeff and Kevin did a session on DevOps for Logic Apps. They explained the available tooling in Visual Studio for that purpose:
- Hosted Logic App designer
- Cloud Explorer
- Resource Group Projects
Hosted Logic App designer – First of all, since some time it is possible to create your Logic Apps from within Visual Studio. This enables you to for example use Team Foundation Services or Visual Studio Services to check-in your Logic Apps code.
Cloud Explorer – Another feature in Visual Studio is the Cloud Explorer which, besides browse and search capabilities for your Logic Apps, the following features:
- Edits done in the designer can be published to the Azure portal
- Enable, disable and delete Logic Apps
- Run Logics Apps and view the Run History
- Download Logic App which is handy when started development in the portal
After download the Logic App, you can add the Logic App as an existing item to a Resource Group project, which we will discuss now.
Resource Group projects – Visual Studio comes with the Resource Group project type, which allows you to persist artefacts and configuration for your deployments. Amongst the features are:
- Storing/using parametrization which supports Azure Vault for safely storing credentials
- Creation of connections like you can in the Azure portal
- The configuration of your Integration accounts to easily reference schema’s, maps etc.
- Source control
After you have created such a project, the Azure Resource template contains the stuff and other stuff you need to be in the deployment. Think of for example:
- Logic Apps which need to be referenced by Id
- Parameters, for example – different environments
- Variables which actually are constants
- Any post deploy output values like the Request Trigger URL
A good starting point is the Azure Quickstart templates, which contains over 500 templates, including a number of templates for creating Logic Apps. An example of such a template is a Logic App which uses an Azure function. So the fun part of using these templates is that basically, your infrastructure and PaaS solutions can be code and be deployed with these templated.
You’ll find these templates here: https://azure.microsoft.com/en-us/resources/templates/
Related Links – Recap of Day 2 at INTEGRATE 2017
Author: Lex Hegt
Lex Hegt works in the IT sector for more than 25 years, mainly in roles as developer and administrator. He works with BizTalk since BizTalk Server 2004. Currently he is a Technical Lead at BizTalk360. View all posts by Lex Hegt
by Lex Hegt | Feb 22, 2017 | BizTalk Community Blogs via Syndication
Part 2 – Advanced setup
This is an article in a series of 2 about the BizTalk Deployment Framework (BTDF). This open source framework is often used to create installation packages for BizTalk Applications. More information about this software can be found here CodePlex.
With this series of articles, we aim to provide a useful set of hands-on documentation about the framework.
The series consists of the following parts:
- Part 1 – Introduction and basic setup
- Part 2 – Advanced setup (this article)
- Introduction
- Custom Targets
- Conditions
- Host Groups
- Executing third party executables
- Tips and Tricks
- Conclusion
Introduction
In the first part of this series we have seen how you can setup a BizTalk Deployment-project, add artefacts to the project, how you can deploy variable settings for other DTAP environments and how you can generate distributable MSI packages.
In this second article we’ll show somewhat more advanced topics like Custom Targets, Conditions, Host Groups and we’ll see how you can run third party executables from within your deployment. We’ll finish with a couple of Tips and Tricks.
Custom Targets
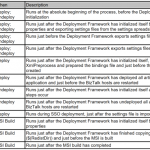
To be able to customize your deployments, the BizTalk Deployment Framework uses a concept called Custom Targets. These Custom Targets allow you to execute commands during certain phases of the deployment. We will describe a couple of Custom Targets and show how you can use them later on as well. The currently available Custom Targets are shown below.
Adding Custom Targets to your Deployment project
Before describing the Custom Targets, let’s first have a quick look on how to add Custom Targets to your Deployment project.
To keep your Deployment project nicely organized, it is a good idea to keep all the custom targets you will be using grouped together below all the BizTalk artefacts you will deploy. So the Custom Targets will be added at the end of your Deployment project.
Below is a picture which shows where the CustomRedist target is added to the Deployment project. This target was actually already added to the project during creation of the Deployment project.
As you can see, you can simple type the text <Target Name=”…”></Target> and at the ellipsis, provide the name of the Custom Target you will be going to use. Everything you want to perform during the execution of the target, can be entered between the start tag and the end tag. We’ll see examples of the kind of commands which can be performed later in this article.
CustomRedist
This target becomes executed right after BTDF has finished copying files. So this is the ideal moment if you would like for example to add additional files to the MSI package, which will be copied to the installation folder on deployment.
Below you have a sample in which a folder becomes created and some files are copied to that folder:
    <MakeDir Directories="$(RedistDir)SQLScripts" />
    <CreateItem Include="SQLScripts*.*">
          <Output TaskParameter="Include" ItemName="SQLScripts" />
    </CreateItem>
    <Copy DestinationFolder="$(RedistDir)SQLScripts%(RecursiveDir)" SourceFiles="@(SQLScripts)"/>
CustomDeployTarget and CustomPostDeployTarget
The CustomDeployTarget target runs just before Deployment has started, while the CustomPostDeployTarget target runs directly after Deployment has finished. Either can be used if you want to deploy additional stuff. Later we’ll describe how these targets are used to run third party executables, but you might also use these targets to create for example an EventLog source.
CustomUndeployTarget and CustomPostUndeployTarget
The CustomUndeployTarget target runs just before any undeployment has been performed, while the CustomPostUndeployTarget target runs right after the undeployment has taken place. These targets can be used if you would like to clean up stuff after undeployment. You can think of that as cleaning any created files during deployment. All just to be sure that you keep your environment nice and clean.
Conditions
The concepts of Conditions can be used in both Bindingfiles as in the BTDF project file. With Bindingfiles this might be used to create different ports in different environments.
In the BTDF project file this feature can become used when for example, you want to execute certain targets only in certain environments.
As applying Conditions is almost the same for both kind of files, let’s just have a look at the latter one.
Let’s assume that we want to execute an .exe file only for the Test and Production environment. To be able to execute certain targets just for certain environments, you need to do the following:
– Add an Environment variable to your BTDF Settings file
– Add the variable to your BTDF project file
– Add a filter to the CustomPostDeployTarget
Add an Environment variable to your BTDF Settings file
From Visual Studio open the SettingFileGenerator.xml file in Excel and add a variable called Environment. Each environment will get a unique value. Below picture shows a setting file which is extended with such a setting and contains unique values for all environments, namely DEV, SDEV, TEST and PROD.
Add the variable to your BTDF project file
To be able to use the Environment variable, you need to do the following:
• Open the Deployment.btdfproj file and look for an ItemGroup which contains the value PropsFromEnvSettings. Typically this settings contains the values SSOAppUserGroup and SSOAppAdminGroup.
• Add a semicolon and the new variable Environment. Afterwards the ItemGroup will look like below.
    <ItemGroup>
      <PropsFromEnvSettings Include="SsoAppUserGroup;SsoAppAdminGroup;Environment" />
    </ItemGroup>
Add a filter to the CustomPostDeployTarget
In the final step you’ll arrange that the step which executes the .exe file only gets executed in case you’re deploying on the TEST or PROD environment. Navigate to the target called CustomPostDeployTarget and add the condition: $(Environment)==’TEST’ OR $(Environment)==’PROD’ to it.
When you’ve done that, the target will look as follows:
    <Target Name="CustomPostDeployTarget" Condition="$(Environment)=='TEST' OR $(Environment)=='PROD'">
        <MakeDir Directories="$(RedistDir)SQLScripts" />
        <CreateItem Include="SQLScripts*.*">
                <Output TaskParameter="Include" ItemName="SQLScripts" />
        </CreateItem>
        <Copy DestinationFolder="$(RedistDir)SQLScripts%(RecursiveDir)" SourceFiles="@(SQLScripts)"/>
    </Target>
Now, when you save the project file, create an MSI and execute that MSI, the CustomPostDeployTarget will only be executed when you are deploying to the Test or the Production environment.
Host Groups
In most cases a BizTalk application uses only a couple of Host Instances. After a deployment it is a good practice to restart all relevant Host Instances. BTDF enables you to achieve this by using an BizTalkHosts ItemGroup. If you omit this ItemGroup, all Host Instances will be restarted.
You can put such an ItemGroup in the BTDF-project file. To keep the project file nicely organized you can consider to have that ItemGroup below the BizTalk artefacts you are deploying.
    <ItemGroup>
        <BizTalkHosts Include="SendHost;ReceiveHost;OrchestrationHost" />
    </ItemGroup>
As you can see, you can easily add multiple hosts by using semicolons between the separate hosts.
Executing third party executables
The BizTalk Deployment Framework enables you to execute third party executables. Below you find brief examples to show what you can achieve with this capability.
Executing SQL Server scripts
Say you have a custom database which is used by your BizTalk solution and this database needs to be extended with additional tables and stored procedures. Without using the BizTalk Deployment Framework, you would need to run the necessary SQL Server scripts on each environment by hand. This is a time-consuming and error-prone task which can be automated with BTDF.
To be able to execute SQL Server commands, you need to execute an executable called sqlcmd. Below you find an example on how to execute SQL scripts:
<Target Name="CustomPostDeployTarget">
<Exec Command="sqlcmd -S $(SQLServer) -i"SQLScripts<Name of T-SQL deploy script>"" />
</Target>
As you can see, you can simply add an Exec command to the deployment target.
For all the ins and outs on deploying SQL Server scripts, check this article on TechNet Wiki.
Create BizTalk360 alerts
Another example of running third party executables is the creation of BizTalk360 alarms. Normally you’ll have to do this manually after each deployment of a new or changed BizTalk application. This too can be a time-consuming and error prone task. By using BTDF and a tool called BT360Deploy, you can automate the creation of alarms during the deployment of you BizTalk application.
In the picture here above, you have an example of the output of BT360Deploy. More information on BT360Deploy can be found on CodePlex.
Tips and Tricks
We’ll end this article by providing you with a couple of Tips and Tricks
Do not automatically start the Application after deployment
BTDF allows you to automatically start the deployed BizTalk application, i.e. start all ports and orchestrations after deployment. Although that sounds like a convenient feature, especially in Dev and Test environments, your BizTalk administrator probably prefers that you leave the just deployed BizTalk application not started on Production environments. The reason for this is that in this way the BizTalk Administrator has better control over the moment when the BizTalk application must be activated.
Consider (not) restarting Host Instance
We have seen that BTDF can restart the Host Instance(s) after deployment. But in case you use scripting for unattended deployment of multiple BizTalk applications at the same time, you don’t want the Host Instances restarted after each deployment package as this is a waste of time and resources. In that case, you remove the ItemGroup that contains the BizTalkHosts. Instead you set the SkipHostInstancesRestart property in the first PropertyGroup of the project file to True:
<SkipHostInstancesRestart>False</SkipHostInstancesRestart>
ItemGroups per artefact
To keep your BTDF project file organized, it is preferable that you use separate ItemGroups for all the separate types of artefacts you will be deploying.
  <ItemGroup>
    <Schemas Include="Kovai.BTDF.Schemas.dll">
      <LocationPath>..$(ProjectName).Schemasbin$(Configuration)</LocationPath>
    </Schemas>
    <Schemas Include="Kovai.BTDF.MoreSchemas.dll">
      <LocationPath>..$(ProjectName).MoreSchemasbin$(Configuration)</LocationPath>
    </Schemas>
  </ItemGroup>

  <ItemGroup>
    <Transforms Include=" Kovai.BTDF.Maps.dll ">
      <LocationPath>..$(ProjectName).Mapsbin$(Configuration)</LocationPath>
    </Transforms>
    <Transforms Include=" Kovai.BTDF.MoreMaps.dll ">
      <LocationPath>..$(ProjectName).MoreMapsbin$(Configuration)</LocationPath>
    </Transforms>
  </ItemGroup>

  <ItemGroup>
    <Orchestrations Include=" Kovai.BTDF.Orchestrations.dll ">
      <LocationPath>..$(ProjectName).Orchestrationsbin$(Configuration)</LocationPath>
    </Orchestrations>
    <Orchestrations Include=" Kovai.BTDF.MoreOrchestrations.dll ">
      <LocationPath>..$(ProjectName).MoreOrchestrationsbin$(Configuration)</LocationPath>
    </Orchestrations>
  </ItemGroup>
Conclusion
In a series of 2 articles we have seen quite a lot of the capabilities of the BizTalk Deployment Framework. In part 1 we started with pointing out the advantages of using BTDF over the out-of-the-box capabilities of BizTalk Server and we created a simple Deployment project which showed how to setup a deployment with basic artefacts like Schemas, Maps and Orchestrations. We extended this project by creating variables to be used for environment specific settings like URL’s of endpoints.
In part 2 we have seen some more advanced features like Conditions and Host Groups. We have also seen how we can run third party executables to automate your deployment as far as possible and to decrease the amount of manual and error prone labour as much as possible.
Still there are much more possibilities with BTDF which we did not discuss. For example, you can also use it to create virtual directories, deploy SSO settings, create EventLog Event Sources, create Registry keys etc. etc. etc..
It must be clear by now that the BizTalk Deployment Framework is a very powerful framework that can be used with straight forward to complex deployments. So when you are already familiar with the framework and are using it for the deployment of standard BizTalk artefacts, why not expand your experience with BTDF and start deploying less common artefacts like SQL scripts. When you do that properly, your BizTalk Administrator might become your new best friend!
Happy deploying!
Author: Lex Hegt
Lex Hegt works in the IT sector for more than 25 years, mainly in roles as developer and administrator. He works with BizTalk since BizTalk Server 2004. Currently he is a Technical Lead at BizTalk360. View all posts by Lex Hegt
by Lex Hegt | Feb 13, 2017 | BizTalk Community Blogs via Syndication
This is an article in a series of 2 about the BizTalk Deployment Framework (BTDF). This open source framework is often used to create installation packages for BizTalk Applications. More information about this software can be found here CodePlex. With these series of articles, we aim to provide a useful set of hands-on documentation about the framework.
The series consists of the following parts:
- Part 1 – Introduction and basic setup (this article)
- Introduction
- BizTalk out-of-the-box capabilities
- Top reasons to use BTDF
- Setting up a BTDF-project
- Conclusion
- Part 2 – Advanced setup
Introduction
In this first part, we will shortly discuss the shortcomings of the deployment packages which can be created with the out-of-the-box capabilities of BizTalk Server and introduce you to the benefits of BTDF. Further this article will show you how you can create a BTDF-project for the deployment of basic BizTalk artifacts like Schema’s, Maps and Orchestrations and how you can deploy variable settings for other DTAP environments. We will end this article with showing you how you can generate distributable MSI packages.
BizTalk out-of-the-box capabilities
Microsoft BizTalk Server comes with capabilities to create deployment packages. However, the MSI packages you create with the out-of-the-box features of BizTalk Server have some shortcomings which lead to deployments that are time consuming and error-prone. The main reasons for this are:
- The packages can only contain URI’s of Endpoints (Receive Locations and Send Ports) of a single DTAP environment. So DTAP promotion from the same package is not possible.
- Only deployment of BizTalk artifacts is possible. So if you need, for example, to create and populate database tables, this cannot be automated.
Top reasons to use BTDF
As you’ll imagine, BTDF has eliminated these shortcomings, because of which the framework has been widely adopted. Below you’ll find a list which contains a number of reasons why you could use this framework:
- Deploy complex BizTalk solutions containing BizTalk artifacts but also for example SSO settings, ESB itineraries and SQL Server scripts, with no human intervention
- Consolidate all of your environment-specific configuration and runtime settings into one, easy-to-use Excel spreadsheet
- Maintain a single binding file that works for all deployment environments
- Make automated deployment a native part of the BizTalk development cycle, then use the same script to deploy to your servers
Setting up a BTDF-project
After you have downloaded and installed BTDF on your Development box, you can start with setting up your BTDF-project. To get that working, you need to take the following steps:
- Add a BTDF project to your BizTalk solution
- Add BizTalk artifacts to the BTDF project
- Deploy from Visual Studio
- Generate a master PortBinding file
- Apply Environment Specific Settings
- Generate a MSI
Add a BTDF project to your BizTalk solution
Firstly, you need to open a BizTalk solution in Visual Studio and perform the following steps:
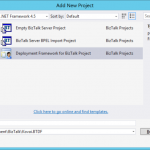
- Right-click the Solution Explorer and select Add/New Project…
- In the dialog that opens, in the left hand pane, navigate to BizTalk Projects
- In the right pane, select Deployment Framework for BizTalk Project, give the project the name Deployment and click the OK button to continue the creation of the project.
In the screen that follows you can configure which artifacts you want to deploy. Perform the following:
- Double-click on the text True after Deploy Settings into SSO. It will be set to False
- Uncheck the check mark ‘Write properties to the project file only when…’
- Click the Create Project button
After the project has been created, you’ll get a small dialog box, which states that you need to edit the file Deployment.btdfproj to configure your specific deployment requirements. And that’s exactly what we are going to do in a couple of minutes! For now, just click the OK button.
Although the aforementioned project file is shown in the left part of the screen, the Solution Explorer does not yet show the newly created Deployment project. To have the project shown up there, you need to manually add the project file and some other files to the solution in a Solution folder.
Perform the following actions to add the Deployment project to the solution:
- Right-click on the Solution Explorer, select Add/New Solution Folder, enter Deployment and hit the Enter key
- Right-click on the Deployment folder, select Add/Existing Item… and in the dialog box that appears double-click the folder Deployment
- Select all the files and click on the Add button
The Deployment project is now added to your BizTalk solution and that project in the Solution Explorer looks like below.
Note: Take care that it is important to name that solution folder Deployment, otherwise Visual Studio won’t be able to find the Deployment.btdfproj file.
Add BizTalk artifacts to the BTDF project
Now we have the Deployment project in place, we are going to add some basic BizTalk artifacts to the Deployment project. To start we’ll add the following types of artifacts:
- Schemas
- Maps
- Orchestrations
To keep the Deployment project file nicely organized, we will create an ItemGroup for each type of artifact. As we start with 3 types of artifacts, we’ll end up having 3 ItemGroups. Probably it will be clear by now that ItemGroups can be used to organize the artifacts you want to deploy. An ItemGroup is an element from MSBuild which is used by BTDF. Besides ItemGroups, you will also find PropertyGroups within the BTDF project file. PropertyGroups are used to organize all kind of parameters which can be used during deployment. Think of this for example of the name of the project, but also which kind of artifacts need to be deployed.
The project file already contains an ItemGroup for deploying schemas. We will use this as a template for our own purposes.
Follow below instructions to add schemas, maps and orchestrations to the deployment project.
- In the Deployment project file, search for the ItemGroup that is used for deploying Schemas. It contains the text ‘<Schemas Include=”YourSchemas.dll”>’.
- Replace ‘YourSchemas.dll’ with the name of the DLL which contains your schemas
- The line with the ‘<LocationPath>’ tag, must contain the path where the DLL resides
The ItemGroup will now look like below:
  <ItemGroup>
    <Schemas Include="Kovai.BTDF.Schemas.dll">
      <LocationPath>..$(ProjectName).Schemasbin$(Configuration)</LocationPath>
    </Schemas>
  </ItemGroup>
Next we’ll prepare deployment of the BizTalk Maps.
- Below the ItemGroup to deploy Schemas, create a new ItemGroup to deploy Maps. Therefore, you can copy/paste below XML:
  <ItemGroup>
    <Schemas Include="Kovai.BTDF.Schemas.dll">
      <LocationPath>..$(ProjectName).Schemasbin$(Configuration)</LocationPath>
    </Schemas>
  </ItemGroup>
Now we are going to prepare deployment of the BizTalk Orchestrations.
- Below the ItemGroup to deploy Maps, create a new ItemGroup to deploy Orchestrations. Therefore, you can copy/paste this XML:
<ItemGroup>
    <Orchestrations Include=" Kovai.BTDF.Orchestrations.dll ">
      <LocationPath>..$(ProjectName).Orchestrationsbin$(Configuration)</LocationPath>
    </Orchestrations>
  </ItemGroup>
If you have multiple projects of for example orchestrations, you can simple copy/paste the <Orchestrations>…</Orchestrations> block and provide it with the correct Include-parameter and location path. Of course, this also works the same for other types of artifacts like schemas, maps, pipelines etc.
Deploy from Visual Studio
We now have deployment for some basic artifacts in place, so let’s deploy the BizTalk solution and see what happens:
- Right-click the solution (in the solution Explorer) and select Build Solution
- When the solution is built without errors, you can deploy the solution, therefore just click the little green arrow in the upper left are of Visual Studio:
If everything runs like expected the Kovai.BTDF application is created and the schemas, the map and the orchestration will be deployed properly, but you’ll end up with the following error:
Could not enlist orchestration ‘Kovai.BTDF.Orchestrations.BizTalk_Orchestration1,Kovai.BTDF.Orchestrations, Version=1.0.0.0, Culture=neutral, PublicKeyToken=72ff5decf00d3ffb’. Could not enlist orchestration ‘Kovai.BTDF.Orchestrations.BizTalk_Orchestration1’. All orchestration ports must be bound and the host must be set.
This is due to the fact that the orchestration Orchestration1 contains ports which will have to be configured and bound in the BizTalk Administration Console. Let’s just do that and afterwards export the Binding file into your Deployment project.
- Open the BizTalk Server Administration Console and navigate to the BizTalk application called BTDF
- Right-click the application and click Configure. The following screen appears:
- Select a Host in the designated dropdown box
- Create a Receive Port and a Receive Location (use the FILE adapter) and bind it to rcvPort
- Create a Send Port (use the FILE adapter) and bind it to sndPort
- Click the OK button
- Right-click the application again and click .. and in the dialog box that appears, click Start again. The application should now be started properly
Generate a master PortBinding file
We now have a running BizTalk application which includes bindings between the deployed orchestration and a couple of ports. In the next step we will make these bindings available to our deployment project. Therefore, we need to export the bindings.
Again Right-click the application Kovai.BTDF and now select Export/Bindings…
- Click on the ellipsis button (…), navigate to your Deployment project, select xml, click the OK button and confirm that you want to overwrite the existing file
- Switch to Visual Studio and notice that you are prompted with the following message:
- Click Yes to reload the PortBindingsMaster.xml file
- Open PortBindingsMaster.xml and notice that it contains the bindings you created earlier
Apply Environment Specific Settings
For just local deployments you now have the basics in place. However, in most scenarios you will have to deploy your BizTalk solution(s) to multiple DTAP environments. In that case, the addresses of your Receive Locations and Send Ports will differ between environments. BTDF facilitates this by providing a XML file which can be edited in Microsoft Excel.
Maintaining DTAP environments
That XML file, named SettingsFileGenerator.xml, can contain columns for each DTAP environment to which you have to deploy your BizTalk solution. Below you find a screen shot of how such a file looks like by default.
As you can see, there are columns for multiple environments; Local Development, Shared Development, Test and Production. You are free to rename the values in the existing columns, or add/remove columns.
Maintaining environment specific settings
In the spreadsheet there currently are 2 settings defined; SsoAppUserGroup and SsoAppAdminGroup. You can add more settings in the first column and give them values for the different environments in the following columns. If the value is the same for two or more environments, you could enter a value in the column Default Values, as this value will be used in case no value is entered for one or more environments.
The screenshot below shows a Settings file that now contains values for the addresses of the Receive Location and the Send Port. As you can see, there are Default values entered and the columns for Local Development and Shared Development are left empty, so while deploying to those environments, the Default values will be used.
To be able to use for example the SP_Address variable from the settings file in the PortBindingsMaster, you need to open the PortBindingsMasterFile.xml file, navigate to the Send Port which should use the addresses and replace the current address with ${SP_Address}.
So before that part of the PortBindingsMaster.xml file looks like this:
    <SendPort Name="SendPort2" IsStatic="true" IsTwoWay="false" BindingOption="1">
      ...
      <PrimaryTransport>

<Address>C:BizTalkKovai.BTDFOut%MessageID%.xml</Address>

      ...
    </SendPort>
After the change the XML will look like below:
<SendPort Name="SendPort2" IsStatic="true" IsTwoWay="false" BindingOption="1">
      ...
      <PrimaryTransport>

<Address>${SP_Address}%MessageID%.xml</Address>

      ...
    </SendPort>
Generate a MSI
So far, we have only done deployments through Visual Studio. When we have to deploy our BizTalk solutions to non-development servers, we do that by installing MSI’s. BTDF is also able to generate MSI’s. Besides the BizTalk artifacts which need to be deployed, these MSI’s can also contain custom components, binding files for your entire DTAP environment and all kind of custom scripts, which can also be started during deployment.
Generating a MSI is done from Visual Studio, just choose one of below steps to generate a MSI:
- Click on the below button in the toolbar
- In the Visual Studio menu, select Tools/Deployment Framework for BizTalk/Build Server Deploy MSI
Both options will provide you with a MSI which you can use to deploy the BizTalk application throughout your DTAP environment.
Conclusion
In this first article we have seen how the BizTalk Deployment Framework differs from the out-of-the-box capabilities of BizTalk Server and described the benefits of BTDF. We’ve also setup a simple deployment project in an existing BizTalk solution and shown how you can add some basic BizTalk artifacts to that project. Further we have seen how we can create different settings for, for example, Receive Location addresses and how they become deployed to multiple environments. Finally, we’ve seen deployment from Visual Studio and we’ve generated a MSI based on the BTDF project.
Explore best practices for deploying BizTalk Server 2016 from Sandro Pereira’s Whitepaper.
In the next article, we’ll get familiar with amongst others Custom Targets, Conditions and see how we can run third party executables to automatically deploy non-standard artifacts like SQL Server scripts or even automatically create BizTalk360 alerts from within your deployment project!
Check out the 2nd article of the series here.
Author: Lex Hegt
Lex Hegt works in the IT sector for more than 25 years, mainly in roles as developer and administrator. He works with BizTalk since BizTalk Server 2004. Currently he is a Technical Lead at BizTalk360. View all posts by Lex Hegt