by community-syndication | Oct 25, 2012 | BizTalk Community Blogs via Syndication
Great news – Jurgen
Willis and his team have worked hard to bring Microsoft’s
first V1.0 WF Workflow Hosting Manager.
It runs both as part of Windows Server and within Azure VMs also. It also is
used by the SharePoint team in 2013, so learn it once and you’ll get great mileage
out of it.
(I’m yet to put it through serious paces)
Some links to help you out
What
is it?
WF
Mgr 1.0 – Code Samples
The following main areas for WF improvements in .NET 4.5: (great MSDN
magazine article)
-
Workflow Designer enhancements
-
C# expressions
-
Contract-first authoring of WCF Workflow Services
-
Workflow versioning
-
Dynamic update
-
Partial trust
-
Performance enhancements
Specifically for WorkflowManager there’s integration with:
1. Windows Azure Service Bus.
So all in all a major improvement and we’ve now got somewhere serious to host our
WF Services. If you’ve ever gone through the process of creating your own WF host,
you’ll appreciate it’s not a trivial task especially if you want some deeper functionality
such as restartability and fault tolerance.
but. if you want to kick off a quick WF to be part of an install script, evaluate
an Excel spreadsheet and set results, then hosting within the app, spreadsheet is
fine.
Let’s go through installation:
Download from here
Workflow_Manager_BPA.msi = Best Practices Analyser.
WorfklowClient = Client APIs, install on machines that want to communicate to WF Manager.
WorkflowManager = the Server/Service Component.
WorkflowTools = VS2012 plugin tools – project types etc.
And we’ll grab the 4 or you can you the Web Platform Installer
The Workflow Client should install fine on it’s own (mine didn’t
as I had to remove some of the beta bits that were previously installed).
Installing the Workflow Manager – create a farm, I went for a Custom
Setting install below, just to show you the options.
As you scroll down on this page, you’ll notice a HTTP Port – check
the check box to enable HTTP communications to the Workflow Manager.
This just makes it easier if we need to debug anything across the wire.
Select NEXT or the cool little Arrow->
On Prem Service Bus is rolled into this install now – accepting defaults.
Plugin your Service Accounts and passphrase (for Farm membership and an encryption
seed).
Click Next -> to reveal.
As with the latest set of MS Products a cool cool feature is the ’Get PowerShell
Commands’ so you can see the script behind your UI choices (VMM manager,
SCCM 2012 has all this right through). BTW – passwords don’t get exported in the script,
you’ll need to add.
Script Sample:
# To be run in Workflow Manager PowerShell
console that has both Workflow Manager and Service Bus installed.
# Create new SB Farm
$SBCertificateAutoGenerationKey = ConvertTo-SecureString -AsPlainText -Force
-String ‘***** Replace with Service Bus Certificate Auto-generation key ******’ -Verbose;
New-SBFarm -SBFarmDBConnectionString ‘Data
Source=BTS2012DEV;Initial Catalog=SbManagementDB;Integrated Security=True;Encrypt=False’
-InternalPortRangeStart 9000 -TcpPort 9354 -MessageBrokerPort 9356 -RunAsAccount ‘administrator’
-AdminGroup ‘BUILTIN\Administrators’ -GatewayDBConnectionString ‘Data Source=BTS2012DEV;Initial
Catalog=SbGatewayDatabase;Integrated Security=True;Encrypt=False’ -CertificateAutoGenerationKey
$SBCertificateAutoGenerationKey -MessageContainerDBConnectionString ‘Data Source=BTS2012DEV;Initial
Catalog=SBMessageContainer01;Integrated Security=True;Encrypt=False’ -Verbose;
# To be run in Workflow Manager PowerShell
console that has both Workflow Manager and Service Bus installed.
# Create new WF Farm
$WFCertAutoGenerationKey = ConvertTo-SecureString -AsPlainText -Force
-String ‘***** Replace with Workflow Manager Certificate Auto-generation key ******’
-Verbose;
New-WFFarm -WFFarmDBConnectionString ‘Data
Source=BTS2012DEV;Initial Catalog=BreezeWFManagementDB;Integrated Security=True;Encrypt=False’
-RunAsAccount ‘administrator’ -AdminGroup ‘BUILTIN\Administrators’ -HttpsPort 12290
-HttpPort 12291 -InstanceDBConnectionString ‘Data Source=BTS2012DEV;Initial Catalog=WFInstanceManagementDB;Integrated
Security=True;Encrypt=False’ -ResourceDBConnectionString ‘Data Source=BTS2012DEV;Initial
Catalog=WFResourceManagementDB;Integrated Security=True;Encrypt=False’ -CertificateAutoGenerationKey
$WFCertAutoGenerationKey -Verbose;
# Add SB Host
$SBRunAsPassword = ConvertTo-SecureString -AsPlainText -Force -String
‘***** Replace with RunAs Password for Service Bus ******’ -Verbose;
Add-SBHost -SBFarmDBConnectionString ‘Data
Source=BTS2012DEV;Initial Catalog=SbManagementDB;Integrated Security=True;Encrypt=False’
-RunAsPassword $SBRunAsPassword -EnableFirewallRules $true -CertificateAutoGenerationKey
$SBCertificateAutoGenerationKey -Verbose;
Try
{
# Create new SB Namespace
New-SBNamespace -Name ‘WorkflowDefaultNamespace’ -AddressingScheme
‘Path’ -ManageUsers ‘administrator’,’mickb’ -Verbose;
Start-Sleep -s 90
}
Catch [system.InvalidOperationException]
{
}
# Get SB Client Configuration
$SBClientConfiguration = Get-SBClientConfiguration -Namespaces ‘WorkflowDefaultNamespace’
-Verbose;
# Add WF Host
$WFRunAsPassword = ConvertTo-SecureString -AsPlainText -Force -String
‘***** Replace with RunAs Password for Workflow Manager ******’ -Verbose;
Add-WFHost -WFFarmDBConnectionString ‘Data
Source=BTS2012DEV;Initial Catalog=BreezeWFManagementDB;Integrated Security=True;Encrypt=False’
-RunAsPassword $WFRunAsPassword -EnableFirewallRules $true -SBClientConfiguration
$SBClientConfiguration -EnableHttpPort -CertificateAutoGenerationKey $WFCertAutoGenerationKey
-Verbose;
Upon completion you should see a new IIS Site. with the ’management ports’ of in
my case HTTPS
Let’s Play
Go and grab the samples and have a play – make sure you run the samples as the user
you’ve nominated as ’Admin’ during the setup – for now.
Blog Post by: Mick Badran
by community-syndication | Oct 24, 2012 | BizTalk Community Blogs via Syndication
I have been doing a lot of work with NodeJS and Windows Azure lately. I am planning to write a series of blog post about the techniques required build NodeJS applications that leverage different Windows Azure components. I am also planning on deep diving…(read more)
Blog Post by: gsusx
by community-syndication | Oct 24, 2012 | BizTalk Community Blogs via Syndication
When creating BizTalk orchestrations, we also have some building blocks available to do exception handling. In this blog I’ll try to give a very brief explanation of the available building blocks for your orchestration. I won’t describe everything in detail, because this would lead us to far (and would give one massive blog post).
For exception handling in orchestration there are 3 shapes available:
- Throw Exception
- Scope
- Compensate
I want go in much details for the Scope and Compensate shapes. If you need more detailed description on how Exception handling can be used with these 2 shapes I would suggest reading this blog from Richard Seroter. And if this still doens’t answers all of your questions, let me know… than I can devote another post with a more detailed explanation on some aspects of the exception handling in orchestrations.
Throw Exception
Firstly we have the ‘Throw Exception’-shape. this one is the simplest of all shapes for exception handling.
Frankly, it does nothing more than it’s name suggests… It just throws an Exception, nothing more fancy. To achieve this you’ll need to follow these three simple steps:
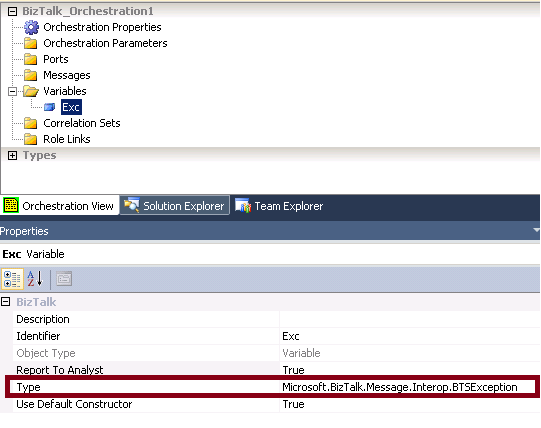
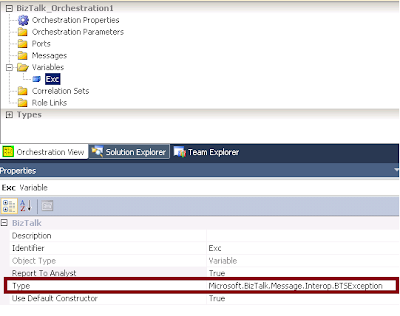
- Define a variable with the type set to any Exception class you prefer. In below example I’ve created an exception variable of type Microsoft.Biztalk.Message.Interop.BTSException
Note: The Report To Analyst property in the screenshot exists on many shapes. The property however has no influence on the behavior of your orchestration. I merely is a property used to integrate withe the Orchestration Designer for Business Analysts (ODBA) Visio plugin. If set to false, that shape will be considered as a low level detail that won’t be visible in the Visio Designer.
- Instantiate the variable and set any values according to the occured error
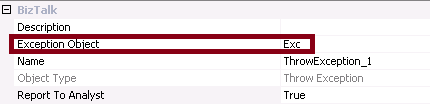
- Now use the Throw Exception shape and configure it ro use the Exception object you’ve created
Scope
Scopes are used for three reasons
- to configure transaction (long running or atomic)
- to handle exceptions
- to trigger compensating logic
For more info on the transaction types, I’ll refer to this blog from Sandro Pereira.
A scope shape can have one or more Exception handling blocks and/or one Compensation Block. The Transaction type you’ve chosen for your scope will define which of these blocks can be added. An atomic scope can only have a compensation block, and a scope configured with the transaction type non can only have an Exception block. While a long running scope can have both blocks.
For an overview of the possibilities, check the below screenshot.
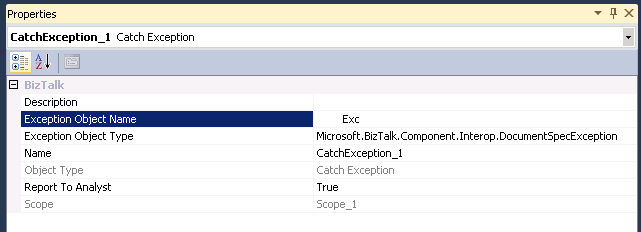
Note that there could be more than one Exception block, but only one Compensation block added to a Scope
Exception handling block
The Exception handling block is used to catch exceptions that occur inside the scope the block belongs to. The Exception Object Type in the properties of the exception block will define which Exceptions types will be handled by this Exception block.
When an exception occurs, the engine will check for the closest exception block that can handle this type of exception. The consideration of which exception block will be called is determined sequentially, just like in .NET. If no suitable exception handler is found, the default exception handles is triggered, and this means that the compensation blocks for all nested scopes will be called, after which the exception is rethrowed and the orchestration will become suspended.
Compensation block
Compensation is a way to correct or undo logical piece of work that have previously committed. An exception can occur in the orchestration afther succesfully executing all logic in the scope. In this case, the process might be in a state where it is logically incorrect. So the action already performed in a transactional scope need to be compensated… this can be achieved using a compensation block
If no compensation block is added, the default compensation will be performed. this means calling all compensation blocks of the nested scopes, starting with the most recently completed ones, just as with the default exception handler.
Compensate
The compensate shape can only be used inside of an exception handler. The explicit use of this compensate shape, allows us to specify the order of compensation execution ourselfs. So this can be used in cases the default order (starting from te most recently completed ones and working its way back) doesn’t fit.
1 compensate shape can only trigger 1 compensation block of a transaction. So the order must be defined using multiple compensate shapes, calling the compensation blocks in the desired order.
Remarks
by community-syndication | Oct 24, 2012 | BizTalk Community Blogs via Syndication
For a recent project I needed to send messages to BizTalk through an ASP.NET application. This blog post contains a streaming approach using the net.tcp WCF binding. Code and screenshots provided.
by community-syndication | Oct 23, 2012 | BizTalk Community Blogs via Syndication
Published By: Bill Chesnut
Recently Microsoft has added the Service Bus to the Preview (new) Portal and has added several new features, I will provide you with an introduction to the portal and the new features.
In the portal you can see all of the Service Bus name spaces that I have defined, which subscription they belong to and the location
If I select one of the name spaces, I can see all the Queues, Topics and Relays under that namespace, including the type, current size and max size
When I open a topic, you are presented the the Dashboard, showing the size and incoming messages, I also see some details about the topic down the right side, including “View Connection String”, the connection string now seem like the preferred method to connect to the service bus.
When I click on the “View Connection String” link, I am presented with the connection string, similar to the SQL Databases. I could then copy this string and use it to connect to my Service Bus Namespace.
When I select the monitor tab, I see more details about the size and incoming message activity, at the bottom of this screen there is a button to “Add Metrics” to see additional information
When I click on the “Add Metrics” button, here are the metrics I can add
if I expand the individual metrics I get a list of the subscriptions, this topic has 600 subscriptions, but there does not seem to be a way to scroll this list, there is a search feature on the title line.
When I select the Subscriptions tab, I get a list of all of the subscriptions, including the message count, which in the past has been difficult and time consuming to get. There is also a Create button, to create a new subscription
When I click the “Create” button I am present with the following 2 screen to create a subscription, but it does not seem to have anywhere to add the filter
The last one that I will look at is the Relay
When I select the Relays tab, you are presented with this screen, monitoring of the Relays are possible but you cannot create them from the Portal
Well I hope that this give you an introduction to the capabilities now available in the Preview Portal for working with the Azure Service Bus Queues, Topics and Relays.
More …
Tags: Service Bus,Azure,Preview Portal
by community-syndication | Oct 22, 2012 | BizTalk Community Blogs via Syndication
Published by: Bill Chesnut
One of the preview feature that Microsoft release in June 2012 was the Virtual Network Preview, before this the only choice for connection your Azure services to your on-premises resources was Azure Connect. Azure Connect was a good solution for point to point connections, but had several limitation around domain controllers and windows clustering.
With the June 2012 release of Azure Virtual Networking we were now able to connect a set of Azure services to our on premises network via an IPsec VPN. In the preview there is only a subset of 2 hardware vendors devices supported, Cisco and Juniper, but there have been some blog posts detailing how to setup the Virtual Networking to Microsoft TMG server. Not having access to a hardware firewall supported by Azure Virtual Networking, I decided to give the TMG solution at try. I attempted to use the TMG server from our Mexia Infrastructure, but being located behind another firewall that does not allow IPsec VPN connectivity, it would not connect. I then embarked on installing TMG on my home network as a virtual machine, actually not as difficult as you would expect, I had prior experience with both TMG and its predecessor ISA.
I was then able to establish the VPN, but ended up with having to enable the NAT feature on the IPsec VPN and only able to communicate in one direction, from Azure to my on premises machines. For the tests I was planning this was good enough. I then created a virtual machine in the Azure Virtual Machine preview and select a subnet that I had created during the virtual network configuration on the Azure side. I was then able to join the new machine to my domain and logon with my domain credentials, 1st hurdle solved.
I next created a small application that loaded a number of BizTalk Tracking database (the only database I had with a reasonable number of records in it) records into a dataset, I then ran the test on the machine with the SQL server for BizTalk. The results for the local SQL server were as I expected sub second response for 1000 records. I then tested it on another machine in the same network and other than the initial connection taking just under a second longer, the other results were almost the same as being on the SQL server. The next test was running the same test on the Azure Virtual machine, the test program was using windows authentication so that worked perfectly since the Azure Virtual machine was domain joined. The test results were a bit slower than I expected, the initial test was about 8 times slower than being on the SQL Server, which amount to 8 seconds to retrieve 1000 records, after the initial retrieval it did drop down a bit but only to the high 5 seconds low 6 seconds. Not impressed with the speed, I tried retrieving 10 records, that dropped the time to around 1.5 seconds, So it seem that the biggest factor is actually moving the data. Given that I am on a standard ADSL2 connections, that could account for some of this delay.
For me these test have highlight several issues, some related to the virtual networking and other related to the fact that the Azure Data Centre is not located in Australia. First, I think there needs to be a wider range of devices both hardware and software supported for the Virtual Networking, I can understand how this is going to be a support nightmare, but at least publish the required setting and have some addition diagnostics when things don’t work. I have actually found a couple of under $500 ADSL2 routers that look like they support the same configuration as I used for TMG, now to just get my hands on one of them.
Secondly, I think the amount of data that is going to need to traverse the connection between your on premises data centre and the Azure Virtual Network is going to be the key factor to being able to build a responsive and usable hybrid solution, I also think that SQL data sync will need to be an integral part of any hybrid solution.
Lastly I am disappointed in the latency, encountered getting from Australia to any of the Azure Data Centres, I did a quick test from a virtual machine I have hosted in the US by Rackspace and the latency to the 4 US Azure Data Centres was at most 1/3 for the latency from Australia and in one case it was almost internal network latency of under 3 ms. I don’t think this is an unsurmountable challenge for Australia, but we are going to have to do our hybrid solutions smarter and more efficient that the developers in the US and Europe.
More …
Tags: Virtual Network,Azure,Azure VM

by community-syndication | Oct 22, 2012 | BizTalk Community Blogs via Syndication
SOAPUI is a great free tool that helps you to frame up request messages generated based on a service’s metadata and use them to callon HTTP based SOAP services as well amongst other advanced features. One of the most common questions I have been approached for recently is how to use SOAPUIto call on a […]
Blog Post by: Johann

by community-syndication | Oct 21, 2012 | BizTalk Community Blogs via Syndication
The out of the box unit test framework for BizTalk maps leaves a lot to be desired. Effectively a Visual Studio map unit test is the equivalent of choosing to validate your map, which involves running an instance of an input message through your map and validating the output of the map against it’s schema. […]
Blog Post by: Johann
by community-syndication | Oct 21, 2012 | BizTalk Community Blogs via Syndication
Ever since I came up with the crazy idea of creating an Azure application that would spin up 256 worker roles to render a 3D animation created using the Kinect depth camera I have been trying to think of something useful to do with it.
I have also been busy working on developing training materials for a Windows Azure course that I will be delivering through a training partner in Stockholm, and for customers wanting to learn Windows Azure. I hit on the idea of combining the render demo and a course lab and creating a lab where the students would create and deploy their own mini render farms, which would participate in a single render job, consisting of 2,000 frames.
The architecture of the solution is shown below.
As students would be creating and deploying their own applications, I thought it would be fun to introduce some competitiveness into the lab. In the 256 worker role demo I capture the rendering statistics for each role, so it was fairly simple to include the students name in these statistics. This allowed the process monitor application to capture the number of frames each student had rendered and display a high-score table.
When I demoed the application I deployed one instance that started rendering a frame every few minutes, and the challenge for the students was to deploy and scale their applications, and then overtake my single role instance by the end of the lab time. I had the process monitor running on the projector during the lab so the class could see the progress of their deployments, and how they were performing against my implementation and their classmates.
When I tested the lab for the first time in Oslo last week it was a great success, the students were keen to be the first to build and deploy their solution and then watch the frames appear. As the students mostly had MSDN suspicions they were able to scale to the full 20 worker role instances and before long we had over 100 worker roles working on the animation.
There were, however, a few issues who the couple of issues caused by the competitive nature of the lab. The first student to scale the application to 20 instances would render the most frames and win; there was no way for others to catch up. Also, as they were competing against each other, there was no incentive to help others on the course get their application up and running.
I have now re-written the lab to divide the student into teams that will compete to render the most frames. This means that if one developer on the team can deploy and scale quickly, the other team still has a chance to catch up. It also means that if a student finishes quickly and puts their team in the lead they will have an incentive to help the other developers on their team get up and running.
As I was using “Sharks with Lasers” for a lot of my demos, and reserved the sharkswithfreakinlasers namespaces for some of the Azure services (well somebody had to do it), the students came up with some creative alternatives, like “Camels with Cannons” and “Honey Badgers with Homing Missiles”. That gave me the idea for the teams having to choose a creative name involving animals and weapons.
The team rendering architecture diagram is shown below.
Render Challenge Rules
In order to ensure fair play a number of rules are imposed on the lab.
%u00b7 The class will be divided into teams, each team choses a name.
%u00b7 The team name must consist of a ferocious animal combined with a hazardous weapon.
%u00b7 Teams can allocate as many worker roles as they can muster to the render job.
%u00b7 Frame processing statistics and rendered frames will be vigilantly monitored; any cheating, tampering, and other foul play will result in penalties.
The screenshot below shows an example of the team render farm in action, Badgers with Bombs have taken a lead over Camels with Cannons, and both are leaving the Sharks with Lasers standing.
If you are interested in attending a scheduled delivery of my Windows Azure or Windows Azure Service bus courses, or would like on-site training, more details are here.
by community-syndication | Oct 21, 2012 | BizTalk Community Blogs via Syndication
The BizTalk community series blog posts have been running for a number of months now. Since January I have introduced 20 BizTalk community members. Yet there are a still more stories to follow the next couple of months. There are a lot of IT professionals around the world dedicated towards BizTalk. Many of them contribute to community through blogs, forums, wiki’s, articles, books and giving presentations.
The people I interviewed and talked to for these series are representatives of the BizTalk community. They are committed to BizTalk and to its community by providing their knowledge and experience through channels I just mentioned. Today I have another story for you on an enthusiastic BizTalk professional from India: Ritu Raj.
Ritu is 27 years old engineer working in the IT industry for the last 5 years. He is currently
based out of Pune, Maharastra, India. After graduating Ritu started working with BizTalk at KEANE as a Software Engineer. He then moved on to work with CompuGain and Mahindra Satyam as a Senior Engineer working on BizTalk 2009 and 2010. Having worked with Microsoft for a relatively short period, Ritu moved on to join “Syncada from VISA” as a Senior Developer/Architect using his experience and expertise on BizTalk to develop and design solutions.
Ritu is a dedicated follower of the TechNet wiki and tries to help on the BizTalk forums. In past he has made a few blog posts. He is a core developer through out and that is what he loves doing.
“Developing is what I am best at. I have been actively working on architecting solutions on BizTalk and related technology.”
Ritu’s view on BizTalk is as follows:
“For me BizTalk is the best tool available in market for bizness (read Business) talking. BizTalk with the evolution of technology and science is remarkable. I think myself to be a privileged to see this transition and working with the same. BizTalk has adapted itself within the moving technology space. It has been growing more robust and reliable with every new release.”
Ritu loves spending time with his loved ones and friends. He likes reading articles on new trends in technology. Besides that he loves soft music, action and historic movies.
Like many fellow Indian (BizTalk) professionals Ritu is a cricket fan and loves playing it in his free time. He is a hard core Indian Cricket team fan and likes to see the England team win, if India is not the opponent. Besides criket he follows lawn tennis and Roger Federer is his all time favorite sports person.
A final comment from Ritu and expressing his appreciation for these series:
“Also, a big thanks to Steef-Jan for featuring me on introducing series and starting such a great initiative to bring BizTalk community closer and closer by each day. I would like to thank you for all the great posts and work you have done towards helping out the community.”
Thanks Ritu for your time and contributions so far, keep it up.