
by [email protected] Steef-Jan Wiggers | Jan 22, 2015 | BizTalk Community Blogs via Syndication
BizTalk Server 2013 introduced a couple of new adapters. One of them was the
WCF-WebHttp adapter that offers REST Support. The WCF-WebHttp adapter gives you the ability to send messages to Restful services and receive messages through an exposed endpoint. One of the limitations with the adapter (binding) was the lack of Json support. You had to write your own custom pipeline components to serialize the Json format to XML (you can read about it in this blogpost: BizTalk Server support for restful services). In the new BizTalk Server 2013 R2 there is out-of the box support for sending and receiving JSON messages with the following features:
- a wizard to generate XSD schema from a JSON instance,
- and an Encoder and Decoder component to use with custom pipelines.
You do not have to write your own custom components anymore. By creating a custom pipeline and dragging either a JsonEncoder or JsonDecoder you can serialize Json into xml or vice versa. With an instance of a Json message you can use the wizard to create a Json XSD schema.
Scenario
There are many web services present that have a REST interface and talk JSON over the wire. The WCF-WebHttp adapter in BizTalk Server 2013 R2 provides means to communicate with these services. There are various scenario’s you can think of to how to demonstrate the functionality of the WCF- WebHttp. In this blog I will demonstrate how to consume a relatively simple Restful Endpoint that you can choose from the Restful Service endpoints of the US Federal Aviation Administration. In this case I will use the Airport Service as an example. The Airport service provides the airport status and delay information from the Air Traffic Control System Command Center (ATCSCC) for every US Airport. It has one endpoint that only supports the GET operation.
The GET request is the fundamental, widely used operation in the REST world. You can simply visit a URL in a browser (or programmatically) and for instance in the case of the Airport Service type the following URL:
http://services.faa.gov/airport/status/SEA?format=xml
The browser will return a machine understandable structured data like below:
In this blog we will not specify the xml format, but the Json format i.e. format=json. There will be scenarios in the real world that services do not support xml format and only communicate through the REST protocol and json format. Let’s assume the airport service only supports json. The URL would look like:
http://services.faa.gov/airport/status/SEA?format=json
The following more advanced scenario describes how the airport service is consumed through BizTalk Server 2013 R2 that receives a request from a client application:
From a client application a request for the status of an airport will be send as a soap/xml message. BizTalk will map this request to a GET operation to the Restful service endpoint. That’s is the incoming message contains the airport code that is marked as property for its schema (xsd). That property will mapped to outgoing request URL to call the Restful endpoint. The endpoint on its turn will process the request and hopefully will provide the status of a given airport based upon the airport code provided within the request URL. The result will be mapped to response message that will be routed back to the client application, where it will be rendered in a Windows Form.
The communication with the internal endpoint in this scenario will be SOAP/XML as explained. The endpoint is hosted in a two way receive port (request/response). The message will subsequently be mapped to a REST call to the service indicating that the expected response format is json. BizTalk will decode the response into XML, so that it is published as an XML message in the MessageBox. The receive port will subscribe on that message so it will be routed back as response to the client that on his turn renders it in the UI (Form). This scenario shows that BizTalk acts as a broker and protocol mediator (SOAP/XML à REST/JSON à SOAP/XML) between internal client and the external airport service.
Building the solution
The solution of the described scenario consists of the following parts that will be discussed in the subsequent paragraphs:
- Exposing schema’s for internal service exposing an operation to client application that will consume the service.
- Creating a custom receive pipeline to enable decoding of json message to xml.
- Configuration of a Send Port with the Web-Http adapter (or binding if you like), send and receive.
- Testing the solution.
Exposing schema’s as service
The first step in this scenario is creating the internal service endpoint based on the following schemas
Request schema containing one element, AirportCode, which is promoted as property. Later I will explain, the reason why the AirportCode is promoted. The other schema is based on the Json response of the Airport Service. By calling the service in the browser (Chrome with Postman application) using the following http://services.faa.gov/airport/status/SEA?format=json you can obtain the Json.
Save this file as json. Subsequently you follow the following steps:
- In the Solution Explorer, right-click the project name > Add > New Item > JSON Schema Wizard. Provide a name for the schema (JSONSchemaAirportStatus.xsd), and then click Add.
- In the JSON Schema Wizard, on the welcome page, click Next.
- In the JSON Schema Information page, provide the location of the JSON purchase order file that is sent to the BizTalk Server application. Provide a root node name, a target namespace, and then click Finish.
- Now you will have a schema like below:
First schema will be request of the service endpoint and the second the response the generated schema based on json. Both schema are with the same BizTalk project. You must compile this BizTalk project as you will need the assembly later.
The following steps will lead to creation of a WCF Service based on the early two created schemas:
Launch the BizTalk Web Services Publishing Wizard and follow the steps described in MSDN page How to Use the BizTalk Web Services Publishing Wizard to Publish Schemas as a Web Service. Basically you launch the wizard, pass the welcome screen. Specify adapter (WCF binding) to communicate with the service, whether or not you want the service expose Meta data, in which application (receive location) you like tie the service to.
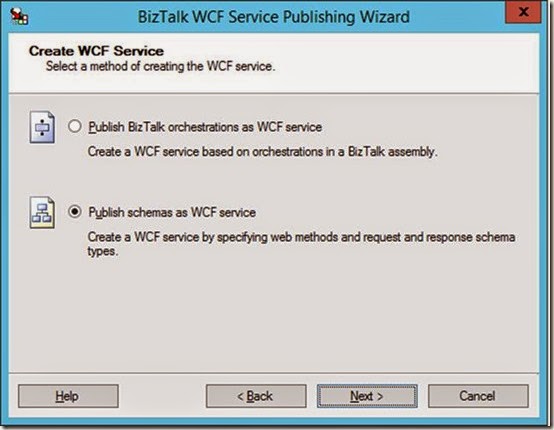
- Click Next and select Publish schemas as WCF Service.
- Again click Next and start specifying the service operations, assign schema’s you created earlier and that are within the BizTalk assembly to request and response of the Service Method.
- Again click Next and to specify the location of the service in IIS. BizTalk delegates the hosting of service to IIS, yet to start the service it relies on the receive location to be enabled.
- Last time to click Next to see the summary of what you have specified for the service.
- Click Create to provision the WCF-service.
- Click Finish to end the Wizard. The provisioned service will appear in IIS.
- When you enable the receive location in BizTalk that has the Uri of the service you can browse to it.

- The service is up and running the WSDL can be imported as service reference in the client.
Create a custom receive pipeline
BizTalk Server 2013 R2 provides pipeline components that can be used to process JSON messages within a BizTalk Server application, i.e. JSON decoder and JSON encoder. For the custom receive pipeline we will use the JSON decoder pipeline component. To create the custom receive pipeline you can follow the steps below:
In Visual Studio within your Solution Explorer of your project, you right-click and point to Add > New Item > Receive Pipeline. Specify a name for the pipeline name like JsonReceive.btp, and then click Add. Within the Decode stage you can add the new JSON decoder. In the other stages and other pipeline components as shown in the screenshot, and save changes.
In the properties of the JSON decoder you specify the Root Node and Root Node Namespace.
You can do this at design time like above or in run-time.
Next you add the XML Disassembler pipeline component in the Dissemble stage. Save and your custom receive pipeline for serializing JSON to XML is ready.
Creating and configuring the Send Port with the Web-Http adapter
To be able to consume the Airport Service with BizTalk you will need to have a send port configured with the WCF-WebHttp adapter. This can be done by configuring the WCF-WebHttp adapter or binding if you like in case you choose WCF-Custom. The configuration is pretty straight forward. The Airport Service is a public service that requires no authentication for its usage. In the general tab of the WCF-WebHttp Transport properties the address of the service can be specified (URI). Besides the address you specify here the HTTP Method (GET) and perform a URL mapping.
In HTTP Method and URL Mapping section you specify the method (operations) you are going to perform. In the case of the Airport Service this is going to be only the GET. In case you use an orchestration that the Name has to be specified, which is the name of the operation of the logical port. The URL mapping you define what is going to added after the specified URI. To make it more dynamic instead of hard-coding in general or like in this scenario the airport code you make use of variable mapping configuration feature. So what’s between the brackets is a variable that can be mapped to promoted property. The HTTP Method and URL Mapping looks in this case like:
<BtsHttpUrlMapping>
<Operation Method=”GET” Url=”status/{airportcode}?”/format=json”>
</BtsHttpUrlMapping>
Variable mapping is powerful technique to define any custom variable (or place holder) in your URL, in this scenario case {airportcode} and map that variable to any context property with property name and namespace. The Variable mapping is specified by click the Edit… button.
Variable is mapped to the property namespace that defines the AirportCode.
The general tab is important for specifying the address, method and URL mapping. The other tabs are:
- The Binding tab provides you the ability to configure the time-out and encoding-related properties.
- The Security tab provide you the ability to define the security capabilities of the WCF-WebHttp send port.
- The Behaviour tab provides you the ability to configure the endpoint behavior for the send port.
- The Proxy tab provides you the ability to configure the proxy setting for the WCF-WebHttp send port.
- The Messages tab provides you the ability to specify how the message is sent to the REST interface.
Note: In this scenario we only use GET operation of the Airport service. Based on the verb you have to specify in the Suppress Body for Verbs the GET, because a payload is not required for this operation. Since BizTalk sends out messages with a payload this needs to suppress!
For further details on configuration settings for these tabs see MSDN article How to Configure a WCF-WebHttp Send Port.
Test the solution.
Last part is the client. The client in this scenario is a Windows Forms application. This application has a simple UI and a reference to the created WCF-Service host in a BizTalk receive location. The client will send the chosen airport code to the service.
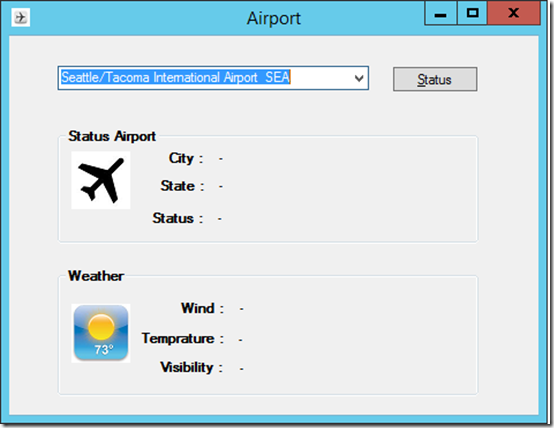
The client has a combo box with airport names and corresponding codes of all the US Airports. When you select SEA the code for Seattle/Tacoma Airport then the airport code SEA will be sent as a request message to the WCF-Service. Eventually the response will be rendered in the client.
If you want to monitor the network traffic between BizTalk and the Restful service you could for instance use Netmonitor 3.4.
And examine the out- and inbound traffic from BizTalk to Restful endpoint and back.
In case you enable tracking for the WCF-WebHttp configured send port you can examine the tracked messages in BizTalk.
Above you see the response from the Restful endpoint that arrives at BizTalk.
And how it is send to the client as XML.
This blog has demonstrate how fairly easy it is to consume a json message with BizTalk Server 2013 R2 after invoking a Restful service. Now custom coding is required to serialize a Json format into XML the internal format of the BizTalk messaging engine. Currently REST/Json has taken over the XML/Soap world, at least in the cloud that is. Numerous services available in the cloud support REST let alone only support REST. Therefore, BizTalk Server has adapted to that shift in cloud and supports REST through the WCF-WebHttp adapter and support for JSON.
Cheers,
Steef-Jan
by community-syndication | Jan 22, 2015 | BizTalk Community Blogs via Syndication
BizTalk Server 2013 introduced a couple of new adapters. One of them was the WCF-WebHttp adapter that offers REST Support. The WCF-WebHttp adapter gives you the ability to send messages to Restful services and receive messages through an exposed endpoint. One of the limitations with the adapter (binding) was the lack of Json support. You had to write your own custom pipeline components to
by community-syndication | Jan 22, 2015 | BizTalk Community Blogs via Syndication
Published by: Bill Chesnut
I have decided to start a series of blog post on the tools I use as a BizTalk developer, some of the tools are not only for BizTalk but provide functionality for BizTalk developers
The 1st tool that I am going to talk about is Papercut (http://papercut.codeplex.com), Papercut is a simplified SMTP server that can be use for sending email message from BizTalk or SQL. I have found over the years that sending emails from a BizTalk developer/test environment is very hard to setup and very error prone, lots of the test data supplied to developers have real email addresses in it and the last thing a developer wants to do is send a test email to a real user. This is why Papercut is so good, as far as BizTalk and SQL are concerned Papercut is a real live mail server to send emails to, but in reality it is a local service that accepts and stores the email sent.
Installing
Download Papercut from codeplex and run the installer:
Select the Click Once or Zip Installer
Open the Click Once
Click Install
Wait for the Installation to Complete
Click Run (up to you to un-check the “Always ask before opening this file”)
Installation Complete
Configuring BizTalk
There are several ways to configure BizTalk but the best is via the adapter properties:
In the BizTalk Administrator Console, Expand BizTalk Group, Expand Platform Settings, Expand Adapters, Click SMTP, Right Click on Send Hander, Click Properties
From the SMTP – Adapter Handler Properties Dialog, Click Properties
Configure as follows (the From address can be anything you choose), Click OK
Repeat these steps for All SMTP Send Handers
Configuring BAM Alerts
To Configure BAM Alerts, with SQL 2012 or SQL 2014, it is necessary to Setup Database Mail:
In SQL Server 2014 Management Studio, Expand Management, Right Click Database Mail, Click Configure Database Mail
Click Next
Select Set up Database Mail but performing the following tasks:, Click Next
Click Yes
Configure the Profile Name and Description as shown and Click Add
Configure as shown (email address can be anything you choose), Click Ok
Click Next
Click Public, Click Next (public profile does not matter since mail setup is completely local)
Click Next
Click Finish
Wait for configuration to finish, Click Close
Database Mail is now Configured
Right Click on Database Mail, Select Send Test E-Mail
Fill in To email and Click Send Test E-Mail
The following notification should appear, Click the Notification
Papercut Opens and show the test email, click Delete, close Papercut
Click OK
Now that Database Mail is configured and tested, Open the BizTalk Server Configuration, Click BAM Alerts, Click Enable, Enter BAM Alerts User, Enter SQL Server for Alerts databases, Click Apply Configuration
Click Next
Wait for the Configuration to complete, Click Finish, Close Microsoft BizTalk Server Configuration
BAM Alerts are now configured
Testing
To Test send emails, I have deployed the SDK Orchestration sample Hello World, I have then created a new Send Port called HelloWorldSendPortEmail:
Configure As Shown, Click Configure
Fill in Email Address and Subject (with your choice of values), click Compose
Click Text and Enter some text, Click Attachments
Select “Attach only body part”, Click OK
Click OK
Stop the Microsoft.Sample.BizTalk.HelloWorld Orchestration and rebind the send port to the new Email send port, Click Ok and start the Orchestration
Drop a copy of the SamplePOInput.xml file in the In directory, the notification below should appear, click on the notification
In Papercut, click on Raw and scroll down to the attachment
Testing is complete
Conclusion
I hope that you can get as much use out of Papercut as I have and that it make developing BizTalk solutions faster and simpler.
Please stay tuned for my next instalment in my BizTalk Developer Tools series.
More …

by community-syndication | Jan 17, 2015 | BizTalk Community Blogs via Syndication
Amazon S3 (Simple storage service) is “in the cloud” or internet based storage service. It is managed by Amazon in their data centers world wide and provides highly available, secure and scalable solution for storage. The objects or files stored on this storage can be retrieved & saved via REST interface or APIs provided by […]
Blog Post by: Abdul Rafay
by community-syndication | Jan 14, 2015 | BizTalk Community Blogs via Syndication
(I originally wrote this the 5th of May 2014 but did not publish it. I only sent it as internal feedback at the time. I am now choosing to publish it anyway since there has now been ample time for Microsoft to fix the problem)
The scenario
I am using the BizTalk Server WCF adapters in a solicit-response send port and I am getting the response using the Body Path configuration option.
The problem
Main issues that using the WCF Adapter – Messages tab – Inbound BizTalk message body – Path, configured with an XPath and String Node Encoding configuration options produces under load:
- Deserialization fails producing random and irregular errors seemingly caused by the stream position jumping to an erroneous location.
- The adapter returns the wrong mismatched response (!!!) back to the pipeline
For the first issue, the following is the error message (or an example of):
System.Xml.XmlException: Start element 'To s:mustUndersta' does not match end element 'sendMessageResult'. Line 1, position 951.
If you catch it and look at the XmlExceptions call stack, you will find this:
at System.Xml.XmlExceptionHelper.ThrowXmlException(XmlDictionaryReader reader, String res, String arg1, String arg2, String arg3)
at System.Xml.XmlUTF8TextReader.ReadEndElement()
at System.Xml.XmlUTF8TextReader.Read()
at System.Xml.XmlSubtreeReader.Read()
at Microsoft.BizTalk.Adapter.Wcf.Runtime.BinaryReaderStream.ReadContentAsString(Byte[] buffer, Int32 offset, Int32 count)
(call stack continues with custom code)
For the second issue, you will NOT find anything wrong in BizTalk. It will simply associate the wrong response with the wrong request and return the wrong message! This is far worse than the first exception in my opinion since it effectively, successfully and quietly sends back someone else's response to a caller. When examining it closer it does not appear to swap responses, it just hands one response back to more then one caller, and the other responses simply disappear and are never used. BizTalk will not discover this (at least not in my case where I am always getting the same response MessageType back from the port), only whatever application logic that are either built into BizTalk by you or the system or application calling BizTalk or human intervention might discover what has happened. Perhaps when getting the wrong data back.
Guide to reproduce
Steps (that I took) to build up and test a solution to reproduce the error:
- Download the Windows Communication Foundation (WCF) and Windows Workflow Foundation (WF) Samples for .NET Framework 4, http://www.microsoft.com/en-us/download/details.aspx?id=21459 (this is not required, though it gives us a simple starting point.
- Use the Self-Host sample found at \WCF\Basic\Services\Hosting\SelfHost\CS and described at http://msdn.microsoft.com/en-us/library/vstudio/ms733765%28v=vs.100%29.aspx. Basically this is the Calculator sample hosted in a Console app (this is not required for repro, it is just for simplicity).
- Test it to make sure it’s working.
- Extend the Client somewhat to get a bit more simultaneous and multi-threaded. I will show this later but essentially I am using the Calculator Add method and from several threads to create some load.
- Test it again and see there are no errors.
- Create a receive port and receive location, as well as a send port in BizTalk and route the message through so that BizTalk is between the client and the service.
- Test it and make sure it’s working (at this point I still have no issues).
- Now consume the Calculator service metadata in a BizTalk project to create the schema for the Add, Subtract, etc methods and their responses. Create a simple BizTalk flat file schema (we need something to store the XPath string we extract), create a pipeline with the Flat File Disassembler configured with that schema (we need to disassemble the string we receive from the adapter into that schema), and then a Map mapping from that schema to the original Calculator service schema and the AddResponse message (we want the client to get the correct response back).
- Compile, Deploy and wire everything up inside Biztalk (ie re-configure the ports created to use the receive pipeline we created, and the map we created.
- Also configure the send ports WCF Adapter – Messages tab – Inbound BizTalk message body – Path, with an XPath and String Node Encoding.
- Run a single message through to make sure everything works. In fact, run it non-multi-threaded with several messages and make sure it works (which for me it did).
- Now run multiple threads to create a load on the system.
- Watch as the previously described errors appear. At first it works fine, then I begin getting responses I did not expect (2+2 = 8?) and then I run into the ’Start element ’’ does not match end element ’’ exception.
An in-depth look
The service
There is nothing to see here really. It’s your most basic WCF service, same as it comes with the sample (slightly abbreviated in the sample below).
Code
namespace Microsoft.ServiceModel.Samples
{
    // Define a service contract.
    [ServiceContract(Namespace="http://Microsoft.ServiceModel.Samples")]
    public interface ICalculator
    {
        [OperationContract]
        double Add(double n1, double n2);
       ...
    }

    // Service class which implements the service contract.
    // Added code to write output to the console window
    public class CalculatorService : ICalculator
    {
        public double Add(double n1, double n2)
        {
            double result = n1 + n2;
            Console.WriteLine("Received Add({0},{1})", n1, n2);
            Console.WriteLine("Return: {0}", result);
            return result;
        }
        ...

        // Host the service within this EXE console application.
        public static void Main()
        {
            // Create a ServiceHost for the CalculatorService type.
            using (ServiceHost serviceHost = new ServiceHost(typeof(CalculatorService)))
            {
                // Open the ServiceHost to create listeners and start listening for messages.
                serviceHost.Open();

                // The service can now be accessed.
                Console.WriteLine("The service is ready.");
                Console.WriteLine("Press <ENTER> to terminate service.");
                Console.WriteLine();
                Console.ReadLine();

            }
        }

    }

}
Config
This is basically the same as the sample, the only exception is that I removed security (simply because that’s what the scenario I was testing had).
    <bindings>
      <wsHttpBinding>
        <binding name="wsConfig">
          <security mode="None" />
        </binding>
      </wsHttpBinding>
    </bindings>

    <services>
      <service name="Microsoft.ServiceModel.Samples.CalculatorService" behaviorConfiguration="CalculatorServiceBehavior">
        <host>
          <baseAddresses>
            <add baseAddress="http://localhost:8000/ServiceModelSamples/service"/>
          </baseAddresses>
        </host>
        <!-- this endpoint is exposed at the base address provided by host: http://localhost:8000/ServiceModelSamples/service  -->
        <endpoint address="" binding="wsHttpBinding" contract="Microsoft.ServiceModel.Samples.ICalculator" bindingConfiguration="wsConfig"/>
        <!-- the mex endpoint is exposed at http://localhost:8000/ServiceModelSamples/service/mex -->
        <endpoint address="mex" binding="mexHttpBinding" contract="IMetadataExchange"/>
      </service>
    </services>

    <!--For debugging purposes set the includeExceptionDetailInFaults attribute to true-->
    <behaviors>
      <serviceBehaviors>
        <behavior name="CalculatorServiceBehavior">
          <serviceMetadata httpGetEnabled="True"/>
          <serviceDebug includeExceptionDetailInFaults="False"/>
        </behavior>
      </serviceBehaviors>
    </behaviors>
The client
Here I have added some multi-threading aspects on top of the sample code.
Code
namespace Microsoft.ServiceModel.Samples
{
    //The service contract is defined in generatedClient.cs, generated from the service by the svcutil tool.

    //Client implementation code.
    class Client
    {
        static void Main()
        {
            Console.WriteLine("Press ENTER to start!");
            Console.ReadLine();

            List<Task> tList = new List<Task>();

            Action a = () =>
            {
                Random random = new Random();
                int mseconds = random.Next(1, 100) * 10;
                System.Threading.Thread.Sleep(mseconds);

                // Create a client
                CalculatorClient client = new CalculatorClient();

                for (int i = 0; i < 10; i++)
                {
                    double result = client.Add(Convert.ToDouble(i), Convert.ToDouble(i));
                    double localResult = Convert.ToDouble(i) + Convert.ToDouble(i);
                    if (result != localResult)
                        Console.WriteLine("{0} !!!!!!!!!!!!!!!!!!! {1}", result, localResult);
                }

                //Closing the client gracefully closes the connection and cleans up resources
                client.Close();
            };

            for (int i = 0; i < 100; i++)
            {
                Task t = new Task(a);
                t.Start();
                tList.Add(t);
            }

            Task.WaitAll(tList.ToArray());

            Console.WriteLine();
            Console.WriteLine("Press <ENTER> to terminate client.");
            Console.ReadLine();
        }
    }
}
As you can see it does not take much, that is – I am not running thousands of threads here, in fact in total I only make a thousand calls, and I get an error every time I have run the app so far.
Let’s examine this a little bit closer. As you can see I am doing the following.
double result = client.Add(Convert.ToDouble(i), Convert.ToDouble(i));
double localResult = Convert.ToDouble(i) + Convert.ToDouble(i);
if (result != localResult)
    Console.WriteLine("{0} !!!!!!!!!!!!!!!!!!! {1}", result, localResult);
That is, I am sending the addition of the two numbers to the service, and the doing the same calculation locally. Then I compare the result I get from the service with my local result. If they do not match, I print the fact.
Config
The clients config (by necessity) matches that of the services. It is available in the download but I am not including a dump of it.
The BizTalk solution
To be able to reproduce the problem in a portable manner I created a simple BizTalk solution.
Visual Studio Solution
At this point I have got three projects in Visual Studio, of which my BizTalk project is the first in the below screenshot.
It contains the following artifacts:
- CalculatorService_microsoft_servicemodel_samples.xsd – the schema for the Calculator service that was automatically generated for me (I removed the other generated artifacts as they were non-essential for the purpose of this repro).
- FFAddResult.xsd – a simple flat file schema that will act as the temporary carrier of the result after I extract it from the incoming xml response until the Map transforms the message back into an AddResponse message.
- Map1.btm – a map that transforms from FFAddResult to CalculatorService_microsoft_servicemodel_samples#AddResponse.
- ReceiveFFAddResultPipeline.btp – a disassemble pipeline that will take the incoming string and create an FFAddResult xml message.
The FFAddResult.xsd is extremely simple.
As is the Map1.btm.
BizTalk Server configuration
In BizTalk I have a receive port and a receive location with very simple configuration; PassThruReceive and PassThruTransmit pipelines, WCF-Custom WS-Http binding (so I can host it in BizTalk and have fewer moving pieces – not essential to the repro, just easier to move around).
Everything is according to default configuration except no security.
No behaviors, no special parts of the message extracted here or non of that (the xpath is on the send port receive).
Speaking of which, the send port (in the configuration that give me issues) is a solicit-response port running the WCF-WSHttp adapter (to be frank, I have not tested other adapters/bindings) and running the receive pipeline we created.
Receive pipeline has trivial config.
We have our inbound map configured.
And a filter on the receive port name that I won’t include a screenshot of.
The adapter configuration is set to forward the call to the backend service add method.
It also has security set to none (not shown in screenshot) as well as on the Messages tab having the Inbound BizTalk message body – Path, set to an XPath and String Node Encoding. the xpath in this case is /*[local-name()='AddResponse' and namespace-uri()='http://Microsoft.ServiceModel.Samples']/*[local-name()='AddResult' and namespace-uri()='http://Microsoft.ServiceModel.Samples'], which will forward the string value inside the AddResult node for the pipeline.
Executing the failing code
Below is a screenshot of the app running, where as you can notice, the response is not as expected.
As mentioned before, the app gets a number if these mismatched erroneous responses and then crashes (due to the previously mentioned exception and the sample apps lack of exception handling).
Here is also some sample output from the service (in this case the screenshot is from a test where it has been able to run to completion and what we are seeing are the final tasks/threads doing their last calls).
The workaround
Ok, now that we are aware of the failing component. Can we work around it?
Enter the XPathExtractor pipline component, based of some of BizTalks hidden gems.
Essentially, the solution is – don’t use the BizTalk message body – Path option. Instead, just get the body and extract the XPath you want in a pipeline component. Although I have not done any performance comparisons but I am not expecting the code to have any noticeably difference in performance. You might want to think twice before running very large message through it (as will become evident in the source code included later). But I think the same is true for using the adapters Body Path option, which (as we can see from the callstack the exception had) also gets the content of the node as a string.
I created a new port and a new pipeline, getting only he body in the adapter and instead extracting the string in the pipeline. Configuration as follows.
The Execute method of the pipeline component does this:
Stream stream = new ReadOnlySeekableStream(pInMsg.BodyPart.GetOriginalDataStream());

XmlTextReader xmlTextReader = new XmlTextReader(stream);
XPathCollection xPathCollection = new XPathCollection();
xPathCollection.Add(this.XPath);
XPathReader xPathReader = new XPathReader(xmlTextReader, xPathCollection);

bool matchFound = false;
while (xPathReader.ReadUntilMatch())
{
    if (xPathReader.Match(0))
    {
        string val = xPathReader.ReadString();
        stream = new VirtualStream(new MemoryStream(System.Text.Encoding.GetEncoding(this.Encoding).GetBytes(val)));
        matchFound = true;
        //break; // don't break, read to end to play nice with other components
                    // that have a streaming approach and might want to process the full message
    }
}

if (!matchFound)
    throw new Exception("xPathReader.ReadUntilMatch() found no match");

stream.Seek(0, SeekOrigin.Begin);
pInMsg.BodyPart.Data = stream;
pContext.ResourceTracker.AddResource(xPathReader);
I have run this a number of times and never as of yet gotten the same exception.
Remember that if you have any objections on the code in this component (like why is he adding the xPathReader to the resourceTracker, or whatever else) that this is not used when I get the issues, this is used to get around them.
Quick performance comparison
Quick and dirty indeed. This has no intention to go deep or be thorough. With that out of the way
Without Adapter Body Path
Red is proc. Blue is message publishing rate. Green is memory (not sure I got the right counter for that one, but I’ll ignore that for putting together this post).
With Adapter Body Path
It’s not really applicable to performance measures because it fails quite early. The most interesting thing with this graph I would say is that I don’t have to reach higher than 4 simultaneous request to start getting issues.
With XPath extraction in pipeline component
Also note that due to the randomness of my Task execution this may not be altogether comparable, so just keep that in mind. I post it mainly to illustrate that I am not running a really massive load, to show how early it fails, and to note that the workaround is not terrible.
My environment
My repro environment is a Hyper-V virtual machine with 4608MB allocated running alone on a 8 core host machine. It’s BizTalk Server 2010 with CU6, Windows Server 2008 R2 fully patched, SQL Server 2008 R2 SP1 (yes, I am aware there is a later service pack, but at the time it was not applied. I would be very surprised if it makes a difference). I have reproduced this error on several environments so it’s not isolated to mine. Although I am running BizTalk Server 2010 I would not be surprised to find this in BizTalk Server 2009, BizTalk Server 2006 R2 or even BizTalk Server 2013. Though I can neither confirm not deny since I have not tried.
Download
The full source code and bindings for everything I have mentioned in this article, including the code for the pipeline component, is available for download here.
Blog Post by: Johan Hedberg

by community-syndication | Jan 13, 2015 | BizTalk Community Blogs via Syndication
This next posts will focus on installing and configuring BizTalk Server 2013 R2 and additional components Make sure that you have installed all the latest critical Windows updates from Microsoft and all the prerequisites before you install BizTalk Server 2013 R2. Install BizTalk Server 2013 R2 In this section you’ll install BizTalk Server, confirm that […]
Blog Post by: Sandro Pereira

by community-syndication | Jan 13, 2015 | BizTalk Community Blogs via Syndication
Error Scenario A BizTalk WCF endpoint is exposed with security enabled: SSL witha client certificate is required (so mutual, 2-way client and server authentication is configured). BizTalk (2009) receive location is configured as follows: IIS configuration: (Incidently, the following command can be run in a Windows […]
Blog Post by: James Corbould

by community-syndication | Jan 12, 2015 | BizTalk Community Blogs via Syndication
This next posts will focus on installing the BizTalk prerequisites and perform the necessary configuration on BizTalk Server machine. Before installing BizTalk Server or its prerequisites, make sure you have installed the latest critical Windows updates from Microsoft. Configure SQL Server Database Mail feature If you wish to configure BAM Alerts on your BizTalk Server […]
Blog Post by: Sandro Pereira

by community-syndication | Jan 11, 2015 | BizTalk Community Blogs via Syndication
This next posts will focus on installing the BizTalk prerequisites and perform the necessary configuration on BizTalk Server machine. Before installing BizTalk Server or its prerequisites, make sure you have installed the latest critical Windows updates from Microsoft. Install SQL Server 2014 BizTalk Server provides the capability to specify a business process and also a […]
Blog Post by: Sandro Pereira

by Rene Brauwers | Jan 11, 2015 | BizTalk Community Blogs via Syndication
…a belated Happy New Year! I know it has been quiet on this blog for quiet some time, but I’ll clear this up in the near future once things are certain for a 100%
Recently a colleague of mine, André Ruiter @AndreRuiter67 , asked my view on a particular challenge involving flatfiles. This challenge in short consisted of:
How would one based on a flatfile output x files, where the files would contain grouped data based on a specific value in the original flatfile.
My response was, as most of my response, as I enjoy using OOB functionality (thus no code): use a flatfile disassembler in a custom receive pipeline add a map on the receive port in which the inbound file is being transformed to an internal format. Within this internal document ensure to promote the field(s) one wants to group on (correlate). Then use an orchestration which subscribes to the internal message(s) and implement the sequential convoying pattern and aggregate the results to an output format and lastly store the end result to disk.
As you’ve been reading the above you might go like; do what? So for the readers convenience I will walk through an example and explain the required steps. In case it makes sense, well you now know how to implement it, so go ahead move on… Nothing to see anymore
Before we start, I assume you have at least a basic understanding of BizTalk, as such I will not explain all things, although I will have a step by step instruction relating to the flat file generation as well as the sequential convoy. Having said this you ought to be able to follow all steps and reproduce the steps involved all by yourself and in case that doesn’t work out for you, I’ve added the source which you can download here.
The scenario
In our example we will receive a comma delimited file containing data received from smart energy readers. Each line contains data like;
-customer id
-date of the energy reading
-energy consumption value since last reading
-name of the energy company (to which the reader belongs and sends out the bills)
Example file contents
customerId,readingDate,consumption,energyCompanyName 1,2015–01–01,12,“Free Energy INC“2,2015–01–01,8,“Water Works LTD“3,2015–01–01,23,“Windmills INC“4,2015–01–01,5,“Sun Unlimited“5,2015–01–01,6,“Free Energy INC“6,2015–01–01,3,“Free Energy INC“7,2015–01–01,12,“Water Works LTD“8,2015–01–01,8,“Windmills INC“9,2015–01–01,9,“Windmills INC“10,2015–01–01,26,“Sun Unlimited“11,2015–01–01,24,“Water Works LTD“12,2015–01–01,17,“Go Nuclear“13,2015–01–01,11,“Water Works LTD“14,2015–01–01,9,“Windmills INC“15,2015–01–01,0,“Free Energy INC“16,2015–01–01,5,“Go Nuclear“17,2015–01–01,12,“Windmills INC“18,2015–01–01,43,“Sun Unlimited“19,2015–01–01,35,“Water Works LTD“20,2015–01–01,23,“Free Energy INC“21,2015–01–01,2,“Sun Unlimited“22,2015–01–01,14,“Free Energy INC“23,2015–01–01,13,“Water Works LTD“24,2015–01–01,9,“Go Nuclear“25,2015–01–01,26,“Windmills INC“26,2015–01–01,27,“Sun Unlimited“27,2015–01–01,25,“Go Nuclear“28,2015–01–01,31,“Water Works LTD“29,2015–01–01,4,“Water Works LTD“30,2015–01–01,7,“Sun Unlimited“
based on this file we need to split the source file into separate files grouped by energy company.
Sounds easy doesn’t it? Well let’s get to it!
Create the to use schemas [Flat file header ]
First of we will start with creating an xml presentation of the source flat file Header. For this we will use the BizTalk Flat File Wizard.
Step 1
In the solution explorer of Visual Studio, select your BizTalk Project and add a new item [ Right Click -> Add -> New Item -> Flat File Schema Wizard ] and add a descriptive name for the flatfile schema header you are about to create and click on the [ Add button ]
Step 2
The BizTalk Flat File Wizard will appear. Now press the [ Next button] untill you see [ Flat File Information Screen ]. On this screen, [ browse ] to the csv file in question. Enter a name for the record in the [ Record Name ] input field. Leave the other options in tact and press the [ Next button ].
Step 3
You should now be on the [ Select Document Screen ]. On this screen, select the header [ The first line ] and press the [ Next button ].
Step 4
At this point you should be on the [ Select Record Format Screen ]. On this screen, ensure you select that the record is being by means of a [ Delimiter Symbol ]. Once you’ve selected this item press the [ Next button ].
Step 5
The next screen which pops up allows you the select the [ Child Delimiter ] ensure that for you select the [ {CR/LF} ] option. Now press the [ Next Button ]
Step 6
Now you will be presented with the [ Child Elements ] screen. On this screen ensure that you change the [ Element Type ] from [ Field Element ] to [ Record ]. Once done press the [ Next Button ].
Step 7
So far all we have done is defined our record definition, the next few steps will define our header elements (our columns if you prefer). The screen which you will be presented with at this stage is the start of this process. In order to start press the [ Next Button ]
Step 8
The sceen [ Select Document Data ] allows you to select the actual data (headers elements). If you followed up on all the steps so far it would suffice to select the [ Next Button ]. In case you’re not sure ensure that you only have selected the actual data excluding the [ New line characters ].
Step 9
Once again you will be presented with the [ Select Record Format Screen ]. On this screen, ensure you select that the record is being by means of a [ Delimiter Symbol ]. Once you’ve selected this item press the [ Next button ].
Step 10
The next screen which pops up allows you the select the [ Child Delimiter ] ensure that for you select the [ , ] (Comma) option. Now press the [ Next Button ]
Step 11
You will now be presented with the [ Childs Elements ] screen which actually allows us to define the columns of the header. In our example we will make a few modification relating to the [ Element Name ] we will not change the [ Data Type ] as we are defining our header section and we are currently only defining the header (column) names. For brevity see the screenshot below which depicts all changes I’ve made. Once you have made the changes press the [ Next Button ]
Before changes
After changes
Step 12
Congratulations at this point you have created your header structure, the end result should look similar to the image as depicted below. (note I’ve selected the Flat File tab, to display the non-xsd view)
<a href=”http://blog les pilules de viagra.brauwers.nl/wp-content/uploads/2015/01/image12.png”>
Create the to use schemas [Flat file non header data]
Now that we have defined our xml representation of our flat file header is time to define an xml representation of the non header data. For this we will once again use the BizTalk Flat File Wizard. The steps 1 to 13 we went thought earlier will have to repeated with a few [ Changes in Configuration ]. As such I will only list those steps which are different. Yeah you are allowed to call me lazy
Step 2
The BizTalk Flat File Wizard will appear. Now press the [ Next button] until you see [ Flat File Information Screen ]. On this screen, [ browse ] to the csv file in question. Enter a name for the record in the [ Record Name ] input field. Leave the other options in tact and press the [ Next button ]. Note I’ve named the [ Record Name ] EnergyReadings
Step 3
You should now be on the [ Select Document Screen ]. On this screen, select the [ The second line ] which contains the (repeating) data and press the [ Next button ].
Step 6
Now you will be presented with the [ Child Elements ] screen. On this screen ensure that you change the [ Element Type ] from [ Field Element ] to [ Repeating Record ]. Once done press the [ Next Button ].
Step 11
You will now be presented with the [ Childs Elements ] screen which actually allows us to define the columns value. In our example we will make a few modification relating to the [ Element Name ] and the [ Data Type ]. For brevity see the screenshot below which depicts all changes I’ve made. Once you have made the changes press the [ Next Button ]
After changes
Congratulations at this point you have created your data structure, however we will need to make some manual changes to the generated schema. This changes will ensure that we will instruct BizTalk to[ Auto Debatch ] the inbound records to single records (in case there are multiple data lines.)
Step 12
In order to ensure that [ Auto Debatching ] will happen we will need to do the following. [ Select the Schema Element ] of the newly generated schema and then in the [ Properties ] window ensure to change the following setting: [ Allow Message Breakup at InFix Root ] from [ False ] to [ True ]
Step 13
The last step we need to perform to enable [ Auto Debatching ] consists of changing the [ Max Occurs ] [ Property ] of the [ Repeating ‘Element’ ] from being [ Unbound ] to [ 1 ]
Create the to use schemas [Other]
Now that we’ve created our schemas which represent the flat file definition, we can move on to creating the other schema’s we need. I will not go over the details on how to create these ‘normal’ schemas instead I’ll list the schema’s required.
Property schema
We start of with a definition of a simple property schema, this schema will only hold one field and will be named EnergyCompany.
If you need more information with regards to property schemas please click on this link.
Internal schema: Reading
This schema is our internal representation of a energy reading, and looks as depicted below. Please note that the element named [ CompanyName ] has been promoted, as such we can use it later on when we are about to implement or sequential convoy.
Internal schema: EnergyReading
This schema is the actual representation of the xml we will output and contains multiple readings on a per energy ompany basis. It has to be noted that this schema is a composite schema and as such it [ Imports ] the schema [ Reading ] (see 1). The other thing which has to be noted is the fact that the [ Reading ] element has it’s [ Max Occurs ] value set to unbounded.
Creation of the Receive Pipeline
Now that all schemas have been created we can go ahead with the creation of a receive pipeline. Once again I will not dive into the nitty gritty details, but if you require more information please click on this link
So create a [Receive Pipeline ] and give it a meaning name, drag a [ Flat File Disassembler Component ] to the [ Design Surface ] and drop it in the [ Disassemble stage (1) ]. Now [ Click ]on the just added component and go to the [ Properties Windows ]. In this window ensure to select the earlier on created [ Flat File Header Schema ] for the [ Header Schema Property (2) ] and select the [Flat File Schema ] for the [ Document Schema Property (2) ].
Transformations
At this point we can start with the required mappings we need. In total we will need 3 maps. The required maps are listed below.
Please note if you want to learn more with regards to mappings and advanced patterns (In my example everything is kept quit basic), I can only recommend that you download and start reading an ebook titled “BizTalk Mapping Patterns and Best Practices” which a friend of mine, Sandro Pereira @sandro_asp, and Microsoft Integration MVP put together for free. Go here to download it
EnergyReadingFF_TO_Reading
This mapping will be used on the receive port and will map the generated inbound flat file xml structure to our single reading file.
Reading_TO_EnergyReadings
This mapping will be used in our orchestration, which implements a sequential convoy, and maps the single reading file to the energy readings
Reading_Readings_TO_AggregatedEnergyReadings
This mapping will be used in our orchestration which implements a sequential convoy as well, and maps all results together.
Sequential Convoy
Before we can deploy our BizTalk Application there is one more thing we need to implement, and that’s a mechanism to output the grouped files. The way to implement this is using an orchestration and implement the [ Sequential Convoy ] pattern. Below a screenshot of the end result and I’ll go into the basic details using steps which refer to the screenshot below. In case you want to now more about the [ Sequential Convoy] pattern please click on this link.
Step 1: rcvReading
This receive shape ensures that messages with the message type http://FlatFileGrouping.Reading#Reading are being subscribed to. These are the single reading messages as stated earlier. It has to be noted that we initialize a [ correlation Set ] this set will ensure that we actually will create a single process (Singleton) which subscribes not only to messages of the aforementioned messagetypes but to messages which contain the same value for the element CompanyName contained with the reading message.
Click on this link for more information on the [ Receive shape ]
Click on this link for more information on [ Correlation Sets ]
Step 2: Init Timeout boolean
This expression shape is used to initialize a boolean which is used later on in the process to indicate if the convoying process should be ended. The initial value here is set [ False ]
Click on this link for more information on the [ Expression Shape ]
Step 3: Construct Energy Readings
This construction block is used to to host the [ Reading_TO_EnergyReadings ] transformation, and as such initializes the actual message we will send out to disk containing the grouped contents with regards to the energy readings on a per company base
Click on this link for more information on the [ Construct Message Shape ]
Step 4: Loop until timeout
This loop ensures that the contained logic is being repeated as long as the previous initialized boolean is False. In our specific case the boolean is set to true once we have not received any more reading messages for 30 seconds.
Click on this link for more information on the [ Looping Shape ]
Step 5: Listen
This shape will enable us to receive other messages for a given time window.
Click on this link for more information on the [ Listen Shape ]
Step 6: rcvSubsequentReadings
This receive shape ensures that messages with the message type http://FlatFileGrouping.Reading#Reading are being subscribed to. These are the single reading messages as stated earlier. It has to be noted that we follow a [ correlation Set ] this will ensure that we will receive any follow up messages without starting up a new service instance of this orchestration. Ie; if an instance of this orchestration is initiated and a message with has the value Company Y for the element CompanyName contained with the reading message is received it will enter the process at this point (and be further processed)
Click on this link for more information on [ Correlation Sets ]
Step 7: Aggregate following reading to initial reading
This construction block is used to to host the composite transformation [ Reading_Readings_TO_AggregatedEnergyReadings ], and as such this map takes both the follow up reading message as well as the in step 3 constructed Energy Reading message and combines these messages to a temp message called AggregatedEnergyReadings.
Click on this link for more information on the [ Construct Message Shape ]
Click on this link for more information on [ Multi Part Mappings ]
Step 8: Copy to EnergyReadings
This message assignment shape is used to copy over output of the previous mapping (step 7) to the original Energy readings document.
Click on this link for more information on the [ Message Assignment Shape ]
Step 9: Wait 30 seconds
This delay shape will be activated once the listen shape has not received any messages for 30 seconds.
Click on this link for more information on the [ Delay Shape ]
Step 10: Set bHasTimeout
This expression shape is used to set the bHasTimeout boolean to [ True ] ensuring that we will exit the loop and are able to end to process eventually after sending out the energy readings message
Click on this link for more information on the [ Expression Shape ]
Step 11: sndAggregation
This shape will actually send out the energy readings message, which at this time only contains data relating to a specific company,
Click on this link for more information in the [ Send Shape ]
Final Configuration
At this point you will have created all the required artifacts and as such you could deploy the application and configure it. Below I’ve listed the items which need to be configured
Receive Port and Location
In order to start processing the inbound Flat File we need to set up a receive port and receive location. Once this has been configured using the File Adapter we can simply start the processing of a readings flat file by dropping such a file in the folder to which the file adapter listens. The initial processing includes debatching the inbound flat file structure to separate files using the earlier defined [ Receive Pipeline ] and the [ Transformation ] of the xml presentation of the flat file energy reading to the internal reading format.
Below the settings I used for configuring the receive port and location
Receive Port Type [ One Way ]
Receive Port Inbound Map [ EnergyReadingFF_TO_Reading]
Receive Location Transport Type [ FILE Adapter ]
Receive Location Receive Pipeline [Flat File Pipeline created earlier]
Inbound Map: EnergyReadingFF_TO_Reading
Send port:
Transport Type: File
Filters: BTS.Operation = name of the send port operation name in the orchestration
Send Port
The send port which needs to be configured will subscribe to messages which are send out by the orchestration and ensures that this message is written to disk.
Below the settings I used for configuring the receive port and location
Send Port Trabs port Type [ FILE Adapter ]
Send Port Filter [BTS.Operation = name of the send port operation name in the orchestration]
Et voila
So I hope you enjoyed this post, and feel free to give me a shout on twitter @ReneBrauwers or in the comments below, and as a reminder you can download the source here (including bindings)
Please note; the bindings might not import this is most likely due to the fact that I use different Host Instance names (Processing_Host for the orchestration, Receive_Host and Send_Host for receiving and sending the files)
Cheerio
René



