by Rene Brauwers | Apr 8, 2013 | BizTalk Community Blogs via Syndication
Note: Please be advised, this post most likely contains grammar mistakes I am sorry for that but I was in a hurry and wanted to share this with you all. Anyway; enjoy…
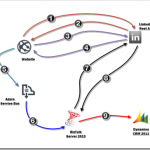
there was this BizTalk Integrator who was wondering how hard it would be to get LinkedIn profile information and store this in Microsoft Dynamics CRM 2011. He didn’t waste a lot of time and within no time he produced a diagram showing on a high level how he intended to tackle this issue.
-
Redirect user to LINKEDIN to get Authorization Code.
-
Authorization code is send back.
-
Request OAUTH 2.0 Access Token using obtained authorization code
-
OAUTH Access token is send back.
-
Establish Service Bus Connection. Create a Topic, Subscription and Filters if they don’t exists. Create message containing OAUTH Access token and set brokered message properties. Once done publish message.
-
BizTalk retrieves message from Topic Subscription.
-
BizTalk creates a GET Request including the OAUTH Token and sends it to the LinkedIn api to request the user’s information.
-
BizTalk receives a response from LinkedIn, and creates a new Atom Feed message containing the Contact Properties required to add a new contact in CRM
-
BizTalk sends a POST request to the CRM 2011 XRMServices/2011/OrganizationData.svc/ContactSet/ endpoint such that a new Contact is created
Okay all kidding aside; in this blog post I will dive deeper in to the above mentioned scenario, and will highlight the ins-and-outs as mentioned in steps 1 to 9. So let’s get started.
For all those, not interested in reading about it; but rather want to see the pre-recorded demo. Click here
One of the first challenges we have to tackle consist of obtaining a token from LinkedIn which allows us to perform authorized requests against a certain user profile. In English; in order to get LinkedIn profile information we need to acquire approval from the profile owner. Once we have obtained this permission we need to obtain an OATH 2.0 token which can then be used to authorize our requests to the LinkedIn API.
So how did I solve this ‘challenge’, well I build this small website based on MVC 4* and hosted it for free in Azure. This website uses the default MVC 4 template, and all I did is change some text and added a new controller and subsequent view. The controller, which I gave a self-explanatory name ‘LinkedInController’ takes care of all logic required (getting the OAUTH token and sending it so Windows Azure Service Bus).
Read all about MVC here, and in order to learn more about MVC and other cool stuff go to Pluralsight)
Below a more detailed overview, on how I took care of steps 1 to 4.
Note: I gathered the information on how to authenticate using OAUTH 2.0 from this page
1) Obtaining profile user permission.
On the default action (Index) in my case, I perform a good-old fashioned redirect to a LinkedIn site in order to obtain the user’s authorization (permission) to query his/hers LinkedIn profile. On this site the user is presented with the following screen.
2) Obtaining linkedIN’s authorization code.
Once the user has allowed access; he or she will be redirected back to the mvc website. This redirection request from LinkedIn contains a Authorization_Code parameter and points to a specific Action within the LinkedIn Controller.This action will extract the Authorization Code and this code will be stored internally.
3) Request OATH 2.0 token.
Next a HTTP Post to the LinkedIn API will be executed, containing the users authorization code and some other vital information
4) Process JSON response.
As a result we retrieve a JSON response which is serialized back into a custom object.
5) Publish message to windows azure service bus.
Once we’ve filled out custom object, I send it to a custom build class*, which then sends this object to a Windows Azure Topic.
* The custom class I’ve build is my own implementation of the REST API for creating TOPICs, Subscriptions, Filters and sending messages to Windows Azure Service Bus (see Service Bus REST API Reference). I’ve build this class a while back and the main reason I;’ve build it, is such that I can reuse it in my Demo Windows Phone Apps and Demo Windows Store Apps). I will not list the code here, however if you are interested just send me an email and I’ll send it to you
The above mentioned class requires that some specific information is passed in, this is explained below
Payload
The first required parameter is of type Object and should contain the message object which is to be sent to service bus.
Brokered message Properties
This parameter contains the key and value pairs adding additional context to the message send to service bus. In my demo I’ve added the following key value pairs to the message. The importance of these properties will be made clear in a little while.
Source=linkedIN
Method=select
Object=personalData
Auth=[DYNAMIC]
Note: Auth will be replaced in code with the actual OAuth 2.0 token received earlier and is added to the context of the message. Later on this is used by BizTalk (but more on this later)
Service bus name space
One of the required parameters is the service namespace which is to be used. In my demo I created a namespace called brauwers
A service namespace provides a scoping container for addressing Service Bus resources within your application.
Service bus Management Credentials
Two other parameters which are required, consist of the so-called issuer-name and issuer-token. These credentials are required if we want to perform actions on the service bus resource like (posting messages, or performing management operations). My component requries that you supply the owner (or full access) credentials as this component will try to perform some management operations (creating subscriptions) which needs these elevated privileges
Service bus Topic name
This parameter should consist of the name of the Topic to which the message will be published. In my demo I’ve chosen the value “SocialAccessTokens”.
Note: in case the topic does not exists the custom class will create it (hence the reason we need to use an issuer who has elevated (create) privileges
Service bus Topic subscription
This parameter holds the desired topic subscription name, which we want to create. In my demo I’ve chosen the value “LinkedINSubscription”
Note: Eventually a filter will be added to this subscription, such that messages matching a this filter or rule (see brokered message properties mentioned earlier) will be ‘attached’ to this subscription. The importance of this, will be made clear further down in this blog post when we will explain how BizTalk is configured). On another note; in case this subscription does not exist a the custom class will create it (hence the reason we need to use an issuer who has elevated (create) privileges.
Service bus Topic Filter name
This parameter contains the name to use for the filter, which will be attached to the topic subscription.
Service bus Topic Filter expression (Sqlfilter)
This parameter is actually pretty important as this parameter defines the rule which applies to the subscription it is attached to. The filter I used in my example –> Source = ‘linkedIN’ (keep in mind that we set a brokered message property earlier containing these values)
Note: the filter in my example should be interpreted as follows: messages send to the topic (SocialAccessTokens) which contain a brokered message property key named source, and of which the value matches the string “linkedIN” should be ‘attached’ to the subscription “LinkedINSubscription”.
Well the previous steps; ensured that a message containing the OAUTH 2.0 token, required to perform LinkedIn profile requests on behalf of the profile owner. The next steps should result in a new contact in Dynamics CRM 2011 based upon the data retrieved from LinkedIn. These steps involve BizTalk and some of it’s ‘new’ (or let’s reformulate this: out of the box) capabilities, consisting of the SB-Message adapter and the WCF-WebHttp Adapter.
So let’s get started.
6) Setting up BizTalk such that is connects to windows azure service bus.
At this point a message has been delivered to a Windows Azure Service Bus topic. However now we need to pull this message into BizTalk and for this to work we need to perform a few steps like
- a) defining a property schema used to capture the custom brokered message properties.
- b) define a schema which reflects the message send to windows azure service bus
- c) deploy the artifacts
- d) configure a receive port and location to get the service bus message(s) in BizTalk
These steps will be explained further below
Defining a property schema used to capture the custom brokered message properties.
Note: Before proceeding ensure you’ve created a new solution and BizTalk project and don’t forget to sign it with a strong key and give it an application name.
In step 5; we added a few custom properties to the message context consisting of the keys “Source,Method,Object and Auth” . In my example I want to use these properties as Promoted Properties within BizTalk, such that I can do some nice stuff with them (more about this in step 7). So in order to cater for this we need to create a new Property Schema in BizTalk and all this schema needs to contain are elements which are named exactly like the brokered message property key names.
Define a schema which reflects the message send to windows azure service bus
In order for BizTalk to recognize a message it’s message definition needs to be known internally. In English; if we want to work with the message as send to windows azure service bus in BizTalk, we need to ensure that BizTalk can recognize this message and thus we need to define. How this is done is explained below
- In my example I send a message to the service bus; this message is actually a representation of an internal defined class. This class is defined as mentioned below:
- So how do we translate this message to a BizTalk Schema? Well we have a few options, and I’ll use the not so obvious approach and that’s the manual approach. In order to do so, we need to create a new schema in BizTalk which has the following properties and structure:Target Namespace should match the DataContract Namespace, thus in my case : http://brauwers.nl/socialauthenticator/linkedin/v1.0/
The Main Root should match the class name, thus in my case :ApiAccessInformation
The main root should contain the following elements, all of them of type string
1) apiName
2) apiClientId
3) apiClientSecret
4) apiAccessScope
5) authorizationKeyThe end result should look like depicted in the image below
Deploy the artifacts
So far so good, but first let’s deploy the BizTalk project, and once it is deployed we can go ahead and start configuring it. (I named my BizTalk Application CRM2011)
Set up BizTalk Receive Port and Receive Location
So far so good, but now we need to put everything together such that we can configure BizTalk to read the Service Bus Topic Subscription and process any messages published to it. How this is done is explained below.
- Go to your just deployed BizTalk Application and create a one-way receive-port and name it appropriately.
- Created a new receive location, choose the SB-Messaging adapter, select your receive host and select the xml_receive pipeline component.
- Configured the SB-Messaging adapter. Enter the appropriate subscription url. In my case this would be: sb://brauwers.servicebus.windows.net/socialaccesstokens/subscriptions/LinkedINSubscription
sb://[NAMESPACE].servicebus.windows.net/[TOPIC_NAME]/subscriptions/[SUBSCRIPTION CONTAINING MESSAGES]
- Fill out the required authentication information, consisting of
the Access Control Service uri and a valid Issuer Name and Issuer Key
- Select the property schema to use such that the Brokered Message Properties defined earlier are treated as Promoted Properties within BizTalk.
- Press OK
7) Setting up BizTalk such that the LinkedIn API can be queried.
At this point we’ve set up BizTalk such that it can retrieve the messages published to windows azure service bus and tread the brokered message properties as Promoted properties. This section will now list and explain the next steps which are needed in order to query the LinkedIn API using the wcf-webhttp adapter.
Creating a new send port leveraging the new wcf-webhttp adapter
So how do we configure the wcf-webhttp adapter such that we can send a GET request to the linkedIn API, well the steps below will show how this is achieved.
- Create a new static solicit-response port and name it appropriately, choose the WCF-WebHttp adapter, choose your prefered send handler and select XML_Transmit as Send Pipeline and XML_Receive as Receive Pipeline
- Now click on configure, such that we can configure the WCF-WebHttp adapter.
- First configure the Endpoint address; I’ve used https://api.linkedin.com/v1/people
- Now we set the HTTP Method and URL Mapping, for this I use the BtsHttpUrlMapping element, which contains an operation method which is set to GET and the rest of the Address Uri which consists of a list of profile fields we want to select and an oauth2 access token which value we will set using variable mapping (step 5 below)
- In our BtsHttpUrlMapping we have set a dynamic parameter which was named {Auth}. The value we want to assign to this, will be the oAuth 2.0 token which is available to us as a promoted property (see explanation step 6 “Setting up BizTalk such that is connects to windows azure service bus“). So for Propery Name we select the element name containing the promoted propery value (in my case Auth) and for property namespace we enter the namespace name of our created property schema.
- Once done press OK.
- Now select the security tab and ensure that the security mode is set to Transport and the Transport client credential type is set to NONE
- Now go to the Messages Tab and ensure that the following Outbound Http Headers are set
Accept: application/atom+xml;
Content-Type: application/atom+xml;charset=utf-8
Accept-Encoding: gzip, deflate
User-Agent: BizTalk
- Make sure that the outbound message is surpressed, by indicating the GET verb-name
8) Dealing with the response message received from LinkedIn.
Well at this point we have send a GET request to linkedIn, however we haven’t set up the logic yet to cater for processing the response message send back to BizTalk by the LinkedIn API. So let’s dive in to it straight away.
Figuring out the response format from LinkedIn
In order to figure out the response message which is sent back to BizTalk, I have used Fiddler and composed a GET request as it would be sent by BizTalk.
- Open fiddler, and go to the compose tab, and use the following Uri, and replace [TOKEN] with the OAUTH token (note: you can get your token by going to the web application, but be aware if you allow access to your profile, you will be part of my DEMO and as a result your profile information will be stored in my Demo CRM environment )
https://api.linkedin.com/v1/people~:(first-name,last-name,email-address,date-of-birth,main-address,primary-twitter-account,picture-url,headline,interests,summary,languages,skills,specialties,educations,certifications,courses,three-current-positions,three-past-positions,following,job-bookmarks,phone-numbers,bound-account-types,twitter-accounts,im-accounts)?oauth2_access_token=[TOKEN]
- Add the following request headers
Accept: application/atom+xml;
Content-Type: application/atom+xml;charset=utf-8
Accept-Encoding: gzip, deflate
User-Agent: BizTalk
- Press Execute, and double click on the 200 Response, and select the RAW tab
- Copy and past the response message, and store it as an xml file
- Now go back to your BizTalk Solution and right click in your project and select –> Add new generated item)
- Select Generate Schema
- Select Well-Formed XML and browse to your saved XML file containing the response and press OK
- A new schema should be created and it should look similar to the one displayed below
9) Transforming the LinkedIn Profile RESPONSE and constructing a CRM POST request.
Well at this point we have the response definition, and now we are ready for constructing our POST request which eventually will ensure that we store the data in CRM. So let’s get started with these final pieces.
Figuring out the request message structure needed for inserting data into CRM
In order to figure out the request or payload message which is sent as body in the POST request to CRM, I have used this CRM Codeplex project CRM ODATA Query Designer Below the steps I performed to obtain the correct XML structure (note you need to have installed the codeplex project)
- Open up CRM in your browser and select the CRM Odata Query Designer
- Select ContactSet
- Press Execute and switch to the results (ATOM) tab
- Now look for the first ID and copy the url
- Copy this url in your browser and then select source
- Copy the result xml, and store it locally
- Open the xml file and let’s clean it up, such that only those fields are left which matter to you. See below my cleaned-up xml structure (please note the elements named new_ ,these are custom fields I’ve added)
- Now open up your BizTalk Solution, right click and select the “Add new generated item” like you did before and generate a schema using the well-formed xml.
- An xsd schema has been created, and it should look similar to the one depicted below. Note that I manually added the min and max occurance
Create a BizTalk Mapping which creates the CRM Insert Request
At this point we can create a mapping between the LinkedInResponse message and the CRM Insert message; I’ve done so and named this map “LinkedInPersonResponse_TO_AtomEntryRequest_CrmInsert.btm”
Build the BizTalk solution and Deploy
Now that we have all artifacts ready, we can deploy our BizTalk Solution once again and finish up the last part of our BizTalk configuration.
Creating a new send port leveraging the new WCF-WebHttp adapter to send a POST request to CRM
Our final step, before testing, consists of adding one last send port which leverages the WCF-WebHttp adapter once more; but this time we will be performing a HTTP POST to the crm endpoint (..XRMServices/2011/OrganizationData.svc/ContactSet/) which will result in a new contact record in CRM 2011. Below I’ll show you how to configure this last sendport.
- Create a new static One-Wayport and name it appropriately, choose the WCF-WebHttp adapter, choose your prefered send handler and select XML_Transmit as Send Pipeline
- Now click on configure, such that we can configure the WCF-WebHttp adapter.
- First configure the Endpoint address, which should point to an address ending on OrganisationData.svc/ContactSet .The full endpoint I’ve used is http://lb-2008-s07/Motion10/XRMServices/2011/OrganizationData.svc/ContactSet/
- Now we set the HTTP Method and URL Mapping, this is pretty straightforward as we only have to add the verb POST.
- Now select the security tab and ensure that the security mode is set to TransportCredentialOnly and the Transport client credential type is set to NTLM
- Now go to the Messages Tab and ensure that the following Outbound Http Headers are set
User-Agent: BizTalk
Content-Type: application/atom+xml
- Once done press OK
- Now select the outbound maps section, and select the map you’ve created and deployed earlier.
- Last but not least, add a Filter, stating “BTS.MessageType = person” such that the we can route the LinkedIn Response message (Person) to this sendport.
- At this point, we are done and we can now start the application and see if everything works.
Note: in order to be able to add records to CRM, you need to ensure that you’ve added the Host Intance User Account used for the selected Send Handler in CRM and granted this account the correct permissions. Failure doing so, will result in a 400 Bad Request which initially will throw you off.
Below I’ve added a few screenshots
The account svc-bts trustetd is the account used by the LowLatency_Host which I use to connect to the XRM service from CRM.
Subsequently I’ve created an account in CRM2011 for this user
and added this account (for testing purposes) to the System Administrator role.
Click Here to see a video showcasing above mentioned scenario
by community-syndication | Apr 5, 2013 | BizTalk Community Blogs via Syndication
Windows Azure HDInsight is the simplest option to get a Hadoop cluster up and running very quickly in a Windows Azure environment. Among other numerous advantages, this service allows to use Windows Azure blob storage (ASV or Azure Storage Vault for short) exactly as HDFS (Hadoop distributed file system). In its public beta version, Windows Azure HDInsight uses ASV as its default file system. I put some screen shots of what you can easily do (in a matter of minutes) with such a cluster in this post: TUTO – Hadoop arrive dans le portail Windows Azure. Lan%u00e7ons des jobs Java, PIG et HIVE pour voir !.
Still, you may want to install a custom distribution, run custom components which are not available in the HDInsight distribution, or have Hadoop running on Linux instead of Windows. This post shows how to install a Linux distribution on Windows Azure virtual machines.
While it is possible to install several distributions like MapR, CDH (Cloudera) or HortonWorks (HDP) on different Linux OSs like CentOS, SUSE, or Ubuntu, this post takes HDP 1.2 on CentOS as an example. The documentation I want to be able to follow here in order to install the cluster is the Hortonworks’ HDP 1.2.2 installation with Ambari on CentOS.
In this post, I suppose you already have a Windows Azure account. The windowsazure.com web site can provide you with the information you need to get one. I also suppose readers are quite advanced users so I don’t give all the details when documentation also exists elsewhere.
Scope
This blog post shows one way to install a Linux Hadoop cluster. It may not respect all the best practices, particularly in terms of security. The goal of the post is to show how this kind of environment can be hosted in Windows Azure. In this post, I chose to use Windows (DNS Server, Web Browser, scripting environment, ) because this is what is simple for me, but this is possible to install the cluster without using Windows at all. I give some hints on how to do that. Also, I use the portal and PowerShell (scripting) because I find it more easy to understand that way, but I’m pretty confident everything could be done with scripting.
Choosing the Windows Azure environment for the Linux cluster
There are several ways to have a local network in Windows Azure. One of them is to create a virtual network.
I also want to be able to use a browser against the cluster and have a DNS I can easily setup and manage. In this scenario, I install a Windows Server which plays those roles. This is because I’m more a Windows guy ! Note that you may prefer installing a Linux based DNS server in the virtual Network and browse the cluster thru an SSH tunnel.
The following table contains the machines I want to instanciate and their roles:
| Server Name |
Server role |
subnet |
| n124dns |
DNS
Browser
(Windows Server) |
subnet1 |
| n124m |
master node |
subnet2 |
| n124w1 to n124w3 |
worker nodes |
subnet3 |
In this sample, all machines are in the following DNS domain name : n124.benjguin.com
At the end, I’ll have those machines:
n124dns will be a Windows Server machine, and it could be a Linux machine.
All other will be Linux machines.
Configure the Virtual Network
You can find details on Windows Azure virtual networks here: http://www.windowsazure.com/en-us/manage/services/networking/.
I create a virtual network like explained at http://www.windowsazure.com/en-us/manage/services/networking/create-a-virtual-network/.
The parameters I enter are detailed in the XML file below (this file can be obtained by exporting the virtual network configuration from the Windows Azure Management portal).
<NetworkConfiguration xmlns:xsd="http://www.w3.org/2001/XMLSchema" xmlns:xsi="http://www.w3.org/2001/XMLSchema-instance" xmlns="http://schemas.microsoft.com/ServiceHosting/2011/07/NetworkConfiguration">
  <VirtualNetworkConfiguration>
    <Dns>
      <DnsServers>
        <DnsServer name="n124dns" IPAddress="10.124.1.4" />
      </DnsServers>
    </Dns>
    <VirtualNetworkSites>
      <VirtualNetworkSite name="n124" AffinityGroup="NorthEurope2Aff">
        <AddressSpace>
          <AddressPrefix>10.0.0.0/8</AddressPrefix>
        </AddressSpace>
        <Subnets>
          <Subnet name="Subnet-1">
            <AddressPrefix>10.124.1.0/24</AddressPrefix>
          </Subnet>
          <Subnet name="Subnet-2">
            <AddressPrefix>10.124.2.0/24</AddressPrefix>
          </Subnet>
          <Subnet name="Subnet-3">
            <AddressPrefix>10.124.3.0/24</AddressPrefix>
          </Subnet>
        </Subnets>
        <DnsServersRef>
          <DnsServerRef name="n124dns" />
        </DnsServersRef>
      </VirtualNetworkSite>
    </VirtualNetworkSites>
  </VirtualNetworkConfiguration>
</NetworkConfiguration>
from the portal, the virtual network looks like this:
Install the DNS Server
I install the DNS server as a Windows Server 2012 VM. It could also be a Linux machine, but I find it simpler to use a Windows Server which will also serve as a desktop environment for administrative tasks like browsing services like Ambari Server or Hadoop dashboards from a machine that has local access to the whole cluster.
I create a new Windows Server 2012 VM. For that, I go to the Windows Azure Management portal, and select NEW at the bottom left of the web page. Then,
Then I can connect to this machine from the portal:
from the Server Manager which can be started with this icon at the bootom left of the Desktop, I do the following:
I ignore the following warning:
After the installation, I can use the DNS configuration console that can be started that way:
I create a zone called n124.benjguin.com (benjguin.com is a domain I own) and its associated reverse lookup zone. Here is how it looks:
NB: you may also want to turn off the IE Enhanced Security Configuration here:
Create a Linux image
HDP documentation explains how to install on RPM based Linux OSs. CentOS is one of them. So let’s install CentOS virtual machines.
For that, I go to the Windows Azure Management portal, and select NEW at the bootom left of the web page. Then,
Yes
I’ll follow the Hortonworks’ documentation for a CentOS 6 OS. In particular, chapter 1.5 explains how to prepare the environment. I’ll give URLs in the documentation so that you can have the context, as well as the main steps I follow in my environment.
http://docs.hortonworks.com/HDPDocuments/HDP1/HDP-1.2.2/bk_using_Ambari_book/content/ambari-chap1-5-2.html
ssh-keygen
(keep defaults)
sudo su
cd
mkdir .ssh
cat /home/benjguin/.ssh/id_rsa.pub >> .ssh/authorized_keys
chmod 700 .ssh
chmod 640 .ssh/authorized_keys
# cf http://stackoverflow.com/questions/7268788/centos-6-sshd-server-refused-our-key
restorecon -R -v /root/.ssh
CTRL-D
ssh root@localhost should work without asking for a password
http://docs.hortonworks.com/HDPDocuments/HDP1/HDP-1.2.2/bk_using_Ambari_book/content/ambari-chap1-5-5.html
sudo -s
setenforce 0
vi /etc/selinux/config
http://docs.hortonworks.com/HDPDocuments/HDP1/HDP-1.2.2/bk_using_Ambari_book/content/ambari-chap1-5-6.html
sudo -s
chkconfig iptables off
/etc/init.d/iptables stop
http://docs.hortonworks.com/HDPDocuments/HDP1/HDP-1.2.2/bk_using_Ambari_book/content/ambari-chap1-5-7.html
sudo -s
vi /etc/yum/pluginconf.d/refresh-packagekit.conf
sudo shutdown -h now
()
Now, I have my own Linux image. I’ll use it to create the different Linux VMs I need in my cluster.
Instanciate Linux virtual machines
sudo -s
vi /etc/hosts
sudo -s
fdisk -l
grep SCSI /var/log/messages
fdisk /dev/sdc
mkfs.ext3 /dev/sdc1
mkdir /mnt/datadrive
mount /dev/sdc1 /mnt/datadrive
vi /etc/fstab
add the following line at the end of the file:
/dev/sdc1 /mnt/datadrive ext3 defaults 1 2
The other machines in the cluster can be created thru the portal too. But that can also be done thru a script. There are two main flavors of automation scripts in Windows Azure: the Windows Azure PowerShell module can be used from Windows machines, the Command Line Interface (CLI for short, more information) which is based on Node.js can be used from Windows, Mac and Linux. They can be downloaded from http://www.windowsazure.com/en-us/downloads/.
As I’m a Windows guy, I will use PowerShell here. The details on how to start with the Windows Azure PowerShell cmdlets is available here.
Here is the script I use to create n124w1, n124w2 and n124w3:
Import-Module azure
#select default subscription and storage account
$subscription = ‘Azure bengui’
Set-AzureSubscription -SubscriptionName $subscription -CurrentStorageAccount ‘northeurope2affstorage’
Set-AzureSubscription -DefaultSubscription $subscription
#$adminPassword="******obfuscated*****"
+#region secret
#endregion
#create an empty collection of VMConfigs
$vms = @()
#loop on the three VM we want to create
for($i=1; $i -le 3; $i++)
{
Write-Host "creating n124w${i}OS"
$sshPort = 52200 + $i
#create a new VM Config
$newVM = `
New-AzureVMConfig -ImageName myCentOSImage -InstanceSize Medium -Name "n124w$i" `
-AvailabilitySetName "n124wAvailabilitySet" -DiskLabel "n124w${i}os" `
-HostCaching ReadWrite -Label "n124w$i" |
Add-AzureProvisioningConfig -Linux -LinuxUser "benjguin" -Password $adminPassword |
Add-AzureDataDisk -CreateNew -DiskLabel n124w${i}data1 -DiskSizeInGB 100 -LUN 0 |
Add-AzureEndpoint -LocalPort 22 -Name "SSH$i" -Protocol tcp -PublicPort $sshPort |
Set-AzureSubnet ‘Subnet-3’
#add the VM config to the collection
$vms += ,$newVM
}
#show the collection
$vms | format-table
#create the VM
New-AzureVM -ServiceName ‘n124’ -VMs $vms -VNetName ‘n124’
This generates the following output:
creating n124w1OS
creating n124w2OS
creating n124w3OS
AvailabilitySetName ConfigurationSets DataVirtualHardDisks Label OSVirtualHardDisk RoleName RoleSize RoleType
——————- —————– ——————– —– —————– ——– ——– ——–
n124wAvailabilitySet {n124w1, Microsoft… {} bjEyNHcx Microsoft.Samples…. n124w1 Medium PersistentVMRole
n124wAvailabilitySet {n124w2, Microsoft… {} bjEyNHcy Microsoft.Samples…. n124w2 Medium PersistentVMRole
n124wAvailabilitySet {n124w3, Microsoft… {} bjEyNHcz Microsoft.Samples…. n124w3 Medium PersistentVMRole
WARNING: VNetName, DnsSettings, DeploymentLabel or DeploymentName Name can only be specified on new deployments.
OperationDescription OperationId OperationStatus
——————– ———– —————
New-AzureVM – Create VM n124w1 652a8988-df51-4777-94ae-bc7764296b0b Succeeded
New-AzureVM – Create VM n124w2 5b165d43-dcc7-4f5d-a1fc-ae77c6fa62dd Succeeded
New-AzureVM – Create VM n124w3 70750433-9f19-493c-9fdd-a8aad69fa193 Succeeded
and that can be seen in the Windows Azure management portal:
The DNS server can be manually updated in order to obtain the following configuration:
Then, from n124m, I can connect to other machines like this:
From there, I can update /etc/hosts in order to have hostname and hostname -f having the right names.
I can also format the data disks.
These are the same steps as before for n124w*. To summarize, here a few screen shots for n124w2:
mkfs.ext3 /dev/sdc1
mkdir /mnt/datadrive
mount /dev/sdc1 /mnt/datadrive
vi /etc/fstab
add the following line at the end of the file:
/dev/sdc1 /mnt/datadrive ext3 defaults 1 2
(same for other n124w* machines).
Now I have a whole set of machines in the same network, and they are ready to have Hadoop installed on them.
Install Hadoop distribution
I can now start at step 2 of the installation in Hortonworks’ documentation.
connect to n124m
sudo su
rpm -Uvh http://public-repo-1.hortonworks.com/ambari/centos6/1.x/GA/ambari-1.x-1.el6.noarch.rpm
from http://docs.hortonworks.com/HDPDocuments/HDP1/HDP-1.2.2/bk_using_Ambari_book/content/ambari-chap2.1.2.html,
yum install epel-release
y
yum install ambari-server
y
()
from http://docs.hortonworks.com/HDPDocuments/HDP1/HDP-1.2.2/bk_using_Ambari_book/content/ambari-chap2-2.html
ambari-server setup
(I use default answers during the setup)
from http://docs.hortonworks.com/HDPDocuments/HDP1/HDP-1.2.2/bk_using_Ambari_book/content/ambari-chap2-3.html
ambari-server start
I am now at step 3 of the Hortonworks’ documentation
http://docs.hortonworks.com/HDPDocuments/HDP1/HDP-1.2.2/bk_using_Ambari_book/content/ambari-chap3-1.html states to connect to http://{main.install.hostname}:8080. I do that from the Windows Server machine which is in the local network where the Linux machines are.
NB: in order to connect to n124dns, one simple way is to select this VM in the Windows Azure management portal and click Connect:
In a remote desktop on the n124dns machine, I do the following:
I connect with admin/admin
Next screen asks for the .ssh/id_rsa key. The simplest way is to copy it from an ssh session ([email protected]:22 in my case) and paste it in the browser.
in the customize services web page, I have
I choose to remove /mnt/resource folders because it corresponds to a disk that lives with the VM and which is not persisted in the Windows Azure storage folder. This disk is destroyed when one destroys the VM. HDFS would support it, but I want to be able to stop my whole cluster without loosing HDFS data. So I change to the following:
I do the same in tab MapReduce
I also enter the required passwords and click Next
the detail is the following
Admin Name : admin
Cluster Name : n124hdp
Total Hosts : 4 (4 new)
Local Repository : No
Services
HDFS
NameNode : n124m.n124.benjguin.com
SecondaryNameNode : n124w1.n124.benjguin.com
MapReduce
JobTracker : n124m.n124.benjguin.com
Nagios
Server : n124m.n124.benjguin.com
Ganglia
Server : n124m.n124.benjguin.com
Hive + HCatalog
Hive Metastore : n124m.n124.benjguin.com
Database : MySQL (New Database)
HBase
Master : n124m.n124.benjguin.com
Oozie
Server : n124m.n124.benjguin.com
Run
Let’s now test HDFS, PIG and HIVE by ourselves in this cluster.
I open a new SSH connection to the master node (n124m, available at n124.cloudapp.net:22)
let’s copy /etc/paswd file to /hwork/in HDFS folder
[benjguin@n124m ~]$ cp test.pig /tmp
[benjguin@n124m ~]$ cd /tmp
[benjguin@n124m tmp]$ cat test.pig
A = load ‘/hwork/in’ using PigStorage(‘:’);
B = foreach A generate \$0 as id;
store B into ‘/hwork/out1’;
[benjguin@n124m tmp]$ sudo -u hdfs pig test.pig
2013-04-05 10:54:08,586 [main] INFO org.apache.pig.Main – Apache Pig version 0.10.1.23 (rexported) compiled Mar 28 2013, 12:20:36
2013-04-05 10:54:08,587 [main] INFO org.apache.pig.Main – Logging error messages to: /tmp/pig_1365159248577.log
2013-04-05 10:54:09,141 [main] INFO org.apache.pig.backend.hadoop.executionengine.HExecutionEngine – Connecting to hadoop file system at: hdfs://n124m.n124.benjguin.com:8020
2013-04-05 10:54:09,318 [main] INFO org.apache.pig.backend.hadoop.executionengine.HExecutionEngine – Connecting to map-reduce job tracker at: n124m.n124.benjguin.com:50300
2013-04-05 10:54:10,104 [main] INFO org.apache.pig.tools.pigstats.ScriptState – Pig features used in the script: UNKNOWN
2013-04-05 10:54:10,294 [main] INFO org.apache.pig.backend.hadoop.executionengine.mapReduceLayer.MRCompiler – File concatenation threshold: 100 optimistic? false
2013-04-05 10:54:10,323 [main] INFO org.apache.pig.backend.hadoop.executionengine.mapReduceLayer.MultiQueryOptimizer – MR plan size before optimization: 1
2013-04-05 10:54:10,323 [main] INFO org.apache.pig.backend.hadoop.executionengine.mapReduceLayer.MultiQueryOptimizer – MR plan size after optimization: 1
2013-04-05 10:54:10,431 [main] INFO org.apache.pig.tools.pigstats.ScriptState – Pig script settings are added to the job
2013-04-05 10:54:10,469 [main] INFO org.apache.pig.backend.hadoop.executionengine.mapReduceLayer.JobControlCompiler – mapred.job.reduce.markreset.buffer.percent is not set, set to default 0.3
2013-04-05 10:54:10,471 [main] INFO org.apache.pig.backend.hadoop.executionengine.mapReduceLayer.JobControlCompiler – creating jar file Job5927476079760658662.jar
2013-04-05 10:54:14,037 [main] INFO org.apache.pig.backend.hadoop.executionengine.mapReduceLayer.JobControlCompiler – jar file Job5927476079760658662.jar created
2013-04-05 10:54:14,061 [main] INFO org.apache.pig.backend.hadoop.executionengine.mapReduceLayer.JobControlCompiler – Setting up single store job
2013-04-05 10:54:14,101 [main] INFO org.apache.pig.backend.hadoop.executionengine.mapReduceLayer.MapReduceLauncher – 1 map-reduce job(s) waiting for submission.
2013-04-05 10:54:14,603 [main] INFO org.apache.pig.backend.hadoop.executionengine.mapReduceLayer.MapReduceLauncher – 0% complete
2013-04-05 10:54:15,036 [Thread-7] INFO org.apache.hadoop.mapreduce.lib.input.FileInputFormat – Total input paths to process : 1
2013-04-05 10:54:15,036 [Thread-7] INFO org.apache.pig.backend.hadoop.executionengine.util.MapRedUtil – Total input paths to process : 1
2013-04-05 10:54:15,052 [Thread-7] WARN org.apache.hadoop.io.compress.snappy.LoadSnappy – Snappy native library is available
2013-04-05 10:54:15,053 [Thread-7] INFO org.apache.hadoop.util.NativeCodeLoader – Loaded the native-hadoop library
2013-04-05 10:54:15,053 [Thread-7] INFO org.apache.hadoop.io.compress.snappy.LoadSnappy – Snappy native library loaded
2013-04-05 10:54:15,056 [Thread-7] INFO org.apache.pig.backend.hadoop.executionengine.util.MapRedUtil – Total input paths (combined) to process : 1
2013-04-05 10:54:16,311 [main] INFO org.apache.pig.backend.hadoop.executionengine.mapReduceLayer.MapReduceLauncher – HadoopJobId: job_201304050850_0005
2013-04-05 10:54:16,311 [main] INFO org.apache.pig.backend.hadoop.executionengine.mapReduceLayer.MapReduceLauncher – More information at: http://n124m.n124.benjguin.com:50030/jobdetails.jsp?jobid=job_201304050850_0005
2013-04-05 10:54:26,873 [main] INFO org.apache.pig.backend.hadoop.executionengine.mapReduceLayer.MapReduceLauncher – 50% complete
2013-04-05 10:54:30,936 [main] INFO org.apache.pig.backend.hadoop.executionengine.mapReduceLayer.MapReduceLauncher – 100% complete
2013-04-05 10:54:30,938 [main] INFO org.apache.pig.tools.pigstats.SimplePigStats – Script Statistics:
HadoopVersion PigVersion UserId StartedAt FinishedAt Features
1.1.2.23 0.10.1.23 hdfs 2013-04-05 10:54:10 2013-04-05 10:54:30 UNKNOWN
Success!
Job Stats (time in seconds):
JobId Maps Reduces MaxMapTime MinMapTIme AvgMapTime MaxReduceTime MinReduceTime AvgReduceTime Alias Feature Outputs
job_201304050850_0005 1 0 3 3 3 0 0 0 A,B MAP_ONLY /hwork/out1,
Input(s):
Successfully read 45 records (2588 bytes) from: "/hwork/in"
Output(s):
Successfully stored 45 records (304 bytes) in: "/hwork/out1"
Counters:
Total records written : 45
Total bytes written : 304
Spillable Memory Manager spill count : 0
Total bags proactively spilled: 0
Total records proactively spilled: 0
Job DAG:
job_201304050850_0005
2013-04-05 10:54:30,954 [main] INFO org.apache.pig.backend.hadoop.executionengine.mapReduceLayer.MapReduceLauncher – Success!
[benjguin@n124m tmp]$
so PIG works!
let’s now do the same thing with HIVE:
that works too!
Automate the cluster [de]provisioning
Once I have the VMs setup, I want to be able to stop paying for compute by shutting down and removing the VMs (while still keeping the virtyual hard disks VHD).
Il also want to be able to restart the whole cluster quite quickly.
As seen before in this post, it is possible to automate by scripting. Here are the scripts I use to stop and start this cluster.
NB: I took the OS disk names and data disk names from the Windows Azure portal
To shut up the cluster, I use
#region init
Import-Module ‘c:\Program Files (x86)\Microsoft SDKs\Windows Azure\PowerShell\Azure\Azure.psd1’
$subscription = ‘Azure bengui’
Set-AzureSubscription -SubscriptionName $subscription -CurrentStorageAccount ‘northeurope2affstorage’
Set-AzureSubscription -DefaultSubscription $subscription
$cloudSvcName = ‘n124’
#endregion
#region shutdown and delete
echo ‘will shut down and remove the following’
#$vms = Get-AzureVM -ServiceName $cloudSvcName | where { !($_.name -eq ‘n124dns’) }
$vms = Get-AzureVM -ServiceName $cloudSvcName
$vms | select name
$vms | Stop-AzureVM
$vms | Remove-AzureVM
#endregion
To startup the cluster, I use:
Import-Module azure
$subscription = ‘Azure bengui’
Set-AzureSubscription -SubscriptionName $subscription -CurrentStorageAccount ‘northeurope2affstorage’
Set-AzureSubscription -DefaultSubscription $subscription
$cloudSvcName = ‘n124’
$vNetName = ‘n124’
$vms = @()
$vmName=‘n124dns’
$n124dns = New-AzureVMConfig -DiskName ‘n124dns-n124dns-0-20130117132807’ -InstanceSize Small -Name $vmName -Label $vmName |
Set-AzureSubnet ‘Subnet-1’ |
Add-AzureEndpoint -LocalPort 3389 -Name ‘RDP’ -Protocol tcp -PublicPort 3389
$vms += ,$n124dns
$vmName=‘n124m’
$vm1 = New-AzureVMConfig -DiskName ‘n124-n124m-2013-04-03’ -InstanceSize Medium -Name $vmName -Label $vmName |
Add-AzureDataDisk -DiskName ‘n124-n124m-0-201304031626300873’ -Import -LUN 0 |
Add-AzureEndpoint -LocalPort 22 -Name ‘SSH’ -Protocol tcp -PublicPort 22 |
Set-AzureSubnet ‘Subnet-2’
$vms += ,$vm1
$osDiskNames = @(‘n124-n124w1-0-201304041529430938’, `
‘n124-n124w2-0-201304041530370691’, `
‘n124-n124w3-0-201304041532060509’)
$dataDiskNames = @(‘n124-n124w1-0-201304041529470297’, `
‘n124-n124w2-0-201304041530410363’, `
‘n124-n124w3-0-201304041532090540’)
#loop on the three VM we want to create
for($i=1; $i -le 3; $i++)
{
Write-Host "creating n124w${i}OS"
$sshPort = 52200 + $i
$j = $i – 1
#create a new VM Config
$newVM = `
New-AzureVMConfig -DiskName $osDiskNames[$j] -InstanceSize Medium -Name "n124w$i" `
-AvailabilitySetName "n124wAvailabilitySet" -Label "n124w$i" |
Add-AzureDataDisk -DiskName $dataDiskNames[$j] -Import -LUN 0 |
Add-AzureEndpoint -LocalPort 22 -Name "SSH$i" -Protocol tcp -PublicPort $sshPort |
Set-AzureSubnet ‘Subnet-3’
#add the VM config to the collection
$vms += ,$newVM
}
#show the collection
$vms | format-table
#create the VM
New-AzureVM -ServiceName ‘n124’ -VMs $vms -VNetName ‘n124’
So I now have a Linux cluster with Hadoop installed and I can start, and stop it (without loosing HDFS data) with scripts.
Benjamin
Blog Post by: Benjamin GUINEBERTIERE


