by community-syndication | Sep 18, 2012 | BizTalk Community Blogs via Syndication
| Windows Azure Web Sites makes it easy to create new Web Sites. A site can be empty, created from a popular framework such as WordPress or Umbraco, or the result of a migration from an existing app. |
Les sites Web Windows Azure simplifient la cr%u00e9ation de nouveaux sites Web. Un tel site peut %u00eatre vide, cr%u00e9%u00e9 %u00e0 partir d’un Framework populaire tel que WordPress ou Umbraco, ou %u00eatre le r%u00e9sultat de la migration d’une application existante. |
| In order to test these features yourself, you can benefit from a 90 day free trial offer, and activate the preview web sites feature. |
si vous souhaitez tester ces fonctionnalit%u00e9s par vous m%u00eame, vous pouvez profiter d’une offre d’essai gratuit pendant 90 jours, et activer la fonctionnalit%u00e9 des sites Web actuellement en test. |
| A lot is being written about ASP.NET MVC which is awesome, but legacy applications may still be written as ASP.NET Web Forms (Note that most of this post can also be applied to other ASP.NET apps like an MVC one!). |
On %u00e9crit beaucoup %u00e0 propos d’ASP.NET MVC qui est excellent, mais les applications existantes risquent fort d’%u00eatre de type Web Forms ASP.NET (NB: une bonne partie de ce billet s’applique %u00e0 ASP.NET en g%u00e9n%u00e9ral et donc %u00e0 MVC!). |
| Let’s see how to migrate such an ASP.NET Web Forms App. to Windows Azure Web Sites. |
Voyons comment migrer une telle application ASP.NET Web Forms vers les sites Web Windows Azure. |
| TailspinSpyworks is one of the available samples on ASP.NET reference web site. It can be found at http://www.asp.net/web-forms/samples which leads to the following download. |
TailspinSpyworks est un des exemples sur le site de r%u00e9f%u00e9rence d’ASP.NET. On peut le trouver %u00e0 http://www.asp.net/web-forms/samples qui am%u00e8ne au site de t%u00e9l%u00e9chargement suivant. |
| The first part of this post is about downloading the sample and make it run locally. Then I’ll show how to migrate it to Windows Azure. |
La premi%u00e8re partie de ce billet est consacr%u00e9e %u00e0 la fa%u00e7on de t%u00e9l%u00e9charger cet exemple et le faire fonctionner localement avant de le migrer vers Windows Azure. |
| My development machine has Visual Studio 2012, SQL Server 2012, and the latest SQL Server Data Tools (SSDT) that can be donwloaded for Visual Studio 2012. |
Ma machine de d%u00e9veloppement a Visual Studio 2012, SQL Server 2012, et les derniers outils SQL Server Data Tools (SSDT) qui peuvent %u00eatre t%u00e9l%u00e9charg%u00e9s pour Visual Studio 2012. |
| The solution was written with previous generation tools, but it was already targetting .NET Framework 4.0 and I won’t change that. |
La solution a %u00e9t%u00e9 %u00e9crite avec la g%u00e9n%u00e9ration pr%u00e9c%u00e9dente des outils, mais elle cible le .NET Framework 4.0 et l’on ne va pas changer cela. |
| After unblocking the zip file I downloaded from codeplex and unzipping to D:\dev\TailspinSpyworks-v0.9, I get the following: |
Apr%u00e8s avoir d%u00e9bloqu%u00e9 le fichier zip que j’ai t%u00e9l%u00e9charg%u00e9 depuis codeplex et d%u00e9zipp%u00e9 vers D:\dev\TailspinSpyworks-v0.9, j’obtiens cela: |
| I open the solution in Visual Studio 2012. |
J’ouvre la solution dans Visual Studio 2012. |
| I have a simple report with just a few warnings that I can ignore. |
J’’obtiens un rapport avec juste quelques warnings que je peux ignorer |
| The solution uses two different databases. The ASP.NET database and the commerce database. The first one contains data for ASP.NET services like membership and the commerce DB contains the core application data. |
La solution utilise deux bases de donn%u00e9es diff%u00e9rentes. La base ASP.NET et la base Commerce. La premi%u00e8re contient des services ASP.NET telle que les comptes et la base commerce contient les donn%u00e9es de base de l’application. |
| The database connection strings suppose you have SQL Server Express. In my case, I have a SQL Server 2012 developer edition so I just move the files from App_Data in the project to the SQL Server Data folder and attach the files in that SQL Server 2012 developer edition instance. The details are beyond the scope of this post. |
Les chaines de connexion des bases de donn%u00e9es supposent l’utilisation de SQL server Express. Dans mon cas, j’ai SQL Server 2012 developer edition; je d%u00e9place donc les fichiers depuis App_Data du projet pour les attacher %u00e0 cette instance SQL Server 2012 developer edition. Les d%u00e9tails exacts vont au del%u00e0 de ce billet. |
()
()
| I also remove the user that corresponds to the developer as it is not used by the project. There’s an associated schema which is not used either and that can also be removed. |
J’enl%u00e8ve %u00e9galement l’utilisateur qui correspond au d%u00e9veloppeur puisqu’il n’est pas utilis%u00e9 dans ce projet. Il y a %u00e9galement un sch%u00e9ma associ%u00e9 qui n’est pas non plus utilis%u00e9 et que je supprime %u00e9galement. |
| Then, it is also possible to view those databases from the SSDT; this is a way to get the connection strings, amongst other things. |
Il est ensuite possible de voir ces m%u00eames bases de donn%u00e9es depuis SSDT, de fa%u00e7on %u00e0 obtenir les cha%u00eenes de connexion, entre autres. |
| Then the 2 local connection strings can be updated in the Web.config file. In my case, they change from |
Puis les 2 cha%u00eenes de connexion locale peuvent %u00eatre mises %u00e0 jour dans le fichier Web.config. Dans mon cas, on les change de |
<connectionStrings>
<add name="ApplicationServices" connectionString="data source=.\SQLEXPRESS;Integrated Security=SSPI;AttachDBFilename=|DataDirectory|\aspnetdb.mdf;User Instance=true" providerName="System.Data.SqlClient" />
<add name="CommerceEntities" connectionString="metadata=res://*/Data_Access.EDM_Commerce.csdl|res://*/Data_Access.EDM_Commerce.ssdl|res://*/Data_Access.EDM_Commerce.msl;provider=System.Data.SqlClient;provider connection string="Data Source=.\SQLEXPRESS;AttachDbFilename=|DataDirectory|\Commerce.mdf;Integrated Security=True;User Instance=True;MultipleActiveResultSets=True"" providerName="System.Data.EntityClient" />
</connectionStrings>
<connectionStrings>
<add name="ApplicationServices" connectionString="Data Source=.;Initial Catalog=ASPNETDB-TAILSPINSPYWORKS.MDF;Integrated Security=True;Connect Timeout=15;Encrypt=False;TrustServerCertificate=False" providerName="System.Data.SqlClient" />
<add name="CommerceEntities" connectionString="metadata=res://*/Data_Access.EDM_Commerce.csdl|res://*/Data_Access.EDM_Commerce.ssdl|res://*/Data_Access.EDM_Commerce.msl;provider=System.Data.SqlClient;provider connection string="Data Source=.;Initial Catalog=COMMERCE-TAILSPINSPYWORKS.MDF;Integrated Security=True;Connect Timeout=15;Encrypt=False;TrustServerCertificate=False"" providerName="System.Data.EntityClient" />
</connectionStrings>
| then I start locally the App. |
puis je peux d%u00e9marrer l’application. |
| I also had to fix a few things in the code like this one in D:\dev\TailspinSpyworks-v0.9\TailspinSpyworks\Error.aspx.cs |
J’ai aussi d%u00fb corriger deux ou trois choses dans le code comme cela dans le fichier D:\dev\TailspinSpyworks-v0.9\TailspinSpyworks\Error.aspx.cs |
namespace TailspinSpyworks
{
    public partial class Error : System.Web.UI.Page
    {
        protected void Page_Load(object sender, EventArgs e)
        {
            Label_ErrorFrom.Text = Request["Err"].ToString();
            // there might be no Inner Exception.
            //Label_ErrorMessage.Text = Request["InnerErr"].ToString();
            // string.Format will apply ToString() only to non null arguments
            Label_ErrorMessage.Text = string.Format("{0}", Request["InnerErr"]);
        }
    }
}
| as well as recreate an empty event for the ProductDetails.aspx page. The event was not there and generated an exception: |
ou comme recr%u00e9er un %u00e9venement vide pour la page ProductDetails.aspx. L’%u00e9v%u00e9nement %u00e9tait absent et g%u00e9n%u00e9rait une exception: |
        protected void FormView_Product_PageIndexChanging(object sender, FormViewPageEventArgs e)
        {
            // this event was recreated but is not handled
        }
| so for now, I just made the sample app working on my machine. I didn’t start the migration to Windows Azure yet! So I mark the post with an <hr/> |
Donc jusqu’%u00e0 pr%u00e9sent j’ai juste fait fonctionner l’application sur ma machine. Je n’ai pas encore commenc%u00e9 la migration vers Windows Azure! Je marque donc le billet d’un <hr/> |
| OK, let’s start the migration now! |
OK, d%u00e9marrons la migration maintenant! |
| First I create a new Windows Azure Web Site named TailspinSpyworks, with an associated Windows Azure SQL database. In this case, I create a database in an existing Windows Azure SQL database server, but I could also create a new server as well. |
Pour commencer je cr%u00e9e un nouveau site Web Windows Azure appel%u00e9 TailspinSpyworks, avec une base de donn%u00e9es Windows Azure SQL Database. Ici, je cr%u00e9e une base dans un serveur Windows Azure SQL Database existant, mais j’aurais aussi pu cr%u00e9er un nouveau serveur. |
| This is done from the Windows Azure portal, at http://manage.windowsazure.com. |
Cela se fait depuis le portail Windows Azure, %u00e0 http://manage.windowsazure.com. |
| A few seconds later, I have an empty web site with its associated Windows Azure SQL Database where I’ll be able to host the migrated Web Forms app. |
Quelques secondes apr%u00e8s, j’ai un site Web vide avec une base de donn%u00e9es Windows Azure SQL Database associ%u00e9e o%u00f9 je vais pouvoir h%u00e9berg%u00e9e l’application migr%u00e9e. |
| I will get and download from the portal the publishing profile of the new web site. |
Je vais r%u00e9cup%u00e9rer et t%u00e9l%u00e9charger depuis le portail le profil de publication du nouveau site Web. |
| Now, I can start publishing from Visual Studio 2012. |
Maintenant, je peux d%u00e9marrer une publication depuis Visual Studio 2012. |
| The next screen is the most important one |
L’%u00e9cran suivant est le plus important |
| I check the “remove additional files at destination” because I know my local app has the whole content and I can remove the default index page once the App is deployed. |
Je s%u00e9lectionne “remive additional files at destination” parce que je sais que mon application locale a tout le contenu dont j’ai besoin et je peux donc supprimer la page d’index par d%u00e9faut une fois que l’application aura %u00e9t%u00e9 d%u00e9ploy%u00e9e. |
| and I accept to close the Wizard and install |
et j’accepte de fermer l’assistant pour installer |
| The details about this are provided in the link. I will create such a user once the App is in the cloud. So let’s move on by restarting the publishing Wizard. |
Les d%u00e9tails sont fournis dans le lien. Je vais cr%u00e9er un utilisateur de l’application une fois que cette derni%u00e8re sera h%u00e9berg%u00e9e dans Windows Azure. Avan%u00e7ons et red%u00e9marrons l’assistant de migration. |
| The “ApplicationServices” connection string has been replaced by the “DefaultConnection” connection string. As I want to use only one database for the ASP.NET Universal Providers and the Commerce DB, I select the same connection string for both cases. It happens to be the Windows Azure SQL Database that was created with the Windows Azure Web Site. |
La cha%u00eene de connexion “ApplicationServices” a %u00e9t%u00e9 remplac%u00e9e par la cha%u00eene de connexion “DefaultConnection”. Comme je veiux utiliser uniquement une base de donn%u00e9es pour les fournisseurs universels ASP.NET et la base Commerce, je s%u00e9lectionne la m%u00eame cha%u00eene de connexion pour les deux cas. Il s’agit d’ailleurs de la base Windows Azure SQL Database qui avait %u00e9t%u00e9 cr%u00e9%u00e9e en m%u00eame temps que le site Web Windows Azure. |
| For both databases, I leave the Update Database check box cleared because I use other means to migrate the databases. The ASP.NET Universal Providers will create the schema at runtime, and I will migrate the Commerce DB with a tool I like a lot because it si simple and easy to use. |
Pour les deux bases de donn%u00e9es, je laisse la case %u00e0 cocher “Update Database” vierge puisque j’utilise d’autres m%u00e9thodes pour migrer les bases. La base des fournisseurs universels ASP.NET cr%u00e9era le sch%u00e9ma au moment de l’ex%u00e9cution, et je vais migrer le base de donn%u00e9es Commerce avec un outil que j’aime bien pour sa simplicit%u00e9 d’utilisation. |
Next>
Publish
| Let’s now migrate the database with the Windows Azure SQL Database migration Wizard that can be found at http://sqlazuremw.codeplex.com. |
Migrons maintenant la base de donn%u00e9es avec l’assistant de migration Widnows Azure SQL Database qui peut %u00eatre trouv%u00e9 %u00e0 http://sqlazuremw.codeplex.com. |
| I just download it, unblock it, and extract it to a folder from where I start SQLAzureMW.exe. |
Je le t%u00e9l%u00e9charge, le d%u00e9bloque, l’extrais dans un dossier o%u00f9 je peux d%u00e9marrer SQLAzureMW.exe. |
Connect
Next>
Next>
Next>
| The result summary gives information about default choices made by the tool. They can also be seen in the SQL Script tab. Here is its content in my case: |
Le r%u00e9sum%u00e9 du r%u00e9sultat fournit quelques informations sur les choix par d%u00e9faut propos%u00e9s par l’outil. On peut aussi les voir dans l’onglet “SQL Script”. Voici son contenu dans mon cas: |
--~Changing index [dbo].[Orders].PK_Orders to a clustered index.  You may want to pick a different index to cluster on.
SET ANSI_NULLS ON
SET QUOTED_IDENTIFIER ON
IF NOT EXISTS (SELECT * FROM sys.objects WHERE object_id = OBJECT_ID(N'[dbo].[Orders]') AND type in (N'U'))
BEGIN
CREATE TABLE [dbo].[Orders](
    [OrderID] [int] IDENTITY(1,1) NOT NULL,
    [CustomerName] [nvarchar](256) COLLATE SQL_Latin1_General_CP1_CI_AS NOT NULL,
    [OrderDate] [datetime] NOT NULL,
    [ShipDate] [datetime] NOT NULL,
 CONSTRAINT [PK_Orders] PRIMARY KEY CLUSTERED
(
    [OrderID] ASC
)WITH (STATISTICS_NORECOMPUTE  = OFF, IGNORE_DUP_KEY = OFF)
)
END
GO
IF NOT EXISTS (SELECT * FROM dbo.sysobjects WHERE id = OBJECT_ID(N'[DF_Orders_OrderDate]') AND type = 'D')
BEGIN
ALTER TABLE [dbo].[Orders] ADD  CONSTRAINT [DF_Orders_OrderDate]  DEFAULT (getdate()) FOR [OrderDate]
END
GO
IF NOT EXISTS (SELECT * FROM dbo.sysobjects WHERE id = OBJECT_ID(N'[DF_Orders_ShipDate]') AND type = 'D')
BEGIN
ALTER TABLE [dbo].[Orders] ADD  CONSTRAINT [DF_Orders_ShipDate]  DEFAULT (getdate()) FOR [ShipDate]
END
GO
SET ANSI_NULLS ON
SET QUOTED_IDENTIFIER ON
IF NOT EXISTS (SELECT * FROM sys.objects WHERE object_id = OBJECT_ID(N'[dbo].[OrderDetails]') AND type in (N'U'))
BEGIN
CREATE TABLE [dbo].[OrderDetails](
    [Id] [int] IDENTITY(1,1) NOT NULL,
    [OrderID] [int] NULL,
    [ProductID] [int] NULL,
    [Quantity] [int] NULL,
    [UnitCost] [money] NULL,
 CONSTRAINT [PK_OrderDetails] PRIMARY KEY CLUSTERED
(
    [Id] ASC
)WITH (STATISTICS_NORECOMPUTE  = OFF, IGNORE_DUP_KEY = OFF)
)
END
GO
--~Changing index [dbo].[Categories].PK_Categories to a clustered index.  You may want to pick a different index to cluster on.
SET ANSI_NULLS ON
SET QUOTED_IDENTIFIER ON
IF NOT EXISTS (SELECT * FROM sys.objects WHERE object_id = OBJECT_ID(N'[dbo].[Categories]') AND type in (N'U'))
BEGIN
CREATE TABLE [dbo].[Categories](
    [CategoryID] [int] IDENTITY(1,1) NOT NULL,
    [CategoryName] [nvarchar](50) COLLATE SQL_Latin1_General_CP1_CI_AS NULL,
 CONSTRAINT [PK_Categories] PRIMARY KEY CLUSTERED
(
    [CategoryID] ASC
)WITH (STATISTICS_NORECOMPUTE  = OFF, IGNORE_DUP_KEY = OFF)
)
END
GO
--~Changing index [dbo].[Products].PK_Products to a clustered index.  You may want to pick a different index to cluster on.
SET ANSI_NULLS ON
SET QUOTED_IDENTIFIER ON
IF NOT EXISTS (SELECT * FROM sys.objects WHERE object_id = OBJECT_ID(N'[dbo].[Products]') AND type in (N'U'))
BEGIN
CREATE TABLE [dbo].[Products](
    [ProductID] [int] IDENTITY(1,1) NOT NULL,
    [CategoryID] [int] NOT NULL,
    [ModelNumber] [nvarchar](50) COLLATE SQL_Latin1_General_CP1_CI_AS NULL,
    [ModelName] [nvarchar](50) COLLATE SQL_Latin1_General_CP1_CI_AS NULL,
    [ProductImage] [nvarchar](50) COLLATE SQL_Latin1_General_CP1_CI_AS NULL,
    [UnitCost] [money] NOT NULL,
    [Description] [nvarchar](3800) COLLATE SQL_Latin1_General_CP1_CI_AS NULL,
 CONSTRAINT [PK_Products] PRIMARY KEY CLUSTERED
(
    [ProductID] ASC
)WITH (STATISTICS_NORECOMPUTE  = OFF, IGNORE_DUP_KEY = OFF)
)
END
GO
SET ANSI_NULLS ON
SET QUOTED_IDENTIFIER ON
IF NOT EXISTS (SELECT * FROM sys.objects WHERE object_id = OBJECT_ID(N'[dbo].[SelectPurchasedWithProducts]') AND type in (N'P', N'PC'))
BEGIN
EXEC dbo.sp_executesql @statement = N'CREATE PROCEDURE dbo.SelectPurchasedWithProducts
 @ProductID int
AS
    SELECT  TOP 5
    OrderDetails.ProductID,
    Products.ModelName,
    SUM(OrderDetails.Quantity) as TotalNum

FROM
    OrderDetails
  INNER JOIN Products ON OrderDetails.ProductID = Products.ProductID

WHERE   OrderID IN
(
    /* This inner query should retrieve all orders that have contained the productID */
    SELECT DISTINCT OrderID
    FROM OrderDetails
    WHERE ProductID = @ProductID
)
AND OrderDetails.ProductID != @ProductID

GROUP BY OrderDetails.ProductID, Products.ModelName

ORDER BY TotalNum DESC
RETURN

'
END
GO
SET ANSI_NULLS ON
SET QUOTED_IDENTIFIER ON
IF NOT EXISTS (SELECT * FROM sys.objects WHERE object_id = OBJECT_ID(N'[dbo].[Reviews]') AND type in (N'U'))
BEGIN
CREATE TABLE [dbo].[Reviews](
    [ReviewID] [int] IDENTITY(1,1) NOT NULL,
    [ProductID] [int] NOT NULL,
    [CustomerName] [nvarchar](50) COLLATE SQL_Latin1_General_CP1_CI_AS NULL,
    [CustomerEmail] [nvarchar](50) COLLATE SQL_Latin1_General_CP1_CI_AS NULL,
    [Rating] [int] NOT NULL,
    [Comments] [nvarchar](3850) COLLATE SQL_Latin1_General_CP1_CI_AS NULL,
 CONSTRAINT [PK_Reviews] PRIMARY KEY CLUSTERED
(
    [ReviewID] ASC
)WITH (STATISTICS_NORECOMPUTE  = OFF, IGNORE_DUP_KEY = OFF)
)
END
GO
--~Changing index [dbo].[ShoppingCart].PK_ShoppingCart to a clustered index.  You may want to pick a different index to cluster on.
SET ANSI_NULLS ON
SET QUOTED_IDENTIFIER ON
IF NOT EXISTS (SELECT * FROM sys.objects WHERE object_id = OBJECT_ID(N'[dbo].[ShoppingCart]') AND type in (N'U'))
BEGIN
CREATE TABLE [dbo].[ShoppingCart](
    [RecordID] [int] IDENTITY(1,1) NOT NULL,
    [CartID] [nvarchar](50) COLLATE SQL_Latin1_General_CP1_CI_AS NULL,
    [Quantity] [int] NOT NULL,
    [ProductID] [int] NOT NULL,
    [DateCreated] [datetime] NOT NULL,
 CONSTRAINT [PK_ShoppingCart] PRIMARY KEY CLUSTERED
(
    [RecordID] ASC
)WITH (STATISTICS_NORECOMPUTE  = OFF, IGNORE_DUP_KEY = OFF)
)
END

IF NOT EXISTS (SELECT * FROM sys.indexes WHERE object_id = OBJECT_ID(N'[dbo].[ShoppingCart]') AND name = N'IX_ShoppingCart')
CREATE NONCLUSTERED INDEX [IX_ShoppingCart] ON [dbo].[ShoppingCart]
(
    [CartID] ASC,
    [ProductID] ASC
)WITH (STATISTICS_NORECOMPUTE  = OFF, IGNORE_DUP_KEY = OFF, DROP_EXISTING = OFF, ONLINE = OFF)
GO
IF NOT EXISTS (SELECT * FROM dbo.sysobjects WHERE id = OBJECT_ID(N'[DF_ShoppingCart_Quantity]') AND type = 'D')
BEGIN
ALTER TABLE [dbo].[ShoppingCart] ADD  CONSTRAINT [DF_ShoppingCart_Quantity]  DEFAULT ((1)) FOR [Quantity]
END
GO
IF NOT EXISTS (SELECT * FROM dbo.sysobjects WHERE id = OBJECT_ID(N'[DF_ShoppingCart_DateCreated]') AND type = 'D')
BEGIN
ALTER TABLE [dbo].[ShoppingCart] ADD  CONSTRAINT [DF_ShoppingCart_DateCreated]  DEFAULT (getdate()) FOR [DateCreated]
END
GO
SET ANSI_NULLS ON
SET QUOTED_IDENTIFIER ON
IF NOT EXISTS (SELECT * FROM sys.views WHERE object_id = OBJECT_ID(N'[dbo].[VewOrderDetails]'))
EXEC dbo.sp_executesql @statement = N'CREATE VIEW dbo.VewOrderDetails
AS
SELECT        dbo.Products.ProductID, dbo.Products.ModelNumber, dbo.Products.ModelName, dbo.OrderDetails.Quantity, dbo.OrderDetails.UnitCost,
                         dbo.OrderDetails.OrderID
FROM            dbo.OrderDetails INNER JOIN
                         dbo.Products ON dbo.OrderDetails.ProductID = dbo.Products.ProductID
'
GO
SET ANSI_NULLS ON
SET QUOTED_IDENTIFIER ON
IF NOT EXISTS (SELECT * FROM sys.views WHERE object_id = OBJECT_ID(N'[dbo].[ViewAlsoPurchased]'))
EXEC dbo.sp_executesql @statement = N'CREATE VIEW dbo.ViewAlsoPurchased
AS
SELECT        TOP (5) dbo.OrderDetails.ProductID, dbo.Products.ModelName, SUM(dbo.OrderDetails.Quantity) AS TotalNumPurchased, dbo.OrderDetails.OrderID,
                         dbo.Products.ProductID AS Products_ProductID
FROM            dbo.OrderDetails INNER JOIN
                         dbo.Products ON dbo.OrderDetails.ProductID = dbo.Products.ProductID
WHERE        (dbo.OrderDetails.OrderID IN
                             (SELECT DISTINCT OrderID
                               FROM            dbo.OrderDetails AS OrderDetailsSelected))
GROUP BY dbo.OrderDetails.ProductID, dbo.Products.ModelName, dbo.OrderDetails.OrderID, dbo.Products.ProductID
ORDER BY TotalNumPurchased DESC
'
GO
SET ANSI_NULLS ON
SET QUOTED_IDENTIFIER ON
IF NOT EXISTS (SELECT * FROM sys.views WHERE object_id = OBJECT_ID(N'[dbo].[ViewCart]'))
EXEC dbo.sp_executesql @statement = N'CREATE VIEW dbo.ViewCart
AS
SELECT        TOP (100) PERCENT dbo.Products.ProductID, dbo.Products.ModelNumber, dbo.Products.ModelName, dbo.Products.UnitCost, dbo.ShoppingCart.Quantity,
                         dbo.ShoppingCart.CartID
FROM            dbo.Products INNER JOIN
                         dbo.ShoppingCart ON dbo.Products.ProductID = dbo.ShoppingCart.ProductID AND dbo.Products.ProductID = dbo.ShoppingCart.ProductID
ORDER BY dbo.Products.ModelName, dbo.Products.ModelNumber
'
GO
IF NOT EXISTS (SELECT * FROM sys.foreign_keys WHERE object_id = OBJECT_ID(N'[dbo].[FK_Order_OrderDetails]') AND parent_object_id = OBJECT_ID(N'[dbo].[OrderDetails]'))
ALTER TABLE [dbo].[OrderDetails]  WITH CHECK ADD  CONSTRAINT [FK_Order_OrderDetails] FOREIGN KEY([OrderID])
REFERENCES [dbo].[Orders] ([OrderID])
GO
IF  EXISTS (SELECT * FROM sys.foreign_keys WHERE object_id = OBJECT_ID(N'[dbo].[FK_Order_OrderDetails]') AND parent_object_id = OBJECT_ID(N'[dbo].[OrderDetails]'))
ALTER TABLE [dbo].[OrderDetails] CHECK CONSTRAINT [FK_Order_OrderDetails]
GO
IF NOT EXISTS (SELECT * FROM sys.foreign_keys WHERE object_id = OBJECT_ID(N'[dbo].[FK_Products_Categories]') AND parent_object_id = OBJECT_ID(N'[dbo].[Products]'))
ALTER TABLE [dbo].[Products]  WITH CHECK ADD  CONSTRAINT [FK_Products_Categories] FOREIGN KEY([CategoryID])
REFERENCES [dbo].[Categories] ([CategoryID])
GO
IF  EXISTS (SELECT * FROM sys.foreign_keys WHERE object_id = OBJECT_ID(N'[dbo].[FK_Products_Categories]') AND parent_object_id = OBJECT_ID(N'[dbo].[Products]'))
ALTER TABLE [dbo].[Products] CHECK CONSTRAINT [FK_Products_Categories]
GO
IF NOT EXISTS (SELECT * FROM sys.foreign_keys WHERE object_id = OBJECT_ID(N'[dbo].[FK_Reviews_Products]') AND parent_object_id = OBJECT_ID(N'[dbo].[Reviews]'))
ALTER TABLE [dbo].[Reviews]  WITH NOCHECK ADD  CONSTRAINT [FK_Reviews_Products] FOREIGN KEY([ProductID])
REFERENCES [dbo].[Products] ([ProductID])
NOT FOR REPLICATION
GO
IF  EXISTS (SELECT * FROM sys.foreign_keys WHERE object_id = OBJECT_ID(N'[dbo].[FK_Reviews_Products]') AND parent_object_id = OBJECT_ID(N'[dbo].[Reviews]'))
ALTER TABLE [dbo].[Reviews] CHECK CONSTRAINT [FK_Reviews_Products]
GO
IF NOT EXISTS (SELECT * FROM sys.foreign_keys WHERE object_id = OBJECT_ID(N'[dbo].[FK_ShoppingCart_Products]') AND parent_object_id = OBJECT_ID(N'[dbo].[ShoppingCart]'))
ALTER TABLE [dbo].[ShoppingCart]  WITH CHECK ADD  CONSTRAINT [FK_ShoppingCart_Products] FOREIGN KEY([ProductID])
REFERENCES [dbo].[Products] ([ProductID])
GO
IF  EXISTS (SELECT * FROM sys.foreign_keys WHERE object_id = OBJECT_ID(N'[dbo].[FK_ShoppingCart_Products]') AND parent_object_id = OBJECT_ID(N'[dbo].[ShoppingCart]'))
ALTER TABLE [dbo].[ShoppingCart] CHECK CONSTRAINT [FK_ShoppingCart_Products]
GO
-- BCPArgs:2:[dbo].[Orders] in "c:\SQLAzureMW\BCPData\dbo.Orders.dat" -E -n -b 10000 -a 16384
GO
-- BCPArgs:13:[dbo].[OrderDetails] in "c:\SQLAzureMW\BCPData\dbo.OrderDetails.dat" -E -n -b 10000 -a 16384
GO
-- BCPArgs:7:[dbo].[Categories] in "c:\SQLAzureMW\BCPData\dbo.Categories.dat" -E -n -b 10000 -a 16384
GO
-- BCPArgs:41:[dbo].[Products] in "c:\SQLAzureMW\BCPData\dbo.Products.dat" -E -n -b 10000 -a 16384
GO
-- BCPArgs:6:[dbo].[ShoppingCart] in "c:\SQLAzureMW\BCPData\dbo.ShoppingCart.dat" -E -n -b 10000 -a 16384
GO
| In this case, what the tool did was to make some indexes on primary keys clustered because a Windows Azure SQL Database requires each table to have a cluster index. The tool also removed extended properties(without mentionning) that are used by the entity framework to store designer related data that can be used at design time. |
Dans ce cas, ce que l’outil a fait est de rendre l’index sur la clef primaire clusteris%u00e9 parce qu’une base Windows Azure SQL Database a besoin d’un index custeris%u00e9. L’outil a %u00e9galement supprim%u00e9 des propri%u00e9t%u00e9s %u00e9tendues (sans le mentionner) qui sont utilis%u00e9es par l’entity framework pour stocker des informations du designer qui peuvent %u00eatre utilis%u00e9es au moment de la conception. |
| If you need to have a deep control on how the database is migrated, you can also use the SQL Server Data Tools (SSDT). This blog post explains how this works. |
Si vous avez besoin d’avoir un contr%u00f4le plus pr%u00e9cis sur la fa%u00e7on dont la migration de la base se fait, vous pouvez utiliser les SQL Server Data Tools (SSDT). Ce billet explique comment cela marche. |
| The choices made by the tool are OK for me so I just accept and click Next and I enter the parameters about the Windows Azure SQL Database server |
Les choix effectu%u00e9s par l’outil me conviennent donc j’accepte, je clique sur Next et j’entre les param%u00e8tres %u00e0 propos du serveur Windows Azure SQL Database |
18/09/2012 16:18:34 --> Error #: 40514 -- 'NOT FOR REPLICATION' is not supported in this version of SQL Server.
IF NOT EXISTS (SELECT * FROM sys.foreign_keys WHERE object_id = OBJECT_ID(N'[dbo].[FK_Reviews_Products]') AND parent_object_id = OBJECT_ID(N'[dbo].[Reviews]'))
ALTER TABLE [dbo].[Reviews]  WITH NOCHECK ADD  CONSTRAINT [FK_Reviews_Products] FOREIGN KEY([ProductID])
REFERENCES [dbo].[Products] ([ProductID])
NOT FOR REPLICATION
| The script had remaining errors. So I change the local database with SSDT before re-executing the Wizard. |
Le script a encore quelques erreurs. Cela m’am%u00e8ne %u00e0 changer la base de donn%u00e9es locale avec SSDT avant de r%u00e9-ex%u00e9cuter l’assistant. |
| NB: the same could also have been done from SQL Server Management Studio. |
NB: on peut faire la m%u00eame chose depuis SQL Server Management Studio. |
| I restart the Windows Azure SQL Database Migration Wizard with the same steps as before until this screen: |
Je red%u00e9marre l’assistant de migration Windows Azure SQL Database avec les m%u00eames %u00e9tapes que pr%u00e9c%u00e9demment jusqu’%u00e0 cet %u00e9cran: |
| The tables that had already succeeded have primary key violations when trying again, which can be safely ignored. Another option could be to remove objects in the target database and retry. I choose to skip the errors. |
Les tables qui avaient jusqu’ici d%u00e9j%u00e0 %u00e9t%u00e9 migr%u00e9es ont des violations de clef primaire quand l’outil cherche %u00e0 recharger leurs donn%u00e9es; cela peut donc %u00eatre ignor%u00e9. Une autre option aurait %u00e9t%u00e9 de supprimer les objets dans la base cible et de recommencer. Je choisis d’ignorer les erreurs en question. |
| and I repeat the operation for each tab about any previously succeeding table until the last one |
puis je r%u00e9p%u00e8te l’op%u00e9ration pour les diff%u00e9rents onglets des diff%u00e9rentes tables concern%u00e9es jusqu’au dernier |
| the result is OK |
le r%u00e9sultat est OK |
Exit
| I can now test the App in Windows Azure Web Sites: |
Je peux maintenant tester l’application dans Windows Azure Web Sites: |
http://tailspinspyworks.azurewebsites.net/
| the pictures were not included because they are not part of the project which is a good way to show how easy it is to update the app from the Visual Studio project: |
les images n’ont pas %u00e9t%u00e9 incluses parce qu’elles ne faisaient pas partie du projet ce qui me donne l’occasion de montrer qu’il est simple de republier l’application depuis le projet Visual Studio: |
| After creating the first user, I see that the database contains the table for membership and so on, together with the other commerce tables; having all the tables in the same DB is the option I chose: |
Apr%u00e8s avoir cr%u00e9%u00e9 le premier utilisateur, je vois que la base de donn%u00e9es contient les tables d’utilisateurs entre autres, ainsi que les tables de la base commerce; avoir toutes les tables dans la m%u00eame base est l’option que j’avais choisie: |
Benjamin
Blog Post by: Benjamin GUINEBERTIERE

by community-syndication | Sep 18, 2012 | BizTalk Community Blogs via Syndication
Today I want to talk to you about two small optimizations often forgotten but with performance implications. Some of these implications may be noticed more in the early days of our BizTalk environment when the databases are small or almost empty and often need to increase, others can have impact later when databases are large […]
Blog Post by: Sandro Pereira
by community-syndication | Sep 18, 2012 | BizTalk Community Blogs via Syndication
In the previous article we looked at some of the basic GET operations we can perform using the new REST (WCF-WebHttp) adapter that ships with BizTalk Server 2010 R2. All our examples are based on XML data formats. One of the readers asked the question in the comments, how we can consume a REST end […]
The post Consuming JSON endpoint with BizTalk 2010 R2 REST WCF-WebHttp adapter appeared first on BizTalk360 Blog.
Blog Post by: Saravana Kumar
by community-syndication | Sep 18, 2012 | BizTalk Community Blogs via Syndication
I’ve just completed a basic implementation using Windows Azure SQL Data Sync that I will be using in a demo for an upcoming course. This is a basic walkthrough that you should be able to follow if you want to get to grips with the new SQL Data Sync functionality in Windows Azure.
The walkthrough is based on the SQL Data Sync August 2012 – Service Update, changes in future versions are possible.
Scenario
The scenario for this walkthrough is shown in the diagram below.
Adventure Works has an existing on-premise SQL database that contains its business information. They plan to create an on-line store application hosted in Windows Azure. In order to keep the product information in the on-line store database up to date, SQL data sync will be used to coordinate the synchronization between the on-premise database and the product database hosted in SQL Azure.
Existing Implementation
The existing implementation consists of a slightly modified version of the Adventureworks2012 database for Windows Azure. The sample database can be downloaded here: http://msftdbprodsamples.codeplex.com/releases/view/37304.
The database has been modified to replace the custom defined data types, which are currently not supported in Data Sync, with regular SQL data types. The modified code to create the Product table is shown below.
|
CREATE TABLE [Production].[Product](
[ProductID] [int] IDENTITY(1,1) NOT NULL,
[Name] nvarchar(50) NOT NULL,
[ProductNumber] [nvarchar](25) NOT NULL,
[MakeFlag] bit NOT NULL,
[FinishedGoodsFlag] bit NOT NULL,
[Color] [nvarchar](15) NULL,
[SafetyStockLevel] [smallint] NOT NULL,
[ReorderPoint] [smallint] NOT NULL,
[StandardCost] [money] NOT NULL,
[ListPrice] [money] NOT NULL,
[Size] [nvarchar](5) NULL,
[SizeUnitMeasureCode] [nchar](3) NULL,
[WeightUnitMeasureCode] [nchar](3) NULL,
[Weight] [decimal](8, 2) NULL,
[DaysToManufacture] [int] NOT NULL,
[ProductLine] [nchar](2) NULL,
[Class] [nchar](2) NULL,
[Style] [nchar](2) NULL,
[ProductSubcategoryID] [int] NULL,
[ProductModelID] [int] NULL,
[SellStartDate] [datetime] NOT NULL,
[SellEndDate] [datetime] NULL,
[DiscontinuedDate] [datetime] NULL,
[rowguid] [uniqueidentifier] NOT NULL,
[ModifiedDate] [datetime] NOT NULL,
CONSTRAINT [PK_Product_ProductID] PRIMARY KEY CLUSTERED
(
[ProductID] ASC
)WITH (STATISTICS_NORECOMPUTE = OFF, IGNORE_DUP_KEY = OFF)
)
|
With the changes made to AdventureWorks2012ForSQLAzure_Schema.sql the CreateAdventureWorksForSQLAzure.cmd is run specifying local server and credentials to create and populate the database on the local instance of SQL Server.
A very WPF basic line-of-business (LOB) application is created in WPF to allow product data to be modified. The XMLT for the min window is shown here:
|
<Window x:Class=”ProductEditor.MainWindow”
xmlns=”http://schemas.microsoft.com/winfx/2006/xaml/presentation”
xmlns:x=”http://schemas.microsoft.com/winfx/2006/xaml”
Title=”MainWindow” Height=”350″ Width=”525″>
<StackPanel>
<Button Name=”btnUpdate” Content=”Update” Click=”btnUpdate_Click” />
<DataGrid Name=”dgdProducts” AutoGenerateColumns=”True” >
</DataGrid>
</StackPanel>
</Window>
|
The code-behind here:
|
public partial class MainWindow : Window
{
AdventureWorks2012Entities m_Entities;
public MainWindow()
{
m_Entities = new AdventureWorks2012Entities();
InitializeComponent();
List<Product> prods =
(from p in m_Entities.Products where p.ListPrice > 0
select p).ToList<Product>();
dgdProducts.ItemsSource = prods;
}
private void btnUpdate_Click(object sender, RoutedEventArgs e)
{
m_Entities.SaveChanges();
}
}
|
The application uses an entity framework model to connect to the on-premise Adventureworks2012 database. A screenshot of the application is shown below.
Creating Windows Azure SQL Databases
The first step in creating the cloud-based online store is to create the databases that will be used for the online store and the data synchronization. The following two 1 GB web databases are created using the Windows Azure Portal.
%u00b7 SyncHubDb – A database to act as the hub database for SQL Data Sync.
%u00b7 WebStoreDb – A database for the online web store application.
Both the databases are creates as the 1G Web databases.
Creating a Sync Group
With the SQL Databases created in Windows Azure, the next task is to use SQL Data Sync to define a sync group to synchronize the produce data.
The first step is provision a SQL Data Sync server in an appropriate region. This is currently done using the old Azure portal. Click on the Data Sync button, and then click Provision, select the account, and specify a region, its best to use the same region where your Windows Azure SQL Databases are located.
Once the Data Sync server has been provisioned, a new sync group can be created. With Sync Groups selected, click Create.
Enter the name for the sync group, and then click on the icon for the Sync Hub database.
Enter the database details for the Sync Hub database and click Add.
All data synchronization that is processed by this sync group will pass through the sync hub database, which must be hosted in Windows Azure SQL Database.
Adding an On-Premise Database
In order to use SQL Data Sync with an on-premise database you will need to install and configure Microsoft SQL Data Sync Agent on your local SQL server and register the database with the service.
Click on the icon to add an on-premise database and select Add a new SQL database to the sync group, you can also specify the Sync Direction here, I left the default of Bi-Directional selected.
If you don’t have an agent configured, select Install a new Agent.
Download and install the agent, and then enter a name and generate an agent key.
Start Microsoft SQL Data Sync Agent from the start menu and set the agent key that was generated in the portal. This will open a management console for the on-premise service.
Click on Register, and then select the appropriate database on the local SQL server, and click Save.
You should see that the database is reachable.
Back in the portal, click Next, then Get Database List, select the database, and click Finish.
The on-premise database will now be connected to the Data Sync server in Windows Azure.
Configuring the Sync Schedule
The schedule for data synchronization can now be configured, along with the conflict resolution options, the time interval must be between 5 minutes and one month. I selected a 5 minute interval and Client Wins. The short time interval is good for demo purposes.
Setting Client Wins for conflict resolution means that the on-premise database will win if there are any conflicts with the data synchronization.
Defining the Data Set
The next step is to define the data that will be synchronized by the sync group. In this scenario, only the Product table in the Production schema will be synchronized. To do this, select the AdventureWorks2012 database, and then select the Products table, ensuring all columns are selected. Note that some of the tables contain data types that do not meet the schema requirements for synchronization; this is why the data types in the Product table were modified.
Now the data set has been selected, the sync group can be deployed. Click the Deploy button to do this.
The Sync Group will be provisioned and the first data synchronization will run. After a few seconds the status of the two databases should transition to good.
Opening the SyncHubDb in the Windows Azure portal shows the tables that have been created. The Production.Product table is present, with the 504 rows of product data. There are also a number of tables that are used by SyncFramework to manage the synchronization process.
Selecting data from the Production.Product table shows that the product data is now present in the SyncHubDb database. This was synchronized from the on-premise database when the Sync Group was provisioned. The synchronization will run every 5 minutes to synchronize any changes between the Product tables in both databases.
Adding a Windows Azure SQL Database
The next step is to add the WebStoreDb database to the sync group. This is done in a similar way to adding the SyncHubDb database. Click on the Add Windows Azure SQL Database icon and specify the WebStoreDb database details. With this database the data synchronization will be one directional, data will be synchronized from the hub to the WebStoreDb database, but not from the WebStoreDb database to the sync hub.
Deploy the Sync Group to save the changes, after a while the provisioning and synchronization will complete, and the topology will be as follows.
Clicking on the Log Viewer icon will show logs from the synchronization process. This can be used to verify that synchronization is taking place, and to diagnose any errors with the synchronization process.
Examining the WebStoreDb database shows that the product data has successfully been synchronized. The synchronization will run using the 5 minute schedule to ensure that any changes in the on-premise database are updated in the on-line store.
Creating the Online Store Application
The on-line store application is a simple ASP.net web forms application that uses entity framework to data-bind to the products table in the WebStoreDb database.
The default page has been modified to use a Repeater control to display product information.
|
<%@ Page Title=”Home Page” Language=”C#” MasterPageFile=”~/Site.Master” AutoEventWireup=”true” CodeBehind=”Default.aspx.cs” Inherits=”AdventureWorksStore._Default” %>
<asp:Content runat=”server” ID=”FeaturedContent” ContentPlaceHolderID=”FeaturedContent”>
<section class=”featured”>
<div class=”content-wrapper”>
<hgroup class=”title”>
<h1>Adventure Works Online Store</h1>
</hgroup>
<h2>Select * from our Products…</h2>
</div>
</section>
</asp:Content>
<asp:Content runat=”server” ID=”BodyContent” ContentPlaceHolderID=”MainContent”>
<h3>This is what we have:</h3>
<asp:Repeater ID=”rptProducts” runat=”server”>
<HeaderTemplate>
</HeaderTemplate>
<ItemTemplate>
<div>
<div>
<h1><%# Eval(“Name”) %> – <%# Eval(“ListPrice”, “{0:c}”) %></h1>
</div>
</div>
</ItemTemplate>
</asp:Repeater>
</asp:Content>
|
The code behind file will use entity framework to load the product data and data-bind it to the Repeater.
|
public partial class _Default : Page
{
protected void Page_Load(object sender, EventArgs e)
{
AdventureWorks2012Entities ents = new AdventureWorks2012Entities();
List<Product> products =
(from p in ents.Products where p.ListPrice > 0 select p).ToList<Product>();
rptProducts.DataSource = products;
rptProducts.DataBind();
}
}
|
The connection string is modified to use the WebStoreDb database hosted in Windows Azure SQL Database.
|
<connectionStrings>
<add name=“DefaultConnection“ providerName=“System.Data.SqlClient“ connectionString=“Data Source=(LocalDb)\v11.0;Initial Catalog=aspnet-AdventureWorksStore-20120913144202;Integrated Security=SSPI;AttachDBFilename=|DataDirectory|\aspnet-AdventureWorksStore-20120913144202.mdf“ />
<!–<add name=”AdventureWorks2012Entities” connectionString=”metadata=res://*/ProductsModel.csdl|res://*/ProductsModel.ssdl|res://*/ProductsModel.msl;provider=System.Data.SqlClient;provider connection string="data source=win7base;initial catalog=AdventureWorks2012;integrated security=True;MultipleActiveResultSets=True;App=EntityFramework"” providerName=”System.Data.EntityClient” />–>
<add name=“AdventureWorks2012Entities“ connectionString=“metadata=res://*/ProductsModel.csdl|res://*/ProductsModel.ssdl|res://*/ProductsModel.msl;provider=System.Data.SqlClient;provider connection string="Server=tcp:SERVER.database.windows.net,1433;Database=WebStoreDb;User ID=USER@SERVER;Password=password;Trusted_Connection=False;Encrypt=True;Connection Timeout=30"“ providerName=“System.Data.EntityClient“ />
</connectionStrings>
|
The application is deployed as a Windows Azure Web Site, and tested. The default page successfully displays product information.
Testing Data Synchronization & Scheduling
In order to test that the data synchronization and scheduling are working correctly, the WPF LOB application will be used to make some changes to the products data. In this test the first three products are put on special offer, and the changes updated in the on-premise database.
After a few minutes the changes have been successfully synchronized with the WbStoreDb database, and the special offer products are viewable in the online store website.
The log files can be viewed to see the results of the synchronization operations.
From the Adventureworks2012 database to the SyncHubDb database:
|
Sync completed successfully in 17.27 seconds.
Upload: 3 changes applied
Download: 0 changes applied
For more information, provide tracing id ’cd32f136-c1aa-4cdc-a220-5568b897ce14’ to customer support.
|
From the SyncHubDb database to the WebStoreDb database:
|
Sync completed successfully in 1.11 seconds.
Upload: 0 changes applied
Download: 3 changes applied
For more information, provide tracing id ’c229816d-eff7-4549-a94a-6bd5985b4777’ to customer support.
|
Conclusions
I’ve only taken a quick look at Windows Azure SQL Data Sync and it seems fairly intuitive to get up and running with it and get basic synchronization up and running. I’ve always been a believer that companies will “Extend to the Cloud” rather than “Move to the Cloud”, and will focus on creating hybrid applications, with some services hosted in the cloud, whilst maintaining existing on-premise applications. Windows Azure SQL Data Sync, like Windows Azure Service Bus, is a great technology for bridging the gap between on-premise applications and applications hosted in the cloud.
by community-syndication | Sep 17, 2012 | BizTalk Community Blogs via Syndication
Here’s something I go this morning which I think is a SharePoint error:
Blog Post by: Mick Badran

by community-syndication | Sep 17, 2012 | BizTalk Community Blogs via Syndication
Scott Hanselman wrote an interesting post called Everything’s Broken and Nobody’s Upset this weekend, and it reminded me of the classic, profound Louis CK bit called Everything’s Amazing and Nobody’s Happy. While Scott’s post was reasonable, I’m an optimist and instead thought of a few aspects of technology awesomeness in life that are super cool […]
Blog Post by: Richard Seroter

by community-syndication | Sep 16, 2012 | BizTalk Community Blogs via Syndication
Further to a question I recently answered on StackOverflow, I wanted to expand a little on when it is necessary to restart a BizTalk Host Instance, and when this is overkill. Host Instance restart required Any change to an underlying datatype, map or orchestration will require a restart of the corresponding Host Instance. This is […]
Blog Post by: Brett
by community-syndication | Sep 16, 2012 | BizTalk Community Blogs via Syndication
Microsoft BizTalk ESB Toolkit includes a set of helper classes used by the other processes, services, and components in the toolkit. Because these helper classes are also public, you can use them in your own code as required. For example in a BizTalk Orchestration you can use the MapHelper class to perform transformations directly.
The TransformMessage method takes as parameters a string that contains the message to transform and a string that contains the fully qualified name of a map deployed in BizTalk. The method returns a string containing the transformed document.
The Transformation Web service from the ESB Toolkit enables external applications to submit a document to an ESB application and have it transformed using a deployed Microsoft BizTalk map. But is it also possible to call directly the MapHelper class from you own code? In order to test it I created an small Windows Form application that calls the MapHelper class and after some tweaking it worked!
The sample tool makes it very easy to execute a BizTalk map. It requires a XML file as input, the name of the assembly and the map name.
First enter the Source file and the fully qualified name of the map and click on Test Map
The output is stored in a file and shown on the Result tab.
How the sample works
In the sample .NET application is a reference added to the ESB.TransformServices.dll assembly, which contains the classes required to call a BizTalk map. This is located in C:\Program Files\Microsoft BizTalk ESB Toolkit 2.1\Web\ESB.TransformServices\bin\.
Download
You can download the sample tool with the source code here:
http://code.msdn.microsoft.com/Execute-a-BizTalk-map-from-26166441
by community-syndication | Sep 15, 2012 | BizTalk Community Blogs via Syndication
In my last post I provided a walkthrough that allows you to send a typed Brokered Message from a Console application to a Service Bus Queue, have BizTalk retrieve this message and then write it to disk. I am now going to expand upon that scenario and describe how we can leverage Brokered Message properties within BizTalk to route the message to different locations using BizTalk’s promoted properties.
What is a Brokered Message Property?
In many ways a Brokered Message Property is very similar to a Prompted Property within BizTalk. These properties can be used to capture meta-data outside the body of the message. We can then use these properties for routing within the Service Bus when delivering messages to different Service Bus Topics. It is important to note that we don’t have to use these properties for just routing. We can also use them as part of business logic in downstream systems if we so desire.
Why is this important for BizTalk?
As I mentioned in the previous paragraph we can use Promoted Properties within BizTalk to route messages and we can also use it to capture meta data if we want (although you should look at distinguished fields instead if that is your intent). In the BizTalk 2010 R2 CTP there is now support for transitioning Brokered Messages Properties from Service Bus Queue clients to BizTalk promoted properties. BizTalk applications themselves do not understand a Brokered Message property, but BizTalk will convert these Brokered Message Properties into BizTalk Promoted Properties where they can be used to route messages.
Scenario Walkthrough
In my previous blog post I used a Power Outage scenario. My client application would pass along customer information to a Service Bus Queue and then BizTalk would pick that message up and write it to disk. In a ’real life’ scenario I would have routed that message to a Customer Information System (CIS) or a Work Order Management (WOM) system so that a field operations team could address the power outage. In this walkthrough I am going to build upon that scenario. This difference this time around is that I am going to introduce a Brokered Message Property called isCriticalCustomer. I hate to publicly admit it but not all customers are treated equally when it comes to delivering power. An example of a Critical Customer may be a hospital. It is more important for a Power company to get their power on before yours. A patient’s respirator is more important that someone watching the latest American Idol episode.
Within my Console application this isCriticalCustomer property will be set as a Brokered Message Property. When this message is retrieved by BizTalk this property will be converted into a Promoted Property and BizTalk will then use that Promoted Property to route the message to a different destination.
Note: A person with a lot of Service Bus experience may say why don’t you just use Topics? I could have a Topic for regular customers and a Topic for Critical Customers. This is also a valid pattern but for the purposes of demonstrating BizTalk capabilities I will leave the routing to BizTalk.
Modifying Queue Client
I am not going to display all of the code required for this client to work. I am going to be adopting the code I listed in my previous post. So please refer back to that post for the starting point. I will include any areas within this post where I have made changes.
In the code below I am going to create and send two messages. In red you will discover that I am setting a Brokered Message Property called isCriticalCustomer. In the first message I am indicating that this is not a critical customer (aka a regular customer). In the second message I am saying that it will be a Critical Customer. Once we get to the BizTalk section you will see how we can use this property to route the message within BizTalk.
//Create new instance of PowerOut object
//This customer will not be a Critical Customer
PowerOut po = new PowerOut();
po.CustomerName = “Stephen Harper”;
po.PhoneNumber = “613-123-4567”;
po.Address = “24 Sussex Drive”;
BrokeredMessage message = new BrokeredMessage(po, new DataContractSerializer(typeof(PowerOut)));
message.Properties.Add(“isCriticalCustomer”, false);
myQueueClient.Send(message);
//Create new instance of PowerOut object
//This customer will be a Critical Customer
po = new PowerOut();
po.CustomerName = “Calgary General Hospital”;
po.PhoneNumber = “403-123-4567”;
po.Address = “1 Red Mile Drive”;
message = new BrokeredMessage(po, new DataContractSerializer(typeof(PowerOut)));
message.Properties.Add(“isCriticalCustomer”, true);
myQueueClient.Send(message);
BizTalk Modifications
You may recall from my previous post that my BizTalk solution was very simple as I only had a schema that represented this Customer message being sent from my client application. So in order to support our new scenario I only need to add one more artifact to my solution and that is a Property Schema. The reason why I need to add this schema is that I need an artifact within my BizTalk application to “hold” these values as they are being populated when BizTalk receives the message. This is no different than when you want take a value from one of your “regular” BizTalk schemas and turn it into a Promoted Property.
Within our BizTalk solution we need to do the following:
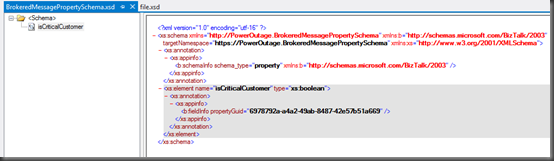
- Add a PropertySchema to our project. Once it has been added there will be a default property that we will rename to isCriticalCustomer and change the data type to be a boolean.
- We now need to re-deploy our application.
- Open up the ReceiveBMfromServiceBus Receive Location, click the Configure button. Now click on the Properties tab. Within this tab we are going to specify our namespace for our PropertySchema. If you are unsure where you can get this namespace from, look in the image above and notice the value of the targetNamespace matches the value that I have put in this text box. We also need to ensure that the Promote Brokered Message Properties checkbox is checked on.

- Next we are going to remove our previous Send Port and create two new Send Ports. One send port will be for Regular Customers and the other will be created for Critical Customers.
- Below is the Send Port for regular customers. Notice that a separate sub-folder called RegularCustomers has been created for these files.

- Click on the Filters label and then add a new Property. You will notice that within the dropdown list you will find the property that we created in our PropertySchema called isCriticalCustomer. We need to select this value and then set the value to false.

Note: When you pull down the Property drop down you will also discover the Out of the Box Service Bus Brokered Message properties. These properties are out of the scope of this post but it is something that may be beneficial down the road.
- We now want to perform similar actions to our other send Port that will be use to send our CriticalCustomer messages.

- Once again we are going to click on the Filters label. We will use the isCriticalCustomer property again but this time we will set the Value to true.

- We can now bounce any affected Host Instance(s) and start our application.
Testing our Application
As you my recall, we modified our Console application so that it will send two messages to the same PowerOutage queue. In the first message, we set the isCriticalCustomer Brokered Message property to false. In the second message, for the hospital, we set it to true. The end result is that we should receive one message in our Regular Customers folder and one in our Critical Customers folder.
- As promised when I run the application I will find one message in each corresponding folder:

- If I open the files I will discover that the right message was delivered to the correct folder:

Conclusion
Overall it is a pretty slick, and seamless, experience. I think the BizTalk product team has done a great job in bridging the Service Bus Brokered Messaging Property with BizTalk’s Promoted Property. In my opinion, the Azure Service Bus and BizTalk Server really complement each other by providing robust Hybrid solutions. It is great to see smooth interoperability between these two technology sets.
This concludes this blog post. I am not done yet with this series as I have still just scratched the surface. I plan on writing more about my experience with Sending messages to Service Bus Queues/Topics from BizTalk and perhaps dive into some different messaging patterns.
by community-syndication | Sep 15, 2012 | BizTalk Community Blogs via Syndication
REST is getting wider adoption recently mainly due to the popularity of mobile devices and light weight rich (Ajax) web applications. In such scenarios usage of SOAP based services looks bit of overhead with lot of additional elements and attributes. Majority of the open API’s these days are exposed as REST based end points. Example […]
The post REST (WCF-WebHttp) adapter in BizTalk Server 2010 R2 appeared first on BizTalk360 Blog.
Blog Post by: Saravana Kumar


