by community-syndication | Dec 9, 2010 | BizTalk Community Blogs via Syndication
When selecting a new technology platform, everyone loves to know the platform has already been proven out in production in some other organizations. (Let them find all the bugs and issues! Not us!). With that in mind, I wanted to call out the new case study that we have published for one of our location Canadian BizTalk partners and BizTalk 2010. QLogitek (http://www.qlogitek.com) is a cloud based provider of B2B services and Trading Partner Management. They have been operating for years on a platform that they built mostly in house. With the release of BizTalk 2010 and its enhanced EDI and TPM capabilities, QLogitek decided that it was time to migrate off their custom legacy code and onto the Microsoft platform. They join out Technology Adopter Program (TAP) and started to build out a SOA based verison of the EDI/TPM platform using the BizTalk 2010 beta. I’ll let the case study (at http://www.microsoft.com/casestudies/Microsoft-SQL-Server-2008-R2-Enterprise/QLogitek/Supply-Chain-Integrator-Relies-on-Microsoft-Platform-to-Facilitate-20-Billion-in-Business/4000008714) speak for itself, but I did want to call out a couple of quotes:
- With its flexible solution based on the Microsoft platform, QLogitek can provide real-time access to transactional data and quickly launch new offerings. The company can also deploy B2B platforms for new enterprise customers up to 75 percent faster.
- “With Intelligent Mapper, we can look at a purchase order with 100,000 line items and visually create complex mappings 30 to 40 percent faster than we could in the past.
- “We can add a single trading partner to an established B2B platform 90 percent faster, and we expect to reduce the time and cost of adding new enterprise customers by 75 percent.”
Also, I wanted to send my congrats to the Qlogitek team for a great job done while working with the beta.
Cheers and stay connected:
Peter
by community-syndication | Dec 8, 2010 | BizTalk Community Blogs via Syndication
“This utility can be used to persist the ESB configuration information into the BizTalk SSO database. This can also be used to view configuration information and remove the configuration information from the SSO database.”
The tool allows you to, once you have stored the initial esb.config into the SSO db, it allows you to update it with new orchestrations that are deployed.
Here are the steps:
- Determine the Application name. This can be done by either opening up the ESB Configuration Tool and taking not of the following: Application Name, Administrator Group Name, and User Group Name
or opening up the machine.config
  <enterpriseLibrary.ConfigurationSource selectedSource="ESB SSO Configuration Source">

    <sources>

      <add name="ESB File Configuration Source" type="Microsoft.Practices.EnterpriseLibrary.Common.Configuration.FileConfigurationSource, Microsoft.Practices.EnterpriseLibrary.Common, Version=4.1.0.0,Culture=neutral, PublicKeyToken=31bf3856ad364e35"

        filePath="C:\Program Files (x86)\Microsoft BizTalk ESB Toolkit 2.1\esb.config" />

      <add name="ESB SSO Configuration Source" type="Microsoft.Practices.ESB.SSOConfigurationProvider.SSOConfigurationSource, Microsoft.Practices.ESB.SSOConfigurationProvider, Version=2.1.0.0, Culture=neutral, PublicKeyToken=31bf3856ad364e35"

        applicationName="ESB toolkit" description="Configuration Data"

        contactInfo="[email protected]"

        userGroupName="HAL2008R2\BizTalk Application Users"

        adminGroupName="HAL2008R2\SSO Administrators" />

    </sources>

  </enterpriseLibrary.ConfigurationSource>
- The next thing to do is export the particular section, (I have taken the current esb.config and trimmed it for simplicity sake)
<?xml version="1.0" encoding="utf-8"?>

<!--

    ESB configuration file mapped using File provider

    Used as alternative to SSO configuration

-->

<configuration>

  <configSections>

    <section name="esb" type="Microsoft.Practices.ESB.Configuration.ESBConfigurationSection, Microsoft.Practices.ESB.Configuration, Version=2.1.0.0, Culture=neutral, PublicKeyToken=31bf3856ad364e35"/>

    <section name="esb.resolver" type="Microsoft.Practices.Unity.Configuration.UnityConfigurationSection,
                 Microsoft.Practices.Unity.Configuration, Version=1.2.0.0,
                 Culture=neutral, PublicKeyToken=31bf3856ad364e35"/>

    <section name="cachingConfiguration" type="Microsoft.Practices.EnterpriseLibrary.Caching.Configuration.CacheManagerSettings, Microsoft.Practices.EnterpriseLibrary.Caching, Version=4.1.0.0,Culture=neutral, PublicKeyToken=31bf3856ad364e35"/>

    <section name="instrumentationConfiguration" type="Microsoft.Practices.EnterpriseLibrary.Common.Instrumentation.Configuration.InstrumentationConfigurationSection, Microsoft.Practices.EnterpriseLibrary.Common, Version=4.1.0.0, Culture=neutral, PublicKeyToken=31bf3856ad364e35" />

  </configSections>

  <connectionStrings>

    <add name="ItineraryDb" connectionString="Data Source=.;Initial Catalog=EsbItineraryDb;Integrated Security=True"

      providerName="System.Data.SqlClient" />

    <add name="BAMEventSource" connectionString="Integrated Security=SSPI;Data Source=.;Initial Catalog=BizTalkMsgBoxDb"

      providerName="MES" />

  </connectionStrings>

  <!-- ESB configuration section -->

  <esb>

    <!--There is a TON of stuff in here-->

  </esb>

  <!-- BRE configuration section-->

  <esb.resolver>

    <!--There is a TON of stuff in here-->

  </esb.resolver>

  <!-- Instrumentation Configuration Section -->

  <instrumentationConfiguration

    performanceCountersEnabled="false"

    eventLoggingEnabled="false"

    wmiEnabled="false"

    applicationInstanceName="" />

  <!-- Caching ConfigurationSection -->

  <cachingConfiguration defaultCacheManager="Default Cache Manager">

    <!--There is a TON of stuff in here-->

  </cachingConfiguration>

</configuration>
So you now know that there are the following sections:
- esb
- esb.resolver
- instrumentationsConfiguration
- cachingConfiguration So we can export the current configuration by running the following command: (separate lines for easiness.
C:\Program Files (x86)\Microsoft BizTalk ESB Toolkit 2.1\Bin>Microsoft.Practices.ESB.PersistConfigurationTool.exe

/V

/S:EsB.RESOLVER

/A:"ESB Toolkit"

/AG:"HAL2008R2\SSO Administrators"

/UG:"HAL2008R2\BizTalk Application Users"
Notice that the /S is not case sensitive.
So if I export the data I really care about (the ESB section) I would run the following command:
C:\Program Files (x86)\Microsoft BizTalk ESB Toolkit 2.1\Bin>Microsoft.Practices.ESB.PersistConfigurationTool.exe /V /S:esb /A:"ESB Toolkit" /AG:"HAL2008R2\SSOAdministrators" /UG:"HAL2008R2\BizTalk Application Users" >ssoesbconfig.xml
I have a file called ssoesbconfig.xml that I can re-import later.
Let’s do that, lets add an orchestration to the ssoesbconfig.xml:
This is a small section of the ESB section
    <itineraryServices cacheManager="Itinerary Services Cache Manager" absoluteExpiration="3600">

      <clear />

      <itineraryService scope="Messaging" id="6a594d80-91f7-4e10-a203-b3c999b0f55e" name="Microsoft.Practices.ESB.Services.Routing" type="Microsoft.Practices.ESB.Itinerary.Services.RoutingService, Microsoft.Practices.ESB.Itinerary.Services, Version=2.1.0.0, Culture=neutral, PublicKeyToken=31bf3856ad364e35" stage="AllReceive" serviceCategory="Itinerary" />

      <itineraryService scope="Orchestration" id="774488bc-e5b9-4a4e-9ae7-d25cdf23fd1c" name="Microsoft.Practices.ESB.Services.Routing" type="Microsoft.Practices.ESB.Agents.Delivery, Microsoft.Practices.ESB.Agents, Version=2.1.0.0, Culture=neutral, PublicKeyToken=31bf3856ad364e35" stage="None" serviceCategory="Itinerary" />

     <itineraryService scope="Messaging" id="cfbe36c5-d85c-44e9-9549-4a7abf2106c5" name="Microsoft.Practices.ESB.Services.Transform" type="Microsoft.Practices.ESB.Itinerary.Services.TransformationService, Microsoft.Practices.ESB.Itinerary.Services, Version=2.1.0.0, Culture=neutral, PublicKeyToken=31bf3856ad364e35" stage="All" serviceCategory="Itinerary" />

      <itineraryService scope="Orchestration" id="92d3b293-e6d4-44a1-b27d-c42b48aec667" name="Microsoft.Practices.ESB.Services.Transform" type="Microsoft.Practices.ESB.Agents.Transform, Microsoft.Practices.ESB.Agents, Version=2.1.0.0, Culture=neutral, PublicKeyToken=31bf3856ad364e35" stage="None" serviceCategory="Itinerary" />

      <itineraryService scope="Invocation" id="977f085f-9f6d-4c18-966f-90bed114f649" name="Microsoft.Practices.ESB.Services.SendPort" type="Microsoft.Practices.ESB.Itinerary.Services.SendPortService, Microsoft.Practices.ESB.Itinerary.Services, Version=2.1.0.0, Culture=neutral, PublicKeyToken=31bf3856ad364e35" stage="AllReceive" serviceCategory="Itinerary" />

      <itineraryService scope="Messaging" id="4810569C-8FF2-4162-86CE-47692A0B4017" name="Microsoft.Practices.ESB.Itinerary.Services.Broker.MessagingBroker" type="Microsoft.Practices.ESB.Itinerary.Services.Broker.MessagingBroker, Microsoft.Practices.ESB.Itinerary.Services.Broker, Version=2.1.0.0, Culture=neutral, PublicKeyToken=31bf3856ad364e35" stage="All" serviceCategory="Broker" />

      <itineraryService scope="Orchestration" id="865338bc-e5b9-4a4e-9ae7-d25cdf23fd1d" name="ItineraryDemo.Processes.MyCustomOrchestrationService" type="ItineraryDemo.Processes.MyCustomOrchestrationService, ItineraryDemo.Processes, Version=1.0.0.0, Culture=neutral, PublicKeyToken=2347f209b71b5d12" stage="None" serviceCategory="Itinerary" />

    </itineraryServices>


Let’s create a new itinearyService element with a Orchestration scope attribute, a unique id attribute, the friendly name of an orchestration, the type attribute as the name comma assembly, stage None, and serviceCategory being Itinerary.
    <itineraryServices cacheManager="Itinerary Services Cache Manager" absoluteExpiration="3600">

      <clear />

      <itineraryService scope="Messaging" id="6a594d80-91f7-4e10-a203-b3c999b0f55e" name="Microsoft.Practices.ESB.Services.Routing" type="Microsoft.Practices.ESB.Itinerary.Services.RoutingService, Microsoft.Practices.ESB.Itinerary.Services, Version=2.1.0.0, Culture=neutral, PublicKeyToken=31bf3856ad364e35" stage="AllReceive" serviceCategory="Itinerary" />

      <itineraryService scope="Orchestration" id="774488bc-e5b9-4a4e-9ae7-d25cdf23fd1c" name="Microsoft.Practices.ESB.Services.Routing" type="Microsoft.Practices.ESB.Agents.Delivery, Microsoft.Practices.ESB.Agents, Version=2.1.0.0, Culture=neutral, PublicKeyToken=31bf3856ad364e35" stage="None" serviceCategory="Itinerary" />

      <itineraryService scope="Messaging" id="cfbe36c5-d85c-44e9-9549-4a7abf2106c5" name="Microsoft.Practices.ESB.Services.Transform" type="Microsoft.Practices.ESB.Itinerary.Services.TransformationService, Microsoft.Practices.ESB.Itinerary.Services, Version=2.1.0.0, Culture=neutral, PublicKeyToken=31bf3856ad364e35" stage="All" serviceCategory="Itinerary" />

      <itineraryService scope="Orchestration" id="b483Bf6d-6c81-4da4-988e-ca25ae29af5f" name="NewMemberPrototype.ExtractZipProcess" type="NewMemberPrototype.ExtractZipProcess,NewMemberPrototype, Version=1.0.0.0, Culture=neutral, PublicKeyToken=d0e4897b4fef39d3" stage="None" serviceCategory="Itinerary" />

      <itineraryService scope="Orchestration" id="92d3b293-e6d4-44a1-b27d-c42b48aec667" name="Microsoft.Practices.ESB.Services.Transform" type="Microsoft.Practices.ESB.Agents.Transform, Microsoft.Practices.ESB.Agents, Version=2.1.0.0, Culture=neutral, PublicKeyToken=31bf3856ad364e35" stage="None" serviceCategory="Itinerary" />

      <itineraryService scope="Invocation" id="977f085f-9f6d-4c18-966f-90bed114f649" name="Microsoft.Practices.ESB.Services.SendPort" type="Microsoft.Practices.ESB.Itinerary.Services.SendPortService, Microsoft.Practices.ESB.Itinerary.Services, Version=2.1.0.0, Culture=neutral, PublicKeyToken=31bf3856ad364e35" stage="AllReceive" serviceCategory="Itinerary" />

      <itineraryService scope="Messaging" id="4810569C-8FF2-4162-86CE-47692A0B4017" name="Microsoft.Practices.ESB.Itinerary.Services.Broker.MessagingBroker" type="Microsoft.Practices.ESB.Itinerary.Services.Broker.MessagingBroker, Microsoft.Practices.ESB.Itinerary.Services.Broker, Version=2.1.0.0, Culture=neutral, PublicKeyToken=31bf3856ad364e35" stage="All" serviceCategory="Broker" />

      <itineraryService scope="Orchestration" id="865338bc-e5b9-4a4e-9ae7-d25cdf23fd1d" name="ItineraryDemo.Processes.MyCustomOrchestrationService" type="ItineraryDemo.Processes.MyCustomOrchestrationService, ItineraryDemo.Processes, Version=1.0.0.0, Culture=neutral, PublicKeyToken=2347f209b71b5d12" stage="None" serviceCategory="Itinerary" />

    </itineraryServices>


And now it is time to insert it back into the SSODb by running the following command:
C:\Program Files (x86)\Microsoft BizTalk ESB Toolkit 2.1\Bin>Microsoft.Practices.ESB.PersistConfigurationTool.exe /P /S:ESB /A:"ESB Toolkit" /AG:"HAL2008R2\SSOAdministrators" /UG:"HAL2008R2\BizTalk Application Users" /F:"C:\Program Files (x86)\Microsoft BizTalk ESB Toolkit 2.1\Bin\esbconfiguration.xml"
Notice that I did not need to remove (/R), I just overwrote the data, and I am ready to go (well, okay, after I restart Visual Studio).
by community-syndication | Dec 8, 2010 | BizTalk Community Blogs via Syndication
I just received a notification that my request to join the Beta Program for Azure Connect was approved. And that immediately got me starting to test it out. Things look very straightforward.
I am using the phrase VPN as a Service for this feature, since it really explains it all.
Virtual Network Configuration of Windows Azure Role
Portal settings
- After logging in on the Azure Portal, you can click the Virtual Network button in the left corner at the bottom of the screen:
- After this, it is possible to enable the Virtual Network features for a specific subscription
- When selecting a subscription, you can get the Activation Token from the portal, by clicking the ’Get Activation Token’ button. That allows to copy the activation token to the clipboard for later use.
Visual Studio project settings
- In Visual Studio, when having the SDK 1.3 installed, it is possible to copy the activation token to the properties of an Azure role in the property pages:
- Now you can deploy the role to the Windows Azure portal.
Adding an ’on-premise’ server to the Virtual Cloud Network
Installing the Azure Connect Client software agent
- On the local servers, it is now possible to install the ’Local endpoint’, by clicking the correct button.
- This shows a link to download the software on the machine (on premise). This link is only active for a while.
- The installation package is very easy to install, by selecting the correct language and clicking Next-Next-Finish. After the endpoint software is installed, be sure to open the TCP 443 outbound port.
- As expected, the local endpoint agent runs as a Windows Service:
-
Adding a local endpoint to an Azure Endpoint group
- An Azure Endpoint group can be created, by clicking the “Create Group” button in the ribbon of the management portal.
- This pops up a wizard where you can provide a name for the group and where you can add the local endpoints and Azure roles that should be part of the group. You can also indicate if the local endpoints are “interconnected” or not. This specifies if the endpoints can reach each other.
(be careful: in some multi-tenant situations, this can be seen as a risk!)
- I could immediately see my local computer name in the Local Endpoint list and in the Role list, I could only see the role that was configured with the activation token for this Connect group.
- That’s the only required actions we need to take and now we have IP/Network connectivity between my local machine and my Azure role in the Cloud.
Testing the connectivity
Since I had added the Remote Desktop Connectivity support to my Azure role (see my previous blog post: Exploring the new Azure property pages in Visual Studio), I am now able to connect to my Role instance in the cloud and connect to it.
- After logging in on my machine, I was immediately able to connect to my local machine, using my machine name. I had a directory shared on my local machine and I was able to connect to it.
- For a nice test, I added a nice ’cloud picture’ on my local share and selected it to be my desktop background in the cloud. (the picture was on top of a Mountain in the French Alps, with the Mount Blanc in the background, for those wondering)
- A part of my cloud desktop is here:
Conclusion
This was a very simple post, highlighting the way to set up the configuration between a Cloud app and local machines. It really only took me about 5 minutes to get this thing working, knowing that I had never seen or tested this functionality before (only heard about it).
Some nice scenarios can now be implemented:
- Making your Azure roles part of your Active Directory
- Network connectivity between Cloud and Local (including other protocols, like UDP)
Definitely more to follow soon.
Sam Vanhoutte, Codit
by community-syndication | Dec 8, 2010 | BizTalk Community Blogs via Syndication
I just received a notification that my request to join the Beta Program for Azure Connect was approved. And that immediately got me starting to test it out. Things look very straightforward.
Virtual Network Configuration of Windows Azure Role
Portal settings
- After logging in on the Azure Portal, you can click the Virtual Network button in the left corner at the bottom of the screen:
- After this, it is possible to enable the Virtual Network features for a specific subscription
- When selecting a subscription, you can get the Activation Token from the portal, by clicking the ’Get Activation Token’ button. That allows to copy the activation token to the clipboard for later use.
Visual Studio project settings
- In Visual Studio, when having the SDK 1.3 installed, it is possible to copy the activation token to the properties of an Azure role in the property pages:
- Now you can deploy the role to the Windows Azure portal.
Adding an ’on-premise’ server to the Virtual Cloud Network
Installing the Azure Connect Client software agent
- On the local servers, it is now possible to install the ’Local endpoint’, by clicking the correct button.
- This shows a link to download the software on the machine (on premise). This link is only active for a while.
- The installation package is very easy to install, by selecting the correct language and clicking Next-Next-Finish. After the endpoint software is installed, be sure to open the TCP 443 outbound port.
- As expected, the local endpoint agent runs as a Windows Service:
-
Adding a local endpoint to an Azure Endpoint group
- An Azure Endpoint group can be created, by clicking the “Create Group” button in the ribbon of the management portal.
- This pops up a wizard where you can provide a name for the group and where you can add the local endpoints and Azure roles that should be part of the group. You can also indicate if the local endpoints are “interconnected” or not. This specifies if the endpoints can reach each other.
(be careful: in some multi-tenant situations, this can be seen as a risk!)
- I could immediately see my local computer name in the Local Endpoint list and in the Role list, I could only see the role that was configured with the activation token for this Connect group.
- That’s the only required actions we need to take and now we have IP/Network connectivity between my local machine and my Azure role in the Cloud.
Testing the connectivity
Since I had added the Remote Desktop Connectivity support to my Azure role (see my previous blog post: Exploring the new Azure property pages in Visual Studio), I am now able to connect to my Role instance in the cloud and connect to it.
- After logging in on my machine, I was immediately able to connect to my local machine, using my machine name. I had a directory shared on my local machine and I was able to connect to it.
- For a nice test, I added a nice ’cloud picture’ on my local share and selected it to be my desktop background in the cloud. (the picture was on top of a Mountain in the French Alps, with the Mount Blanc in the background, for those wondering)
- A part of my cloud desktop is here:
Conclusion
This was a very simple post, highlighting the way to set up the configuration between a Cloud app and local machines. It really only took me about 5 minutes to get this thing working, knowing that I had never seen or tested this functionality before (only heard about it).
Some nice scenarios can now be implemented:
- Making your Azure roles part of your Active Directory
- Network connectivity between Cloud and Local (including other protocols, like UDP)
Definitely more to follow soon.
Sam Vanhoutte, Codit
by community-syndication | Dec 8, 2010 | BizTalk Community Blogs via Syndication
Our WCF Registry: SO-Aware keeps being evangelized throughout the world. This week Tellago Studios’ Dwight Goins will be speaking at Microsoft events in Dallas and Houston ( https://msevents.microsoft.com/cui/EventDetail.aspx?culture=en-US&EventID…(read more)
by community-syndication | Dec 8, 2010 | BizTalk Community Blogs via Syndication
Back when BizTalk Server 2009 was released, there was a lot of buzz about the new integrated support for unit testing of schemas, maps, and pipelines, and cleaner support for automated builds driven by Team Foundation Server (TFS). These were definitely welcome additions that made it much easier to enable continuous integration with automated build and testing. However, there were some things missing. In this article, I’ll review the current state of automated build and testing capabilities that exists for BizTalk Server 2010 when using Visual Studio 2010 Team Foundation Server (TFS). I will first examine the items lacking out of the box, and then direct you to community projects that can improve the situation.
When it comes to the built-in unit testing support in BizTalk Server 2009 and 2010, there are still some areas lacking. For example, testing schemas with imports yielded erroneous results, as all of the necessary schemas were not used in validation. Testing pipelines cannot be accomplished purely in memory with the API exposed. There was not really any work done to enable integration and functional testing of orchestrations. Finally, the automated build process did not take into account the necessity for the bits that were compiled to be deployed somewhere for testing — possibly due to the lack of functional and integration testing support for orchestrations (i.e., there would be no reason to deploy bits that could not be tested anyway).
Thankfully, community efforts filled in most of these gaps for BizTalk Server 2009, and indeed in most cases these community projects preceded the implementation of automated build and testing support in BizTalk Server. Pipeline, pipeline component, and flat-file schema testing was made much more elegant with Tomas Restrepo’s PipelineTesting library. Functional and integration testing of orchestrations was provided for in BizUnit, and automated deployment in preparation for test could be enabled using the bLogical Custom Tasks.
You may have used one or all of these community tools when setting up an environment with BizTalk Server 2009 and Team Foundation Server 2008, and it is still possible to use most of the functionality offered by these in BizTalk Server 2010 and Team Foundation Server 2010. If you have not had any experience with enabling automated testing of BizTalk Server applications, you may benefit from our self-paced online training course covering BizTalk testing strategies.
PipelineTesting Library
The PipelineTesting library is a mature and stable library that has been well maintained and has always remained a step ahead of what was offered out of the box with each version of BizTalk Server. It not only provides a less-clunky API, but a fuller feature set. This is best shown by a short example (although this example does not even get into the depth of what is provided in the PipelineTesting library).
Here is some rough sample code that shows basic usage of the built-in BizTalk Pipeline Testing support:
[TestMethod]
public void TimeReportFFReceivePipeline_TimeReportFF_OutputValidates()
{
    // Built-in BizTalk Pipeline Testing Support
    // (CON: Must be enabled on pipeline project before compilation)

    // CON: Must create the pipeline ahead of time
    TimeReportFFReceivePipeline target = new TimeReportFFReceivePipeline();

    // PRO: Can provide a list of input documents without loading them explicitly
    // CON: Input documents must exist on disk
    StringCollection inputDocuments = new StringCollection();
    inputDocuments.Add(Path.Combine(TestContext.TestDeploymentDir, "TimeReport_3.txt"));

    StringCollection parts = new StringCollection();

    Dictionary schemas = new Dictionary();
    // CON: Must reference .xsd file
    schemas.Add("TestWorkshopApplication.Messaging.TimeReportFF", @"..\..\..\Messaging\TimeReportFF.xsd");

    target.TestPipeline(inputDocuments, parts, schemas);

    // CON: Must locate output messages as files
    DirectoryInfo testDir = new DirectoryInfo(TestContext.TestDeploymentDir);
    FileInfo[] outputList = testDir.GetFiles("*.out");

    Assert.IsTrue((outputList.Length > 0), "No outputs for pipeline found");

    foreach (FileInfo file in outputList)
    {

        /* Additional testing of message content */

    }
}
Now compare that with a code performing roughly the same test using the PipelineTesting library:
[TestMethod]
public void TimeReportFFInPipeline_TimeReportFF_OutputValidates()
{

    // PipelineTesting Library Pipeline Testing Support

    String sourceFile = Path.Combine(TestContext.TestDeploymentDir, "TimeReport_4.txt");

    // PRO: Can compose a pipeline at runtime
    FFDisassembler ffDasm = Disassembler.FlatFile().WithDocumentSpec(typeof(TimeReportFF));
    ReceivePipelineWrapper target = Pipelines.Receive().WithDisassembler(ffDasm);
    target.AddDocSpec(typeof(TimeReportFF));

    MessageCollection result;

    // CON: Have to manually load input document
    // PRO: Input document can exist only in memory
    using (var readStream = File.OpenRead(sourceFile))
    {
        IBaseMessage msg = MessageHelper.CreateFromStream(readStream);
        result = target.Execute(msg);
    }

    Assert.IsTrue(result.Count > 0, "No outputs found from flat file pipeline");

    // PRO: Raw IBaseMessage instances of outputs are available in memory
    foreach (IBaseMessage msg in result)
    {

        /* Additional testing of message content or context */
    }

}
It actually doesn’t take too much effort to get this library working with your BizTalk Server 2010 solutions, and in turn with Team Foundation Server 2010. You will have to upgrade the solution to the Visual Studio 2010 format, and re-reference the PipelineObjects library (exists under the \Program Files\Microsoft Visual Studio 10.0\Common7\IDE\PublicAssemblies folder). If you don’t have NUnit installed, you can exclude the Test project from the build. Once you have it built, you’re good to start writing tests against your BizTalk Server 2010 artifacts. When automating the build and test with Team Foundation Server, you will need to remember to include the .dll somewhere within source control.
BizUnit 3.1
BizUnit is a framework for performing automated integration and functional testing of BizTalk solutions. It takes a black-box approach, and requires that all artifacts are built and deployed before testing commences. If you already perform manual end-to-end testing of your BizTalk applications, you could likely benefit greatly from BizUnit over time. It provides a huge library of pre-built test steps (e.g., start BizTalk host, copy a file, wait for a file, execute a database query) that have the net effect of saving you a lot of time. Test cases, which are combinations of test steps, exist in a declarative XML format that are processed by the BizUnit class which can be invoked from within your MSTest or NUnit test assemblies.
Getting BizUnit working for BizTalk Server 2010 is not necessarily a very easy process. Before you even begin, you must consider that there are two versions currently available. The most recent version is BizUnit 4.0 Beta, which completely changes the test case format (to use XAML), and looks to be the way of the future. However, it does not look like that version has been updated in quite some time, so it is unclear when a final release will be ready. The other version available is BizUnit 3.1, which is stable and has a fully developed library of test steps along with full documentation. For the sake of this blog posting, we will go forward with 3.1, and examine some of the issues you will encounter.
This is another instance in which you will have to upgrade the solution to the Visual Studio 2010 solution file format. From there, you will notice that the solution has a project for each category of test step (e.g., BizTalk steps, LoadGen steps, MQ Series steps, Outlook automation steps, etc…). You can exclude the project for any type of step that you will not be using. Then for each of the “Steps” projects, you will need to re-reference assemblies, so that the latest versions are referenced. You might notice at this point, that the BizTalkSteps project has a dependency on the PipelineTesting library already discussed. You will definitely want to include the version that you built against the BizTalk Server 2010 binaries here. This is another place where you will need to remember to include the .dll’s for both the BizUnit runtime and the steps that you will be using within source control, or simply install BizUnit on each build server if that makes more sense in your environment.
bLogical Custom Tasks
With BizTalk Server 2009, it became possible to automate builds of BizTalk applications without installing Visual Studio on the build server (though it is required to install the Project Build Component from the BizTalk installation media). It was also possible with BizTalk Server 2009 to automate tests and, with the help of community tools, automate integration and functional tests. However it was still not possible, using only out-of-the-box functionality, to include deployment as part of the build. The custom MSBuild Tasks for BizTalk by bLogical were developed to add the missing deployment step to the automated build process. Unfortunately, there are a few issues that still need to be overcome for these to work with Team Foundation Server 2010.
First, the easiest problem to deal with is in the GacHelper.cs class within the project:
namespace Blogical.Shared.Tools.BizTalkBuildTasks.Internal
{
	public class GacHelper
	{
		#region Private Fields
		const string ToolName = "bin\\gacutil.exe";
		#endregion
This path gets concatenated with the path to the .NET Framework SDK to resolve the full path to the gacutil tool. Unfortunately, this will reference the old gacutil tool. For .NET 4 assemblies, the new tool path should be "bin\\NETFX 4.0 Tools\gacutil.exe".
The second hurdle isn’t so easily solved. There is a dependency, mainly in the internal TeamBuildTask base class, on classes within the Microsoft.TeamFoundation.Build.Proxy namespace. This has been obsoleted, and no longer appears in the 2010 version of the assembly. This means that, at least for now, you will now have to provide your own solution for these small missing pieces in the automated build/deployment process. Post a comment if you have found an alternative solution, or keep watching this space for updates on this.
Summary
Using BizTalk Server 2010, you can still benefit from the automated build and testing capabilities released with BizTalk Server 2009, and most of the community solutions developed to enable continuous integration. There are a few steps necessary to get everything working and setup, and a few missing pieces that you will have to build yourself, but the end result is beautiful.
Also, bear in mind that Team Foundation Server is not just about source control and it’s not just about automated build or testing. It’s also about issue tracking, project management, and reporting. If you are paying for a license, make sure that your organization is taking full advantage of it — especially on your BizTalk Server integration solutions. Be sure to check our new collection of instructor-led training on Application Lifecycle Management using Visual Studio 2010 and Team Foundation Server 2010.

by community-syndication | Dec 8, 2010 | BizTalk Community Blogs via Syndication
Recently I saw a message on the WF4 Forum where someone was asking for help learning how to consume a WCF service from a Workflow.
In this post I’m going to walk through how you can consume a WCF service from a Workflow where both the service and the workflow live in the same web site. This should be simple, but unfortunately it is not as simple as it should be.
Create an ASP.NET Web Application
- Start Visual Studio 2010 and Create a new ASP.NET Web Application
- Add a new WCF Service to the project
- Add a new Activity to the project
Add a Service Reference To The WCF Service
- Right click on the project and select Add Service Reference
- Click on the Discover button to locate the service
- Add the reference
Now What…
A standard WCF service reference was created but the generated client class is not an activity. You could create a CodeActivity (or better yet an AsyncCodeActivity) to use the generated class but really that is not the best solution.
The Problem
The problem is that there are 2 implementations of Add Service Reference. The original one (let’s call it ASR-Code) which generates the typical code based client classes and then another one we call ASR-XAML which generates a XAML based WF client proxy.
How do we know which one to invoke when you right click and say Add Service Reference? We know by looking at the project type. If you start your project as an Activity Library or a WCF Workflow Service application then you get ASR-XAML, everything else gets ASR-Code which is why we got a code based proxy when we really wanted a XAML based proxy.
The Workaround
The workaround is to add a new Activity Library project to your solution and then add the service reference from there. But… once again it is not as easy as it should be.
Add a new Activity Library project
- Right click on the solution and select Add new project
- Create a new project of type Activity Library
Add a Service Reference To The WCF Service
- Right click on the project and select Add Service Reference
- Click on the Discover button to locate the service
- Add the reference
- A dialog will appear reminding you to build the project and you will have a new XAML based activity in the toolbox to consume the service
Use the New Activity in your Web Application
- Right click on the Web App and add a project reference to the Activity Library
Doh! Just when we thought he had this problem solved…
The Workaround For The Workaround
In this case there is a loophole we can exploit and is has to do with the order of operations. Try this.
- Delete the activity library project
- Add another activity library project
- From your Web App add a project reference to the activity library
- Now add a service reference from the activity library to the service in your web app
- Build the solution
Now your XAML activity can be used from the web app
Really? What alternatives are there?
If you don’t want to use these workarounds there are some options
Option – Bypass the service and invoke the business logic from a CodeActivity
If your business logic lives in the same web app, you might be able to invoke the business logic directly without sending a message through WCF. If you can do this it will result in better performance as well as avoid the problem all together.
Option – Use an AsyncCodeActivity to invoke your service logic
If you do need to send a message, you can use the WCF generated code proxy async interface (you have to generate w/async support). I highly recommend async but you can also use a CodeActivity if you don’t want to do async but this will hurt your performance.
Option – put your activities into a separate WCF Workflow Service Web application
This will keep the boundaries clear and you can invoke your services in their own application. The downside is that you now have 2 web applications to manage.
Is this going to get better?
Yes, we have an open bug on this and are considering options for making this better in the future. One option might be to simply let you choose if you want the XAML reference to be generated when you create a service reference. Don’t know how long it will be before this gets better but it probably will not be fixed until the next release of Visual Studio.
by community-syndication | Dec 8, 2010 | BizTalk Community Blogs via Syndication
The latest issue of the MSDN Magazine features a great article on the Windows Azure Access Control service written by our two technical evangelists: Vittorio Bertocci and Wade Wegner.
Want to get an overview of what Access Control is good for and how to get started?
Follow this link to the article: Re-Introducing the Windows Azure AppFabric Access Control Service.
by community-syndication | Dec 8, 2010 | BizTalk Community Blogs via Syndication
A couple of weeks ago I was working with a customer who engaged me to assist with a “little” problem they had – under certain conditions, the system would lose messages coming from a MSMQ queue and designed to correlate to instances of a long-running WF service hosted in IIS/AppFabric.
The Rule of Thumb
Now, because I don’t want to waste anybody’s time, before I go into explaining all the details I’ll just give you the rule of thumb from my learning: if you want to reliably expose your WF services via MSMQ, always use transactional queues coupled with a TransactedReceiveScope inside the workflow definition.
As long as you remember the above and are comfortable implementing it, you can happily stop reading right here. For the curious amongst us, I’ll continue with the full story.
The Scenario
So, the customer had a long-running WF-based service that at some point in the execution was awaiting a correlated message to come in, via an endpoint bound to a non-transactional MSMQ queue.
(By the way, if you are looking for information on enabling MSMQ communication for WF services, I would point you to an excellent step-by-step guide written by Cindy Song and available here.)
Anyway, under normal circumstances, everything works OK, with the correlated message consumed off the queue and fed into the right workflow instance, which would continue its execution as expected. However, as with any real-life solution, the customer had a few scenarios (not very uncommon) that pushed the envelope a bit – welcome to the real world! So, let’s look at the easiest and most obvious to explain in a blog post – a workflow instance starts, sends a one-way request to an external application or a human to perform some task, continues to do a bit of work, and then starts waiting for the external one-way “response” to come in (via a non-transactional MSMQ queue) before completing. Conceptually, this is depicted below:
Now, let’s look at what happens if one of the “Do something” activities fails – obviously the workflow instance will get suspended and never reach the “Receive TaskCompleted” activity. Unless you’ve created some special logic on the client to detect such conditions the following sequence will happen:
- The client “Complete Task” message will go to the queue bound to the “Receive TaskCompleted” endpoint
- From there, the workflow endpoint using the MSMQ binding will pick up the message (this takes the message off the queue completely and unconditionally)
- The message dispatcher, which is the WF runtime component responsible for inspecting incoming messages and matching them to their corresponding WF instances, will try to get to our now suspended WF instance, which of course will fail.
What now? The message has been consumed from the queue and because it is a non-transactional queue there is no rollback. At the same time the target WF instance is incapable of receiving the message and AppFabric itself does not provide a temporary message store to put the message into. So, at that point, the runtime’s only choice is to logs an exception in the AppFabric monitoring DB and discontinue further actions for this message, as follows:
The bottom line is that in cases like this we are losing the message payload with no ability to handle the message manually or through a different component.
Once you realize what’s happening in step 3 above, even if it is not the desired/ideal outcome, at least it is all logical and makes sense. So, let’s focus on the solution – to transaction-enable the queue and the corresponding receive activity within the workflow so that if the WF runtime cannot deliver the message to an instance, the pick-up from the queue would roll back and a delivery retried later, if so configured.
Using a transactional MSMQ queue
To enable transactions for a MSMQ queue, you will need to create the queue as Transactional. What I mean here is that you cannot just change a non-transactional queue to a transactional one without re-creating it completely.
Configuring the service to receive messages from the transactional queue
The first step is to update the workflow to use the TransactedReceiveScope for all MSMQ-bound Receive activities. Let’s assume we have the following super-simple workflow with just two one-way Receive activities – Start, and FollwowUp, which is correlated to the Start:
We will need to modify the definition to use the TransactedReceiveScope activity as depicted below:
As we can see, the change is as simple as placing the FollowUp activity into the Request placeholder of a TransactedReceiveScope activity.
The second step is to create the correct web.config file entries for the service’s endpoint(s), along with their binding configuration. For the sample service below, my updated web.config file has the following content:
The second, MSMQ-bound, endpoint is using the netMsmqBinding, with a custom configuration named netMsmqBinding_Config, which specifies the exactlyOnce attribute with a value of true (meaning it should use transactional semantics for communicating with the queue). The custom binding configuration also specifies what retry semantics should be used for “failed” messages via the receiveRetryCount, maxRetryCycles, and retryCycleDelay attributes. The meaning and default values for these attributes and how they affect the MSMQ message delivery retry logic can be found on MSDN here. With the sample web.config above, if the target WF instance cannot receive the request, the message will be placed in the “retry” pool of the queue and a single re-delivery attempt will be made after 1 minute. The receiveErrorHandling attribute with a value of Move means that if all specified delivery attempts fail, the message will be moved to the poison queue where another process or a person can handle the error condition (the topic of poison queues is also covered in the same MSDN article).
The Conclusion
When using MSMQ to communicate with long-running WF services, the system design should always employ transactional queues for reliable delivery. This will effectively eliminate the potential for message loss in the WF message dispatcher in cases where the correlated target WF instance cannot either be found, activated, or capable of receiving the incoming message at the given point in time.
Thanks for reading again and happy MSMQ’ing! J
Authored by: Emil Velinov
Reviewed by: Keith Bauer, Christian Martinez
by community-syndication | Dec 8, 2010 | BizTalk Community Blogs via Syndication
This week the data team released the CTP5 build of the new Entity Framework Code-First library. EF Code-First enables a pretty sweet code-centric development workflow for working with data. It enables you to:
- Develop without ever having to open a designer or define an XML mapping file
- Define model objects by simply writing “plain old classes” with no base classes required
- Use a “convention over configuration” approach that enables database persistence without explicitly configuring anything
- Optionally override the convention-based persistence and use a fluent code API to fully customize the persistence mapping
I’m a big fan of the EF Code-First approach, and wrote several blog posts about it this summer:
Today’s new CTP5 release delivers several nice improvements over the CTP4 build, and will be the last preview build of Code First before the final release of it. We will ship the final EF Code First release in the first quarter of next year (Q1 of 2011). It works with all .NET application types (including both ASP.NET Web Forms and ASP.NET MVC projects).
Installing EF Code First
You can install and use EF Code First CTP5 using one of two ways:
Approach 1) By downloading and running a setup program. Once installed you can reference the EntityFramework.dll assembly it provides within your projects.
or:
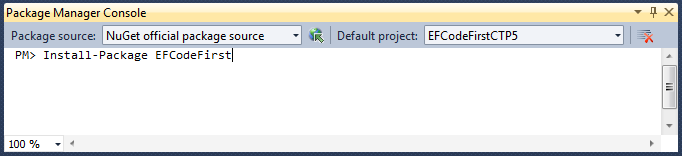
Approach 2) By using the NuGet Package Manager within Visual Studio to download and install EF Code First within a project. To do this, simply bring up the NuGet Package Manager Console within Visual Studio (View->Other Windows->Package Manager Console) and type “Install-Package EFCodeFirst”:
Typing “Install-Package EFCodeFirst” within the Package Manager Console will cause NuGet to download the EF Code First package, and add it to your current project:

Doing this will automatically add a reference to the EntityFramework.dll assembly to your project:

NuGet enables you to have EF Code First setup and ready to use within seconds. When the final release of EF Code First ships you’ll also be able to just type “Update-Package EFCodeFirst” to update your existing projects to use the final release.
EF Code First Assembly and Namespace
The CTP5 release of EF Code First has an updated assembly name, and new .NET namespace:
- Assembly Name: EntityFramework.dll
- Namespace: System.Data.Entity
These names match what we plan to use for the final release of the library.
Nice New CTP5 Improvements
The new CTP5 release of EF Code First contains a bunch of nice improvements and refinements. Some of the highlights include:
- Better support for Existing Databases
- Built-in Model-Level Validation and DataAnnotation Support
- Fluent API Improvements
- Pluggable Conventions Support
- New Change Tracking API
- Improved Concurrency Conflict Resolution
- Raw SQL Query/Command Support
The rest of this blog post contains some more details about a few of the above changes.
Better Support for Existing Databases
EF Code First makes it really easy to create model layers that work against existing databases. CTP5 includes some refinements that further streamline the developer workflow for this scenario.
Below are the steps to use EF Code First to create a model layer for the Northwind sample database:
Step 1: Create Model Classes and a DbContext class
Below is all of the code necessary to implement a simple model layer using EF Code First that goes against the Northwind database:

EF Code First enables you to use “POCO” – Plain Old CLR Objects – to represent entities within a database. This means that you do not need to derive model classes from a base class, nor implement any interfaces or data persistence attributes on them. This enables the model classes to be kept clean, easily testable, and “persistence ignorant”. The Product and Category classes above are examples of POCO model classes.
EF Code First enables you to easily connect your POCO model classes to a database by creating a “DbContext” class that exposes public properties that map to the tables within a database. The Northwind class above illustrates how this can be done. It is mapping our Product and Category classes to the “Products” and “Categories” tables within the database. The properties within the Product and Category classes in turn map to the columns within the Products and Categories tables – and each instance of a Product/Category object maps to a row within the tables.
The above code is all of the code required to create our model and data access layer! Previous CTPs of EF Code First required an additional step to work against existing databases (a call to Database.Initializer<Northwind>(null) to tell EF Code First to not create the database) – this step is no longer required with the CTP5 release.
Step 2: Configure the Database Connection String
We’ve written all of the code we need to write to define our model layer. Our last step before we use it will be to setup a connection-string that connects it with our database. To do this we’ll add a “Northwind” connection-string to our web.config file (or App.Config for client apps) like so:
  <connectionStrings>

    <add name="Northwind"
         connectionString="data source=.\SQLEXPRESS;Integrated Security=SSPI;AttachDBFilename=|DataDirectory|\northwind.mdf;User Instance=true"
         providerName="System.Data.SqlClient" />

  </connectionStrings>
EF “code first” uses a convention where DbContext classes by default look for a connection-string that has the same name as the context class. Because our DbContext class is called “Northwind” it by default looks for a “Northwind” connection-string to use. Above our Northwind connection-string is configured to use a local SQL Express database (stored within the \App_Data directory of our project). You can alternatively point it at a remote SQL Server.
Step 3: Using our Northwind Model Layer
We can now easily query and update our database using the strongly-typed model layer we just built with EF Code First.
The code example below demonstrates how to use LINQ to query for products within a specific product category. This query returns back a sequence of strongly-typed Product objects that match the search criteria:

The code example below demonstrates how we can retrieve a specific Product object, update two of its properties, and then save the changes back to the database:

EF Code First handles all of the change-tracking and data persistence work for us, and allows us to focus on our application and business logic as opposed to having to worry about data access plumbing.
Built-in Model Validation
EF Code First allows you to use any validation approach you want when implementing business rules with your model layer. This enables a great deal of flexibility and power.
Starting with this week’s CTP5 release, EF Code First also now includes built-in support for both the DataAnnotation and IValidatorObject validation support built-into .NET 4. This enables you to easily implement validation rules on your models, and have these rules automatically be enforced by EF Code First whenever you save your model layer. It provides a very convenient “out of the box” way to enable validation within your applications.
Applying DataAnnotations to our Northwind Model
The code example below demonstrates how we could add some declarative validation rules to two of the properties of our “Product” model:

We are using the [Required] and [Range] attributes above. These validation attributes live within the System.ComponentModel.DataAnnotations namespace that is built-into .NET 4, and can be used independently of EF. The error messages specified on them can either be explicitly defined (like above) – or retrieved from resource files (which makes localizing applications easy).
Validation Enforcement on SaveChanges()
EF Code-First (starting with CTP5) now automatically applies and enforces DataAnnotation rules when a model object is updated or saved. You do not need to write any code to enforce this – this support is now enabled by default.
This new support means that the below code – which violates our above rules – will automatically throw an exception when we call the “SaveChanges()” method on our Northwind DbContext:

The DbEntityValidationException that is raised when the SaveChanges() method is invoked contains a “EntityValidationErrors” property that you can use to retrieve the list of all validation errors that occurred when the model was trying to save. This enables you to easily guide the user on how to fix them. Note that EF Code-First will abort the entire transaction of changes if a validation rule is violated – ensuring that our database is always kept in a valid, consistent state.
EF Code First’s validation enforcement works both for the built-in .NET DataAnnotation attributes (like Required, Range, RegularExpression, StringLength, etc), as well as for any custom validation rule you create by sub-classing the System.ComponentModel.DataAnnotations.ValidationAttribute base class.
UI Validation Support
A lot of our UI frameworks in .NET also provide support for DataAnnotation-based validation rules. For example, ASP.NET MVC, ASP.NET Dynamic Data, and Silverlight (via WCF RIA Services) all provide support for displaying client-side validation UI that honor the DataAnnotation rules applied to model objects.
The screen-shot below demonstrates how using the default “Add-View” scaffold template within an ASP.NET MVC 3 application will cause appropriate validation error messages to be displayed if appropriate values are not provided:

ASP.NET MVC 3 supports both client-side and server-side enforcement of these validation rules. The error messages displayed are automatically picked up from the declarative validation attributes – eliminating the need for you to write any custom code to display them.
Keeping things DRY
The “DRY Principle” stands for “Do Not Repeat Yourself”, and is a best practice that recommends that you avoid duplicating logic/configuration/code in multiple places across your application, and instead specify it only once and have it apply everywhere.
EF Code First CTP5 now enables you to apply declarative DataAnnotation validations on your model classes (and specify them only once) and then have the validation logic be enforced (and corresponding error messages displayed) across all applications scenarios – including within controllers, views, client-side scripts, and for any custom code that updates and manipulates model classes.
This makes it much easier to build good applications with clean code, and to build applications that can rapidly iterate and evolve.
Other EF Code First Improvements New to CTP5
EF Code First CTP5 includes a bunch of other improvements as well. Below are a few short descriptions of some of them:
EF Code First allows you to override an “OnModelCreating()” method on the DbContext class to further refine/override the schema mapping rules used to map model classes to underlying database schema. CTP5 includes some refinements to the ModelBuilder class that is passed to this method which can make defining mapping rules cleaner and more concise. The ADO.NET Team blogged some samples of how to do this here.
- Pluggable Conventions Support
EF Code First CTP5 provides new support that allows you to override the “default conventions” that EF Code First honors, and optionally replace them with your own set of conventions.
EF Code First CTP5 exposes a new set of change tracking information that enables you to access Original, Current & Stored values, and State (e.g. Added, Unchanged, Modified, Deleted). This support is useful in a variety of scenarios.
- Improved Concurrency Conflict Resolution
EF Code First CTP5 provides better exception messages that allow access to the affected object instance and the ability to resolve conflicts using current, original and database values.
- Raw SQL Query/Command Support
EF Code First CTP5 now allows raw SQL queries and commands (including SPROCs) to be executed via the SqlQuery and SqlCommand methods exposed off of the DbContext.Database property. The results of these method calls can be materialized into object instances that can be optionally change-tracked by the DbContext. This is useful for a variety of advanced scenarios.
- Full Data Annotations Support
EF Code First CTP5 now supports all standard DataAnnotations within .NET, and can use them both to perform validation as well as to automatically create the appropriate database schema when EF Code First is used in a database creation scenario.
Summary
EF Code First provides an elegant and powerful way to work with data. I really like it because it is extremely clean and supports best practices, while also enabling solutions to be implemented very, very rapidly. The code-only approach of the library means that model layers end up being flexible and easy to customize.
This week’s CTP5 release further refines EF Code First and helps ensure that it will be really sweet when it ships early next year. I recommend using NuGet to install and give it a try today. I think you’ll be pleasantly surprised by how awesome it is.
Hope this helps,
Scott


