by community-syndication | Jan 18, 2010 | BizTalk Community Blogs via Syndication
I was doing some research lately into a publish/subscribe scenario and it made me think of a “gotcha” that folks may not think about when building this type of messaging solution.
Specifically, what are the implications of resubmitted a failed transmission to a particular subscriber in a publish/subscribe scenario? For demonstration purposes, let’s say I’ve got […]

by community-syndication | Jan 18, 2010 | BizTalk Community Blogs via Syndication
Have you ever asked yourself the question – what happens when a BizTalk HTTP receive location is outside it’s service window?
The file adapter doesn’t pick up any files from the folder when the receive location is outside the service window.
For the HTTP adapter BizTalk will return a 500 (Internal Server Error) response to the […]
by community-syndication | Jan 18, 2010 | BizTalk Community Blogs via Syndication
This is part four of a twelve part series that introduces the features of WCF WebHttp Services in .NET 4. In this post we will cover:
- Configuring automatic format selection for a WCF WebHttp Service
- Setting the response format explicitly in code per request
Over the course of this blog post series, we are building a web service called TeamTask. TeamTask allows a team to track tasks assigned to members of the team. Because the code in a given blog post builds upon the code from the previous posts, the posts are intended to be read in-order.
Downloading the TeamTask Code
At the end of this blog post, you’ll find a link that will allow you to download the code for the current TeamTask Service as a compressed file. After extracting, you’ll find that it contains “Before” and “After” versions of the TeamTask solution. If you would like to follow along with the steps outlined in this post, download the code and open the “Before” solution in Visual Studio 2010. If you aren’t sure about a step, refer to the “After” version of the TeamTask solution.
Note: If you try running the sample code and see a Visual Studio Project Sample Loading Error that begins with “Assembly could not be loaded and will be ignored”, see here for troubleshooting.
Getting Visual Studio 2010
To follow along with this blog post series, you will need to have Microsoft Visual Studio 2010 and the full .NET 4 Framework installed on your machine. (The client profile of the .NET 4 Framework is not sufficient.) At the time of this posting, the Microsoft Visual Studio 2010 Ultimate Beta 2 is available for free download and there are numerous resources available regarding how to download and install, including this Channel 9 video.
Step 1: Handling Requests in JSON
So far in this blog post series we’ve been sending and receiving HTTP messages with XML content only. But WCF WebHttp Services also provides first-class support for JSON. In fact, by default a WCF WebHttp Service will handle requests in JSON automatically. Just to prove this, we’ll have our client send an HTTP PUT request to the TeamTask service in JSON.
If you haven’t already done so, download and open the “Before” solution of the code attached to this blog post.
Open the Program.cs file from the TeamTask.Client project in the code editor and add the following static method to the Program class:
static void WriteOutContent(HttpContent content)
{
content.LoadIntoBuffer();
Console.WriteLine(content.ReadAsString());
Console.WriteLine();
}
This static WriteOutContent() method will allow us to easily write out the body of a request or response message to the console. The content is streamed by default, so we call the LoadIntoBuffer() method to give us the ability to read the content multiple times.
Change the UpdateTask() method to serialize the request to JSON instead of XML by replacing:
HttpContent content = HttpContentExtensions.CreateDataContract(task);
With:
HttpContent content = HttpContentExtensions.CreateJsonDataContract(task);
Add a call to the WriteOutContent() method after the request content is created so that we can verify the request really is in JSON like so:
HttpContent content = HttpContentExtensions.CreateJsonDataContract(task);
Console.WriteLine(“Request:”);
WriteOutContent(content);
Open the Web.Config file from the TeamTask.Server project and change the value of the “automaticFormatSelectionEnabled” setting from “true” to “false” like so:
<webHttpEndpoint>
<standardEndpoint name=“” helpEnabled=“true”
automaticFormatSelectionEnabled=“false“/>
</webHttpEndpoint>
Note: The default value for automaticFormatSelectionEnabled is actually false, so we could simply delete the attribute altogether. However, we’ll be re-enabling it soon so it is easier to keep it around.
Start without debugging (Ctrl+F5) to get the TeamTask service running and then start the client by right clicking on the TeamTask.Client project in the “Solution Explorer” window and selecting “Debug”->”Start New Instance”. The console should contain the following output:
Notice that the HTTP PUT request is in JSON, and yet the TeamTask service handles it without any problem.
Note: Throughout this blog post, we’ll be running both the service and the client projects together a number of times. You might find it convenient to configure the TeamTask solution to automatically launch the server and then the client when you press (F5). To do this, right click on the TeamTask solution in the Solution Explorer (Ctrl+W,S) and select “Properties” from the context menu that appears. In the Solution Properties window, select the “Multiple startup projects” radio button. Make sure that the TeamTask.Service project is the top project in the list by selecting it and clicking on the up arrow button. Click on the “Action” cell for the TeamTask.Service project and select “Start without Debugging”. Then click on the “Action” cell for the TeamTask.Client project and select “Start”.
Helpful Tip: It might seem counterintuitive that we set “automaticFormatSelectionEnabled” to false when we were explicitly trying to demonstrate how our service could automatically handle a JSON request. You would probably assume that “automaticFormatSelectionEnabled” needs to be set to “true” to handle a JSON request. But this isn’t the case, as we saw when we executed the client. The “automaticFormatSelectionEnabled” setting applies to outgoing responses only. All incoming requests in either XML or JSON are automatically handled, and in fact, there is no way to disable this behavior to accept only one format or the other. |
Step 2: Setting the Response Format Automatically
In step one, we wrote the request message body to the console to show that it was in fact JSON. But what about the response message? We didn’t write it out to the console, but it happens to be in XML. You can see for yourself by adding a call to the WriteOutContent() method and passing in the response content.
Of course this is odd-a client sends JSON and gets XML back. This occurs because the default response format of the UpdateTask() operation is XML. You specify the default response format for an operation using the ResponseFormat property on the [WebGet] or [WebInvoke] attributes, but the ResponseFormat property isn’t explicitly set with the UpdateTask() operation and it defaults to XML.
We could set the ResponseFormat for the UpdateTask() operation to JSON, but that wouldn’t really solve our problem. If a client were to send a request in XML, it would get back a response in JSON. What we really want is for the WCF infrastructure to be smart enough to choose the correct response format given the request itself. And in fact, this is exactly the behavior the new automatic format selection feature in WCF WebHttp Services provides.
Enabling automatic format selection is as easy as setting “automaticFormatSelectionEnabled” to “true” in the Web.config for the service. With the online templates it is set to “true” by default, which is why we had to set it to “false” in step one.
When automatic format selection is enabled, the WCF infrastructure will try to determine the appropriate response format using:
The value of the HTTP Accept header of the request. If the request doesn’t provide an Accept header or the Accept header doesn’t list an appropriate format, the WCF infrastructure will try to use
The content-type of the request. If the request doesn’t have a body or if the content-type of the request isn’t an appropriate format, the WCF infrastructure will use
The default response format for the operation.
Now we’ll re-enable automatic format selection and demonstrate how it works by sending an HTTP GET request with an Accept header indicating a preference for JSON. We’ll also update our client to write out the response from the HTTP PUT request and show that the response format matches that of the request (even without an Accept header).
Open the Web.Config file from the TeamTask.Server project and change the value of the “automaticFormatSelectionEnabled” setting from “false” to “true” like so:
<webHttpEndpoint>
<standardEndpoint name=“” helpEnabled=“true”
automaticFormatSelectionEnabled=“true“/>
</webHttpEndpoint>
Open the Program.cs file from the TeamTask.Client project in the code editor and replace the static GetTask() method implementation with the implementation below. You’ll also need to add “using System.Runtime.Serialization.Json;” to the code file:
static Task GetTask(HttpClient client, int id)
{
Console.WriteLine(“Getting task ‘{0}’:”, id);
using (HttpRequestMessage request =
new HttpRequestMessage(“GET”, “Tasks”))
{
request.Headers.Accept.AddString(“application/json”);
using (HttpResponseMessage response = client.Send(request))
{
response.EnsureStatusIsSuccessful();
WriteOutContent(response.Content);
return response.Content.ReadAsJsonDataContract<List<Task>>()
.FirstOrDefault(task => task.Id == id);
}
}
}
This implementation of the static GetTask() method is very similar to the client code we wrote in part two of this blog post series. However, we are now instantiating an HttpRequestMessage so that we can set the Accept header to “application/json”. We are also using the ReadAsJsonDataContract() extension method instead of the ReadAsDataContract() extension method since the content is now JSON instead of XML.
If you try to build you’ll find that the ReadAsJsonDataContract() extension method has a dependency, so in the “Solution Explorer” window, right click on the TeamTask.Client project and select “Add Reference”. In the “Add Reference” window, select the “.NET” tab and choose the System.ServiceModel.Web assembly.
In the UpdateTask() method, also write the response out to the console and replace the ReadAsDataContract() call with a ReadAsJsonDataContract() call like so:
using (HttpResponseMessage response = client.Put(updateUri, content))
{
response.EnsureStatusIsSuccessful();
Console.WriteLine(“Response:”);
WriteOutContent(response.Content);
return response.Content.ReadAsJsonDataContract<Task>();
}
Start without debugging (Ctrl+F5) to get the TeamTask service running and then start the client by right clicking on the TeamTask.Client project in the “Solution Explorer” window and selecting “Debug”->”Start New Instance”. The console should contain the following output:
Notice that JSON was used for the responses of both the GET and PUT requests. JSON was used with the GET request because of the HTTP Accept header value, and it was used for the PUT request because the request itself used JSON.
Step 3: Setting the Response Format Explicitly
Automatic format selection is a powerful new feature, but it may not be the solution for all scenarios. For example, it won’t work when a service wants to support clients that aren’t able to set the HTTP Accept header when they send GET requests. Therefore WCF WebHttp Services also allows the response format to be set explicitly in code.
We’ll demonstrate how to explicitly set the response format by adding a “format” query string parameter to the GetTasks() operation of the TeamTask service. The value of this query string parameter will determine the response format.
Open the TeamTaskService.cs file in the code editor.
Add a “format” query string parameter to the UriTemplate of the GetTasks() operation along with a matching method parameter like so:
[WebGet(UriTemplate =
“Tasks?skip={skip}&top={top}&owner={userName}&format={format}”)]
public List<Task> GetTasks(int skip, int top, string userName, string format)
Within the body of the GetTasks() operation, add the following code:
// Set the format from the format query variable if it is available
if (string.Equals(“json”, format, StringComparison.OrdinalIgnoreCase))
{
WebOperationContext.Current.OutgoingResponse.Format =
WebMessageFormat.Json;
}
Setting the response format explicitly is as simple as setting the Format property on the OutgoingResponse of the WebOperationContext. When the “format” query string is equal to “json”, the response format is set to JSON, otherwise the default value of XML is used.
Start without debugging (Ctrl+F5) and use the browser of your choice to navigate to http://localhost:8080/TeamTask/Tasks. In Internet Explorer, the list of tasks will be displayed as shown below:
Now, send another request with the browser, but add the “format” query string parameter to the URI like so: http://localhost:8080/TeamTask/Tasks?format=json. In Internet Explorer, you’ll be presented with a dialog box asking if you want to download the response as a file. Save the file and open it in notepad and it will contain the tasks in the JSON format as shown below:
Helpful Tip: While WCF WebHttp Services offers first-class support for XML and JSON, it also provides a more advanced API for returning plain text, Atom feeds, or any other possible content-type. We’ll cover this feature in part eight of this blog post series. |
Next Steps: Error Handling with WebFaultException
So far in our implementation of the TeamTask service, we haven’t provided any real error handling. In part five of this blog post series we’ll rectify this and use the new WebFaultException class to communicate why a request has failed by providing an appropriate HTTP status code.
Randall Tombaugh
Developer, WCF WebHttp Services
by community-syndication | Jan 18, 2010 | BizTalk Community Blogs via Syndication
From time to time I check out on what’s happening in my favourite ’moon lighting’
area – Silverlight.
Love the Silverlight potential – I’m a big fan.
So from http://silverlight.net – I found a Z-80
EMULATOR!!! (like what’s next an Apple II)
You hit the ’Run’ button and far too many years has passed between me and my Computer
Engineering Degree of Demorgans Theorem and Fast Fourier Transforms.
Great effort! (by someone whom had SOOO much time on their hands)
http://www.expertgig.com/slsample/sl_z80emu/SL_Z80emuTestPage.html

by community-syndication | Jan 18, 2010 | BizTalk Community Blogs via Syndication
I’m really chuffed to have not one but 3 new team members on board the MockingBird project. Welcome to Shen Chauhan, my MCS colleague and WPF whizz-kid, Bram Veldhoenand Cormac O’Brien.
So, whats cooking for MockingBird in 2010 ? I have a veritable laundry list of features for the next release(s) but here’s the broad themes […]

by community-syndication | Jan 18, 2010 | BizTalk Community Blogs via Syndication
I’m delighted to be delivering my first presentation for the UK SOA/BPM User Group next week on the topic of Windows Server AppFabric (formerly code-named “Dublin”). The link to register is hereand the page will be updated with the abstract shortly.
The tight integration between WCF and WF 4.0 and the hosting support in AppFabric is […]
by community-syndication | Jan 17, 2010 | BizTalk Community Blogs via Syndication
Hi all
Today I started receiving this error in the event log every time I tried to test my
custom functoid in a map on the receive port.
A message received by adapter "FILE" on receive location "Receive Location3"
with URI "C:\Projects\TestCumulativeFunctoid\TestCumulativeFunctoid\Instances\In\*Copy*.xml"
is suspended.
Error details: The system cannot find the file specified. (Exception from HRESULT:
0x80070002)
MessageId: {5C621C74-A873-4E68-84E0-D0621DF9471E}
InstanceID: {21D3DCEC-7C1C-4865-BB46-6D1BF6FAC7AA}
The map worked fine in Visual Studio and I was quite confused and even restarted my
machine.
It turned out that I had forgotten to sign the assembly with the functoid, so the
script I have to deploy a new functoid failed when adding the assembly to the GAC,
which I didn’t notice, since the script runs so fast I never see the result 🙂
But really.. why can’t an error like that contain the name of the file that cannot
be found?
—
eliasen
by community-syndication | Jan 17, 2010 | BizTalk Community Blogs via Syndication
It has been a while ago since I found the time to post some blogs. So hopefully a new ’fresh’ start 🙂
Next Tuesday (Jan. 19th 2010) I’ll give a presentation about using BizTalk RFID with the ESB Toolkit 2.0.
My presentation will be about how to start with BizTalk RFID and to use it together with the ESB Toolkit 2.0.
And if you start using the ESB Toolkit 2.0 in which ways can you implement it.
Hope to see you there.
More info can be found at http://www.btug.biz/Home/NL/tabid/81/Default.aspx
by community-syndication | Jan 16, 2010 | BizTalk Community Blogs via Syndication
I had a requirement where I needed to upload images to a SharePoint library and use the information from the image filename to populate columns within the document library. Performing these tasks within an orchestration is pretty trivial as you can set context properties in a Message Assignment shape that will drive the behavior of the WSS Adapter. I couldn’t justify performing these tasks in an Orchestration since it would involve an extra hop to the MessageBox in order for Orchestration to be invoked.
Another option is to do all of this work in a Pipeline component. I can create a Send Port subscription that would allow me to access the context properties from the message received and update them to include the WSS properties all within in a pipeline. This would allow the solution to become a pure messaging solution and I can save an extra Message Box hop. When building this solution, I referenced Saravana Kumar’s white paper on Pipeline Components. It came in handy, especially in the area of creating the Design time pipeline properties.
Within the Pipeline Component, the first thing that I wanted to to was retrieve the source file name. I am able to do this by reading the “ReceivedFileName” property from the File Adapter’s context properties. I then wanted to clean this file name up since the value of this property includes the entire UNC path: \\Servery\RootFolder\SubFolder\filename.jpg. I have written some utility methods to parse the file name from this long string.
There are 3 parts to the image file name(1213455_NEW_20100110120000.jpg) that I am particularly interested in. They include an Asset Number, Asset State and the Date/Time that the image was taken. The scenario itself is a field worker who needs to capture an image of an asset, indicate the Asset Number and its state i.e. New/Old. This information is then captured in the name of the image. Since it is an image, there is no other reasonable way to store this meta data outside the file name. This in itself is the reason why I need to to use a pipeline component. Standard WSS adapter functionality includes the ability to use XPATH statements to extract data from the message payload and populate a SharePoint document library column.
Once I have captured this meta data and massaged it to my liking, I want to then provide this context data to the WSS Adapter. The WSS adapter is a little different than most of the other adapters in that you can populate an XML document and push that into the ConfigPropertiesXml context property. The document structure itself is a flat XML structure that uses a “key-value” convention.
<ConfigPropertiesXml><PropertyName1>Column 1 Name</PropertyName1><PropertySource1>Column 1 Value</PropertySource1><PropertyName2>Column 2 Name</PropertyName2><PropertySource2>Column 2 Value</PropertySource2><PropertyName3>Column 3 Name</PropertyName3><PropertySource3>Column 3 Value</PropertySource3></ConfigPropertiesXml>
I also want to populate the WSS Adapter’s Filename context property. I can achieve this by the following statement:
pInMsg.Context.Write("Filename",
"http://schemas.microsoft.com/BizTalk/2006/WindowsSharePointServices-properties", ImageFileName);
Below is my Execute method, in my pipeline component, where all of this processing takes place. You can download the entire sample here. This code is at a proof of concept stage so you will want to evaluate your own error handling requirements. Use at your own risk.
public IBaseMessage Execute(IPipelineContext pContext, IBaseMessage pInMsg)
{
//Get received file name by retrieving it from Context
string FilePath = pInMsg.Context.Read("ReceivedFileName", "http://schemas.microsoft.com/BizTalk/2003/file-properties") as string;
//strip path from filename
string ImageFileName = GetFileNameFromPath(FilePath);
//Utility methods to parse filename
string msgAssetNumber = GetAssetNumberFromFileName (ImageFileName);
string msgAssetState = GetAssetStateFromFileName(ImageFileName);
string msgImageDateTime = GetImageDateFromFileName(ImageFileName);
//Write desired file name to context of WSS Adapter
pInMsg.Context.Write("Filename",
"http://schemas.microsoft.com/BizTalk/2006/WindowsSharePointServices-properties", ImageFileName);
// Populate Document Library Columns with values from file name
string strWSSConfigPropertiesXml = string.Format("<ConfigPropertiesXml><PropertyName1>{0}</PropertyName1><PropertySource1>{1}</PropertySource1>" +
"<PropertyName2>{2}</PropertyName2><PropertySource2>{3}</PropertySource2><PropertyName3>{4}</PropertyName3><PropertySource3>{5}</PropertySource3></ConfigPropertiesXml>",
this.AssetNumber,msgAssetNumber,this.AssetState,msgAssetState,this.ImageDateTime,msgImageDateTime);
pInMsg.Context.Write("ConfigPropertiesXml", "http://schemas.microsoft.com/BizTalk/2006/WindowsSharePointServices-properties", strWSSConfigPropertiesXml);
return pInMsg;
}
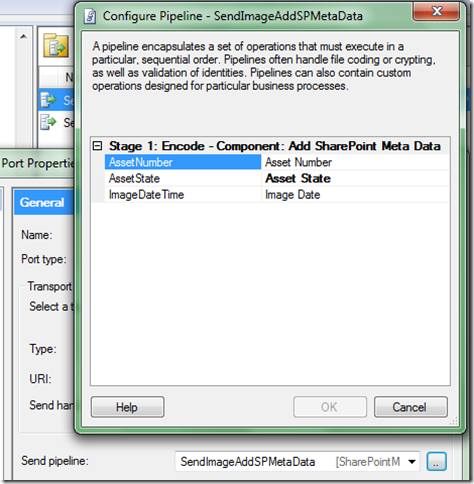
A feature that I wanted to provide is the ability to provide the SharePoint column names at configuration time. I didn’t want to have to compile code if the SharePoint team wanted to change a column name. So this is driven from the pipeline configuration editor. The values that you provide (on the right hand side) will set the column names in the ConfigPropertiesXml property that is established at run time.
If you provide a value in this configuration that does not correspond to a column in SharePoint, you will get a warning/error on the Send Port.
Event Type: Warning
Event Source: BizTalk Server 2009
Event Category: (1)
Event ID: 5743
Date: 1/10/2010
Time: 7:38:19 PM
User: N/A
Computer:
Description:
The adapter failed to transmit message going to send port "SendDocToSharePoint" with URL "wss://SERVER/sites/BizTalk%%20Repository/Inbound%%20Documents". It will be retransmitted after the retry interval specified for this Send Port. Details:"The Windows SharePoint Services adapter Web service encountered an error accessing column "Missing Column" in document library http://SERVER/sites/BizTalk%%20Repository/Inbound%%20Documents. The column does not exist. The following error was encountered: "Value does not fall within the expected range.".
This error was triggered by the Windows SharePoint Services receive location or send port with URI wss://SERVER/sites/BizTalk Repository/Inbound Documents.
Windows SharePoint Services adapter event ID: 12295".
For more information, see Help and Support Center at http://go.microsoft.com/fwlink/events.asp.
The end result is that I can use information contained in the file name to populate meta data columns in SharePoint without an Orchestration.

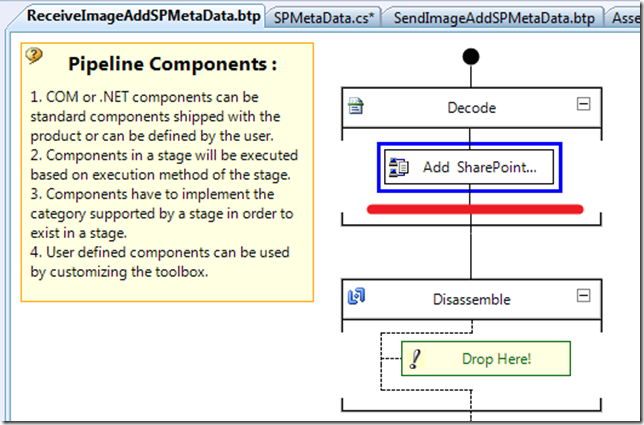
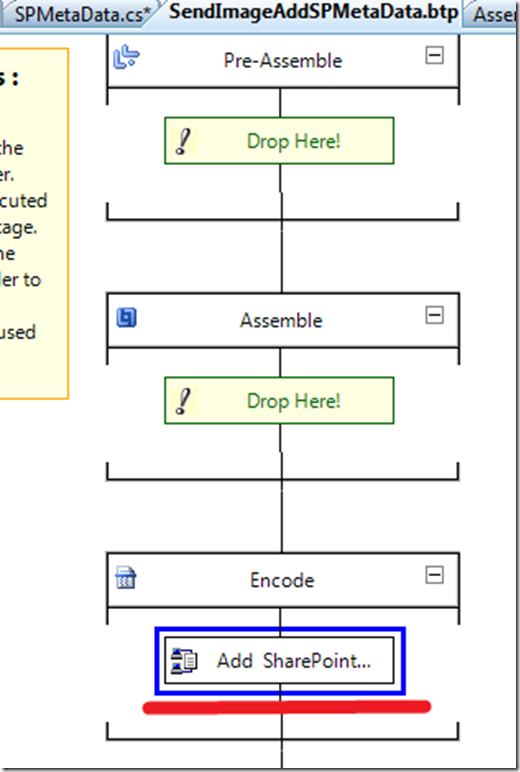
Also note, I have built this pipeline component so that it can be used in a Receive Pipeline or as Send Pipeline by including the CATID_Decoder and CATID_Encoder attributes.
[ComponentCategory(CategoryTypes.CATID_PipelineComponent)]
[ComponentCategory(CategoryTypes.CATID_Decoder)]
[ComponentCategory(CategoryTypes.CATID_Encoder)]
[System.Runtime.InteropServices.Guid("9d0e4103-4cce-4536-83fa-4a5040674ad6")]
public class AddSharePointMetaData : IBaseComponent, IComponentUI, IComponent, IPersistPropertyBag
by community-syndication | Jan 16, 2010 | BizTalk Community Blogs via Syndication
We recently had a webcast at SBUG where Hans Hanston from Agile Point demonstrated a little about their BPM product and how it could be used to create a composited solution integrating sharepoint and SAP.
This is available for offline viewing on the following link:
http://uksoabpm.org/OnlineMiniMeetings.aspx
Note one of the really interesting bits of the demo I thought was the upgrade and versioning of a process running in AgilePoints BPM platform. It was interesting to see how you could easily visualise the differences and opt to roll back in process instances to an earlier state so they could take advantage of the upgrade.