by community-syndication | Aug 12, 2005 | BizTalk Community Blogs via Syndication
In my last entry, I discussed some ways that can making working with binding files
a bit easier. Here is another post in that same vein that addresses a common
pain point…
Un-escaping TransportTypeData
One of the annoying things about binding files is that adapters only have a string
element available to store adapter-specific information for send ports and receive
locations. As a result, adapters will store escaped XML (or even “doubly escaped”
xml…) This can be extremely hard to manage, especially for adapters such as
MQSeries that keep quite a bit of information in this form.
To solve this problem, I introduced a new command-line tool in the most recent version
of the Deployment
Framework called “ElementTunnel.exe” (the source for which is in the Tools download.)
This utility will take in an xml file, along with a file containing xpaths to elements
that should be “encoded” or “decoded”. The end result is that you can choose
to manage a “master” binding file (not directly useable) and run ElementTunnel on
it immediately prior to deployment. (You may also run XmlPreProcess on the same
file for macro expansion! The sample in the deployment framework shows both occurring
– XmlPreProcess should occur first!)
So what does this mean? An example for a single Send Port snippet: It means
that, in the case of MQSeries, instead of storing and maintaining this mess:
<SendPort Name=”SomeQueue” IsStatic=”true” IsTwoWay=”false”>
<TransmitPipeline Name=”SomeAssembly.SomeQueue” FullyQualifiedName=”SomeAssembly.SomeQueue,
SomeAssembly, Version=1.0.0.0, Culture=neutral, PublicKeyToken=bb955d799cc915b9″ Type=”2″
/>
<PrimaryTransport>
<Address>MQS://SomeServer/SomeQM/SomeQueue</Address>
<TransportTypeData><CustomProps><AdapterConfig vt=”8″>&lt;Config
xmlns:xsd=
;”http://www.w3.org/2001/XMLSchema” xmlns:xsi=”http://www.w3.org/2001/XMLSchema-instance”&
amp;gt;&lt;uri&gt;MQS://SomeServer/SomeQM/ SomeQueue& amp;lt;/uri&gt;&lt;queueDetails&
amp;gt;SomeServer/SomeQM/SomeQueue&lt;/queueDetails&
amp;gt;&lt;transactionSupported&gt;yes&
amp;lt;/transactionSupported&gt;&lt;dataConversion&gt;no&lt;/dataConversion&
amp;gt;&lt;segmentationAllowed&gt;no&lt;
/segmentationAllowed&gt;&lt;fragmentationSize&
amp;gt;500&lt;/fragmentationSize&gt;&lt;ordered& amp;gt;no&lt;/ordered&gt;&lt;/Config&
amp;gt;</AdapterConfig& gt;</CustomProps></TransportTypeData>
<RetryCount>3</RetryCount>
<RetryInterval>5</RetryInterval>
…
</SendPort>> >
You can store and maintain this:
<SendPort Name=”SomeQueue” IsStatic=”true” IsTwoWay=”false”>
<TransmitPipeline Name=”SomeAssembly.SomeQueue” FullyQualifiedName=”SomeAssembly.SomeQueue,
SomeAssembly, Version=1.0.0.0, Culture=neutral, PublicKeyToken=bb955d799cc915b9″ Type=”2″
/>
<PrimaryTransport>
<Address>MQS://SomeServer/SomeQM/SomeQueue</Address>
<TransportTypeData> <CustomProps>
<AdapterConfig vt=”8″>
<Config>
<uri>MQS://SomeServer/SomeQM/SomeQueue</uri>
<queueDetails>SomeServer/SomeQM/SomeQueue</queueDetails>
<transactionSupported>yes</transactionSupported>
<dataConversion>no</dataConversion>
<segmentationAllowed>no</segmentationAllowed>
<fragmentationSize>500</fragmentationSize>
<ordered>no</ordered>
</Config>
</AdapterConfig>
</CustomProps> </TransportTypeData>
<RetryCount>3</RetryCount>
<RetryInterval>5</RetryInterval>
…
</SendPort>
Ahhh, isn’t that better? Of course, similar goodness for all other adapters.
And, in the clean version, you’ll find it easier to place/maintain XmlPreProcess macros.
In the Deployment Framework sample, you’ll see that we pass the following xpaths to
ElementTunnel (along with the “master” binding file itself):
/BindingInfo/ReceivePortCollection/ReceivePort/ReceiveLocations/ReceiveLocation/ ReceiveLocationTransportTypeData/CustomProps/AdapterConfig
/BindingInfo/ReceivePortCollection/ReceivePort/ReceiveLocations/ReceiveLocation/ ReceiveLocationTransportTypeData
/BindingInfo/SendPortCollection/SendPort/*/TransportTypeData/CustomProps/AdapterConfig
/BindingInfo/SendPortCollection/SendPort/*/TransportTypeData
If you want to “unescape” your binding file (generally a one-time thing, just to get
clean content) you’ll want to pass these xpaths in a slightly different order, because
of the “double escaping”:
/BindingInfo/ReceivePortCollection/ReceivePort/ReceiveLocations/ReceiveLocation/ ReceiveLocationTransportTypeData
/BindingInfo/ReceivePortCollection/ReceivePort/ReceiveLocations/ReceiveLocation/ ReceiveLocationTransportTypeData/CustomProps/AdapterConfig
/BindingInfo/SendPortCollection/SendPort/*/TransportTypeData
/BindingInfo/SendPortCollection/SendPort/*/TransportTypeData/CustomProps/AdapterConfig
So! If you are managing large binding files (where escaped xml is getting in your
way), you might find this technique handy…Grab the tool, and give it a go.
by community-syndication | Aug 12, 2005 | BizTalk Community Blogs via Syndication
With BizTalk 2004, it can be quite helpful to eventually maintain binding files as
“source code”. After a solution has reached a certain point of stability (where
port definitions are not changing often), many projects will use the Deployment Wizard
to do one last export of the binding information — and then maintain it by hand for
any future changes (storing it in version control along with the rest of the solution.)
There are some interesting benefits that come along with this. One such benefit
is the ability to use the XmlPreProcess tool
to merge environment-specific elements into the binding file (like URIs, retry counts,
etc.), using the SettingsFileGenerator.xls spreadsheet to assist — as has been discussed
on this blog before. Even if you are not using the Deployment
Framework (which uses XmlPreProcess extensively), you should consider using XmlPreProcess as
a standalone tool. The ability to easily maintain a matrix of logical names
(for physical endpoints, etc.) versus “environment names” (development, QA, production,
etc.) is a huge help. See the example spreadsheet below. (The Deployment
Framework also shows how to extend use of this same spreadsheet to manage run-time
configuration settings that are stored in the BizTalk SSO.)
(click)
Optional Deployment of Port Definitions
On to a bit more advanced topic: If you have a set of port definitions that you want
to conditionally deploy into a given environment, you can define a true/false
value within the spreadsheet and use simple “ifdef” logic in your binding file around
the port definition. For instance, you might want a particular File Send Port
or Receive Location to only be active in your development and test environments.
To do this, define a name such as “LogInboundPODocsToFile”, and set the default value
to “true” – and set it to “false” in the “production” column. Mark up your binding
file accordingly. See the example spreadsheet and binding file snippet below.
(When XmlPreProcess is run on this binding file, the port definition will only be
included for environments where the LogInboundPODocsToFile value is true.)
(click)
<!-- ifdef ${LogInboundPODocsToFile} -->

      <SendPort Name="LogSalesOrderResponse_FILE" IsStatic="true" IsTwoWay="false">

      <TransmitPipeline Name="SendWithDefaultNamespaceFormat"

      FullyQualifiedName="SendWithDefaultNamespaceFormat, XYZCo.BizTalk.Pipelines, Version=1.0.0.0,

      Culture=neutral,     PublicKeyToken=343bd7a15fff8d6e"

      Type="2" />

      <PrimaryTransport>

      <Address>C:\Dev\FileLog\%MessageID%.xml</Address>

      <TransportType Name="FILE" Capabilities="11" ConfigurationClsid="5e49e3a6-b4fc-4077-b44c-22f34a242fdb"

      />

      ...

      </SendPort>

      <!-- endif -->
Why would you want to conditionally deploy ports? Like many, I have found it
useful to have an additional file-based Receive Location (associated with a Receive
Port bound to an orchestration) to kick off orchestrations during development – even
if the actual transport used in production will be something different. In addition,
binding an orchestration to a Send Port Group allows you to have an additional
file-based Send Port that will create an easy log of outbound traffic. Finally,
you might create a file-based Send Port that acts as an “additional” subscriber (by
Receive Port Name) to your inbound messages for an easy log of inbound traffic.
(And, combined with a file-based receive port, these two mechanisms give you an easy
re-processing mechanism – just drag/drop in Explorer.) But you might want all
of this machinery shut off in production, hence the technique we just discussed.
Macro Recursion
Another feature within XmlPreProcess is the ability to use “macro” recursion with
XmlPreProcess. This means you can define a macro (logical name) such as QueueServer
(with a different value for development, QA, and production, etc.) and then define
additional values in the spreadsheet that build on this such as: POAckQueue = {$QueueServer}\private$\POAckQueue.
This indirection can make maintaining large numbers of endpoint URIs even easier…See
the example below – where POAckQueue can now appear in the “default” column (applicable
to all environments.)
(click)
Multiple Environments
Note that the SettingsFileGenerator.xls spreadsheet provided with the Deployment Framework
sample (and with XmlPreProcess) has room for four environments (development, QA, staging,
and production.) However, you can simply add columns to manage additional environments
if need be. One such use of this would be to create a column for “unit testing”,
where the URIs and other binding file substitutions point to resources under the control
of your unit testing framework.
More to say on binding file management in another post…
by community-syndication | Aug 12, 2005 | BizTalk Community Blogs via Syndication
With BizTalk 2004, it can be quite helpful to eventually maintain binding files as
“source code”. After a solution has reached a certain point of stability (where
port definitions are not changing often), many projects will use the Deployment Wizard
to do one last export of the binding information — and then maintain it by hand for
any future changes (storing it in version control along with the rest of the solution.)
There are some interesting benefits that come along with this. One such benefit
is the ability to use the XmlPreProcess tool
to merge environment-specific elements into the binding file (like URIs, retry counts,
etc.), using the SettingsFileGenerator.xls spreadsheet to assist — as has been discussed
on this blog before. Even if you are not using the Deployment
Framework (which uses XmlPreProcess extensively), you should consider using XmlPreProcess as
a standalone tool. The ability to easily maintain a matrix of logical names
(for physical endpoints, etc.) versus “environment names” (development, QA, production,
etc.) is a huge help. See the example spreadsheet below. (The Deployment
Framework also shows how to extend use of this same spreadsheet to manage run-time
configuration settings that are stored in the BizTalk SSO.)
(click)
Optional Deployment of Port Definitions
On to a bit more advanced topic: If you have a set of port definitions that you want
to conditionally deploy into a given environment, you can define a true/false
value within the spreadsheet and use simple “ifdef” logic in your binding file around
the port definition. For instance, you might want a particular File Send Port
or Receive Location to only be active in your development and test environments.
To do this, define a name such as “LogInboundPODocsToFile”, and set the default value
to “true” – and set it to “false” in the “production” column. Mark up your binding
file accordingly. See the example spreadsheet and binding file snippet below.
(When XmlPreProcess is run on this binding file, the port definition will only be
included for environments where the LogInboundPODocsToFile value is true.)
(click)
<!-- ifdef ${LogInboundPODocsToFile} -->

<SendPort Name="LogSalesOrderResponse_FILE" IsStatic="true" IsTwoWay="false">

<TransmitPipeline Name="SendWithDefaultNamespaceFormat"

FullyQualifiedName="SendWithDefaultNamespaceFormat, XYZCo.BizTalk.Pipelines, Version=1.0.0.0,

Culture=neutral,     PublicKeyToken=343bd7a15fff8d6e"

Type="2" />

<PrimaryTransport>

<Address>C:\Dev\FileLog\%MessageID%.xml</Address>

<TransportType Name="FILE" Capabilities="11" ConfigurationClsid="5e49e3a6-b4fc-4077-b44c-22f34a242fdb"

/>

...

</SendPort>

<!-- endif -->
Why would you want to conditionally deploy ports? Like many, I have found it
useful to have an additional file-based Receive Location (associated with a Receive
Port bound to an orchestration) to kick off orchestrations during development – even
if the actual transport used in production will be something different. In addition,
binding an orchestration to a Send Port Group allows you to have an additional
file-based Send Port that will create an easy log of outbound traffic. Finally,
you might create a file-based Send Port that acts as an “additional” subscriber (by
Receive Port Name) to your inbound messages for an easy log of inbound traffic.
(And, combined with a file-based receive port, these two mechanisms give you an easy
re-processing mechanism – just drag/drop in Explorer.) But you might want all
of this machinery shut off in production, hence the technique we just discussed.
Macro Recursion
Another feature within XmlPreProcess is the ability to use “macro” recursion with
XmlPreProcess. This means you can define a macro (logical name) such as QueueServer
(with a different value for development, QA, and production, etc.) and then define
additional values in the spreadsheet that build on this such as: POAckQueue = {$QueueServer}\private$\POAckQueue.
This indirection can make maintaining large numbers of endpoint URIs even easier…See
the example below – where POAckQueue can now appear in the “default” column (applicable
to all environments.)
(click)
Multiple Environments
Note that the SettingsFileGenerator.xls spreadsheet provided with the Deployment Framework
sample (and with XmlPreProcess) has room for four environments (development, QA, staging,
and production.) However, you can simply add columns to manage additional environments
if need be. One such use of this would be to create a column for “unit testing”,
where the URIs and other binding file substitutions point to resources under the control
of your unit testing framework.
More to say on binding file management in another post…
by community-syndication | Aug 11, 2005 | BizTalk Community Blogs via Syndication
Version 2.6 of the Deployment Framework is now available (see the download links
– the full
download, core,
and tools have
all been updated.) Future work in this area will be about augmenting the already-great
deployment story in BizTalk 2006!
The release notes below will (likely) only be interesting for folks that are using
the framework extensively.
Interesting Features:
-
If you populate the bizTalkHosts property with the name of the Hosts
that you are using, the ‘servicecontroller’ nant task is used for the stop/start of
BizTalk services, with a configurable timeout stored in the ‘biztalkHostResetTime’
nant property. This requires recopying the BizTalk.nant.tasks.dll to
your \program files\nant\bin directory. This alleviates the problem some users were
having with timeouts in service restarts.
-
IISReset now uses configurable reset time from nant property iisResetTime.
-
Modified the sample application to demonstrate how you can maintain adapter configuration
in binding files (i.e. the TransportTypeData sections) in its “unescaped” form —
rather than having to maintain it as escaped xml-within-xml. This relies on a new
tool – ElementTunnel.exe, which is also in the Tools download. This is a huge help with
adapters such as MQSeries that have many configuration elements. More on this
in another post.
Administrivia:
-
SSOSettingsFileImport.exe opens files with read access only, eliminating some file
locking issues.
-
Permissions on the physical directories associated with virtual directories are now
granted to the account specified as the application pool account (instead of just
aspnet account.)
-
Now using NAnt .85 RC3
-
Now using log4net 1.2.9 (thanks Campbell McNeill for
work on this!)
-
Now using the July 2005 release of WiX (thanks
to Loren Halvorsen for work on compatibility
with this.)
-
Now using XmlPreProcess 1.0
RC3 (and the associated SettingsFileGenerator.xls.) One new feature here is the ability
to use URLs that contain query strings in the spreadsheet. The name/value pair XML
files that are generated will wrap as CDATA where appropriate. Thanks Loren!
-
Modified the sample application to demonstrate how file receive and drop locations
can be made relative to the a) project directory on a developer workstation or b)
installation directory on a server. This has actually be in the sample application
before – but it relied on the xmlpoke nant task, whereas now it uses the XmlPreProcess
mechanism we use for all other binding file modifications.
-
Modified the deployment verification unit test in the sample application to rely on
a NUnitUtility helper class that you can pull into your own projects. One included
method allows you to examine the event log (on multiple machines) looking for errors
that BizTalk might have raised during the test – very handy, and a potentially important
component of your test.
-
Support for a local_settings file used with XmlPreProcess. It can be handy to have
an “environment specific” set of macro values that are particular to a local workstation,
and the sample application shows how this is done now.
-
Added transforms and schemas to the list of what is re-gac’d for the updateOrchestrations
target. See here for
more detail. In a recent release, I made changes that allowed for the use of a single
binding file, so that binding files as emitted by the deployment wizard could be used
(rather than splitting them by hand, which was required early on with the Deployment
Framework.) This was a good change…but the implementation broke the “messaging
only” scenario (where you have no orchestrations.) I don’t have a good fix for this
yet. The workaround is as follows: In your project’s nant file, set includeOrchestrations
to “true” (even though you don’t have any), and define the orchestration assembly
list to be an empty string, as shown here:
<property name="includeOrchestrations" value="true" />


         <property name="orchestrations" value="" />
How do you upgrade? Extract the “core” zip file on “top” of your existing project,
and then fix up the WiX directory manually (since it will be named BizTalkSample.WiXSetup
after the unzip.) All tools and scripts will be updated as a result. Then
test…Leave a comment with any issues you encounter. Good luck!
by community-syndication | Aug 11, 2005 | BizTalk Community Blogs via Syndication
Version 2.6 of the Deployment Framework is now available (see the download links
– the full
download, core,
and tools have
all been updated.) Future work in this area will be about augmenting the already-great
deployment story in BizTalk 2006!
The release notes below will (likely) only be interesting for folks that are using
the framework extensively.
Interesting Features:
-
If you populate the bizTalkHosts property with the name of the Hosts
that you are using, the ‘servicecontroller’ nant task is used for the stop/start of
BizTalk services, with a configurable timeout stored in the ‘biztalkHostResetTime’
nant property. This requires recopying the BizTalk.nant.tasks.dll to
your \program files\nant\bin directory. This alleviates the problem some users were
having with timeouts in service restarts.
-
IISReset now uses configurable reset time from nant property iisResetTime.
-
Modified the sample application to demonstrate how you can maintain adapter configuration
in binding files (i.e. the TransportTypeData sections) in its “unescaped” form —
rather than having to maintain it as escaped xml-within-xml. This relies on a new
tool – ElementTunnel.exe, which is also in the Tools download. This is a huge help with
adapters such as MQSeries that have many configuration elements. More on this
in another post.
Administrivia:
-
SSOSettingsFileImport.exe opens files with read access only, eliminating some file
locking issues.
-
Permissions on the physical directories associated with virtual directories are now
granted to the account specified as the application pool account (instead of just
aspnet account.)
-
Now using NAnt .85 RC3
-
Now using log4net 1.2.9 (thanks Campbell McNeill for
work on this!)
-
Now using the July 2005 release of WiX (thanks
to Loren Halvorsen for work on compatibility
with this.)
-
Now using XmlPreProcess 1.0
RC3 (and the associated SettingsFileGenerator.xls.) One new feature here is the ability
to use URLs that contain query strings in the spreadsheet. The name/value pair XML
files that are generated will wrap as CDATA where appropriate. Thanks Loren!
-
Modified the sample application to demonstrate how file receive and drop locations
can be made relative to the a) project directory on a developer workstation or b)
installation directory on a server. This has actually be in the sample application
before – but it relied on the xmlpoke nant task, whereas now it uses the XmlPreProcess
mechanism we use for all other binding file modifications.
-
Modified the deployment verification unit test in the sample application to rely on
a NUnitUtility helper class that you can pull into your own projects. One included
method allows you to examine the event log (on multiple machines) looking for errors
that BizTalk might have raised during the test – very handy, and a potentially important
component of your test.
-
Support for a local_settings file used with XmlPreProcess. It can be handy to have
an “environment specific” set of macro values that are particular to a local workstation,
and the sample application shows how this is done now.
-
Added transforms and schemas to the list of what is re-gac’d for the updateOrchestrations
target. See here for
more detail. In a recent release, I made changes that allowed for the use of a single
binding file, so that binding files as emitted by the deployment wizard could be used
(rather than splitting them by hand, which was required early on with the Deployment
Framework.) This was a good change…but the implementation broke the “messaging
only” scenario (where you have no orchestrations.) I don’t have a good fix for this
yet. The workaround is as follows: In your project’s nant file, set includeOrchestrations
to “true” (even though you don’t have any), and define the orchestration assembly
list to be an empty string, as shown here:
<property name="includeOrchestrations" value="true" />


<property name="orchestrations" value="" />
How do you upgrade? Extract the “core” zip file on “top” of your existing project,
and then fix up the WiX directory manually (since it will be named BizTalkSample.WiXSetup
after the unzip.) All tools and scripts will be updated as a result. Then
test…Leave a comment with any issues you encounter. Good luck!
by community-syndication | Aug 11, 2005 | BizTalk Community Blogs via Syndication
Today I dived in the new BAM Portal of BTS2006 Beta 1 and had it up and running BAM in about 1 hour. First of all I Migrate a simple project EAISolution (from the Labs of BTS2004 maybe u know it) and I had a BAM xls SalesManagerView.xls copied to my project directory. The migration from VSS2003 to VSS2005 went perfectly. I filled in a new application EAISolution and deployed it.
After the deployment of the orchestration and the EAISchemas I started up my new Application. So far so good.
Alse a new feature is the Zoom function This orchestration I zoomed out for 50%. Now the Business Activity Monitoring was ahead. The first thing I did was search for the BAM.xls as in BTS2004. I couldn’t find it. In the BTS2006 the Excel Add-in is added to the Toolbox add-in and it is now automaticly checked. So I started up Excel and installed via the Tool menu the new Business Activity Monitoring. Now the Menu Item BAM was added. But I wanted to use the previous Excel Definitions (SalesManagerView.xls). When I started up the file u receive the following message :
I hoped there was a migration option somewhere but I couldn’t find it so I decided to make the Activity and views from the beginning but then in a BTS2006 format like u did in BTS2004. When I finished the Activity and Views (Milestones etc) I exported the XLS to a XML file (option Export XML).
In the older version of BizTalk the BM.exe was the deployment tool for BAM. This tool is changed. In BTS2004 the statement was like this : bm.exe deploy salesmanagersview.xls. The tool generates a Live Worksheet for u and the Business Analist could work with that one. To attach the definition to your Business Process (in my sample EAIOrchestration) the TPE tool was the tool to use. Import the XML Definition file and select to right Assembly and the drag and drop action can begin. In BTS2006 the deployment is a littlebit different. The new statement is : BM deploy-all -DefinitionFile:salesmanagersview.xml. Now the definitions activities,milestones etc are stored in the BAMPrimaryImport Database. To attach the shapes from your orchestration to the Milestones and the Data is a littlebit different. I started up the new Tracking Profile Editor and u can select the deployed BAM Activity Definition from the left pane and the assembly with your orchestration from the right pane.
When I started up the BAM Portal I saw that BIzTalk added a new folder SalesManagerView nested with Activity Seach and Aggregations. What I missed was the folder Alert Manager. You can read this in the documentation Scott Woodgate posted on his blog, one of the new features of BTS2006. I started up the BizTalk Server Configuration to see if the BAM Tools –> BAM Alerts was installed. I saw that the check box was not on, but I installed SQL Notification Services. (Strange !!). After read some documents I noticed that I installed the wrong version of SQL Notification Services. U have to install SQL Server 2000 Notification Services, Standard Edition 2.0 SP1 and I installed an earlier version. So I uninstalled that version and installed the newer version and started up the BizTalk Server Configuration Tool and I noticed that I could press on the check box , filled in all the Alert field like Alert File Location (Network drive) , SMTP Server , Alert Database. The last option in this screen gives me an error the Prefix of the Alert Database names. I filled in BAMAlerts and everything went fine. I think this is a small bug. I reported this to the Microsoft guys.
BizTalk generates two extra database : BAMAlertsApplication and BAMAlertsNSMain.
A little example of the BAM Portal u can so here :
I will tell u the alert functionality in my next post

by stephen-w-thomas | Aug 10, 2005 | Stephen's BizTalk and Integration Blog
Direct binding in Biztalk Server 2004 can be used to send messages from one Orchestration to another. It can also be used to send messages directly into the message box, but that is not the focus of this post. Direct binding is easily misunderstood, specifically Partner Port binding since can be somewhat confusing to set up.
I will walk through the 4 simple steps to set up direct binding using partner ports.
It is important to note direct binding still uses the publish and subscribe system in Biztalk to send messages between Orchestrations.
Terminology:
Orchestration1 – The process that will send the message to another Orchestration.
Orchestation2 – The process that will receive the message from another Orchestration.
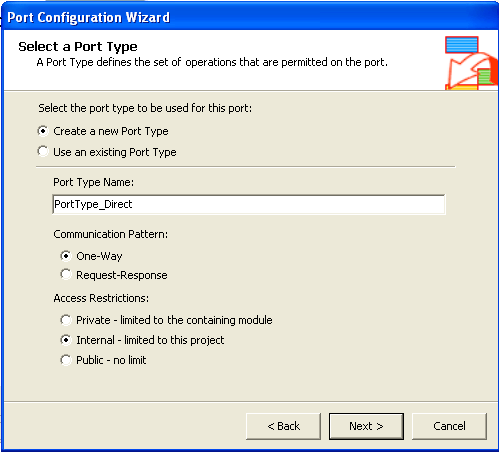
Step 1: Create a new port and port type in Orchestation2. Note that you can also use any existing internal or referenced public port type.
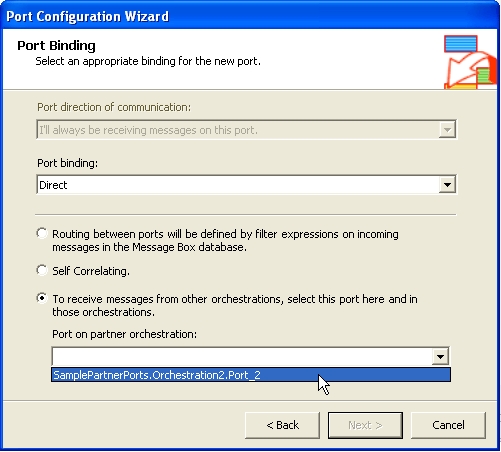
Step 2: Set Porting Bindings. Select Direct Binging, Partner Port – 3rd radio button. Select the new port you are creating in the Port On Partner Orchestration drop down.
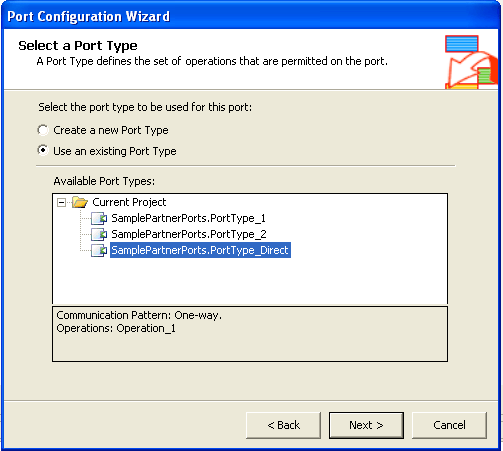
Step 3: Create a new port in Orchestration1 using the existing port type created (or selected) in Step 1.
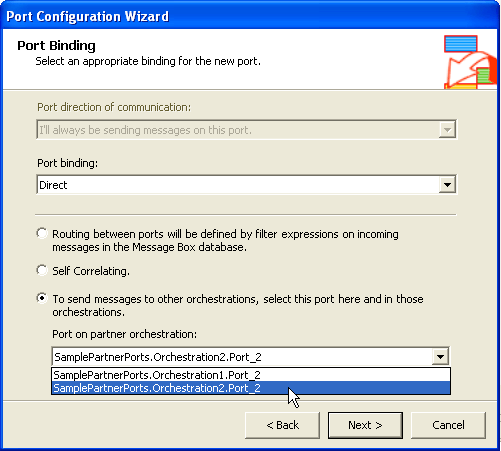
Step 4: Set Porting Bindings. Select Direct Binging, Partner Port – 3rd radio button. Select the port you created in Step 2 on Orchestration2 in the Port On Partner Orchestration drop down.
It is that easy. If you have additional questions or want more information on Direct Binding, Charles Young has by far the best blog posting on this subject.
I have also put together a sample. This sample shows how to use Direct Binding with Partner Ports to send a message from one Orchestration to another.
Download: Biztalk Direct Binding Sample
To run the sample, just deploy the solution and start both Orchestrations. Drop a message into the In folder and it shows up in Out. Check HAT, you will see both Orchestrations ran.
by community-syndication | Aug 10, 2005 | BizTalk Community Blogs via Syndication
This week I have time to look at the new version of BizTalk and I participate with the BizTalk 2006 Beta program. Im really impressed to see how this Beta 1 version is rolled out. I’ve got some problems to install Windows Sharepoint Services , but when u follow the Install Instructions it will be solved.
The only thing I saw was a Query Error in the BizTalk Administration Console so far. When I do a refresh on the BizTalk Group I see the following error :
I run Microsoft SQL Server 2000 with SP4. Anyone have an idea ? Of course I submit this issue to Microsoft. Hope they will come with an answer very soon.
by stephen-w-thomas | Aug 10, 2005 | Downloads
This sample shows up to use Direct Binding in Biztalk Server 2004 to send messages from one Orchestration to another using Partner Ports. Direct binding is easily misunderstood and Partner Port binding can be rather confusing to set up. Direct binding still uses the publish and subscribe system in Biztalk to send messages between Orchestrations.
This sample should work with BizTalk 2004 and BizTalk 2006.
Get more information from the original blog post on this topic: http://www.biztalkgurus.com/biztalk_server/biztalk_blogs/b/biztalk/archive/2005/08/10/direct-binding-sample-for-biztalk-2004.aspx