This post was originally published here
This is the first in a series of blogposts around setting up CI/CD for Azure API Management using Azure Resource Manager templates. We will be using Visual Studio Team Services to host our repositories and set up our build and release pipeline. By using CI/CD our API Management will be updated any time we check in changes made in our ARM templates.
The posts in this series are the following, this list will be updated as the posts are being published.
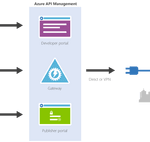
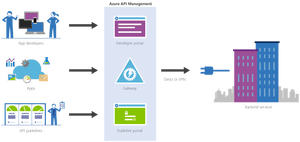
We will have several developers who are working in API Management creating and updating API definitions. The developers can either do this directly in the ARM template files, or by creating the API definition in the portal first and exporting it with a tool like the API Management ARM Template Creator. They will then check in their changes to a GIT repository hosted in VSTS.
In this first post we will create an instance of API Management, without any custom APIs defined, just the Echo API which comes out of the box. We will start by creating a account in VSTS.

Create VSTS account
Once your account has been created, add a new project under which we will host our repositories. Select GIT as the version control provider.

Browse projects

Create new project

Set up project properties
Once our project has been created, let’s create a new GIT repository which will be used to hold the ARM template used to deploy our API Management instance. By creating a repository we can easily detect changes to trigger a specific deployment, like the instance or a specific API definition. This also allows us to limit developers to specific repositories, for example we might only want our lead developers to work on the instance, but have all developers work on APIs within the instance.
Manage repositories

Create new repository

Set repository properties
Once created, switch to your new repository.

Switch to API Management instance repository
Clone the repository to your local machine. When working with ARM template I like using Visual Studio Code in combination with the Azure Resource Manager Tools extension, but you can use any tool you like.
Clone repository
Once you have cloned your repository, create a new file called instance.json, and use the following code to make it an ARM template.
Notice that we use a couple of parameters, these can be overridden at deployment time according to the environment we are deploying to, for example we will want to use the Developer sku in our test environment, but use the Standard sku in the production environment. The other thing to notice is we use [resourceGroup().location] for our location, this will make sure our API Management instance lands in the same region as the resource group to which we deploy from our deployment pipeline.
{ "$schema": "https://schema.management.azure.com/schemas/2015-01-01/deploymentTemplate.json#", "contentVersion": "1.0.0.0", "parameters": { "APIManagementSku": { "type": "string", "defaultValue": "Developer" }, "APIManagementSkuCapacity": { "type": "string", "defaultValue": "1" }, "APIManagementInstanceName": { "type": "string", "defaultValue": "MyAPIManagementInstance" }, "PublisherName": { "type": "string", "defaultValue": "Eldert Grootenboer" }, "PublisherEmail": { "type": "string", "defaultValue": "me@mydomain.com" } }, "variables": {}, "resources": [ { "type": "Microsoft.ApiManagement/service", "name": "[parameters('APIManagementInstanceName')]", "apiVersion": "2017-03-01", "properties": { "publisherEmail": "[parameters('PublisherEmail')]", "publisherName": "[parameters('PublisherName')]", "notificationSenderEmail": "apimgmt-noreply@mail.windowsazure.com", "hostnameConfigurations": [], "additionalLocations": null, "virtualNetworkConfiguration": null, "customProperties": { "Microsoft.WindowsAzure.ApiManagement.Gateway.Security.Protocols.Tls10": "False", "Microsoft.WindowsAzure.ApiManagement.Gateway.Security.Protocols.Tls11": "False", "Microsoft.WindowsAzure.ApiManagement.Gateway.Security.Protocols.Ssl30": "False", "Microsoft.WindowsAzure.ApiManagement.Gateway.Security.Ciphers.TripleDes168": "False", "Microsoft.WindowsAzure.ApiManagement.Gateway.Security.Backend.Protocols.Tls10": "False", "Microsoft.WindowsAzure.ApiManagement.Gateway.Security.Backend.Protocols.Tls11": "False", "Microsoft.WindowsAzure.ApiManagement.Gateway.Security.Backend.Protocols.Ssl30": "False" }, "virtualNetworkType": "None" }, "resources": [], "sku": { "name": "[parameters('APIManagementSku')]", "capacity": "[parameters('APIManagementSkuCapacity')]" }, "location": "[resourceGroup().location]", "tags": {}, "scale": null } ], "outputs": {} } |
Now commit and push these changes changes to the repository, so we can use it in our build and deployment pipeline.

Commit and push changes to repository
Go back to VSTS, and create a new build definition for our project.
Open builds

Create new definition
Make sure you have selected the repository for the API Management instance, and create an empty process definition.

Select API Management instance repository

Create empty process definition
We will start by setting the trigger to enable continous integration. This will kick of the build each time we check in a change to our repository.

Enable continous integration trigger
Next go to the tasks, and add a Azure Resource Group Deployment task to your build Phase. The name of the task is somewhat misleading, as it does not just do resource group deployments, but actually deploys complete ARM templates.
Add Azure Resource Group Deployment task
Click on the task we just added, set the name of the task, and select the subscription to be used. If needed, authorize your connection. In this build pipeline we will only validate the template, so nothing will be deployed yet.
Select subscription and authorize if needed
Fill in the rest of the Azure details of the task. Keep in mind that the resource group will only be used for validation, you can use either an existing or a new resource group for this.

Set Azure details
Now fill in the template details of the task. For the Template reference, select the ARM template we created earlier on by clicking on the three dots next to the textbox. Set the deployment mode to Validation only, this will allow us to validate the ARM template without deploying it. Leave all other sections of the build task to their default values.

Set template and deployment mode
Now add a Delete an Azure Resource Group if it is empty task to the build phase. This custom task has first to be added to your VSTS account (you will need to refresh your VSTS browser screen after you added it), and will be used to clean up the resource group if it was created during the validation if it is empty. This is done, because if you created a new resource group in the previous task, it will leave an empty resource group behind.
Add Delete an Azure Resource Group if it is empty task
Open the new task, and set the Azure details. Make sure to use the same subscription and resource group as was used during the validation. You could use VSTS variables here instead as well, but for this blogpost I will just set the names manually.

Set Azure details
And now add a Publish Build Artifacts task to our build stage. This task will publish the ARM template so we can use it in our deployment pipeline.
Publish Build Artifacts task
Open the task, and select the ARM template file for Path to publish. Give a name for the artifact which will be published, and set the publish location to VSTS.

Set publish settings
We now have completed our build pipeline, so save and queue the definition. This will publish the artifact which we can then use to set up our deployment pipeline.

Save and queue the build definition

Select location to save the definition

Queue the build definition
We have finished our build pipeline, so the next step is to set up a deployment definition. Go to Releases and create a new definition.

Create new release definition
Start with an empty process, as we will set up our definition ourselves.
Choose empty process
In this definition, two environments will be used, Test and Production. But first we will link our artifacts from our build pipeline, by clicking on the Add artifact field.

Add artifact
Select the build definition we created before, this will read the ARM template which we validated in our build pipeline.

Select build definition
And now click on the button to set a continuous deployment trigger, and enable this trigger. This will make sure our deployment process runs each time our build pipeline completes successfully.

Open continous deployment trigger

Enable continuous deployment trigger
Now that we have set up our artifacts to be published, click on the environment and set the environment name to Test.
Set test environment
Next click on the Tasks dropdown and select the Test environment.

Open Test environment tasks
Add an Azure Resource Group Deployment task to your phase, this will deploy the ARM template to our Azure environment.
Add Azure Resource Group Deployment task
Open the task, and edit the Azure details. Remember, this is for your test environment, so set the subscription and / or resource group accordingly.

Set Azure details for test environment
For the template, select the output from our build pipeline. If you want, you can override your template parameters here as well, but as our defaults are already prepared for the test environment, we will not do this at this time.

Use template from build pipeline
Go back to your pipeline, and click on the Clone button under the Test environment.

Clone the test environment
Rename this new environment to Production, and open the pre-deployment conditions.
Open pre-deployment conditions
As this is our production environment, we don’t want to release here until a release manager has approved the deployment. To do this, enable the Pre-deployment approvals option and select someone who is allowed to approve the deployments. Normally this will probably be a release manager.

Enable pre-deployment approvals
Open your Production tasks, click on the Azure Resource Group Deployment task, and update the subscription and / or resource group for your production environment.

Update subscription and resource group
As this is our production instance, we will want to run on the Standard tier of API Management instead of the Developer tier, so override the APIManagementSku property we had set in our ARM template.

Override sku to use Standard tier
And finally name and save your deployment definition.
Name and save definition
To test our CI/CD process, we can now make a change to the ARM template and check it in to our repository. This will then start the build pipeline validating our template, and once it is done, kick off the deployment pipeline automatically, deploying it to Azure.

Build pipeline gets triggered automatically after check in
The first time this is done, it will take a while to create the API Management instance, and if you are on VSTS free build tier, it might show as failed on the deployment, because it will exceed the maximum of 30 minutes.

Deployment succeeded
From now on after making changes to your ARM template your API Management instance will automatically be updated through the CI/CD pipeline. And as we choose for incremental updates in our deployment process, it will only update the parts which have actually been changed, without redeploying the entire instance.
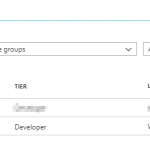
API Management instance has been created