Recently, a client asked me for help rectifying some existing logic apps in their environment because their resource had left the company. Not only to rectify the project but to put it in a better shape and use all good best practices.
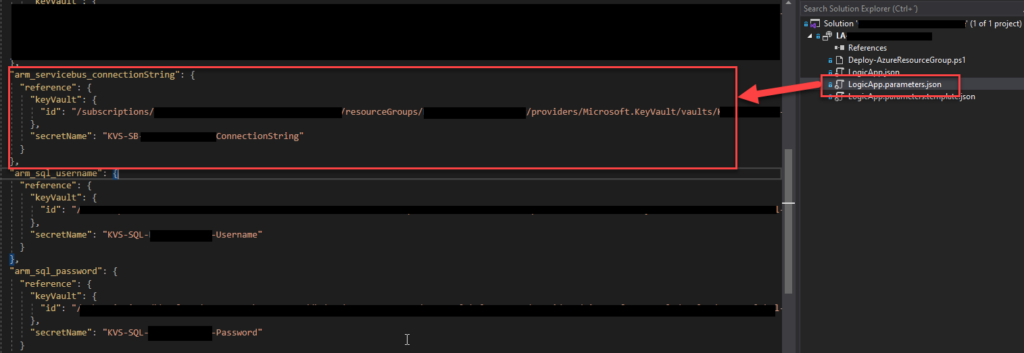
One of the tasks we decided to do was reference secrets in Key Vault for the deployment process, whether through CI/CD or directly through Visual Studio. We had administrator access to the Key Vault in the dev environment, so we were able to easily create those secrets and reference them in the Logic App parameter file, for example, an Azure Service Bus connection string. For those who are not aware, we can archive that by using the code below:
The problem was that when we tried to deploy the solution through Visual Studio, we got the following error:
Logic app visual studio deployment Multiple error occurred: Forbidden,Forbidden,Forbidden. Please see details.
Without any more detail. After some analysis, we realized that the number of Forbidden words in the messages matched the number of key vault secrets we were trying to reference. When we commented on them all and only left one, then we got an error message with more detail:
The secret of KeyVault parameter ‘name’ cannot be retrieved. Http status code: ‘Forbidden’. Error message: ‘Access denied to first party service. Caller: name=ARM;tid=;appid=… Vault:;location=’. Please see https://aka.ms/arm-keyvault for usage details.
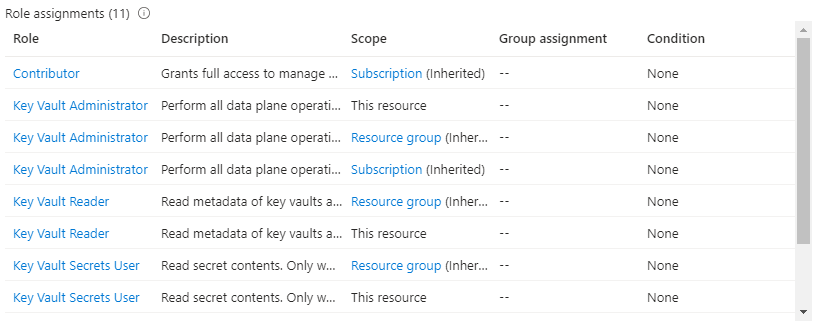
Initially, I thought that was a Key Vault access permission issue, even though I was a Key Vault administrator. However, sometimes, we also need some RBAC permission. In the end, I ended up giving Administrator, Reader, and Secret User permission access at the key vault, resource group, and subscription level:
Still, I was getting the same error!
Cause
When you are developing a Logic App Consumption, this is, in fact, an ARM template project and an ARM template deployment. So, when we reference a Key Vault secret in the LogicApp.parameters.json file, we are referencing a secure parameter that will be used during the ARM template deployment.
The problem is that to be able to access the key vault by the resource manager, you need to change the access policy to allow Azure Resource Manager for template deployment.
You can see this on the official documentation here:
When you need to pass a secure value (like a password) as a parameter during deployment, you can retrieve the value from an Azure Key Vault. To access the Key Vault when deploying Managed Applications, you must grant access to the Appliance Resource Provider service principal. The Managed Applications service uses this identity to run operations. To successfully retrieve a value from a Key Vault during deployment, the service principal must be able to access the Key Vault.
Solution
To solve this issue is quite very simple:
Sign in to the Azure Portal.
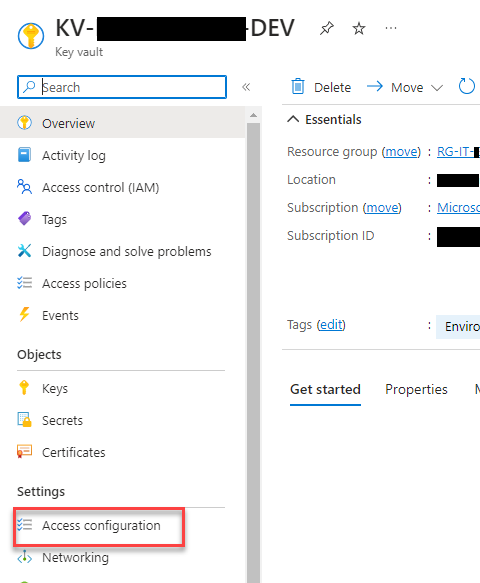
Open your key vault. Enter key vaults in the search box or select Key vaults.
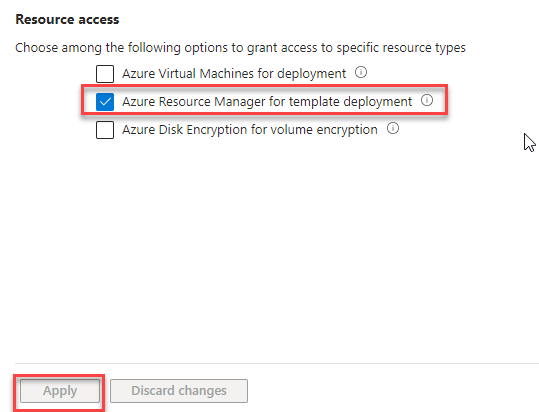
On the Key Vault, select Access configuration under the Settings section
Select Azure Resource Manager for template deployment under Resource access. Then, select Apply.
Now, you will be able to successfully reference the Key Vault secure parameter and deploy the Logic App Consumption solution from Visual Studio.
Hope you find this helpful! So, if you liked the content or found it useful and want to help me write more, you can buy (or help me buy) my son a Star Wars Lego!
Author: Sandro Pereira
Sandro Pereira lives in Portugal and works as a consultant at DevScope. In the past years, he has been working on implementing Integration scenarios both on-premises and cloud for various clients, each with different scenarios from a technical point of view, size, and criticality, using Microsoft Azure, Microsoft BizTalk Server and different technologies like AS2, EDI, RosettaNet, SAP, TIBCO etc.
He is a regular blogger, international speaker, and technical reviewer of several BizTalk books all focused on Integration. He is also the author of the book “BizTalk Mapping Patterns & Best Practices”. He has been awarded MVP since 2011 for his contributions to the integration community.
View all posts by Sandro Pereira
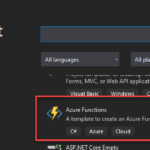
Unfortunately, until this date, there isn’t available an Azure Logic Apps Tools for Visual Studio Extension for Visual Studio 2022, which means that we still need to use Visual Studio 2019 to create Logic App Consumption projects with Visual Studio.
An opposite to other Azure Services like Azure Functions that have a dedicated Azure Function project Template:
There isn’t a Logic App Consumption Visual Studio project template. Instead, we need to use the Azure Resource Group project template, and inside we will select that it will be applying a Logic App template.
Creating a Visual Studio Logic App Consumption project
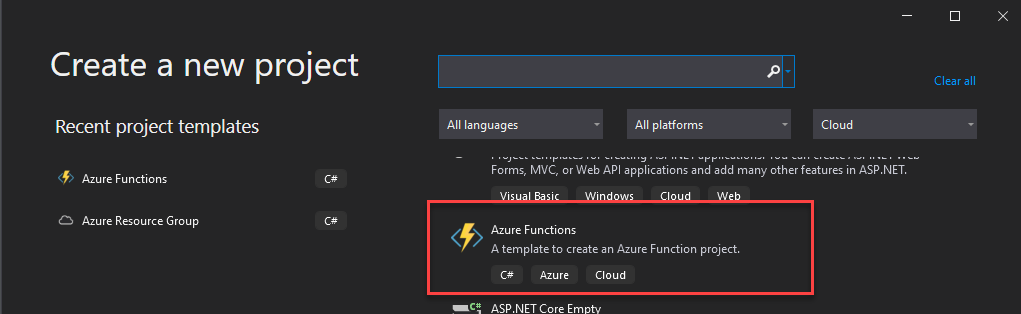
The Logic Apps designer integrates with the current Azure Resource Group project. That saying, you will not find any Logic App template in the list of templates. Instead, we need to create an Azure Resource Group project to get started, and to do that, we need:
Open Visual Studio, and on the Create a new project panel, select C# -> Azure -> Cloud, or search for Azure Resource Group:
From the list of project templates, select the Azure Resource Group template.
On the Configure your new project panel, give a proper Project name, Location, and Solution name. Leave the Framework as .NET Framework 4.7.2 and select Create.
Finally, on the Select Azure Template panel, from the Visual Studio Templates list, select the Logic App template and select OK.
This will create an empty Visual Studio Logic App solution. Now on the Visual Studio solution:
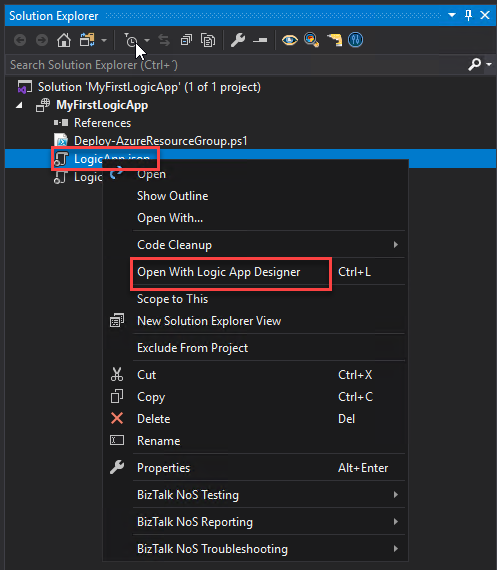
Right-click on the LogicApp.json file and select Open With Logic App Designer.
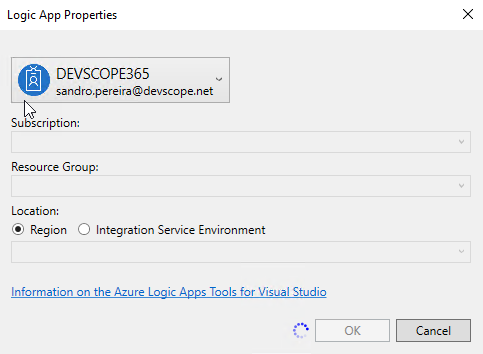
This will open a Logic App Properties window, where you need to:
Define the credentials to authenticate on the Azure subscription.
Define the Subscription and Resource Group where you want to create these resources.
Define if you want the Location to be in the same Region or in an Integration Service Environment (ISE) – be aware the ISE is being deprecated.
And then select OK.
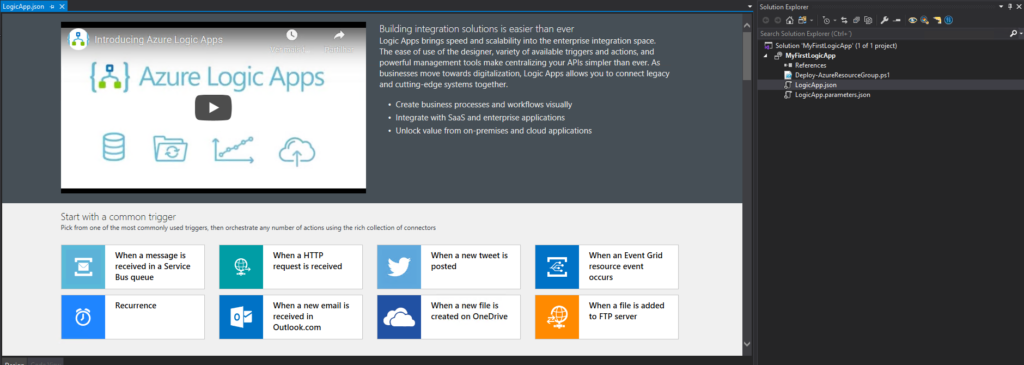
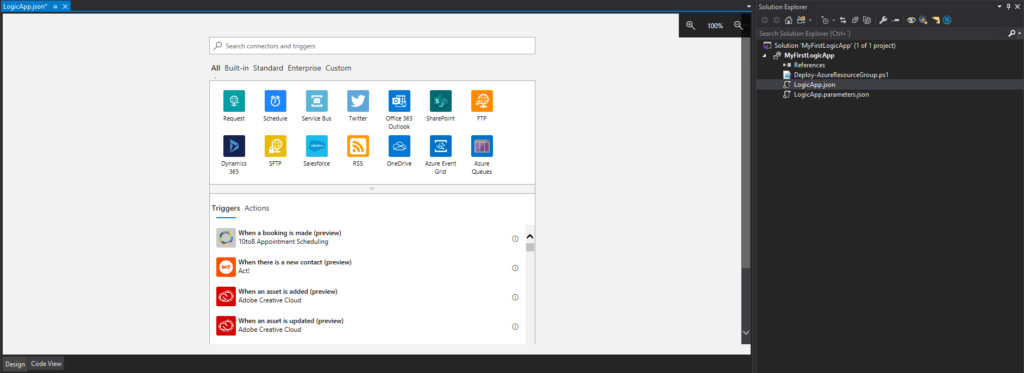
This will embed the Logic App designer inside the Visual Studio.
Now you need to select a common trigger, a template, or use a blank Logic App to start creating your business process.
Hope you find this helpful! So, if you liked the content or found it helpful and want to help me write more content, you can buy (or help buy) my son a Star Wars Lego!
Author: Sandro Pereira
Sandro Pereira lives in Portugal and works as a consultant at DevScope. In the past years, he has been working on implementing Integration scenarios both on-premises and cloud for various clients, each with different scenarios from a technical point of view, size, and criticality, using Microsoft Azure, Microsoft BizTalk Server and different technologies like AS2, EDI, RosettaNet, SAP, TIBCO etc.
He is a regular blogger, international speaker, and technical reviewer of several BizTalk books all focused on Integration. He is also the author of the book “BizTalk Mapping Patterns & Best Practices”. He has been awarded MVP since 2011 for his contributions to the integration community.
View all posts by Sandro Pereira
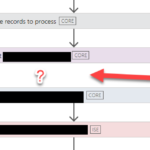
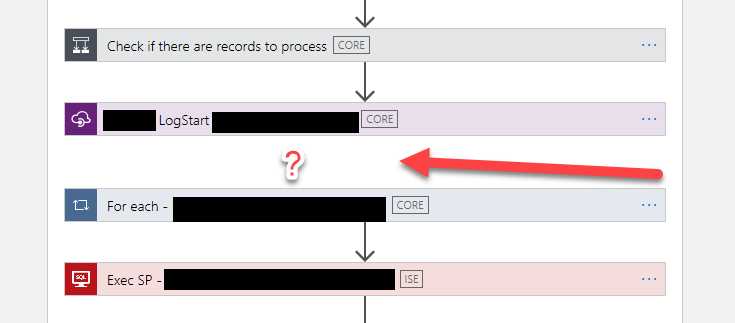
Today while developing an existing Logic App Consumption in Visual Studio 2019, yes, we still don’t have support for Visual Studio 2022, I realized that for some unknown reason, one of the actions, in my case a For each action, didn’t have the normal arrow – that indicates the precedence of the previous step in the Logic App designer as you can see in the picture above – for some unknown reason it evaporated:
I tried to re-order (or move) the For each action in the designer to see if I could fix this issue, without success. A good option that you should always try is to close that file and open it again to force a refresh on the designer – that solves many issues – but it didn’t do the trick on this issue.
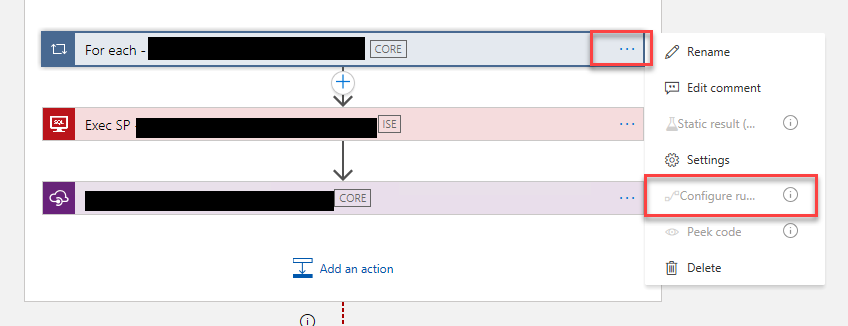
I couldn’t by Designer solve this issue because the property Configure run after settings were disabled:
I honestly don’t know what would happen if I tried to deploy this Logic App in this situation, but it shouldn’t be good. And this situation was causing me inconvenience when moving and reordering the actions. So I have no other option than try to fix it.
Cause
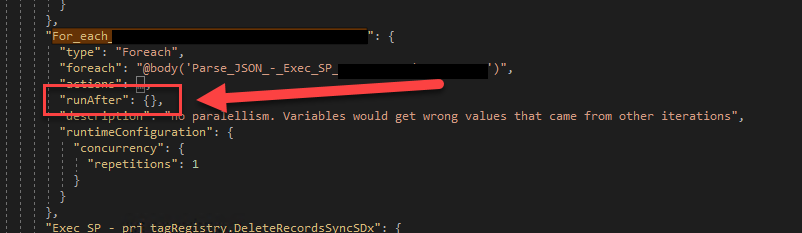
When inspecting the Code view, I realized that, again, for some unknown reason, the runAfter property was empty. The Logic App designer normally fills this value to run if the previous action Succeeded.
Solution
To fix this issue or behavior, we need to manually configure the runAfter property like:
Where the Name_Previous_Action is the name of the previous action on the workflow, the spaces in the action name are replaced by underscores.
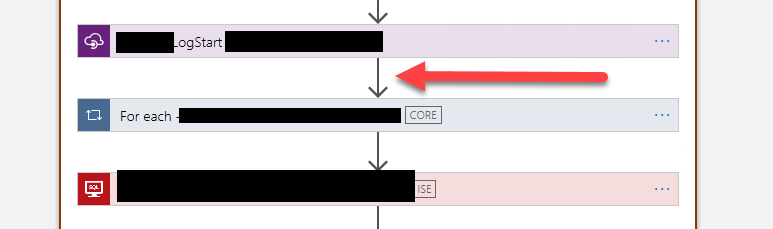
After that, if you return to the designer, you will see everything back to normality:
Hope you find this useful! So, if you liked the content or found it useful and want to help me write more content, you can buy (or help buy) my son a Star Wars Lego!
Author: Sandro Pereira
Sandro Pereira lives in Portugal and works as a consultant at DevScope. In the past years, he has been working on implementing Integration scenarios both on-premises and cloud for various clients, each with different scenarios from a technical point of view, size, and criticality, using Microsoft Azure, Microsoft BizTalk Server and different technologies like AS2, EDI, RosettaNet, SAP, TIBCO etc.
He is a regular blogger, international speaker, and technical reviewer of several BizTalk books all focused on Integration. He is also the author of the book “BizTalk Mapping Patterns & Best Practices”. He has been awarded MVP since 2011 for his contributions to the integration community.
View all posts by Sandro Pereira
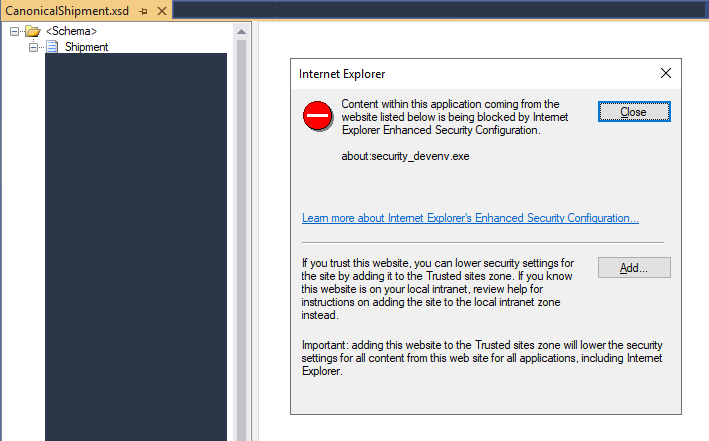
I have been working on a new BizTalk Server project on a new client for a few weeks. Now that we are beginning the development phase, I was getting annoying with an Internet Explorer security blocking windows every time I try to open a schema document on Visual Studio with the BizTalk Server Schema Editor:
Internet Explorer
Content within this application coming from the website listed below is being blocked by Internet Explorer Enhanced Security Configuration:
about:security_devenv.exe
To be honest, I initially ignored this issue and immediately clicked on the Close button, and everything would work as usual. But starting to work every day on the project and facing this issue every time I tried to open a Schema was simple to annoying.
Cause
We don’t need the IE to develop BizTalk Schemas, but the XSD viewer, in fact, opens an IE embedded inside Visual Studio. And that is the reason for this issue.
I typically don’t get this “warning” message because I usually turn off Internet Explorer Enhanced Security Configuration on my BizTalk Servers.
Solution
The solution is simple:
You can turn off Internet Explorer Enhanced Security Configuration by:
Start by running the Server Manager, if it is not already open, from either:
On the Windows taskbar, click the Server Manager button
On the Start screen, click Server Manager
In the Server Manager Dashboard, from the scope pane (on the left side) click on Local Server
In the Server Properties for the Local Server, you’ll see the option for IE Enhanced Security Configuration. Click On to change the option
A dialog box appears, letting Internet Explorer Enhanced Security Configuration be enabled/disabled separately for normal users and administrators; turn off both. After disabling both options, click OK
Click the Refresh button at the top of the Server Manager and the IE Enhanced Security Configuration should now show as Off
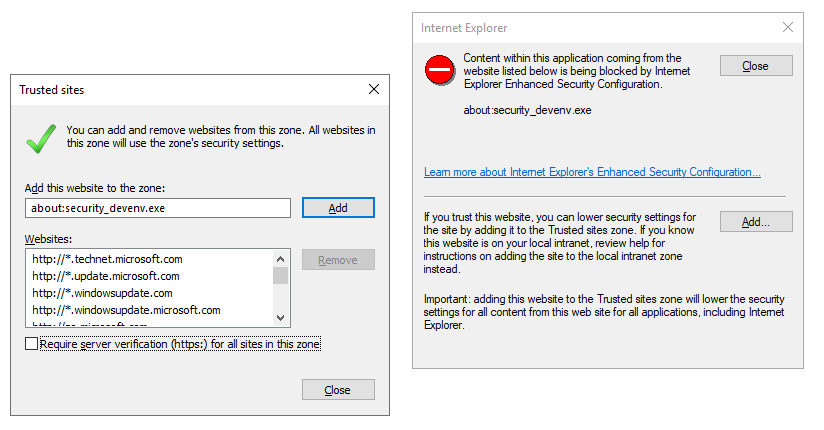
Or, if don’t want to turn off Internet Explorer Enhanced Security Configuration , you can on the blocking pop-up window click on Add
On the Trusted sites window, make sure Require server verification (https:) for all sites in this zone is not marked and then click Add
After one of these two options/settings that annoying blocking behavior inside Visual Studio will be gone.
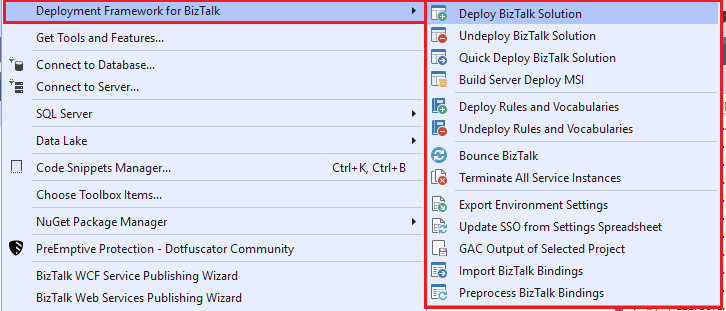
Patrick Wellink, a long-time BizTalk Server consultant from the Netherlands, asked me to broadcast this news. I’m happy to do it because I know that many of you use and like BizTalk Deployment Framework (BTDF) to perform deployment across your environments.
Patrick suppresses a need by developing a Visual Studio 2019 plugin (VSIX) for BizTalk Server 2020. Of course, there was already a new version of The BTDF Framework. But one of the convenient things was the visual studio plugin… that was missing.
Unfortunately, and I understand this feeling entirely because I also have several community projects, we always have to for the owner and developer to upgrade his project, and we usually struggle to find the time. So I take this opportunity to encourage all community members to start contributing to these initiatives as Patrick did. Start performing changes and submit your contributions to the repo. I speak for myself, and from what I know from the community, we accept the changes and are happy that you contribute.
And it wasn’t that difficult, rephrasing Patrick:
With some guidance of this post and some fiddeling I got the VSIX to work for VS2019. After some more fiddeling I got the project wizard to run as well.
I did so with minimal effort.
Where I can download it
You can download the Visual Studio 2019 plugin (VSIX) for BizTalk Server 2020 here:
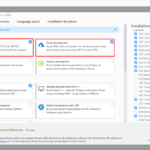
Azure Logic Apps Tools is available for Visual Studio 2019, 2017, and 2015 Community edition or greater and will allow you to design and deploy your logic apps from within Visual Studio. The Logic App designer integrates with the current Azure Resource Group project so you can seamlessly work with resource deployments that include Logic Apps.
Although this tool is officially supporting three versions of Visual Studio, I will advise you to install it only on Visual Studio 2019 and not in older versions. At some point, they will be officially removed or discontinued.
Prerequisites
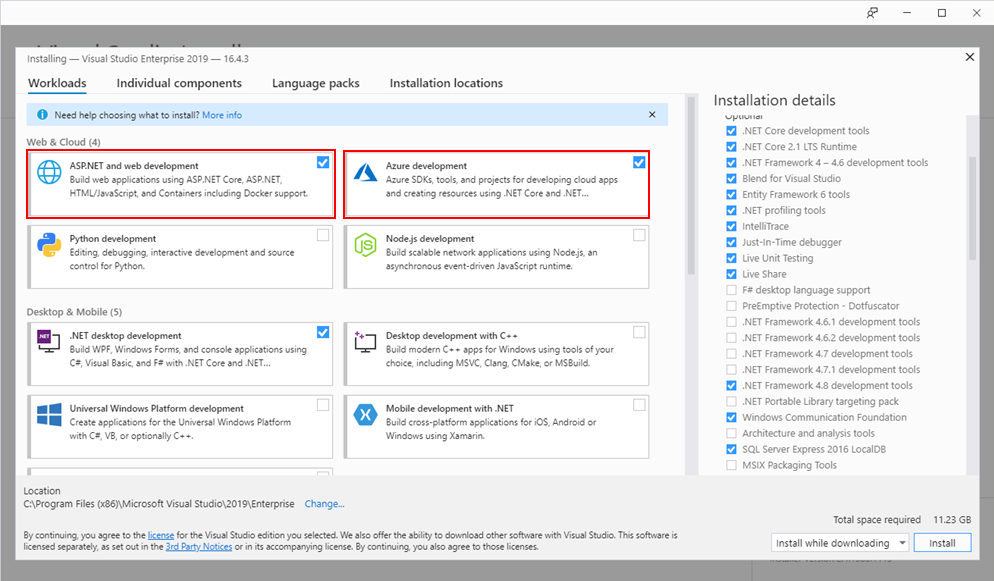
Visual Studio 2019, 2017, or 2015 – Community edition or greater;
Visual Studio Tools for Azure: Azure SDK, tools, and projects for developing cloud apps and creating resources using .NET Core and .NET. Important also to create hybrid solutions without having the need for another development environment.
In the Visual Studio installer, install Visual Studio (or modify an existing installation). Make sure the Azure development and ASP.NET and web development workloads are selected.
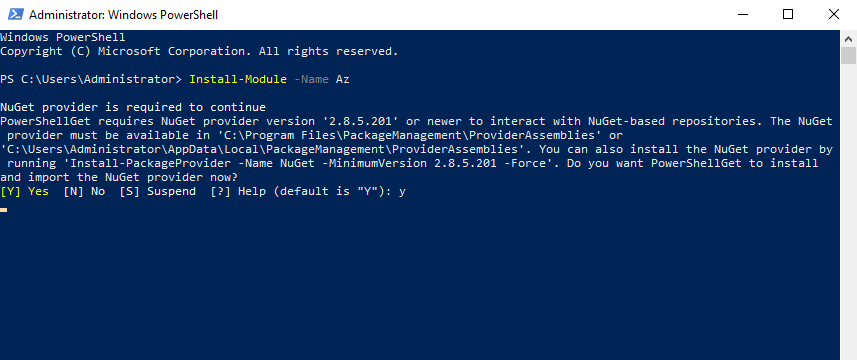
and run the following command: Install-Module -Name Az
Note: of course, for this or any other approach describe above, you need an Azure subscription or sign up for a free Azure account.
Install Azure Logic Apps Tools for Visual Studio 2019
AftAfter you install the prerequisites, this is a straightforward process. To accomplish that, we need to:
Open your Visual Studio, on the entry screen select the option Continue without code->
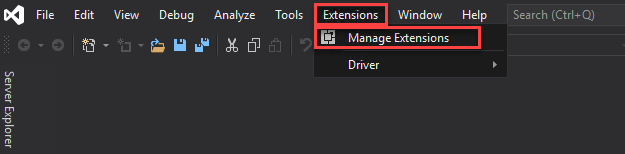
Then on the menu, navigate to Extensions > Manage Extensions
Select Online and search for Logic Apps
The add-in will be listed in the search results section. Click Download to download and install the add-in. You need to close your Visual Studio in order to begin installing this extension.
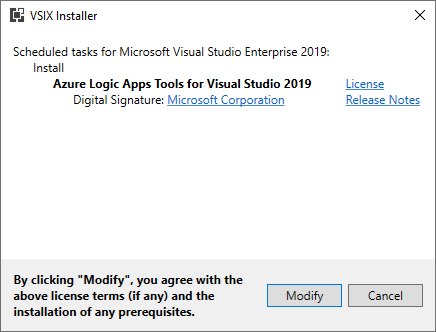
On the VSIX Installer screen
Make sure that the correct version of Visual Studio is selected.
Click Install or Modify. This will download and install the add-in to your version of Visual Studio.
At the end select Close.
Creating a Visual Studio Logic App project
The Logic Apps designer integrates with the current Azure Resource Group project. That saying, you will not find any Logic App template from the list of templates. Instead, we need to create an Azure Resource Group project to get started and to do that, we need:
Open Visual Studio and on the Create a new project panel, select C# -> Azure -> Cloud, or select for Azure Resource Group;
Select Azure Resource Group from the template list;
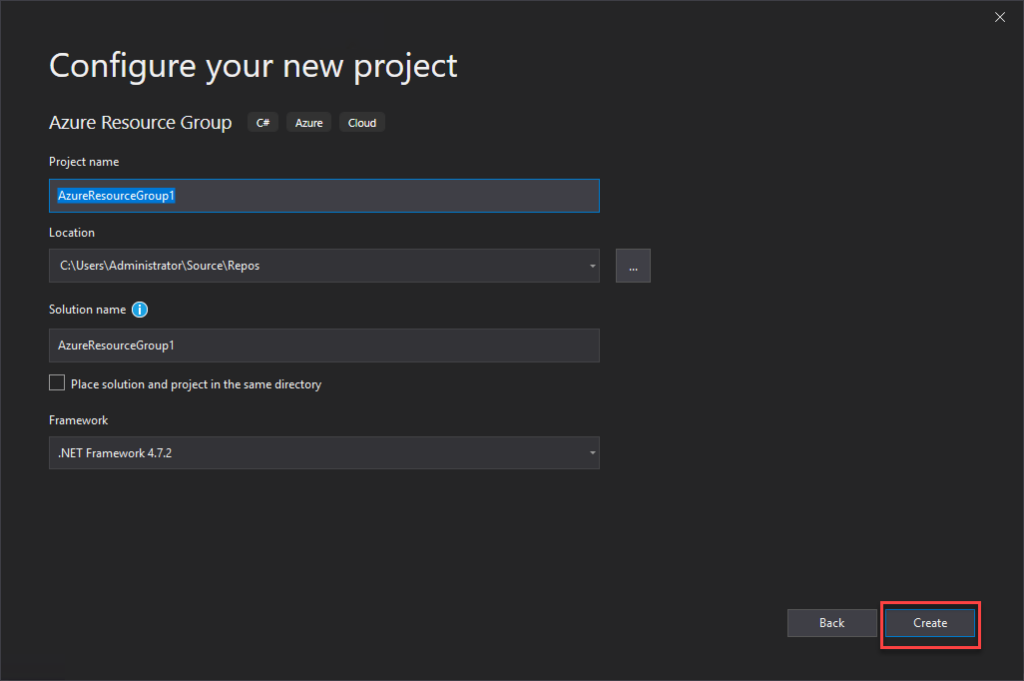
On the Configure your new project panel, give a proper Project name, Location, Solution name, and leave the Framework as .Net Framework 4.7.2 and select Create.
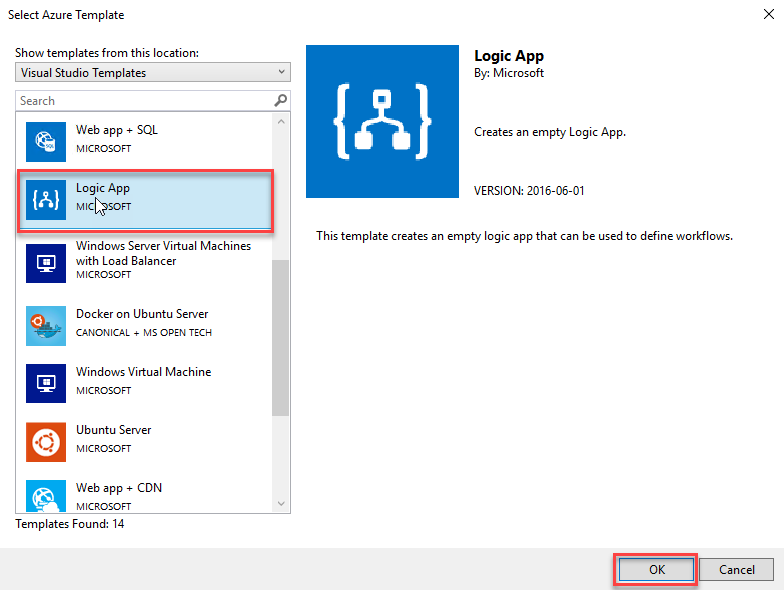
Finally, on the Select Azure Template panel, from the Visual Studio Templates list, select the Logic App template and select OK.
This will create an empty Visual Studio Logic App solution. Now on the Visual Studio solution:
Right-click on the LogicApp.json file and select Open With Logic App Designer
This will open a Logic App Properties window, where you need to:
Define the credentials to authenticate on the Azure subscription;
Define the Subscription and Resource Group where you want to create these resources;
Define if you want the Location to be in the same Region or in an Integration Service Environment (ISE);
And then select OK.
This will embed the Logic App designer inside the Visual Studio.
Now you need to select a common trigger, a template, or use a blank Logic App to start creating your business process.
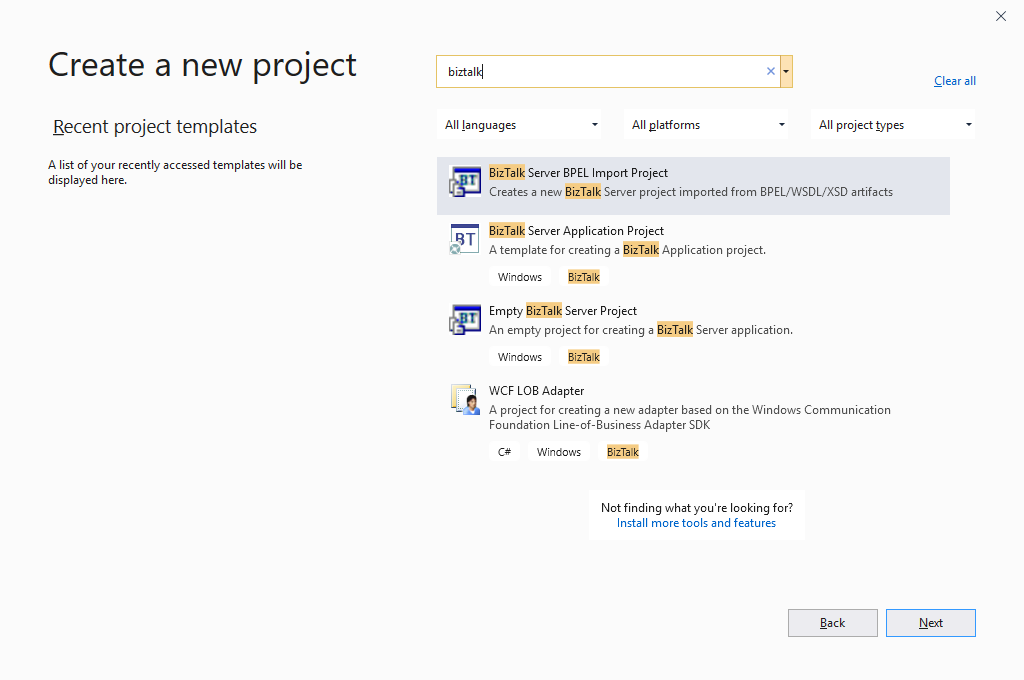
BizTalk Server 2020 – 20 days, 20 posts – day 7. And for this post, I choose a crucial piece for BizTalk developers: How to install BizTalk Server Visual Studio Project Template.
On previous versions of BizTalk Server and Visual Studio, when we were installing BizTalk Server, it would detect that we had Visual Studio present and the BizTalk Server installation process will also install on our machines all the Visual Studio Templates necessary for us to build our BizTalk Server solutions.
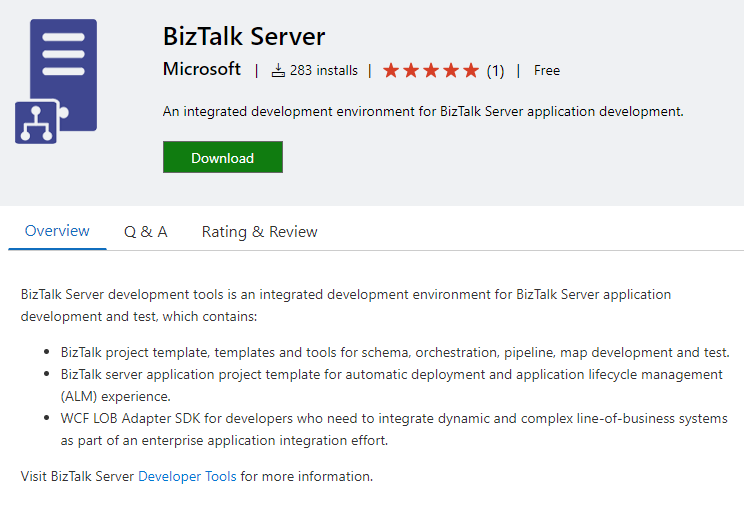
BizTalk Server development tools are an integrated development
environment for BizTalk Server application development and testing, which
contains:
BizTalk project template, templates, and tools for schema, orchestration, pipeline, map development, and test.
BizTalk server application project template for automatic deployment and application lifecycle management (ALM) experience.
WCF LOB Adapter SDK for developers who need to integrate dynamic and complex line-of-business systems as part of an enterprise application integration effort.
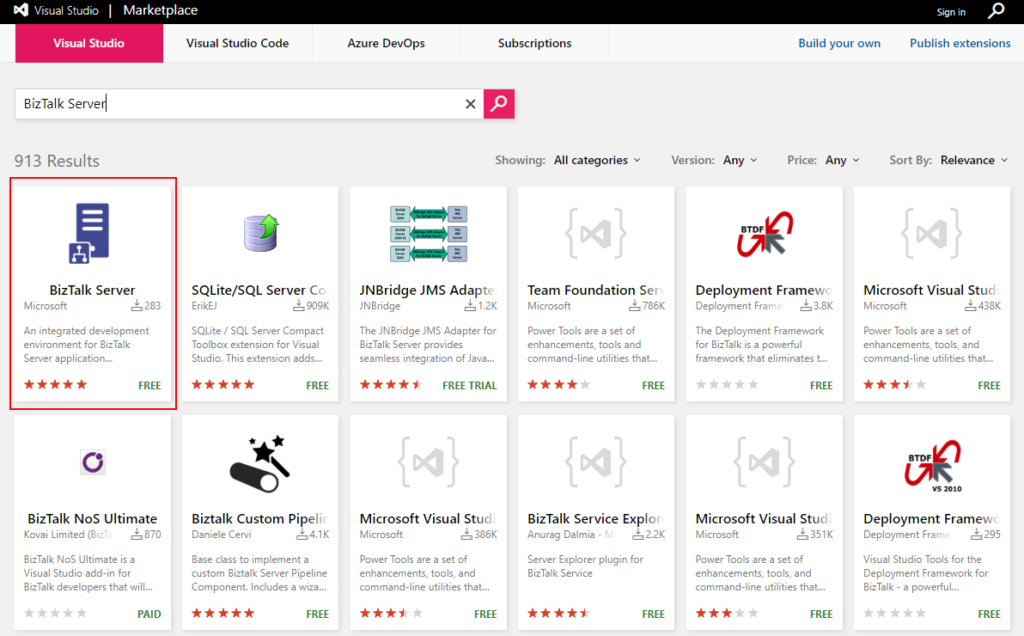
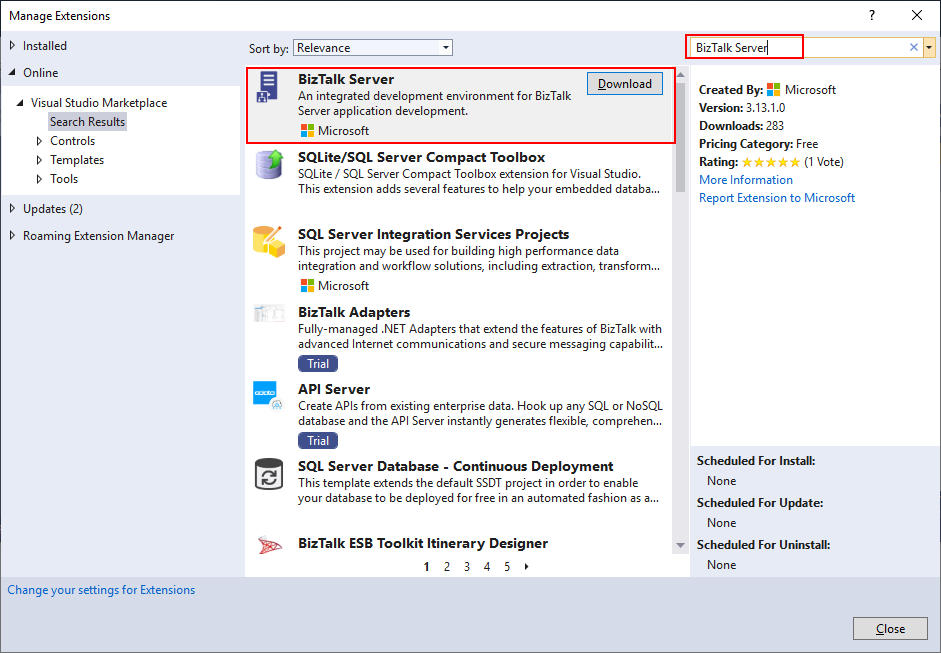
Search for BizTalk Server and download the BizTalk Server development tools provided by Microsoft.
Or directly thru Visual Studio:
Open Visual Studio and use the Manage
Extensions dialog box to install and manage Visual Studio extensions.
To open the Manage
Extensions dialog, choose Extensions à Manage Extensions. Or, type Extensions in the search box and choose Manage
Extensions.
On the Search, type BizTalk
Server and chose to download the BizTalk Server development tools
provided by Microsoft.
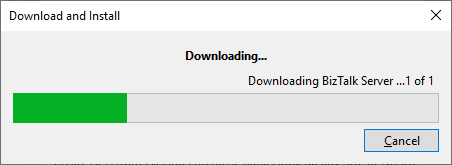
It will automatically download
and install these components.
To finalize you need to close
all Microsoft Visual Studio windows that are open. And next time you will open
Visual Studio, the BizTalk Server project template will be available for you to
start developing your solutions.
BizTalk Server 2020 – 20 days, 20 posts – day 6. In the last post, I published the BizTalk MapperExtensions Functoid Wizard to be compatible with BizTalk Server 2020 and Visual Studio 2019 but I reference that Visual Studio 2019 has a completely different look and fill and you will not be able to see this project under “BizTalk” projects in your Visual Studio 2019, instead, you need to search for it or scroll down to find it. So I decided to develop an alternative approach: BizTalk MapperExtensions Functoid Project Template.
BizTalk MapperExtensions Functoid Project Template is a Custom Functoid Project Template for Visual Studio 2019. It allows you to create new Functoids project for BizTalk Server 2020 without having to create manually the project, in other words, having to manually create:
A new class library project in Visual Studio;
Add a reference to the Microsoft.BizTalk.BaseFunctoids assembly;
Add New Class and having to code the entire class;
This Template will automatically create a project sample reference for you to create your custom Functoid. You them need to make the necessary changes and implement the required logic.
The difference between this resource (BizTalk MapperExtensions Functoid Project Template) and the BizTalk MapperExtensions Functoid Wizard are:
You don’t required to install nothing, you just need to copy this resouce to a specific folder (explain bellow);
There is no Wizard involved to customize the project, instead a sample project will be created and you need to implememet all the required changes;
You can filter on the Visual Studio menu for BizTalk project and this template will appear, that doesn’t happen with the wizard;
Installation
To use this project template just download the BizTalk MapperExtensions Functoid Template.zip file (without unzip) and copy to the following location:
C:Users<your-account>DocumentsVisual Studio 2019TemplatesProjectTemplates
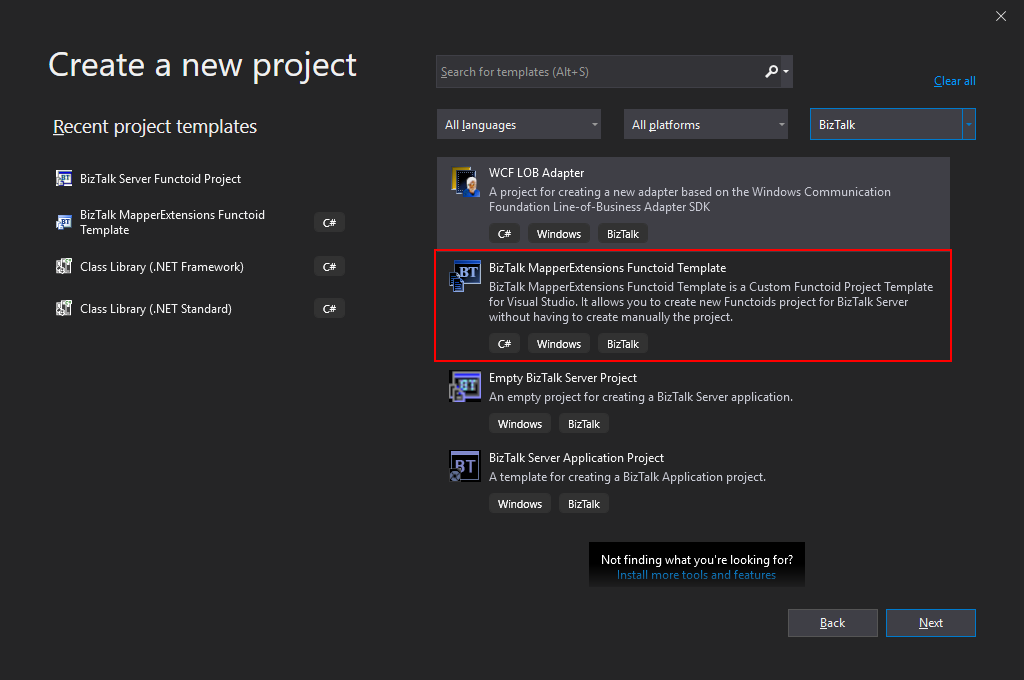
BizTalk Server 2020 – 20 days, 20 posts – day 5. I will finish my challenge regardless of all these constraints we are facing, and that limits our free time. So, while my wife was sleeping our cute little monster yesterday, I was able to migrate this tool and test it to be compatible with BizTalk Server 2020. Today while she is doing the same, I’m publishing this productivity tool for those that love BizTalk Mapper as I do: BizTalk MapperExtensions Functoid Wizard. Once again, I hope you enjoy and find this tool useful.
BizTalk MapperExtensions Functoid Wizard
BizTalk MapperExtensions Functoid Wizard is a Custom Functoid Project Wizard for Visual Studio 2019. It allows you to create new Functoids project for BizTalk Server 2020 without having to create manually the project, in other words, having to manually create:
A new class library project in Visual Studio;
Add a reference to the Microsoft.BizTalk.BaseFunctoids assembly;
Add New Class and having to code the entire class;
This Wizard will do this process automatically, and used in conjunction with Item Template for Visual Studio: Custom BizTalk Functoid will facilitate and significantly expedite the development process of our projects.
To use this project template download the executable files available on the Installation Files folder and run the setup file.
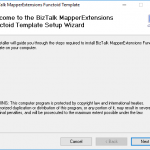
Once you run the setup file follow these steps:
On the Welcome to the BizTalk MapperExtensions Functoid Template Setup Wizard screen, click Next.
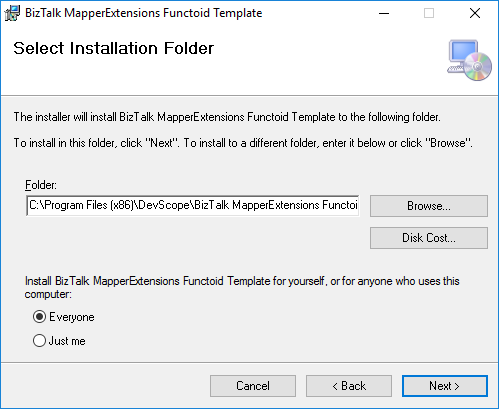
On the Select Installation Folder screen, select the folder where you want to install the Wizard and select the option Everyone. Click Next to continue.
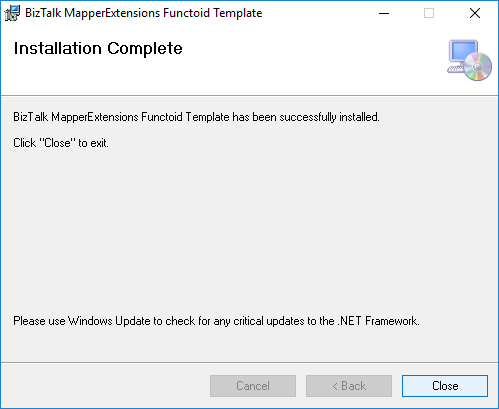
On the Confirm Installation screen, confirm your intent to install by clicking Next.
On the Installation Complete screen, click close and the installation is complete.
Now you can see a new BizTalk project Wizard on Visual Studio 2019. Unfortunately, Visual Studio 2019 has a completely different look and fill and you will not be able to see this project under “BizTalk” projects in your Visual Studio 2019, instead, you need to search for it or scroll down to find it.
I still need to find a way to solve this limitation or release a different approach to solve this issue and have a more friendly approach.
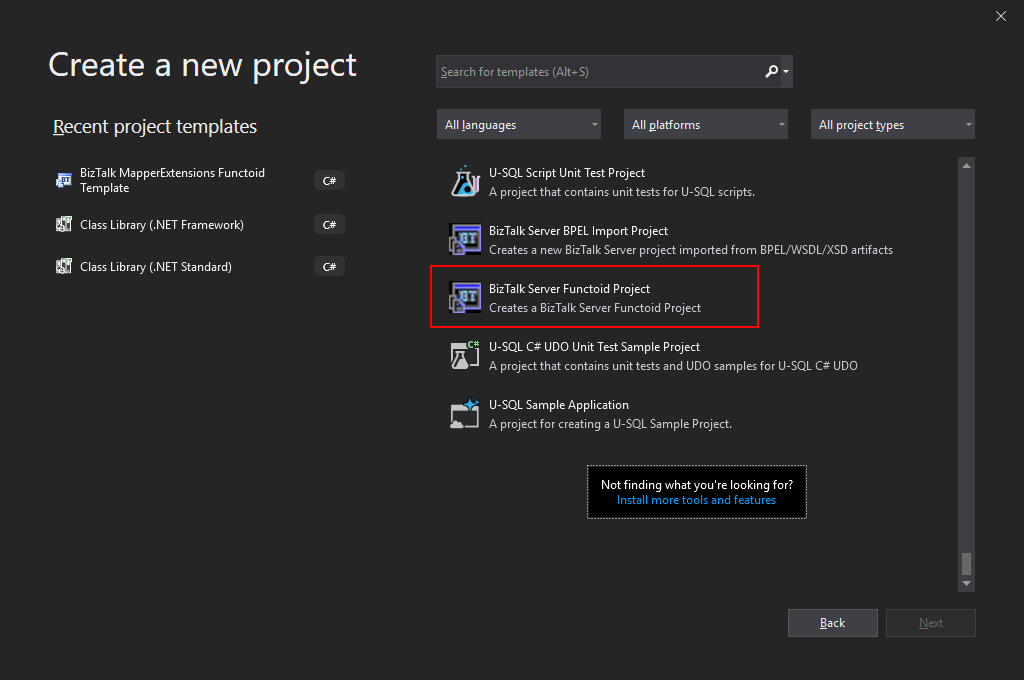
Create New Functoid Project
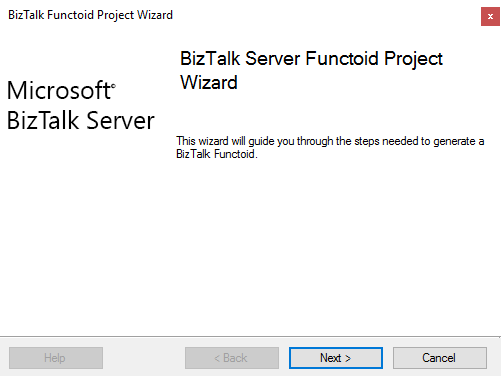
To create a new functoid using this project template choose the option BizTalk Server Functoid Project in Visual Studio 2019 and a Wizard will pop-up. Follow the requirements of this wizard to create the Functoid.
In the Start screen, click Next to continue.
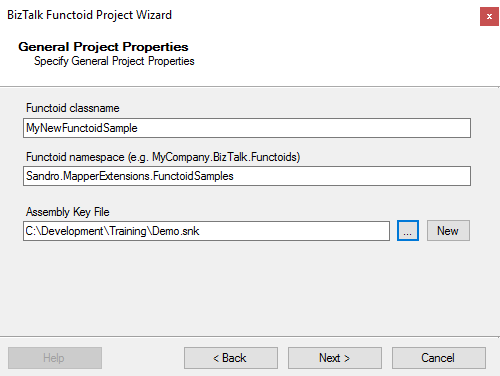
In the General Project Properties screen, fill the Functoid class name, namespace and create or select a new Strong Key (you can use an existing one). Click Next to continue.
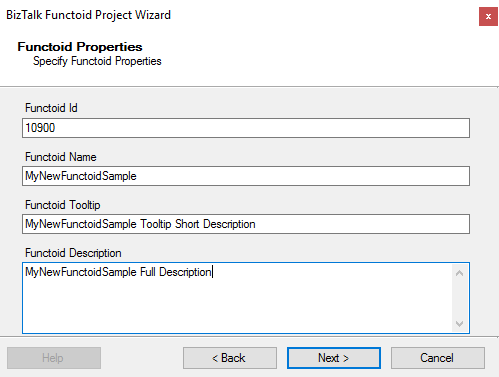
In the Functoid Properties screen, define the Functoid ID (must be greater than 10000), the functoid name, the tooltip (short description) and description (full description). Click Next to continue.
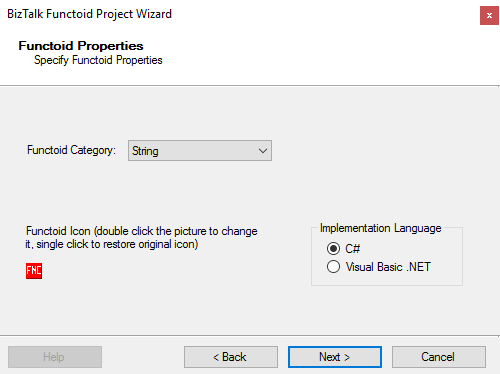
In the second Functoid Properties screen, choose the functoid category and the implementation language (the language in which you want to implement your functoid behavior code): C# or VB.NET. Click Next to continue.
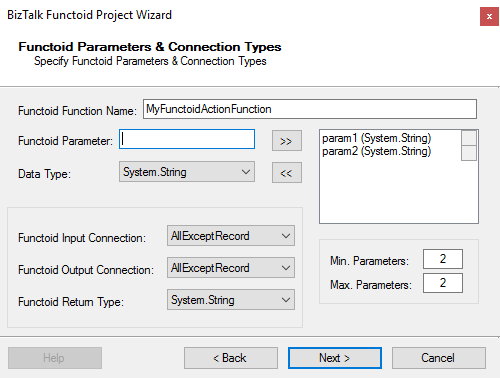
In the Functoid Parameters and Connection Type” screen, define the functoid function name, function inputs and types and output and types. Click Next to continue.
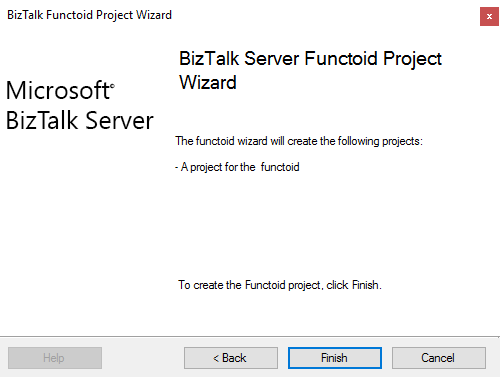
On the final screen, click Finish to create the Visual Studio project.
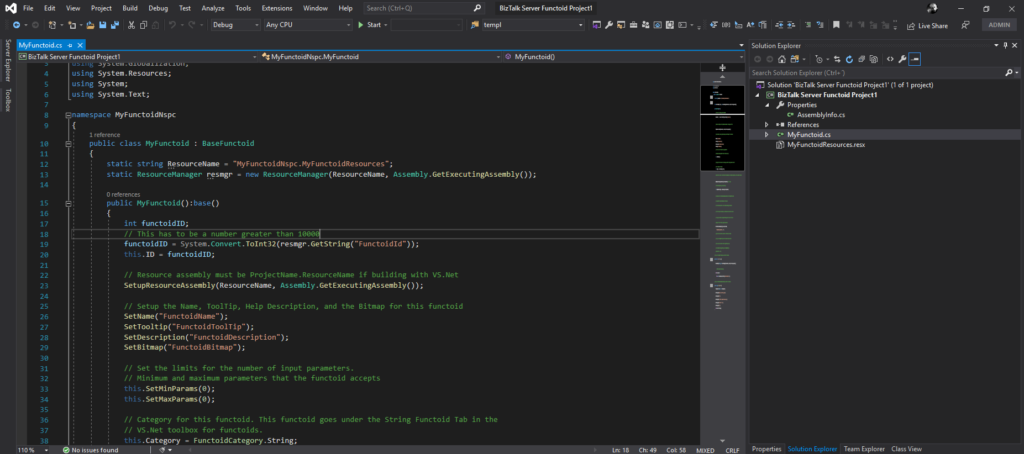
Visual Studio will create a new Project based on your implementation language and definitions provided in the Wizard.
Open the generated class and implement your code
Other versions
This tool is also available for the following BizTalk Server versions:
Do you feel difficult to keep up to date on all the frequent updates and announcements in the Microsoft Integration platform?
Integration weekly update can be your solution. It’s a weekly update on the topics related to Integration – enterprise integration, robust & scalable messaging capabilities and Citizen Integration capabilities empowered by Microsoft platform to deliver value to the business.
If you want to receive these updates weekly, then don’t forget to Subscribe!