by Steef-Jan Wiggers | Feb 14, 2017 | BizTalk Community Blogs via Syndication
BizTalk Server is able to communicate with the outside world, leveraging the Azure Service Bus Relay, Queues and/or Topics/Subscriptions. The latter is indirect one-way messaging (brokered) through listening to a specific subscription, in a topic or service bus queue. Through the relay, you can have direct two-way messaging. This capability can help in scenarios where you do not want to expose your ERP system like SAP or other directly to the cloud connected system. You might also have invested in a BizTalk solution and like to have an easy access to the cloud yet do not want to change the systems. The other benefit of using the relay is that you do not have to move your BizTalk installation into another zone like the DMZ to be closer to the outside world.
Other means of access to BizTalk can be indirect through the Logic App adapter (new with BizTalk Server 2016) or directly by exposing a BizTalk endpoint (WCF-BasicHttp, WsHttp or WebHttp) in IIS, accessible through reverse proxy. The latter is also possible using the BizTalk WCF Service Publishing Wizard that will extend the reach of the service to the Service Bus.
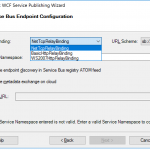
In this blog post, we’ll be discussing on securing a BizTalk endpoint that uses the BasicHttpRelay or NetTcpRelay i.e. a BizTalk endpoint configured with these WCF Bindings. Extending an endpoint using WCF Publishing Wizard doesn’t add extra capability, yet more complexity as the endpoint will be exposed internally through the chosen binding, however, to the Service Bus one of the relay bindings has to be selected (see picture below).
To be able to have an endpoint exposed to Azure Service Bus, you will need a namespace in your subscription. To setup a Service Bus Namespace is straightforward — in the Azure Market Place, select Service Bus and click Create. Specify a name i.e. that’s the namespace, choose a suitable price plan and specify the Resource Group and Location (regional data center).
In the picture above, you can clearly see what each price plan offers in terms of capacity, features and message size. This Azure service and others are very transparent in their costs and capability by vividly showing the options in pricing tiers.
Scenario
Our scenario to explain how to secure a relay configured BizTalk endpoint will be as follows:
- A receive location will be configured with a given address and security details from the Service Bus Namespace
- The endpoint will be hosted through BizTalk and registered in the Service Bus Namespace EnterpriseA
- API Management Instance will have an API that will connect through one of its operations to the relay endpoint
- A client can call the MyAPI order operation
The Service Bus Namespace credentials are abstracted away in the API management and not known to the MyAPI user. The MyAPI user will have to provide an API Key to be able to call the operation Order. The MyAPI can be further secured by applying OAuth 2.0 or OpenID, which we will not discuss in this blog.
Setting up BizTalk Endpoint with Relay binding
BizTalk Server started providing support to the Azure Service Bus with SB-messaging, WCF-BasicHttpRelay and NetTcpRelay adapters. The relay, as mentioned earlier, supports two-way messaging, and that will be the adapter we will use to build our scenario. The configuration of the relay in BizTalk is straight forward. You create a Receive Port, add a Receive Location, select the appropriate binding i.e. BasicHttpRelay or NetTcpRelay and configure.
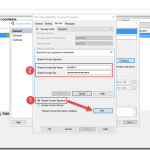
The key aspects of the configuration are the address, which is the namespace of your service name to be placed in the standard DNS. servicebus.windows.net followed by the name of your endpoint at the end. And security, where we specify the security mode, client security (authentication type), and connection information i.e. SAS key, which can be obtained through Shared Access Policies tied to our Service Bus namespace.
Once we configured our adapter and enabled the ReceiveLocation, the endpoint will be registered in Service Bus Namespace.
The endpoint is available, however, not visible or discoverable through the Azure Portal. To see if the endpoint is up, we use ServiceBus360 or we could use the Service Bus Explorer.
Provisioning API Management
API Management is an Azure Service, which can be provisioned through the Azure Portal. The service provides an API gateway i.e. you can publish API’s to external and internal consumers. You can also provide a gateway to backend services hosted in your data center like a BizTalk endpoint (hosted in a Receive Location, or actually the Host Instance). The features API Management provides are:
- API documentation and an interactive console (developer portal)
- Throttle, rate limit and quota of APIs
- Monitor API health
- Support modern formats like JSON and REST to existing APIs
- Connect to APIs hosted anywhere on the Internet or on-premises and publish globally
- Gain analytic insights of APIs that are being used
- Management of your service (API Management instance) via the Azure portal, REST API, PowerShell, or Git repository
In this blog post, I will demonstrate some of the features mentioned above in relation to securing BizTalk endpoints.
To create an API Management Service, you can select API Management in the Azure Portal and click Create. Specify a name i.e. that’s the name of your API Management instance, choose a suitable pricing tier, specify the Resource Group, Organization Name, Administrator Email and Location (regional data center).
Again, in the picture above, you can clearly see what each price plan offers in terms of capacity, features and scale. The provision of your API Management service i.e. instance can take some time (30 minutes or more).
Securing the relay binding with API Management
Our first step is to open up the Publisher Portal by clicking Publisher Portal in our API Management Service. In the Publisher Portal, we can click Add API and specify a Web API name, the Service URL of our relay endpoint, which we like to secure. We place our API in Starter Product, which is an existing default product what limits us in 5 calls/minute up to a maximum of 100 calls/week. For demo purposes, this is sufficient. More on products, read Microsoft docs How to create and publish a product in Azure API Management.
The second step is adding an operation to the just defined API, which will be a REST type of operation i.e. POST on our endpoint i.e. the relay endpoint that is hosted by BizTalk. The endpoint for this operation will be the following https://enterprisea.servicebus.windows.net/myendpoint/order.
The API and its operation have been defined and the final step will be setting a policy on our operation. Policies in API Management are where a lot of the magic happens, like converting JSON to XML or vice versa, applying CORS, or set HTTP headers. The latter is what we need to set a pre-generated SAS token (using Shared Access Signatures, enter the token in a CDATA tag). We could ask the client of our API to set these headers, however we then devalue the strength of API management and enforce the client to provide the SAS-key. In that case the client needs to know the Service Namespace credentials, which is not what we want. With API Management, we can enforce other authentication strategies or just simply let the client use our API and provide only an API-Key. We will discuss this in testing the endpoint through API Management.
In the policy, we will set the Authorization header for accessing our relay endpoint and we will need a SAS-token. Now the SAS-Key needs to be generated by us and put into the set-header name policy as shown below.
<policies>
        <inbound>
                <set-header name="Authorization" exists-action="skip">
                        <value><![CDATA[SharedAccessSignature sr=https%3a%2f%2fenterprisea.servicebus.windows.net&sig=E26706kmlcrFlkdP%2bgcFqalfKRAxzO2Ht%2flz8BhuGaqQ%3d&se=1484788588&skn=RootManageSharedAccessKey]]></value>
                        <!-- for multiple headers with the same name add additional value elements -->
                </set-header>
                <base />
        </inbound>
        <backend>
                <base />
        </backend>
        <outbound>
                <base />
        </outbound>
        <on-error>
                <base />
        </on-error>
</policies>
The SAS-token will have a validity of a certain period of days or months, which at some point need to be refreshed in the policy. Fortunately, you can use a tool from Sandro Dimattia to obtain the token for a certain amount of time i.e. the Time To Live (TTL, see also Protecting your Azure Event Hub using Azure API Managment). We will further discuss this later on the considerations concerning the refreshing of the token.
Our API is now ready to be tested. It is already published and available, because we placed our API in the Starter Product, which is published and protected by default. Note that a custom product is not published by default.
Testing the endpoint through API Management
Testing of an API can easily be done in the Developer Portal of our API Management instance. In the Azure Portal, we click Developer Portal where we click on the API menu item (top bar) and select our API. The API has only one operation, which is Order. We will try it out and add a header to indicate the content type for the payload, and our request body (which the format our BizTalk endpoint is expecting).
When we hit Send we will be sending the following over the wire:
POST https://enterprisea.azure-api.net//Order HTTP/1.1
Host: enterprisea.azure-api.net
Ocp-Apim-Trace: true
Ocp-Apim-Subscription-Key: ••••••••••••••••••••••••••••••••
Content-Type: text/xml

<ns0:Request xmlns:ns0="http://EnterpriseA.Schemas.Orders">
<ID>123</ID>
<Description>My Product Description</Description>
<Quantity>1</Quantity>
<Price>100</Price>
</ns0:Request>
We receive the following response:
<strong>Response status</strong>
202 Accepted
<strong>Response latency</strong>
6033 ms
<strong>Response content</strong>
Transfer-Encoding: chunked
Strict-Transport-Security: max-age=31536000
Ocp-Apim-Trace-Location: https://apimgmtstigjqylbzcvt5mdi.blob.core.windows.net/apiinspectorcontainer/LghnyTlQR3qEhFUmXwPlsQ2-24?sv=2015-07-08&sr=b&sig=ewuBua9VTrXtwrrOmMeCdm5uA54uBtqB9FO2CjSVOl8%3D&se=2017-01-19T17%3A21%3A14Z&sp=r&traceId=1d50bac0dc28414a8cc1d46281e03e41
Date: Wed, 18 Jan 2017 17:21:20 GMT
Content-Type: application/xml; charset=utf-8

<ns0:Response xmlns:ns0="http://EnterpriseA.Schemas.Orders">
        <ID>123</ID>
        <Status>Ok</Status>
        <Error>
                <Code>0</Code>
                <Description>No Error</Description>
        </Error>
</ns0:Response>
We can also click on Trace to investigate deeper what happens behind the scenes i.e. beyond the API endpoint https://enterprisea.azure-api.net//Order. When we hit inbound we can inspect the call to the relay endpoint.
{ "configuration":
{ "api":
{ "from": "/",
"to":
{ "scheme": "https",
"host": "enterprisea.servicebus.windows.net",
"port": 443,
"path": "/myendpoint",
"queryString": "",
"query": {},
"isDefaultPort": true } },
"operation":
{ "method": "POST", "uriTemplate": "/Order" },
"user": { "id": "1",
"groups": [ "Administrators", "Developers" ] },
"product": { "id": "587f536c0c2a0e0060060001"
}
}
 }
As you can see this is interesting detail information. We see the host i.e. endpoint of our relay with port 443 i.e. HTTPS type of port, path (/myendpoint) and uriTemplate (/Order).
We can drill down further by click Backend in Trace and observe the details there. We see the complete URL (address) where the payload will be posted.
{
"message": "Request is being forwarded to the backend service.",
"request":
{ "method": "POST",
"url": "https://enterprisea.servicebus.windows.net/myendpoint/Order",
"headers":
[ { "name": "Ocp-Apim-Subscription-Key",
"value": "fd8f172f22bf405283f7796ed90c8eb1" },
{ "name": "Content-Length",
"value": "184" },
{ "name": "Content-Type",
"value": "text/xml" },
{ "name": "Authorization",
"value": "SharedAccessSignature sr=https%3a%2f%2fenterprisea.servicebus.windows.net&amp;amp;amp;amp;sig=E26806kmlcrFydP%2bgcFqalfKRAxzO2Ht%2flz8BhuGaqQ%3d&amp;amp;amp;amp;se=1484788588&amp;amp;amp;amp;skn=RootManageSharedAccessKey" }
,
{ "name": "X-Forwarded-For",
"value": "13.94.139.231"
}
]
}
}
We also can observer the API Key i.e. Ocp-Apim-Subcription-Key, Content-Type, the header with the SAS-Token, and an IP address, which is the Public Virtual IP (VIP) address of our APIM Instance where the request was initiated.
Note that if other developers want to test it, they will be required to subscribe to the Product and use a subscription key to access the APIs included in it. We can access it, since we created the Azure API Management and therefore we are administrator.
Considerations
BizTalk endpoints which are configured with the relay extend their reach or boundaries to Azure and such provide means of access to the outside world in a new way. Through the relay, two-way direct messaging can be facilitated with external parties. To further secure the endpoints, by not sharing the service bus credentials, we used API Management, which brings in a few aspects you have to bear in mind.
The first aspect is the availability of the BizTalk endpoints. They can extend as shown in this blog post, however they depend on the host instance under which the receive location runs. If the host is stopped, then the endpoint will become unavailable. You can mitigate this risk by having two instances of the BizTalk host and a Receive Location with the same address i.e. endpoint registered in the Azure Service Bus. And then there is the availability of the Service Bus and API Management, both are managed by Microsoft and fall under a SLA.
The second aspect is the quality of service, which has moved from BizTalk side to API Management. This means that you can implement security, rate limiting, throttling, and other service quality aspects at the API Management level by configuration using policies. This is a huge time saver, since on the BizTalk level you, for instance will have to build a custom behavior to support OAuth 2.0.
The third aspect I like to discuss, is the contract of the message you sent to the API. The actual contract is abstracted away as only the endpoint is visible as an operation in the API. Therefore, you still need to agree on the contract and format i.e. XML or JSON with your consumers. We have shown XML messages here, yet BizTalk supports JSON natively using the appropriate pipeline components.
The final aspect will be TTL of the token. As you have seen in this blog post you can create a SAS-token that has a validity based on how you set it using a tool. You do have to keep in mind when the token has almost expired you refresh the token. Moreover, you will need to have a certain SLA in place to ensure the service endpoint does not become unavailable.
Conclusion
This blog post has provided an overview on how to secure BizTalk endpoints exposed through WCF-Relay bindings, in particular we chose WCF-BasicHttpRelay. The NetTcp variant would not have been any different, other than on the protocol level. A BizTalk endpoint can be secured leveraging the relay and API Management, i.e. we can apply some quality of service aspects through API Management on our BizTalk hosted endpoint. BizTalk itself can host the actual service itself, which can be any type of service.
Using API Management, you can abstract the relay endpoint away from the consumers (clients), whitelist IP’s, cache response, monitor health, have support for OAuth 2.0, and many other aspects that are hard to accomplish with BizTalk itself when it comes to exposing endpoints to Azure. The other benefit is that you do not have to burden infrastructure guys to move BizTalk to another zone, or open up extra firewall ports, setup reverse proxies, and so on (see also a talk by Kent Weare API Management Part 1 – An Introduction to Azure API Management).
Call to action
If you like to further explore the technology that has been showcased in this blog I, would suggest to explore the following resources:
Author: Steef-Jan Wiggers
Steef-Jan Wiggers has over 15 years’ experience as a technical lead developer, application architect and consultant, specializing in custom applications, enterprise application integration (BizTalk), Web services and Windows Azure. Steef-Jan is very active in the BizTalk community as a blogger, Wiki author/editor, forum moderator, writer and public speaker in the Netherlands and Europe. For these efforts, Microsoft has recognized him a Microsoft MVP for the past 5 years. View all posts by Steef-Jan Wiggers
by Nick Hauenstein | Jan 25, 2017 | BizTalk Community Blogs via Syndication
At the end of last week, a few of us from QuickLearn Training hosted a webinar with an overview of a few of the new features in BizTalk Server 2016. This post serves as a proper write-up of the feature that I shared and demonstrated – Shared Access Signature Support for Relay Adapters. If you missed it, we’ve made the full recording available on YouTube here. We’ve also clipped out just the section on Shared Access Signature Support for Relay Adapters over here – which might be good to watch before reading through this post.
While that feature is not the most flashy or even the most prominent on the What’s New in BizTalk Server 2016 page within the MSDN documentation, it should come as a nice relief for developers who want to host a service in BizTalk Server while exposing it to consumers in the cloud — with the least amount of overhead possible.
Shared Access Signature (SAS) Support for Relay Adapters
You can now use SAS authentication with the following adapters:
- WCF-BasicHttpRelay
- WCF-NetTcpRelay
- WCF-BasicHttp*
- WCF-WebHttp*
* = Used only for sending messages as a client
Why Use SAS Instead of ACS?
Before BizTalk Server 2016, our only security option for the BasicHttpRelay and NetTcpRelay adapters was the Microsoft Azure Access Control Service (ACS).
One of the main scenarios that the Access Control Service was designed for was Federated Identity. For simpler scenarios, wherein I don’t need claims mapping, or even the concept of a user, using ACS adds potentially unnecessary overhead to (1) the deployed resources (inasmuch as you must setup an ACS namespace alongside the resources you’re securing), and (2) the runtime communications.
Shared Access Signatures were designed more for fine-grained and time-limited authority delegation over resources. The holder of a key could sign and distribute small string-based tokens that define a resource a client could access and timeframe within which they were allowed to access the resource.
Hosting a Relay Secured by Shared Access Signatures
In order to expose a BizTalk hosted service in the cloud via Azure Relay, you must first create a namespace for the relay – a place for the cloud endpoint to be hosted. It’s at the namespace level that you can generate keys used for signing SAS tokens that allow BizTalk server to host a new relay, and tokens that allow clients to send messages to any of that namespace’s relays.
The generated keys are associated with policies that have certain associated claims / rights that each is allowed to delegate.
In the example above, using the key associated with the biztalkhost policy, I would be able to sign tokens that allow applications to listen at a relay endpoint within the namespace, but I would not be able to sign tokens allowing applications to Send messages to the same relays.
Clicking a policy reveals its keys. Each policy has 2 keys that can be independently refreshed, allowing you to roll over to new keys while giving a grace period in which the older keys are still valid.
Either one of these keys can be provided in the BizTalk Server WCF-BasicHttpRelay adapter configuration to host a new relay.
Configuring the Security Settings for the WCF-BasicHttpRelay Adapter
When configuring the WCF-BasicHttpRelay adapter, rather than providing a pre-signed token with a pre-determined expiration date, you provide the key directly. The adapter can then sign its own tokens that will be used to authorize access to the Relay namespace and listen for incoming connections. This is configured on the Security tab of the adapter properties.
If you would like to require clients to authenticate with the relay before they’re allowed to send messages, you can set the Relay client authentication type to RelayAccessToken:
From there it’s a matter of choosing your service endpoint, and then you’re on your way to a functioning Relay:
Once you Enable the Receive Location, you should be able to see a new WCF Relay with the same name appear in the Azure Portal for your Relay namespace. If not, check your configuration and try again.
Most importantly, your clients can update their endpoint addresses to call your new service in the cloud.
The Larger Picture: BizTalk Hybrid Cloud APIs
One thing to note about this setup, however, is that the WCF-BasicHttpRelay adapter is actually not running in the Isolated Host. In other words, rather than running as part of a site in IIS, it’s running in-process within the BizTalk Server Host Instance itself. While that provides far less complexity, it also sacrifices the ability to run the request through additional processing before it hits BizTalk Server (e.g., rate limiting, blacklisting, caching, URL rewriting, etc…). If I were hosting the service on-premises I would have this ability right out of the box. So what would I do in the cloud?
Using API Management with BizTalk Server
In the cloud, we have the ability to layer on other Azure services beyond just using the Azure Relay capability. One such service that might solve our dilemma described in the previous section would be Azure API Management.
Rather than having our clients call the relay directly (and thus having all message processing done by BizTalk Server), we can provide API Management itself a token to access to our BizTalk Hosted service. The end users of the service wouldn’t know the relay address directly, or have the required credentials to access it. Instead they would direct all of their calls to an endpoint in API Management.
API Management, like IIS, and like BizTalk Server, provide robust and customizable request and response pipelines. In the case of API Management, the definitions of what happens in these pipelines are called “policies.” There are both inbound policies and outbound policies. These policies can be configured for a whole service at a time, and/or only for specific operations. They enable patterns like translation, transformation, caching, and rewriting.
In my case, I’ve designed a quick and dirty policy that replaces the headers of an inbound message so that it goes from being a simple GET request to being a POST request with a SOAP message body. It enables caching, and at a base level implements rate-limiting for inbound requests. On the outbound side it translates the SOAP response to a JSON payload — effectively exposing our on-premises BizTalk Server hosted SOAP service as a cloud-accessible RESTful API.
So what does it look like in action? Below, you can see the submission of a request from the client’s perspective:
How does BizTalk Server see the input message? It sees something like this (note that the adapter has stripped away the SOAP envelope at this point in processing):
What about on the outbound side? What did BizTalk Server send back through the relay? It sent an XML message resembling the following:
If you’re really keen to dig into the technical details of the policy configuration that made this possible, they’re all here in their terrifying glory (click to open in a new window, and read slowly from top to bottom):
The token was generated with a quick and dirty purpose-built simple console app (the best kind).
Tips, Tricks, and Stumbling Blocks
Within the API Management policy shown above, you may have noticed the CDATA sections. This is mandatory where used. You’ll end up with some sad results if you don’t remember to escape any XML input you have, or the security token itself which includes unescaped XML entities.
Another interesting thing with the policy above is that the WCF-BasicHttpRelay adapter might choke while creating a BizTalk message out of the SOAP message constructed via the policy above (which includes heaps of whitespace so as to be human readable), failing with the following message The adapter WCF-BasicHttpRelay raised an error message. Details “System.InvalidOperationException: Text cannot be written outside the root element.
This can be fixed quite easily by adjusting the adapter properties so that they’re looking for the message body with the expression set to “*”.
Questions and Final Thoughts
During the webinar the following questions came up:
- Q: Is https supported?
- A: Yes, for both the relay itself and the API management endpoint.
- Q: Maximum size is 256KB; I was able to get a response about 800 KB; Is that because BizTalk and Azure apply the compression technology and after compression the 800KB response shrinks to about 56KB?
- A: The size limit mentioned applies to brokered messages within Service Bus. Azure Relay is a separate service that isn’t storing the message for any period of time – messages are streamed to the service host. Which means if BizTalk Server disconnects, the communication is terminated. There’s a nice article comparing the two communication styles over here.
I hope this has been both helpful and informative. Be sure to keep watching for more of QuickLearn Training’s coverage of New Features in BizTalk Server 2016, and our upcoming BizTalk Server 2016 training courses.

by Mick Badran | May 23, 2016 | BizTalk Community Blogs via Syndication
After a few customer engagements recently this topic has come up several times, some lean in closer and let’s have a chat on it.
How application infrastructure is evolving to support digital business?
The great thing in this modern era is that businesses are placing great pressure on traditional IT, integrators and solution architects to innovate and look for that next disruptive edge.
With a pea sized idea, access to the rapidly evolving cloud technologies businesses can disrupt even the most cemented industries. In fact many of my customer meetings are around disruption, “What/How can we disrupt today?”. The business climate has never been better & hence the birth of the phrase ‘digital business’.
Many companies that ‘push tin’ are scrambling to offer a range of other services as they also see the future is not in tin, not so much in technical expertise (while I do love being part of a great team, cloud templates can put short work to our previous ‘cluster’ expert), but in being agile! Taking an idea whether it’s IoT or anything else and realising the solution. In my opinion, this is the skill that will be much sought after in the market.
Integration is key here.

What about the application landscape? How has it changed?
Great question!
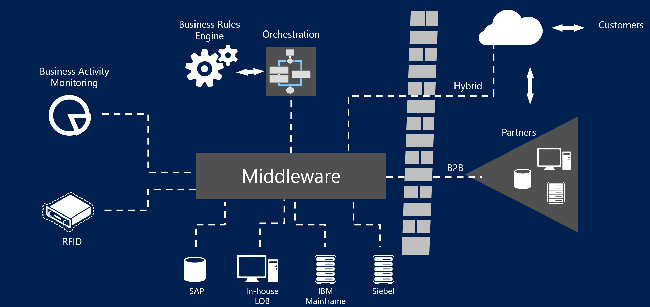 Figure 2 – Depicting the role of middleware
From what I’ve experienced is that over the past 20 odd years, application integration ‘layers’ (or middleware) were large, monolithic and usually cost a fair bit of $$. Associated with a software platform purchase was a good 9-18 month evaluation of the platform to see if it was ‘fit for purpose’.
(There were a whole series of VAN’s in this space as well – Value Added Networks, which made life simple to move data/messages through a particular industry vertical. This was partly because it was made complex by proprietary interfaces, and also the fact that the VAN providers wanted customer lock-in. So naturally everything to do with these environments was ‘hard’ and we let the ‘experts’ deal with it)
In these times many of the systems and applications all had custom ways to communicate. Software vendors reluctantly opened up ways of getting data in/out of their system. Communications standards were lacking, as well as message formats and protocols.
The fact that the middleware platforms communicated with a large number of systems from DB2, SAP, OracleEB, JD Edwards through to Pronto (ERPs) made attractive choices for businesses that saw the value in getting ‘end-to-end integration’ and a full 360 degree customer view.
Fast forward to present day…..
Software vendors are exploding at a rate of knots all over the web. Applications are more about functionality than specifically where they run – on-premises or cloud or…phone…or where ever. Applications today are modular and connected by well known interfaces – although the resiliency and interface workflows are lagging behind a little in this realm.
The software industry realises that mobile devices are king and they build applications accordingly. For e.g. the pseudo modern accepted message/data exchange JSON/HTTP (aka REST) based APIs. I had one of my team members complain when an interface they were talking to was SOAP. I felt like I was talking about tape backups 🙂
Given that Mobile is taking charge and software is providing better foundations for ease of mobile development and operation, you could call it the mobile evolution….
REST based APIs are accepted as the norm with OpenId/OAuth being token based authentication standards, allowing the beauty of delegated authentication (something that plagued many previous integration implementations in the quest for the elusive single sign-on capability).
 Figure 3 – Illustrates the business need to maximise and provide a comprehensive set of APIs in which to monetise.
Businesses today are realising they don’t need mobile, they don’t need a website….they need an API!!! An API:
- to expose their business to public consumers
- to expose their business to down stream consumers
- to expose their business to upstream consumers
- to commercialise their offerings.
They now realise they can get away from building ‘yet another mobile app’ and focus squarely on turning data into information.
Software today needs to produce analytics cause gone are the days when we got excited at just being ‘connected’.

by Mick Badran | May 23, 2016 | BizTalk Community Blogs via Syndication
After a few customer engagements recently this topic has come up several times, some lean in closer and let’s have a chat on it.
How application infrastructure is evolving to support digital business?
The great thing in this modern era is that businesses are placing great pressure on traditional IT, integrators and solution architects to innovate and look for that next disruptive edge.
With a pea sized idea, access to the rapidly evolving cloud technologies businesses can disrupt even the most cemented industries. In fact many of my customer meetings are around disruption, “What/How can we disrupt today?”. The business climate has never been better & hence the birth of the phrase ‘digital business’.
Many companies that ‘push tin’ are scrambling to offer a range of other services as they also see the future is not in tin, not so much in technical expertise (while I do love being part of a great team, cloud templates can put short work to our previous ‘cluster’ expert), but in being agile! Taking an idea whether it’s IoT or anything else and realising the solution. In my opinion, this is the skill that will be much sought after in the market.
Integration is key here.
What about the application landscape? How has it changed?
Great question!
 Figure 2 – Depicting the role of middleware
From what I’ve experienced is that over the past 20 odd years, application integration ‘layers’ (or middleware) were large, monolithic and usually cost a fair bit of $$. Associated with a software platform purchase was a good 9-18 month evaluation of the platform to see if it was ‘fit for purpose’.
(There were a whole series of VAN’s in this space as well – Value Added Networks, which made life simple to move data/messages through a particular industry vertical. This was partly because it was made complex by proprietary interfaces, and also the fact that the VAN providers wanted customer lock-in. So naturally everything to do with these environments was ‘hard’ and we let the ‘experts’ deal with it)
In these times many of the systems and applications all had custom ways to communicate. Software vendors reluctantly opened up ways of getting data in/out of their system. Communications standards were lacking, as well as message formats and protocols.
The fact that the middleware platforms communicated with a large number of systems from DB2, SAP, OracleEB, JD Edwards through to Pronto (ERPs) made attractive choices for businesses that saw the value in getting ‘end-to-end integration’ and a full 360 degree customer view.
Fast forward to present day…..
Software vendors are exploding at a rate of knots all over the web. Applications are more about functionality than specifically where they run – on-premises or cloud or…phone…or where ever. Applications today are modular and connected by well known interfaces – although the resiliency and interface workflows are lagging behind a little in this realm.
The software industry realises that mobile devices are king and they build applications accordingly. For e.g. the pseudo modern accepted message/data exchange JSON/HTTP (aka REST) based APIs. I had one of my team members complain when an interface they were talking to was SOAP. I felt like I was talking about tape backups 🙂
Given that Mobile is taking charge and software is providing better foundations for ease of mobile development and operation, you could call it the mobile evolution….
REST based APIs are accepted as the norm with OpenId/OAuth being token based authentication standards, allowing the beauty of delegated authentication (something that plagued many previous integration implementations in the quest for the elusive single sign-on capability).
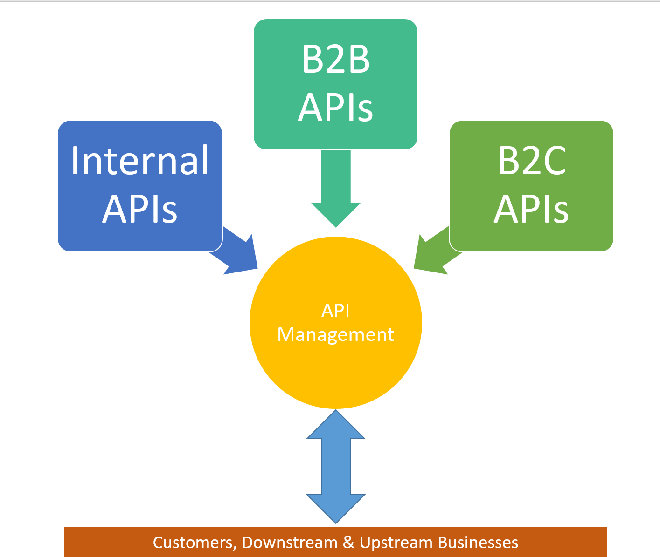 Figure 3 – Illustrates the business need to maximise and provide a comprehensive set of APIs in which to monetise.
Businesses today are realising they don’t need mobile, they don’t need a website….they need an API!!! An API:
- to expose their business to public consumers
- to expose their business to down stream consumers
- to expose their business to upstream consumers
- to commercialise their offerings.
They now realise they can get away from building ‘yet another mobile app’ and focus squarely on turning data into information.
Software today needs to produce analytics cause gone are the days when we got excited at just being ‘connected’.
by Rene Brauwers | May 29, 2014 | BizTalk Community Blogs via Syndication
Introduction
Microsoft released a new service to Azure, called API Management. This service was released on May the 12th 2014.
Currently the Azure API Management is still in Preview, but already it enables us to easily create an API façade over a diverse set of currently available Azure services like Cloud Services, Mobile Services, Service bus as well as on premise web-services.
Instead of listing all the features and write an extensive introduction about Azure API Management I’d rather supply you with a few links which contains more information about the Azure API Management service:
Microsoft:
http://azure.microsoft.com/en-us/services/api-management/
http://azure.microsoft.com/en-us/documentation/services/api-management/
Blogs:
http://trinityordestiny.blogspot.in/2014/05/azure-api-management.html
http://blog.codit.eu/post/2014/05/14/Microsoft-Azure-API-Management-Getting-started.aspx
Some more background
As most of my day-to-day work involves around the Microsoft Integration space in which I am mainly focusing on BizTalk Server, BizTalk Services and Azure in general, I was looking to a find a scenario in which I, as an Integration person, could and would use Azure API management.
The first thing which popped in to my mind; wouldn’t it be great to virtualize my existing BizTalk Service Bridges using Azure API management. Well currently this is not possible, as the only authentication and authorization method on a BizTalk Service Bridge is ACS (Access Control Service) and this is not supported in the Azure API Management Service.
Luckily with the last feature release of BizTalk Services included support for Azure Service Bus Topics / queues as a source J and luckily for me Azure Service Bus supports SAS (Shared Access Signatures) and using such a signature I am able to generate a token and use this token in the HTTP Header – Authorization section of my http request.
Knowing the above, I should be able to define API’s which virtualize my Service bus Endpoints. Create a product combining the defined API’s and assign policies to my API operations.
Sounds easy? Doesn’t it. Well it actually is. So without further ado, let’s dive into a scenario which involves exposing an Azure Service bus Topic using Azure API Management.
Getting started
Before we actually start please note that the sample data (Topic names, user-accounts, topic subscriptions, topic subscription rules etc.) I use for this ‘Step by step’ guide is meant for a future blog post 😉 extending an article I posted a while back on the TechNet Wiki
Other points you should keep in mind are
- Messages send to a TOPIC may not exceed 256Kb in size, if a message is larger you will receive an error message from Service Bus telling you that the message is too large.
- Communication to service bus is asynchronous; thus we send a message and all we get back is an HTTP code telling us the status of the submission (200 OK, 210 Accepted etc.) or an error message indicating that something went wrong (401 Access Denied, etc.). So actually our scenario is using the Fire and Forget principle.
- You will have to create a SAS Token, which needs to be send in the header of the message in order to authenticate to Service bus.
Enough set, let’s get started.
For the benefit of the reader I’ve added hyperlinks below such that you can skip those sections involved which you might already know.
Sections Involved
If you don’t already have an Azure account, you can sign up for a free trial here
Once you’ve signed up for an Azure account, login to the Azure Portal and create a new Azure Service Bus Topic by following the steps listed below.
-
If you have logged in to the preview portal, click on the ’tile’ Azure Portal. This will redirect you to an alternative portal which allows for a more complete management of your Azure Services.
-
In the ‘traditional’ portal click on Service Bus
-
Create a new Namespace for your Service bus Entity
-
Enter a name for your Service bus namespace and select the region to which it should be deployed and select the checkmark which starts the provisioning.
-
Once the provisioning has finished, select the Service Bus Entity and click on Connection Information
-
A window will appear with Access Connection Information, in this screen copy the ACS Connection String to your clipboard. (We will need this connection string later on) and then click on the checkbox to close to window
Now that a new Service Bus Entity has been provisioned, we can proceed with creating a TOPIC within the created Service Bus entity, for this we will use the Service Bus Explorer from Paolo Salvatori. Which you can download here. Once you’ve downloaded this tool, extract it and execute the ServiceBusExplorer.exe file and follow the below mentioned steps.
-
Press CRTL+N which will open the “Connect to Service Bus Namespace” window
-
In the Service Bus Namespaces box, select the following option from the dropdown: “Enter Connection String”
-
Copy and paste the ACS Connection String (you copied earlier, see previous section step 6) and once done press “OK”
-
The Service Bus Explorer should now have made a connection to your Service Bus Entity
-
In the menu on your left, select the TOPIC node, right click and select “Create Topic”
-
In the window which now appears enter a TOPIC name “managementapi_requests” in the “Path” box and leave all other fields blank (we will use the defaults). Once done press the “Create button”
-
Your new Topic should now have been created
Now that we have created a TOPIC it is time to add some subscriptions. The individual subscriptions we will create will contain a filter such that messages which are eventually posted to this TOPIC end up in a subscription based on values set in the HTTP header of the submitted messages. In order to set up some subscriptions follow the below mentioned steps:
-
Go back to your newly created TOPIC in the Service Bus Explorer
-
Right click on the TOPIC and select “Create Subscription”
-
The Create Subscription windows will now show in which you should execute the following steps
- A) Subscription Name: BusinessActivityMonitoring
- B) Filter: MessageAction=’ BusinessActivityMonitoring’
- C) Click on the Create button
-
Now repeat Steps 2 and 3 in order to create the following subscription
- Subscription Name: Archive
- Filter: 1 = 1
At this point we have set up our Topic and added some subscriptions le viagra est il efficace. The next step consists of adding a Shared Access Policy to our topic. This policy than allows us to generate a SAS token which later on will be used to authenticate against our newly created Topic. So first things first, let’s assign a Shared Access Policy first. The next steps will guide you through this.
-
-
Go to the Service Bus menu item and select the Service Bus Service you created earlier by clicking on it.
-
Now select TOPICS from the tab menu
-
Select the Connection Information Icon on the bottom
-
A new window will pop up, in this windows click on the link “Click here to configure”
-
Now un the shared access policies:
- A) Create a new policy named ‘API_Send’
- B) Assign a Send permission to this policy
- C) Create a new policy named ‘API_Receive’
- D) Assign the Listen permission to this policy
- E) Create a new policy named ‘API_Manage’
- F) Assign the Manage permission to this policy
- G) Click on the SAVE icon on the bottom
-
At this point for each policy a Primary and Secondary key should be generated.
Once we’ve added the policies to our Topic we can generate a token. In order to generate a token, I’ve build a small forms application which uses part of the code which was originally published by Santosh Chandwani. Click the following link to start downloading the application “Sas Token Generator“. Using the SAS Token Generator application we will now generate the token signatures.
-
-
Fill out the following form data
- A) Resource Uri = HTTPs Endpoint to your TOPIC
- B) Policy Name = API_Send
- C) Key = The Primary Key as previously generated
- D) Expiry Date = Select the date you want the Sas token to expire
- E) Click on generate
-
After you have clicked GENERATE by Default a file will be created on your desktop containing all generated Sas Tokens, the file is named SAS_tokens.txt. Once saved you will be asked if you want to copy the generated token to your Clipboard. Below 2 images depicting the message-prompt as well as the contents stored in the generated file.Perform step 2 for the other 2 policies as well (API_Listen and API_Manage)
At this point we have set up our Service Bus Topic, Subscriptions and have generated our Sas Tokens we are all set to start exposing the newly created service bus topic using Azure API Management, but before we can start with this we need to create a new API Management Instance. The steps below detail how to do this.
-
-
Click on API Management, in the right menu-bar, and click on the link “Create an API Management Service”
-
A menu will pop up in which you need to select CREATE once more
-
At this point a new window will appear:
- A) Url: Fill out an unique name
- B) Pricing Tier: Select Developer
- C) Subscription: Check your subscription Id (Currently it does not show the subscription name, which I expect to be fixed pretty soon)
- D) Region: Select a region close to you
- E) Click on the right arrow
-
You now will end up at step 2:
- A) Organization Name: Fill out your organization name
- B) Administration E-Mail: Enter your email address
- C) Click on the ‘Checkmark’ icon
-
In about 15 minutes your API management Service will have been created and you will be able to login.
Now that we have provisioned our Azure API management service it is time to create and configure an API which exposes the previously defined Azure Service Bus Topic such that we can send messages to it. The API which we are about to create will expose one operation pointing to the Azure Service Bus Topic and will accept both XML as JSON messages. Later on we will define a policy which will ensure that if a JSON message is received it is converted to XML and that the actual calls to the Service Bus Rest API are properly authenticated using our SAS token created earlier.
So let’s get started with the creation of our API by Clicking the Manage Icon which should be visible in the menu bar at the bottom of your window.
Once you’ve clicked the Manage icon, you should automatically be redirected to the API Management portal.
Now that you are in the Azure API Management Administration Portal you can start with creating and configuring a new API, which will virtualize your Service Bus Topic Rest Endpoints. In order to do so follow the following steps.
-
Click on the API’s menu item on your left
-
Click on ADD API
-
A new window will appear, fill out the following details
-
A) Web API title
- Public name of the API as it would appear on the developer and admin portals.
-
B) Web Service Uri
- This should point to your Azure Service Bus Rest Endpoint. Click on this link to get more information. The format would be: http{s}://{serviceNamespace}.servicebus.Windows.net/{topic path}/messages
-
C) Web API Uri suffix
- Last part of the API’s public URL. This URL will be used by API consumers for sending requests to the web service.
-
D) Once done, press Save
-
Once the API has been created you will end up at the API configuration page
-
Now click on the Settings Tab
- A) Enter a description
- B) Ensure to set authentication to None (we will use the SAS token later on, to authenticate)
- C) Press Save
-
Now click on the Operations Tab, and click on ADD Operation.
- Note: detailed information on how to configure an operation can be found here
-
A form will appear which will allow you to configure and add an operation to service. By default the Signature menu item is selected, so we start with configuring the signature of our operation.
- A) HTTP verb: Choose POST as we will POST messages to our Service Bus Topic
- B) URL Template: We will not use an URL template, so as a default enter a forward-slash ” / “
- C) Display Name: Enter a name, which will be used to identify the operation
- D) Description: Describe what your operation does
-
Now click on the Body item in the menu bar on the left underneath REQUESTS (we will skip caching as we don’t want to cache anything), and fill out the following fields
- A) Description: add a description detailing how the request body should be represented
-
Now click on the ADD REPRESENTATION item just underneath the description part and enter Application/XML
-
Once you’ve added the representation type, you can add a representation example.
-
Now once again click on the ADD REPRESENTATION item just underneath the description part and enter Application/JSON
-
Once you’ve added the representation type, you can add a representation example.
-
Now click on the ADD item in the menu bar on the left underneath RESPONSES (We will skip Caching, Parameters and Body as we don’t need it)
-
Start typing and select a response code you which to return once the message has been send to the service operation.
-
Now you could add a description and add a REPRESENTATION, however in our case we will skip this as a response code 202 Accepted is all we will return.
- Press save
Now that we have defined our API we need to make it part of a Product. Within Azure API Management this concept has been introduced as a container containing one or more API definitions to which consumers (developers) can subscribe. In short if your API is not part of a product definition consumers can not subscribe to it and use it. More information regarding the ‘Product’ definition can be found here.
In order to create a new product, we need to perform the following steps:
-
Select the Products menu item from within the API Management Administration Portal and click on it.
-
A new window will appear listing all products currently available, in this window click on the ADD PRODUCT item
-
Fill out the following form items in order to create a product.
- A) Title: Enter the name of the product
- B) Description: Add a description of the product
- C) Require subscription approval: Ensure to check this, as this will require any subscription requests to this product to be approved first
- D) Press Save
-
Now that we have created our Product it is time to see if there are any other things we need to configure before we add policies to it and publish it. In order to check the settings by clicking on the newly created product
-
On the summary tab, click on the link ADD API TO PRODUCT
-
A new window will pop up, select the API you want to add to the product and once done click Save
At this point we have created a product but have not yet published it. We will publish it in a bit, but first we need to set up some policies for the API and the operation we’ve created earlier, In order to do this follow these steps
-
From the menu bar on your left select the Policies item and in the main window in the policy scope section make the following selections
- A) For the API select the API you created earlier
- B) For the Operation select the operation you created earlier
-
Now in the Policy definition section, click on ADD Policy
-
At this point the Empty Policy definition is visible
For our API operation to correctly function we are going to have to add a few policies. These policies should take care of the following functionality
- Authenticate to our Service Bus Topic using our previously created SAS Token
- Automatically convert potential JSON messages to their equivalent XML counterpart
- Add some additional context information to the inbound message which are converted to brokered message properties when passed won to Azure Service Bus.
General information on which policies are available to you within the Azure API Management Administration Portal and how to use them can be found here
The next few steps will show you how we can add policy statements which will ensure the above mentioned functionality is added.
-
In the Policy definition section, ensure to place your cursor after the <inbound> tag
-
From the Policy statements, select and click on the “Set HTTP Header” statement.
-
A “Set Header” Tag will be added to the Policy Definition area, which will leverage the Authorization Header containing our SAS token we created earlier. The steps required are listed below:
- A) Put in the value “Authorization” for the attribute “name”
- B) Put in the following value “skip” for the attribute “exists-action”
- C) Now get the SAS Token you created earlier, wrap the token string in between a CDATA element and put all of this in between the “value” element
Textual example:
<set-header name=”Authorization“ exists-action=”skip“>
<value><![CDATA[YOUR SAS TOKEN STRING]]></value>
</set-header>
-
Place your cursor just after the closing tag </set-header>
-
From the Policy statements, select and click on the “Convert JSON to XML” statement.
-
A “json-to-xml” Tag will be added to the Policy Definition area, which contains the instructions resulting in JSON messages to be converted to XML. Ensure that the tag is configured as mentioned below:
- A) Put in the value “content-type-json” for the attribute “apply”
- B) Put in the following value “false” for the attribute “consider-accept-header”
Textual example:
<json-to-xml apply=”content-type-json“ consider-accept-header=”false“/>
-
Now add “set-header” policy statements adding the following headers
-
A) Header name: MessageId
- exists-action: “skip”
- value:“00000000-0000-0000-0000-000000000000”
-
B) Header name: MessageAction
- exists-action: “skip”
- value=“Undefined”
textual example:
<set-header name=”MessageId“ exists-action=”skip“>
<value>00000000-0000-0000-0000-000000000000</value>
</set-header>
<set-header name=”MessageAction“ exists-action=”skip“>
<value>Undefined</value>
</set-header>
-
Once you have added all the policy statements, press the save button
Now we have created a new product and assigned policies we need to perform some group/user related actions. This way we can set up a dedicated Group of users which is allowed to use our Product and it’s containing API.
The steps below will guide you through this process
-
Now select the Visibility tab, and click on the MANAGE GROUPS link
-
You will be redirected to the GROUPS page, on this page click on the ADD GROUP Link
-
A new windows will pop up, fill out the following fields
- A) Name: Unique name of the group
- B) Description: General description of the group and its purpose
- C) Click on Save
-
After you’ve created the new Group, select the developers menu item and in the main window click on ADD User
-
Once again a new window will pop up. In this window fill out the following fields:
- A) Email
- B) Password
- C) First and last name
- D) Press Save
-
Now that we have created a new user, we need to make it a member of our group. In order to do so follow the following steps
-
- A) Ensure to select the new user
- B) Click on the ADD TO GROUP item and add the user to the earlier created Group
-
Now go back to the PRODUCTS menu item and select the product you created earlier
-
In the main window follow these steps
- A) Click on the Visibility Tab
- B) Allow the new group to subscribe to your product
- C) Click Save
-
Now Click on the summary tab and click on the PUBLISH link
-
Now select the Developers menu item and click on the user you created earlier
-
The main window will now change, in this window click on ADD Subscription
-
A window will pop up, in this window ensure to put a checkmark in front of the product you want the user to subscribe to. Once done press the subscribe button
At this point you have set up your API and now you can proceed with testing it. In order to test we will use the Azure API Management Developer Portal and we will log-on to it using the user account we set up previously.
The steps below list the steps involved:
-
First log out of the Azure API Management Administration Portal
-
Now login using the email and password of the user you defined earlier
-
In the top menu, select APIS
-
Click on the API you created earlier
-
Click on the button “Open Console”
-
A form will appear which allows you to send a message to the API. Follow the steps below to send a JSON formatted message to the API.
- A) From the dropdown select a subscription-key (used to authenticate to the API)
- B) Add two http headers
- Content-type: application/json [indicates that the message you are about to send is formatted as JSON]
- MessageAction: NonExisting [this will ensure that the message ends up in our Azure Service Bus subscription named Archive, as this subscription is our catch-all
- MessageId: 11111111-1111-1111-1111-111111111111
- MessageBatchId: SingleMessageID
- C) Add some sample JSON
- D) Press HTTP POST
-
Now open up the Service Bus Explorer and connect to your service bus instance
-
Right Click on the Archive subscription and select the option “Receive all messages”
-
One message should be received, which should meet the following test criteria:
MY TEST RESULT: PASSED
- Now we will perform another test, but this time we will send an XML formatted message to the API.
- A) From the dropdown select a subscription-key (used to authenticate to the API)
- B) Add two http headers
- Content-type: application/xml [indicates that the message you are about to send is XML]
- MessageAction: BusinessActivityMonitoring [this will ensure that the message ends up in our Azure Service Bus subscription named BusinessActivityMonitoring and it will end up in our Archive subscription (as it is our catch-all)]
- C) Add some sample XML
- D) Press HTTP POST
- Right Click on the BusinessActivityMonitoring subscription and select the option “Receive all messages”. One message should be received, which should meet the following test criteria:
- The message should be formatted in XML
- The following custom message properties should be available
- MessageAction: BusinessActivityMonitoring
- MessageId: 00000000-0000-0000-0000-00000000000
- MessageBatchId: SingleMessageID
-
MY TEST RESULT: PASSED
-
Now let’s receive all message from our Archive subscription (it should contain a copy of the previous message). Reason for this, is the fact that the archive subscription is our Catch-All subscription and thus all messages send to the topic end up in this subscription as well.
MY TEST RESULT: PASSED
- Ensure to document your API well, this makes life easier for the consumers
- Using SAS Tokens you can fairly easy integrate fairly with Azure Service Bus Queues / Topics
- If using a policy to set Custom Headers (which you use for setting the Authorization header) ensure to enclose the SAS token within a <![CDATA[ …… ]]> tag
- The Azure API Management Key can be found on the developer page of the Azure API Developer Portal (f.e https://{namespace}.portal.azure-api.net/developer)
- Code examples on how to consume an API are available from the Azure API Developer Portal, by clicking on the menu item APIS and then clicking on the API you want to test
- Logging into the Azure API Management Administration Portal must be done using the Azure Management Portal
- Azure Management API, in my opinion, could easily be used to virtualize your on premise internet-faced web services (BizTalk generated web services f.e). This way you have one central place to govern and manage them.
I hope this walkthrough contributed in gaining a better understanding of how we as integrators can leverage the Azure API Management Service to expose Service Bus entities. Once you’ve grasped the concepts you could easily take it a step further and for example involve Azure BizTalk Services which would process messages from certain subscriptions, do some transformations and deliver it to for example another Azure Service Bus Topic, the topic endpoint could then be incorporated into a new API which would allow your API consumers to retrieve their processed messages.
Ah well you get the idea, the possibilities are almost endless as Azure delivers all these building-blocks (services) which enable you to create some amazing stuff for your customers.
I hope to publish a new post in the coming weeks; I’ve already worked out a scenario on paper which involves Azure API Management, Azure Service Bus, Azure BizTalk Services, Azure File Services, and an Azure Website; however implementing it and writing it down might take some time and currently my spare-time is a bit on the shallow side. Ah well, just stay tuned, check my Twitter and this blog.
Until next time!
Cheers
René