by community-syndication | Jan 16, 2010 | BizTalk Community Blogs via Syndication
I had a requirement where I needed to upload images to a SharePoint library and use the information from the image filename to populate columns within the document library. Performing these tasks within an orchestration is pretty trivial as you can set context properties in a Message Assignment shape that will drive the behavior of the WSS Adapter. I couldn’t justify performing these tasks in an Orchestration since it would involve an extra hop to the MessageBox in order for Orchestration to be invoked.
Another option is to do all of this work in a Pipeline component. I can create a Send Port subscription that would allow me to access the context properties from the message received and update them to include the WSS properties all within in a pipeline. This would allow the solution to become a pure messaging solution and I can save an extra Message Box hop. When building this solution, I referenced Saravana Kumar’s white paper on Pipeline Components. It came in handy, especially in the area of creating the Design time pipeline properties.
Within the Pipeline Component, the first thing that I wanted to to was retrieve the source file name. I am able to do this by reading the “ReceivedFileName” property from the File Adapter’s context properties. I then wanted to clean this file name up since the value of this property includes the entire UNC path: \\Servery\RootFolder\SubFolder\filename.jpg. I have written some utility methods to parse the file name from this long string.
There are 3 parts to the image file name(1213455_NEW_20100110120000.jpg) that I am particularly interested in. They include an Asset Number, Asset State and the Date/Time that the image was taken. The scenario itself is a field worker who needs to capture an image of an asset, indicate the Asset Number and its state i.e. New/Old. This information is then captured in the name of the image. Since it is an image, there is no other reasonable way to store this meta data outside the file name. This in itself is the reason why I need to to use a pipeline component. Standard WSS adapter functionality includes the ability to use XPATH statements to extract data from the message payload and populate a SharePoint document library column.
Once I have captured this meta data and massaged it to my liking, I want to then provide this context data to the WSS Adapter. The WSS adapter is a little different than most of the other adapters in that you can populate an XML document and push that into the ConfigPropertiesXml context property. The document structure itself is a flat XML structure that uses a “key-value” convention.
<ConfigPropertiesXml><PropertyName1>Column 1 Name</PropertyName1><PropertySource1>Column 1 Value</PropertySource1><PropertyName2>Column 2 Name</PropertyName2><PropertySource2>Column 2 Value</PropertySource2><PropertyName3>Column 3 Name</PropertyName3><PropertySource3>Column 3 Value</PropertySource3></ConfigPropertiesXml>
I also want to populate the WSS Adapter’s Filename context property. I can achieve this by the following statement:
pInMsg.Context.Write("Filename",
"http://schemas.microsoft.com/BizTalk/2006/WindowsSharePointServices-properties", ImageFileName);
Below is my Execute method, in my pipeline component, where all of this processing takes place. You can download the entire sample here. This code is at a proof of concept stage so you will want to evaluate your own error handling requirements. Use at your own risk.
public IBaseMessage Execute(IPipelineContext pContext, IBaseMessage pInMsg)
{
//Get received file name by retrieving it from Context
string FilePath = pInMsg.Context.Read("ReceivedFileName", "http://schemas.microsoft.com/BizTalk/2003/file-properties") as string;
//strip path from filename
string ImageFileName = GetFileNameFromPath(FilePath);
//Utility methods to parse filename
string msgAssetNumber = GetAssetNumberFromFileName (ImageFileName);
string msgAssetState = GetAssetStateFromFileName(ImageFileName);
string msgImageDateTime = GetImageDateFromFileName(ImageFileName);
//Write desired file name to context of WSS Adapter
pInMsg.Context.Write("Filename",
"http://schemas.microsoft.com/BizTalk/2006/WindowsSharePointServices-properties", ImageFileName);
// Populate Document Library Columns with values from file name
string strWSSConfigPropertiesXml = string.Format("<ConfigPropertiesXml><PropertyName1>{0}</PropertyName1><PropertySource1>{1}</PropertySource1>" +
"<PropertyName2>{2}</PropertyName2><PropertySource2>{3}</PropertySource2><PropertyName3>{4}</PropertyName3><PropertySource3>{5}</PropertySource3></ConfigPropertiesXml>",
this.AssetNumber,msgAssetNumber,this.AssetState,msgAssetState,this.ImageDateTime,msgImageDateTime);
pInMsg.Context.Write("ConfigPropertiesXml", "http://schemas.microsoft.com/BizTalk/2006/WindowsSharePointServices-properties", strWSSConfigPropertiesXml);
return pInMsg;
}
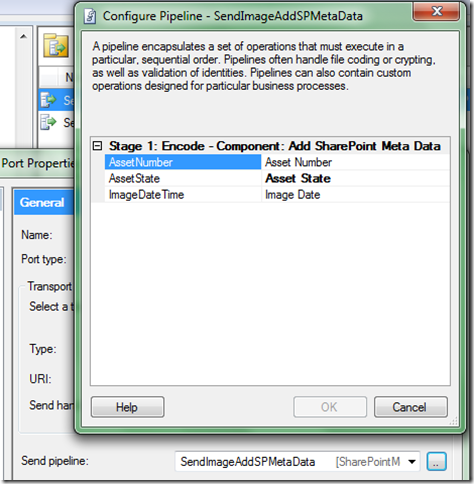
A feature that I wanted to provide is the ability to provide the SharePoint column names at configuration time. I didn’t want to have to compile code if the SharePoint team wanted to change a column name. So this is driven from the pipeline configuration editor. The values that you provide (on the right hand side) will set the column names in the ConfigPropertiesXml property that is established at run time.
If you provide a value in this configuration that does not correspond to a column in SharePoint, you will get a warning/error on the Send Port.
Event Type: Warning
Event Source: BizTalk Server 2009
Event Category: (1)
Event ID: 5743
Date: 1/10/2010
Time: 7:38:19 PM
User: N/A
Computer:
Description:
The adapter failed to transmit message going to send port "SendDocToSharePoint" with URL "wss://SERVER/sites/BizTalk%%20Repository/Inbound%%20Documents". It will be retransmitted after the retry interval specified for this Send Port. Details:"The Windows SharePoint Services adapter Web service encountered an error accessing column "Missing Column" in document library http://SERVER/sites/BizTalk%%20Repository/Inbound%%20Documents. The column does not exist. The following error was encountered: "Value does not fall within the expected range.".
This error was triggered by the Windows SharePoint Services receive location or send port with URI wss://SERVER/sites/BizTalk Repository/Inbound Documents.
Windows SharePoint Services adapter event ID: 12295".
For more information, see Help and Support Center at http://go.microsoft.com/fwlink/events.asp.
The end result is that I can use information contained in the file name to populate meta data columns in SharePoint without an Orchestration.

Also note, I have built this pipeline component so that it can be used in a Receive Pipeline or as Send Pipeline by including the CATID_Decoder and CATID_Encoder attributes.
[ComponentCategory(CategoryTypes.CATID_PipelineComponent)]
[ComponentCategory(CategoryTypes.CATID_Decoder)]
[ComponentCategory(CategoryTypes.CATID_Encoder)]
[System.Runtime.InteropServices.Guid("9d0e4103-4cce-4536-83fa-4a5040674ad6")]
public class AddSharePointMetaData : IBaseComponent, IComponentUI, IComponent, IPersistPropertyBag


by community-syndication | Jan 15, 2010 | BizTalk Community Blogs via Syndication
[In addition to blogging, I am also now using Twitter for quick updates and to share links. Follow me at: twitter.com/scottgu]
This is the second in a series of blog posts I’m doing on the upcoming ASP.NET MVC 2 release. This blog post covers some of the validation improvements coming with ASP.NET MVC 2.
ASP.NET MVC 2 Validation
Validating user-input and enforcing business rules/logic is a core requirement of most web applications. ASP.NET MVC 2 includes a bunch of new features that make validating user input and enforcing validation logic on models/viewmodels significantly easier. These features are designed so that the validation logic is always enforced on the server, and can optionally also be enforced on the client via JavaScript. The validation infrastructure and features in ASP.NET MVC 2 are designed so that:
1) Developers can easily take advantage of the DataAnnotation validation support built-into the .NET Framework. DataAnnotations provide a really easy way to declaratively add validation rules to objects and properties with minimal code.
2) Developers can optionally integrate either their own validation engine, or take advantage of existing validation frameworks like Castle Validator or the EntLib Validation Library. ASP.NET MVC 2’s validation features are designed to make it easy to plug-in any type of validation architecture – while still taking advantage of the new ASP.NET MVC 2 validation infrastructure (including client-side validation, model binding validation, etc).
This means that enabling validation is really easy for common application scenarios, while at the same time still remaining very flexible for more advanced ones.
Enabling Validation with ASP.NET MVC 2 and DataAnnotations
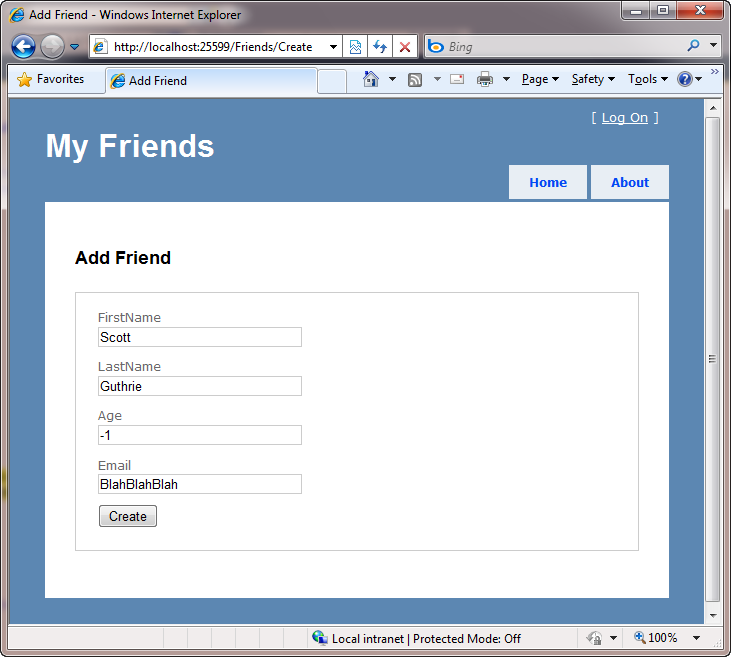
Let’s walkthrough a simple CRUD scenario with ASP.NET MVC 2 that takes advantage of the new built-in DataAnnotation validation support. Specifically, let’s implement a “Create” form that enables a user to enter friend data:
We want to ensure that the information entered is valid before saving it in a database – and display appropriate error messages if it isn’t:

We want to enable this validation to occur on both the server and on the client (via JavaScript). We also want to ensure that our code maintains the DRY principle (“don’t repeat yourself”) – meaning that we should only apply the validation rules in one place, and then have all our controllers, actions and views honor it.
Below I’m going to be using VS 2010 to implement the above scenario using ASP.NET MVC 2. You could also implement the exact same scenario using VS 2008 and ASP.NET MVC 2 as well.
Step 1: Implementing a FriendsController (with no validation to begin with)
We’ll begin by adding a simple “Person” class to a new ASP.NET MVC 2 project that looks like below:

It has four properties (implemented using C#’s automatic property support, which VB in VS 2010 now supports too – woot!).
We’ll then add a “FriendsController” controller class to our project that exposes two “Create” action methods. The first action method is called when an HTTP-GET request comes for the /Friends/Create URL. It will display a blank form for entering person data. The second action method is called when an HTTP-POST request comes for the /Friends/Create URL. It maps the posted form input to a Person object, verifies that no binding errors occurred, and if it is valid will eventually save it to a database (we’ll implement the DB work later in this tutorial). If the posted form input is invalid, the action method redisplays the form with errors:

After we’ve implemented our controller, we’ll right-click within one of its action methods and choose the “Add View” command within Visual Studio – which will bring up the “Add View” dialog. We’ll choose to scaffold a “Create” view that is passed a Person object:

Visual Studio will then generate a scaffolded Create.aspx view file for us under the \Views\Friends\ directory of our project. Notice below how it takes advantage of the new strongly-typed HTML helpers in ASP.NET MVC 2 (enabling better intellisense and compile time checking support):

And now when we run the application and hit the /Friends/Create URL we’ll get a blank form that we can enter data into:

Because we have not implemented any validation within the application, though, nothing prevents us from entering bogus input within the form and posting it to the server.
Step 2: Enabling Validation using DataAnnotations
Let’s now update our application to enforce some basic input validation rules. We’ll implement these rules on our Person model object – and not within our Controller or our View. The benefit of implementing the rules within our Person object is that this will ensure that the validation will be enforced via any scenario within our application that uses the Person object (for example: if we later added an edit scenario). This will help ensure that we keep our code DRY and avoid repeating rules in multiple places.
ASP.NET MVC 2 enables developers to easily add declarative validation attributes to model or viewmodel classes, and then have those validation rules automatically be enforced whenever ASP.NET MVC performs model binding operations within an application. To see this in action, let’s update our Person class to have a few validation attributes on it. To do this we’ll add a “using” statement for the “System.ComponentModel.DataAnnotations” namespace to the top of the file – and then decorate the Person properties with [Required], [StringLength], [Range], and [RegularExpression] validation attributes (which are all implemented within that namespace):

Note: Above we are explicitly specifying error messages as strings. Alternatively you can define them within resource files and optionally localize them depending on the language/culture of the incoming user. You can learn more about how to localize validation error messages here.
Now that we’ve added the validation attributes to our Person class, let’s re-run our application and see what happens when we enter bogus values and post them back to the server:

Notice above how our application now has a decent error experience. The text elements with the invalid input are highlighted in red, and the validation error messages we specified are displayed to the end user about them. The form is also preserving the input data the user originally entered – so that they don’t have to refill anything.
How though, you might ask, did this happen?
To understand this behavior, let’s look at the Create action method that handles the POST scenario for our form:

When our HTML form is posted back to the server, the above method will be called. Because the action method accepts a “Person” object as a parameter, ASP.NET MVC will create a Person object and automatically map the incoming form input values to it. As part of this process, it will also check to see whether the DataAnnotation validation attributes for the Person object are valid. If everything is valid, then the ModelState.IsValid check within our code will return true – in which case we will (eventually) save the Person to a database and then redirect back to the home-page.
If there are any validation errors on the Person object, though, our action method redisplays the form with the invalid Person. This is done via the last line of code in the code snippet above.
The error messages are then displayed within our view because our Create form has <%= Html.ValidationMessageFor() %> helper method calls next to each <%= Html.TextBoxFor() %> helper. The Html.ValidationMessageFor() helper will output the appropriate error message for any invalid model property passed to the view:

The nice thing about this pattern/approach is that it is pretty easy to setup – and it then allows us to easily add or change validation rules on our Person class without having to change any code within our controllers or views. This ability to specify the validation rules one place and have it be honored and respected everywhere allows us to rapidly evolve our application and rules with a minimum amount of effort and keep our code very DRY.
Step 3: Enabling Client-side Validation
Our application currently only performs server-side validation – which means that our end users will need to perform a form submit to the server before they’ll see any validation error messages.
One of the cool things about ASP.NET MVC 2’s validation architecture is that it supports both server-side and client-side validation. To enable this, all we need to do is to add two JavaScript references to our view, and write one line of code:

When we add these three lines, ASP.NET MVC 2 will use the validation meta-data we’ve added to our Person class and wire-up client-side JavaScript validation logic for us. This means that users will get immediate validation errors when they tab out of an input element that is invalid.
To see the client-side JavaScript support in action for our friends application, let’s rerun the application and fill in the first three textboxes with legal values – and then try and click “Create”. Notice how we’ll get an immediate error message for our missing value without having to hit the server:

If we enter some text that is not a legal email the error message will immediately change from “Email Required” to “Not a valid email” (which are the error messages we specified when we added the rules to our Person class):

When we enter a legal email the error message will immediately disappear and the textbox background color will go back to its normal state:

The nice thing is that we did not have to write any custom JavaScript of our own to enable the above validation logic. Our validation code is also still very DRY- we can specify the rules in one place and have them be enforced across all across the application – and on both the client and server.
Note that for security reasons the server-side validation rules always execute even if you have the client-side support enabled. This prevents hackers from trying to spoof your server and circumvent the client-side rules.
The client-side JavaScript validation support in ASP.NET MVC 2 can work with any validation framework/engine you use with ASP.NET MVC. It does not require that you use the DataAnnotation validation approach – all of the infrastructure works independent of DataAnnotations and can work with Castle Validator, the EntLib Validation Block, or any custom validation solution you choose to use.
If you don’t want to use our client-side JavaScript files, you can also substitute in the jQuery validation plugin and use that library instead. The ASP.NET MVC Futures download will include support for enable jQuery validation against the ASP.NET MVC 2 server-side validation framework as well.
Step 4: Creating a Custom [Email] Validation Attribute
The System.ComponentModel.DataAnnotations namespace within the .NET Framework includes a number of built-in validation attributes that you can use. We’ve used 4 different ones in the sample above – [Required], [StringLength], [Required], and [RegularExpression].
You can also optionally define your own custom validation attributes and use them as well. You can define completely custom attributes by deriving from the ValidationAttribute base class within the System.ComponentModel.DataAnnotations namespace. Alternatively, you can choose to derive from any of the existing validation attributes if you want to simply extend their base functionality.
For example, to help clean up the code within our Person class we might want to create a new [Email] validation attribute that encapsulates the regular expression to check for valid emails. To do this we could simply derive it from the RegularExpression base class like so, and call the RegularExpression’s base constructor with the appropriate email regex:

We can then update our Person class to use our new [Email] validation attribute in place of the previous regular expression we used before – which makes the code more clean and encapsulated:

When creating custom validation attributes you can specify validation logic that runs both on the server and on the client via JavaScript.
Step 5: Persisting to a Database
Let’s now implement the logic necessary to save our friends to a database.

Right now we are simply working against a plain-old C# class (sometimes referred to as a “POCO” class – “plain old CLR (or C#) object”). One approach we could use would be to write some separate persistence code that maps this existing class we’ve already written to a database. Object relational mapping (ORM) solutions like NHibernate support this POCO / PI style of mapping today very well. The ADO.NET Entity Framework (EF) that ships with .NET 4 will also support POCO / PI mapping, and like NHibernate will also optionally enable the ability to define persistence mappings in a “code only” way (no mapping file or designers required).
If our Person object was mapped to a database in this way then we wouldn’t need to make any changes to our Person class or to any of our validation rules – it would continue to work just fine.
But what if we are using a graphical tool for our ORM mappings?
Most developers using Visual Studio today don’t write their own ORM mapping/persistence logic – and instead use the built-in designers within Visual Studio to help manage this.
One question that often comes up when using DataAnnotations (or any other form of attribute based validation) is “how do you apply them when the model object you are working with is created/maintained by a GUI designer”. For example, what if instead of having a POCO style Person class like we’ve been using so far, we instead defined/maintained our Person class within Visual Studio via a GUI mapping tool like the LINQ to SQL or ADO.NET EF designer:

Above is a screen-shot that shows a Person class defined using the ADO.NET EF designer in VS 2010. The window at the top defines the Person class, the window at the bottom shows the mapping editor for how its properties map to/from a “People” table within a database. When you click save on the designer it automatically generates a Person class for you within your project. This is great, except that every time you make a change and hit save it will re-generate the Person class – which would cause any validation attribute declarations you make on it to be lost.
One way you can apply additional attribute-based meta-data (like validation attributes) to a class that is auto-generated/maintained by a VS designer is to employ a technique we call “buddy classes”. Basically you create a separate class that contains your validation attributes and meta-data, and then link it to the class generated by the designer by applying a “MetadataType” attribute to a partial class that is compiled with the tool-generated class. For example, if we wanted to apply the validation rules we used earlier to a Person class maintained by a LINQ to SQL or ADO.NET EF designer we could update our validation code to instead live in a separate “Person_Validation” class that is linked to the “Person” class created by VS using the code below:

The above approach is not as elegant as a pure POCO approach – but has the benefit of working with pretty much any tool or designer-generated code within Visual Studio.
Last Step – Saving the Friend to the Database
Our last step – regardless of whether we use a POCO or tool-generated Person class – will be to save our valid friends into the database.
Doing that simply requires us to replace the “Todo” placeholder statement within our FriendsController class with 3 lines of code that saves the new friend to a database. Below is the complete code for the entire FriendsController class – when using ADO.NET EF to do the database persistence for us:

And now when we visit the /Friends/Create URL we can easily add new People to our friends database:
Validation for all the data is enforced on both the client and server. We can easily add/modify/delete validation rules in one place, and have those rules be enforced by all controllers and views across our application.
Summary
ASP.NET MVC 2 makes it much easier to integrate validation into web applications. It promotes a model-based validation approach that enables you to keep your applications very DRY, and helps ensure that validation rules are enforced consistently throughout an application. The built-in DataAnnotations support within ASP.NET MVC 2 makes supporting common validation scenarios really easy out of the box. The extensibility support within the ASP.NET MVC 2 validation infrastructure then enables you to support a wide variety of more advanced validation scenarios – and plugin any existing or custom validation framework/engine.
Hope this helps,
Scott
by community-syndication | Jan 14, 2010 | BizTalk Community Blogs via Syndication
If you are in are in Minneapolis on Thursday January 21st please join us for the Twin Cities Connected Systems User Group Meeting.
The meeting takes place at the Microsoft offices at 8300 Norman Center Drive, Bloomington, MN 55437. This months meeting time has changed and we will be meeting from 5:00 to 6:30
Ed Jones from RBA will be presenting on Implementing a Service Bus Architecture with BizTalk 2009 and the BizTalk ESB Toolkit 2.0: A Real World Example
Here is a write-up of what will be covered:
Although BizTalk Server offers much in terms of flexibility and extensibility through the implementation of Service Oriented Architectures, most BizTalk applications are developed in “hub-and-spoke” models that are tightly coupled to specific points of functionality. Entire business processes are often represented as orchestration. As such, when business processes change, orchestrations also need to change, often requiring the reconstruction and redeployment of entire BizTalk solutions.
One way to alleviate this pain is to avoid the use of a “hub-and-spoke” model altogether in favor of a Service Bus approach. The BizTalk ESB Toolkit helps accomplish this by making the creation of a true Service Bus easier. One feature of the toolkit for example, itineraries, allows us to create capabilities that are independent of each other and independent of specific processes. This “Composition of Capabilities” method is preferred over the point-to-point solutions used in many BizTalk applications enabling more extensible and flexible Business Processes.
Our client required a system that would accept incoming shipment data in the form of flat-files in multiple formats, process that data through a series of resolutions, and then output the data in both its raw and processed form into an ERP system. Some data will be processed, while other data will be ignored. Over time it is expected that the various processes may change in size, scope, and sequential order. Our solution implements ESB Toolkit Itineraries to accomplish this composition of capabilities. We also use the Exception Management and other more traditional BizTalk functionalities such as Business Rules.


