by community-syndication | Jan 21, 2010 | BizTalk Community Blogs via Syndication
Just wanted to forward this on to SBUG members that Udi Dahan has advised me theres still a couple of places available on his training course in Febuary
See the following link for details:
http://skillsmatter.com/course/open-source-dot-net/advanced-distributed-systems-design-with-soa/ps-510
by community-syndication | Jan 21, 2010 | BizTalk Community Blogs via Syndication
This is part five of a twelve part series that introduces the features of WCF WebHttp Services in .NET 4. In this post we will cover:
- Handling Errors with the WebFaultException class
Over the course of this blog post series, we are building a web service called TeamTask. TeamTask allows a team to track tasks assigned to members of the team. Because the code in a given blog post builds upon the code from the previous posts, the posts are intended to be read in-order.
Downloading the TeamTask Code
At the end of this blog post, you’ll find a link that will allow you to download the code for the current TeamTask Service as a compressed file. After extracting, you’ll find that it contains “Before” and “After” versions of the TeamTask solution. If you would like to follow along with the steps outlined in this post, download the code and open the “Before” solution in Visual Studio 2010. If you aren’t sure about a step, refer to the “After” version of the TeamTask solution.
Note: If you try running the sample code and see a Visual Studio Project Sample Loading Error that begins with “Assembly could not be loaded and will be ignored”, see here for troubleshooting.
Getting Visual Studio 2010
To follow along with this blog post series, you will need to have Microsoft Visual Studio 2010 and the full .NET 4 Framework installed on your machine. (The client profile of the .NET 4 Framework is not sufficient.) At the time of this posting, the Microsoft Visual Studio 2010 Ultimate Beta 2 is available for free download and there are numerous resources available regarding how to download and install, including this Channel 9 video.
Step 1: Handling Non-Existent Users
In the very first post of this series, we implemented the GetUser() service operation. The GetUser() service operation returns the details of a user given a username provided in the request URI.
A precondition of the GetUser() operation is that the given username exists in the database. But what happens when this precondition isn’t met? Unfortunately, the implementation from the first blog post does something quite awkward: It returns a response with an HTTP status code of 200 along with an empty message body.
Let’s improve the GetUser() operation to handle non-existent user errors in a manner more consistent with HTTP. To do this, we’ll use the WebFaultException class to both set the HTTP status code to 404 (Not Found) and provide an indication of the error in the message body.
If you haven’t already done so, download and open the “Before” solution of the code attached to this blog post.
Open the TeamTaskService.cs file in the code editor.
In the GetUser() operation add the code below after the LINQ query for the user. You’ll also need to add “using System.Net;” to the code file.
if (user == null)
{
throw new WebFaultException<string>(
string.Format(“There is no user with the userName ‘{0}’.”, userName),
HttpStatusCode.NotFound);
}
There are both generic and non-generic versions of the WebFaultException. The generic version is generally the more appropriate one to use, as it allows you to specify the exception details that will be serialized into the body of the response. In this case, the exception details are just a string, but any type that can be serialized can be used. We’re also setting the correct HTTP status code of 404 (Not Found).
As you can see, correctly handling errors with a WCF WebHttp Service is as simple as throwing an exception.
Helpful Tip: If you’ve used WCF to build SOAP services, you may notice that the WebFaultException is very similar to the FaultException class. This isn’t just a coincidence. The WebFaultException actually derives from the FaultException class. Therefore in the context of a SOAP service, the WebFaultException will behave as a FaultException-the detail will be serialized to the body of the SOAP message and the HTTP status code will be ignored as it isn’t relevant with SOAP. |
Step 2: Viewing the Error on the Client
We could verify that our improved implementation of the GetUser() operation correctly handles non-existent users with the browser, but we’ll write some client code to do this instead. This is because we want to demonstrate one of the more exciting features of the WebFaultException class-that it composes with automatic and explicit format selection.
With the WebFaultException, the detail of the exception that is serialized in the body of the response message will always be in the format (XML or JSON) that the client would have received had there not been an error. If the client was expecting XML, the client will get the exception detail serialized as XML. Likewise, if the client was expecting JSON, the client will get the exception detail serialized as JSON.
Open the Program.cs file of the TeamTask.Client project in the code editor and copy the following static method into the Program class:
static void GetUser(HttpClient client, string userName, string accepts)
{
Console.WriteLine(“Getting user ‘{0}’:”, userName);
using(HttpRequestMessage request = new HttpRequestMessage(“GET”,
“Users/”+ userName))
{
request.Headers.Accept.AddString(accepts);
using (HttpResponseMessage response = client.Send(request))
{
Console.WriteLine(” Status Code: {0}”, response.StatusCode);
Console.WriteLine(” Content: {0}”,
response.Content.ReadAsString());
}
}
Console.WriteLine();
}
The static GetUser() method is very similar to the client code we wrote in part two of this blog post series. The only thing to notice is that we are able to set the HTTP Accept header on the request.
Now we’ll implement the Main() method to call GetUser() twice: once with an XML content type in the Accept header and a second time with a JSON content type. Replace the Main() method implementation with the following code:
using (HttpClient client = new HttpClient(“http://localhost:8080/TeamTask/”))
{
GetUser(client, “noSuchUser”, “application/xml”);
GetUser(client, “noSuchUser”, “application/json”);
Console.ReadKey();
}
Start without debugging (Ctrl+F5) to get the TeamTask service running and then start the client by right clicking on the TeamTask.Client project in the “Solution Explorer” window and selecting “Debug”->”Start New Instance”. The console should contain the following output:
Notice that there is no such user with the username “noSuchUser” and that the status code for both responses is 404 (Not Found). With the first request, the response content is in XML. With the second request, the response content is in JSON, which happens to be just a quoted string for this simple example.
Step 3: Handling Errors in the UpdateTask() Operation
The UpdateTask() operation, which we added to the TeamTask service in the part three, could also benefit from some improved error handling.
First, in the current implementation of the UpdateTask() operation, we are parsing a UriTemplate path variable to get the id of the task to update. We assume that parsing the id will always be successful, but this isn’t a valid assumption. We’ll change the implementation of the UpdateTask() operation so that it returns an HTTP status code of 400 (Bad Request) when the request URI includes a id value that can’t be parsed as an integer.
Second, it is possible that a client could try to update a non-existent task. In the current implementation, this error will surface as a OptimisticConcurrencyException, which is thrown from the ADO.NET Entity Framework code on trying to persist the updated task to the database. This OptimisticConcurrencyException will result in an HTTP response with a status code of 400 (Bad Request) and HTML content that explains that the server encountered an error. This is the default behavior for unhandled, non-WebFaultExceptions. We’ll change this so that the UpdateTask() operation returns an HTTP status code of 404 (Not Found) when a client attempts to update a non-existent task.
Open the TeamTaskService.cs file in the code editor.
In the UpdateTask() operation replace the code for parsing the id with the following code:
// The id from the URI determines the id of the task
int parsedId;
if(!int.TryParse(id, out parsedId))
{
throw new WebFaultException<string>(
string.Format(
“The value ‘{0}’ is not a valid task id. The id must be an integer.”,
id), HttpStatusCode.BadRequest);
}
task.Id = parsedId;
Wrap the call to SaveChanges() on the ObjectContext with a try-catch block that will properly handle the OptimisticConcurrencyException as shown below. You’ll also need to add “using System.Data;” to the code file.
try
{
objectContext.SaveChanges();
}
catch (OptimisticConcurrencyException)
{
throw new WebFaultException<string>(
string.Format(“There is no task with the id ‘{0}’.”, parsedId),
HttpStatusCode.NotFound);
}
After implementing these error handling improvements, the UpdateTask() should look similar to the code below. We’ll leave it as an exercise for the reader to verify that these error handling improvements behave as expected.
[Description(“Allows the details of a single task to be updated.”)]
[WebInvoke(UriTemplate = “Tasks/{id}”, Method = “PUT”)]
public Task UpdateTask(string id, Task task)
{
// The id from the URI determines the id of the task
int parsedId;
if (!int.TryParse(id, out parsedId))
{
throw new WebFaultException<string>(
string.Format(
“The value ‘{0}’ is not a valid task id. The id must be an integer.”,
id), HttpStatusCode.BadRequest);
}
task.Id = parsedId;
using (TeamTaskObjectContext objectContext =
new TeamTaskObjectContext())
{
objectContext.AttachTask(task);
try
{
objectContext.SaveChanges();
}
catch (OptimisticConcurrencyException)
{
throw new WebFaultException<string>(
string.Format(“There is no task with the id ‘{0}’.”, parsedId),
HttpStatusCode.NotFound);
}
// Because we allow partial updates, we need to refresh from the dB
objectContext.Refresh(RefreshMode.StoreWins, task);
}
return task;
}
Next Steps: Using Routes to Compose WCF WebHttp Services
The TeamTask service can now handle possible client errors such as trying to update or retrieve non-existent tasks or users. Of course, there are still opportunities to improve the error handling of the service but we’ll leave such improvements as an exercise for the reader.
In part six of this blog post series we’ll continue to improve the TeamTask service. We’ll refactor our single TeamTaskService class into two separate classes (TaskService and UserService) as we learn about the ability to compose WCF WebHttp Services with the new ASP.NET routes integration feature introduced in .NET 4.
Randall Tombaugh
Developer, WCF WebHttp Services
by community-syndication | Jan 21, 2010 | BizTalk Community Blogs via Syndication
by community-syndication | Jan 20, 2010 | BizTalk Community Blogs via Syndication
A colleague and I have been working through some anomalies when it comes to SAP IDoc schemas that were generated using the BizTalk Adapter Pack 2.0 SAP Adapter. This is the adapter which is based upon WCF and NOT the .Net Connector based adapter.
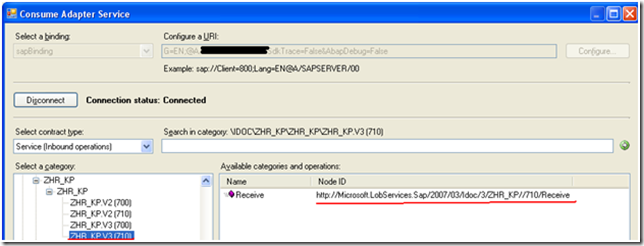
When you go to generate an IDoc using the Consume Adapter Service wizard in Visual Studio, you will be presented with a screen like this. You will most likely have a few options when selecting an IDoc and version to use. To be sure that you have selected the right version of IDoc, you should contact your BASIS admin.
As you select different versions of IDocs, notice that the Node ID changes. This Node ID will soon become your Target Namespace in the XSD schema that you are about to generate.

This Target Namespace is very important since BizTalk uses the Target Namespace and root node to determine subscriptions.

If you have chosen the wrong version of IDoc you will soon know. You will receive a subscription error indicating that you have received a message that BizTalk does not have a Schema for.
Event Type: Error
Event Source: BizTalk Server 2009
Event Category: BizTalk Server 2009
Event ID: 5719
Date: 1/17/2010
Time: 1:54:31 PM
User: N/A
Computer: Server
Description:
There was a failure executing the receive pipeline: “Microsoft.BizTalk.DefaultPipelines.XMLReceive, Microsoft.BizTalk.DefaultPipelines, Version=3.0.1.0, Culture=neutral, PublicKeyToken=31bf3856ad364e35” Source: “XML disassembler” Receive Port: “WcfReceivePort_SAPBinding_IdocZHR_KPV3R710_Custom” URI: “sap://CLIENT=XXX;LANG=EN;@a/SAPSERVER/XX?ListenerGwServ=SAPGWXX&ListenerGwHost=SAPSEVER& ListenerProgramId=XXXXXX&RfcSdkTrace=False&AbapDebug=False” Reason: Finding the document specification by message type “http://Microsoft.LobServices.Sap/2007/03/Idoc/3/ZHR_KP//700/Receive#Receive” failed. Verify the schema deployed properly.
If you refer to the first image in this blog post, you will see that the Node Id has a value of http://Microsoft.LobServices.Sap/2007/03/Idoc/3/ZHR_KP//710/Receive#Receive where as BizTalk has received an IDoc with a Namespace of http://Microsoft.LobServices.Sap/2007/03/Idoc/3/ZHR_KP//700/Receive#Receive. So how can this be? SAP by default generates an IDoc based upon the current release version. But you also have the ability to send a specific IDoc version as configured in the SAP Program ID. This provides some flexibility in the event you need to use a legacy IDoc version.
When SAP sends an IDoc out, it will populate this version information in the control record. I have turned on tracking on the receive port and as you can see this information has been populated by SAP.

Since I am using an XML Receive pipeline and SAP has no idea what namespace BizTalk is requiring, the SAP Adapter is generating this namespace at run-time based upon the DOCREL and IDOC_VERSION elements.
The lesson here is to make sure you know what version of the IDoc is currently configured with your Program Id within SAP. I must also caution that while this approach does work, it may not live through your next SAP upgrade. At least not without updating your BizTalk projects. With each SAP major release, you can expect this DOCREL value and potentially the IDOC_Version to increase. So the next time you upgrade your SAP environment, you may get into the same situation that I have described(subscription errors) and it may take some significant refactoring to get your BizTalk schemas and maps back in sync with your SAP version.
In the next post of this series, I will discuss how you can use a Receive Pipeline and Flat File Pipeline Disassembler to override this namespace so that it does not become dependant upon the DOCREL and IDOC_VERSION elementsstay tuned.

by community-syndication | Jan 19, 2010 | BizTalk Community Blogs via Syndication
A couple weeks ago, Yossi Dahan followed up on a post of his where he noticed that when a message absorbed by a one-way receive port was published to the BizTalk MessageBox where more than one request-response port was waiting for it, an error occurred. Yossi noted that this appeared to be fixed in BizTalk […]
by community-syndication | Jan 19, 2010 | BizTalk Community Blogs via Syndication
Apologies for not having posted in a while. As some of you know, my wife and I just welcomed Adelaide Sanders to our clan.
As busy as technology related projects are, this one is a great deal more time consuming and requires even higher levels of attention.
Rest assured I’ll be returning in February 2010 with some new posts and reflections on technologies I’m playing with while on paternity leave.
Until then, feel free to contact me at jeff dot sanders at dynamicshift dot com.
Thanks —
by community-syndication | Jan 18, 2010 | BizTalk Community Blogs via Syndication
I have been spending my free time working on my next book. Danny Garber and I are co-authoring this book from APress.
The book will be available this spring and should coincide with the release of AppFabric.

by community-syndication | Jan 18, 2010 | BizTalk Community Blogs via Syndication
I was doing some research lately into a publish/subscribe scenario and it made me think of a “gotcha” that folks may not think about when building this type of messaging solution.
Specifically, what are the implications of resubmitted a failed transmission to a particular subscriber in a publish/subscribe scenario? For demonstration purposes, let’s say I’ve got […]

by community-syndication | Jan 18, 2010 | BizTalk Community Blogs via Syndication
Have you ever asked yourself the question – what happens when a BizTalk HTTP receive location is outside it’s service window?
The file adapter doesn’t pick up any files from the folder when the receive location is outside the service window.
For the HTTP adapter BizTalk will return a 500 (Internal Server Error) response to the […]
by community-syndication | Jan 18, 2010 | BizTalk Community Blogs via Syndication
This is part four of a twelve part series that introduces the features of WCF WebHttp Services in .NET 4. In this post we will cover:
- Configuring automatic format selection for a WCF WebHttp Service
- Setting the response format explicitly in code per request
Over the course of this blog post series, we are building a web service called TeamTask. TeamTask allows a team to track tasks assigned to members of the team. Because the code in a given blog post builds upon the code from the previous posts, the posts are intended to be read in-order.
Downloading the TeamTask Code
At the end of this blog post, you’ll find a link that will allow you to download the code for the current TeamTask Service as a compressed file. After extracting, you’ll find that it contains “Before” and “After” versions of the TeamTask solution. If you would like to follow along with the steps outlined in this post, download the code and open the “Before” solution in Visual Studio 2010. If you aren’t sure about a step, refer to the “After” version of the TeamTask solution.
Note: If you try running the sample code and see a Visual Studio Project Sample Loading Error that begins with “Assembly could not be loaded and will be ignored”, see here for troubleshooting.
Getting Visual Studio 2010
To follow along with this blog post series, you will need to have Microsoft Visual Studio 2010 and the full .NET 4 Framework installed on your machine. (The client profile of the .NET 4 Framework is not sufficient.) At the time of this posting, the Microsoft Visual Studio 2010 Ultimate Beta 2 is available for free download and there are numerous resources available regarding how to download and install, including this Channel 9 video.
Step 1: Handling Requests in JSON
So far in this blog post series we’ve been sending and receiving HTTP messages with XML content only. But WCF WebHttp Services also provides first-class support for JSON. In fact, by default a WCF WebHttp Service will handle requests in JSON automatically. Just to prove this, we’ll have our client send an HTTP PUT request to the TeamTask service in JSON.
If you haven’t already done so, download and open the “Before” solution of the code attached to this blog post.
Open the Program.cs file from the TeamTask.Client project in the code editor and add the following static method to the Program class:
static void WriteOutContent(HttpContent content)
{
content.LoadIntoBuffer();
Console.WriteLine(content.ReadAsString());
Console.WriteLine();
}
This static WriteOutContent() method will allow us to easily write out the body of a request or response message to the console. The content is streamed by default, so we call the LoadIntoBuffer() method to give us the ability to read the content multiple times.
Change the UpdateTask() method to serialize the request to JSON instead of XML by replacing:
HttpContent content = HttpContentExtensions.CreateDataContract(task);
With:
HttpContent content = HttpContentExtensions.CreateJsonDataContract(task);
Add a call to the WriteOutContent() method after the request content is created so that we can verify the request really is in JSON like so:
HttpContent content = HttpContentExtensions.CreateJsonDataContract(task);
Console.WriteLine(“Request:”);
WriteOutContent(content);
Open the Web.Config file from the TeamTask.Server project and change the value of the “automaticFormatSelectionEnabled” setting from “true” to “false” like so:
<webHttpEndpoint>
<standardEndpoint name=“” helpEnabled=“true”
automaticFormatSelectionEnabled=“false“/>
</webHttpEndpoint>
Note: The default value for automaticFormatSelectionEnabled is actually false, so we could simply delete the attribute altogether. However, we’ll be re-enabling it soon so it is easier to keep it around.
Start without debugging (Ctrl+F5) to get the TeamTask service running and then start the client by right clicking on the TeamTask.Client project in the “Solution Explorer” window and selecting “Debug”->”Start New Instance”. The console should contain the following output:
Notice that the HTTP PUT request is in JSON, and yet the TeamTask service handles it without any problem.
Note: Throughout this blog post, we’ll be running both the service and the client projects together a number of times. You might find it convenient to configure the TeamTask solution to automatically launch the server and then the client when you press (F5). To do this, right click on the TeamTask solution in the Solution Explorer (Ctrl+W,S) and select “Properties” from the context menu that appears. In the Solution Properties window, select the “Multiple startup projects” radio button. Make sure that the TeamTask.Service project is the top project in the list by selecting it and clicking on the up arrow button. Click on the “Action” cell for the TeamTask.Service project and select “Start without Debugging”. Then click on the “Action” cell for the TeamTask.Client project and select “Start”.
Helpful Tip: It might seem counterintuitive that we set “automaticFormatSelectionEnabled” to false when we were explicitly trying to demonstrate how our service could automatically handle a JSON request. You would probably assume that “automaticFormatSelectionEnabled” needs to be set to “true” to handle a JSON request. But this isn’t the case, as we saw when we executed the client. The “automaticFormatSelectionEnabled” setting applies to outgoing responses only. All incoming requests in either XML or JSON are automatically handled, and in fact, there is no way to disable this behavior to accept only one format or the other. |
Step 2: Setting the Response Format Automatically
In step one, we wrote the request message body to the console to show that it was in fact JSON. But what about the response message? We didn’t write it out to the console, but it happens to be in XML. You can see for yourself by adding a call to the WriteOutContent() method and passing in the response content.
Of course this is odd-a client sends JSON and gets XML back. This occurs because the default response format of the UpdateTask() operation is XML. You specify the default response format for an operation using the ResponseFormat property on the [WebGet] or [WebInvoke] attributes, but the ResponseFormat property isn’t explicitly set with the UpdateTask() operation and it defaults to XML.
We could set the ResponseFormat for the UpdateTask() operation to JSON, but that wouldn’t really solve our problem. If a client were to send a request in XML, it would get back a response in JSON. What we really want is for the WCF infrastructure to be smart enough to choose the correct response format given the request itself. And in fact, this is exactly the behavior the new automatic format selection feature in WCF WebHttp Services provides.
Enabling automatic format selection is as easy as setting “automaticFormatSelectionEnabled” to “true” in the Web.config for the service. With the online templates it is set to “true” by default, which is why we had to set it to “false” in step one.
When automatic format selection is enabled, the WCF infrastructure will try to determine the appropriate response format using:
The value of the HTTP Accept header of the request. If the request doesn’t provide an Accept header or the Accept header doesn’t list an appropriate format, the WCF infrastructure will try to use
The content-type of the request. If the request doesn’t have a body or if the content-type of the request isn’t an appropriate format, the WCF infrastructure will use
The default response format for the operation.
Now we’ll re-enable automatic format selection and demonstrate how it works by sending an HTTP GET request with an Accept header indicating a preference for JSON. We’ll also update our client to write out the response from the HTTP PUT request and show that the response format matches that of the request (even without an Accept header).
Open the Web.Config file from the TeamTask.Server project and change the value of the “automaticFormatSelectionEnabled” setting from “false” to “true” like so:
<webHttpEndpoint>
<standardEndpoint name=“” helpEnabled=“true”
automaticFormatSelectionEnabled=“true“/>
</webHttpEndpoint>
Open the Program.cs file from the TeamTask.Client project in the code editor and replace the static GetTask() method implementation with the implementation below. You’ll also need to add “using System.Runtime.Serialization.Json;” to the code file:
static Task GetTask(HttpClient client, int id)
{
Console.WriteLine(“Getting task ‘{0}’:”, id);
using (HttpRequestMessage request =
new HttpRequestMessage(“GET”, “Tasks”))
{
request.Headers.Accept.AddString(“application/json”);
using (HttpResponseMessage response = client.Send(request))
{
response.EnsureStatusIsSuccessful();
WriteOutContent(response.Content);
return response.Content.ReadAsJsonDataContract<List<Task>>()
.FirstOrDefault(task => task.Id == id);
}
}
}
This implementation of the static GetTask() method is very similar to the client code we wrote in part two of this blog post series. However, we are now instantiating an HttpRequestMessage so that we can set the Accept header to “application/json”. We are also using the ReadAsJsonDataContract() extension method instead of the ReadAsDataContract() extension method since the content is now JSON instead of XML.
If you try to build you’ll find that the ReadAsJsonDataContract() extension method has a dependency, so in the “Solution Explorer” window, right click on the TeamTask.Client project and select “Add Reference”. In the “Add Reference” window, select the “.NET” tab and choose the System.ServiceModel.Web assembly.
In the UpdateTask() method, also write the response out to the console and replace the ReadAsDataContract() call with a ReadAsJsonDataContract() call like so:
using (HttpResponseMessage response = client.Put(updateUri, content))
{
response.EnsureStatusIsSuccessful();
Console.WriteLine(“Response:”);
WriteOutContent(response.Content);
return response.Content.ReadAsJsonDataContract<Task>();
}
Start without debugging (Ctrl+F5) to get the TeamTask service running and then start the client by right clicking on the TeamTask.Client project in the “Solution Explorer” window and selecting “Debug”->”Start New Instance”. The console should contain the following output:
Notice that JSON was used for the responses of both the GET and PUT requests. JSON was used with the GET request because of the HTTP Accept header value, and it was used for the PUT request because the request itself used JSON.
Step 3: Setting the Response Format Explicitly
Automatic format selection is a powerful new feature, but it may not be the solution for all scenarios. For example, it won’t work when a service wants to support clients that aren’t able to set the HTTP Accept header when they send GET requests. Therefore WCF WebHttp Services also allows the response format to be set explicitly in code.
We’ll demonstrate how to explicitly set the response format by adding a “format” query string parameter to the GetTasks() operation of the TeamTask service. The value of this query string parameter will determine the response format.
Open the TeamTaskService.cs file in the code editor.
Add a “format” query string parameter to the UriTemplate of the GetTasks() operation along with a matching method parameter like so:
[WebGet(UriTemplate =
“Tasks?skip={skip}&top={top}&owner={userName}&format={format}”)]
public List<Task> GetTasks(int skip, int top, string userName, string format)
Within the body of the GetTasks() operation, add the following code:
// Set the format from the format query variable if it is available
if (string.Equals(“json”, format, StringComparison.OrdinalIgnoreCase))
{
WebOperationContext.Current.OutgoingResponse.Format =
WebMessageFormat.Json;
}
Setting the response format explicitly is as simple as setting the Format property on the OutgoingResponse of the WebOperationContext. When the “format” query string is equal to “json”, the response format is set to JSON, otherwise the default value of XML is used.
Start without debugging (Ctrl+F5) and use the browser of your choice to navigate to http://localhost:8080/TeamTask/Tasks. In Internet Explorer, the list of tasks will be displayed as shown below:
Now, send another request with the browser, but add the “format” query string parameter to the URI like so: http://localhost:8080/TeamTask/Tasks?format=json. In Internet Explorer, you’ll be presented with a dialog box asking if you want to download the response as a file. Save the file and open it in notepad and it will contain the tasks in the JSON format as shown below:
Helpful Tip: While WCF WebHttp Services offers first-class support for XML and JSON, it also provides a more advanced API for returning plain text, Atom feeds, or any other possible content-type. We’ll cover this feature in part eight of this blog post series. |
Next Steps: Error Handling with WebFaultException
So far in our implementation of the TeamTask service, we haven’t provided any real error handling. In part five of this blog post series we’ll rectify this and use the new WebFaultException class to communicate why a request has failed by providing an appropriate HTTP status code.
Randall Tombaugh
Developer, WCF WebHttp Services


