by community-syndication | Jun 11, 2010 | BizTalk Community Blogs via Syndication
After my previous post about how you can monitor service calls with AppFabric, several people asked about how you can capture errors with AppFabric. Unfortunately, the default error handling behavior of WCF Data Services does not work well with AppFabric. Though it does return HTTP status codes to the calling application to indicate the error, AppFabric will not record these as exceptions as it would normally.
To work around this behavior, you can simply add code to handle exceptions and report the error to AppFabric using the same WCFEventProvider I showed in the previous post. I’ve cleaned up and modified the code a bit to handle errors as well.
I’ve attached the sample code to this blog post. It includes the SQL script you will need to create the database.
Step 1 – Override the DataService<T>.HandleException method
protected override void HandleException(HandleExceptionArgs args)
{
    eventProvider.WriteErrorEvent(
        this.GetType().Name,
        "Exception {0} status code {1}",
        args.Exception.Message,
        args.ResponseStatusCode);
}
Step 2 – Invoke the service with an invalid URI
If you invoke the service with an invalid URI it will return an HTTP 404 (Not Found) exception. It might be nice to know if you are getting a great deal of invalid URIs thrown at your service. I’ve modified the Default.htm file to include a link that will yield an error. To see the error,
- Run the project and click the link Generate Error by querying bad resource uses the link Services/Conference.svc/BadResource.
- Open IIS Manager
- Open the AppFabric Dashboard for the RESTWeb project
You will notice that this one call to the service is recorded as both a Completed call and also an Error. This is a side effect of the way that WCF Data Services report the error, this will be corrected in a future release.
To get specifics about the error, just click the link for Errors and click on the Errors tab to see the exception text.
Step 2 – Provide Warnings for ServiceMethods
There may be cases where you want to provide a warning in the AppFabric log. In the sample code, I’ve included a service method on the data service that accepts a name parameter. If no name is provided, the code records a warning.
[WebGet]
public string SayHello(string name)
{
    // Output a warning if name is empty
    if (string.IsNullOrWhiteSpace(name))
        eventProvider.WriteWarningEvent(
            "Conference SayHello",
            "Warning - name is empty");
    else
        eventProvider.WriteInformationEvent(
            "Conference SayHello",
            "Saying Hello to user {0}",
            name);

    return "Hello " + name;
}
To see this warning
- Navigate to RESTWeb/Default.htm
- Click the link Generate warning with empty name to SayHello which passes a name with Whitepsace.
- The call will succeed
- Open (or Refresh) the AppFabric Dashboard for RESTWeb
- In the WCF Call History Click the Completed link
- Right click on the top OperationCompleted event and select View All Related Events
- Look for the warning event. The payload will contain the warning text.
Step 3 – Read The Monitoring Database
Finally I thought you might like to see how you can read these monitoring events from the monitoring database with a web app. I’ve added the ShowEvents.aspx page which will display events from the Conference service.
To make this work
- Check the connection string – it uses the database name AppFabricMonitoringDB
- The IIS APPPOOL\DefaultUser will need to be granted permission to read from this database. To do this, just add it to the Local Security Group AS_Observers
Be sure to reboot after adding the DefaultAppPool to this group
- Next I created an Entity Framework Model that includes just the WCFEvent View.
- Then I dropped a ListView on the page and wired it up to the dataset.
- Click on the Show Monitoring Events from Conference Service link to see it
Summary
With a little bit of code in your WCF DataService, AppFabric can provide some very useful monitoring information. And because AppFabric collects this information across the server farm, all the servers will log events in the monitoring database.
by community-syndication | Jun 11, 2010 | BizTalk Community Blogs via Syndication
TechEd 2010 North America is done for another year. I thought the conference went really well and people were full of enthusiasm. A lot of Product Groups have shipped, or are shipping products this year. There were over 11 300 in attendance for this event eager to hear about the latest bits in the pipeline . I was at TechEd in LA last year and can tell you there wasn’t near that many people in attendance.
BizTalk and the Cloud
I saw a really interesting session where BizTalk was brokering a connection through the Service Bus into a SAP and a Mainframe system. A Web app was hosted in Azure and BizTalk was listening for requests via the AppFabric Service Bus. It was probably the riskiest demo I saw, but Chris and Elizabeth pulled it off without a hitch. I have been thinking about these types of scenarios quite a bit since I have done a fair about of integration with SAP in the past. SAP certainly cannot connect into the Azure Service Bus at this time nor do I expect them to be able to do that any time soon. Mainframe systems are no different since they most likely will not have a transport mechanism capable of communicating with the Microsoft cloud. Many businesses leverage SAP to run their core business, having BizTalk capable of connecting into the cloud provides an additional layer of abstraction and security when accessing SAP data.
More Cloud
There was certainly no shortage of Cloud talk at this conference. The next session I saw was called Appfabric: Extend .Net technologies to the Cloud. It was presented by Aaron Skonnard and Keith Brown. You can tell these guys are very comfortable on the presenter’s stage. It was probably best presentation that I have seen in a long time.
Some of the topics discussed include:
- You can think of Azure AppFabric as an extension of the .Net framework
- No Azure Workflow as a Service in this release
- Relay bindings allow your application access into the Service Bus
- Direct connections allow you to communicate peer to peer with other clients in order to improve performance and reduce charges
- Eventing pub/sub can be used in multi-cast situations
- To increase interoperability use Http Relay Bindings
View from the BizTalk Booth
- A had a few conversations with attendees who were using other middleware products such as Oracle or IBM and wanted to know how BizTalk stacked up in terms of feature set. None of the features that they were requesting were absent from the BizTalk stack. They also wanted to see how easy the Microsoft tools are to use and the impression that I got is that they felt they were on par with what they were use to seeing.
- Another attendee wanted to know whether they should be using WF or BizTalk. Quite frankly this scenario can still get a little blurry for me. We talked about things like low latency, durable messaging, flat file requirements, Adapters and management of the solutions.
Next Year
Next year TechEd will be held in Atlanta from May 16th-19th. There is currently an early bird special where you can save $500 for registering early. http://northamerica.msteched.com/?fbid=qjus7wvTc2O
by community-syndication | Jun 11, 2010 | BizTalk Community Blogs via Syndication
Last month I blogged about how Microsoft is starting to make code contributions to jQuery, and about some of the first code contributions we were working on: jQuery Templates and Data Linking support.
Today, we released a prototype of a new jQuery Globalization Plugin that enables you to add globalization support to your JavaScript applications. This plugin includes globalization information for over 350 cultures ranging from Scottish Gaelic, Frisian, Hungarian, Japanese, to Canadian English. We will be releasing this plugin to the community as open-source.
You can download our prototype for the jQuery Globalization plugin from our Github repository:
http://github.com/nje/jquery-glob
You can also download a set of samples that demonstrate some simple use-cases with it here.
Understanding Globalization
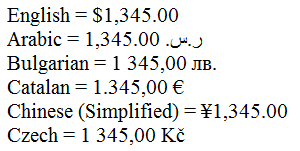
The jQuery Globalization plugin enables you to easily parse and format numbers, currencies, and dates for different cultures in JavaScript. For example, you can use the Globalization plugin to display the proper currency symbol for a culture:
You also can use the Globalization plugin to format dates so that the day and month appear in the right order and the day and month names are correctly translated:

Notice above how the Arabic year is displayed as 1431. This is because the year has been converted to use the Arabic calendar.
Some cultural differences, such as different currency or different month names, are obvious. Other cultural differences are surprising and subtle. For example, in some cultures, the grouping of numbers is done unevenly. In the "te-IN" culture (Telugu in India), groups have 3 digits and then 2 digits. The number 1000000 (one million) is written as "10,00,000". Some cultures do not group numbers at all. All of these subtle cultural differences are handled by the jQuery Globalization plugin automatically.
Getting dates right can be especially tricky. Different cultures have different calendars such as the Gregorian and UmAlQura calendars. A single culture can even have multiple calendars. For example, the Japanese culture uses both the Gregorian calendar and a Japanese calendar that has eras named after Japanese emperors. The Globalization Plugin includes methods for converting dates between all of these different calendars.
Using Language Tags
The jQuery Globalization plugin uses the language tags defined in the RFC 4646 and RFC 5646 standards to identity cultures (see http://tools.ietf.org/html/rfc5646). A language tag is composed out of one or more subtags separated by hyphens. For example:
| Language Tag |
Language Name (in English) |
| en-AU |
English (Australia) |
| en-BZ |
English (Belize) |
| en-CA |
English (Canada) |
| Id |
Indonesian |
| zh-CHS |
Chinese (Simplified) Legacy |
| Zu |
isiZulu |
Notice that a single language, such as English, can have several language tags. Speakers of English in Canada format numbers, currencies, and dates using different conventions than speakers of English in Australia or the United States. You can find the language tag for a particular culture by using the Language Subtag Lookup tool located here: http://rishida.net/utils/subtags/
The jQuery Globalization plugin download includes a folder named globinfo that contains the information for each of the 350 cultures. Actually, this folder contains more than 700 files because the folder includes both minified and un-minified versions of each file.
For example, the globinfo folder includes JavaScript files named jQuery.glob.en-AU.js for English Australia, jQuery.glob.id.js for Indonesia, and jQuery.glob.zh-CHS for Chinese (Simplified) Legacy.
Example: Setting a Particular Culture
Imagine that you have been asked to create a German website and want to format all of the dates, currencies, and numbers using German formatting conventions correctly in JavaScript on the client. The HTML for the page might look like this:

Notice the span tags above. They mark the areas of the page that we want to format with the Globalization plugin. We want to format the product price, the date the product is available, and the units of the product in stock.
To use the jQuery Globalization plugin, we’ll add three JavaScript files to the page: the jQuery library, the jQuery Globalization plugin, and the culture information for a particular language:

In this case, I’ve statically added the jQuery.glob.de-DE.js JavaScript file that contains the culture information for German. The language tag “de-DE” is used for German as spoken in Germany.
Now that I have all of the necessary scripts, I can use the Globalization plugin to format the product price, date available, and units in stock values using the following client-side JavaScript:

The jQuery Globalization plugin extends the jQuery library with new methods – including new methods named preferCulture() and format(). The preferCulture() method enables you to set the default culture used by the jQuery Globalization plugin methods. Notice that the preferCulture() method accepts a language tag. The method will find the closest culture that matches the language tag.
The $.format() method is used to actually format the currencies, dates, and numbers. The second parameter passed to the $.format() method is a format specifier. For example, passing “c” causes the value to be formatted as a currency. The ReadMe file at github details the meaning of all of the various format specifiers: http://github.com/nje/jquery-glob
When we open the page in a browser, everything is formatted correctly according to German language conventions. A euro symbol is used for the currency symbol. The date is formatted using German day and month names. Finally, a period instead of a comma is used a number separator:

You can see a running example of the above approach with the 3_GermanSite.htm file in this samples download.
Example: Enabling a User to Dynamically Select a Culture
In the previous example we explicitly said that we wanted to globalize in German (by referencing the jQuery.glob.de-DE.js file). Let’s now look at the first of a few examples that demonstrate how to dynamically set the globalization culture to use.
Imagine that you want to display a dropdown list of all of the 350 cultures in a page. When someone selects a culture from the dropdown list, you want all of the dates in the page to be formatted using the selected culture.

Here’s the HTML for the page:

Notice that all of the dates are contained in a <span> tag with a data-date attribute (data-* attributes are a new feature of HTML 5 that conveniently also still work with older browsers). We’ll format the date represented by the data-date attribute when a user selects a culture from the dropdown list.
In order to display dates for any possible culture, we’ll include the jQuery.glob.all.js file like this:

The jQuery Globalization plugin includes a JavaScript file named jQuery.glob.all.js. This file contains globalization information for all of the more than 350 cultures supported by the Globalization plugin. At 367KB minified, this file is not small. Because of the size of this file, unless you really need to use all of these cultures at the same time, we recommend that you add the individual JavaScript files for particular cultures that you intend to support instead of the combined jQuery.glob.all.js to a page. In the next sample I’ll show how to dynamically load just the language files you need.
Next, we’ll populate the dropdown list with all of the available cultures. We can use the $.cultures property to get all of the loaded cultures:

Finally, we’ll write jQuery code that grabs every span element with a data-date attribute and format the date:

The jQuery Globalization plugin’s parseDate() method is used to convert a string representation of a date into a JavaScript date. The plugin’s format() method is used to format the date. The “D” format specifier causes the date to be formatted using the long date format.
And now the content will be globalized correctly regardless of which of the 350 languages a user visiting the page selects. You can see a running example of the above approach with the 4_SelectCulture.htm file in this samples download.
Example: Loading Globalization Files Dynamically
As mentioned in the previous section, you should avoid adding the jQuery.glob.all.js file to a page whenever possible because the file is so large. A better alternative is to load the globalization information that you need dynamically.
For example, imagine that you have created a dropdown list that displays a list of languages:

The following jQuery code executes whenever a user selects a new language from the dropdown list. The code checks whether the globalization file associated with the selected language has already been loaded. If the globalization file has not been loaded then the globalization file is loaded dynamically by taking advantage of the jQuery $.getScript() method.

The globalizePage() method is called after the requested globalization file has been loaded, and contains the client-side code to perform the globalization.
The advantage of this approach is that it enables you to avoid loading the entire jQuery.glob.all.js file. Instead you only need to load the files that you need and you don’t need to load the files more than once.
The 5_Dynamic.htm file in this samples download demonstrates how to implement this approach.
Example: Setting the User Preferred Language Automatically
Many websites detect a user’s preferred language from their browser settings and automatically use it when globalizing content. A user can set a preferred language for their browser. Then, whenever the user requests a page, this language preference is included in the request in the Accept-Language header.
When using Microsoft Internet Explorer, you can set your preferred language by following these steps:
- Select the menu option Tools, Internet Options.
- Select the General tab.
- Click the Languages button in the Appearance section.
- Click the Add button to add a new language to the list of languages.
- Move your preferred language to the top of the list.

Notice that you can list multiple languages in the Language Preference dialog. All of these languages are sent in the order that you listed them in the Accept-Language header:
Accept-Language: fr-FR,id-ID;q=0.7,en-US;q=0.3
Strangely, you cannot retrieve the value of the Accept-Language header from client JavaScript. Microsoft Internet Explorer and Mozilla Firefox support a bevy of language related properties exposed by the window.navigator object, such as windows.navigator.browserLanguage and window.navigator.language, but these properties represent either the language set for the operating system or the language edition of the browser. These properties don’t enable you to retrieve the language that the user set as his or her preferred language.
The only reliable way to get a user’s preferred language (the value of the Accept-Language header) is to write server code. For example, the following ASP.NET page takes advantage of the server Request.UserLanguages property to assign the user’s preferred language to a client JavaScript variable named acceptLanguage (which then allows you to access the value using client-side JavaScript):

In order for this code to work, the culture information associated with the value of acceptLanguage must be included in the page. For example, if someone’s preferred culture is fr-FR (French in France) then you need to include either the jQuery.glob.fr-FR.js or the jQuery.glob.all.js JavaScript file in the page or the culture information won’t be available. The “6_AcceptLanguages.aspx” sample in this samples download demonstrates how to implement this approach.
If the culture information for the user’s preferred language is not included in the page then the $.preferCulture() method will fall back to using the neutral culture (for example, using jQuery.glob.fr.js instead of jQuery.glob.fr-FR.js). If the neutral culture information is not available then the $.preferCulture() method falls back to the default culture (English).
Example: Using the Globalization Plugin with the jQuery UI DatePicker
One of the goals of the Globalization plugin is to make it easier to build jQuery widgets that can be used with different cultures.
We wanted to make sure that the jQuery Globalization plugin could work with existing jQuery UI plugins such as the DatePicker plugin. To that end, we created a patched version of the DatePicker plugin that can take advantage of the Globalization plugin when rendering a calendar. The following image illustrates what happens when you add the jQuery Globalization and the patched jQuery UI DatePicker plugin to a page and select Indonesian as the preferred culture:

Notice that the headers for the days of the week are displayed using Indonesian day name abbreviations. Furthermore, the month names are displayed in Indonesian.
You can download the patched version of the jQuery UI DatePicker from our github website. Or you can use the version included in this samples download and used by the 7_DatePicker.htm sample file.
Summary
I’m excited about our continuing participation in the jQuery community. This Globalization plugin is the third jQuery plugin that we’ve released.
We’ve really appreciated all of the great feedback and design suggestions on the jQuery templating and data-linking prototypes that we released earlier this year. We also want to thank the jQuery and jQuery UI teams for working with us to create these plugins.
Hope this helps,
Scott
P.S. In addition to blogging, I am also now using Twitter for quick updates and to share links. You can follow me at: twitter.com/scottgu
by community-syndication | Jun 10, 2010 | BizTalk Community Blogs via Syndication
Recently, I had to implement an SSIS package which imports some data into SQL Server from MSMQ. It turns out reading MSMQ from within an SSIS package is more difficult than it seems at first. I’ve documented how to get things working because I could find little other documentation.
When reading data from MSMQ, there’s multiple steps to take:
- Setting up a queue, if not yet available
- Set up a connection with MSMQ by adding a connection manager to the SSIS package
- Adding and configuring a Message Queue Task
- Putting data onto the queue
- Running the package to validate the data is read from the queue
Setting up a queue
In Windows Server (2008 R2 in my case), create a new queue. It doesn’t really matter whether this queue is transactional or not.
Setting up a connection with MSMQ from within an SSIS package
First things first, let’s start with setting up a connection manager for MSMQ. When creating a new SSIS package, this is the view you get:
In the “Connection Managers” area, right-click and choose “new connection”. From the list that is displayed, select the “MSMQ” type and click “Add”.
A new dialog pops up, in which you can configure the connection to be made. I choose “.\Private$\mh” (a local queue called “mh”). Click “Test” to ensure the connection can be made and click “OK”.
The connection manager is set up.
Adding a Message Queue Task
Adding a Message Queue task to the Control Flow is easy, drag and drop it from the Toolbox on the left (press CTRL-ALT-X if it’s not displayed) to the Control Flow surface, like displayed below.
To configure the Message Queue Task, double-click the Message Queue task’s icon on the left of the Task in the Control Flow. A new dialog pops up in which we’ll configure the task. Select the connection manager we set up previously for the “MSMQConnection” property within the dialog and change the default “Send message” value for the “Message” property to “Receive message”.
Change to the “Receive” configuration page by click “Receive” on the left-hand side of the dialog. Choose whether the message should be removed from the queue after it is read by SSIS. I’ve chosen not to timeout reading the queue. Set the “MessageType” property to “String message to variable”.
Click on the drop-down for the “Variable” property and choose “New variable". This will show a new dialog, in which a new variable can be defined. For this example, let’s use the information shown below and click “OK”.
After closing the dialog, we’ll be returned to the “Message Queue Task editor” dialog, which shows the newly created variable.
The Message Queue Task is configured to read messages from the “.\Private$\mh” queue.
Putting data onto the queue
For SSIS to be able to read the queue, ensure you label everything you put onto the queue with the label ’String message’. If you don’t the message will not be picked up by SSIS.
Validation the package
Pressing F-5 (Debug) from within the Business Intelligence Development Studio will run the package, effectively picking up a message from the queue if there is any.
HTH, happy trails!
by community-syndication | Jun 10, 2010 | BizTalk Community Blogs via Syndication
More BizTalk
We took a closer look at the Dashboard Settings in the BizTalk Admin Console. There are 3 main categories that you can configure:
- Group Configurations
- Host Configurations
- Host Instance Configurations
Probably the most compelling setting allows you to control the polling interval when connecting to the MessageBox for new messages. You even have the ability to configure these settings based upon a Messaging or Orchestration scenario at the Host level. In the demo, we saw a simple Receive and Respond scenario. The default configuration setting is to have BizTalk connect to the MessageBox every 500 ms. This message took .68 seconds to be processed end to end. The Polling interval was then changed to 10 ms and the message took .09 seconds to process. Some pretty dramatic improvements. The end result is that the BizTalk Host Instances are not waiting as long for their next polling interval so messages will be processed more frequently. These actions are not without some risk though. The more frequently you poll, the more stress you put on you SQL Server database so mileage will vary.
The portability of the Dashboard settings were also demonstrated. You now have the ability to export and import your configuration settings across environments so you are not manually tweaking on several servers. You also have the ability to script the import and export of these settings
The new BizTalk Management Pack for SCOM was demonstrated. They have rebuilt this MP from the ground up and now include 2 separate views:
The Application view focuses on artifacts that would typically be addressed by BizTalk developers. So if you have a message that failed in a pipeline or a retrying sent port then you would find them in this view. More infrastructure related items would be found in the Deployment view. So if you had a database or host instance offline, you will find these types of alerts in the Deployment view.
Unfortunately, the new SCOM pack will only work with BizTalk 2010 so if you are still on BizTalk 2009 or previous, you cannot use this MP. The good news is that the MP will ship with BizTalk 2010 so there will be no gap between those two products and their release dates.
Other bits
- The support for SQL 2005 and Windows 2003 is gone for BizTalk 2010
- BizTalk 2009 (and earlier) will not be certified for Windows Server 2008 R2.
- Business Activity Monitoring (BAM) Portal will support 64 bit app pools – Not exactly true, please see comment by Rahul for further clarification
- BizTalk Admin Console is still not a native 64bit app. You can run in WOW mode on 64 bit machine though
BizTalk Business to Business integration
I later sat in on a B2B presentation that discussed EDI and Trading Partner Management. I have not had a lot of exposure to these 2 features of BizTalk so it was interesting to get a look under the hood. The TPM management is greatly improved and is more intuitive to use as you can now group Business Units under a Parent entity.
They also discussed the BizTalk Mapper since EDI schemas tend to be large and complex. Leveraging new features like Search, Indicative Match, copy and pasting functiods, highlighting selected nodes and links goes along way.
The enhanced FTP adapter was discussed and here are some of the core features:
- Support for Read Only Receive scenarios
- FTPS protocol is now supported
- Improved performance when connecting to AIX systems
- Atomic Sends for Text files
Communications Server 14
Office Communications Server (OCS) has been rebranded to just Communications Server or “CS 14”. I am not that familiar(at a deep technical level) with OCS and related technologies but since we do use it I thought I would check out the Q and A session that deals with interoperability.
I think it is pretty safe to say that this industry is in a state of transition. You have traditional telecom companies like Cisco and Avaya who are trying to hold onto their footprint and then you have Microsoft who is very hungry in this vertical. The frustrating part is that these companies have so much at stake that they are not collaborating much (from what I can see) and that leaves customers who have a blend of this technology frustrated as it is tough to develop roadmaps with so much changing. It may be a good idea to sit on the sidelines for a year to see how this all shakes out.
View from the BizTalk Booth
More great conversations at the BizTalk booth:
- An Infrastructure Architect wanted to know what impact BizTalk has on his environment since his organization is planning on implementing BizTalk
- Another attendee is looking and managing the provisioning of Datacenter assets through BizTalk. He wanted BizTalk to host services that would expose functions like “deploy Windows Server”, “Deploy SQL Server”, “Deploy Application ’x’ to Server ’y’”. It was a very interesting discussion about how they wanted to provision systems to their private cloud.
- More questions about using the BizTalk Mapper activity in WF
- There genuinely seems to be interest in BizTalk. Perhaps people are just being polite, but a lot of people are talking about introducing BizTalk to their environment(s).

by community-syndication | Jun 10, 2010 | BizTalk Community Blogs via Syndication
Last month I blogged about the Extension Manager that is built-into VS 2010 – as well as about a cool VS 2010 PowerCommands extension that provides some extra features for Visual Studio. The Visual Studio 2010 Extension Manager provides an easy way for developers to quickly find and install extensions and plugins that enhance the built-in functionality to VS 2010.
New VS 2010 Productivity Power Tools Release
Earlier this week Jason Zander announced the availability of a new VS 2010 Productivity Power Tools release that includes a bunch of great new VS 2010 extensions that provide a bunch of cool new functionality for you to take advantage of.
You can download and install the release for free here. Some of the code editor improvements it provides include:
- Entire Line Highlighting: Makes it easier to track cursor location within the editor
- Entire Line Selection: Triple Clicking a line in the code editor now selects the entire line (like with MS Word)
- Code Block Movement: Use Alt+Up/Down Arrow now moves selected code blocks up/down in the editor
- Consistent Tabs vs. Spaces: Ensure consistent tab vs. space usage across your projects
- Colorized Parameters: It is now easier to see/identify method parameters
- Column Guide: You can now add vertical column guidelines to help with text alignment and sizes
- Align assignments: Makes it easier to line-up multiple variable assignments within your code
- HTML Clipboard Support: Copy/paste code from VS into an HTML buffer (useful for blogging!)
- Ctrl + Click Go to Definition: You can now hold down the Ctrl key and click a type to go to its definition
It also includes several tab management improvements for managing document tabs within the IDE:
- Show Close Button in Tab Well: Shows a close button in document well for the active tab (like VS 2008 did)
- Colored Tabs: You can now select the color of each document tab by project or by regex
- Pinned Tabs: Enables you to pin tabs to keep them always visible and available
- Vertical Tabs: You can now show document tabs vertically to fit more tabs than normal
- Remove Tabs by Usage Order: Better behavior when adding new tabs and one needs to be hidden for space reasons
- Sort Tabs by Project: Tabs can be sorted by project they belong to, keeping them grouped together
- Sort Tabs Alphabetically: Tabs can be sorted alphabetically
And last – but not least – it includes a new and improved “Add Reference” dialog:
This new Add Reference dialog caches assembly information – which means it loads within a second or two (note: the very first time it still loads assembly data – but it then caches it and makes it fast afterwards). The new Add Reference dialog also now includes searching support – making it easier to find the assembly you are looking for.
You can read more about all of the above improvements in Jason’s blog post about the release.
New Visualization and Modeling Feature Pack Release
Earlier this week we also shipped a new feature pack that adds additional modeling and code visualization features to VS 2010 Ultimate. You can download it here.
The Visualization and Modeling Feature Pack includes a bunch of great new capabilities including:
- Web Site Visualization: New support for generating a DGML visualization for ASP.NET projects
- C/C++ Native Code Visualization: New support for generating DGML diagrams for C/C++ projects
- Generate Code from UML Class Diagrams: You can now generate code from your UML diagrams
- Create UML Class Diagrams from Code: Create UML diagrams from existing code bases
- Import UML from XML: Import UML class, sequence, and use case elements from XMI 2.1 files
- Custom Validation Layer Rules: Write custom code to create, modify, and validate layer diagrams
Jason’s blog post covers more about these features as well.
Hope this helps,
Scott
P.S. In addition to blogging, I am also now using Twitter for quick updates and to share links. Follow me at: twitter.com/scottgu
by community-syndication | Jun 9, 2010 | BizTalk Community Blogs via Syndication
In the recently released BizTalk Server 2010 Beta, we introduced a new feature “BizTalk + AppFabric”, which allows users to easily develop simple integration applications. With this feature, users can:
%u00b7 Develop Windows Workflow applications that require connectivity to backend Line of Business (LOB) systems like SAP, Oracle DB, Oracle E-Business Suite, Seibel, and SQL Server without writing custom code for LOB connectivity.
%u00b7 Develop XML-based data transformation using the easy-to-use and rich user interface of BizTalk Mapper that can be launched and used right within a .NET/WF project
In this blog, I will provide an overview of this feature. A more elaborate whitepaper with a tutorial can be found here.
With this feature, Windows Workflow Foundation (WF) activities are provided to the end user to programmatically access BizTalk’s LOB connectivity and data transformation capabilities. This enables users to easily create new composite applications using the WF model, which can be deployed, hosted, managed in Windows Server AppFabric. This also enables web-based applications to access LOB data. This can help a class of scenarios (such as Web-based queries) that are best effort, short running and don’t require the durability/persistence provided by traditional BizTalk Server. A typical application architecture may look like below:
Figure 1 A workflow service hosted in AppFabric/IIS connecting to a Line-of-Business system
Connecting to a Line of Business System
BizTalk provides a set of WCF based adapters that provide easy connectivity to Line of Business (LoB) systems. To use this, you need to install the WCF LoB Adapter SDK and the BizTalk Adapter Pack, which are available as part of BizTalk Server 2010 Beta release.
To use this feature from a WF project in Visual Studio, click the “Add Adapter Service Reference” menu item.
This brings up a dialog box (like the one below) which you can use to connect to the LoB system. The dialog box allows you to browse through the artifacts supported by the LoB system and choose the operations you want to use. For example, in the screenshot below, we use the “Select” operation on the SQL Database table “CustomerInfo”.
When you click OK, the plugin will generate WF activities for the operations you have selected. You must build your project to see the activities on the Visual Studio Toolbox (See below). Once that is done, you can simple drag-and-drop the activities to use them in your workflow.
Transforming Data using the BizTalk Mapper
BizTalk provides a rich GUI-based tool for performing data transformations for XML data. We can now use this capability from a WF application through the Mapper activity. You will see this activity on the Toolbox under the “BizTalk” category after you install BizTalk Server (Developer Tools) and the WCF LOB Adapter SDK.
To use this mapper activity, you need to specify the InputDataContractType and the OutputDataContractType. As the name suggests, these are .NET types for the input data and the output data for the activity. You can then create a new map or select an existing map based on these types. If you are creating a new map, the activity will generate the XML schemas for the selected input and output DataContract types and a new BizTalk map (.btm) file.
You can then open and edit the BizTalk map file in the BizTalk Mapper GUI from within the WF project itself. When the map file is saved, it will automatically be compiled and built along with the project.
The mapper activity has an input argument that takes the data to be transformed and an output argument where the transformed data is stored. You can create workflow variables to pass the input and store the output from the activity. At runtime, the input data will first be serialized into XML. It will then be transformed using XSLT generated from the map file and finally de-serialized back into an object of the output type.
Summary
With these features, developing web applications which require access to LoB data will be a lot easier. The ability to use the BizTalk Mapper for data transformation means that different data in different LoB systems can be transformed using an interactive and intuitive GUI-based tool. Windows Server AppFabric provides a hosting service to deploy and manage these applications.
We would be happy to see you try out these features in your workflow applications, and receive your feedback. You can either write to me directly (sameerch @ microsoft . com) or leave a feedback here on this blog.
Sameer Chabungbam
Program Manager, BizTalk Server Team
by community-syndication | Jun 9, 2010 | BizTalk Community Blogs via Syndication
[Update 21/10/2010: Made changes to the article to reflect the changes in branding and features post RTM]
In the recently released BizTalk Server 2010, we introduced a new feature of BizTalk called “AppFabric Connect”, which allows users to easily develop simple integration applications. With this feature, users can:
- Develop Windows Workflow applications that require connectivity to backend Line of Business (LOB) systems like SAP, Oracle DB, Oracle E-Business Suite, Seibel, and SQL Server without writing custom code for LOB connectivity.
- Develop XML-based data transformation using the easy-to-use and rich user interface of BizTalk Mapper that can be launched and used right within a .NET/WF project
In this blog, I will provide an overview of this feature. A more elaborate whitepaper with a tutorial can be found here.
With this feature, Windows Workflow Foundation (WF) activities are provided to the end user to programmatically access BizTalk’s LOB connectivity and data transformation capabilities. This enables users to easily create new composite applications using the WF model, which can be deployed, hosted, managed in Windows Server AppFabric. This also enables web-based applications to access LOB data. This can help a class of scenarios (such as Web-based queries) that are best effort, short running and don’t require the durability/persistence provided by traditional BizTalk Server. A typical application architecture may look like below:
Figure 1 A workflow service hosted in AppFabric/IIS connecting to a Line-of-Business system
Connecting to a Line of Business System
BizTalk provides a set of WCF based adapters that provide easy connectivity to Line of Business (LoB) systems. To use this, you need to install the WCF LoB Adapter SDK and the BizTalk Adapter Pack, which are available as part of BizTalk Server 2010 release.
To use this feature from a WF project in Visual Studio, click the “Add Adapter Service Reference…” menu item.
This brings up a dialog box (like the one below) which you can use to connect to the LoB system. The dialog box allows you to browse through the artifacts supported by the LoB system and choose the operations you want to use. For example, in the screenshot below, we use the “Select” operation on the SQL Database table “CustomerInfo”.
When you click OK, the plugin will generate WF activities for the operations you have selected. You must build your project to see the activities on the Visual Studio Toolbox (See below). Once that is done, you can simple drag-and-drop the activities to use them in your workflow.
Transforming Data using the BizTalk Mapper
BizTalk provides a rich GUI-based tool for performing data transformations for XML data. We can now use this capability to map .NET types from a WF application through the Mapper activity. You will see this activity on the Toolbox under the “BizTalk” category after you install BizTalk Server (Developer Tools) and the WCF LOB Adapter SDK.
To use this mapper activity, you need to specify the InputDataContractType and the OutputDataContractType. As the name suggests, these are .NET types for the input data and the output data for the activity. You can then create a new map or select an existing map based on these types. If you are creating a new map, the activity will generate the XML schemas for the selected input and output DataContract types and a new BizTalk map (.btm) file.
You can then open and edit the BizTalk map file in the BizTalk Mapper GUI from within the WF project itself. When the map file is saved, it will automatically be compiled and built along with the project.
The mapper activity has an input argument that takes the data to be transformed and an output argument where the transformed data is stored. You can create workflow variables to pass the input and store the output from the activity. At runtime, the input data will first be serialized into XML. It will then be transformed using XSLT generated from the map file and finally de-serialized back into an object of the output type.
Summary
With these features, developing web applications which require access to LoB data will be a lot easier. The ability to use the BizTalk Mapper for data transformation means that different data in different LoB systems can be transformed using an interactive and intuitive GUI-based tool. Windows Server AppFabric provides a hosting service to deploy and manage these applications.
We would be happy to see you try out these features in your workflow applications, and receive your feedback. You can either write to me directly (sameerch @ microsoft . com) or leave a feedback here on this blog.
Sameer Chabungbam
Program Manager, BizTalk Server Team
by community-syndication | Jun 9, 2010 | BizTalk Community Blogs via Syndication
WCF Data Services provides a very simple model driven way to expose data using REST and the OData format. As I was preparing my talk for Tech-Ed on Implementing REST in .NET I was asking myself if there would be any value in using Windows Server AppFabric with WCF Data Services. After all, AppFabric has monitoring which can capture tracking information across the server farm storing it in a monitoring database. Typically we show Workflow Services using this capability because they provide such a rich stream of tracking events. However, it is quite possible to use AppFabric to monitor data services. In this post I’ll take you through step by step how you can do it.
Note: To make this post more readable – click on the images to see them full size.
Step 1 – Host your site in IIS
To benefit from Windows Server AppFabric your web application must be hosted in IIS. To use Visual Studio with IIS you must run it as administrator. Then go into the project properties of your web application and set it to run in the local IIS server.
Step 2 – Browse to your service and see the monitoring in action
In my RESTWeb demo application I’ve added some links to the Default.htm page that will exercise the service. If you run the app and hit a few pages you will see that AppFabric captures information about your service being invoked.
To see it
- Open IIS Manager
- Select the RESTWeb website by expanding the Default Web site
- Double click on AppFabric Dashboard
- Check the WCF Call History section
Here you can see that there were 4 calls to the WCF Data Service named Conference.svc. If you click on the hyperlink for Conference.svc you will get the detail on those 4 calls.
This is good, but because we have a WCF Data Service all the requests look the same in the tracking data. We can see that somebody invoked the service but we don’t know what things they were querying in the model or if they were doing a GET, POST, PUT etc.
Step 3 – Instrument your service to emit custom tracking records
In my RESTWeb web application, I’ve added some sample code I got from the AppFabric guys (with some minor modifications from me) that shows how you can emit a custom tracking record that will be displayed in AppFabric. By overriding the DataService.OnStartProcessingRequest method, I can now emit a tracking record with details of the request.
    public class Conference : DataService<ConferenceDataEntities>
    {
        // Sample class allows you to emit custom tracking records
        static WCFUserEventProvider eventProvider = new WCFUserEventProvider();

        protected override void OnStartProcessingRequest(ProcessRequestArgs args)
        {
            string text = string.Format("Processing HTTP {0} request for URI {1}",
                args.OperationContext.RequestMethod, args.RequestUri);

            // Push the event through ETW to AppFabric
            eventProvider.WriteInformationEvent("Conference Request", text);
        }
Step 4 – Enable End-To-End Tracking
To make this work you have to turn on end-to-end tracking in AppFabric. To do this
- Right click on your web app and select Manage WF and WCF Services
- Select the Monitoring Tab
- Set the monitoring level to End-To-End
Step 5 – Verify Behavior
- Run a few more queries through your data service. In my RESTweb example just click through a few links on the home page.
- Open (or refresh) AppFabric Dashboard as you did before.
- Click the link for calls to Conference.svc
- Right click on the top event and select View Related Events
- Now you will see a number of related events (related because of end-to-end tracking) – the tracking record payload will contain the message we created in the code.
Summary
The attached sample code is what I showed at my Tech-Ed Session. Hope you find it helpful.
by community-syndication | Jun 9, 2010 | BizTalk Community Blogs via Syndication
I opened up day two with a session involving Connecting to Line Of Business (LOB) systems in 15 minutes
We saw:
- A demonstration of the BizTalk mapper activity in WF
- Many questions from the audience regarding the licensing model. Some people questioned that if you had to buy a BizTalk Standard license to use the Mapper and LOB adapters then why wouldn’t you just use BizTalk. The response was that there may be some scenarios where you still want to avoid the BizTalk message box but want to connect to LOB systems like SAP without having to write a lot of code to transform data between the two systems. The BizTalk Mapper will easily pay for itself over time as it allows you to convert data through a GUI tool instead of writing a lot of code.
- You will not have to install all of BizTalk in order to use these two new activities in WF. Microsoft plans on providing a “AppFabric Connect” feature that allows you to just install the BizTalk bits that you need
- Licensing for these components will be based on the same model that BizTalk standard edition uses so you will be paying per proc(and not by the core)
- Oracle adapter exposed as WCF service that SharePoint BCS (Business Connectivity Services) consumed…no code is required.
- Connecting to IBM lob systems in a similar manner. Use the BizTalk HIS components outside of BizTalk and connect to legacy IBM systems without BizTalk.
- I got the sense that a lot of .Net developers were excited to see these capabilities but not so excited that they needed to pay for BizTalk licenses in order to use these bits.
Another interesting session I saw involved extracting SAP data so that it can be used by Microsoft BI tools. The tool is called Simplement Data Liberator. We heard from one of their customers who uses a blend of SAP and Microsoft tools. They explained some of their Roadblocks to “True BI”;
- SAP tables difficult to understand
- SAP tables difficult to extract
- Need too many experts
- Explicit skill set required to use a SAP BI tool
- Needed real time access to SAP data
- Needed SharePoint integration
- Better value with Microsoft Consultants
- Wanted wider talent pool
SAP has over 50 000 tables so trying to extract data manually or through Custom code is a daunting experience. The Simplement Data Liberator tool has solved this challenge. The Tool replicates SAP data into SQL Server. You can get both German and English Meta data and SAP Security info is also replicated. This tool eliminates the need to write ABAP for reporting in SAP. Surface SAP data into Microsoft BI products by using SQL queries.
Other features:
- Work with only tables you need
- Load into SQL server via replication
- Manipulate/Transform data such as dates (ETL)
- Attached meta data so that you can use English Table names
- Use SharePoint, Excel services or SQL Server Reporting Services (SSRS) to query data
We saw a demo where a customer was updated in the SAP GUI system and within seconds (3-5) the data was in the SQL BI system. I must say that I was impressed by the demo, it seems like this vendor understands SAP very well and has figured out a way to lower customer costs when consuming SAP data.
View from the BizTalk Booth
More great questions and conversations about BizTalk:
- An excellent conversation about End to End Message Security. You always want to trust your developers to do the right thing, but how do you prevent a developer from adding their own receive location, or subscription in BizTalk for malicious purposes; to prevent a rogue developer from depositing money into their Bank Account via BizTalk. If anyone one has thoughts on this type of scenario and have figured out a way to solve it I would be interested in hearing about it – use comments below.
- Whether BizTalk is truly pub/sub due to the polling nature of the Host instance connecting to BizTalk MessageBox looking for more work. This attendee was looking for more Event Driven processes inside BizTalk.
- A DBA was interested to know how BizTalk will connect to their Database and some of the “gotchas” to look out for
- A few people that closed the door on BizTalk after BizTalk 2004 that are now back taking another look at BizTalk 2010. I can’t say this enough, the product has matured significantly over the past and it is worth taking another look at
- Connecting BizTalk to the AppFabric Service bus in order to connect with other external parties


