by community-syndication | Aug 6, 2010 | BizTalk Community Blogs via Syndication
In this post I like to show all table operations possible with WCF-SQL Adapter. The WCF based SQL Adapter can be used to connect BizTalk applications to SQL Server. WCF-SQL Adapter is part of BizTalk Server Adapter Pack 2.0, but can also be downloaded separately. To work with the adapter you will need to install the WCF LOB Adapter SDK SP2 before installing this adapter. Something that is overlooked easily, which also accounts for the fact that this adapter is offered as a supplement to BizTalk Server 2009. You must have a valid license for the BizTalk Server in order to use the SQL adapter and be eligible for support and to receive updates.
Important to note here are the supported operating systems:
- Windows Server 2003 Service Pack 2
- Windows Server 2008
- Windows Vista
- Windows XP Service Pack 3
- Windows XP SP3
- Windows Server 2003 SP2
- Windows Server 2003 R2
- Windows Server 2008
- Windows Vista
- and required is .NET 3.5 SP1.
The Adapter Metadata wizard is supplied through WCF LOB Adapter SDK and necessary to generate schema’s through Visual Studio .NET.
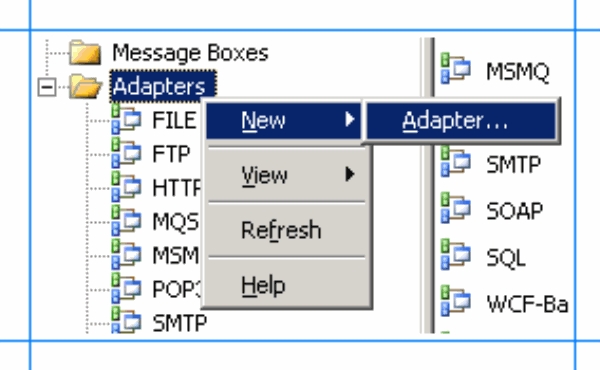
The SQL adapter can be used in BizTalk either as a WCF-Custom port or a WCF-SQL port. If you want to use the SQL adapter through a WCF-Custom port, you do not need to add the WCF-Custom port to the BizTalk Server Administration console, because the WCF-Custom port is added to the BizTalk Server Administration console by default. However, if you want to use the SQL adapter through a WCF-SQL port, you must first add the WCF-SQL adapter to the BizTalk Server Administration console. To add the WCF-SQL Adapter you need to start the BizTalk Server Administration Console and than perform the following steps:
1. In the console tree, expand the BizTalk Group, expand Platform Settings, and then click Adapters.
2. Right-click Adapters, point to New, and click Adapter.
3. In the Adapter Properties dialog box, specify a name for the adapter and from the Adapter list, select WCF-SQL.

4. Click Ok.
Having the adapter in place you can use it for your solutions. You can download sample from Microsoft related SQL Adapter through BizTalk Adapter Pack 2.0 samples. There you will find the Performing Operations on Tables sample that shows how to perform operations on tables in SQL Server, but this only shows you the select operation (i.e. download is called SelectTable.exe).
To perform operations on SQL Server by using the WCF-SQL adapter with BizTalk Server, you must perform a set of design-time and run-time tasks using Visual Studio and BizTalk Server Administration console respectively. These high level tasks to create a message based solution are:
- Create BizTalk project, and generate schema.
- Create messages instances.
- Build and deploy the BizTalk project.
- Configure the application.
- Start the application.
Downloaded sample executes the SELECT operation on the EMPLOYEE table in a SQL Server database. This sample performs the following operations:
- Picks up the request message to execute the SELECT operation from a predefined file location.
- Sends the request to the SQL Server database to perform the operation.
- Receives the response from the SQL Server database and copies the response at another predefined file location.
Download sample contains code and sqlscript is provided to create the database. I like to show all the CRUD operations (i.e. CREATE, REQUEST, UPDATE and DELETE). You can create the database using SQL Server Management Studio and load/execute the script (2005 or 2008 found in SelectTable solution sqlscripts folder). Other step to perform is creating a BizTalk project.
BizTalk Project and generate schema (’s)
First, we need the XML schemas, which represent our data source. By installing the WCF LOB Adapter SDK SP2, you will have a metadata browser built into Visual Studio. NET at your disposal. You can access this from a BizTalk project by right-clicking the project, choosing Add then Generated Items and selecting Consume Adapter Service.

This action opens a new window that provides us the interface to connect to, browse, and select database objects for service interaction. The very first thing we need to do here is choose the sqlBinding as the service binding, and then configure a connection string. The simplest working connection string consists of an Initial Catalog value for the database, and a valid Server name entry. Note that the adapter now uses a connection string in the form of a URI instead of the traditional Data Source=;Initial_Catalog=;User_ Id=;Password= style.
![clip_image002[6]](https://lh6.ggpht.com/_1u48slmLB_0/TFwTRdtUhhI/AAAAAAAADU8/wRSxaWngeEk/clip_image0026_thumb2.jpg?imgmax=800 "clip_image002[6]")
Once a satisfactory connection string is defined, the Connect button can be clicked to establish an active connection to the target database. If the connection is successful, one see the category browser with a set of database object categories.

On the root “/” character a range of un-typed generic functions are displayed, which can be exploited. Click on tables and you will see a number of Tables, select Employee.

Click the Delete, Insert, Select and Update statement in available categories and operations. Click the Add button to add the operations.

After clicking the Ok button at the bottom, schema (and a single binding file) is added to our associated BizTalk project in Visual Studio.NET.

The binding can be used later, when solution is deployed and ports have to be configured for SQL Server (i.e. Send Port).
Create message instances
Next step is to generate messages from generated schema, which can be routed from Recieve location in Receive Port to a send port with WCF-SQL Adapter (messaging based solution). Generating the first message is easy, as you can right click on the TableOperation.dbo.Employee.xsd and select Generate Instance and an instance of top element is created (i.e. delete).

You will get a instance of message as depicted below:

By opening up the TableOperation.dbo.Employee.xsd in file-editor you can move the next operation to top, so you can then in Visual Studio generate the next instance for an operation or you can use XML-Editor inside Visual Studio (closing schema, right click and select open with and then select XML Editor) to move elements around. In end you will have four xml instance for TableOperations, save to file as xml (type all files, encoding UTF-8!).
Select:
<ns0:Select xmlns:ns0=”http://schemas.microsoft.com/Sql/2008/05/TableOp/dbo/Employee%22>
<ns0:Columns></ns0:Columns>
<ns0:Query></ns0:Query>
</ns0:Select>
Insert:
<ns0:Insert xmlns:ns0=”http://schemas.microsoft.com/Sql/2008/05/TableOp/dbo/Employee%22>
<ns0:Rows>
<ns1:Employee xmlns:ns1=”http://schemas.microsoft.com/Sql/2008/05/Types/Tables/dbo%22>
<ns1:Employee_ID></ns1:Employee_ID>
<ns1:Name></ns1:Name>
<ns1:DOJ></ns1:DOJ>
<ns1:Designation></ns1:Designation>
<ns1:Job_Description></ns1:Job_Description>
<ns1:Photo></ns1:Photo>
<ns1:Rating></ns1:Rating>
<ns1:Salary></ns1:Salary>
<ns1:Last_Modified></ns1:Last_Modified>
<ns1:Status></ns1:Status>
<ns1:Address></ns1:Address>
</ns1:Employee>
</ns0:Rows>
</ns0:Insert>
Update:
<ns0:Update xmlns:ns0=”http://schemas.microsoft.com/Sql/2008/05/TableOp/dbo/Employee%22>
<ns0:Rows>
<ns0:RowPair>
<ns0:After>
<ns1:Employee_ID xmlns:ns1=”http://schemas.microsoft.com/Sql/2008/05/Types/Tables/dbo%22></ns1:Employee_ID>
<ns1:Name xmlns:ns1=”http://schemas.microsoft.com/Sql/2008/05/Types/Tables/dbo%22></ns1:Name>
<ns1:DOJ xmlns:ns1=”http://schemas.microsoft.com/Sql/2008/05/Types/Tables/dbo%22></ns1:DOJ>
<ns1:Designation xmlns:ns1=”http://schemas.microsoft.com/Sql/2008/05/Types/Tables/dbo%22></ns1:Designation>
<ns1:Job_Description xmlns:ns1=”http://schemas.microsoft.com/Sql/2008/05/Types/Tables/dbo%22></ns1:Job_Description>
<ns1:Photo xmlns:ns1=”http://schemas.microsoft.com/Sql/2008/05/Types/Tables/dbo%22></ns1:Photo>
<ns1:Rating xmlns:ns1=”http://schemas.microsoft.com/Sql/2008/05/Types/Tables/dbo%22></ns1:Rating>
<ns1:Salary xmlns:ns1=”http://schemas.microsoft.com/Sql/2008/05/Types/Tables/dbo%22></ns1:Salary>
<ns1:Last_Modified xmlns:ns1=”http://schemas.microsoft.com/Sql/2008/05/Types/Tables/dbo%22></ns1:Last_Modified>
<ns1:Status xmlns:ns1=”http://schemas.microsoft.com/Sql/2008/05/Types/Tables/dbo%22></ns1:Status>
<ns1:Address xmlns:ns1=”http://schemas.microsoft.com/Sql/2008/05/Types/Tables/dbo%22></ns1:Address>
</ns0:After>
<ns0:Before>
<ns1:Employee_ID xmlns:ns1=”http://schemas.microsoft.com/Sql/2008/05/Types/Tables/dbo%22></ns1:Employee_ID>
<ns1:Name xmlns:ns1=”http://schemas.microsoft.com/Sql/2008/05/Types/Tables/dbo%22></ns1:Name>
<ns1:DOJ xmlns:ns1=”http://schemas.microsoft.com/Sql/2008/05/Types/Tables/dbo%22></ns1:DOJ>
<ns1:Designation xmlns:ns1=”http://schemas.microsoft.com/Sql/2008/05/Types/Tables/dbo%22></ns1:Designation>
<ns1:Job_Description xmlns:ns1=”http://schemas.microsoft.com/Sql/2008/05/Types/Tables/dbo%22></ns1:Job_Description>
<ns1:Photo xmlns:ns1=”http://schemas.microsoft.com/Sql/2008/05/Types/Tables/dbo%22></ns1:Photo>
<ns1:Rating xmlns:ns1=”http://schemas.microsoft.com/Sql/2008/05/Types/Tables/dbo%22></ns1:Rating>
<ns1:Salary xmlns:ns1=”http://schemas.microsoft.com/Sql/2008/05/Types/Tables/dbo%22></ns1:Salary>
<ns1:Last_Modified xmlns:ns1=”http://schemas.microsoft.com/Sql/2008/05/Types/Tables/dbo%22></ns1:Last_Modified>
<ns1:Status xmlns:ns1=”http://schemas.microsoft.com/Sql/2008/05/Types/Tables/dbo%22></ns1:Status>
<ns1:Address xmlns:ns1=”http://schemas.microsoft.com/Sql/2008/05/Types/Tables/dbo%22></ns1:Address>
</ns0:Before>
</ns0:RowPair>
</ns0:Rows>
</ns0:Update>
Delete:
<ns0:Delete xmlns:ns0=”http://schemas.microsoft.com/Sql/2008/05/TableOp/dbo/Employee%22>
<ns0:Rows>
<ns1:Employee xmlns:ns1=”http://schemas.microsoft.com/Sql/2008/05/Types/Tables/dbo%22>
<ns1:Employee_ID></ns1:Employee_ID>
<ns1:Name></ns1:Name>
<ns1:DOJ></ns1:DOJ>
<ns1:Designation></ns1:Designation>
<ns1:Job_Description></ns1:Job_Description>
<ns1:Photo></ns1:Photo>
<ns1:Rating></ns1:Rating>
<ns1:Salary></ns1:Salary>
<ns1:Last_Modified></ns1:Last_Modified>
<ns1:Status></ns1:Status>
<ns1:Address></ns1:Address>
</ns1:Employee>
</ns0:Rows>
</ns0:Delete>
Build and deploy the BizTalk project
Only schemas are required for a messaging only scenario with WCF-SQL Adapter to perform operations on SQL Server. Therefore after assigning a strong name and application name to BizTalk project it can be build and deployed.

Configure the application
After solution has been deployed it is time to configure the ports. FILE ports are easy and focus here will be configuring the WCF-SQL Send Port. Through BizTalk Management Console one can browse to SelectTable application and right click the application and select Import Bindings and navigate to file called WcfSendPort_SqlAdapterBindings_Custom.bindinginfo.xml, select and click Open. You will notice that a Send Port will be created automatically.

If you look at created send port and configuration you will notice that everything is there. I can tell that this will not work for all the operations as I experience the following error described in this blog post: Why does the Adapter say ’Action is not understood’ even though I am using the binding file generated by the ’Consume Adapter Service’ wizard? I choose to delete three operations and create three similar send ports based on first generated send port. Next steps are setting filters on WCF-Send Port and File Send Port. Configuration is as follows:
|
Port Name
|
Type
|
Filter
|
|
RcvPortTableOperations
|
FILE
|
|
|
SndDeleteOperation
|
WCF-SQL
|
BTS.MessageType == http://schemas.microsoft.com/Sql/2008/05/TableOp/dbo/Employee#Delete
|
|
SndInsertOperation
|
WCF-SQL
|
BTS.MessageType == http://schemas.microsoft.com/Sql/2008/05/TableOp/dbo/Employee#Insert
|
|
SndSelectOperation
|
WCF-SQL
|
BTS.MessageType == http://schemas.microsoft.com/Sql/2008/05/TableOp/dbo/Employee#Select
|
|
SndUpdateOperation
|
WCF-SQL
|
BTS.MessageType == http://schemas.microsoft.com/Sql/2008/05/TableOp/dbo/Employee#Update
|
|
SndOperationResponse
|
FILE
|
BTS.MessageType == http://schemas.microsoft.com/Sql/2008/05/TableOp/dbo/Employee#SelectResponse
OR
BTS.MessageType == http://schemas.microsoft.com/Sql/2008/05/TableOp/dbo/Employee#SelectResponse
OR
BTS.MessageType == http://schemas.microsoft.com/Sql/2008/05/TableOp/dbo/Employee#SelectResponse
OR
BTS.MessageType == http://schemas.microsoft.com/Sql/2008/05/TableOp/dbo/Employee#SelectResponse
|
Start the application
In the end your messaging solutions can be depicted as below. After configuration you can start BizTalk application.

Select Operation:

Response:

Insert Operation:

Response:

Results so far if you query Employee Table are:

Update Operation:

Response:

Result after update if you query Employee Table again are:

Last operation will be delete.
Delete Operation:

Response:

Result after delete if you query Employee Table again are:

I hope with this post I was able to show all operations (CRUD) on table. The sample from MSDN shows only SELECT operation and here I have extended on that, showing all operations and how to setup WCF-SQL Adapter and steps to do, before you can execute all operations on a SQL Table.
Cheers!
Technorat: BizTalkBizTalk Server 2009
by community-syndication | Aug 6, 2010 | BizTalk Community Blogs via Syndication
The Bing API allows you to get results from multiple sourcetypes, one of them being the Translation SourceType.
More Info on the API can be found here.
The SDK comes with some nice samples and can be found here.
As a practise we are going to do a query from a BizTalk Pipeline component to translate a field configured by an XPath.
In design we need to define a source language, destination language and the XPath to the field we will translate.
TranslationLanguage is just an enum to facilitate configuration in pipeline design time.
private Helper.TranslationLanguage _SourceLang;
private Helper.TranslationLanguage _DestLang;
private string _XPath;
public Helper.TranslationLanguage SourceLanguage
{ get; set; }
public Helper.TranslationLanguage DestinationLanguage
{ get; set; }
public string XPath
{ get; set; }
Next we modify the Execute function of the component to call the Tranlate method we will define further on, to modify the message.
A good way to do this is by using the XPathMutatorStream. More info on XPathMutatorStream can be found here.
IBaseMessage Microsoft.BizTalk.Component.Interop.IComponent Execute(IPipelineContext pContext, IBaseMessage pInMsg)
{
IBaseMessage biztalkMessage = pInMsg;
XmlReader reader = XmlReader.Create(pInMsg.BodyPart.Data);
XPathCollection xpaths = new XPathCollection();
xpaths.Add(this._XPath);
ValueMutator mutator = new ValueMutator(handleXpathFound);
pInMsg.BodyPart.Data = new XPathMutatorStream(reader, xpaths, mutator);
return pInMsg;
}
private void handleXpathFound(int matchIdx, Microsoft.BizTalk.XPath.XPathExpression matchExpr, string origVal, refstring finalVal)
{
finalVal = Helper.Translate(SourceLanguage, DestinationLanguage, origVal);
}
Finally we’ll send a request to the Bing API using the XML protocols ( we are BizTalk Developpers after all … ).
We build the query using the arguments provided and return the translation:
public static string Translate(TranslationLanguage SourceLang,
TranslationLanguage DestLang, string text)
{
LoadLanguages();
HttpWebRequest request = BuildRequest(_Languages[SourceLang],
_Languages[DestLang], text);
try
{
HttpWebResponse response = (HttpWebResponse)request.GetResponse();
XmlDocument document = new XmlDocument();
document.Load(response.GetResponseStream());
XmlNamespaceManager nsmgr = new XmlNamespaceManager(document.NameTable);
nsmgr.AddNamespace(“tra”, “http://schemas.microsoft.com/LiveSearch/2008/04/XML/translation”);
return document.DocumentElement.SelectSingleNode(“./tra:Translation/
tra:Results/tra:TranslationResult”, nsmgr).InnerText;
}
catch (WebException ex)
{
throw new ApplicationException(“Web Error while translating”,ex);
}
}
static HttpWebRequest BuildRequest(string SourceLang, string DestLang, string text)
{
string requestString = “http://api.bing.net/xml.aspx?”
+ “AppId=” + AppId
+ “&Query=” + text
+ “&Sources=Translation”
+ “&Version=2.2”
+ “&Translation.SourceLanguage=” + SourceLang
+ “&Translation.TargetLanguage=” + DestLang;
HttpWebRequest request = (HttpWebRequest)HttpWebRequest.Create(
requestString);
return request;
}
Time to test: Create a BizTalk project with
A schema for testing:
A pipeline with our new component. We define the xpath to the Value Record, the source and destinationlanguage. I created pipelines to translate to Dutch and French from English:
Deploy in BiZtalk, create Receiveport with Receivelocation, 2 Sendports with a filter on the Receiveportname and our pipeline to translate to French and Dutch.
Drop a test message:
<ns0:TestTranslatorSchema
xmlns:ns0=“http://TestTranslator.TestTranslatorSchema“>
<Value>What language is this written in?</Value>
</ns0:TestTranslatorSchema>
And observe the results:
<ns0:TestTranslatorSchema
xmlns:ns0=“http://TestTranslator.TestTranslatorSchema“>
<Value>Quelle langue c’est écrit ?</Value>
</ns0:TestTranslatorSchema>
<ns0:TestTranslatorSchema
xmlns:ns0=“http://TestTranslator.TestTranslatorSchema“>
<Value>In welke taal is dit geschreven?</Value>
</ns0:TestTranslatorSchema>
Korneel Vanhie, CODit
by community-syndication | Aug 5, 2010 | BizTalk Community Blogs via Syndication
The Windows Azure AppFabric LABS August Release is live as of August 5th, 2010. This release is a major update to Access Control. It’s available in our LABS environment: http://portal.appfabriclabs.com.
For more details please see Justin Smith’s Blog entry
The Windows Azure AppFabric Team
by community-syndication | Aug 5, 2010 | BizTalk Community Blogs via Syndication
Get a complete overview of BizTalk server 2009 developer capabilities and toolsets with QuickLearn’s new self-paced course: BizTalk Developer Fundamentals.
This brand new course provides an introduction to developing applications with BizTalk Server 2009. New-to-product developers will learn how-to work with Visual Studio and BizTalk developer tools to jumpstart their BizTalk projects.
The BizTalk Developer Fundamentals Training includes an overview of:
- Creating BizTalk Schemas
- Creating BizTalk Maps & Functoids
- Message BizTalk Routing & Ports
- Building BizTalk Pipelines
- Building BizTalk Orchestrations
The subscription to the BizTalk Developer Fundamentals training includes:
- 60-days of access to video presentations and demos
- 15 hours of lab time
- Online Support
View all of QuickLearn’s BizTalk Server 2009 Training

by community-syndication | Aug 5, 2010 | BizTalk Community Blogs via Syndication
Thanks to all the attendees of my end of day session on MEF yesterday. Here’s
the code.
MEFDemo.zip
(78.36 KB)
BTW – the problem I had with the bi-directional Import/Export was that I was calling
SatisfyImportsOnce – not ComposeParts. SIO of course only satisfies the imports
on the object in question – so this makes sense 🙂

Check out my new book on REST.
by community-syndication | Aug 5, 2010 | BizTalk Community Blogs via Syndication
In previous posts I’ve described how we can use SO-Aware to centralize the configuration of WCF services avoiding the need of maintaining complex configuration files across services and clients. The mechanism is enabled by a custom WCF service host which…(read more)

by community-syndication | Aug 5, 2010 | BizTalk Community Blogs via Syndication
I’ve blogged in the past about the VS 2010 Productivity Power Tool Extensions – a free set of Visual Studio 2010 extensions that provide some nice additional functionality.
You can read my previous blog posts about it here and here. In today’s post I’m going to briefly highlight a few small, but nice, code editor capabilities that are enabled when you install the free extensions (and which I didn’t highlight in my previous blog posts).
Ctrl+Click “Go to Definition”
One of the small, but useful, features that I find myself using a lot with the extensions is the "Ctrl + Click” go to definition feature.
For those of you who haven’t tried it, it enables you to quickly navigate to the definition of a member or type within your code. You can accomplish the same behavior out of the box with Visual Studio by right-clicking on a member/type and then choosing the “Go to Definition” context menu item – or by moving your cursor over a type/member and then pressing the F12 key. But for some reason I’ve found the Ctrl+Click gesture provided by the VS 2010 Power Tool Extensions more natural and faster to use (since for my keyboard the F12 key requires a split-second extra finger move to use – whereas the control key is always in easy reach).
To try out the “Ctrl+Click” behavior, just hold down the “Ctrl” key and use your mouse to hover over a type or member in your code. When the extension is enabled you’ll find that this causes a hyperlink to appear under each type/member you hover over:
Clicking the hyperlink will immediately navigate you to the definition of the type/member within your code:

Note that the “go-to-definition” feature in VS can also be used on a type that you don’t have source access to. For example, like with the DbSet<T> collection I used in my EF “code-first” blog post yesterday:

When you click a type referenced from a binary library, VS will automatically generate a class definition based on the signature compiled into the assembly:

Triple Click Selection
Another one of the “small but useful” features provided with the power tool extensions that I find myself using a lot is the “triple click” feature.
Today with VS you can double-click on a word to automatically select it:

When the “Triple Click” extension is enabled you can now also triple-click on a line to automatically select the entire line:

This behavior has been supported in Word for awhile. Until I saw that there was a power tools extension for it I didn’t actually realize that VS didn’t already do it by default. Well – now you can.
“Alt Up/Down Arrow” Line Movement
Another “small but useful” feature provided by the power tool extensions is the ability to easily move lines of code up/down within the editor.
Simply select either a single line of code, or a block of multiple lines of code, within the editor:
Then hold down the “alt” key, and press either the up or down arrow on your keyboard. This will cause the editor to move the selected code up or down within the editor (without you having to copy/paste or move anything around manually):

This is another one of those features that Word has had for awhile – and which is nice to now have in VS.
Column Guides
Column guidelines allow you display a vertical band within the code editor. This is useful to help identify the maximum size a single line of text should be within your code (for example: to avoid wrapping when printing it out).
The power tool extensions enable you to add a column guide pretty easily. Just cursor over in your code editor to where you want the guideline to be (note: you can see the exact line column count at the bottom of the editor):

Then right-click and choose the “Guidelines->Add Guideline” menu command:

This will then cause VS to show a column guide-line in all code editor windows at that column width – making it easier to see when you’ve written code or a comment that wraps beyond that:

If you want to remove a guideline, you need to move your editor cursor to be at the same column width as the guideline. You can then right-click and use the “Guidelines->Remove Guideline” command to remove it.
Extensions Update
In case you missed it, the Visual Studio team last week made a minor update to the VS 2010 Productivity Power Tool Extensions to fix a few bugs and performance issues that people reported with the last release.
Sean has a blog post with more details about the update here. The update included fixes for:
- Poor performance with Solution Navigator searches on large projects. In this revision, we’ve made some optimizations to the search algorithm. Search will also now only be initiated after two characters are typed in the search box.
- Items in Solution Folders were not sorted. In this revision, they are sorted alphabetically.
- Invoking Quick Access could cause a crash on some machine configurations. This issue has been resolved in the current revision.
- Ctrl+1 & Ctrl+2 were not configurable in the Solution Navigator, which blocked the ability to type @ on some keyboards. This revision provides the Edit.ShowSolutionNavigatorPopupForSelection & Edit.ShowSolutionNavigatorPopupForFile commands which can be rebound using Tools => Options => Environment => Keyboard.
If you have a previous build of the Power Tool Extensions installed you use the “Tools->Extension Manager” menu command, select the power tools extension and then click the “update” button to upgrade to the latest build.
Summary
If you haven’t tried out the VS 2010 Productivity Power Tool Extensions yet, I’d encourage you to give it a try. It includes some nice additional functionality which can help save you keystrokes and time as you work within Visual Studio. I’ve only covered a few of the features in this post and my previous two posts – there are a lot more cool things in there that I haven’t blogged about yet.
You can also now enable/disable each individual feature within the extensions pack – allowing you to selectively choose what you want to use. Use the “Tools->Options” menu command, and navigate to the “Power Productivity Tools” tree-view item to enable/disable individual features.
Hope this helps,
Scott
P.S. In addition to blogging, I am also now using Twitter for quick updates and to share links. Follow me at: twitter.com/scottgu

by community-syndication | Aug 4, 2010 | BizTalk Community Blogs via Syndication
Thanks to everyone who came to my AppFabric Cache and REST talks today.
Here are the slides:
W14_Flanders_REST.zip
(600.34 KB)
W9_Flanders_AppFabricCache.zip
(1.89 MB)
And the demos:
CachingDemo.zip
(178.41 KB)
RESTDemo1.zip
(302.27 KB)
Thanks again

Check out my new book on REST.
by community-syndication | Aug 4, 2010 | BizTalk Community Blogs via Syndication
I had a very painful experience this week on a project. We were implementing some new features in an existing BizTalk application and the first builds on the build server were good then suddenly a number of the tests started failing with the below error in the event log.
Event Type:Error
Event Source:XLANG/s
Event Category:None
Event ID:10030
Date:8/4/2010
Time:1:36:21 PM
User:N/A
Computer:——————
Description:
Uncaught exception (see the ‘inner exception’ below) has suspended an instance of service ——————ImportMemberChange(88c96b70-f723-78d4-e8e1-d8464f189ee9)’.
The service instance will remain suspended until administratively resumed or terminated.
If resumed the instance will continue from its last persisted state and may re-throw the same unexpected exception.
InstanceId: 4bb8171d-ca71-4b9b-b8b8-5f0cf5fa6abd
Shape name: Ctor
ShapeId: ec543efe-e955-4860-a1b3-7b97dc4f3038
Exception thrown from: segment 1, progress 46
Inner exception: Error encountered while executing the transform ——————.MemberImportMap. Error:Unable to create the transform..
Exception type: XTransformationFailureException
Source: Microsoft.XLANGs.Engine
Target Site: Void ApplyTransform(System.Type, System.Object[], System.Object[])
The following is a stack trace that identifies the location where the exception occured
at Microsoft.XLANGs.Core.Service.ApplyTransform(Type mapRef, Object[] outParams, Object[] inParams)
at ——————————–.ImportMemberChange.segment1(StopConditions stopOn)
at Microsoft.XLANGs.Core.SegmentScheduler.RunASegment(Segment s, StopConditions stopCond, Exception& exp)
Additional error information:
Could not load file or assembly ——————.Utilities, Version=999.999.999.999, Culture=neutral, PublicKeyToken=——————or one of its dependencies. The system cannot find the file specified.
Exception type: FileNotFoundException
Source: mscorlib
Target Site: System.Reflection.Assembly _nLoad(System.Reflection.AssemblyName, System.String, System.Security.Policy.Evidence, System.Reflection.Assembly, System.Threading.StackCrawlMark ByRef, Boolean, Boolean)
The following is a stack trace that identifies the location where the exception occured
at System.Reflection.Assembly._nLoad(AssemblyName fileName, String codeBase, Evidence assemblySecurity, Assembly locationHint, StackCrawlMark& stackMark, Boolean throwOnFileNotFound, Boolean forIntrospection)
at System.Reflection.Assembly.nLoad(AssemblyName fileName, String codeBase, Evidence assemblySecurity, Assembly locationHint, StackCrawlMark& stackMark, Boolean throwOnFileNotFound, Boolean forIntrospection)
at System.Reflection.Assembly.InternalLoad(AssemblyName assemblyRef, Evidence assemblySecurity, StackCrawlMark& stackMark, Boolean forIntrospection)
at System.Reflection.Assembly.InternalLoad(String assemblyString, Evidence assemblySecurity, StackCrawlMark& stackMark, Boolean forIntrospection)
at System.Reflection.Assembly.Load(String assemblyString)
at Microsoft.XLANGs.BaseTypes.TransformBase.get_TransformArgs()
at Microsoft.XLANGs.RuntimeTypes.TransformMetaData..ctor(Type transformBaseType)
at Microsoft.XLANGs.RuntimeTypes.TransformMetaData._creator(Type t)
at Microsoft.XLANGs.RuntimeTypes.MetadataCache._slowFor(Type t)
at Microsoft.XLANGs.RuntimeTypes.MetadataCache.For(Type t)
at Microsoft.XLANGs.RuntimeTypes.TransformMetaData.For(Type t)
at Microsoft.XLANGs.Core.Service.ApplyTransform(Type mapRef, Object[] outParams, Object[] inParams)
Basically this error is saying that the assembly the map is using to reference some functions called by the scripting functoid can not be found.
There are many forum posts along the similar lines but our situation was a little different because the build would run fine when ran locally or on the build server outside of cruise control. It was only when cruise control runs the build and does some additional steps to apply versioning to the code that we saw this problem.
After lot of investigation I found the cause of the problem when I disassembled the map assembly using Reflector. With reflector you can see the XSLTAgruments property which contains a string which outlines the expansion objects which will be used by the transform when executing. This indicates the assemblies which will be called.
In this string I could see the wrong version number had been applied during the compile of the project it was just a question of working out why.
Again after a lot more digging I found that in our case it was my old friend the Visual Studio Configuration Manager which obviously decided that it hadnt been getting enough attention recently so decided to change the Debug/Release/DEployment/Development settings within the solution. Fortunately if you have BizTalk 2009 or are planning BizTalk 2010 you shouldnt get this problem but its a big pain for 2006R2. So what happened was that during the compilation the the BizTalk project is somehow picking up a reference to the default versioned utilities component rather than the version number supplied by cruise control.
I managed to fix this by going through all of the settings in the configuration manager and lining up the Debug –> Development and Release –> Deployment settings then everything just worked.
Im not sure how the settings get changed as it wasnt done intentionally by us and the solution file is source controlled but we had added some projects to the solution so it could have gotten in that way.
Anyway on the of chance it saves someone half a day figuring this out.

by community-syndication | Aug 4, 2010 | BizTalk Community Blogs via Syndication
In this and following blogposts I would like to share my experience with integrating SalesForce with a fictive system via MSMQ (fictive system could be ERP, package application, service, ect). Integration is facilitated by BizTalk Server 2009 running on one of my VM machines (hosted by Hyper-V, see BizTalk Virtual Machines with Windows 2008 R2 Hyper V).
SalesForce is a leading CRM software solution that runs in the cloud and can be viewed as software as a service (SaaS). SalesForce itself states it is a leader in CRM (true if you consider their offering as off-premise software) and platform as a service. Latter sounds optimistic as there are some similarities with Microsoft Azure, which is also viewed as platform as a service with richer set of capabilities and a lot more flexibility. SalesForce is more targeted on CRM and you can build applications around it that can be hosted in the cloud or develop services, which I did and I am not the only one. I was inspired by Richard Seroter’s post and the fact that I had to do a POC integrating SalesForce (CRM) with Navision (Finance).
Prerequisites for anyone who would like to integrate with SalesForce is to setup an account with SalesForce to have an development environment (Sandbox) available to build.
Second is having an BizTalk development environment (VS 2008, SQL Server 2008) with connection to internet. If you filled in the details, accept agreement and submit, you will receive an email in couple of minutes you can use to login. After login you need to one time change the password.

Once that is done you can start setting some things in SalesForce listed down below:
1. Adding an account

Note: language here is Dutch as it is localized.
2. Save and add some detail to account


3. Now I can go to APEX classes and develop some code


Notice that if you click save after developing some code, it will compile and tell you if there is an error. If syntax is correct and code compiles then you will something similar as below.

To have access to this created web service you need to have a security token and your credentials. As stated on their site they mention the following:
When accessing salesforce.com from outside of your company’s trusted networks, you must add a security token to your password to log in to the API or a desktop client such as Connect for Outlook, Connect Offline, Connect for Office, Connect for Lotus Notes, or the Data Loader. For security reasons, your security token is delivered to the email address associated with your account. To reset and send your security token, click the button below.

You basically have to reset your security token, because it will not be provided when you create an account with SalesForce. If you provide security token you will receive a INVALID_LOGIN error.

Security token is necessary to setup session and reuse it (see also code Richard Seroter created for his solution).
Another thing you need to do is to generate Enterprise WSDL. Each SalesForce.com sandbox (like mine) has its own WSDL file (enterprise.wsdl). To access the Force.com Web service, you need this WSDL file. It defines the Web service that is available to you. Your development platform uses this WSDL to generate an API to access the Force.com Web service it defines. You can either obtain the WSDL file from your organization’s Salesforce.com administrator or you can generate it yourself if you have access to the WSDL download page in the Salesforce.com user interface. Click Setup Develop API to display the WSDL download page. For more info see SalesForce API Quickstart.

You can save the WSDL to file.

I created an empty solution called SalesForce.Integration.POC and a created helper class called BTSSFHelper, through creating C# class library (SalesForce.Integration.POC.BTSSFHelper). Next is to add service reference to enterprise.wsdl. I tried through service referenc, but it somehow does not compile:
Error = “Error 101 The namespace ‘SalesForce.Integration.POC.BTSSFHelper.SvcSFRef’ already contains a definition for ‘ExceptionCode’ C:\Projects\SalesForce.Integration.POC\SalesForce.Integration.POC.BTSSFHelper\Service References\SvcSFRef\Reference.cs 808 17 SalesForce.Integration.POC.BTSSFHelper”
I did a workaround by deleting service reference and add web service reference (that is the old way or at least VS 2005 way) through service reference -> advanced -> Add Web Reference.

If I build now there is no problem. Next step was to sign the helperclass with a strong name and rebuild. Next is to create a new BizTalk Project called SalesForce.Integration.POC.Solution to add to the solution. In this project I like to consume the web service I build in SalesForce. I need wsdl from my service, so in SalesForce I navigate to Apex classes and generate WSDL.

WSDL like enterprise one I save to file. I then go to Add Generated Items –> Consume WebService and walk through the wizard (Metadata Files -> WSDL from file -> Add WSDL -> Import).
![clip_image002[6]](https://lh6.ggpht.com/_1u48slmLB_0/TFmT2HTMU_I/AAAAAAAADUM/82zDyFKsYH4/clip_image002%5B6%5D_thumb%5B2%5D.jpg?imgmax=800 "clip_image002[6]")
![clip_image002[8]](https://lh4.ggpht.com/_1u48slmLB_0/TFmT3LjW_0I/AAAAAAAADUU/MT5N1r31PDE/clip_image002%5B8%5D_thumb%5B2%5D.jpg?imgmax=800 "clip_image002[8]")
![clip_image002[10]](https://lh4.ggpht.com/_1u48slmLB_0/TFmT4Gd66-I/AAAAAAAADUc/qZpPweckQmw/clip_image002%5B10%5D_thumb%5B2%5D.jpg?imgmax=800 "clip_image002[10]")
Now I all set to consume my SalesForce web service within an orchestration. This is will be discussed in my next post Part II together with interaction with MSMQ. I hope by now some of steps are clear to setup an environment in SalesForce to create a web service and necessary security.
Cheers!
Technorati: BizTalkBizTalk Server 2009salesforce


![clip_image002[6]](https://lh3.ggpht.com/_1u48slmLB_0/TFwTQwQTrVI/AAAAAAAADU4/BRGTF5VAliI/s1600-h/clip_image00264.jpg "clip_image002[6]")


![clip_image002[6]](https://lh6.ggpht.com/_1u48slmLB_0/TFmT1MiARVI/AAAAAAAADUI/G1-w92BFRVI/s1600-h/clip_image002%5B6%5D%5B4%5D.jpg "clip_image002[6]")
![clip_image002[8]](https://lh6.ggpht.com/_1u48slmLB_0/TFmT2nbikbI/AAAAAAAADUQ/GFPcbjdI33Q/s1600-h/clip_image002%5B8%5D%5B4%5D.jpg "clip_image002[8]")
![clip_image002[10]](https://lh4.ggpht.com/_1u48slmLB_0/TFmT3rsUJMI/AAAAAAAADUY/upbmfna9JLY/s1600-h/clip_image002%5B10%5D%5B4%5D.jpg "clip_image002[10]")