by community-syndication | Jan 16, 2013 | BizTalk Community Blogs via Syndication
While getting my BizTalk SWIFT environment prepared on BizTalk, I decided to test
the waters by running through the Tutorial – big trouble in little Sydney resulted.
While the tutorial is comprehensive, it’s written for previous versions of the SWIFT
accelerator so there’s the few paths (BREConfigurator.exe.config) that need correcting
for some of the SDK tools. Which I can live with as their part of the SDK and this
isn’t quite baked BizTalk 2013 yet.
The part where I hit trouble is that during the tutorial once schemas + rules are
deployed, you are to drop a sample MT103_Sample.txt into a folder and viola – it appears
as XML in another folder.
The MT103_Sample.txt is incomplete/incorrect for the SWIFT Schema
– I had a whole series of errors. Called upon my trusted SWIFT guru Angelo whom could
just look at the message and tell me what bits to remove and I should replace parts
with a an Australian Bank who’s code is ’XXXXSSBCXXX’ (scared me), we almost got the
file working.
We decided to settle on this working file MT103 Sample:
Feel free to use it and remove the leading and trailing CRLF in your file.
Mick.
{1:F01SAAJBEBBAXXX0000000001}{2:I103SAAJBEBBXXXXN2020}{4:
:20:TEST000001
:23B:CRED
:23E:SDVA
:23E:INTC
:23E:CORT
:23E:PHOB
:23E:TELE
:23E:PHOI
:26T:AAA
:32A:001118USD3,34
:33B:DEM3,34
:36:1,3456789012
:50A:/34x
SALABEBB
:52A:/C/34x
SALABEBB
:53D:/D/34x
4X35x
:54B:/C/34x
35x
:55B:/C/34x
35x
:56A:/C/34x
SALABEBB
:57A:/C/34x
SALABEBB
:59:4X35x
:70:35x
3X35x
:71A:OUR
:71G:USD1,34
:72:/AAAAAAAA/25x
/A/32x
//33x
/A/x
//x
//x
:77B:35x
2X35x
-}
And here’s the original MT103 Sample.txt working message:
{1:F01BOFAUSNYJXXX4321000123}{2:I103BANKDEFFAXXXN2020}{3:{103:CAD}}{4:
:20:NY20040126000111
:23B:CRED
:32A:040116USD1000000,00
:50K:/987654321
Big Deal Real Estate
Madison Avenue
New York, NY USA
:57A:/654321
NOSCATTT
:59:/1234567890123
I. Buy Buildings
200 Front Street
Toronto, Ontario
Canada
:70:re real estate purchase
10000 King Street East
Toronto
:71A:OUR
-}{5:{CHK:123456789012}}
Blog Post by: Mick Badran
by community-syndication | Jan 16, 2013 | BizTalk Community Blogs via Syndication
BizTalk Accelerator for HL7 extends the capabilities of BizTalk Server for health care providers. Health Level 7 (HL7) is an industry-standard application protocol for electronic data exchange of information.
The Minimal Lower Layer Protocol (MLLP) is the most common mechanism for exchanging the HL7 data. MLLP uses the TCP/IP protocol to transfer the data. MLLP delimiters are used to recognize the start and the end of message.
In BizTalk are often different Receive Ports used for each message type that is sent to BizTalk but some healthcare applications support only one connection. As always there are different solutions but in this example I’m going to use the ESB toolkit to create a MLLP On Ramp and use business rules to determine on the basis of the message type which routing slip or itinerary has to be initiated.
The following tasks must be performed:
- Create a BizTalk project with the required HL7 schemas for the HL7 v2.X message types.
- Create maps to transform the HL7 messages to the destination messages.
- Create a pipeline with the HL7 disassembler pipeline component and necessary ESB Toolkit components.
- Create an itinerary for each message type to process the messages.
- Create business rules to determine which itinerary has to be initiated.
- Create a Receive Port & location that uses the Minimal Lower Layer Protocol (MLLP) and the custom pipeline.
Before You Begin
You have to install the BizTalk 2013 Accelerator for HL7 & ESB Toolkit before you perform the steps later in this How-to topic:
| BizTalk 2013 Accelerator for HL7 |
| Download the BizTalk2013 Accelerators Beta file from the Download Center |
| |
| Run the downloaded BizTalk2013AcceleratorsBeta.exe from your hard drive and choose the directory from which to install the downloaded product. |
| |
| From the directory where you extracted your files, run Setup.exe and follow the instructions to install the BizTalk 2013 Accelerator for HL7. |
|
| |
| The installation is fairly simple. Perform a custom installation to install also the MLLP test tools. |
|
| |
| ESB Toolkit |
With BizTalk Server 2013 Beta, ESB Toolkit is now fully integrated with BizTalk Server. Also, the
ESB Toolkit configuration experience is simplified to enable a quick setup. The installation and configuration is described on MSDN and in an older blog post. |
Steps
| Create a BizTalk project with the required HL7 schemas for the HL7 2.X message types. |
| the HL7 Accelerator comes with 1300 predefined schemas to match almost every 2.X (2.1 through 2.5.1) message type. |
First you will need add the following core schemas:
datatypes_XXX.xsd, segments_XXX.xsd, and tablevalues_XXX.xsd |
|
| |
| The segments_XXX.xsd schema will be imported again in the HL7 schema |
|
| |
| Regardless of the specific HL7 version that you are processing, you will always have an MSH segment. Because of the backward-compatibility rules, the version 2.5 MSH segment is appropriate for all prior versions. |
|
| |
| |
| Create maps to transform the HL7 messages to the destination messages. |
| You almost always need a map to transform the HL7 message to the required message type. |
In this example I’m transforming the HL7 message to a canonical message for internal
BizTalk Server use. |
|
| |
| |
| Create a pipeline with the HL7 disassembler pipeline component and necessary ESB Toolkit components. |
| Create a custom pipeline in Visual Studio with the HL7 message disassembler pipeline component to convert the message to XML. Add the ESB Itinerary Selector and the ESB Dispatcher components to select the itinerary. |
|
| |
| |
| Create an itinerary for each message type to process the messages. |
Create an itinerary for each message type to transform and route the HL7 messages.
Export the itineraries to the itinerary database so they can be used by the Itinerary Selector component. |
|
| |
| |
| Create business rules to determine which itinerary has to be initiated. |
Create business rules for each message type and set the Itinerary Name based on the
ContextMessage Type. |
| Publish and deploy the policy. |
|
| |
| |
| Create a Receive Port & location that uses the Minimal Lower Layer Protocol (MLLP) and the custom pipeline. |
| When the HL7 projects are deployed to BizTalk you can create a Receive Port and Receive Location that uses the MLLP adapter and the custom pipeline. |
In the MLLP Transport Properties dialog box, the following properties are required:
| – |
Connection Name |
: Name of monitored connection. |
| – |
Host |
: Specify a local interface on which to listen for incoming connections |
| – |
Port |
: Local port ID to listen on |
|
|
| |
| With the custom pipeline it’s necessary to set the name of the business rule policy that is called to determine the itinerary. |
Use the Configure Pipeline dialog box to configure the following Itinerary Selector component properties:
a. Click the ItineraryFactKey property, and then type Resolver.Itinerary.
b. Click the ResolverConnectionString property, and then type
BRI:\\policy=MyPolicy;useMsg=true;recognizeMessageFormat=true |
|
| |
| |
To test the MLLP onramp, business rules and itineraries
| You can use the command-line tools from the Accelerator for HL7 to send encoded MLLP messages to BizTalk. |
The structure of an MLLP message is given below:
<SB> + <Message> + <EB> + <CR>
<SB> = Start Block. Messages are prefixed with start byte
<Message> = HL7 Message
<EB> = End Block. Messages are terminated with end byte
<CR> = Carriage Return |
|
| |
The following shows the syntax you use to invoke the mllpsend command-line tool:
mllpsend.exe [/I <IP>] [/P <PORT>] [/TWOWAY] [/REPEAT <n>] [/F <FILENAME> /SB nn /EB nn /CR nn |
|
| |
| When BizTalk receives the HL7 v2 message it’s converted to XML in the pipeline by the HL7 message disassembler pipeline component . The Itinerary Selector component calls the Business Rule engine that determines the message type and set’s the itinerary. In my example itinerary that is executed, the message is transformed to a canonical message and routed to the destination folder. |
|
| |
| |
Conclusion
The BizTalk Accelerator for HL7 works well with the ESB Toolkit. In this example I’ve skipped however the Acknowledgement (ACK) messages. Maybe nice to check out in a future post if it’s possible to use the ESB toolkit to return the ACK and NACK messages!

by community-syndication | Jan 16, 2013 | BizTalk Community Blogs via Syndication
About a month ago I announced the release of the beta installer for the BRE Pipeline Framework. Since then I have been hard at work trying to get the framework up to scratch with the goal towards starting to use it on new projects, and at the very least to use it to make POCs […]
Blog Post by: Johann

by community-syndication | Jan 15, 2013 | BizTalk Community Blogs via Syndication
In this series of blog posts, I’m looking at how well some leading cloud providers have embedded their management tools within the Microsoft Visual Studio IDE. In the first post of the series, I walked through the Windows Azure management capabilities in Visual Studio 2012. This evaluation looks at the completeness of coverage for browsing, […]
Blog Post by: Richard Seroter
by community-syndication | Jan 15, 2013 | BizTalk Community Blogs via Syndication
Microsoft Research(MS Research) is an infinite source of technical innovation. Because of my academic background, I am constantly following the new MS Research projects and drawing ideas and inspiration from them. Recently, I came across Project Hawaii…(read more)
Blog Post by: gsusx
by community-syndication | Jan 14, 2013 | BizTalk Community Blogs via Syndication
What is BizTalk Application Monitoring? When you have set of application running in your BizTalk environment, you will be interested to keep an eye of the health of the application(s). The health of applications is directly connected to various artifacts that’s running inside the application like Receive Locations health Send Ports health Orchestrations health in […]
The post Difference between Simple and Advanced BizTalk Application monitoring in BizTalk360 appeared first on BizTalk360 Blog.
Blog Post by: Saravana Kumar
by community-syndication | Jan 14, 2013 | BizTalk Community Blogs via Syndication
QuickLearn is pleased to announce the availability of two hands-on labs that you can run from within your BizTalk Server 2013 Beta virtual machines running on Windows Azure.
These labs, originally presented at the BizTalk Summit in December, will provide an early look at the new features coming with the BizTalk Server 2013 release, while demonstrating live integration with the Salesforce.com online CRM system.
To complete either of the activities, follow the instructions below:
Lab #1: Integrating BizTalk Server 2013 with Salesforce using a Windows Azure Service Bus Relay
- Create a Windows Azure Virtual Machine using the BizTalk Server 2013 Beta Template
- Start, and then Connect to the Windows Azure Virtual Machine once provisioned.
- Inside the image, launch Powershell
- At the powershell prompt, type and execute the following command to setup and start the lab:
(New-Object Net.WebClient).DownloadString("http://labti.me/biztalksalesforce")| iex
- In the setup wizard, type the password you used for the Administrator account when creating the virtual machine, and then click Next.
- Once setup completes (5-15 minutes depending on image size selected), in the Internet Explorer window, type your First/Last/Email and then click Start Lab
Lab #2: Accessing Salesforce data through the REST API using the WCF-WebHttp Adapter
- Create a Windows Azure Virtual Machine using the BizTalk Server 2013 Beta Template
- Start, and then Connect to the Windows Azure Virtual Machine once provisioned.
- Inside the image, launch Powershell
- At the powershell prompt, type and execute the following command to setup and start the lab:
(New-Object Net.WebClient).DownloadString("http://labti.me/salesforcerest")| iex
- In the setup wizard, type the password you used for the Administrator account when creating the virtual machine, and then click Next.
- Once setup completes (5-15 minutes depending on image size selected), in the Internet Explorer window, type your First/Last/Email and then click Start Lab
If you would like to see a walkthrough of this process, you can watch the video below:
by community-syndication | Jan 14, 2013 | BizTalk Community Blogs via Syndication
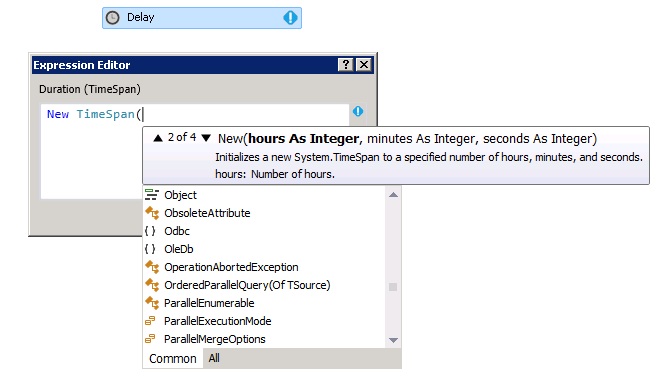
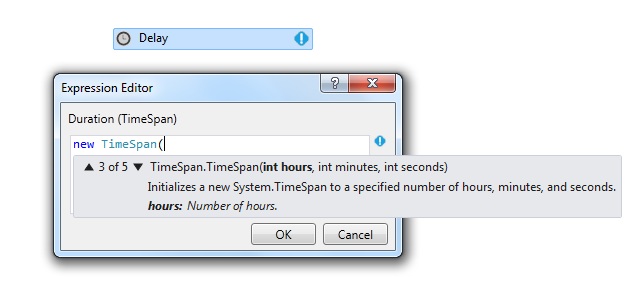
The Delay activity in Workflow Foundation can be used in many scenarios, but the most likely use is in a composite operation, where you want the execution to wait for a response and cast a failure if the response isn’t received in proper time.
The Delay activity has just one parameter, which is call Duration. It expects a Timespan variable or expression. If you want the same duration in every place it would be wise to create a variable to hold the value and use it at the right spots or a better option would be to create a custom activity:
- Add a new file
- Add the delay activity
- Set the Duration on the delay activity
- Rebuild the project
- Add the custom activity to your workflow
In Visual Basic Workflow projects this is how you configure it in the expression:
In Visual C# Workflow project there is a difference based on the edition of Visual Studio you are using. If it is .Net Framework 4 then you have to use Visual Basic syntax and if it is .Net Framework 4.5 you can use C# language in the expression:
Random posts:
Help me, help you. You know how 😉 (click, click, click…) Or buy anything at Amazon. You get the same price, and I get a little bit of money. Follow the Photospots site on Facebook
by community-syndication | Jan 14, 2013 | BizTalk Community Blogs via Syndication
We would like to congratulate Nicholas Hauenstein, the most recent addition to the Visual Studio ALM Rangers! Nick was nominated for his subject matter expertise and contribution to the ALM community.
Nick is currently working on study materials for:
- Exam 70-496: Administering Visual Studio Team Foundation Server 2012
- Exam 70-497: Software Testing with Visual Studio 2012
- Exam 70-498: Delivering Continuous Value with Visual Studio 2012 ALM
More information on these study materials will be announced soon.
Nick joined the ALM Ranger because he wants everyone to succeed with their endeavors, and have the best guidance and tooling available in that pursuit. Nick says, “I’ve already gained immensely from ALM Ranger deliverables (e.g., the Branching and Merging guidance, and the Visual Studio Build Customization Guide), and am excited for the opportunity to give back where I am able.”
See Nick’s announcement and interview on Willy-Peter Schaub’s MSDN Blog.

by community-syndication | Jan 14, 2013 | BizTalk Community Blogs via Syndication
I just finished reading the fascinating new mini-eBook “The New Kingmakers” from Redmonk co-founder Stephen O’Grady. This book represents a more in-depth analysis of a premise put forth by O’Grady a couple years back: developers are the single most important constituency in technology. O’Grady doubles-down on that claim here, and while I think he proves […]
Blog Post by: Richard Seroter