by stephen-w-thomas | Nov 11, 2012 | Stephen's BizTalk and Integration Blog
Let this go down in the record books that today marks the First Annual Celebration of International Check Your Enterprise Single Sign-On Master Secret Key Day!
Picture this, it is 2 AM and you are sound asleep. All of a sudden your work pager goes off. The datacenter is flooded (why they had a datacenter in the basement is a whole other story) and you lost the Master BizTalk Server. The power went off and backup initially failed so all the servers restarted. Your other BizTalk boxes are just fine but can not talk to the Master SSO server so they are not working. Your SQL database is ok because it was higher on the rack. Would you know where your SSO Master Secret Key is in order to promote another server to be the Master? If so, you would be up and running in less than 2 minutes. Otherwiseit might take hours or even days to recover.
Did the expensive implementation consultants who have now left your company tell you something about a SSO Key file someplace but you do not know where it is or what the password is on the file (you can always try “password” first if you do not remember it)?
Put all those worries behind you thanks to today! 11-11 should be your day to re-export your SSO Master Secret Key and keep it in a safe place.
Exporting out the Master Secret is as simple as 1, 2, 3 (http://msdn.microsoft.com/en-us/library/aa559192(v=bts.10).aspx)
1. On the Start menu, click All Programs, click Microsoft Enterprise Single Sign-On, and then click SSO Administration.
2. In the scope pane of the ENTSSO MMC Snap-In, expand the Enterprise Single Sign-On node
3. Right-click System, and then click Back up Master Secret.
Remember first thing Monday, double check your SSO Master Secret Key file and have a Happy International Check Your Enterprise Single Sign-On Master Secret Key Day!

by stephen-w-thomas | Nov 6, 2012 | Stephen's BizTalk and Integration Blog
Over the past few months I have been blogging a lot about the new Windows Azure Virtual Machines. That is because I can see the huge impact on projects for having this type of infrastructure available literally at your fingertips – for pennies an hour.
Just yesterday I setup a full windows domain with 4 servers accessible worldwide in a matter of an hour or two.
I wanted to highlight the general complexity I see at many client related to setting up a new Virtual Machine. I created a video and entered it into the Windows Azure Makes Me FAST Contest. The video is called “The Story of your Life – Mr. Virtual Machine”. It is a “remake” of the old TV Show This Is Your Life well at least that was the goal.
Take a look at the video below and vote for it if you like what you see!
Step 1: Got to http://www.meetwindowsazure.com/fast and find my video. The videos are in the middle of the page. You might have to click the right arrow to see it.

Step 2: Look for video titled “The Story of your Life – Mr. Virtual Machine by Stephen W. Thomas”.

Step 3: Watch it and Vote for it if you like it.

Of course, if you do not like the video please do not vote for it. This website has a lot of other interesting videos. The coolest, next to mine of course, is the one by Alan Smith – “Rapid Massive On-Demand Scalability Makes Me Fast!”. It is well worth a watch.

by stephen-w-thomas | Oct 22, 2012 | Stephen's BizTalk and Integration Blog
The Windows Azure Storage API now have the ability to do cross account, asynchronous blob transfers. This means it is no longer required to download the blob in order to upload it to a different Windows Azure account. You can read all about this here.
Over the past few weeks I have been working with the Windows Azure Virtual Machine feature that is currently in preview mode. I talked in a past blog post and video about using the Gallery to create a BizTalk 2010 R2 CTP Virtual Machine.
The HUGE value I see here is we now have the ability to quickly and easily create Virtual Machines using a given Image or Virtual Hard Drive (VHD). We can even create our own custom Images that can be quickly distributed out to a large development team. VHDs created in Windows Azure can be downloaded and used locally and local VHDs can be uploaded to run inside Window Azure Virtual Machines. Related to that, keep in mind the bandwidth is charged for downloads and that it can take 3 hours or more to download a 30 GB VHD.
I have worked on several large scale development projects in the past and we have had full teams of people who in the beginning were responsible for creating and maintaining the developer image not to mention the internal IT resources required to support, for a limited amount of time, sometimes hundreds of new virtual machines. Add in the “corporate red tape” that is involved with getting new hardware and setting up a new Virtual Machine resulting in massive time (i.e. money) costs to projects.
Some of that time and money can now be saved with Windows Azure Virtual Machines!
Below I am going to walk through the steps in creating a custom, standalone VHD to be shared with developers for local, isolated development. I am creating a VHD and not an Image since this is an isolated Virtual Machine I do not need to join a Domain.
Fist off, why create an Image vs. a Disk (VHD). Shan McArthur has a great blog post on the difference between an Image and a Disk. To sum it up:
Windows Azure Image – is a syspreped version of Windows ready to be setup like a brand new install. You get to create a new Administrator password and you get a new machine name. This would be OK to connect to a domain but ensure the image does not have Machine Name specific items configured, like BizTalk. Creating an Image would require more work for the end user once they got it.
Details on how to create a custom image can be found here.
CRITICAL – I have found that once you sysprep and Capture an Image from an existing VHD, that VHD is now unusable. Kind of makes sense, since you did just sysprep it. You can always re-create a new Virtual Machine by using the new Image you just created.
Windows Azure Disk – is a an exact copy of a Virtual Hard Drive. The Administrator password is the same and so is the machine name. This works well for machines that will run as Stand Alone, not connected to a domain. This would work well to share an already running BizTalk VHD that is fully configured and ready for development.
If we wanted something connected to a domain we would go the Image route since they are syspreped. In this case, I just want to give someone a quick, working version of BizTalk 2010 ready to go so I am going with a Windows Azure Disk (VHD) route.
CRITICAL – The only reliable and repeatable way I have found to copy an Image or VHD is to ensure it does not have any existing leases. A lease is held when you create a Virtual Machine Image or Azure Disk from a VHD in Cloud Storage. Ensure you delete these Images and Disks before copying the blob – do not delete the underlying blob storage. Sometimes, these will get orphaned and you need to remove them using PowerShell. A assume these are all issues related to being a Preview Feature and will be resolved soon.
Below are the steps to create and transfer a VHD to another user. For simplicity, the user will be in the same data center. Cross data center copies are supported, they just take longer.
To help with the cross account copy, I am using my custom tool available here: Windows Azure Virtual Hard Disk (blob storage) Cross Account Copy, Lease Break, and Management Tool
Step 1: Create your Master VHD.
Start with using a custom or prebuild Image to create a new Virtual Machine. Once the Machine is setup like you wish, shut it down and delete the Virtual Machine. Then, inside the Portal Delete the Disk. Ensure you select the “Retain The Associated VHD” option to keep the underlying blob storage of the VHD.
Step 2: Set up the Source and Destination Windows Azure Storage Account Details in the Helper Tool. Download the tool here.
To enable more advanced features, set EnableRESTApi to True and set the Certificate Path and Source Windows Azure Subscription ID.
<!-- Enter the Source Storage Account Details here. -->
<add key="SourceStorageConnection" value="DefaultEndpointsProtocol=https;AccountName=NAME;AccountKey=KEY" />
<!-- Uncomment and Enter the Destination Storage Account Details here. To work with only one account leave commented out.
To copy to the same store set this to the same as Source Account above. -->
<add key="DestinationStorageConnection" value="DefaultEndpointsProtocol=https;AccountName=NAME;AccountKey=KEY" />
<!-- Select to enable REST API Advanced Features - Subscription ID and Certificate are Required for this feature. true | false -->
<add key='EnableRESTApi' value='true' />
<!-- Enter the full path to the -->
<add key='CertificatePath' value='C:\DemoFolder\AzureCerts\Cert.cer'/>
<!-- Your Windows Azure Subscription ID -->
<add key='SourceSubscriptionID' value='GUID' />
.csharpcode, .csharpcode pre
{
font-size: small;
color: black;
font-family: consolas, “Courier New”, courier, monospace;
background-color: #ffffff;
/*white-space: pre;*/
}
.csharpcode pre { margin: 0em; }
.csharpcode .rem { color: #008000; }
.csharpcode .kwrd { color: #0000ff; }
.csharpcode .str { color: #006080; }
.csharpcode .op { color: #0000c0; }
.csharpcode .preproc { color: #cc6633; }
.csharpcode .asp { background-color: #ffff00; }
.csharpcode .html { color: #800000; }
.csharpcode .attr { color: #ff0000; }
.csharpcode .alt
{
background-color: #f4f4f4;
width: 100%;
margin: 0em;
}
.csharpcode .lnum { color: #606060; }
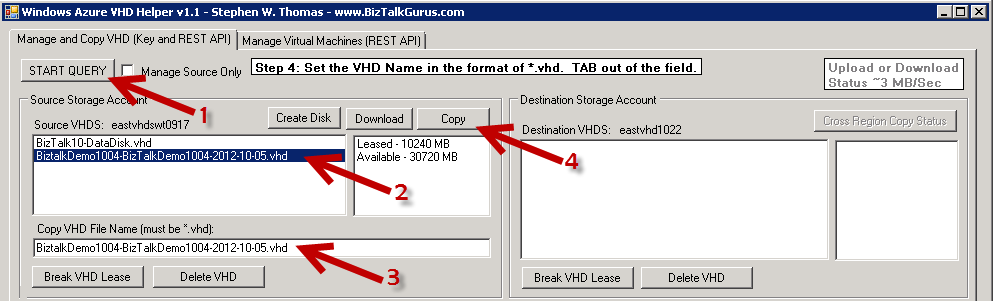
Step 3: Select the VHD to Copy to the Destination Storage Account.
Launch the Helper Tool. Click on START QUERY on the top left. Select the VHD you want to copy. Note that only Available (i.e. blobs without a lease) can be copied with the tool. Rename the destination VHD if desired. Click on Copy.
If your VHD is Leased, that means it is used by an Azure Disk and could be used by a running Virtual Machine. Or it could be a known issue that leaves the VHD in a stuck state. If you know for sure the VHD is not used by an Azure Disk or Virtual Machine, you can select the VHD blob and click Break VHD Lease. You also have the ability to Delete or Download an VHD if you wish all using this Helper Tool.
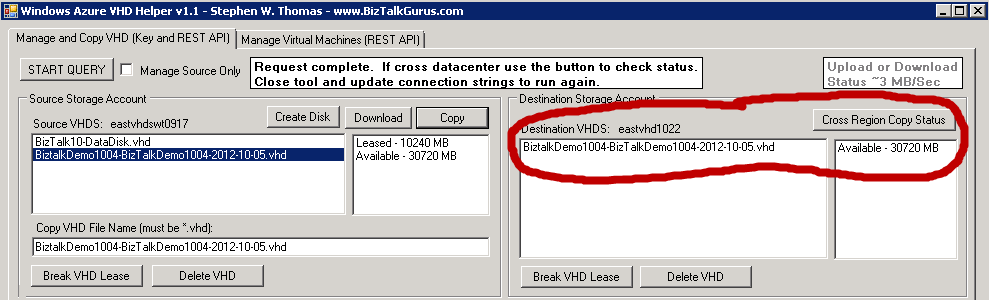
Step 4: See the results in the Destination Storage Account
At this point, if the copy was within the same datacenter it should take only a few seconds. A cross datacenter copy takes much longer. Once you have the VHD, create an Azure OS Disk inside the Portal and use that Disk as the OS Disk of a new Virtual Machine. Just make sure you know the log in account details for the VHD.
Step 5: Enjoy using your new VHD.
If you gave someone else your Azure Storage Key information make sure you regenerate it for security reasons.
Below is the code that is used to make the copy. This is using 1.7.1 of the Azure Storage APIs. At present, I am still working though checking the status of Cross Data Center copies. The method below returns the Copy ID, not the Request ID. The Request ID can easily be used with the API to check the status of a request. Still working on what to do with the Copy ID.
// This is the method that copies the selected VHD
// Account details are read from the App.config file.
// Source and Destination VHD are inputs on the Form.
// Container name is hard coded to vhds.
// If you want to copy to/from other containers just change this and remove the text validation on the Destination Blob Name.
internal void CopyVHD()
{
// Reads Configuration details from the App.config file. Needs a reference to Microsoft.WindowsAzure.Configuration.dll.
// Watch out of issues when using Copy and Paste from the portal. I pasted into Notepad first and that seemed to mess something up.
CloudStorageAccount sourceStorageAccount = CloudStorageAccount.Parse(CloudConfigurationManager.GetSetting("SourceStorageConnection"));
CloudStorageAccount destinationStorageAccount = CloudStorageAccount.Parse(CloudConfigurationManager.GetSetting("DestinationStorageConnection"));
// Create the blob client using the Accounts above
CloudBlobClient sourceBlobClient = sourceStorageAccount.CreateCloudBlobClient();
CloudBlobClient destinationBlobClient = destinationStorageAccount.CreateCloudBlobClient();
// Retrieve reference to a previously created container
// Rename "vhds" as needed. Can be used to read from any container.
CloudBlobContainer sourceContainer = sourceBlobClient.GetContainerReference(containerName);
CloudBlob sourceBlob = sourceContainer.GetBlobReference(lstBoxVHDSSource.SelectedItem.ToString());
CloudBlobContainer destinationContainer = destinationBlobClient.GetContainerReference(containerName);
// Created the container if it does not exist
CreateContainerIfNeeded(destinationContainer);
CloudBlob destinationBlob = destinationContainer.GetBlobReference(txtNewVHDName.Text);
// Logic added to check if a security token has already been created
if (!hasSecurityToken)
{
// Create a permission policy, consisting of a container-level access policy and a public access setting, and store it on the container.
BlobContainerPermissions destinationContainerPermissions = new BlobContainerPermissions();
// The container-level access policy provides read/write access to the container for 1 day.
destinationContainerPermissions.SharedAccessPolicies.Add("imageCopyPolicy", new SharedAccessBlobPolicy()
{
SharedAccessExpiryTime = DateTime.UtcNow.AddDays(1),
Permissions = SharedAccessBlobPermissions.Write | SharedAccessBlobPermissions.Read
});
destinationContainerPermissions.PublicAccess = BlobContainerPublicAccessType.Off;
sourceContainer.SetPermissions(destinationContainerPermissions);
// This gets the token needed for cross-account copies. This is not needed to copy into the same account.
globalSecurityToken = sourceContainer.GetSharedAccessSignature(new SharedAccessBlobPolicy(), "imageCopyPolicy");
// Set the Global Variable
hasSecurityToken = true;
}
// This does the copy using the StartCopyFromBlog method in the 1.7.1 SDK.
string copyID = destinationBlob.StartCopyFromBlob(new Uri(sourceBlob.Uri.AbsoluteUri + globalSecurityToken));
}
.csharpcode, .csharpcode pre
{
font-size: small;
color: black;
font-family: consolas, “Courier New”, courier, monospace;
background-color: #ffffff;
/*white-space: pre;*/
}
.csharpcode pre { margin: 0em; }
.csharpcode .rem { color: #008000; }
.csharpcode .kwrd { color: #0000ff; }
.csharpcode .str { color: #006080; }
.csharpcode .op { color: #0000c0; }
.csharpcode .preproc { color: #cc6633; }
.csharpcode .asp { background-color: #ffff00; }
.csharpcode .html { color: #800000; }
.csharpcode .attr { color: #ff0000; }
.csharpcode .alt
{
background-color: #f4f4f4;
width: 100%;
margin: 0em;
}
.csharpcode .lnum { color: #606060; }
by stephen-w-thomas | Oct 11, 2012 | Stephen's BizTalk and Integration Blog
Currently the Windows Azure Management Portal is having some difficulty using the UI to create an Image from an existing Virtual Machine.
You have two different options to create an Image without using the UI. The two options are using the REST API or PowerShell. The details of each approach our outlined below. I have tested both approaches and was able to create an Image and use that Image to create a new Virtual Machine.
Options 1: Using Windows Azure REST API
1. Sysprep the Virtual Machine and ensure it is shut down according to the instructions here.
2. Download my REST API Helper Tool or use your own.
3. Update the VM-CaptureImage.xml file to have the label name as the name of the Virtual Machine (it can really be anything) and the Image Name as the name of your output image.
4. Set your Management Certificate, Subscription ID, and working folder path inside the App.config file as outlined in the blog post.
5. Make an HTTP POST to: https://management.core.windows.net/<Subscription-ID>/services/hostedservices/<VM-Name>/deployments/<VM-Name>/roleInstances/<VM-Name>/Operations (assumes the Service Name and VM Name are the same).
6. Select the updated VM-CreateImage.xml as the POST Body.
7. This is an Async call and the tool will return an Operations Request ID and auto populate the ability to check the status of that request.
8. In about 3 to 5 minutes click on “Make REST Service Call” to check the status of the Async Request created above. You will eventually see a HttpStatusCode 200 and Status Succeeded (rather than Status In Progress).
Options 2: Using Windows Azure PowerShell
1. Sysprep the Virtual Machine and ensure it is shut down according to the instructions here.
2. Setup and configure PowerShell as outlined here. This takes about 10 minutes.
3. Run the following command: Save-AzureVMImage -ServiceName <Service-Name / Usually VM Name> -Name <Vm-Name> -NewImageName <New-Image-Name> -NewImageLabel <SomeLabel>
4. In about 3 to 5 minutes the screen will update to show the process was successful.
Keep in mind that Windows Azure Virtual Machines are a Preview Feature so from time to time things like this will happen. I am sure the Portal will be corrected soon to allow Images via the UI. Never the less, it is always good to know how to do them programmatically. Enjoy.

by stephen-w-thomas | Oct 9, 2012 | Downloads
This tool is intended to get you moving in the right direction and not intended to solve all your problems out of the box. You will need to use the Windows Azure REST API Reference guide when working with this tool.
I have provided a few sample Request Body templates for Creating a Hosted Service, Creating an Azure Storage Account, Adding a Virtual Machine Disk, and Creating a Virtual Machine (note to create a VM is a multi-step process, see below). Others can easily be added by using the online reference guide.
To use this sample tool you need to configure some basic information inside the App.Config file. You need to set the path to your management certificate, your subscription id, and the path to the folder location of your POST bodies.
    <!--  Enter the full path to the Windows Azure Management Certificate. More details at http://msdn.microsoft.com/en-us/library/windowsazure/ee460782.aspx -->
    <add key='CertificatePath' value='C:\DemoFolder\yourcert.cer'/>

    <!-- Subscription ID for the account and must match Management Certificate -->
    <add key='Subscription' value='your account id' />

    <!--  Default folder location of REST API Post Bodies.  This exists to save time selecting the Post Body file. -->
    <add key='PostBodiesFolder' value='C:\DemoFolder\WindowsAzureRESTApiHelper\WindowsAzureRESTApiHelper\RESTAPIBodies\'/>
How to Use this Sample Tool
1. Once the App.config is setup simply launch the tool. It was built with Visual Studios 2010 but should upgrade to 2012 without issues.
2. Select one of the GET, POST, or DELETE radio buttons.
3. Select your basic action from the drop down or paste in your URL into the text box.
4. Click on “Make A REST Service Call” to complete your request.
5. If you are doing a POST, you will be prompted to select the body of your request.
6. If you do a POST or a DELTE that is an asynchronous process a Request ID is returned in the Response Header. The tool will detect this and auto populate a URL to check the result of the request.
7. You can keep clicking the “Make REST Service Call” button to check the results of the submitted operation until it is competed.
It is that simple!!! Like I said before, this tool is intended to be a starting point for someone new to working with the Windows Azure REST API’s.
Other useful pieces of information
1. To create a new Virtual Machine you need to do the following: First, create the Service using Create Hosted Service. Second, you can use the Quick Create using that Service to create the Virtual Machine.
2. If you plan to work with Virtual Machines using the API, read this blog post about the URLs.
3. If you run into issues the best way to confirm the URL and Post Body is to perform the actions using PowerShell with Fiddler running. This will show the URL and exact Post Body.
by stephen-w-thomas | Oct 9, 2012 | Stephen's BizTalk and Integration Blog
Windows Azure has a few different, somewhat disjointed, toolsets available to create new artifacts and maintain existing ones. The best known is the Web Portal. Very quickly when working with the web portal you discover the portal is not able to do all the tasks needed to support development and maintenance. This brings into play Windows Azure PowerShell Commands, a .Net SDK, and REST API.
If you are new to working with the Windows Azure REST API or if you are looking for sample code working with the Windows Azure REST API, this tool can help you.
This tool is intended to get you moving in the right direction and not intended to solve all your problems out of the box. You will need to use the Windows Azure REST API Reference guide when working with this tool.
I have provided a few sample Request Body templates for Creating a Hosted Service, Creating an Azure Storage Account, Adding a Virtual Machine Disk, and Creating a Virtual Machine (note to create a VM is a multi-step process, see below). Others can easily be added by using the online reference guide.
Download: Windows Azure REST API Sample Tool
To use this sample tool you need to configure some basic information inside the App.Config file. You need to set the path to your management certificate, your subscription id, and the path to the folder location of your POST bodies.
    <!--  Enter the full path to the Windows Azure Management Certificate. More details at http://msdn.microsoft.com/en-us/library/windowsazure/ee460782.aspx -->
    <add key='CertificatePath' value='C:\DemoFolder\yourcert.cer'/>

    <!-- Subscription ID for the account and must match Management Certificate -->
    <add key='Subscription' value='your account id' />

    <!--  Default folder location of REST API Post Bodies.  This exists to save time selecting the Post Body file. -->
    <add key='PostBodiesFolder' value='C:\DemoFolder\WindowsAzureRESTApiHelper\WindowsAzureRESTApiHelper\RESTAPIBodies\'/>
.csharpcode, .csharpcode pre
{
font-size: small;
color: black;
font-family: consolas, “Courier New”, courier, monospace;
background-color: #ffffff;
/*white-space: pre;*/
}
.csharpcode pre { margin: 0em; }
.csharpcode .rem { color: #008000; }
.csharpcode .kwrd { color: #0000ff; }
.csharpcode .str { color: #006080; }
.csharpcode .op { color: #0000c0; }
.csharpcode .preproc { color: #cc6633; }
.csharpcode .asp { background-color: #ffff00; }
.csharpcode .html { color: #800000; }
.csharpcode .attr { color: #ff0000; }
.csharpcode .alt
{
background-color: #f4f4f4;
width: 100%;
margin: 0em;
}
.csharpcode .lnum { color: #606060; }
How to Use this Sample Tool
1. Once the App.config is setup simply launch the tool. It was built with Visual Studios 2010 but should upgrade to 2012 without issues.
2. Select one of the GET, POST, or DELETE radio buttons.
3. Select your basic action from the drop down or paste in your URL into the text box.
4. Click on “Make A REST Service Call” to complete your request.
5. If you are doing a POST, you will be prompted to select the body of your request.
6. If you do a POST or a DELTE that is an asynchronous process a Request ID is returned in the Response Header. The tool will detect this and auto populate a URL to check the result of the request.
7. You can keep clicking the “Make REST Service Call” button to check the results of the submitted operation until it is competed.
It is that simple!!! Like I said before, this tool is intended to be a starting point for someone new to working with the Windows Azure REST API’s.
Download: Windows Azure REST API Sample Tool
Other useful pieces of information
1. To create a new Virtual Machine you need to do the following: First, create the Service using Create Hosted Service. Second, you can use the Quick Create using that Service to create the Virtual Machine.
2. If you plan to work with Virtual Machines using the API, read this blog post about the URLs.
3. If you run into issues the best way to confirm the URL and Post Body is to perform the actions using PowerShell with Fiddler running. This will show the URL and exact Post Body.
by stephen-w-thomas | Oct 8, 2012 | Stephen's BizTalk and Integration Blog
Some enhancements were made this weekend to the Windows Azure Preview Portal. With these enhancements is the addition of Service Bus features and I think the ability to create Containers inside a Storage Account. I do not remember that being in place before.
As it relates to Virtual Machines I noticed the following two changes:
1. When you Capture An Image from an existing Virtual Machine you get a notice saying the Virtual Machine will be deleted.
2. When you delete a DISK you are now giving the option to also delete the underlying blob storage vhd associated with that DISK. This is a nice, money saving feature.
On a side note, it seems the ability to create and capture an Image is no longer working. I have been trying since Friday with no luck. It was working a few weeks ago. So if you are trying to create an Image you may run into issues.
by stephen-w-thomas | Oct 8, 2012 | Stephen's BizTalk and Integration Blog
Windows Azure has a rich Management REST API for working with all types of artifacts.
Continuing on with my current theme of working with the Windows Azure Virtual Machines in Preview mode I came across some details of the REST API that might be helpful to others. While the documentation seem to say for GET and DELETE requests you need something like the following:
https://management.core.windows.net/<subscription-id>/services/hostedservices/<service-name>/deployments/<deployment-name>/roles/<role-name>
.csharpcode, .csharpcode pre
{
font-size: small;
color: black;
font-family: consolas, “Courier New”, courier, monospace;
background-color: #ffffff;
/*white-space: pre;*/
}
.csharpcode pre { margin: 0em; }
.csharpcode .rem { color: #008000; }
.csharpcode .kwrd { color: #0000ff; }
.csharpcode .str { color: #006080; }
.csharpcode .op { color: #0000c0; }
.csharpcode .preproc { color: #cc6633; }
.csharpcode .asp { background-color: #ffff00; }
.csharpcode .html { color: #800000; }
.csharpcode .attr { color: #ff0000; }
.csharpcode .alt
{
background-color: #f4f4f4;
width: 100%;
margin: 0em;
}
.csharpcode .lnum { color: #606060; }
The only way I have been able to get GET and DELTET requests to work is using “deploymentslots” rather than “deployments”. Below are some samples of REST API URLs that I was able to get working. For POST requests, the below URL was used for sending in a Request Body with additional XML payload details.
The Service Name listed below is the Virtual Machine Name witch is usually the same as the underlying Service (although it does not have to be). When deleting, the Hosted Service used by the Virtual Machine may also need to be deleted.
To Get Virtual Machine Details – HTTP GET
https://management.core.windows.net/<Subscription-ID>/services/hostedservices/<Service-Name>/deploymentslots/Production
.csharpcode, .csharpcode pre
{
font-size: small;
color: black;
font-family: consolas, “Courier New”, courier, monospace;
background-color: #ffffff;
/*white-space: pre;*/
}
.csharpcode pre { margin: 0em; }
.csharpcode .rem { color: #008000; }
.csharpcode .kwrd { color: #0000ff; }
.csharpcode .str { color: #006080; }
.csharpcode .op { color: #0000c0; }
.csharpcode .preproc { color: #cc6633; }
.csharpcode .asp { background-color: #ffff00; }
.csharpcode .html { color: #800000; }
.csharpcode .attr { color: #ff0000; }
.csharpcode .alt
{
background-color: #f4f4f4;
width: 100%;
margin: 0em;
}
.csharpcode .lnum { color: #606060; }
To Delete a Virtual Machine – HTTP DELETE
https://management.core.windows.net/<Subscription-ID>/services/hostedservices/<Service-Name>/deploymentslots/Production
.csharpcode, .csharpcode pre
{
font-size: small;
color: black;
font-family: consolas, “Courier New”, courier, monospace;
background-color: #ffffff;
/*white-space: pre;*/
}
.csharpcode pre { margin: 0em; }
.csharpcode .rem { color: #008000; }
.csharpcode .kwrd { color: #0000ff; }
.csharpcode .str { color: #006080; }
.csharpcode .op { color: #0000c0; }
.csharpcode .preproc { color: #cc6633; }
.csharpcode .asp { background-color: #ffff00; }
.csharpcode .html { color: #800000; }
.csharpcode .attr { color: #ff0000; }
.csharpcode .alt
{
background-color: #f4f4f4;
width: 100%;
margin: 0em;
}
.csharpcode .lnum { color: #606060; }
Make sure to clean up the Service – HTTP DELETE
https://management.core.windows.net/<Subscription-ID>/services/hostedservices/<Service-Name>
.csharpcode, .csharpcode pre
{
font-size: small;
color: black;
font-family: consolas, “Courier New”, courier, monospace;
background-color: #ffffff;
/*white-space: pre;*/
}
.csharpcode pre { margin: 0em; }
.csharpcode .rem { color: #008000; }
.csharpcode .kwrd { color: #0000ff; }
.csharpcode .str { color: #006080; }
.csharpcode .op { color: #0000c0; }
.csharpcode .preproc { color: #cc6633; }
.csharpcode .asp { background-color: #ffff00; }
.csharpcode .html { color: #800000; }
.csharpcode .attr { color: #ff0000; }
.csharpcode .alt
{
background-color: #f4f4f4;
width: 100%;
margin: 0em;
}
.csharpcode .lnum { color: #606060; }
To Import a VM State (exported using PowerShell): – HTTP POST with Post Body
https://management.core.windows.net/<Subscription-ID>/services/hostedservices/<Service-Name>/deployments
.csharpcode, .csharpcode pre
{
font-size: small;
color: black;
font-family: consolas, “Courier New”, courier, monospace;
background-color: #ffffff;
/*white-space: pre;*/
}
.csharpcode pre { margin: 0em; }
.csharpcode .rem { color: #008000; }
.csharpcode .kwrd { color: #0000ff; }
.csharpcode .str { color: #006080; }
.csharpcode .op { color: #0000c0; }
.csharpcode .preproc { color: #cc6633; }
.csharpcode .asp { background-color: #ffff00; }
.csharpcode .html { color: #800000; }
.csharpcode .attr { color: #ff0000; }
.csharpcode .alt
{
background-color: #f4f4f4;
width: 100%;
margin: 0em;
}
.csharpcode .lnum { color: #606060; }
To use Quick Create or Create a New Virtual Machine: – HTTP POST with Post Body
https://management.core.windows.net/<Subscription-ID>/services/hostedservices/<Service-Name>/deployments
.csharpcode, .csharpcode pre
{
font-size: small;
color: black;
font-family: consolas, “Courier New”, courier, monospace;
background-color: #ffffff;
/*white-space: pre;*/
}
.csharpcode pre { margin: 0em; }
.csharpcode .rem { color: #008000; }
.csharpcode .kwrd { color: #0000ff; }
.csharpcode .str { color: #006080; }
.csharpcode .op { color: #0000c0; }
.csharpcode .preproc { color: #cc6633; }
.csharpcode .asp { background-color: #ffff00; }
.csharpcode .html { color: #800000; }
.csharpcode .attr { color: #ff0000; }
.csharpcode .alt
{
background-color: #f4f4f4;
width: 100%;
margin: 0em;
}
.csharpcode .lnum { color: #606060; }
Hope this helps someone else trying to use the Windows Azure REST API with Virtual Machines.
by stephen-w-thomas | Oct 5, 2012 | Stephen's BizTalk and Integration Blog
Recently I was looking at a forum question of someone trying to add a disk to the Azure Virtual Machines using the Windows Azure REST API.
You have two types of Disks. You have a Data Disk that do not have an operating system and are used to store user files. You also have OS Disks. The OS Disks contain the operation system and is the main disk used when creating an Azure Virtual Machine.
These can be created using the REST API, PowerShell, or the Management Portal.
The REST API documentation outlines the following body for the post to create a new disk.
<Disk xmlns="http://schemas.microsoft.com/windowsazure" xmlns:i="http://www.w3.org/2001/XMLSchema-instance">
   <HasOperatingSystem>true|false</HasOperatingSystem>
   <Label>disk-description</Label>
   <MediaLink>uri-of-the-containing-blob</MediaLink>
   <Name>disk-mame</Name>
   <OS>Linux|Windows</OS>
</Disk>
.csharpcode, .csharpcode pre
{
font-size: small;
color: black;
font-family: consolas, “Courier New”, courier, monospace;
background-color: #ffffff;
/*white-space: pre;*/
}
.csharpcode pre { margin: 0em; }
.csharpcode .rem { color: #008000; }
.csharpcode .kwrd { color: #0000ff; }
.csharpcode .str { color: #006080; }
.csharpcode .op { color: #0000c0; }
.csharpcode .preproc { color: #cc6633; }
.csharpcode .asp { background-color: #ffff00; }
.csharpcode .html { color: #800000; }
.csharpcode .attr { color: #ff0000; }
.csharpcode .alt
{
background-color: #f4f4f4;
width: 100%;
margin: 0em;
}
.csharpcode .lnum { color: #606060; }
While these are the right items to send to create the Disk, the order matters if you want to create an OS Disk. I found that the OS Element needed to be first in order to create an OS Disk vs. a Data Disk.
The correct body for the post to create an OS Disk should be:
<Disk xmlns="http://schemas.microsoft.com/windowsazure" xmlns:i="http://www.w3.org/2001/XMLSchema-instance">
   <OS>Linux|Windows</OS>
   <HasOperatingSystem>true|false</HasOperatingSystem>
   <Label>disk-description</Label>
   <MediaLink>uri-of-the-containing-blob</MediaLink>
   <Name>disk-mame</Name>
</Disk>
Hope this helps someone out. More to come in the next few days on working with the Windows Azure REST API.
by stephen-w-thomas | Sep 26, 2012 | Stephen's BizTalk and Integration Blog
Recently the Windows Azure Storage API’s were updated to include the ability to do cross account, asynchronous blob transfers. This means it was no longer necessary to download the blob in order to upload it to a different Windows Azure account. You can read all about this here.
Over the past few weeks I have been working with the Windows Azure Virtual Machine feature that is currently in preview mode. I talked in a past blog post and video about using the Gallery to create a BizTalk 2010 R2 CTP Virtual Machine.
I am working on proving out and understanding the scenario of creating a Master Image (or Master VHD for non-domain Virtual Machines) and sharing it with a large team of developers. Why? Because on past projects we have spent considerable time and resources (i.e. money) creating, maintaining, and provisioning developer images. For example on a recent project an urgent issue arose and we needed a dedicated BizTalk environment to test a cumulative update release. It was requested on Friday morning. Still today on Wednesday it was not created (4 business days later). With Windows Azure Virtual Machines and a pre-built image this would literally be a few minute task and something I could do myself without the involvement of 3 to 5 other people. In total, so much time (i.e. money) can now be saved with Windows Azure Virtual Machines!
This type of example leads me to my tool and why I created it. In my scenario, a Windows Azure Virtual Machine guru would create a master image or vhd for distribution. With the new asynchronous cross account copy, sending an Image or VHD to a new developer is a snap… as long as you know the “rules”. I created, copied, deleted, and destroyed over 100 Virtual Machines at a total cost of around $5.00 across multiple Azure accounts to fully understand how to successfully copy an Image and VHD from one account to another without issues. I put all that into a simple tool that anyone can use to manage vhds and copy them from one account to another. See below for known issues, features of the tool, and quick how to’s.
I welcome all feedback! Please note this tool is an excellent example of why I am NOT a Windows Form guy and in no way should anything done in this tool be considered a best practice. This tool is more about getting the job done and trying to make things easy to understand.
Download: Windows Azure VHD Helper Tool
Basic Steps for Cross Account VHD Copy:
- Shut down your Virtual Machine.
- Delete your Virtual Machine.
- Delete the associated Image or Disk inside the Virtual Machine Portal. This does not remove the underlying blob of the vhd.
- Copy the blob from one storage account to another.
- Add your vhd back and recreate the virtual machine.
Issues (per my research) with VHD Copying as a Preview Feature– make sure you understand these issues and limitations. I assume most are related to preview issues and this process will get simpler with time.
- If you copy a vhd that is Leased (configured as an Image or Disk inside the Virtual Machine Portal) the Source Disk will become unusable.
- If you copy a vhd that is Leased (configured as an Image or Disk inside the Virtual Machine Portal) the Destination Disk will likely not work. I would say about 75% of the time they do not work. I just re-tested this tonight and they worked.
- Copying from one data center to another seems to be as slow as downloading the file.
- When downloading the file, make sure you do not close the form or the download will stop.
- Copy Status does not seem to be working. I either get NULL or Pending all the time. Probably a user error on my part…. The best way to find out if the copy is complete is to check the file size on the destination. It is 0 MB until the copy is complete.
Features:
- Visual view of vhds contained inside a Storage Account
- Simple, one click Delete of vhds
- Simple, one click Lease Break of vhds (for orphaned vhds – see more here)
- One click download of a vhd, tested to work with Hyper-V (downloads at a rate of about 3 MB/sec)
- Support for easily making a copy of a VHD within the same Azure account
- Support for making a vhd copy across Window Azure Accounts within the same region within a few seconds
- Support for making a vhd copy to any account in any region (slow when out of region)
- Prevents you from making a copy of a vhd with an existing Lease
- Uses the Windows Azure Storage API version 1.7.1 (github)
Advanced Features (with REST API Management Certificate):
- Visual view of all vhds contained inside a single Windows Azure Account
- See a “***” by vhds inside the Source storage account
- List all custom user images inside a single Windows Azure Account
Missing Features (i.e. items I hope to add later):
- Ability to upload a vhd
- Ability to get details on an Image
Quick How-To’s:
How to work with just one Storage Account:
Set just a Source Configuration inside the app.config file. I also have a check box for “source only” that will try to auto determine what you want to do. The default is Source Only.
How to Copy a vhd into the same account:
Inside the app.config file for the tool, set the Source and Destination to the same Storage Account.
How to Copy a vhd into another account in the same region (inter-account or cross-account):
Inside the app.config file for the tool, set the Source to the Storage Account that has the source vhd and set Destination to Storage Account that you want for the Destination. The destination container vhds does not need to exist. The tool will create it for you. Click “Copy”. The Destination list should refresh and the copy already be compete. You will know it is complete when the size of the vhd is not 0.
How to Copy a vhd cross region:
Inside the app.config file for the tool, set the Source to the Storage Account that has the source VHD and set Destination to Storage Account that you want for the Destination. The destination container vhds does not need to exist. The tool will create it for you. Select a vhd in the List box that is not lease. Change the vhd name if you wish. Click “Copy”. Click on “List All VHDS” on the top right until you see the file size of the Destination change from 0 to the size of the VHD. This will take a long time, up to 8 hours. I would not close the form until I have confirmed it was completed.
How to Download a Source vhd:
Inside the app.config file for the tool, set the Source to the Storage Account that has the source VHD. Click on “List All VHDS”. Select the VHD you want to download inside the List Box. Click on “Download”. You will be prompted for the download location. Make sure you have enough disk space. Leave the tool open until you see a Completed notice on the top right of the tool. This will take up to 8 hours. Do not close the form or the download will stop.
How to Break a Lease or Delete a vhd on the Source or Destination:
Inside the app.config file for the tool, set the Source and Destination to the Storage Accounts that has the VHDS. Click on “List All VHDS”. Using the List Box, select a single vhd from the list. Click on “Break VHD Lease” to break the existing lease or “Delete VHD” to delete the vhd. Note: this operations are not undoable. Using these incorrectly can result in loss of data or vhds.
I would like to thank the following references:
– How not to throw an exception using CreateIfNotExists on a container – http://blog.smarx.com/posts/testing-existence-of-a-windows-azure-blob
– How to do an Azure REST API Service call – http://msdn.microsoft.com/en-us/library/windowsazure/ee460782.aspx
– How to have a 2nd thread update the main windows form – http://stackoverflow.com/questions/10775367/cross-thread-operation-not-valid-control-textbox1-accessed-from-a-thread-othe
– Async across copy with SDK 1.7.1 – http://blogs.msdn.com/b/windowsazurestorage/archive/2012/06/12/introducing-asynchronous-cross-account-copy-blob.aspx
Download: Windows Azure VHD Helper Tool