by Sandro Pereira | Sep 12, 2017 | BizTalk Community Blogs via Syndication
Continuing the season topic: “BizTalk Server Tips and Tricks” I have to say this is one of my favorites, I simply love this tip…
If you followed the old BizTalk Innovation Day’s events, that lead to the current Integrate event in London, you may remember my dear friend Tord Glad Nordahl complaining every year in his sessions about Developers writing unnecessary information Application Log. Well, I partially agree with him, I agree in the first part: you shouldn’t write custom application errors, warnings of information in the Application Log!

You need to realize that Application Event Log holds almost all the important information related to different aspects of BizTalk – SQL, IIS, BizTalk infrastructure and runtime problems – it is one of the main places that admins use to monitor “applications” installed on their server. This is the information that is extremely important for BizTalk Administrator in order to monitor the well-being of the platform and to diagnose problems. For that reason you don’t want to immerse the Application log with irrelevant and unnecessary information at the point to be almost impossible to find real problems – instead you, or in this case, the admins, should keep it clean.
Instead of using the Application Log, you can use a custom log for logging your custom application (integration) errors, warnings or information., So, in this way, I really don’t care if you are using the Event Viewer to log additional information’s about your integration processes.
What the Administrator does normally in these circumstances?
They tend to ask (argue) to the developer team to change their code, that already is deployed in several (or all) the environments, for not to write in the Application log this unnecessary information…
… they tend to receive the following response, “this information is critical for us to have visibility and track the processes (feeling surprised but I have heard enough times this statement), debugging and troubleshooting and so on”.
It’s basically a stupid and unnecessary battle where I can say that no one will be defeated or victorious.
What should the Administrator do?
Changing people’s behavior is hard, but I’m not saying that you should not try. You should, but getting others to change can be impossible, or a big challenge, it will definitely take time… especially developers who will try to find a thousand excuses for explaining why such information is important.
My advice for them take back the control of your environment by easily creating or using PowerShell (let the developer by happy by writing in the Event Viewer)
With this simple script, you can easily move an Event Source to a different Windows Event Log:
foreach ($LogSource in $LogSources) {

Remove-EventLog -Source $LogSource

}

$logFileExists = Get-EventLog -list | Where-Object {$_.logdisplayname -eq $LogName}

if (! $logFileExists) {

$LogSources | %{

New-EventLog -LogName $LogName -Source $_

}

# Compose Key:

$LogPath = 'HKLM:SYSTEMCurrentControlSetserviceseventlog'+$LogName;

if(Test-Path $LogPath)

{

$acl = Get-Acl $LogPath

$GpOrUsers | %{

$ace = New-Object System.Security.AccessControl.RegistryAccessRule $_,'WriteKey, ReadKey','allow'

$acl.AddAccessRule($ace)

#Set-Acl $LogPath $acl

}

}else{Write-Error "Cannot acesss log $LogName"}

}

else {

$LogSources | %{

New-EventLog -LogName $LogName -Source $_

}

}

This way, you as an admin can take back the control of your environment and fix the developers madness.
The full script can be found and download here: BizTalk DevOps: Moving Event Source To a Different/Custom Windows Event Log
Stay tuned for new tips and tricks!
Author: Sandro Pereira
Sandro Pereira is an Azure MVP and works as an Integration consultant at DevScope. In the past years, he has been working on implementing Integration scenarios both on-premises and cloud for various clients, each with different scenarios from a technical point of view, size, and criticality, using Microsoft Azure, Microsoft BizTalk Server and different technologies like AS2, EDI, RosettaNet, SAP, TIBCO etc. View all posts by Sandro Pereira
by Sandro Pereira | Sep 8, 2017 | BizTalk Community Blogs via Syndication
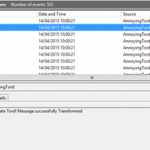
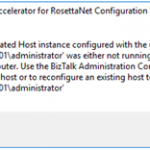
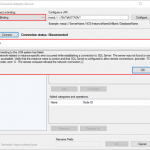
While trying to document, or better update my RosettaNet installation and configuration guide, I got a very strange (but by now I should know that nothing is strange with BizTalk and RosettaNet) while executing Microsoft BizTalk 2016 Accelerator for RosettaNet Configuration Wizard:
A BizTalk Isolated Host instance configured with the user account ‘DOMAINadministrator’ was either not running or does not exist on this computer. Use the BizTalk Administration Console to create a new Isolated host or to reconfigure an existing host to run as ‘DOMAINadministrator.

This error occurred just after I try to open the BTARN configuration wizard! (first thing that appears)
I well aware that when you are planning to install and configure Microsoft BizTalk 2016 Accelerator for RosettaNet (BTARN), you need to be very careful with a certain configuration like this one:
- The BizTalk Host Instance Account and the BizTalk Isolated Host Instance Account should be the same account. Otherwise, BTARN does not function correctly.
Or that:
- BTARN requires the IIS_WPG group (group provided by IIS 6.0 that provides the minimum set of user rights and permissions required to run an application).
- BTARN requires both in-process and isolated host to be marked as “Authentication Trusted” (this setting is off by default when you create a new host)
Notice that this last one is just for everything to work well but it doesn’t impact the configuration itself.
And in fact, all my host instances have the same account and all of them was running.

Cause
BTARN installation process it’s quite old fashioned and weird is some points, the true it that Microsoft just invest a little to modernize it, and change some behaviors and requirements which are no longer justified, a good example is the IIS_WPG group requirement, this group doesn’t exist anymore, so you need to create it manually. Otherwise, BTARN installation fails.
In this case, the problem, as you can see in the figure above, is that I have two types of logon formats:
- The 2 default host instances, created by the BizTalk installation wizard, are defined as “username” – without the domain or in this case the machine name (this is a standalone environment)
- And others are set up in the format “DOMAINUsername”.
Well, regarding BTARN, if you want to avoid problems during the installation/configuration process or future problems in the runtime you should:
- Never use Full Qualify domain name in the Logon credentials. Otherwise, BTARN does not work correctly.
- To avoid BTARN problems use the down-level logon name format (DOMAINUsername).
Solution
To solve this issue the solution was quite simples, I just need to configure the logon to all my host instance in the down-level logon name format (DOMAINUsername).

After that, I was able to execute the BTARN configuration wizard without any further issues and especially no more user account was either not running or does not exist on this computer.
Author: Sandro Pereira
Sandro Pereira lives in Portugal and works as a consultant at DevScope. In the past years, he has been working on implementing Integration scenarios both on-premises and cloud for various clients, each with different scenarios from a technical point of view, size, and criticality, using Microsoft Azure, Microsoft BizTalk Server and different technologies like AS2, EDI, RosettaNet, SAP, TIBCO etc. He is a regular blogger, international speaker, and technical reviewer of several BizTalk books all focused on Integration. He is also the author of the book “BizTalk Mapping Patterns & Best Practices”. He has been awarded MVP since 2011 for his contributions to the integration community. View all posts by Sandro Pereira
by Sandro Pereira | Sep 7, 2017 | BizTalk Community Blogs via Syndication
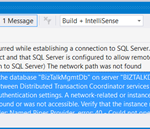
Typical basic error for beginners that also occur sometimes even with experienced BizTalk developers… While trying to deploy a BizTalk Server solution directly from Visual Studio 2017 I got the following errors messages:
| Severity |
Code |
Description |
Project |
File |
Line |
Suppression State |
| Error |
|
A network-related or instance-specific error occurred while establishing a connection to SQL Server. The server was not found or was not accessible. Verify that the instance name is correct and that SQL Server is configured to allow remote connections. (provider: Named Pipes Provider, error: 40 – Could not open a connection to SQL Server) The network path was not found |
|
|
0 |
|
| Severity |
Code |
Description |
Project |
File |
Line |
Suppression State |
| Error |
|
Deployment cannot initialize the connection to the database “BizTalkMgmtDb” on server “BIZTALKDEMO”. Verify that you have the required security permissions and that communication between Distributed Transaction Coordinator services on the machines involved is not prevented by current DTC security, firewall or authentication settings. A network-related or instance-specific error occurred while establishing a connection to SQL Server. The server was not found or was not accessible. Verify that the instance name is correct and that SQL Server is configured to allow remote connections. (provider: Named Pipes Provider, error: 40 – Could not open a connection to SQL Server) The network path was not found |
|
|
0 |
|

Cause
This error may occur for several reasons, like BizTalk Server cannot communicate with SQL Server machine because some firewall restrictions or SQL Server does not accept Remote Connections or that SQL Server Network Protocols are not properly configured – I wrote a few days ago a blog post about that: WCF-SQL Adapter: Connecting to the LOB system has failed. A network-related or instance-specific error occurred while establishing a connection to SQL Server– and so on.
However, in the cause of this problem is quite different, the first error doesn’t tell us to much about the main cause of the problem but the second one:
Deployment cannot initialize the connection to the database “BizTalkMgmtDb” on server “BIZTALKDEMO”…
Gives you a good clue about the problem.
In fact, I was migrating an existing BizTalk Server solution to a new server and I forgot to update the Visual Studio deployment properties and the Server was pointing an incorrect to an incorrect an inaccessible SQL Server.

Solution
Again, this is a typical a beginner error and quite easy to fix, so to solve the problem you just need to properly configure the BizTalk Server deployment properties in all your Visual Studio projects inside your solution by:
- In Visual Studio Solution Explorer, right-click a project for which you want to configure properties, and then click “Properties”.
- Click the “Deployment” tab in Project Properties Designer.
- And make sure you properly configure the following properties:
- Application Name: Name of the BizTalk application to which to deploy the assemblies in this project. If the application already exists, the assemblies will be added to it when you deploy the project. If the application does not exist, the application will be created. If this field is blank, the assemblies will be deployed to the default BizTalk application in the current group. Names that include spaces must be enclosed by double quotation marks (“).
- Configuration Database: Name of the BizTalk Management database for the group, “BizTalkMgmtDb” by default.
- Server: Name of the SQL Server instance that hosts the BizTalk Management database on the local computer. In a single-computer installation, this is usually the name of the local computer. Note: If you move this BizTalk project to a different computer, you probably will need to modify the Server property to reflect the new computer name before you will be able to deploy the assembly.
Note: there are other properties but these three (3) are the most important ones (see the full list of properties here: How to Set Deployment Properties in Visual Studio)
- Save the file and then redeploy the BizTalk Server solution (or project).
Author: Sandro Pereira
Sandro Pereira lives in Portugal and works as a consultant at DevScope. In the past years, he has been working on implementing Integration scenarios both on-premises and cloud for various clients, each with different scenarios from a technical point of view, size, and criticality, using Microsoft Azure, Microsoft BizTalk Server and different technologies like AS2, EDI, RosettaNet, SAP, TIBCO etc. He is a regular blogger, international speaker, and technical reviewer of several BizTalk books all focused on Integration. He is also the author of the book “BizTalk Mapping Patterns & Best Practices”. He has been awarded MVP since 2011 for his contributions to the integration community. View all posts by Sandro Pereira

by Sandro Pereira | Sep 6, 2017 | BizTalk Community Blogs via Syndication
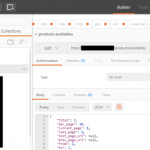
Sometimes the best option to create a REST API and provide something for to the partners to try it out (documentation or starting to developer their side), especially if the requirements are not completely defined, is not to start coding your backend API, which takes more time to develop and which sometimes will be subjected to constant changes, becoming in many cases an inglorious work and a complete waste of time (… sometimes) but instead to prototype your API in your frontend system. So in this post, I will address the question: How to mock responses in API Management?
API Management provides different, powerful and easy ways to mock your API’s to return static or dynamic sample responses even when there is no functional backends service capable of providing them. Mocking can be very useful in several scenarios like:
- Create proof of concepts or demos
- Test Driven Development approach: when the API façade is designed first and the backend implementation comes later or is worked upon in parallel.
- When the backend is temporarily not operational.
- When a specific operation is not yet implemented.
- And so on…
Despite being pretty simple to set up a mock, at the moment there are several ways to archive this in API Management, some of them more simple and static and others more complex and dynamic. So, let’s see all the options.
Options 1) Using the return-response policy in the “old” Publisher portal
Using the return-response policy, it would halt the execution of the API pipeline (… if it exists) and return a response code as specified. You can also send an optional set of headers and a body to the caller.

(Picture from https://www.youtube.com/watch?v=SDyUw93hx1w)
Note: One of the beautiful things on using this policy, comparing with the mock-response policy that we will describe in option 3, is that the mock can be implemented in a very dynamic way if you combine this policy with expressions.
To accomplish that we need to:
- Access to the “old” Publisher portal, by accessing you API Management resource in Azure Portal and then click “Publisher portal” button

- On the Publisher portal, select the option “Policies” from the left menu

-
- Note: Policies can be configured globally or at the scope of a Product, API or Operation.
- The next step is to define the scope of the policy, in our sample, we will be selecting a particular operation. To do that you need to select you API from the “API” drop box and then the specific operation from the “Operation” drop box.
- And then on the “Policy definition” click “ADD POLICY”

- Add a return-response policy in the inbound section by:
- Focus the cursor in the inbound section and then from the Policy statements toolbox click in the option

-
- TIP: When mocking, the policy should always be used in the inbound section to prevent an unnecessary call to the backend.
- This will add the default template format of the policy to the policy definition, that you will need to set up according to your needs:

- To simplify our case, we just need to return a 200-status code with a static JSON response and for that, we need to apply the following policy:
<return-response response-variable-name="existing response variable">
     <set-status code="200" reason="OK" />
     <set-header name="Content-Type" exists-action="override">
         <value>application/json</value>
     </set-header>
     <set-body>{
                 "success": true,
                 "data": {
                    "cards": [
                       {
                          "id": 28,
                          "Name": "Sandro Pereira"
                       },
                       {
                          "id": 56,
                          "Name": "Carolina Pereira"
                       },
                       {
                          "id": 89,
                          "Name": "José Pereira"
                       }
                    ]
                 }
     }</set-body>
</return-response>
- Save the policy to take effect next time a call is made to the operation.
Of course, this policy can be used in many different ways, for example, if you only want to return a 200 OK without body response, you can use an abbreviated version of the policy that will be represented like this:
<return-response/>
But as I told you earlier that this also can be very dynamic as you can see in the “Mocking response in Azure API Management” tutorial provided by Microsoft where they are mocking an “Add two integers” operation in which the policy will look like this:
<return-response response-variable-name="existing response variable">
     <set-status code="200" reason="OK" />
     <set-header name="Content-Type" exists-action="override">
         <value>application/json</value>
     </set-header>
     <set-body>{
          "success": true,
          "data": "@((Convert.ToInt32(context.Request.Url.Query.GetValueOrDefault("a", "0")) + Convert.ToInt32(context.Request.Url.Query.GetValueOrDefault("b", "0"))).ToString())"
     }</set-body>
</return-response>
Here, I am taking the actual query parameters provided in the request and implementing the all the operation logic of my backend API dynamically inside my policy… pretty cool!
Options 2) Using the return-response policy in the Azure Portal.
This second option is exactly the same as the previous one, but instead of doing in the “old” Publisher portal, we will accomplish the same goal using the “new” API Management capabilities/functionalities embedded in the Azure portal.
To accomplish that you need to:
- Access your API Management resource in Azure Portal and then click “APIs” option under “API Management” section from the left menu

- Select the API from the API list, then from the operation list select the correct operation and then click the edit button on the “Inbound processing” policies

- Click in “</> Code View” to view or edit your policies as explained earlier in the first option

- You will find the same experience as the “old” Publisher portal while editing the rules

Both option 1 and 2 are the same, the only difference between them is that in the first option we are using the Publisher portal (this portal still exists because not all functionalities have yet been migrated for the Azure Portal) and in the second we are using the Azure Portal UI.
Options 3) Using the Mock-Response policy
The first two options, that in fact use the same rule are very useful in several distinct scenarios, especially if you want to implement some intelligence (dynamic responses) in you mock.
But what if you want to combine your mocking cases against our API specifications that we used while creating our operations? Fortunately for us, Microsoft released a few months ago a new policy to perform this task in an easier way and you can now use the Mock-Response policy to achieve this effect and it is fully supported through the UI in the Azure Portal.
Note: this policy can also be used in the “old” Publisher portal but I will not address that.
TIP: Once again, you can apply this policy to every section, but its typical usage scenario is on the inbound path to provide a response instead of the backend service and also to prevent unnecessary calls to the backend.
To configure this policy from the Azure Portal you need to:
- Access your API Management instance, under “API Management” section click “APIs”, select the API from the API list, then from the operation list select the correct operation and then click the edit button on the “Inbound processing” policies to open the Inbound processing editor

- You will now notice that a tab titled “Mocking” is available, in which you can configure the desired static response back to your caller by:
- Selecting the “Static responses” option
- And what response status should be returned by configuring the “API Management will return the following response” drop box

Are you wondering where you can define the response?
If you look at the description of this policy in the documentation it says: “… as the name implies, is used to mock APIs and operations. It aborts normal pipeline execution and returns a mocked response to the caller. The policy always tries to return responses of highest fidelity. It prefers response content examples, whenever available. It generates sample responses from schemas, when schemas are provided and examples are not. If neither examples or schemas are found, responses with no content are returned.”
So, in other words, when designing the operation specification:
- if you provide expected response types and samples:

-
- The mock-response policy will take this sample response that you defined as the response to be delivered to the caller
Note: If there are already response status codes, with or without content types, examples and schemas defined, configured on that particular operation (as shown in the figure above), these HTTP status codes will be listed at the top of the “API Management will return the following response” drop box on the mocking section.

- if you instead provide a response schema instead of samples, the mock-response policy will generate a sample response from the schema provided
- If you don’t define samples or schemas, the policy will return a 200 OK response with no content return.
Normally, the policy template (or signature) is:
<mock-response status-code="code" content-type="media type"/>
However, as similar with the return-response policy, you can use an abbreviated version of the policy that looks like this:
<mock-response/>
And again, it will return a 200 OK status code and the response body will be based on an example or schema, if provided for this status code. The first content type found will be used and if no example or schema is found, a response with no content will be returned.
Conclusion
Both mock-response and return-response policies can be used on API Management for prototyping your API frontend. Although at first glance they may have similar behaviors, both policies have advantages and disadvantages and can be used in different scenarios/context.
But I will probably say for mocking propose I will use or advice to use the mock-response policy just because it is simpler and will take advantage from the API specification to generate the mock response which also “force” the developers (or admins in charge of your frontend) to properly document the APIs.
Author: Sandro Pereira
Sandro Pereira lives in Portugal and works as a consultant at DevScope. In the past years, he has been working on implementing Integration scenarios both on-premises and cloud for various clients, each with different scenarios from a technical point of view, size, and criticality, using Microsoft Azure, Microsoft BizTalk Server and different technologies like AS2, EDI, RosettaNet, SAP, TIBCO etc. He is a regular blogger, international speaker, and technical reviewer of several BizTalk books all focused on Integration. He is also the author of the book “BizTalk Mapping Patterns & Best Practices”. He has been awarded MVP since 2011 for his contributions to the integration community. View all posts by Sandro Pereira

by Sandro Pereira | Sep 3, 2017 | BizTalk Community Blogs via Syndication
Welcome back to a new post about BizTalk Server Tips and Tricks! And this time I would like to talk about a very important topic for BizTalk Administrators: BizTalk MarkLog tables.
All the BizTalk databases that are backed up by the ‘Backup BizTalk Server’ job, which means all the default BizTalk databases (SSODB, BizTalkRuleEngineDb, BizTalkMsgBoxDb, BizTalkMgmtDb, BizTalkDTADb, BAMPrimaryImport, BAMArchive and BAMAlertsApplication) with the exception of the BAM Star Schema database (BAMStarSchema), have a table called “MarkLog”.
The only thing that these tables store, is a timestamp in a string format (Log_<yyyy>_<MM>_<dd>_<HH>_<mm>_<ss>_<fff>) that tells you each time the ‘Backup BizTalk Server’ job performs a backup of the transaction log of that specific database.
Note: This task is performed by the 3rd step (MarkAndBackUpLog) of the ‘Backup BizTalk Server’ job
So, each time this step runs, by default each 15 minutes, a string is stored in that table. Unfortunately, BizTalk has no out-of-the-box possibilities to clean up these tables. The normal procedure is to run the old Terminator tool to clean it up, which nowadays is integrated with the BizTalk Health Monitor.
Both of them (they are actually the same tool) has two major problems:
- Using these tools, it means that we need to stop our BizTalk Server environment, i.e., downtime for a few minutes of our entire integration platform.
- If we look at the description of the task, these tools execute: “PURGE Marklog table”, it says that this operation calls a SQL script that cleans up everything in Marklog table – and maybe this is not the best practices in terms of maintaining your environment.
This information is important and useful for the BizTalk Administration team, for example, to keep an eye on the backup/log shipping history records to see whether the backup is working correctly and data/logs are restored correctly in the standby environment.
As a best practice: you should respect the parameter “@DaysToKeep” present in the 4th step (Clear Backup History) of the ‘Backup BizTalk Server’ job, i.e., clean everything on that table older than the days specified in the “@DaysToKeep” parameter.
How to properly maintain BizTalk MarkLog tables?
To address and solve this problem, I end up creating a custom stored procedure in the BizTalk Management database (BizTalkMgmtDb) that I called “sp_DeleteBackupHistoryAndMarkLogsHistory”. This stored procedure is basically a copy of the existing “sp_DeleteBackupHistory” stored procedure with extended functionalities:
- It iterates all the databases that are backed up by BizTalk and delete all data older than the days define in @DaysToKeep parameter
Script sample:
/* Create a cursor */
    DECLARE BackupDB_Cursor insensitive cursor for
        SELECT    ServerName, DatabaseName
        FROM    admv_BackupDatabases
        ORDER BY ServerName
    open BackupDB_Cursor
    fetch next from BackupDB_Cursor into @BackupServer, @BackupDB
    WHILE (@@FETCH_STATUS = 0)
        BEGIN
            -- Get the proper server name
            EXEC @ret = sp_GetRemoteServerName @ServerName = @BackupServer, @DatabaseName = @BackupDB, @RemoteServerName = @RealServerName OUTPUT
            IF @@ERROR <> 0 OR @ret IS NULL OR @ret <> 0 OR @RealServerName IS NULL OR len(@RealServerName) <= 0
            BEGIN
                SET @errorDesc = replace( @localized_string_sp_DeleteBackupHistoryAndMarkLogsHistory_Failed_sp_GetRemoteServerNameFailed, N'%s', @BackupServer )
                RAISERROR( @errorDesc, 16, -1 )
                GOTO FAILED
            END

            /* Create the delete statement */
            select @tsql =
            'DELETE FROM [' + @RealServerName + '].[' + @BackupDB + '].[dbo].[MarkLog]
            WHERE DATEDIFF(day, REPLACE(SUBSTRING([MarkName],5,10),''_'',''''), GETDATE()) > ' + cast(@DaysToKeep as nvarchar(5) )

            /* Execute the delete statement */
            EXEC (@tsql)
            SELECT @error = @@ERROR
            IF @error <> 0 or @ret IS NULL or @ret <> 0
            BEGIN
                 SELECT @errorDesc = replace( @localized_string_sp_DeleteBackupHistoryAndMarkLogsHistory_Failed_Deleting_Mark, '%s', @BackupServer + N'.' + @BackupDB )
                GOTO FAILED
            END

            /* Get the next DB. */
            fetch next from BackupDB_Cursor into @BackupServer, @BackupDB
        END

    close BackupDB_Cursor
    deallocate BackupDB_Cursor
Steps required to install/configure:
- Download the SQL script from BizTalk Server: Cleaning MarkLog Tables According to Some of the Best Practices and create the sp_DeleteBackupHistoryAndMarkLogsHistory stored procedure against to BizTalk Management database (BizTalkMgmtDb)
- Change and configure the 4th step of the ‘Backup BizTalk Server’ job – “Clear Backup History” to call this new stored procedure: sp_DeleteBackupHistoryAndMarkLogsHistory
Note: Do not change or delete the “sp_DeleteBackupHistory”!
Credits: Tord Glad Nordahl, Rui Romano, Pedro Sousa, Mikael Sand and me
Stay tuned for new BizTalk Server Tips and Tricks!
Author: Sandro Pereira
Sandro Pereira is an Azure MVP and works as an Integration consultant at DevScope. In the past years, he has been working on implementing Integration scenarios both on-premises and cloud for various clients, each with different scenarios from a technical point of view, size, and criticality, using Microsoft Azure, Microsoft BizTalk Server and different technologies like AS2, EDI, RosettaNet, SAP, TIBCO etc. View all posts by Sandro Pereira
by Sandro Pereira | Aug 29, 2017 | BizTalk Community Blogs via Syndication
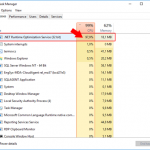
It is very important to optimize everything possible for BizTalk archive the best performance it can, especially if you are dealing with BizTalk Server DEV environments on Azure using Azure Virtual Machines. Again, as I explain in a previous post (here), we normally tend to be careful in choosing the VM Disk type and VM sizes mostly because of the price, so tuning the machine is very important, otherwise sometimes they tend to be a little slow and even the most insignificant things (that we think they are) can have a huge impact on BizTalk Server performance. One of the cases that I found these days was the .NET Runtime Optimization Service causing high CPU usage…

… Indeed, and we don’t need to give explanations to explain that everything that may affects the CPU to cause a High Load (or usage) inherently affects and cause huge impact on BizTalk Server performance.
The .NET framework is regularly optimized by Microsoft using the .NET Runtime Optimization Service to make sure you get the best out of the system libraries and this is also done for your installed managed application. It is also more or less responsible for precompiling .NET assemblies in the background. Once it’s done, it will go away. And while you may see CPU usage almost near the 100%, the compilation happens in a process with low priority, so it tries not to steal the CPU for other processes you are doing. Once everything is compiled, assemblies will now be able to share pages across different processes and warm startup will be typically much faster.
Again, once the .NET Runtime Optimization Service once the service finishes his process it will go away, but in my case this process was already running several hours, so instead of waiting until for the computer to idle, we can force it to compile everything now! Solving this “issue” in a fast way (couple of minutes). For that you should:
- Open a command prompt as administrator and run the adsutil command. To do this, Press the “Windows key” to open the Start menu and type “cmd” on the Start Search box, right-click in “Command Prompt” and select from the context menu the “Run as administrator” option.
- And change to the following folder: “C:WindowsMicrosoft.NETFrameworkv4.0.30319” or “c:WindowsMicrosoft.NETFramework64v4.0.30319” (on a 64-bit operating system)
- Type “ngen.exe executequeueditems”, and press ENTER
- Wait until the operation is finished, I think you may receive the following message at the command prompt: “All compilation targets are up to date.”
This will process all pending work. Once this is done, the service will shutdown, as it has nothing else to do and you will see that the CPU will be back to the normality.

This can be important to be aware for the Administration team (or DevOps team) while planning your .NET framework update to make sure that everything run smoothly especially in the production environment, otherwise this can be one of the reasons (at least for a few minutes or hours) for you notice that our production applications are running a little slowly.
There is also a PowerShell provide by the Microsoft .NET team to speed up the optimization service: DrainNGenQueue.ps (see more here)
Author: Sandro Pereira
Sandro Pereira lives in Portugal and works as a consultant at DevScope. In the past years, he has been working on implementing Integration scenarios both on-premises and cloud for various clients, each with different scenarios from a technical point of view, size, and criticality, using Microsoft Azure, Microsoft BizTalk Server and different technologies like AS2, EDI, RosettaNet, SAP, TIBCO etc. He is a regular blogger, international speaker, and technical reviewer of several BizTalk books all focused on Integration. He is also the author of the book “BizTalk Mapping Patterns & Best Practices”. He has been awarded MVP since 2011 for his contributions to the integration community. View all posts by Sandro Pereira
by Sandro Pereira | Aug 28, 2017 | BizTalk Community Blogs via Syndication
I have been working with API Management (APIM) for a long time, not only playing around with POC and testing new features but actually working and implementing real solutions for clients. I also delivered several API Management talks here in Portugal but I realize that I never wrote a blog post about this topic. That will change today hehe.
OpenAPI Specification (formerly Swagger Specification) is an API description format for REST APIs. An OpenAPI file allows you to describe your entire API, including:
- Available endpoints (/users) and operations on each endpoint (GET /users, POST /users)
- Operation parameters Input and output for each operation
- Authentication methods
- Contact information, license, terms of use and other information.
API specifications can be written in YAML or JSON. The format is easy to learn and is both human-readable and machine-readable.
This specification is widely used these days, especially in the Microsoft community, but unfortunately, not all of them use it and there are still quite a few APIs that do not expose any kind of specification/documentation like Swagger, WADL or even WSDL (this last for web services).
For REST APIs, I have seen several suppliers/partners use Postman Collections to easily test their APIs by emulating request but also to document the APIs by adding a name and descriptions to requests, sample requests, headers, and other metadata. Performing unit tests in all the operations and sharing them inside their teams.
Postman Collections are groups of requests that can be run together as a series of requests, against a corresponding environment. Using scripts, you can build integration test suites, pass data between API requests, and build workflows that mirror your actual use case of APIs.

See how to create a Postman Collection here: Creating collections
I have to say, I love Postman but I never used it for that propose, although it is an excellent tool, in my opinion, I believe that to document an API it has some limitations.
And in one of my recent projects the partner delivered me a Postman Collection as a way of documenting their REST API which led me to a “small” problem:
- I didn’t want to replicate or manually expose the API inside the API Management…
- and the API Management by default doesn’t allow me to import a Postman Collection
So, how can I import a Postman collection into my Azure API Management?
Fortunately for us, there are several free tools that allow you to convert (or transform) a postman collection (1.0 – 2.0) to formats of your choice that in our case Swagger. And one of these tools is APIMATIC.
For that you just need to:
- Access APIMATIC API Transformer page: https://apimatic.io/transformer
- Upload your Postman collection file description
- Provide a File Description URL
- And select the desired output format, in our case we selected “Swagger v2.0 (JSON)”

- And finally, click “Convert Now”
The output file will be automatically downloaded into your machine.

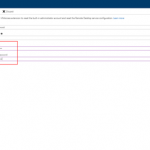
Now that I have my swagger file, I can now access my API Management in the Azure Portal and then:
- From the left pane, select “Add API” and then select “OpenAPI specification” option

- Import the file I had created previously in the APIMATIC web tool and click “Create”

It probably doesn’t do everything for you, you may need to optimize the query parameters or the URL template parameters, but at least this approach will do 90% of the work for you:

This approach saved me several working hours on the task of exposing the Partner API in my API Management Portal.
Author: Sandro Pereira
Sandro Pereira lives in Portugal and works as a consultant at DevScope. In the past years, he has been working on implementing Integration scenarios both on-premises and cloud for various clients, each with different scenarios from a technical point of view, size, and criticality, using Microsoft Azure, Microsoft BizTalk Server and different technologies like AS2, EDI, RosettaNet, SAP, TIBCO etc. He is a regular blogger, international speaker, and technical reviewer of several BizTalk books all focused on Integration. He is also the author of the book “BizTalk Mapping Patterns & Best Practices”. He has been awarded MVP since 2011 for his contributions to the integration community. View all posts by Sandro Pereira
by Sandro Pereira | Aug 27, 2017 | BizTalk Community Blogs via Syndication
I been delivering a lot of BizTalk Server Training Courses for Developers and for Administrator in the past years that I normally like to call them “Developing BizTalk Server version Course” or “BizTalk Server Operations, Administration, and Maintenance (OAM) course” – yes I know, I am very creative in terms of names – and one of the good things about using Azure Virtual Machines for that is that we can easily create several developer machines in a short period of time and manage them for not consuming resources. And normally on of the task that is present in both courses is to configure BizTalk Server environment, because I believe that all BizTalk Developers should know the basics of BizTalk Server in terms of installation, configuration and optimizations – tasks that are normally done by BizTalk Administrations – I can go further and say that, in my personal opinion, if you don’t know these basic concepts you are not truly a BizTalk Developer because many things can be done by configurations and not code.
One of these tasks is to install and configure BizTalk Server LOB adapters, in especially SQL Server adapter, since in a Developer standalone machine we will need to have SQL Server, so it is easy to test this LOB Adapter. However, if we create the Azure BizTalk Server 2016 Developer machine, configure BizTalk Server and then install and configure LOB adapters without doing anything more and you try to create a BizTalk Server solution using Visual Studio and generate SQL Server schemas:
- In the Solution Explorer, right-click your project, click “Add”, and then click “Add Generated Items…”
- In the “Add Generated Items – <Project Name>” dialog box, select “Consume Add Service”, and then click “Add”.
- Select the sqlBinding and properly configuring the URI
We will get the following error message:
Connecting to the LOB system has failed.
A network-related or instance-specific error occurred while establishing a connection to SQL Server. The server was not found or was not accessible. Verify that the instance name is correct and that SQL Server is configured to allow remote connections. (provider: TCP Provider, error: 0 – The remote computer refused the network connection.).

when we try to connect to the SQL Server configured.
Cause
This error may occur for several reasons like BizTalk Server cannot communicate with SQL Server machine because some firewall restrictions or SQL Server does not accept Remote Connections and so on.
However, in our case, we are talking about a standalone BizTalk machine that is trying to access a database in the local SQL Server.
Our problem was that by default what Microsoft could possibly configure wrong in terms of SQL Server protocols on the BizTalk Server developer image on Azure… is actually set up wrongly!

And as I described in my BizTalk Server Installation and configuration tutorial (see here), one of the important steps is to configure SQL Server Network Protocols, in special ensuring that TCP/IP is enabled and Shared Memory is disabled. You can see how to accomplish this using SQL Server Configuration Manager tool here.
The actual problem that was causing the connecting to fail while trying to connect to the LOB system, in this particular case the SQL Server is because the TCP/IP protocol is disabled.
Solution
To properly configure the protocols for SQL Server, especially the TCP/IP protocol, you should:
- Press the “Windows key” to switch to Metro UI and type “SQL Server 20016 Configuration Manager” and click on “SQL Server 2016 Configuration Manager” option on Apps menu.
- In SQL Server Configuration Manager windows, from the left-hand pane expand “SQL Server Network Configuration” option and then click “Protocols for MSSQLSERVER”
- Verify that both “TCP/IP” and “Named Pipes” are enabled;
- If not, right-click in the protocol, and then click “Enable”
- Repeat to enable the other protocol if necessary.
- Verify that “Shared Memory” is Disable.
- If not, right-click Shared Memory, and then click “Disable”
- In the left-hand pane, click “SQL Server Services”, right-click “SQL Server (MSSQLSERVER)”, and then click “Restart”.

- Close SQL Server Configuration Manager.
- Click “OK” and then “Apply”
After correctly configure the SQL Server protocols, again, especially the TCP/IP, you will be able to successfully connect and generate the SQL Server Schemas that you need for your BizTalk Server Solution.
Author: Sandro Pereira
Sandro Pereira lives in Portugal and works as a consultant at DevScope. In the past years, he has been working on implementing Integration scenarios both on-premises and cloud for various clients, each with different scenarios from a technical point of view, size, and criticality, using Microsoft Azure, Microsoft BizTalk Server and different technologies like AS2, EDI, RosettaNet, SAP, TIBCO etc. He is a regular blogger, international speaker, and technical reviewer of several BizTalk books all focused on Integration. He is also the author of the book “BizTalk Mapping Patterns & Best Practices”. He has been awarded MVP since 2011 for his contributions to the integration community. View all posts by Sandro Pereira
by Sandro Pereira | Aug 25, 2017 | BizTalk Community Blogs via Syndication
This week I received a call of one of my customers reporting me a strange issue. Strange because everything was running fine and suddenly, for no apparent reason, each time someone tried to invoke or browse WCF Services exposed by BizTalk Server the IIS Application pool configured for that services automatically stopped.
If we tried to browse the services we got the following error message:
Login failed for user ‘Domain/user’
Exception Details: System.SqlClient.SqlException: Login failed for user ‘domain/user’

Of course, with that type of error description, the first step we did was to reenter the credentials for that user in the application pool but… the same problem persisted.
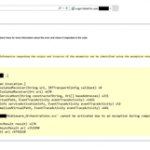
When we investigated the event viewer for additional error details we found in the Security log the following message:
Log Name: Security
Source: Microsoft-Windows-Security-Auditing
Date: {date}
Event ID: 4625
Task Category: Logon
Level: Information
Keywords: Audit Failure
User: N/A
Computer: {machine name}
Description:
An account failed to log on.
Subject:
Security ID: SYSTEM
Account Name: {account name}
Account Domain: {domain name}
Logon ID: 0x3E7
Logon Type: 4
Account For Which Logon Failed:
Security ID: NULL SID
Account Name: {account name}
Account Domain: {domain name}
Failure Information:
Failure Reason: The user has not been granted the requested logon type at this machine.
Status: 0xC000015B
Sub Status: 0x0
Cause
So, at this point, we knew that this was a security policies problem and we suspect that some automatic process created by sysadmins where changings something in the Local Security Settings on the BizTalk Server machine.
After some research, we found out that the user account that is running the Application Pool – in which the BizTalk WCF Services are exposed – requires having “Log on as batch job” rights
Note: By definition, this security setting (Log on as a batch job), allows a user to be logged on by means of a batch-queue facility and is provided only for compatibility with older versions of Windows. For example, when a user submits a job by means of the task scheduler, the task scheduler logs that user on as a batch user rather than as an interactive user.
Solution
To add user rights in the “Log on as batch job” policy, you need to:
- Press the “Windows key” to open the Start menu.
- Type “secpol.msc” and click on “Local Security Policy” option from the Search window.
- On the left pane, select “Local Policies” and the “User Rights Assignment”

- Right click on “Log on as batch job” and click Properties
- Click “Add User or Group…” and add the desired user

- Click “OK” and then “Apply”
Note: Of course, for you to do the above steps, you need to have administrator rights on the computer or be part of specific domain groups in case of Security Settings policies are governed by some AD domain groups.
Note: this problem can also occur and the same solution can be applied to SharePoint.
Author: Sandro Pereira
Sandro Pereira lives in Portugal and works as a consultant at DevScope. In the past years, he has been working on implementing Integration scenarios both on-premises and cloud for various clients, each with different scenarios from a technical point of view, size, and criticality, using Microsoft Azure, Microsoft BizTalk Server and different technologies like AS2, EDI, RosettaNet, SAP, TIBCO etc. He is a regular blogger, international speaker, and technical reviewer of several BizTalk books all focused on Integration. He is also the author of the book “BizTalk Mapping Patterns & Best Practices”. He has been awarded MVP since 2011 for his contributions to the integration community. View all posts by Sandro Pereira
by Sandro Pereira | Aug 18, 2017 | BizTalk Community Blogs via Syndication
Are you careless like me who constantly forgets the credentials (not critical)? If so this post about how you can reset the built-in administrator account password on an Azure BizTalk VM will help you not to waste a few hours in vain.
I think that the life of a consultant is difficult regarding system credentials, you have your personal credentials (AD account, company and personal emails, and so on) and for each client, you may also have different credential accounts… If this were not already complicated, each system may have different criteria that require you to have more complicated or simpler passwords. For these cases, the solution is more or less simple, we annoy the sysadmin and ask him to reset our password. However, for our Azure VM that we create in our Azure Subscription for demos or production, well that can be a more complicated scenario and I have tendency to create and delete several BizTalk Server Developer Edition machines, special for POC, Workshops or courses and sometimes (aka all the time) I forgot the built-in administrator password. So, how can we reset the built-in administrator account password from an Azure BizTalk Server VM?
Note: I am referring Azure BizTalk Server VM, mainly because my blog is about Enterprise Integration but this can apply to any type of Azure VM.
Most of the time the answer is very simple:
- You access the Azure portal (https://portal.azure.com/) and select the Virtual Machine that you want to reset the password
- Then click Support + Troubleshooting > Reset password. The password reset blade is displayed:

- You just need to enter the new password, then click Update. And you will see a message on the right upper corner saying the reset password task is processing.

- The result of the task will be presented in the Notification panel and most of the times you will find a “Successfully reset password” message

But there is always “an exception to the rule”, and that was one of my cases. When I was trying to reset the password through the Azure Portal I was always getting an Unable to reset the password message, don’t know exactly why to be honest. I tried to reset the password by using PowerShell described in the documentation: How to reset the Remote Desktop service or its login password in a Windows VM
Set-AzureRmVMAccessExtension -ResourceGroupName "myResoureGroup" -VMName "myVM" -Name "myVMAccess" -Location WestUS -typeHandlerVersion "2.0" -ForceRerun
But still I was not able to perform this operation and I was getting this annoying error:
…Multiple VMExtensions per handler not supported for OS type ‘Windows’. VMExtension. VMExtension ‘…’ with handler ‘Microsoft.Compute.VMAccessAgent’ already added or specified in input.”
Solution
To solve this problem, I was forced to remove the existing VMExtention by:
- First by getting the list of extensions on VM to find the name of the existing extension (presented in red on the below picture)
Get-AzureRmVM -ResourceGroupName [RES_GRP_NAME] -VMName [VM_NAME] -Status

- And then by removing the VMAccess extension from the virtual machine
Remove-AzureRmVMAccessExtension -ResourceGroupName [RES_GRP_NAME] -VMName [VM_NAME] -Name [EXT_NAME]
- You will get a validation question. “This cmdlet will remove the specified virtual machine extension. Do you want to continue?”, Type “y” and then ENTER to accept and continue.

After that you can access to the Azure portal (https://portal.azure.com/), select the Virtual Machine that you want to reset the password, click Support + Troubleshooting > Reset password and update the built-in administrator account password without the previous problem.
Author: Sandro Pereira
Sandro Pereira lives in Portugal and works as a consultant at DevScope. In the past years, he has been working on implementing Integration scenarios both on-premises and cloud for various clients, each with different scenarios from a technical point of view, size, and criticality, using Microsoft Azure, Microsoft BizTalk Server and different technologies like AS2, EDI, RosettaNet, SAP, TIBCO etc. He is a regular blogger, international speaker, and technical reviewer of several BizTalk books all focused on Integration. He is also the author of the book “BizTalk Mapping Patterns & Best Practices”. He has been awarded MVP since 2011 for his contributions to the integration community. View all posts by Sandro Pereira


