by Sandro Pereira | Nov 7, 2018 | BizTalk Community Blogs via Syndication
And once again I decide to publish another release on my Mapper Extensions UtilityPack project adding new functionalities to this toolset. This time I decided to release 2 new BizTalk Math Functoids:
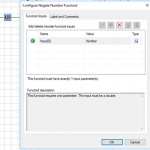
- Negate Number Functoid: You can use the Negate Number functoid to return the input number (double) in its negated form.
- If it’s positive, it will return as negative and vice-versa.
- If zero, of course, will return zero.
- SmartRound Functoid: You can use the SmartRound Functoid to return any number (int or double) rounded up or down to any decimal place, specified by the second parameter of this functoid.
Negate Number Functoid
Use the Negate Number functoid to return the input number (double) in its negated form.
Parameters
The functoid takes one mandatory input parameter:
- Parameter 1: Number to be negated (double or int).
The output of the functoid will be the input number in is negative form. For example:
- Input 1 –> Output = -1
- Input -23,09 –> Output = 23,09
- Input 0 –> Output = 0

SmartRound Functoid
Use the SmartRound Functoid to return any number (int or double) rounded up or down to any decimal place, specified by the second parameter of this functoid.
Parameters
The functoid takes two mandatory input parameters:
- Parameter 1: Number to be rounded (double or int)
- Parameter 2: Number to decimals places
The output of the functoid will be the input number rounded up or down to the specified decimal places. For example:
- Input 23 rounded to 2 –> Output = 23,00
- Input 24,005900 rounded to 3 –> Output = 24,006

BizTalk Mapper Extensions UtilityPack: Project Description
BizTalk Mapper Extensions UtilityPack is a set of libraries with several useful functoids to include and use it in a map, which will provide an extension of BizTalk Mapper capabilities.
Where to download?
You can download this functoid along with all the existing one on the BizTalk Mapper Extensions UtilityPack here:
 BizTalk Mapper Extensions UtilityPack
GitHub
Author: Sandro Pereira
Sandro Pereira lives in Portugal and works as a consultant at DevScope. In the past years, he has been working on implementing Integration scenarios both on-premises and cloud for various clients, each with different scenarios from a technical point of view, size, and criticality, using Microsoft Azure, Microsoft BizTalk Server and different technologies like AS2, EDI, RosettaNet, SAP, TIBCO etc. He is a regular blogger, international speaker, and technical reviewer of several BizTalk books all focused on Integration. He is also the author of the book “BizTalk Mapping Patterns & Best Practices”. He has been awarded MVP since 2011 for his contributions to the integration community. View all posts by Sandro Pereira

by Sandro Pereira | Oct 30, 2018 | BizTalk Community Blogs via Syndication
And another whitepaper was published, this time an update to one of my classics: “Installing BizTalk Server 2016 in a Basic Multi-Computer Environment”!
There are many things to consider when planning this type of installation; often the network infrastructure already exists, and BizTalk Server must coexist with other network applications. This guide describes some of the considerations that apply to the various parts of a BizTalk Server installation in a basic multi-computer environment. This information will help you plan the installation and configuration of BizTalk Server 2016, applications and components on which it depends.

But this step-by-step guide is not only about installing BizTalk Server 2016, but it will also help you configure and optimize your environment.
What to expect about Installing BizTalk Server 2016 in a Basic Multi-Computer Environment whitepaper
This whitepaper will give you a detailed understanding of the following:
- BizTalk Server Installation scenario
- The need for a Domain Controller
- Preparing Computers for Installation
- Preparing and Install SQL Server 2016 machine
- Prepare and install prerequisites on BizTalk Server 2016 machine
- Testing environment connectivity
- Install and configure BizTalk Server 2016 machine
- Optimize the BizTalk Server 2016 environment.
Where I can download it
You can download the whitepaper here:
Once again, I would like to take this opportunity also to say thanks to Lex Hegt for helping me reviewing this whitepaper especially for the incredible work of him correcting my horrible English and in this way make the document and my thoughts being readable.
I hope you enjoy reading this paper and any comments or suggestions are welcome.
You can also find, download and enjoy several other free whitepapers of my own here:
You can download the Installing BizTalk Server 2016 in a Basic Multi-Computer Environment whitepaper here:
Installing BizTalk Server 2016 in a Basic Multi-Computer Environment
Author: Sandro Pereira
Sandro Pereira lives in Portugal and works as a consultant at DevScope. In the past years, he has been working on implementing Integration scenarios both on-premises and cloud for various clients, each with different scenarios from a technical point of view, size, and criticality, using Microsoft Azure, Microsoft BizTalk Server and different technologies like AS2, EDI, RosettaNet, SAP, TIBCO etc. He is a regular blogger, international speaker, and technical reviewer of several BizTalk books all focused on Integration. He is also the author of the book “BizTalk Mapping Patterns & Best Practices”. He has been awarded MVP since 2011 for his contributions to the integration community. View all posts by Sandro Pereira

by Sandro Pereira | Oct 30, 2018 | BizTalk Community Blogs via Syndication
I recently published a new BizTalk Server Tips and Tricks article: “Automatically Generate Schemas from a Well-Formed XML instance” on my blog post series about “BizTalk Server Tips and Tricks” for developers, administrators or business users and I couldn’t resist on asking what about DTD?
Definition of DTD schemas
For who doesn’t know what DTD is, a DTD is a Document Type Definition that defines the structure and the legal elements and attributes of an XML document… So basically, it is the equivalent of what BizTalk Server uses to define how an XML document can be structured: XSD Schema. Nevertheless, there are many differences between DTD (Document Type Definition) and XSD (XML Schema Definition). In short, DTD provides less control on XML structure whereas XSD (XML schema) provides more control.
Some of you may wonder, who cares? No one uses DTD anymore, so why bother?
Yes, indeed DTD is not used very regularly nowadays, and it is very probable that you will never use it… unless… for example, you are working with RosettaNet or in the future, you will have the need to work with RosettaNet. Why? Because most of the RosettaNet Standards – PIP messages – are defined in the format of DTD format!
As I mentioned in my previous blog, there are several ways we can create an XML Schemas in BizTalk Server:
- Manually from the scratch
- From XDR Schema instance
- From a DTD instance
- From a well-formed XML instance
- Import them from a WCF Service or Web Service
- Or automatically generated them from LOB systems (from the adapters)
Generating schemas based on a DTD instance
Today we will be talking about automatically generating XML Schemas from a DTD instance.
To accomplish this we need to:
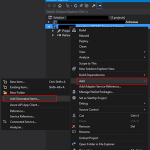
- In Solution Explorer, right-click a BizTalk project, point to Add, and then click Add Generated Items…

- In the Add Generated Items – <BizTalk ProjectName> dialog box, in the Templates section, click Generate Schemas, and then click Add

- In the Generate Schemas dialog box, in the Document type drop-down list, select DTD

- One of the problems, especially in brand new installations, is that sometimes this feature was not installed, and you will see DTD (Not Loaded) in the drop-down list. To install and use this feature you need to:
- Navigate to the “SDKUtilitiesSchema Generator” folder present in the BizTalk Server installation folder. Normally this will be “C:Program Files (x86)Microsoft BizTalk Server <version>SDKUtilitiesSchema Generator”
- And execute the InstallDTD.vbs script by double-clicking. This will install the “Microsoft.BizTalk.DTDToXSDGenerator.dll” DLL on the correct place. This basically means that it will copy this DLL to the “Developer ToolsSchema Editor Extensions” folder present in the BizTalk Server installation folder
- Or manually “Microsoft.BizTalk.DTDToXSDGenerator.dll” DLL to the “Developer ToolsSchema Editor Extensions” folder present in the BizTalk Server installation folder. Normally this will be “C:Program Files (x86)Microsoft BizTalk Server <version>Developer ToolsSchema Editor Extensions
- Close the Generate Schemas dialog box and do the previous steps again. Now you will be able to see that you can use the option DTD in the drop-down list

- In the Generate Schemas dialog box, click Browse, locate the file you want to import, click Open and then click OK
- A new schema, or sometimes at least two schemas are generated from the specified file, using the same name as that file with the .xsd extension, and opened in BizTalk Editor
Quick, simple and practical.
Stay tuned for new Tips and Tricks!
Author: Sandro Pereira
Sandro Pereira is an Azure MVP and works as an Integration consultant at DevScope. In the past years, he has been working on implementing Integration scenarios both on-premises and cloud for various clients, each with different scenarios from a technical point of view, size, and criticality, using Microsoft Azure, Microsoft BizTalk Server and different technologies like AS2, EDI, RosettaNet, SAP, TIBCO etc. View all posts by Sandro Pereira

by Sandro Pereira | Oct 25, 2018 | BizTalk Community Blogs via Syndication
BizTalk Pipeline Components Extensions Utility Pack community project for BizTalk Server 2016, once again, got a new update and it now has a new component that you can use in your custom BizTalk Server pipelines: Unzip File Pipeline Component.
Unzip File Pipeline Component
The Unzip File Pipeline Component for BizTalk Server can be used in a Received pipeline (Disassemble stage), and it allows you to receive a compress (zip/gzip) file and extract its contents into different XML messages.
- The capabilities are like those available in any compression software such as WinZip or 7-zip:
- This component doesn’t require any configurations.
This was an old component that I had that I now updated and improved to BizTalk Server 2016 with the help with my internal team at DevScope, in particular, Pedro Almeida.
You do not need to add a custom pipeline component to be used by the BizTalk Runtime to the Global Assembly Cache (GAC).
What is BizTalk Pipeline Components Extensions Utility Pack?
BizTalk Pipeline Components Extensions Utility Pack is a set of custom pipeline components (libraries) with several custom pipeline components that can be used in received and sent pipelines, which will provide an extension of BizTalk out-of-the-box pipeline capabilities.
The project is available on BizTalk Server Open Source Community repository on GitHub (https://github.com/BizTalkCommunity), and everyone can contribute with new pipeline components that can be extended or improve the existing BizTalk Server capabilities.

At the moment it is only available for BizTalk Server 2016, but it will soon be compiled and available for previous versions of the product.
Where to download it?
You can download BizTalk Pipeline Components Extensions Utility Pack from GitHub here:
BizTalk Pipeline Components Extensions Utility Pack
GitHub
Author: Sandro Pereira
Sandro Pereira lives in Portugal and works as a consultant at DevScope. In the past years, he has been working on implementing Integration scenarios both on-premises and cloud for various clients, each with different scenarios from a technical point of view, size, and criticality, using Microsoft Azure, Microsoft BizTalk Server and different technologies like AS2, EDI, RosettaNet, SAP, TIBCO etc. He is a regular blogger, international speaker, and technical reviewer of several BizTalk books all focused on Integration. He is also the author of the book “BizTalk Mapping Patterns & Best Practices”. He has been awarded MVP since 2011 for his contributions to the integration community. View all posts by Sandro Pereira
by Sandro Pereira | Oct 23, 2018 | BizTalk Community Blogs via Syndication
Welcome back to my blog post series “BizTalk Server Tips and Tricks” for developers, administrators or business users.
There are several ways we can create an XML Schema in BizTalk Server:
- Manually from scratch
- From XDR Schema instance
- From a DTD instance
- From a well-formed XML instance
- Import them from a WCF Service or Web Service
- Automatically generated them from LOB systems (from the adapters)
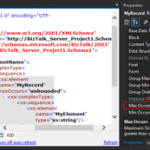
Today, we will be talking about automatically generating XML Schemas from a well-formed XML instance. To accomplish this we need to perform the following steps:
- In Solution Explorer, right-click a BizTalk project, point to Add, and then click Add Generated Items…

- In the Add Generated Items – <BizTalk ProjectName> dialog box, in the Templates section, click Generate Schemas, and then click Add

- In the Generate Schemas dialog box, in the Document type drop-down list, select Well-Formed XML

- One of the problems, especially in brand new installations, is that sometimes this feature was not installed, and you will see Well-Formed XML (Not Loaded) in the drop-down list. To install and use this feature you need to:
- Start a Windows Explorer and navigate to the “SDKUtilitiesSchema Generator” folder present in the BizTalk Server installation folder;
- Normally it will be “C:Program Files (x86)Microsoft BizTalk Server <version>SDKUtilitiesSchema Generator”
- Execute the InstallWFX.vbs script by double-clicking. This will install the “Microsoft.BizTalk.WFXToXSDGenerator.dll” DLL on the correct place
- That basically means, it will copy this DLL to the “Developer ToolsSchema Editor Extensions” folder present in the BizTalk Server installation folder
- Or manually copy “Microsoft.BizTalk.WFXToXSDGenerator.dll” DLL to the “Developer ToolsSchema Editor Extensions” folder, present in the BizTalk Server installation folder
- Normally, it will be “C:Program Files (x86)Microsoft BizTalk Server <version>Developer ToolsSchema Editor Extensions
- Close the Generate Schemas dialog box and do the previous steps again, and now you will be able to see that you already can use the option Well-Formed XML in the drop-down list.

- In the Generate Schemas dialog box, click Browse, locate the file you want to import, click Open and then click OK

- A new schema, or sometimes at least two schemas are generated from the specified file, using the same name as that file with the .xsd extension, and opened in BizTalk Editor
TIP: Before you generate the schemas, rename the XML instance file that you will be using to the proper name you want to give to the Schemas, this will save you time because the Generator Wizard will:
- Give the same name of the specified file with the .xsd extension
- Or will add a sequence to the same name of the specified file with the .xsd extension
In the end, as a best practice, you should rectify or rename the schemas generated to something with context and that will be easy to identify:
If you want it to be perfect, then for each schema, you should change not only the name of the file, but also the Type Name property of each schema.

Initially, this value was set as “myfilename_0”.
The problem of renaming the filename and/or the Type Name property is that once you try to compile it will give you errors because some schemas will be referring files that no longer exist (were renamed):
To solve this, we need to:
- Open the Schema and select the Schema node at the top of the schema tree view
- In the Properties window, in the Advanced category, in the value portion of the Imports property, click the ellipsis (…) button
- In the Imports dialog box, in the Import Schema list, delete the XSD Import line, import the correct one and then click OK

- Alternatively, open the schema file in Notepad (Notepad ++ or other text editors) and rectify the path and filename
Quick, simple and practical!
Stay tuned for new tips and tricks!
Author: Sandro Pereira
Sandro Pereira is an Azure MVP and works as an Integration consultant at DevScope. In the past years, he has been working on implementing Integration scenarios both on-premises and cloud for various clients, each with different scenarios from a technical point of view, size, and criticality, using Microsoft Azure, Microsoft BizTalk Server and different technologies like AS2, EDI, RosettaNet, SAP, TIBCO etc. View all posts by Sandro Pereira
by Sandro Pereira | Oct 17, 2018 | BizTalk Community Blogs via Syndication
Happy to announce that today I decided to publish another release on my Mapper Extensions UtilityPack project. This time I decided to release 2 new BizTalk Database Functoids:
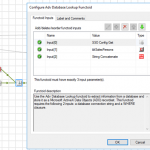
- Adv Database Lookup Functoid: Use the Adv Database Lookup functoid to extract information from a database and store it as a Microsoft ActiveX Data Objects (ADO) recordset. This functoid requires the following 3 inputs: a database connection string, table name and a WHERE clause.
- Adv Value Extractor: Use the Adv Value Extrator functoid to extract the appropriate column value from a recordset returned by the Adv Database Lookup functoid. This functoid requires two inputs parameters: a link to the Database Lookup functoid and a column name.
Basically, they have the same functionality as the default Database Lookup Functoid and Value Extractor Functoid but they have a slightly different implementation.
Unlike the default Database Lookup Functoid that have 4 input parameters
- A lookup value
- A database connection string
- A table name
- A column name for the lookup value.
The limitation of this Functoid is that you cannot have multiple conditions, like WHERE SalesPersonID = “A” and System = “B” because of the nature of how this functoid was created
The Adv Database Lookup Functoid have the goal to suppress this limitation, it will allow 3 inputs:
- A database connection string
- A table name
- A WHERE clause.
In the where condition you will be able to set all the conditions you want, including a combination of AND’s and OR’s.
The Adv Value Extractor Functoid has the exact same functionality that the default Value Extractor Functoid but prepared and optimized to work with the Adv Database Lookup Functoid.
Adv Database Lookup Functoid
Use the Adv Database Lookup functoid to extract information from a database and store it as a Microsoft ActiveX Data Objects (ADO) recordset.
Parameters
The functoid takes three mandatory input parameters:
- Parameter 1: An ActiveX Data Objects .NET (ADO.NET) connection string for a compliant data source in which to search. ODBC data sources (including DSN sources) are not supported.
- Provider=SQLOLEDB.1;Integrated Security=SSPI;Persist Security Info=False;Initial Catalog=DatabaseName;Data Source=SQLServerName
- Parameter 2: The name of the table in the database in which to search;
- Parameter 3: WHERE clause (without the WHERE)
- SourceSystemID like ‘A’ AND SSSalesPersonID = 1
The output of the functoid will be an ADO recordset.

Adv Value Extractor Functoid
Use the Adv Value Extrator functoid to extract the appropriate column value from a recordset returned by the Adv Database Lookup functoid. This functoid requires two inputs parameters: a link to the Database Lookup functoid and a column name.
Parameters
The functoid takes two mandatory input parameters:
- Parameter 1: An ADO recordset, which is the output of the Database Lookup functoid. This recordset never contains more than one database row.
- Parameter 2: The name of a column from which to extract a value for output.
The output of the functoid will be the value of that column on the database table.

BizTalk Mapper Extensions UtilityPack: Project Description
BizTalk Mapper Extensions UtilityPack is a set of libraries with several useful functoids to include and use it in a map, which will provide an extension of BizTalk Mapper capabilities.
Where to download?
You can download this functoid along with all the existing one on the BizTalk Mapper Extensions UtilityPack here:
BizTalk Mapper Extensions UtilityPack
GitHub
Author: Sandro Pereira
Sandro Pereira lives in Portugal and works as a consultant at DevScope. In the past years, he has been working on implementing Integration scenarios both on-premises and cloud for various clients, each with different scenarios from a technical point of view, size, and criticality, using Microsoft Azure, Microsoft BizTalk Server and different technologies like AS2, EDI, RosettaNet, SAP, TIBCO etc. He is a regular blogger, international speaker, and technical reviewer of several BizTalk books all focused on Integration. He is also the author of the book “BizTalk Mapping Patterns & Best Practices”. He has been awarded MVP since 2011 for his contributions to the integration community. View all posts by Sandro Pereira
by Sandro Pereira | Oct 9, 2018 | BizTalk Community Blogs via Syndication
And yes, this is just another “Login failed for user” SQL Server WCF-Adapter related error. In the past I wrote about a similar topic BizTalk WCF-SQL Error:
This time the error message, the cause, and the solution are slightly different. This time while trying to communicate to a brand-new SQL Server server/database to insert date on a table thru BizTalk WCF-SQL adapter I got the following error:
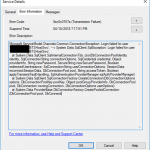
Microsoft.ServiceModel.Channels.Common.ConnectionException: Login failed for user ‘BTSHostSrvc’. —> System.Data.SqlClient.SqlException: Login failed for user ‘BTSHostSrvc’.
at System.Data.SqlClient.SqlInternalConnectionTds..ctor(DbConnectionPoolIdentity identity, SqlConnectionString connectionOptions, SqlCredential credential, Object providerInfo, String newPassword, SecureString newSecurePassword, Boolean redirectedUserInstance, SqlConnectionString userConnectionOptions, SessionData reconnectSessionData, DbConnectionPool pool, String accessToken, Boolean applyTransientFaultHandling, SqlAuthenticationProviderManager sqlAuthProviderManager)
at System.Data.SqlClient.SqlConnectionFactory.CreateConnection(DbConnectionOptions options, DbConnectionPoolKey poolKey, Object poolGroupProviderInfo, DbConnectionPool pool, DbConnection owningConnection, DbConnectionOptions userOptions)
at System.Data.ProviderBase.DbConnectionFactory.CreatePooledConnection(DbConnectionPool pool, DbConnection.

In the event viewer the message is pretty much the same:
A message sent to adapter “WCF-Custom” on send port “STAGING_BULK_SQL_WCf_SEND” with URI “mssql://SQLSRV/ /ESBAsync” is suspended.
Error details: Microsoft.ServiceModel.Channels.Common.ConnectionException: Login failed for user ‘DOMAIN BTSHostSrvc’. —> System.Data.SqlClient.SqlException: Login failed for user DOMAIN BTSHostSrvc’.
at System.Data.SqlClient.SqlInternalConnectionTds..ctor(DbConnectionPoolIdentity identity, SqlConnectionString connectionOptions, SqlCredential credential, Object providerInfo, String newPassword, SecureString newSecurePassword, Boolean redirectedUserInstance, SqlConnectionString userConnectionOptions, SessionData reconnectSessionData, DbConnectionPool pool, String accessToken, Boolean applyTransientFaultHandling, SqlAuthenticationProviderManager sqlAuthProviderManager)
at System.Data.SqlClient.SqlConnectionFactory.CreateConnection(DbConnectionOptions options, DbConnectionPoolKey poolKey, Object poolGroupProviderInfo, DbConnectionPool pool, DbConnection owningConnection, DbConnectionOptions userOptions)
at System.Data.ProviderBase.DbConnectionFactory.CreatePooledConnection(DbConnectionPool pool, DbConnection owningObject, DbConnectionOptions options, DbConnectionPoolKey poolKey, DbConnectionOptions userOptions)
at System.Data.ProviderBase.DbConnectionPool.CreateObject(DbConnection owningObject, DbConnectionOptions userOptions, DbConnectionInternal oldConnection)
at System.Data.ProviderBase.DbConnectionPool.UserCreateRequest(DbConnection owningObject, DbConnectionOptions userOptions, DbConnectionInternal oldConnection)
at System.Data.ProviderBase.DbConnectionPool.TryGetConnection(DbConnection owningObject, UInt32 waitForMultipleObjectsTimeout, Boolean allowCreate, Boolean onlyOneCheckConnection, DbConnectionOptions userOptions, DbConnectionInternal& connection)
at System.Data.ProviderBase.DbConnectionPool.TryGetConnection(DbConnection owningObject, TaskCompletionSource`1 retry, DbConnectionOptions userOptions, DbConnectionInternal& connection)
at System.Data.ProviderBase.DbConnectionFactory.TryGetConnection(DbConnection owningConnection, TaskCompletionSource`1 retry, DbConnectionOptions userOptions, DbConnectionInternal oldConnection, DbConnectionInternal& connection)
at System.Data.ProviderBase.DbConnectionInternal.TryOpenConnectionInternal(DbConnection outerConnection, DbConnectionFactory connectionFactory, TaskCompletionSource`1 retry, DbConnectionOptions userOptions)
at System.Data.ProviderBase.DbConnectionClosed.TryOpenConnection(DbConnection outerConnection, DbConnectionFactory connectionFactory, TaskCompletionSource`1 retry, DbConnectionOptions userOptions)
at System.Data.SqlClient.SqlConnection.TryOpenInner(TaskCompletionSource`1 retry)
at System.Data.SqlClient.SqlConnection.TryOpen(TaskCompletionSource`1 retry)
at System.Data.SqlClient.SqlConnection.Open()
at Microsoft.Adapters.Sql.SqlAdapterConnection.OpenConnection()
— End of inner exception stack trace —
Server stack trace:
at Microsoft.Adapters.Sql.SqlAdapterConnection.OpenConnection()
at Microsoft.Adapters.Sql.ASDKConnection.Open(TimeSpan timeout)
at Microsoft.ServiceModel.Channels.Common.Design.ConnectionPool.GetConnection(Guid clientId, TimeSpan timeout)
at Microsoft.ServiceModel.Channels.Common.Design.ConnectionPool.GetConnectionHandler[TConnectionHandler](Guid clientId, TimeSpan timeout, MetadataLookup metadataLookup, String& connectionId)
at Microsoft.ServiceModel.Channels.Common.Channels.AdapterRequestChannel.OnOpen(TimeSpan timeout)
at System.ServiceModel.Channels.CommunicationObject.Open(TimeSpan timeout)
at Microsoft.BizTalk.Adapter.Wcf.Runtime.OneWayOperationSendPortRequestChannel`1.OnOpen(TimeSpan timeout)
at System.ServiceModel.Channels.CommunicationObject.Open(TimeSpan timeout)
at System.ServiceModel.Channels.ServiceChannel.OnOpen(TimeSpan timeout)
at System.ServiceModel.Channels.CommunicationObject.Open(TimeSpan timeout)
at System.ServiceModel.Channels.CommunicationObject.Open()
Exception rethrown at [0]:
at System.Runtime.Remoting.Proxies.RealProxy.HandleReturnMessage(IMessage reqMsg, IMessage retMsg)
at System.Runtime.Remoting.Proxies.RealProxy.PrivateInvoke(MessageData& msgData, Int32 type)
at System.ServiceModel.ICommunicationObject.Open()
at Microsoft.BizTalk.Adapter.Wcf.Runtime.WcfClient`2.GetChannel[TChannel](IBaseMessage bizTalkMessage, ChannelFactory`1& cachedFactory)
at Microsoft.BizTalk.Adapter.Wcf.Runtime.WcfClient`2.SendMessage(IBaseMessage bizTalkMessage)
MessageId: {84B22A22-13F7-47C7-91B5-A863E64E268E}

Cause
Once again, sometimes is not quite true, the cause of the problem is simple to diagnose, and the error message gives a very good intel in the cause of the problem.
This problem occurs because the user account that you used to access the database, in my case the BizTalk Host Instance Account, don’t have permissions to connect… the SQL Server or SQL Server instance.
Just to be clear, this is not having permission to insert, read or event full permission to do operation on a specific database, that is completely different – I check all of that and the user have the correct access/permission. What I forget was to give access to connect to the SQL Server/SQL Server Instance.
Solution
To solve this issue, you must give access to the user, in my case BizTalk Host Instance Account to connect to the SQL Server and for that, you must:
- Open SQL Server Management Studio and connect to your server.
- In the Object Explorer, expand the “Security” folder under the server.
- Right click on the “Logins” folder and choose “New Login…”
- Add the username or group in the format “DomainUserNameOrGroup”

- Choose the “Securables” tab and make sure that you grant “Connect SQL” permission to the SQL Server/SQL Server instance

- Click “OK” and your user will be created and have access to connect to your SQL Server.
Author: Sandro Pereira
Sandro Pereira lives in Portugal and works as a consultant at DevScope. In the past years, he has been working on implementing Integration scenarios both on-premises and cloud for various clients, each with different scenarios from a technical point of view, size, and criticality, using Microsoft Azure, Microsoft BizTalk Server and different technologies like AS2, EDI, RosettaNet, SAP, TIBCO etc. He is a regular blogger, international speaker, and technical reviewer of several BizTalk books all focused on Integration. He is also the author of the book “BizTalk Mapping Patterns & Best Practices”. He has been awarded MVP since 2011 for his contributions to the integration community. View all posts by Sandro Pereira

by Sandro Pereira | Oct 4, 2018 | BizTalk Community Blogs via Syndication
To end these week contributions, tomorrow is national holiday in Portugal, BizTalk Pipeline Components Extensions Utility Pack community project for BizTalk Server 2016 got a new update. A new component that you can use in your custom BizTalk Server Send pipelines is now available: Remove XML Namespace Pipeline Component.
Remove XML Namespace Pipeline Component
The XML Remove Namespace pipeline component was developed in the old days by Johan Hedberg for BizTalk Server 2006 – you can check the original post here – that I now migrate to BizTalk Server 2016 with his permission and it can be used to remove XML namespaces from XML documents inside custom pipelines.
This has the availability to transform the root of the message from this:
<ns0:Blah xmlns:ns0="http://RemoveXmlNamespace.BTS.BlahMessage">
Into this:
<Blah>
As Johan mention in his original post, you shouldn’t remove the namespace from the messages, however, we don’t leave in a perfect world and we need to deal with legacy systems and sometimes they required, for unknown reasons for me, that we deliver messages without namespace.
To use this pipeline component in your projects you just copy the “RemoveXmlNamespace.PipelineComponents.dll” file into “Pipeline Components“ folder that exists in BizTalk Server Installation directory: “..Program Files (x86)Microsoft BizTalk Server <version>Pipeline Components” on every server.
You do not need to add a custom pipeline component to be used by the BizTalk Runtime to the Global Assembly Cache (GAC).
What is BizTalk Pipeline Components Extensions Utility Pack?
BizTalk Pipeline Components Extensions Utility Pack is a set of custom pipeline components (libraries) with several custom pipeline components that can be used in received and sent pipelines, which will provide an extension of BizTalk out-of-the-box pipeline capabilities.

The project is available on BizTalk Server Open Source Community repository on GitHub (https://github.com/BizTalkCommunity) and everyone can contribute with new pipeline components that can be extended or improve the existing BizTalk Server capabilities.
At the moment it is only available for BizTalk Server 2016 but it will soon be compiled and available for previous versions of the product.
Where to download it?
You can download BizTalk Pipeline Components Extensions Utility Pack from GitHub here:
BizTalk Pipeline Components Extensions Utility Pack
GitHub
Author: Sandro Pereira
Sandro Pereira lives in Portugal and works as a consultant at DevScope. In the past years, he has been working on implementing Integration scenarios both on-premises and cloud for various clients, each with different scenarios from a technical point of view, size, and criticality, using Microsoft Azure, Microsoft BizTalk Server and different technologies like AS2, EDI, RosettaNet, SAP, TIBCO etc. He is a regular blogger, international speaker, and technical reviewer of several BizTalk books all focused on Integration. He is also the author of the book “BizTalk Mapping Patterns & Best Practices”. He has been awarded MVP since 2011 for his contributions to the integration community. View all posts by Sandro Pereira

by Sandro Pereira | Oct 3, 2018 | BizTalk Community Blogs via Syndication
And once again, BizTalk Pipeline Components Extensions Utility Pack community project for BizTalk Server 2016 got a new update. A new component that you can use in your custom BizTalk Server Send pipelines is now available: Zip Pipeline Component.
Zip Pipeline Component
The Zip Pipeline Component is a pipeline component for BizTalk Server which can be used in a send pipeline (encode stage) and is intended to compress (zip/gzip) outgoing messages.
- The capabilities are similar to those available in compression software such as WinZip or 7-zip:
- This component requires two configurations that are:
- the “FileExtension” where you can specify if you want for example a .zip or .gz file.
- and “Enabled” that is a true or false value to activate the compression.
No compression/decompression software needs to be installed in the BizTalk Server machines.
This was an old component that I had that I now updated and improved to BizTalk Server 2016 with the help with my internal team at DevScope, in special, Pedro Almeida.
To use this pipeline component in your projects you just copy the “BizTalk.PipelineComponents.ZipFile.dll” file into “Pipeline Components“ folder that exists in BizTalk Server Installation directory: “..Program Files (x86)Microsoft BizTalk Server <version>Pipeline Components” on every server.
You do not need to add a custom pipeline component to be used by the BizTalk Runtime to the Global Assembly Cache (GAC).
What is BizTalk Pipeline Components Extensions Utility Pack?
BizTalk Pipeline Components Extensions Utility Pack is a set of custom pipeline components (libraries) with several custom pipeline components that can be used in received and sent pipelines, which will provide an extension of BizTalk out-of-the-box pipeline capabilities.

The project is available on BizTalk Server Open Source Community repository on GitHub (https://github.com/BizTalkCommunity) and everyone can contribute with new pipeline components that can be extended or improve the existing BizTalk Server capabilities.
At the moment it is only available for BizTalk Server 2016 but it will soon be compiled and available for previous versions of the product.
Where to download it?
You can download BizTalk Pipeline Components Extensions Utility Pack from GitHub here:
BizTalk Pipeline Components Extensions Utility Pack
GitHub
Author: Sandro Pereira
Sandro Pereira lives in Portugal and works as a consultant at DevScope. In the past years, he has been working on implementing Integration scenarios both on-premises and cloud for various clients, each with different scenarios from a technical point of view, size, and criticality, using Microsoft Azure, Microsoft BizTalk Server and different technologies like AS2, EDI, RosettaNet, SAP, TIBCO etc. He is a regular blogger, international speaker, and technical reviewer of several BizTalk books all focused on Integration. He is also the author of the book “BizTalk Mapping Patterns & Best Practices”. He has been awarded MVP since 2011 for his contributions to the integration community. View all posts by Sandro Pereira
by Sandro Pereira | Oct 2, 2018 | BizTalk Community Blogs via Syndication
Welcome back to my blog post series “BizTalk Server Tips and Tricks” for developers, administrators or business users. Not all tips and tricks are sophisticated or quite robust and ingenious, some of them are quite simple. Some of them are in front of us all the time without us noticing, this is one of these cases.
Today there is a lot more information than in the past, but normally when we start BizTalk Server tutorials about schemas, they tend to say that if you want to specify how many times a record or an element will occur, you should configure the below values:
- The Max Occurs property to specify the maximum occurrences of this node (record or element). The default value is ‘1’ and cannot be less than the Min Occurs property
- The Min Occurs property to specify the minimum occurrences of this node. The default value is ‘1’ and cannot be greater than the Max Occurs property
What this type of tutorial also tells you, is that if you want to specify that a specific node can appear an unlimited number of times, at the Max Occurs property, you should type the value: “unbounded”

So, we tend to manually write the word “unbounded”, each time we want to set a node to appear an unlimited number of times… I think, I can write this word better than my personal name, so many are the times I’ve written it over the years. But to be honest, this can be a little time consuming. Especially if we type it wrongly, newbies need to remember this word – there are other words with the same meaning as unlimited – and sometimes is just a little boring.
Well, guess what, if you are at this point of the post wondering what is the alternative, in the future you should spend a little time reading the description of property inside Visual Studio; the alternative has been there in front of you all the time:
- Maximum Occurrences of this node. Its value should always be greater than or equal to minOccurs of this node. Use ‘unbounded’ or ‘*’ (asterisk) to indicate unlimited occurrences. The default value is ‘1’.

Which means that if we type * (asterisk), this will be automatically translated to “unbounded”.

Quick, simple and practical
Stay tuned for new tips and tricks!
Author: Sandro Pereira
Sandro Pereira is an Azure MVP and works as an Integration consultant at DevScope. In the past years, he has been working on implementing Integration scenarios both on-premises and cloud for various clients, each with different scenarios from a technical point of view, size, and criticality, using Microsoft Azure, Microsoft BizTalk Server and different technologies like AS2, EDI, RosettaNet, SAP, TIBCO etc. View all posts by Sandro Pereira


