Do you feel difficult to keep up to date on all the frequent updates and announcements in the Microsoft Integration platform?
Integration weekly update can be your solution. It’s a weekly update on the topics related to Integration – enterprise integration, robust & scalable messaging capabilities and Citizen Integration capabilities empowered by Microsoft platform to deliver value to the business.
If you want to receive these updates weekly, then don’t forget to Subscribe!
One of the components of BizTalk360 is a SQL Server database. This database is used for all kind of configuration like user permissions and all the monitoring settings. When that data got corrupted or lost, you would have to do all the configuration all over from scratch. To prevent this from happening, you should frequently take backups of that database. Besides creating manual backups, you can also have these backups being created automatically.
There are two different approaches to making automated backups of this database, both are shown below:
Create a SQL Server Maintenance Plan
Extend the Backup BizTalk Server job
The difference between these 2 methods is, that with the Maintenance Plan approach you’ll have a backup which is not in sync with the backup of your BizTalk databases, while with the latter option your BizTalk360 backup will be in sync with the BizTalk backups. This could make restoring your databases in one go easier.
In a previous post, Rochelle has already explained how to create a Maintenance Plan to take care of the BizTalk360 database backups. In this article, we’ll explain how to add the BizTalk360 database to the Backup BizTalk Server job.
Adding custom databases to the BizTalk Server Backup job
What we basically are going to do is using a feature from BizTalk Server. As you probably are aware of, BizTalk Server contains multiple databases and to be able to restore them in sync, the backup needs to be created in sync. The only by Microsoft supported way to create such backups, is by using the Backup BizTalk Server job, which is a SQL Server Agent job. You can read more about that topic in the below articles:
BizTalk users can extend the backup job with other databases which are considered important to the integrations which are deployed in BizTalk Server. This is exactly what we will be doing with the BizTalk360 database.
The process exists of the following steps:
Prepare the BizTalk360 database
Add the BizTalk360 database to the BizTalk Server backup job
Start making backups
Let’s take these steps one by one and have that database added to the BizTalk Server backup job!
Prepare the BizTalk360 database
In this first step, we’ll make sure a table and some Stored Procedures will be created in the BizTalk360 database. The table which becomes created is called MarkLog. You will find this table in all the databases which are being backed up via the BizTalk Server backup job.
Perform below steps to create that table and the needed Stored Procedures:
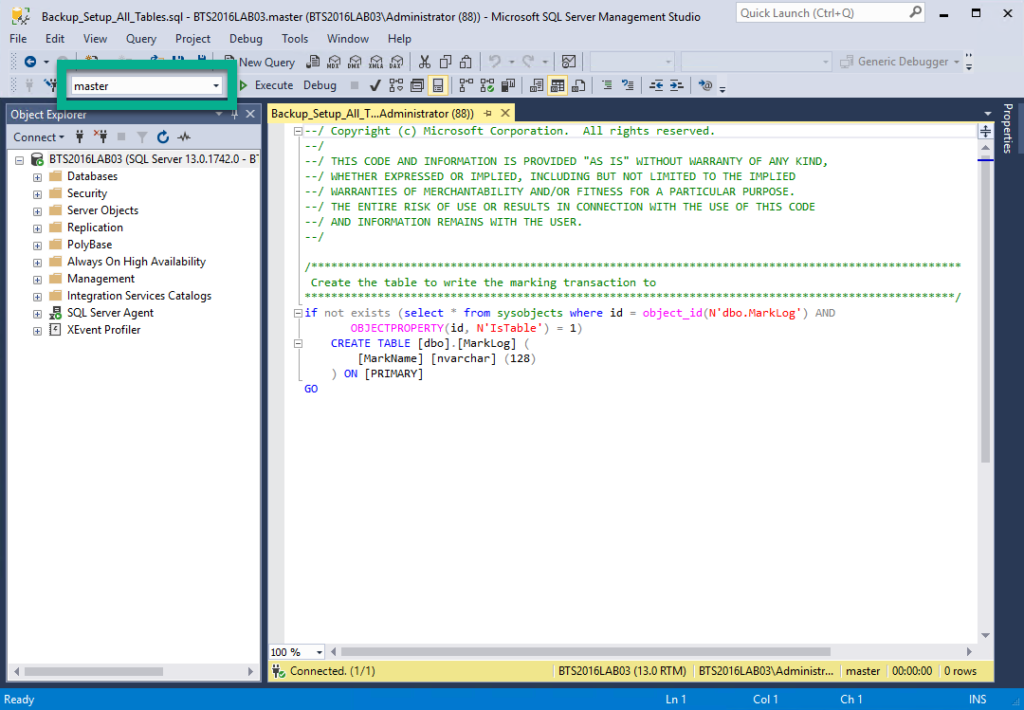
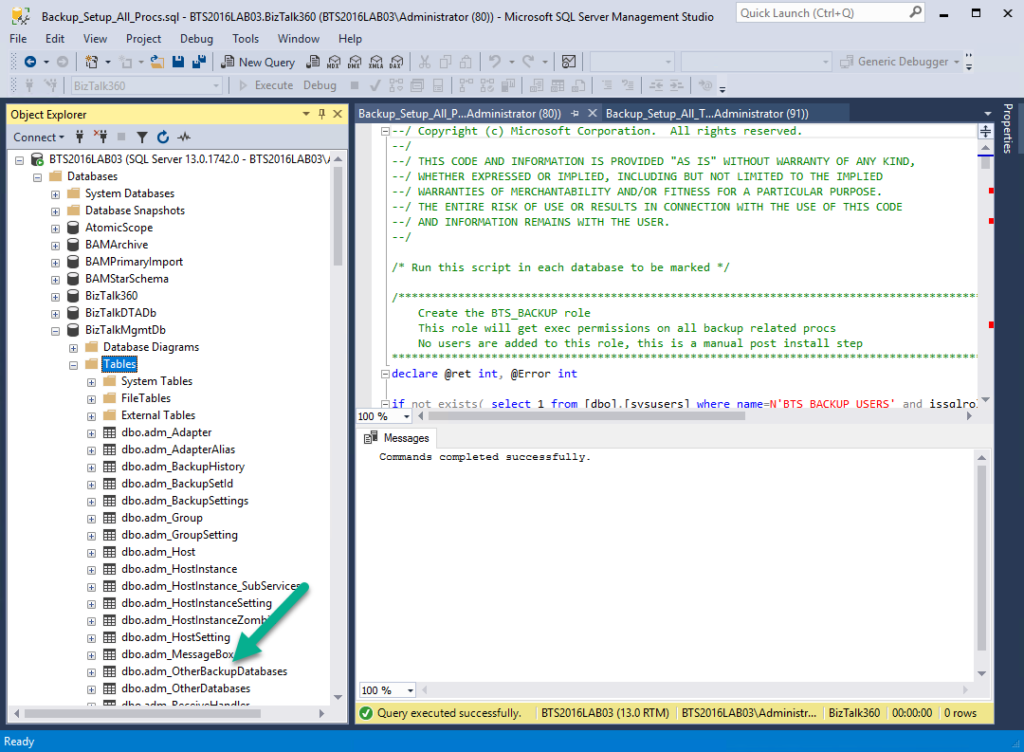
Open SQL Server Management Studio and connect to the SQL Server instance which contains the BizTalk360 database
Click Open File, navigate to folder C:Program Files (x86)Microsoft BizTalk Server 2016Schema and select query Backup_Setup_All_Tables.sql
From the Databases dropdown, select the BizTalk360 database
Click the Execute button or hit F5 to execute the script. If the database has been created successfully, you can proceed with the next step
Click Open File, navigate to folder C:Program Files (x86)Microsoft BizTalk Server 2016Schema and select query Backup_Setup_All_Procs.sql
If not yet selected, select the BizTalk360 database from the Databases dropdown
Click the Execute button or hit F5 to execute the script
If both SQL scripts have been executed successfully, an important part of the configuration has been completed. The BizTalk360 database is ready and in the next step, it will be added to the BizTalk Server backup job!
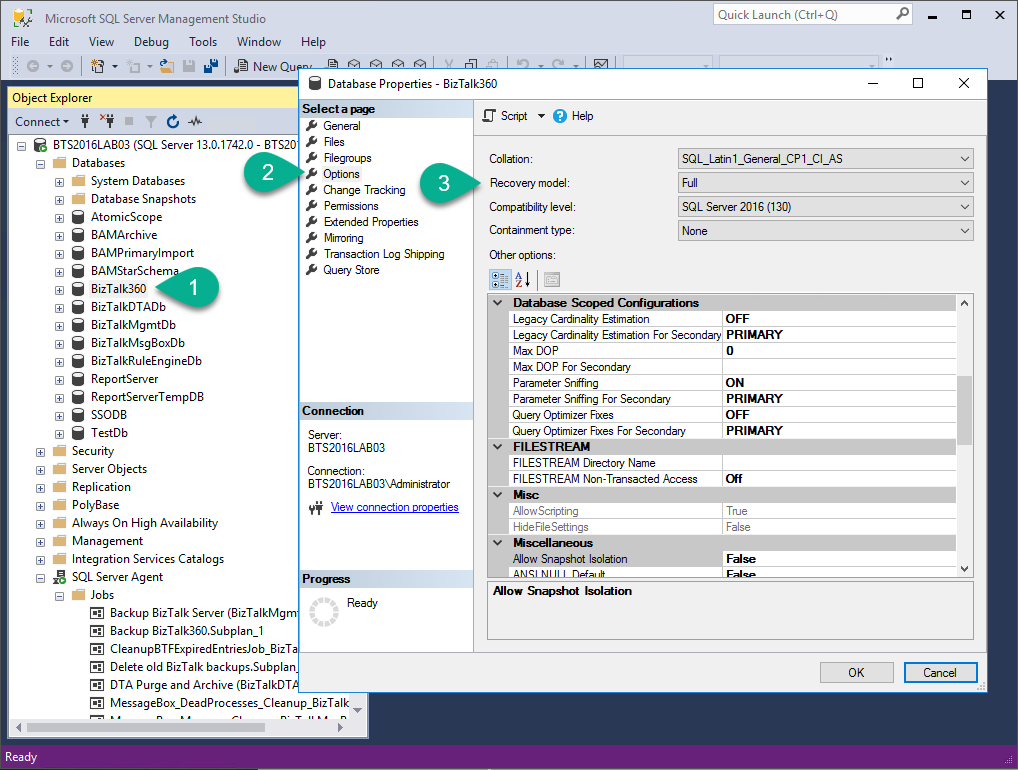
Important: Ensure yourself that the BizTalk360 is in Full Recovery Model, otherwise the backup will fail! You can check this by:
Right-click the database then select Properties
Select Options
Check if the Recovery Model is set to Full
Add the BizTalk360 database to the BizTalk Server backup job
In the previous step, we prepared the BizTalk360 database to be able to be backed up by the BizTalk Server backup job. In this step, we’ll make sure that that database becomes added to a table in BizTalk Server’s management database, which will make sure that the database will be picked up by the BizTalk Server backup job.
Follow below steps, to make sure that the BizTalk360 database will be picked up by the BizTalk Server backup job:
In SQL Server Management Studio, connect to the SQL Server instance which contains the BizTalkMgmtDb
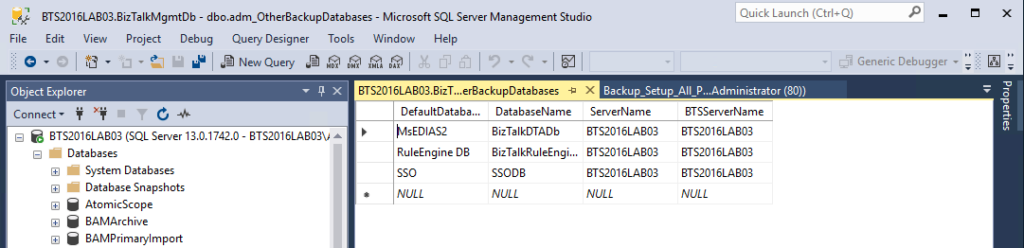
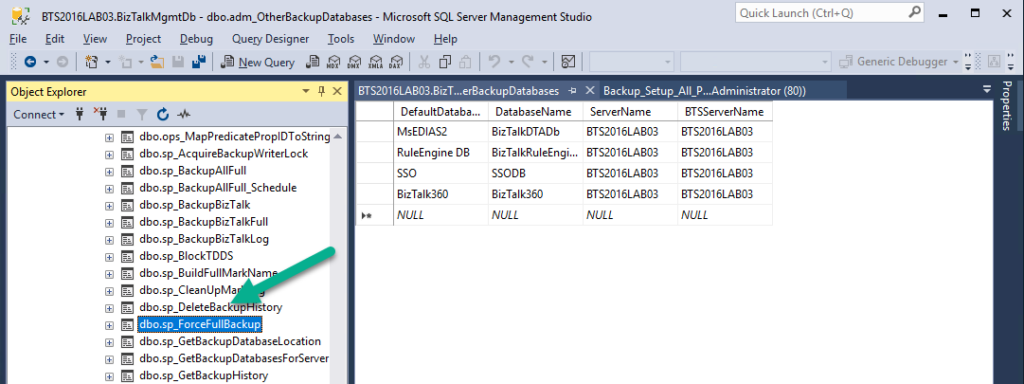
In the Object Explorer, expand the Databases, BizTalkMgmtDb, Tables and find the dbo.adm_OtherBackupDatabases table
Right-click that table and, from the menu that appears, select Edit Top 200 Rows. As you are in Edit mode, you can add a new row which will contain the information about the BizTalk360 database.
In the last row, which now only shows NULL values, enter below values
DefaultDatabase: BizTalk360
DatabaseName: BizTalk360
ServerName: <Name of the SQL Server Instance which contains the BizTalk360 database>
BTSServerName: <Name of the SQL Server Instance which contains the BizTalk360 database>
Hit Enter to save the record in the table
The BizTalk360 database is now part of the BizTalk Server backup job. The last step we need to do is forcing a full backup, to make sure that also incremental backups can be created.
Start making backups
We are almost there; we have seen how the BizTalk360 database has been prepared to accommodate the BizTalk Server backup job. In the previous step, we have added the BizTalk360 database to the BizTalk Server backup job. In this last step, we will force a full backup, to make sure that after that, also incremental backups can be created. By default, a full backup will be created once every 24 hours; Incremental backups will be created, by default, every 15 minutes.
Perform below steps to force a full backup:
In SQL Server Management Studio, under the BizTalkMgmtDb, expand Programmability and expand Stored Procedures
Scroll through the Stored Procedures until you have found sp_ForceFullBackup
Right-click that Stored Procedure and, from the menu that appears, select Execute Stored Procedure… As the Stored Procedures doesn’t need any parameter values, just click OK
If the Stored Procedure has been executed successfully, the next time the BizTalk Server backup job runs, it will perform a full backup
There are a couple of ways to check whether the backups are really being created. You can:
Check the output of the BizTalk Server backup job (in SQL Server Management Studio)
Check if the backup files have been created (in Windows Explorer)
Check the output of the BizTalk Server backup job
To perform this check, perform these steps:
In SQL Server Management Studio, you need to navigate to the SQL Server instance which contains the BizTalk Server backup job
Next, expand SQL Server Agent
Right-click the Backup BizTalk Server job and select View History
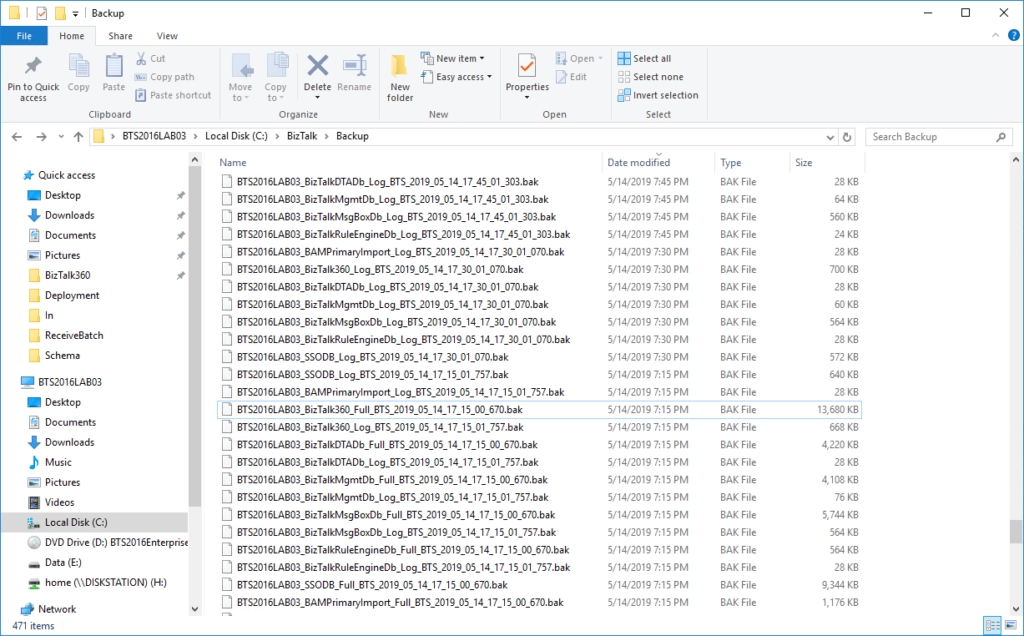
Check if the backup files have been created
To check the availability of the backup files, you firstly need to check where these files are located. Follow the below steps, to find that location and then check the actual location:
In SQL Server Management Studio, you need to navigate to the SQL Server instance which contains the BizTalk Server backup job
Next, expand SQL Server Agent
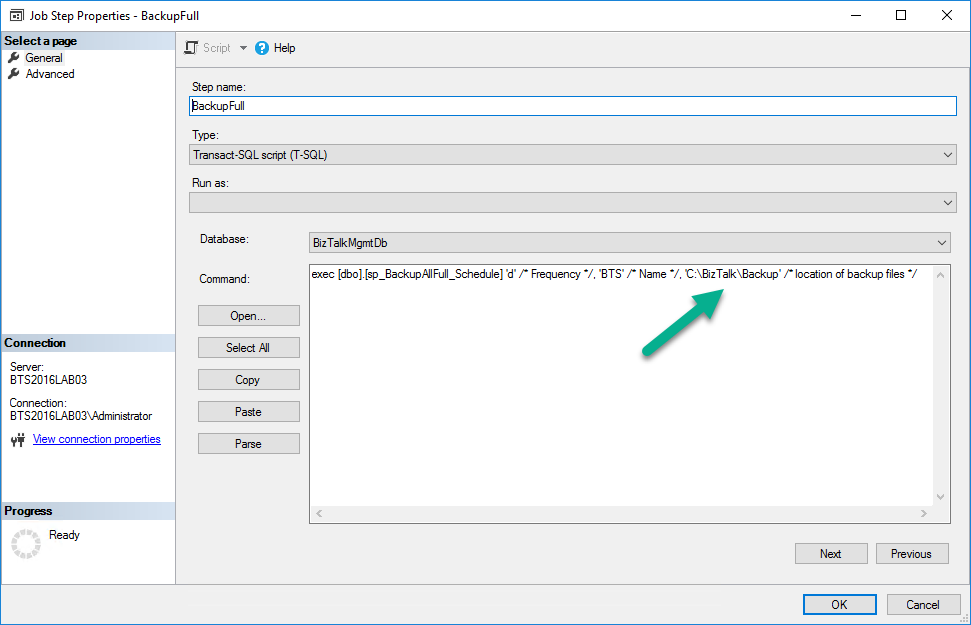
Double-click the Backup BizTalk Server job
In the Job Properties dialog which appears, under Select a Page, select Steps
Now, under Job step list, double click BackupFull
In the Job Step Properties dialog, at Command, scroll to the right to find the backup path
Copy the backup path and close all dialog screens
Next, open a Windows Explorer and paste the backup path in the Address bar
Now the backup files should show. Although we only checked the backup path for the full backup files, this folder might also contain the backup files of the incremental backups.
Conclusion
The BizTalk360 database contains valuable information about, amongst others, your monitoring configuration and the people who have access to BizTalk360. If in case of a disaster, you need to easily restore a backup of your BizTalk360 database, you need to have a recent backup of that database. The BizTalk Server backup job creates such backups. In this article, we have seen how to extend the BizTalk Server backup job to incorporate the backup of the BizTalk360 database.
Do you feel difficult to keep up to date on all the frequent updates and announcements in the Microsoft Integration platform?
Integration weekly update can be your solution. It’s a weekly update on the topics related to Integration – enterprise integration, robust & scalable messaging capabilities and Citizen Integration capabilities empowered by Microsoft platform to deliver value to the business.
If you want to receive these updates weekly, then don’t forget to Subscribe!
This will be the first blog post in a series of articles that I will do on this topic addressing some of the real case scenarios that we may face daily:
How can we easily export a binding file from a BizTalk Application?
How can we easily export a binding file from a specific assembly?
How can we easily export a binding file from a list of assemblies?
How can we easily export a binding file from a Receive Port?
How can we easily export a binding file from a Send Port?
And many more
The today blog post will be about: How can we easily export a binding file from a BizTalk Application?
Exporting a BizTalk Server Application binding is, at first sight, a simple and quick task that can be done using the BizTalk Server Administration Console:
Click Start, click All Programs, click Microsoft BizTalk Server 20xx, and then click BizTalk Server Administration
In the console tree, expand BizTalk Server Administration, expand the BizTalk Group, and then expand Applications
Right-click the application whose bindings you want to export, point to Export, and then click Bindings…
On the Export Bindings page, in Export to file, type the absolute path of the .xml file to which to export the bindings
Ensure that Export all bindings from the current application is selected, and then click OK
But even in simple tasks, we may encounter challenges that require us to perform some monotonous and boring manual operations that consume some of our precious time and are always subject to failures.
The steps that I described above only generate the binding files from that specific environment, maybe or normally this all start in development, but we also will need to generate the same bindings for production and for that we normally need to open the binding file and replace/fix the differences for each different environment… which is normally a tedious operation. What we need to replace is mainly:
the URI’s – it should be fixed, but it is not mandatory. If you know what you are doing, you can fix them directly on the environment after you import the Binding
the host instances – not mandatory, if you have the same host and host instances names across all your different environments (as best practices will tell you to do)
the NT Group Name associated in the Services (Orchestrations) – according to securities best practices you shouldn’t use the same BizTalk Groups in different environments, so in this case, if you follow this best practices, you need to change these parameters in your binding file
Normally, everyone changes the URI’s but neglecting the other parameters may be causing problems during the Binding import.
So, the question is: Is there any way that we can do to improve this experience? And the response is that yes, all of this can be fully automated by using, for example, PowerShell scripts.
Again, I could fully automate this Binding generation for each environment, but let’s keep it simple and address what is mandatory and easily forgotten. In this sample let’s see how I can easily:
Generate a Binding file for 3 environments DEV, QA and PRD:
Changing the NT Group Name for each different environment;
To finalize these sessions resources shared, at least for now because I’m still waiting for other resources to get available. Here is one that I forgot even to mention in my blog that I was speaking at that event: the MVPDays Microsoft Flow Conference 2018 that toked place online on December,12 of last year (http://www.mvpdays.com/?page_id=11493). This was my first session about real case scenarios using PowerApps and Microsoft Flow.
About my session
Session Name: How we use Microsoft Flow and PowerApps: Real cases scenarios
Session Overview: We know that all business problem can be solved with a variety of technologies and different solutions. However, sometimes developing that type of solutions has traditionally been too costly and time-consuming for many of the need’s teams and departments face, especially those projects that are internally for organizations to use or for a short time period. As a result, many of these projects or solutions will be on the shelf or in the imaginary of the collaborators.
They are in Dynamics 365, Office 365, on premises, on the cloud… they are everywhere, and they are fantastic! Developers can do it; IT can do it… you can do it!
Microsoft Flow and PowerApps, sometimes together sometimes isolated are here to help you, and in this session, we will show you real live scenarios on how we use these two technologies in our customers and internally at DevScope.
Slides and Video
MVPDays Microsoft Flow Conference 2018 | How we use Microsoft Flow and PowerApps: Real cases scenarios
Another day, another resource shared! This time regarding my session deliver on Integration User Group or also known as Integration Monday about BizTalk Server NoS add-in – BizTalk NoS Ultimate – that is a Visual Studio add-in for BizTalk developers that aims to improve the experience while developing BizTalk projects. It is an extension to Microsoft Visual Studio that will offer lots of useful functionalities, mainly for developers, by which BizTalk users can save valuable time while working on their day-to-day activities and improve productivity.
About my session
Session Name: The NOS-addin – your (free) BizTalk Dev buddy!
Session Overview: The NOS-add-in is a tool specifically developed for BizTalk developers. It contains all kind of features to make the life of a BizTalk developer easier and thereby less time-consuming.
In this session, I will show the different capabilities of this tool.
Integration User Group aims to educate, evangelize, inform the community about various integration technologies, and how developers and architects can share and learn about the evolving integration and messaging capabilities of the Microsoft platform.
Monitoring and Alert notification is amongst the core functionalities in BizTalk360. To empower better usability, we are improving the alert notification in the upcoming release v9.0 by adding the option for sending alert notifications to a group of Email Id’s. We always give importance to our customer voice and give importance to customer feedbacks while picking up the features for every release. Also this feature becomes implemented based on our customers feedback.
This feature not only addresses the Group Email list, it also has the additional capability to add recipients based on UP Alert and Auto Correct Alert, and an option to copy in people (CC) in notification emails. Those functionalities are also highly recommended by customer feedback as below.
We have achieved the above feedbacks in one powerful feature called “SMTP Notification Channel”.
What is SMTP Notification channel in BizTalk360?
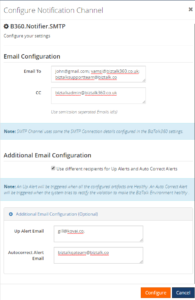
Intending to send email notifications, you simply need to specify the recipients Email address. You can add multiple Email id(s) separated by semicolon. The SMTP Notification channel emails are sent using the SMTP Client server.
The following table provides descriptions of the configuration fields and indicates whether they are required. The section that follows this table provides example configurations.
Field
IsRequired?
Description
Email To
Required
Email address of the notification recipients for all type of alert
CC
Optional
Email address of the notification recipients
Up Alert
Optional
Email address of the notification recipients for Up alert
Auto Correct Alert
Optional
Email address of the notification recipients for Auto Correct alert
The user can create multiple email distribution lists by configuring multiple SMTP notification channels and map them to the same or different Alarms based on the business needs.
Note: To receive alerts through the SMTP notification channel, the user needs to configure the SMTP settings in BizTalk360 (BizTalk360-> Settings-> Monitoring and Notification-> SMTP). The SMTP Notification channel will take the server connection details form the configured SMTP settings.
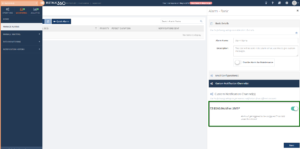
BizTalk360 Alarm Configuration Methods
As you know in BizTalk360, you can configure the alarm notifications in two ways, one is by configuring Alarm only with email ids and the other one is mapping Notification channels (ServiceNow, Slack, PowerShell, Webhook, Microsoft Teams).
Now, in the notification channel we have added an additional advantage for Email configuration, called the SMTP Notification channel. This will behave the same as the native Email configuration methods, which is actually very easy to use and maintain.
BizTalk360 native Email Configuration
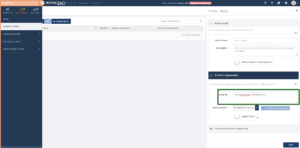
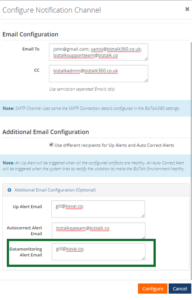
In earlier versions of BizTalk360, a user could configure the Alarm by directly proving the Email id(s), as shown below.
If the user wants to use the same recipients in another alarm, the user needs to copy the email and paste it to the new alarm or they need to type it again manually. It is a very time consuming and tedious process when you want to configure multiple email ids.
Also, in the earlier BizTalk360 versions, there is no option to group the alerts like UP Alert, AutoCorrect Alert and to have a CC for the admin or any other recipients. To overcome all, we have introduced the “SMTP Notification Channel”.
Cons of using the native Email configuration
It’s hard to configure multiple recipients for multiple alarms
Any user can change the recipients for any alarms, which is a security risk
All the alert like up alerts, down alert, autocorrect will be sent to all the configured Emails
No CC option was available
Grouping Email using SMTP Notification Channel
Using this SMTP Notification channel, a professional can effortlessly create multiple email contact groups and effectively send or automate sending BizTalk360 alerts to thousands of recipients in multiple email groups at the same time. In Addition to that, they can group the email recipients based on the type of alerts like Up Alert and Auto Correct Alert.
Pros of using the SMTP Notification channel
It is an easy and effective way to create and manage multiple mailing lists
User can group the email recipients accordingly to their business needs, based on the alerts like UP alert and Auto correct Alert
It helps to add the CC to the alerts, which helps to notify an admin or other professional as per their business norms
Any user can use the Configured SMTP channel for their respective alarms
Only the admin or Super user can create the SMTP Notification channel. Another user cannot create the Channel which improves the security
How can we effectively use the SMTP Notification for our business
Creating an Email Distribution List with the SMTP Notification Channel: Most of the customers use BizTalk360 for the monitoring capability. The user can monitor BizTalk artifacts through the BizTalk360 alarms and the user gets notified when any artifact goes down. The user can configure n number of alarms for their business needs.
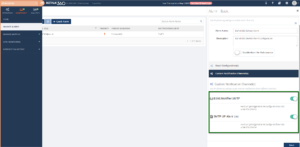
For instance, if a user was monitoring multiple BizTalk artifacts with more than 100 BizTalk360 Alarms with the same set of recipients, and if the admin wants to add/remove a recipient, then the admin needs to go and manually change all the alarms which is time consuming. This can be done much simpler with using the STMP channel; it is enough to provide email recipients only at SMTP notification channel configuration. The same can be used across all the alarms, just by enabling the SMTP channel. And, if there is any change in recipient ids, it’s enough to change it in SMTP notification channel and it will be reflected in all the alarms. The user can also configure multiple SMTP channels to multiple alarms or a single alarm as below, this will reduce the manual effort.
Personalize Alerts to notify different group of users: As you know, users get notified through different types of Biztalk360 alerts such as Down alert, UP Alert, AutoCorrect Alert, Regular Alert and Data Monitoring Alert. The Down Alert will be triggered when the correct state of the artifact is different from the Expected state; the UP Alert will get triggered when all the configured artifacts are in Healthy state; the AutoCorrect Alert will be triggered when system tries to rectify the violation to make BizTalk Environment healthy.
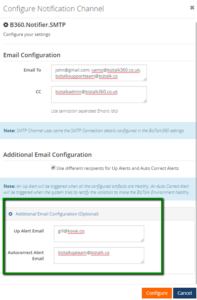
In case an admin wants a down alert to be sent to everyone in the team, but the Up Alert or Auto correct alert need to be notified to only specific members in team, that can be easily achieved by configuring the selected recipient ids Up Alert/Auto correct field while configuring SMTP channel.
Create the SMTP Channel with the Email To, which indicates the Down Alert recipients, then configure the UP Alert and Down Alert recipients on the respective fields. Then configure the channel to the respective Threshold Alarm. When the artifacts are down, it will trigger the alert only to the configured recipients and the same for UP Alert and AutoCorrect Alert.
Make a copy to different users: Within an organization, a user needs to provide a copy of an alert to the admin or some other authority. In this case, they can configure the CC in the SMTP Channel, then the alert will get notified to the admin.
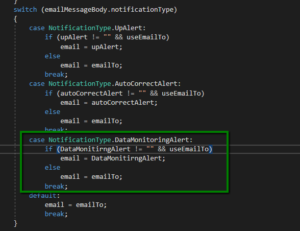
Customizing SMTP Notification Channel: The SMTP Notification channel can be customized based on the business requirements using the GitHub project file. For Instance, if the user wants to send the Data Monitoring alerts to a specific Email group, this can be achieved by adding a piece of code in the GitHub project file. For SMTP Notification channel, the data are retrieved based on the alert notification type.
You need to perform the following steps:
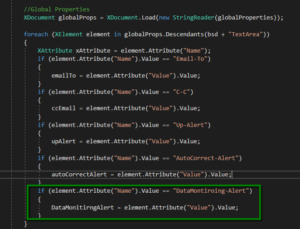
Add the fields to get input for Data monitoring Alert Emails in the global properties XML File.
<TextArea Name=”DataMonitoring-Alert” DisplayName=”Datamonitoring Alert Email” IsMandatory=”false” Tooltip=”Only Data Monitoring alerts will be trggerred to the configured Email Id(s)” DefaultValue=”” Value=”” Type=”email” ValidationPattern=”^([w+-.%]+@[w-.]+.[A-Za-z]{2,}(s*;?s*)*)+$”/>
Get the email id’s and assign to another variable in the SMTPChannel.cs file as
You need to add the Condition respective for Data Monitoring Alert as
Then the user can add separate group Emails for Data Monitoring alert as below.
Wrap Up
A mailing list or group email can be the bliss of a feature for businesses of any size. The SMTP Notification channel allows you to reach out to as many people as you want without having to re-write or copy-paste the same email multiple times.
Stay tuned!!
Conclusion
If you plan on creating and send group emails for an organization or a business purpose, then this SMTP Notification channel will ensure a productive, scalable and goal-driven approach to your group email campaigns.
I may be writing less on my blog as I frequently do, this will change soon, but this year of this is being very productive in terms of lectures. 4 in 4 months and more to come:
3/30/2019 – Real case implementations using Azure Logic Apps and/or Microsoft Flows at Global Integration Bootcamp Madrid
2/14/2019 – Integration Down Under | February 14, 2019 | How we are using Microsoft Integration features and related Azure technologies to improve our processes
2/4/2019 – The NOS-addin – your (free) BizTalk Dev buddy! at Integration Monday
1/30/2019 – XLVIII Porto.Data Community Meeting | How we use Microsoft Flow and PowerApps: Real cases scenarios
Now is time to share some resources before I start writing about other things and completely forget about this.
About my session
Session Name: How we are using Microsoft Integration features and related Azure technologies to improve our processes
Microsoft Integration features Session
Session Overview: In this session, I will show you real live scenarios on how we at DevScope are using Microsoft Integration features (Logic Apps, API Management, API’s) and related Azure technologies like PowerApps, Flows and Power BI to:
First, improve our internal processes like expenses reports, time reports and so on;
And, secondly, how the first step helps us out to extend our product and our business by exporting these same approaches and concepts to our clients
This will be a lightweight talk addressing some real scenarios and show them in action.
Integration Down Under – How we are using Microsoft Integration features and related Azure technologies to improve our processes
About Integration Down Under
Integration Down Under serves the Australian / New Zealand community interested in all things Microsoft integration. Endeavoring to have regular webinar presentations, usually on the 2nd Thursday of each month. Organized by a panel of five Australian and New Zealand integration experts, our guest speakers feature various Azure MVPs, members of the Microsoft product teams, and other prominent members of the Microsoft integration community.
Do you feel difficult to keep up to date on all the frequent updates and announcements in the Microsoft Integration platform?
Integration weekly update can be your solution. It’s a weekly update on the topics related to Integration – enterprise integration, robust & scalable messaging capabilities and Citizen Integration capabilities empowered by Microsoft platform to deliver value to the business.
If you want to receive these updates weekly, then don’t forget to Subscribe!
BizTalk360 already has the capability to integrate with New Relic, in which user can get insights on real-time performance data .
Application Performance Management or Application Performance Monitoring (APM) is an essential tool to help managing and monitoring the performance of an application.In today’s market a wide range of tools is available to optimize and monitor the performance of an application. AppDynamics is a well-known top application performance monitoring tool when it comes to APM. Knowing the importance of Application Performance Monitoring, BizTalk360 provides integration with AppDynamics from the v8.9.6.
Why do we integrate AppDynamics in BizTalk360?
For large organizations spend quite good investment when comes for complex network for optimization and monitor the performance of apps and related issues.AppDynamics is widely used by companies as an enterprise-wide monitoring solution and it has the capability to provide deep performance analytics of your configured environment .Considering the importance of monitoring the performance of BizTalk Server environment in a single place, few of our customer requested us to integrate AppDynamics in BizTalk360.
If you are already using AppDynamics, you can view the performance metrics of the BizTalk server environment across multiple widgets in AppDynamics dashboard from the BizTalk360 v8.9.6.
BizTalk360 Analytical Data in AppDynamics
Initially, BizTalk360 will provide capabilities to push BizTalk Server Analytics information to the AppDynamics. Some of the important BizTalk environment performance metrics categories are
BizTalk Server Health
Host Performance
Messaging
SQL Server
Throttling
All metrics have different counters, which are constantly being collected and pushed over to the AppDynamics Controller.
BizTalk Server Health Metrics has
CPU Usage
Memory Usage
Disk Free Space
Average Disk Queue Length
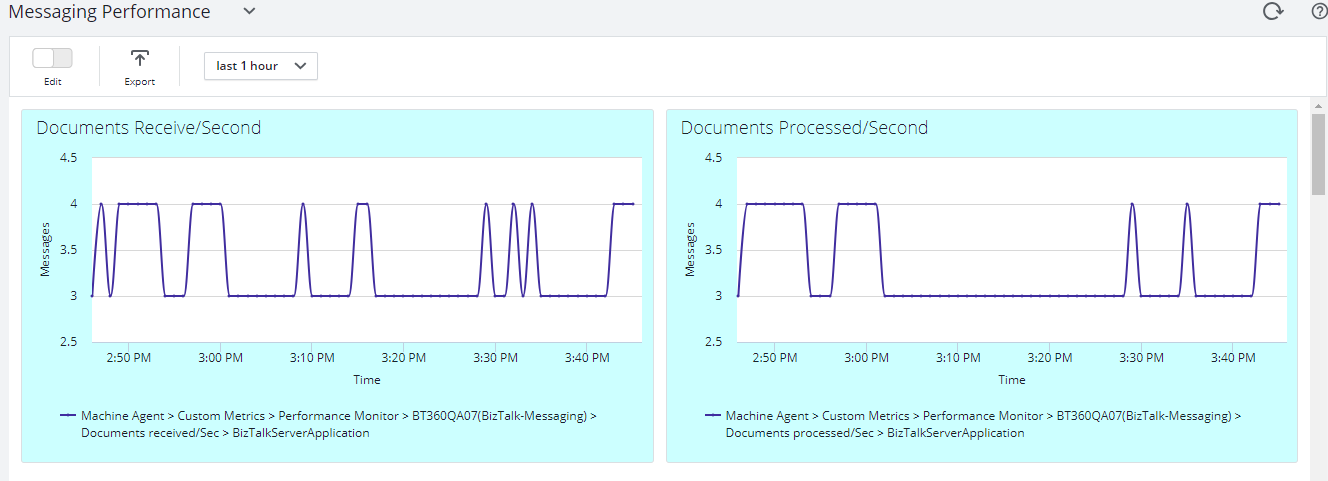
Message Performance
Documents Receive/Second
Documents Processed/Second
Inbound Latency (Sec)
Outbound Latency (Sec)
Outbound Adapter Latency (Sec)
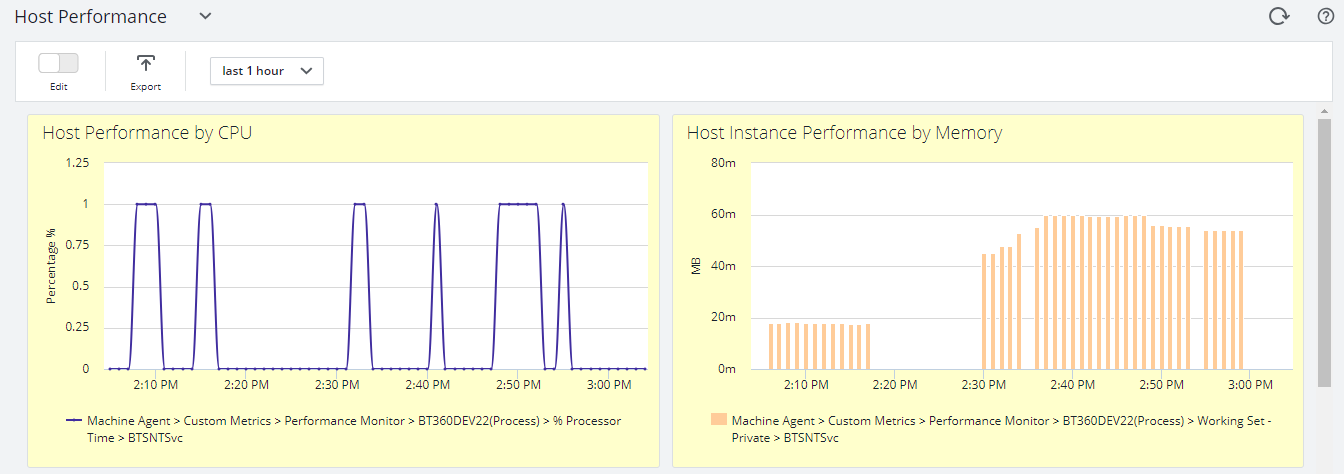
Host Performance
Host Instance performance by CPU and Memory
Throttling Performance
Message delivery Throttling State
Message Publishing Throttling State
Message Delivery Outgoing Rate
Message Delivery Incoming Rate
Active Instance Count
How does BizTalk360 connect with AppDynamics
Every monitoring tool has a different core architecture. When looking on the surface, they might look similar, but when we look in detail of it, it becomes clear how different all the monitoring tools works.
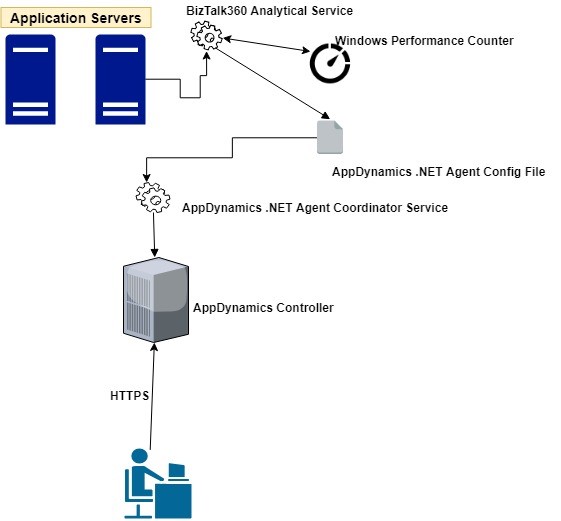
AppDynamics supports different development languages, while we are using .NET because BizTalk360 is build on top of .NET framework.
AppDynamics provides a piece of software called Agent which is installed on the server to which application needs to be monitored. The Agent collects metrics and sends them to a server called the Controller. The controller processes the metrics and presents them via Web Browser.
The BizTalk360 Analytics service includes a sub-service called “AppDynamics” which is responsible to constantly push BizTalk Server performance data to Agent. The AppDynamics sub service executes every 70 seconds and checks for the data in the performance data service(another BizTalk360 Analytical sub service). The Controller, which processes the data, makes the data available through a web browser to the user.
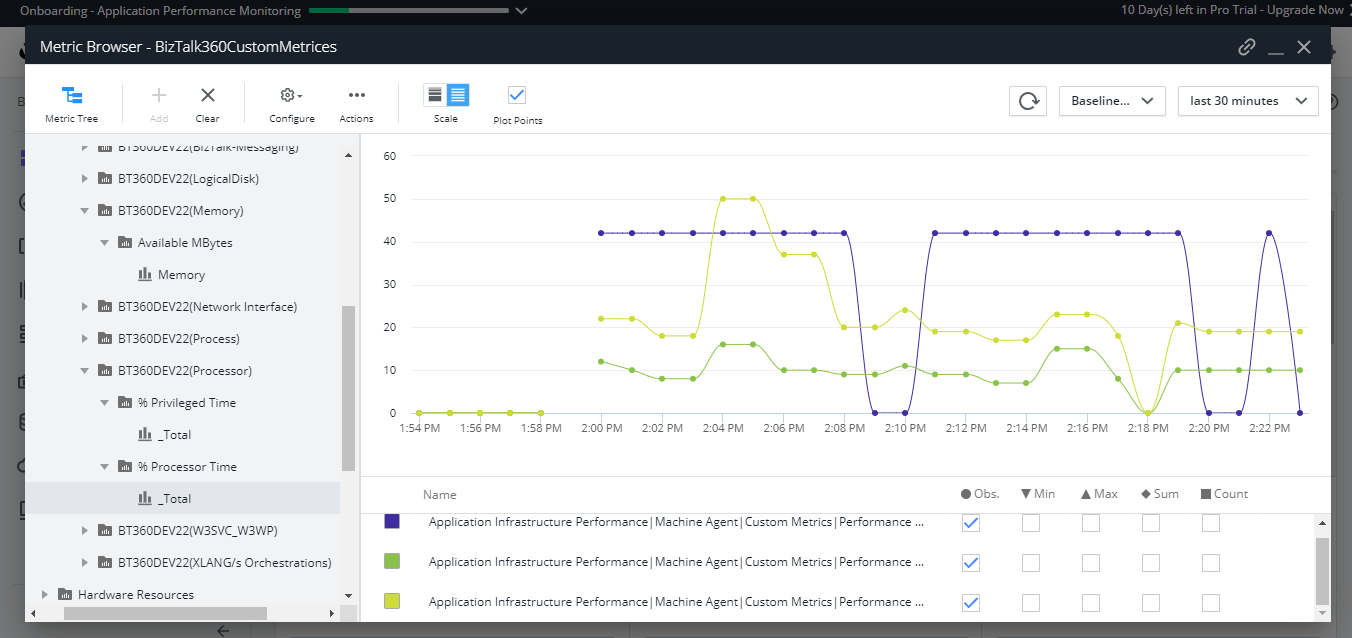
BizTalk360 collects the BizTalk Server Analytical data and the AppDynamics agent constantly picks up these data with the help of Windows performance counter data and sends it over to the controller. In AppDynamics, this data is available under the custom metric in the Metrics browser of each application.
Configuration of the AppDynamics Agent
For configuring the AppDynamics agent, you need to download and install the .NET Agent (32/64 bit) in the Application server (where the BizTalk360 Analytics Service is running) . Once the installation is successful, the .NET agent creates the coordinator service and configuration file which consists of the controller and application details.
The default location of the machine agent configuration file is located at:
For Windows Server 2008 or later: %ProgramData%AppDynamicsDotNetAgent
BizTalk360 collects all the BizTalk Server analytical data assigns it to Windows performance counters, and updates the performance counters in the AppDynamics config file as below .
The data will be collected by the .NET Agent coordinator service and passes it to the respective controller as custom metric mentioned in the agent configuration file.
To get the latest performance metrics/counters user need to restart BizTalk360 Analytics service, by doing this the new counters will be updated in AppDynamic config file. Agent then collects the newly introduced performance counter values and start updating in the respective application metric browser configured in AppDynamics.
Series of steps to be covered after configuring AppDynamics .NET Agent
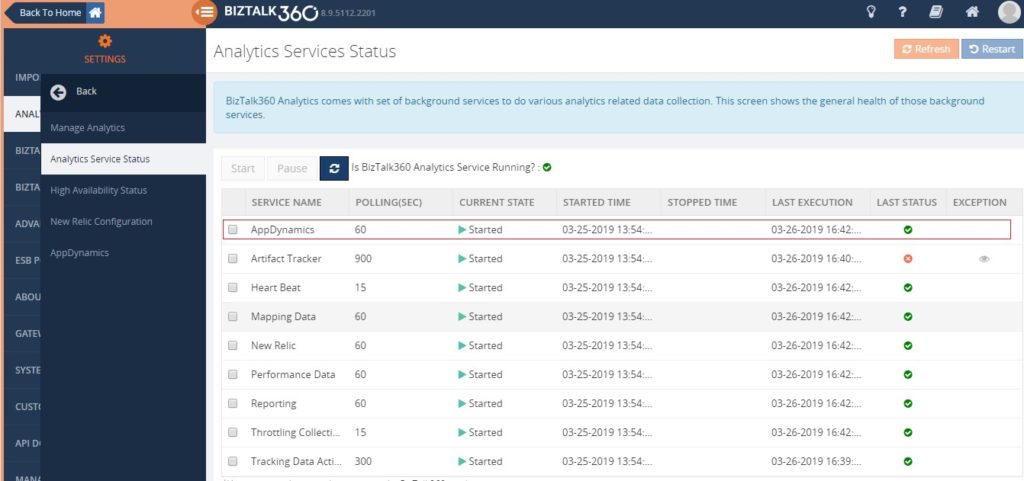
By default when you install/upgrade BizTalk360 AppDynamics sub service will be in the paused state. You need to manually start the service by navigating to BizTalk360 Settings->Analytics health ->Analytics Service Status->AppDynamics .
Ensure performance data collection is enabled in Manage Analytics of BizTalk360 setting side for collecting the analytics data.
Custom Metrics in AppDynamics
Once the AppDynamics agent coordinator service starts pushing data, all the metrics will be available under the metric browser of the respective application in AppDynamics.
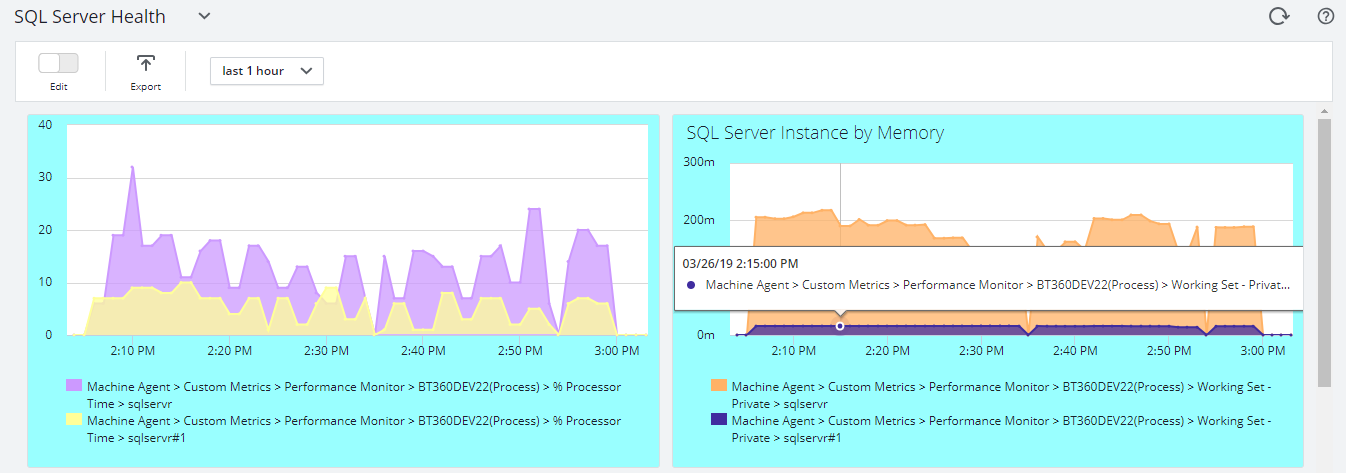
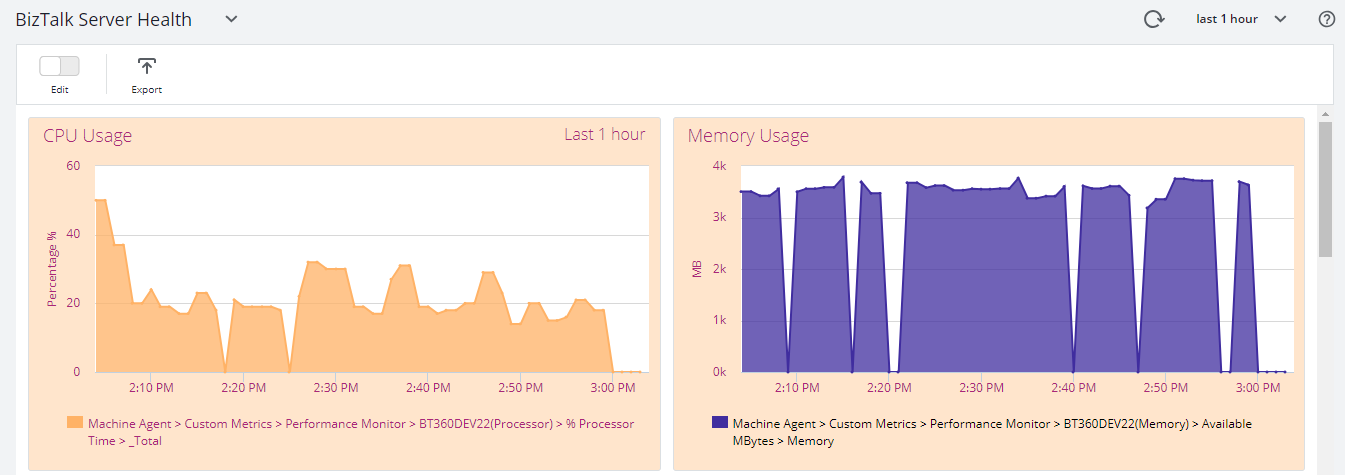
Once the data is populated, you can create dashboards which consist of different metrics data as shown below.
BizTalk Server High Availability
To maximize the uptime of the BizTalk Server solution it is important to monitor the availability of BizTalk Server environment. By enabling the performance counter in Analytics section, the BizTalk360 Analytics service will start to push data to AppDynamics with the help of the Agent coordinator. All the data are segregated based on server name and their corresponding metrics and counters.
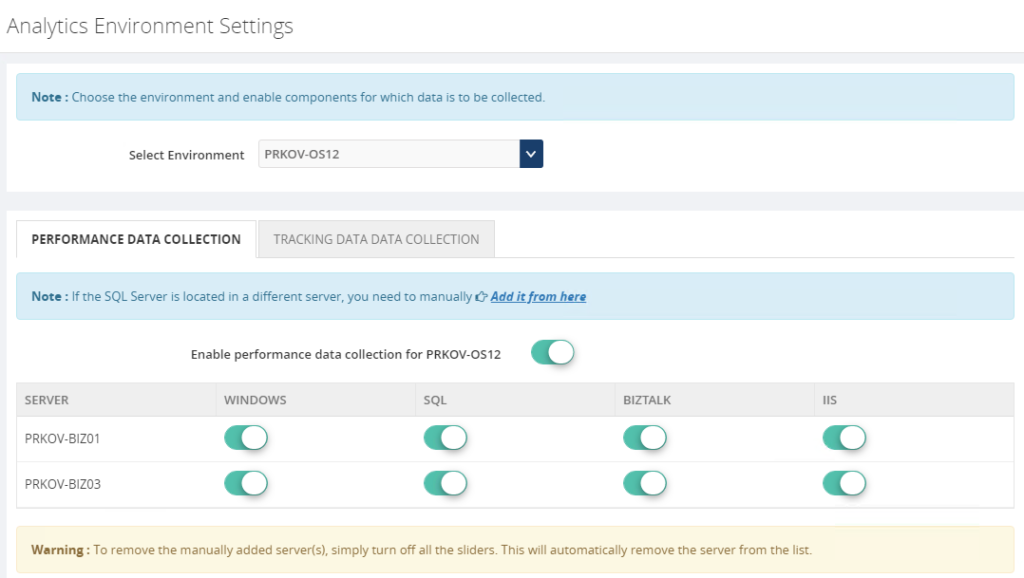
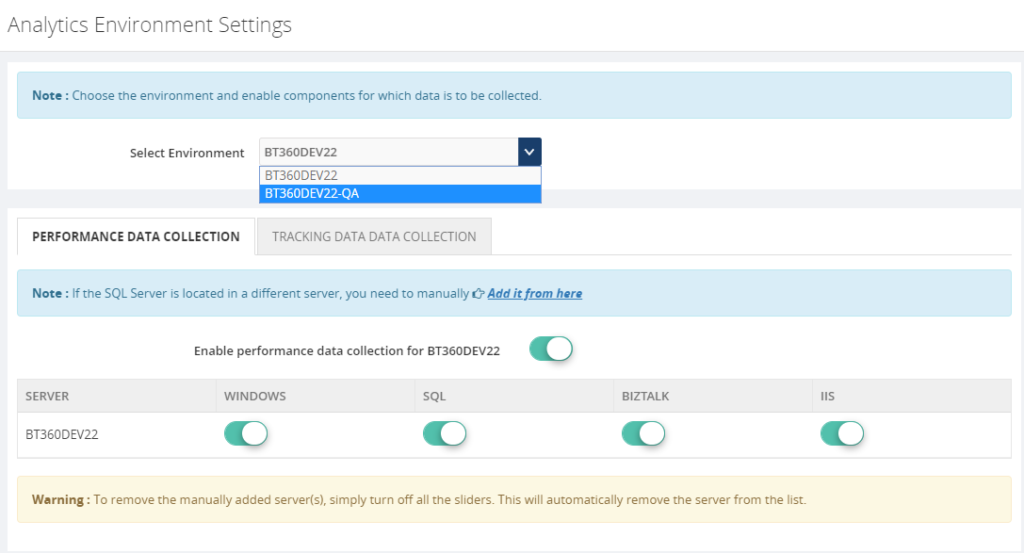
Multiple Environments
You can configure and manage multiple BizTalk environments in BizTalk360. For adding multiple BizTalk Environments please refer this link.
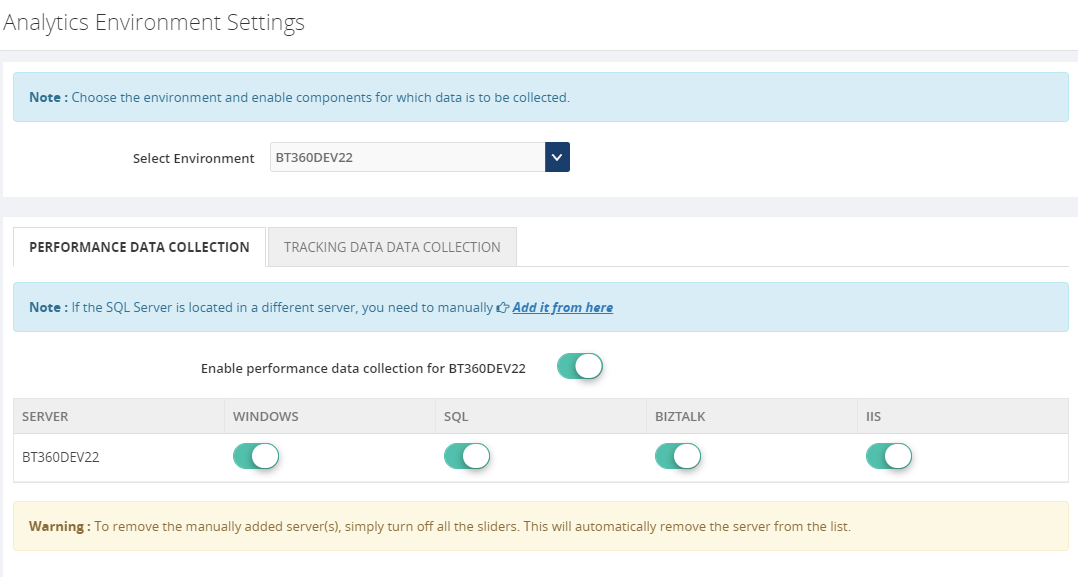
For collecting the performance value of configured environments just enable performance data collection for each server by selecting the respective server name from the dropdown as below .
Environment1
Environment2
Once the Analytical service starts collecting the performance data and pushing it to Agent coordinator , the same you can monitor in AppDynamics dashboard for both the environments.
BizTalk360 High Availability
BizTalk360’s monitoring services and user interface can be installed in more than one places which makes the BizTalk360 as Highly available. It’s predominant to monitor the BizTalk Server and maximize the up-time of BizTalk360. By default, the BizTalk360 high availability services will be available as active and passive on the installed servers and make sure the BizTalk360 is healthy(always up).
To make AppDynamics data collection as highly available you have to install the AppDynamics .NET Agent on the machines where BizTalk360 Analytics services are installed. So when ever the analytics service changes its availability (active/passive) it will collect the data and push to AppDynamics.
Conclusion
With its latest release v8.9.6, we will be bringing the capability to push the BizTalk Server analytical performance data to AppDynamics for optimizing and monitoring BizTalk Server. If you have any feedback or suggestion, please write to us at [email protected]. You can get started to use AppDynamics integration by downloading the 30-day free trial of BizTalk360.


 Wrap Up