
by Praveena Jayanarayanan | May 8, 2017 | BizTalk Community Blogs via Syndication
Here comes BizTalk360 version 8.4 with a bunch of exciting new features and enhancements as usual. As per the below quotes,
Customers often know more about your products than you do. Use them as a source of inspiration and ideas for product development. – David J. Greer
we always listen to the ideas of our customers and implement them for the product development. We make sure their suggestions are addressed and update them in the feedback portal. Based on the priority of the voting by the customers, the features are added to the product in the upcoming releases.
The Monitoring capability is the key feature of BizTalk360. Setting up monitoring is a very easy and quick task with two step process, create an alarm and map the artefact to be monitored. We can configure three different types of alarms namely Threshold, Health check and Data monitoring alarms.
In BizTalk360 v8.4, there are certain enhancements done as part of the alarms. The following are the features as part of the alarm configuration.
- Alarm renaming capability
- Segregation of Data monitoring alarms
- Alarm bulk status update.
In this article, we will have a look into each one of them.
Alarm renaming capability
Prior to v8.4, we cannot rename an alarm and it would be grayed when we edit an alarm. As per the feedback from many of the customers, we have included this ability in our latest release. So now you can rename the alarm as per the business requirement. This renaming applies to Data monitoring alarms also. Once the data monitor alarm is renamed, it will be reflected in the Data monitoring section as well.
With respect to the database changes, earlier, only the Alarm Name was referred in all the places and now AlarmId is being referred everywhere.
Limitation:
- You cannot have same names for two different alarms in the same environment. The alarms can have the same names across the environments.
Segregation of Data Monitoring alarms
In BizTalk360 v7.9 the Data Monitoring functionality was introduced. This also came as a requirement from the customers. It was designed to monitor the data transfer happening in the BizTalk server and trigger alerts based on the conditions set.
In the monitoring home dashboard screen, all the alarms are displayed in a drop down. There might be a chance of unintendingly mapping an artefact to the wrong data monitoring. This confusion can be avoided if the data monitoring alarms are separated from the other alarms. Hence the data monitoring alarms are now segregated and they will be available only in the Data Monitoring section. They will no more be available in the Monitoring home dashboard section and under the Manage Mapping drop-down.
Alarm bulk status update
Under Settings -> Stop alert for maintenance, BizTalk360 has the capability to stop all the alarms from triggering emails. This was as per the feedback from the customer for which we received many votes.
From a business perspective, customers can have created many alarms and a situation might arise that they want to disable certain alarms for maintenance purposes, instead of stopping all of them at once.
In this version of BizTalk360, we can select multiple alarms and enable/disable them at once by clicking on the “Status” button. This is a newly added option for alarm status update. It might look like a small improvement done, but it will be very helpful when doing large implementations and transitions.
What happens during the migration?
Migration scenarios occur when a customer upgrades from a lower version to the latest one. Lot of testing efforts is required to ensure that all the information is retained after migrating from a lower version to higher one. We need to take care that all the data gets migrated without any problem and there is no data loss happening from each of the versions. Also, new changes must get reflected. Extensive testing efforts need to be put to see that this is taken care of and we have assured this.
When the customers migrate from the old versions to the latest one, the ability to edit the alarm name will be shown. The following picture contains some of the migration scenarios that were tested.
One important thing to be noted is the listing of data monitoring alarms. In the older versions, we can see the data monitoring alarms getting listed along with the other types of alarms. Now in the new version, they will get displayed only in the data monitoring section. However, we can edit the names of those alarms in the Manage Alarms page.
Conclusion
Apart from the alarm configuration changes, we have a lot of new features like Logic Apps Data monitoring, IBM MQ monitoring and folder monitoring. We always hear the feedback and suggestions from the customers and try hard to fulfill them to make our product better and at the same time to achieve 100% customer satisfaction.
You can write to us at support@biztalk360.com. Have a try at our latest version by downloading a 14-day free trial of BizTalk360.
Author: Praveena Jayanarayanan
I am working as Senior Support Engineer at BizTalk360. I always believe in team work leading to success because “We all cannot do everything or solve every issue. ‘It’s impossible’. However, if we each simply do our part, make our own contribution, regardless of how small we may think it is…. together it adds up and great things get accomplished.” View all posts by Praveena Jayanarayanan
by Gautam | May 7, 2017 | BizTalk Community Blogs via Syndication
Do you feel difficult to keep up to date on all the frequent updates and announcements in the Microsoft Integration platform?
Integration weekly update can be your solution. It’s a weekly update on the topics related to Integration – enterprise integration, robust & scalable messaging capabilities and Citizen Integration capabilities empowered by Microsoft platform to deliver value to the business.
If you want to receive these updates weekly, then don’t forget to Subscribe!
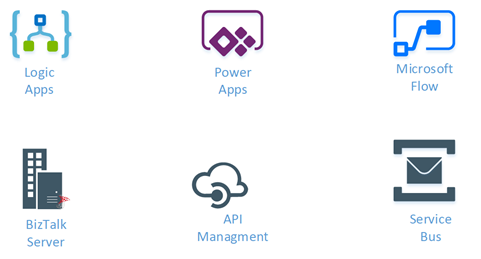
On-Premise Integration:
Cloud and Hybrid Integration:
Feedback
Hope this would be helpful. Please feel free to let me know your feedback on the Integration weekly series.
by Sandro Pereira | May 7, 2017 | BizTalk Community Blogs via Syndication
To close this sequence of posts about BizTalk Server 2016 Feature Pack 1: How to publish BizTalk operational data on Power BI – Step-by-step configuration, in this post we will see how we can connect Power BI BizTalkOperationalData dataset with our on-premise BizTalk environment.
Step-by-step Configuration to Enable BizTalk Server 2016 Operational Data Feed
Fourth step: Connect Power BI BizTalkOperationalData dataset with your on-premise BizTalk environment
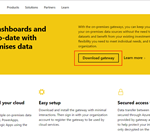
The final step is to install and configure a Power BI Gateway to connect your on-premise BizTalk Server environment.
With the On-premises data gateway, you can keep your data fresh by connecting to your on-premises data sources without the need to move the data. Because it installs and runs on your computer, it is best to install it on a machine that can be left running all the time.
Here are a few things to consider before installing the gateway.
- If you are installing on a laptop, and your laptop is turned off, not connected to the internet, or asleep the gateway won’t work and the data in the cloud service will not be synchronized with your on-premises data.
- If your machine is connected to a wireless network, the gateway may perform more slowly which will cause it to take longer to synchronize the data in the cloud service with your on-premises data.
(source: https://powerbi.microsoft.com/en-us/documentation/powerbi-gateway-onprem/)
To do that we need to:

- Run the downloaded .EXE file – PowerBIGatewayInstall.exe – from your hard drive.
- In the “Security Warning” screen, click “Run”

- In the “Start your on-premises data gateway installation” screen, click “Next”

- · In the “Choose the type of gateway you need” screen, select “On-premises date gateway (recommended)” and then click “Next”
- On-premises data gateway: Multiple users can share and reuse a gateway in this mode. This gateway can be used by Power BI, PowerApps, Flow or Logic Apps. For Power BI, this includes support for both schedule refresh and DirectQuery
- Personal: This is for Power BI only and can be used as an individual without any administrator configuration. This can only be used for on-demand refresh and schedule refresh. This will launch the installation of the personal gateway.

- In the “Reminder before you install” screen, click “Next”

- In the “Getting ready to install the on-premises data gateway” screen, review or change the installation path, select the option “I accept the terms of use and privacy statement” and then click “Install”

- If the install is successful, then the “Almost done” screen will appear. The next step is to sign into your Power BI account to finish the configuration of the gateway. Enter your email account and then click “Sign in”

- The next step is to specify that we want to register a new gateway on our environment.
- Select the option “Register a new gateway on this computer” and then click “Next”

- Finally, the last step is to configure the Gateway settings by defining a Gateway name and recovery key. To finalize the configuration, click “Configure”

When we click configure, the Gateway is confirmed and added to the PowerBI setup for our account.
The only thing the is missing to finalize the process is to add a data source to the gateway that we just created previously on https://app.powerbi.com portal. For that we need to:
- Login in https://app.powerbi.com portal
- Select the gear icon in the upper-right corner and then click “Manage gateways”.

- You can add a new data source by selecting a gateway and click “…” (3 dots) button and then click “Add data source”.

- In the “Data Source Setting” panel set the following configuration:
- Data Source Name: set a name for your data source, example: BizTalkOperationalDataSource
- Data Source Type: From the Data Source Type list, you must select “OData”.
- URL: set the URL that we defined on the “BizTalkOperationalData.pbit” template:
- http://localhost/BizTalkOperationalDataService
- Authentication Method: This can either be Windows or Basic. You would want to choose Basic if you are going to use SQL Authentication instead of Windows Authentication. Then enter the credentials that will be used for this data source.

Now let’s associate this gateway and data source with our BizTalkOperationalData dataset. To do that you need to:
- Select your Workspace, in my case “My workspace” and then select the tab “dataset”

- On our BizTalkOperationalData dataset, click “…” (3 dots) button and then select “Settings”

- On our BizTalkOperationalData dataset, expand the tab “gateway connection”. There you will be able to already see a gateway available under “Use a data gateway”.
- Select the option “Use a data gateway” and click “Apply”.

And now you will be able to successfully refresh manual your dataset or specify a scheduling refresh mechanism.

Related Links
Author: Sandro Pereira
Sandro Pereira lives in Portugal and works as a consultant at DevScope. In the past years, he has been working on implementing Integration scenarios both on-premises and cloud for various clients, each with different scenarios from a technical point of view, size, and criticality, using Microsoft Azure, Microsoft BizTalk Server and different technologies like AS2, EDI, RosettaNet, SAP, TIBCO etc. He is a regular blogger, international speaker, and technical reviewer of several BizTalk books all focused on Integration. He is also the author of the book “BizTalk Mapping Patterns & Best Practices”. He has been awarded MVP since 2011 for his contributions to the integration community. View all posts by Sandro Pereira
by michaelstephensonuk | May 5, 2017 | BizTalk Community Blogs via Syndication
Recently I had a requirement to extend one of our BizTalk solutions, this solution was around user synchronisation. We have 2 interfaces for user synchronisation, one supporting applications which require a batch interface and one which supports messaging. In this case the requirement was to send a daily batch file of all users to a partner so they could setup access control for our users to their system. This is quite a common scenario when you use a vendors application which doesn’t support federation.
In this instance I was initially under the impression that we would need to send the batch as a file over SFTP but once I engaged with the vendor I found we needed to upload the file to a bucket on AWS S3. This then gave me a few choices.
- Logic Apps Bridge
- Use 3rd Party Adapter
- Look ad doing HTTP with WCF Web Http Adapter
- Azure Function Bridge
Knowing that there is no out of the box BizTalk adapter, my first thought was to use a Logic App and an AWS connector. This would allow the logic app to sit between BizTalk and the S3 bucket and to use the connector to save the file. To my surprise at time of writing there aren’t really any connectors for most of the AWS services. That’s a shame as with the per-use cost model for Logic Apps this would have been a perfect better together use case.
My 2nd option was to consider a 3rd party BizTalk adapter or a community one. I know there are a few different choices out there but in this particular project we only had a few days to implement the solution from when we first got it. Its supposed to be a quick win but unfortunately in IT today the biggest blocker I find on any project is IT procurement. You can be as agile as you like, but the minute you need to buy something new things grind to a halt. I expected buying an adapter would take weeks for our organisation (being optimistic) and then there is the money we will spend discussing and managing the procurement, then there would be the deployment across all environments etc. S3 is not a strategic thing for us, it’s a one off for this interface so we ruled out this option.
My 3rd considered option was remembering Kent Weare’s old blog post http://kentweare.blogspot.co.uk/2013/12/biztalk-2013integration-with-amazon-s3.html where he looked at using the Web Http adapter to send messages over HTTP to the S3 bucket. While this works really well there is quite a bit of plumbing work you need to do to deal with the security side of the S3 integration. Looking at Kents article I would need to write a pipeline component which would configure a number of context properties to set the right headers and stuff. If we were going to be sending much bigger files and making a heavier bet on S3 I would probably have used this approach but we are going to be sending 1 small file per day so I don’t fancy spending all day writing and testing a custom pipeline component, id like something simpler.
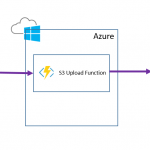
Remembering my BizTalk + Functions article from the other day I thought about using an Azure Function which would receive the message over HTTP and then internally it would use the AWS SDK to save the message to S3. I would then call this from BizTalk using only out of the box functionality. This makes the BizTalk to function interaction very simple. The AWS save also becomes very simple too because the SDK takes care of all of the hard work.
The below diagram shows what this looks like:
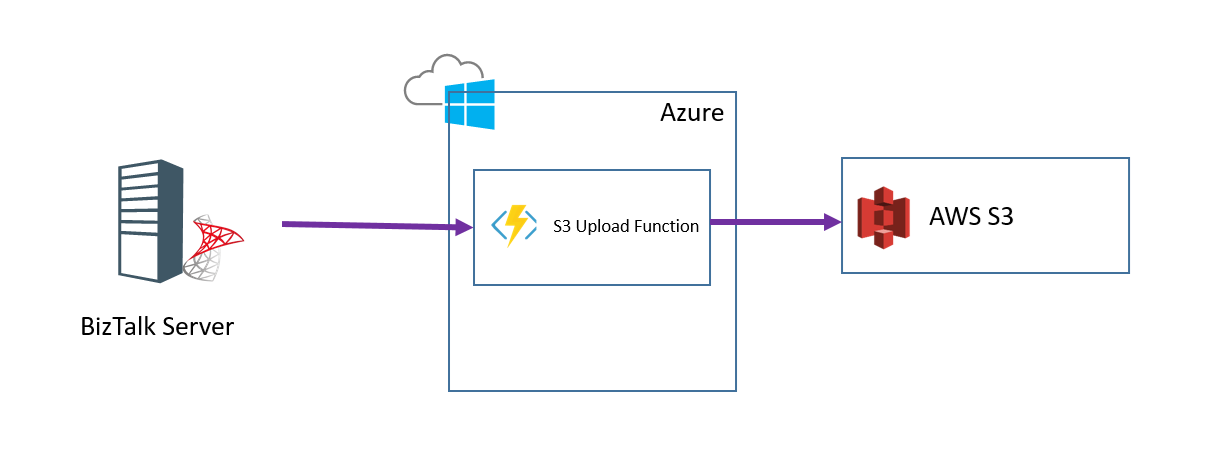
To implement this solution I took the following steps:
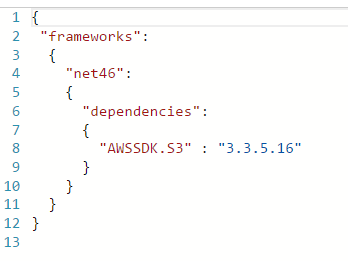
Step 1
I created an Azure Function and added a file called project.json file in the Azure function I modified the json to import the AWS SDK like in the below picture:
Step 2
In the function I imported the Amazon namespaces
Step 3
In the function I added the below code to read the HTTP request and to save it to S3
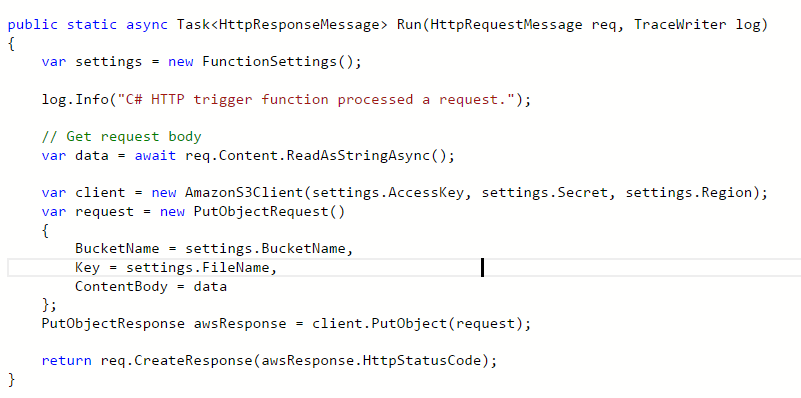
Note that I have a helper class called FunctionSettings which contains some settings like the key and bucket name etc. I am not showing these on the post but you can use the various options for managing config with a function depending upon your preference.
At this point I could now test my function and ensuring my settings are correct it should create a file in S3 when you use the test function option in the Azure Portal.
Step 4
In BizTalk I now added a one way Web Http send port using the address for my function
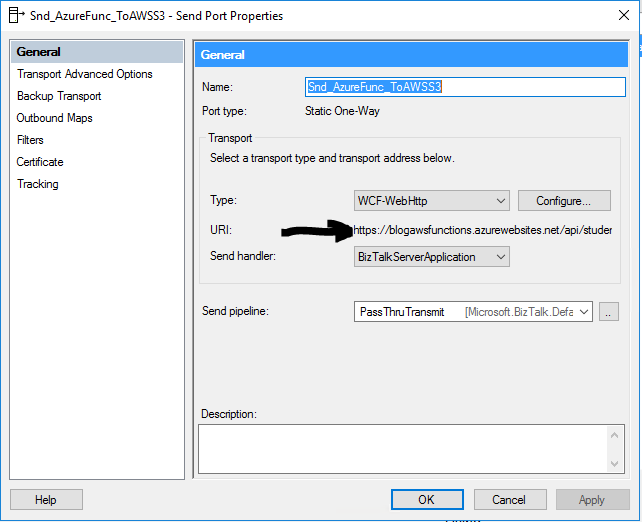
The function address url I can get from the Azure Portal and provides the location to execute my function over HTTP. In the adapter properties I have specified to use the POST http method.
In the message tab for the adapter I have chosen to use the x-functions-key header and have set a key which I generated in the Azure Portal so BizTalk has a dedicated key for calling the function.
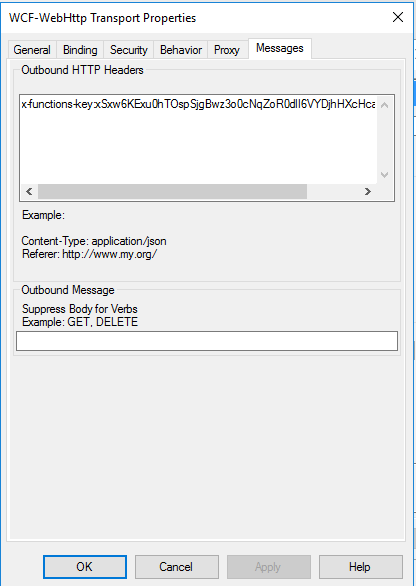
Note you may also need to modify some of the WCF time out and message size parameters.
Step 5
Next I can configure my send port to use the flat file assembler and a map so my canonical message of users is transformed to the appropriate csv flat file format for the B2B partner. At runtime the canonical message is sent to the send port and converted to csv. The csv message is then sent over http to the function and the function will save it to the S3 bucket.
Conclusion
In this particular case I had a simple quick win interface which we wanted to develop but unfortunately one of the requirements we couldn’t handle out of the box with the adapter set we had (S3). Because the business value of the interface wasn’t that high and we wanted this done quickly and cheaply this was a great opportunity to take advantage of the ability to extend BizTalk by calling an Azure Function. In this particular solution I was able to develop the entire solution in a couple of hours and get this into our test environments. The Azure Function was the perfect way to allow us to just get it done and get it shipped so we can focus on more important things.
While some of the other options may have been a prettier architecture or buy rather than build the beauty of the function was that its barely 10 lines of code and its easy to move to one of the other options later if we need to invest more in integration with S3.
by Sandro Pereira | May 5, 2017 | BizTalk Community Blogs via Syndication
Following the sequence of my last post: BizTalk Server 2016 Feature Pack 1: How to publish BizTalk operational data on Power BI – Step-by-step configuration (Part 1), here we will see how we can enable BizTalk operational data feed and how we can use the BizTalk Server Operational Data Power BI template provided by Microsoft to easily publish the report to Power BI.
Step-by-step Configuration to Enable BizTalk Server 2016 Operational Data Feed
Second step: Enable BizTalk operational data feed
To enable BizTalk Server 2016 operational data feed, you should:
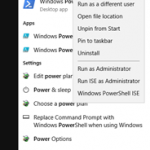
- Run Windows PowerShell as Administrator by:
- Press the “Windows key” to open the Start menu and type “PowerShell”
- Right click on “Windows PowerShell” option and select “Run as administrator”.

- Browse to the BizTalk Server 2016 is installation folder, normally:
- C:Program Files (x86)Microsoft BizTalk Server 2016
- And run the following command. Be sure to update your website, domainuser, password, and domaingroup with your values:
- Service: The service to be configured: “Management” or “OperationalData”.
- WebSiteName: The existing Web Site where the service will be configured. The default value is “Default Web Site”
- ApplicationPool: The Application Pool to be used by the service. If exists, will not be created. The default value is “DefaultAppPool”
- ApplicationPoolUser: Configures the application pool to run as this user identity. Must have BizTalk Server Operator or higher privileges.
- ApplicationPoolUserPassword: Password for the ApplicationPoolUser
- AuthorizationAccount: List of authorized Groups or Users to use this service
FeaturePack.ConfigureServices.ps1 -Service operationaldata -WebSiteName ‘<Default Web Site>’ -ApplicationPool <operationalDataServiceAppPool> -ApplicationPoolUser <domain><user> -ApplicationPoolUserPassword <password> -AuthorizationRoles ‘<domain><group>, <domain><user>’
If everything go well, after you run the script, if you browse the new IIS Application by:
- Open your web browser
- Go to http://localhost/BizTalkOperationalDataService
You will see a JSON file – BizTalkOperationDataService.json – being download.

Third step: Use the BizTalk Server Operational Data Power BI template to publish the report to Power BI
To access the Power BI Template file, and use the provided visualization from Microsoft, use the following steps:
- Browse to “OperationalDataService” folder under the BizTalk Server 2016 is installation folder, normally:
- C:Program Files (x86)Microsoft BizTalk Server 2016OperationalDataService

- And double click to open the “BizTalkOperationalData.pbit” file.
- When prompted from Power BI Desktop, paste the http://<BizTalkServer>/BizTalkOperationalDataService URL that you created for your OData feed.
- Normally: http://localhost/BizTalkOperationalDataService

- And then click “Load” to populate the fields in your Power BI report.

The Template file automatically generates the information and tables available from the OData feed.

The operational data is exposed through the computer and can be accessed and executed by other applications based on permissions.
Publishing your reports to the Power BI service is fast and easy. Once the data have been load you need to:
- Save the file by selecting the menu “File” and click “Save”
- And then select the “Publish” button on the Home tab in Power BI Desktop, and the process begins.

- The first step, of course, is to provide your Power BI account

- After you authenticate on Power BI, a list of destinations that you have access will be presented so you can select the destination to where you want to publish BizTalk Operational Data report.
- Select your destination, in my case, “My workspace”
- and then click “Select”

- The then the publishing process will start

- Once the upload is complete, a dialog box tells you the publishing process succeeded and a link is provided in that dialog to take you directly to your report in the Power BI service, in a web browser.

- If you access to PowerBI.com you will see that you will have BizTalk Operational Data (BizTalk Operational Data report) report available.

And if you click on it, you will be able to see the data that was load and publish by the Power BI desktop.

But the most important question is: Are this data being updated?
And the answer is: No. For that, you will need additional steps.
Related Links
Author: Sandro Pereira
Sandro Pereira lives in Portugal and works as a consultant at DevScope. In the past years, he has been working on implementing Integration scenarios both on-premises and cloud for various clients, each with different scenarios from a technical point of view, size, and criticality, using Microsoft Azure, Microsoft BizTalk Server and different technologies like AS2, EDI, RosettaNet, SAP, TIBCO etc. He is a regular blogger, international speaker, and technical reviewer of several BizTalk books all focused on Integration. He is also the author of the book “BizTalk Mapping Patterns & Best Practices”. He has been awarded MVP since 2011 for his contributions to the integration community. View all posts by Sandro Pereira

by Eldert Grootenboer | May 5, 2017 | BizTalk Community Blogs via Syndication
Just under two weeks away, TUGA IT will be held once again in beautiful Lisbon. TUGA IT is three days full of sessions, workshops, meeting the experts, and having a great time. After having visited last year as a participant, I am honored to have been selected as one of the speakers this year.

On saturday I will be giving a session where we will be going into industrial IoT on Azure. The industrial space is where we will be seeing a huge growth in IoT, and I will be showing how we can use Azure IoT Hub to manage our devices and do bi-directional communication. I will also be showing how we can use Dynamics 365 to give a familiar and easy to use interface to work with these devices and visualize the data. And of course, Azure’s stack will be used to extend on the solution.
Integration is everywhere, and TUGA IT is no exception. We will have a full integration track on saturday where I will be joined by fellow integrators and good friends, Steef-Jan, Sandro, Nino, Tomasso and Ricardo to give a day full of integration sessions.

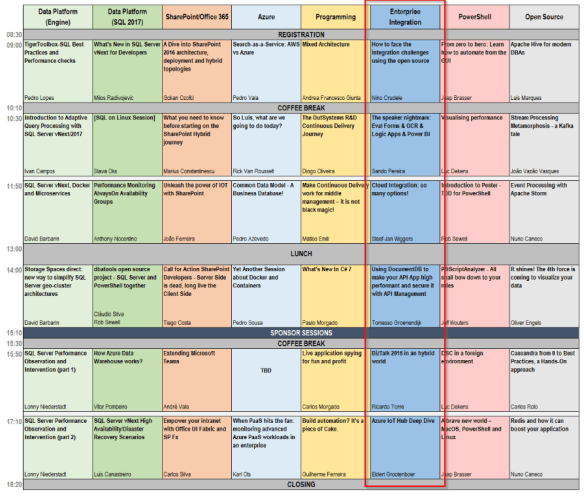
Schedule overview Saturday including Integration track
But there is more than just integration going on. On thursday there are several workshops, where you can learn about various Microsoft products and get hands-on experience. On friday there are also multiple tracks with sessions on many topics like Azure, .NET and more.

Schedule overview Thursday

Schedule overview Friday
As you can see, there is something for everyone at TUGA IT, whether you want to do workshops, attend sessions, or just want to meet with MVP’s and experts from various countries. Be sure to be there as well, registrations are open, and they only ask a small fee for lunch.

by Eldert Grootenboer | May 5, 2017 | BizTalk Community Blogs via Syndication
Just under two weeks away, TUGA IT will be held once again in beautiful Lisbon. TUGA IT is three days full of sessions, workshops, meeting the experts, and having a great time. After having visited last year as a participant, I am honored to have been selected as one of the speakers this year.

On saturday I will be giving a session where we will be going into industrial IoT on Azure. The industrial space is where we will be seeing a huge growth in IoT, and I will be showing how we can use Azure IoT Hub to manage our devices and do bi-directional communication. I will also be showing how we can use Dynamics 365 to give a familiar and easy to use interface to work with these devices and visualize the data. And of course, Azure’s stack will be used to extend on the solution.

Integration is everywhere, and TUGA IT is no exception. We will have a full integration track on saturday where I will be joined by fellow integrators and good friends, Steef-Jan, Sandro, Nino, Tomasso and Ricardo to give a day full of integration sessions.
Schedule overview Saturday including Integration track
But there is more than just integration going on. On thursday there are several workshops, where you can learn about various Microsoft products and get hands-on experience. On friday there are also multiple tracks with sessions on many topics like Azure, .NET and more.

Schedule overview Thursday

Schedule overview Friday
As you can see, there is something for everyone at TUGA IT, whether you want to do workshops, attend sessions, or just want to meet with MVP’s and experts from various countries. Be sure to be there as well, registrations are open, and they only ask a small fee for lunch.

by Sandro Pereira | May 5, 2017 | BizTalk Community Blogs via Syndication
I have been writing a blog post series in BizTalk360 Blog called “Thinking outside the box (or not)” and I will continue to do that in the future. In the meanwhile, I thought of creating another blog post series about one of my favorites topics: “BizTalk Server Tips and Tricks” where I will address some common, and (I hope!) useful BizTalk Server Tips and Tricks (and Workarounds) for developers, administrators or business users. In this blog, let’s get started with “How can we enable BAM Add-In for Excel 2016?”
Add-ins provide optional commands and features for Microsoft Excel. In this case, the BAM Add-In for Excel 2016 provides the tools that you need to create a BAM observation model. In other words, it will allow you to define what data to collect from business processes and to define the way in which business users will view the collected data. A BAM observation model consists of:
- BAM activities: a BAM activity defines milestones and data of interest.
- BAM views: a BAM view defines the dimensions and measures based on the data of interest and milestones that present information to a particular audience.
By default, add-ins are not immediately available in Excel, so you must first install and (in some cases) activate/enable these add-ins to be able to use them.
Assuming that you already have BAM and Excel installed, for enabling the BizTalk Server 2016 BAM Add-In for Excel 2016, we need to:
- Open Excel 2016, click the “Customize Quick Access Toolbar” button present in the Quick Access Toolbar and then click the “More Commands…” option near the bottom of the drop-down menu.
- Alternatively, you can also click the “File” tab and then click “Options”.
- This will open the Excel options dialog box and from there you can select the Add-Ins category. From the Add-ins list, you should select “Business Activity Monitoring”
- Note: Do not yet exit the “Excel Options” box by clicking “OK”
- After selecting “Business Activity Monitoring”, in the bottom of the window in the “Manage: Excel Add-Ins” section, click “Go…”.
- This will bring up an “Add-Ins” dialog box where you need to check the “Business Activity Monitoring” Add-In option.
Having done this, the BAM Add-In will now be accessible through the “Add-ins” tab and you can edit your BAM Activities and Views.
Stay tuned for new tips and tricks!
Author: Sandro Pereira
Sandro Pereira is an Azure MVP and works as an Integration consultant at DevScope. In the past years, he has been working on implementing Integration scenarios both on-premises and cloud for various clients, each with different scenarios from a technical point of view, size, and criticality, using Microsoft Azure, Microsoft BizTalk Server and different technologies like AS2, EDI, RosettaNet, SAP, TIBCO etc. View all posts by Sandro Pereira


