by community-syndication | Jan 5, 2013 | BizTalk Community Blogs via Syndication
I was configuring a new Development environment that consisted of a BizTalk Application Server and a Remote SQL Server. The BizTalk Installation went smoothly but the Configuration did not. I tend to configure SSO service on its own as it can be problematic. There is no point in configuring the remaining databases until a person knows that the SSO database is created successfully. Otherwise, there will be a lot of wasted key strokes.
In this particular case I was able to configure the SSODB but as soon as I would try to configure the Group and Runtime, the System.EnterpriseServices.Transaction Proxy exception started to surface.
If you perform a Google/Bing search for ‘System.EnterpriseServices.TransactionProxyException’ you will probably get quite a few results. Most of the results will point you in the direction of a MSDTC not being enabled or configured correctly.
In my case MSDTC was configured correctly based upon Microsoft’s recommendations. I was a little puzzled at this point but in some of the support forums people were discussing the DTC Tester tool. Having been through a lot of frustration and a few failed attempts at trying to configure the Group and Runtime features I figured I would give it a try. I am glad I did.
The purpose of DTC Tester is to enlist a remote transaction against the Temp Database which is hosted in SQL Server. If you are able to successfully enlist and commit this transaction then there is a very high probability that your BizTalk configuration (as it relates to MSDTC) will be successful.
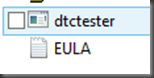
The tool is available here. Download it and run the self extracting executable. At this point we will discover a ’dtctester’ executable and an End User License Agreement.
The dtctester executable needs to be run from a command prompt but requires an ODBC connection is configured before we can run the tool. The ODBC connection should be pointed at the Database Instance where we want our BizTalk Databases to be created.
ODBC connections can be created via the Control Panel and a System DSN will work.

From a command prompt we can now run the tool. When I ran it for the first time I encountered errors (highlighted in red)
C:\Downloads>dtctester <ODBCConnectionName> <UserName> <Password>
Executed: dtctester
DSN: <ODBCConnectionName>
User Name: <UserName>
Password: <Password>
tablename= #dtc7063
Creating Temp Table for Testing: #dtc7063
Warning: No Columns in Result Set From Executing: ‘create table #dtc7063 (ival int)’
Initializing DTC
Beginning DTC Transaction
Enlisting Connection in Transaction
Error:
SQLSTATE=25S12,Native error=-2147168242,msg='[Microsoft][ODBC SQL Server Driver]
Distributed transaction error’
Error:
SQLSTATE=24000,Native error=0,msg=[Microsoft][ODBC SQL Server Driver]Invalid cur
sor state
Typical Errors in DTC Output When
a. Firewall Has Ports Closed
-OR-
b. Bad WINS/DNS entries
-OR-
c. Misconfigured network
-OR-
d. Misconfigured SQL Server machine that has multiple netcards.
Aborting DTC Transaction
Releasing DTC Interface Pointers
Successfully Released pTransaction Pointer.
In my situation the issue ended up being the Windows Firewall on the BizTalk Server was not allowing Outbound DTC connections which was blocking MSDTC from participating in Transactions with SQL Server. You can modify the MSDTC Firewall rules in the Control Panel.
After allowing MSDTC to communicate through the firewall I re-ran the dtctester tool and had success.
C:\Downloads>dtctester <ODBCConnectionName> <UserName> <Password>
Executed: dtctester
DSN: <ODBCConnectionName>
User Name: <UserName>
Password: <Password>
tablename= #dtc9418
Creating Temp Table for Testing: #dtc9418
Warning: No Columns in Result Set From Executing: ‘create table #dtc9418 (ival int)’
Initializing DTC
Beginning DTC Transaction
Enlisting Connection in Transaction
Executing SQL Statement in DTC Transaction
Inserting into Temp…insert into #dtc9418 values (1)
Warning: No Columns in Result Set From Executing: ‘insert into #dtc9418 values (
1) ‘
Verifying Insert into Temp…select * from #dtc9418 (should be 1): 1
Press enter to commit transaction.
Commiting DTC Transaction
Releasing DTC Interface Pointers
Successfully Released pTransaction Pointer.
Disconnecting from Database and Cleaning up Handles
After completing this successful test with the dtctester tool I could successfully configure my BizTalk Group and Runtime.

by community-syndication | Jan 4, 2013 | BizTalk Community Blogs via Syndication
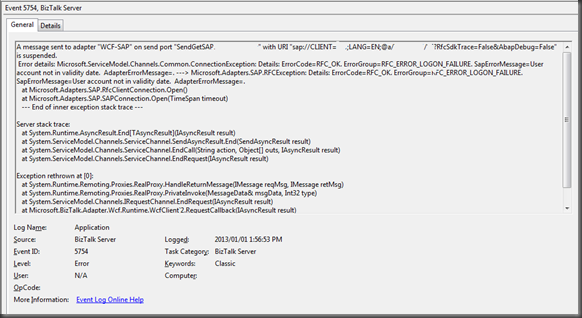
Recently, I have been working with a new organization and have been been building some interfaces that communicate with SAP. Over the Christmas break I continued to work on some of these interfaces. On December 31 my interfaces were working just fine. But, on January 1st, I made a few changes and then ran my BizUnit regression tests just to make sure everything was ok. To my surprise, my tests were failing and the issue was related to the following error.
It just seemed like too much of a co-incidence that the errors started occurring on the first day of the new year. My gut told me that my account must have expired. At my previous organization the SAP-BizTalk system accounts never expired but they do at this one(which is probably not a bad thing). The resolution in this case was for the SAP Basis team to update the validity date for the account. Once this attribute was updated I could re-connect to SAP through my interfaces. I have no idea why the SAP error message doesn’t just say “your account has expired”.
by community-syndication | Jan 4, 2013 | BizTalk Community Blogs via Syndication
The year 2013 will start with two events where I will be speaking. First, on January 16nd I’ll be in London during the BizTalk Summit 2013 hosted by Microsoft UK in their headquarters. It is organized by fellow Microsoft Integration MVP Saravana Kumar (BizTalk360) and Microsoft UK. Saravana and I will be joined on stage by Microsoft Integration MVP’s Tord Nordahl, Sandro Pereira and Nino Crudele. My session will be on the new adapters in BizTalk Server 2013. In this session I will focus on adapters that can be used for integration with cloud services and applications. These adapters are the WCF-BasicHttpRelay, WCF-NetTcpRelay, SB-Messaging and WCF-HttpWeb. In this session there will be 5 demo’s on to how to use these adapters.
Next on the 22nd of January I will be at an event hosted by middleware service provider ESTREME. There will be joined on stage by fellow Microsoft Integration MVP Saravana Kumar, Richard Seroter, who’s touring the Netherlands and Sweden, and Derk Shutte. I will be presenting on BizTalk Best Practices. It will be interesting to talk about best practices from an operational and development view. During my talk I hope on some good discussion with the audience around the best practices for BizTalk.
Both events will be great fun and I like to thank Tim Jonker, Bert van Ark, and Mark van der Harst from ESTREME for organizing the event, Mikael Hakansson getting Richard to Europe and Saravana for organizing the event in London!

by community-syndication | Jan 4, 2013 | BizTalk Community Blogs via Syndication
In a couple weeks, I’m off to Amsterdam and Gothenburg to speak at a pair of events. First, on January 22nd I’ll be in Amsterdam at an event hosted by middleware service provider ESTREME. There will be a handful of speakers, and I’ll be presenting on the Patterns of Cloud Integration. It should be a […]
Blog Post by: Richard Seroter
by community-syndication | Jan 4, 2013 | BizTalk Community Blogs via Syndication
When introducting optional records in a Flat File Schema, it’s important to think about the Parser Optimization property. In this blog post you find out how easy it is to allow records to be optional, but how easy you can forget the Parser Optimization property…
by community-syndication | Jan 4, 2013 | BizTalk Community Blogs via Syndication
So all People out there, I’m up to Windows 8 and I love it. I’ve heard a lot of bad experiences but I find it cool to not have the start button, and my daughter can use the computer even easier now. Anyways, I use this computer for work, so I had to install all […]
Blog Post by: Tord Glad Nordahl

by community-syndication | Jan 3, 2013 | BizTalk Community Blogs via Syndication
2012 was an excellent professional and personal year for me, thankfully with lots of work but also extremely funny. I had the chance to meet and become good friend with a few outstanding BizTalk community members and MVP’s, some I had the opportunity to meet during MVP Summit, like Nino Crudele, others I met during […]
Blog Post by: Sandro Pereira

by community-syndication | Jan 3, 2013 | BizTalk Community Blogs via Syndication
In next couple of weeks I like to do a series of blog posts on the new adapters provided in the upcoming release of BizTalk Server 2013. In this post I like to demonstrate the WCF-BasicHttpRelay adapter.
The WCF-BasicHttpRelay adapter can be used with BizTalk to send and receive messages from the Service Bus relay endpoints using the BasicHttpRelayBinding. This is a binding that BizTalk can use to configure endpoints which can communicate with ASMX-based Web services and other services that conform to the WS-I Basic Profile 1.1. The BasicHttpRelayBinding is derived from the standard BasicHttpBinding. However, the key difference between the two is that the BasicHttpRelayBinding can create publicly reachable and, if required, publicly discoverable HTTP listener endpoint listening on the Windows Azure Service Bus, while the BasicHttpBinding listens through the standard HTTP.sys listener on the local Windows computer.
The following scenario will describe a way to send messages to a Service Bus relay endpoint configured through WCF-BasicHttpRelay adapter in BizTalk Server 2013. A message from a client application will be send through the relay in the Windows Azure Service Bus to BizTalk Server. Below you will find a diagram that shows the flow of a message from a client (a feedback application) that will send a message to endpoint registered in Windows Azure Service Bus, which will be relayed through to BizTalk.
BizTalk Server has an endpoint registered in the Windows Azure Service Bus through a receive location that is configured with the WCF-BasicHttpRelay adapter. A receive location in BizTalk Server 2013 can be configured with the WCF-BasicHttpRelay Adapter using the “http” or “https” URI scheme. The URI will be used to register the endpoint on the Windows Azure Service Bus. The URI can be specified in the general tab of the WCF-BasicHttpRelay Transport properties.
 WCF-BasicHttpRelay Transport properties General Tab.
With the Binding tab you can configure the time-out and encoding-related properties. Depending on your requirements you can specify different values than the default. For this scenario the default values are used.

WCF-BasicHttpRelay Transport properties Binding Tab.
The created channel is SSL-protected if the endpoint URI scheme is “https” and configured through the security tab of WCF-BasicHttpRelay Transport properties.
 WCF-BasicHttpRelay Transport properties Security Tab.
When setting the Security mode to Transport or TransportWithMessageCredential the scheme will be “https”. Setting it to none the scheme will be “http”. By checking the “Enable service discovery” checkbox you can specify whether the behavior of the service is published in the Service Registry. By checking this checkbox the Display name text box and Discovery mode combo box will be enabled. In the text box you can specify the name with which the service is published to the Service Registry. The Discovery mode can be private or public. Public means publishing in the Service Registry, while private means this will not happen.
Finally with the Access control service you can specify the credentials to be used for authorization with the Service Bus in Access control service case you have specified that the Relay Client authentication type is RelayAccessToken. If that is the case then you will have to specify through Access control service (Edit button) the Issuer name and key.

The Access control Service Dialog Box.
The final tab called Messages enables you to specify the data selection for the SOAP Body element.

WCF-BasicHttpRelay Transport properties Messages Tab.
In this scenario all settings are left default.
Enabling the receive location will result in registration of receive location as an endpoint on Windows Azure Service Bus. This will be visible in Windows Azure Portal under the Service Bus your namespace and then relays.

With the relay present in the Service Bus you can send messages to it. Communication with the endpoint in this scenario will be one-way. Therefore message exchange will be fire-and forget. In case the Relay client authentication type is set to none when configuring the adapter your endpoint is accessible for everyone that has knowledge of the endpoint address. With a simple HTTP post I can send an XML message to the endpoint.

The message ends up in BizTalk being published to the MessageBox through Receive Port having a receive location configured with WCF-BasicHttpRelay adapter. A send port will have subscription of the message, which was received through the receive port and will send the message to a file location on the BizTalk machine.

In case the Relay client authentication type is set to RelayAccessToken when configuring the adapter your endpoint is only accessible for those that have the key and have knowledge of the endpoint address.

This scenario shows how with relative ease you can configure a receive port to register an endpoint in Windows Azure Service Bus. This enables you to receive messages into BizTalk to for instance start a process or collect data. In case you register an endpoint in the Windows Azure Service Bus like this then there is an easy way to test it. You can download the Service Bus Explorer by Paolo Salvatori. This great tool enables you to connect to the service bus, browse within you namespace your queues, topics and relays (see my post on Visual Studio Service Bus Explorer versus Standalone Service Bus Explorer). It provides capabilities to test communication with the Windows Azure Service Bus. If I go to the endpoint I created and select the URI I can send a test message to it.

The message will be send to BizTalk through relay in the Windows Azure Service Bus and finally end up in a folder on the BizTalk machine.

To test your endpoint configured through WCF-BasicHttpRelay can easily be tested using the Service Bus Explorer. This will save you time in writing a test client. This was the first of the series on the new adapters that will be available with the upcoming releases of BizTalk Server 2013.
The scenario above was created on a BizTalk Server 2013 Beta Virtual Machine I created on-premise with Windows Server 2008 R2, Visual Studio 2012 and SQL Server 2012. You can download the client I created for sending messages to relay through code gallery. In the series I will discuss the WCF-NetTCPRelay in the next post followed by posts on the SB-Messaging, WCF-WebHTTP and SFTP Adapter.
Cheers, Steef-Jan
by community-syndication | Jan 3, 2013 | BizTalk Community Blogs via Syndication
If you don’t want to use a lot of money on service virtualization tools you can create a simple autogenerated WCF facade service that does a little bit of the things the big service virtualization tools does.
This gives you the option to hide service between one common service. The services behind this service could be a service from your backend system, a service from your CRM system and it might even be some external services.
You could do it manually, but then you would have to update it each time one of the backend services changes and with the human factor as an error source. Visual Studio gives you the option to use text templates which can be used to generate code.
Start by creating a WCF Service Application in Visual Studio and add a text template to this project, which will give you a *.tt file. This is the file that you will edit to create the autogenerated code. You might want to read a bit about it at MSDN before reading on. Here is the link.
Working with tt files is like going back in time. Back to the time with ASP and where you don’t have intellisense. I stongly recommend to use Visual Studio 2012 that at least gives you a good debug option.
The first part of the tt file is the part where you specify which .Net namespace you want to use. The tt files knows nothing about the references that you have in your project, which I found out the hard way. My initial thoughts were to use reflection to get information about the services that I was going to work with, but I got into problems when I wanted to work with service references. So I ended up using the EnvDTE namespace, where you work with the FileCodeModel in Visual Studio. So this gives me this first part of the tt file:
<#@ template debug=”true” hostspecific=”true” #>
<#@ output extension=”cs” #>
<#@ assembly name=”EnvDTE” #>
<#@ assembly name=”System.Xml” #>
<#@ import namespace=”EnvDTE” #>
<#@ import namespace=”System.Diagnostics” #>
<#@ import namespace=”System.Xml” #>
<#@ import namespace=”System.Collections.Generic” #>
I wanted to control which services got autogenerated in an XML file, so I at a *.mapping file to the solution where I created a structure with the name of the service I wanted.
Based on this I could load the FileCodeModel and find the CodeFunctions that needed to be exposed.
<#
EnvDTE.DTE dte = GetEnvDTE();
string myFile = this.Host.ResolvePath(“AutoGeneratedFacade.Mapping”);
XmlDocument xdoc = new XmlDocument();
xdoc.Load(myFile);
foreach (XmlNode node in xdoc.SelectNodes(@”//class/name”))
{
string sourceFileName = node.InnerText;
sourceFileName = @”Service References\” + sourceFileName + @”\Reference.cs”;
ProjectItem enumProjectItem = dte.Solution.FindProjectItem(sourceFileName);
FileCodeModel codeModel = enumProjectItem.FileCodeModel;
CodeNamespace codeNamespace = FindNamespace(codeModel.CodeElements);
CodeInterface codeInterface = FindInterface(codeModel.CodeElements);
List<CodeFunction> codeFunctions = FindMethods(codeInterface.Children);
#>
In the above code there are a couple of utility functions:
<#+
private CodeNamespace FindNamespace(CodeElements elements)
{
foreach (CodeElement element in elements)
{
CodeNamespace ns = element as CodeNamespace;
if (ns != null)
return ns;
}
return null;
}
private CodeInterface FindInterface(CodeElements elements)
{
foreach (CodeElement element in elements)
{
CodeInterface codeInterface = element as CodeInterface;
if (codeInterface != null)
return codeInterface;
codeInterface = FindInterface(element.Children);
if (codeInterface != null)
return codeInterface;
}
return null;
}
private List<CodeFunction> FindMethods(CodeElements elements)
{
List<CodeFunction> methods = new List<CodeFunction>();
foreach (CodeElement element in elements)
{
CodeFunction method = element as CodeFunction;
if (method != null)
methods.Add(method);
}
return methods;
}
private EnvDTE.DTE GetEnvDTE()
{
IServiceProvider hostServiceProvider = (IServiceProvider)Host;
if (hostServiceProvider == null)
throw new Exception(“Host property returned unexpected value (null)”);
EnvDTE.DTE dte = (EnvDTE.DTE)hostServiceProvider.GetService(typeof(EnvDTE.DTE));
if (dte == null)
throw new Exception(“Unable to retrieve EnvDTE.DTE”);
return dte;
}
#>
With the CodeFunctions in hand I am now able to create the new interface and class implementation for the autogenerated WCF facade service:
<#+
private void WriteInterface(CodeFunction method)
{
foreach(CodeElement element in method.Attributes)
{
string at = “”;
CodeAttribute att = element as CodeAttribute;
if (att != null)
{
at = at + “[“;
at = at + att.Name;
at = at + “(“;
at = at + att.Value;
at = at + “)]”;
WriteLine(at);
}
}
Write(method.Type.AsString);
Write(” “);
Write(method.Name);
Write(“(“);
string sparameter = “”;
foreach(CodeElement element in method.Parameters)
{
int count = 0;
CodeParameter parameter = element as CodeParameter;
if (parameter != null)
{
sparameter =sparameter + parameter.Type.AsString + ” “;
sparameter = sparameter + parameter.Name;
if(count < method.Parameters.Count)
sparameter = sparameter + “, “;
count++;
}
}
sparameter = sparameter.Substring(0,sparameter.Length -2);
Write(sparameter);
Write(“);”);
}
#>
And with the interface I am able to create the class the implements the interface:
<#+
private void WriteServiceClass(CodeFunction method, string servicename)
{
Write(“public “);
Write(method.Type.AsString);
Write(” “);
Write(method.Name);
Write(“(“);
string sparameter = “”;
string sparameternames = “”;
foreach(CodeElement element in method.Parameters)
{
int count = 0;
CodeParameter parameter = element as CodeParameter;
if (parameter != null)
{
sparameter =sparameter + parameter.Type.AsString + ” “;
sparameter = sparameter + parameter.Name;
sparameternames = sparameternames + parameter.Name;
if(count < method.Parameters.Count)
{
sparameter = sparameter + “, “;
sparameternames = sparameternames + “, “;
}
count++;
}
}
sparameter = sparameter.Substring(0,sparameter.Length -2);
Write(sparameter);
Write(“)”);
WriteLine(String.Empty);
WriteLine(“{“);
PushIndent(” “);
Write(“FacadeService.”);
Write(servicename);
Write(“.”);
Write(servicename);
Write(“Client service = new FacadeService.”);
Write(servicename);
Write(“.”);
Write(servicename);
Write(“Client();”);
WriteLine(String.Empty);
Write(“return service.”);
Write(method.Name);
sparameternames = sparameternames.Substring(0,sparameternames.Length -2);
Write(“(“);
Write(sparameternames);
Write(“);”);
WriteLine(String.Empty);
ClearIndent();
PushIndent(” “);
WriteLine(“}”)
}
#>
The final piece is to change the SVC file to point to the autogenerated class with changes to the Service and Codebehind attributes.
I used this article as inspiration and borrowed some lines of code from it.
With this I just have to update the service proxy and save the tt file to update my facade service and I don’t have to write copy paste code.
Random posts:
Help me, help you. You know how 😉 (click, click, click…)
by community-syndication | Jan 3, 2013 | BizTalk Community Blogs via Syndication
The success of the product comes to light when people get excited and starts talking about it. Especially when someone like Sandro Pereira who is considered as one of the most influential person in the BizTalk community. We are really humbled and delighted to see Sandro spent lot of time figuring out the capabilities of […]
The post 7 parts series "BizTalk360 a monitoring and support tool" by Sandro Pereira appeared first on BizTalk360 Blog.
Blog Post by: Saravana Kumar


