by community-syndication | Jun 3, 2013 | BizTalk Community Blogs via Syndication
Wow – look what I found earlier today?
The starting point of a great cloud platform enabling REST Endpoints, transforms (aka
maps) and many other EDI – “BizTalkie things”
In a very common scenario, I could have:
a) a RESTful endpoint
b) one or more transforms
c) a RESTful exit point (or it could be a request , response)
Given that it’s part of Azure, then all this magic would be taking place within my
DC local to the bulk of my data and services.
Then we can always use the other Azure widgets such as ServiceBus, Queues, Tables,
VPNs, etc etc.
Stay tuned for some posts in this area in the near future
Blog Post by: Mick Badran
by community-syndication | Jun 2, 2013 | BizTalk Community Blogs via Syndication
The time had come to invoke my light weight DB engine – SQL 2012 Local Install which
effectively is a 33MB install from sites like
http://www.microsoft.com/betaexperience/pd/SQLEXPCTAV2/enus/default.aspx
(the sql management studio is 600MB – localDB engine is 33MB – cool)
So there I was in VSNET trying to create a new SQL ’localdb’ database.
The classic ’instance name’ is (localdb)\v11.0 which is similar to (local)\SQLExpress when
using SQL Express.
Upon plugging this into VSNET, my Windows Event Log was suddenly fully of Red Stop
signs and much chatter
After much attempting to Install Windows Updates and re-install SQL LocalDB the answer
was quite simple really
The Magic Juice – enter SqlLocalDB.exe
This guy is the admin tool of SQL LocalDB – so delving into the supported commands
I could:
a) list all the known LocalDB instances
b) Delete an instance
c) Create an instance
So in short –
sqllocaldb delete “v11.0”
sqllocaldb create “v11.0”
too easy.. (2hrs I wont get back)
All working like a bought one now – beauty.
Blog Post by: Mick Badran
by community-syndication | Jun 2, 2013 | BizTalk Community Blogs via Syndication
Over the past 7 years I have spent a lot of time integrating BizTalk and SAP systems. I probably built more interfaces for SAP than any other system. When new technology such as Windows Azure BizTalk Services surfaces I am always interested to understand what the experience looks like.
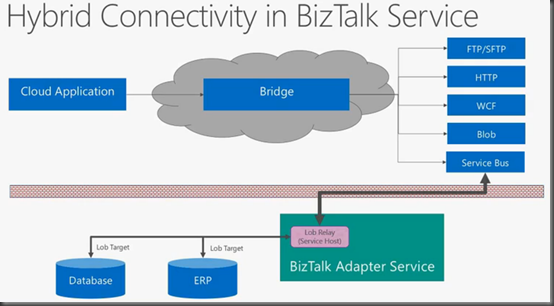
If you read my prior post in this series, you are probably wondering how it is possible to use Windows Azure BizTalk Services in the Windows Azure Cloud and connect to your On-Premise LOB Systems like SAP? Enter BizTalk Adapter Services.
BizTalk Adapter Services allows us to use the BizTalk Adapter Pack in order to connect to LOB systems. The BizTalk Adapter Services are hosted in IIS and leverage the Service Bus Relay (under the hood) in order to traverse Firewalls and NATs. Using the BizTalk Adapter Service is just another tool in our toolbox when achieving Hybrid integration.
Adapter Services Installation
I am now going to quickly install the BizTalk Adapter Services and then provide a walkthrough of how we can integrate with SAP. The scenario that we are going to walk through is part of a larger process that I won’t get into much detail within this blog but we have an SAP process were we need to feed sub-systems within the organization with Equipment data from SAP. We will get this equipment by calling a custom SAP RFC(BAPI).
The BizTalk Adapter Service is a component that we want to install on a Server within our Network. This machine does not require BizTalk Server to be present.


This is an important step as the account that we specify here will require access to SQL Server where configuration will be stored about our Relay Endpoints.

In this case I am using a local SQL Server instance. You can use SQL Express if you so desire but I have leveraged SQL 2008 R2 (SQL Server 2012 is also supported).

This step kinda reminds me of the BizTalk SSO Service password but they are not related or linked.

The BizTalk Adapter Service installation will be installing a Management Web Service. Since I am just using this for demo purposes I did not enable SSL.

Once we have finished installing the BizTalk Adapter Service we will discover a new database called BAService.

We will also discover a new entry in Server Explorer within Visual Studio called BizTalk Adapter Services.

If we right mouse click on BizTalk Adapter Services we have the ability to add a BizTalk Adapter Service by specifying the URL of the Management Service that was created as part of the installation process.

Once this Adapter Service has been added we can expand it and discover our LOB Targets.

We can add a new SAP target by right mouse clicking on SAP and selecting Add SAP Target.

We now need to specify our SAP connection information much like we would if we were adding Generated Items within a BizTalk Server 2013 solution. We need to specify the Application Server, the System Number, Client and Language. I recently blogged about connecting to SAP Messaging Servers. Not to worry these more advanced scenarios are supported by clicking on the Advanced button.
Next we need to provide our SAP credentials if we are not using Windows Credentials.

Much like the BizTalk Server experience we can search operations including IDOCs, BAPIs and RFCs. Do note that at this point we are only able to push messages to SAP. This means we can send an IDOC and call a BAPI/RFC and get the response back. SAP cannot push IDOCs or call an RFC that is hosted by the BizTalk Adapter Service.
Once we have found the artifact that we are looking for we can add it to the Selected operations list and then click the Next button.

Once again need to provide credentials that the BizTalk Adapter Service will use to connect to SAP.

This gets a little interesting. Much like in my previous blog post where we connected to a Service Bus Topic, we will use the production Service Bus connectivity information. So in this case I am going to leverage an existing Service Bus Namespace and credentials to enable Service Bus Relay capabilities.
We also have the ability to specify a Target sub-path that just allows us to organize our endpoints.

We now have a confirmation page that we can just click the Create button in order to finish the wizard.

With our SAP LOB Target created we can now drag that Target onto our canvas:

At this point we have just created an SAP target and added it to our canvas. but we have not actually generated our schemas that will be used within our solution. In order to generate these schemas we need to right mouse click on our SAP LOB Target and specify Add Schemas to Project.

We will once again be prompted for SAP credentials.

Within our solution, we will now find two schemas have been added. One is the core schema and the other is a schema for data types leveraged by the core schema.

A Web Request Schema, that we will expose externally to calling applications, is also needed. This schema is very simple with only two fields: Plant and EquipmentName.

Next we need to add a Map that will allow us to transform our Web Request message into our SAP Request message.

The map is pretty straight forward as we only need to map a couple fields.

A Map that will allow us to transform our SAP Response into our Web Response is also required.

Next, we need to add an Xml Request-Reply Bridge to our canvas by dragging it onto our canvas.

We now want to modify the Property page for this artifact as it will become part of our overall URI.

By double clicking on our Bridge, we have the ability to configure it. Within this configuration we will want to specify the Message Type for the message that we will be receiving from the calling application and the Message Type for the type of message we will be sending back to the calling application.
We also want to specify our two Transformations. The first one will take our Web Request and map it to our SAP Request. The second Transformation will take our SAP Response and map it to our Web Response.

Once our Bridge has been configured, we need to connect our Request Response Bridge to our SAP LOB Target. We can do so by dragging a Connector from our Toolbox and connecting our Bridge to our SAP LOB Target.


Routing messages is a core functionality within BizTalk Services. In order to route messages, we need to provide a filter condition that will allow us to specify messages to flow between the Bridge and the SAP LOB Target. In order to set this filter we need to click on the line that connects these two artifacts and then click on the Filter Condition.

Since we want all messages to flow to this LOB system we will choose Match All and click the OK button.

We also need to specify a SOAP Action much like we need to do with BizTalk Server. In order to do this we need to highlight the connection between the Bridge and LOB target and then click on Route Action.

In this case we want to specify a SOAP Action and then specify the action from our Request Schema. Much like the EAI/EDI Labs solutions we want to wrap our Expression around single quotes( ’ ’)

We are now almost ready to deploy our solution but before we can do that we need to specify our Deployment Endpoint. We can do so by clicking on any blank space on our canvas and then specifying our Deployment Endpoint address in the Property page.

Deploying our solution is as simple as right mouse clicking on our Visual Studio Solution file and selecting Deploy Solution.

In order to deploy our solution we will need to provide the Deployment Endpoint, ACS Namespace(for BizTalk Service environment), Issuer Name and Issuer Shared Secret.

Within a few seconds our solution will be deployed and will be ready for testing. Once again I can use the MessageSender application that is part of the BizTalk Services SDK. But, since looking at a black screen with white xml text isn’t very appealing, I created an ASP.Net Web application and borrowed the MessageSender class from the SDK project. In this case I have my Web Application running on a laptop that isn’t on the same network as the machine that is hosting the BizTalk Adapter Service.

Within the web application, we have the ability to provide a Plant and a wild card string representing a piece of equipment in order to get more details about where that piece of equipment has been deployed, the Manufacturer and Model Number.

Conclusion
Hopefully this walkthrough has provided you with some valuable insight on what it takes to integrate a Line of Business system like SAP with Windows Azure BizTalk Services. I can certainly envision scenarios where an organization uses an LOB system like SAP but may not have a dedicated integration platform to perform some of this integration. Windows Azure BizTalk Services may fill this void and enable some business scenarios that just may not have been possible for that organization. Consider another situation where you may have a SalesForce system that requires SAP data (maybe Equipment data  ) and this type of functionality in BizTalk Services really becomes a business catalyst.
I also think that the BizTalk Adapter Service may provide some interesting Mobile use cases as well as we can now expose SAP data through the cloud in a secure manner.
While the scenario is a bit dated, I also wrote a similar article on how to submit IDOCs to SAP using the Windows Azure EAI/EDI Labs CTP which has now been superseded by Windows Azure BizTalk Services.
by community-syndication | Jun 2, 2013 | BizTalk Community Blogs via Syndication
The Recipient List pattern addresses the scenario solution in which a message is routed to one or more recipients.
For a detailed description of this pattern, see Recipient List on the Enterprise Integration Patterns site.
The implementation of this pattern is a combination of the %u200bMicrosoft BizTalk ESB Toolkit Itinerary Routing Service and multiple resolvers.
Out of the box you can:
- Define the itinerary routing service with a messaging extender to execute in the BizTalk pipeline using Itinerary Designer.
- Define the itinerary routing service with an orchestration extender to execute as an orchestration using Itinerary Designer, which performs routing using BizTalk send ports.
Usually the Recipient List does not modify the message contents but what if recipient A wants to have another message as recipient B, C, and D? In the resolvers you can also configure a map but it will not be executed in the Routing service because only a Transform service can execute a map. You can add a Transform service to the itinerary but then all the messages are modified. So how can you solve this problem? Create a custom RecipientList service and combine the two services!
How to: Create a Custom Itinerary Service Using a BizTalk Orchestration
The following steps are necessary to create an Orchestration based Routing service that also can transform the message.
| 1. Create new BizTalk Server project in Visual Studio and add the new RecipientListService orchestration. |
| |
| 2. Add references to the following ESB Toolkit assemblies: |
- Microsoft.Practices.ESB.Adapter
- Microsoft.Practices.ESB.ExceptionHandling
- Microsoft.Practices.ESB.ExceptionHandling.Schemas.Faults
- Microsoft.Practices.ESB.Itinerary
- Microsoft.Practices.ESB.Itinerary.Schemas
- Microsoft.Practices.ESB.Resolver
- Microsoft.Practices.ESB.Transform
|
| |
| 3. Define a logical direct-bound Receive Port and an activated Receive Shape in the Orchestration. |
| |
| 4. Define a subscription filter to the Receive Shape to activate the orchestration from the message itinerary context so that the orchestration executes the RecipientListService step. |
|
| |
| 5. Add an Expression Shape to the orchestration with the following code to retrieve the current itinerary step. |
// Retrieve the current itinerary step
itinerary = new Microsoft.Practices.ESB.Itinerary.SerializableItineraryWrapper();
itineraryStep = new Microsoft.Practices.ESB.Itinerary.
SerializableItineraryStepWrapper();
itinerary.Itinerary = Microsoft.Practices.ESB.Itinerary.
ItineraryOMFactory.Create(InboundMessage);
itineraryStep.ItineraryStep = itinerary.Itinerary.GetItineraryStep(InboundMessage);
.csharpcode, .csharpcode pre
{
font-size: small;
color: black;
font-family: consolas, “Courier New”, courier, monospace;
background-color: #ffffff;
/*white-space: pre;*/
}
.csharpcode pre { margin: 0em; }
.csharpcode .rem { color: #008000; }
.csharpcode .kwrd { color: #0000ff; }
.csharpcode .str { color: #006080; }
.csharpcode .op { color: #0000c0; }
.csharpcode .preproc { color: #cc6633; }
.csharpcode .asp { background-color: #ffff00; }
.csharpcode .html { color: #800000; }
.csharpcode .attr { color: #ff0000; }
.csharpcode .alt
{
background-color: #f4f4f4;
width: 100%;
margin: 0em;
}
.csharpcode .lnum { color: #606060; } |
| |
| 6. Add an Expression Shape to the orchestration with the following code to retrieve the Resolvers associated with the itinerary. |
// Init
resolverDictionary = null;
// Retrieve the Resolvers associated with the itinerary
resolvers = itineraryStep.ItineraryStep.ResolverCollection;
|
| |
| 7. Add a Decide shape with the rule “resolvers.Count > 0” |
| |
| 8. Add a Loop Shape to the orchestration with the expression “resolvers.MoveNext()” to loop through the Resolvers. |
|
| |
| 9. Add an Expression Shape to the orchestration with the following code to retrieve the Resolver properties. |
// Retrieve current resolver
resolver = resolvers.Current;
// Pass the resolver configuration to the Resolver mgr for resolution
resolverDictionary = Microsoft.Practices.ESB.Resolver.
ResolverMgr.Resolve(InboundMessage, resolver);
// Get properties
mapName = resolverDictionary.Item("Resolver.TransformType");
transportLocation = resolverDictionary.Item("Resolver.TransportLocation");
transportType = resolverDictionary.Item("Resolver.TransportType");
.csharpcode, .csharpcode pre
{
font-size: small;
color: black;
font-family: consolas, “Courier New”, courier, monospace;
background-color: #ffffff;
/*white-space: pre;*/
}
.csharpcode pre { margin: 0em; }
.csharpcode .rem { color: #008000; }
.csharpcode .kwrd { color: #0000ff; }
.csharpcode .str { color: #006080; }
.csharpcode .op { color: #0000c0; }
.csharpcode .preproc { color: #cc6633; }
.csharpcode .asp { background-color: #ffff00; }
.csharpcode .html { color: #800000; }
.csharpcode .attr { color: #ff0000; }
.csharpcode .alt
{
background-color: #f4f4f4;
width: 100%;
margin: 0em;
}
.csharpcode .lnum { color: #606060; } |
| |
| 10. Add a Decide shape with the rule “mapName != null && mapName != " |
|
| |
| 11. Add an Expression Shape to the orchestration with the following code to transform the message. |
// Transform message
transformedMsgXml = Microsoft.Practices.ESB.Transform.MapHelper.
TransformMessage(InboundMessage.Body.OuterXml, mapName);
// Create XmlDocument
xmlDoc.LoadXml(transformedMsgXml);
.csharpcode, .csharpcode pre
{
font-size: small;
color: black;
font-family: consolas, “Courier New”, courier, monospace;
background-color: #ffffff;
/*white-space: pre;*/
}
.csharpcode pre { margin: 0em; }
.csharpcode .rem { color: #008000; }
.csharpcode .kwrd { color: #0000ff; }
.csharpcode .str { color: #006080; }
.csharpcode .op { color: #0000c0; }
.csharpcode .preproc { color: #cc6633; }
.csharpcode .asp { background-color: #ffff00; }
.csharpcode .html { color: #800000; }
.csharpcode .attr { color: #ff0000; }
.csharpcode .alt
{
background-color: #f4f4f4;
width: 100%;
margin: 0em;
}
.csharpcode .lnum { color: #606060; }
|
| 12. Add a Message Assignment Shape to the orchestration with the following code to create the ESBRequest message and set the dynamic port properties. |
// Create ESB Message
ESBMessage.Body = xmlDoc;
// Call the Adapter Manager to set all necessary properties
Microsoft.Practices.ESB.Adapter.AdapterMgr.SetEndpoint(resolverDictionary,ESBMessage);
// Set delivery port address
DynamicPort(Microsoft.XLANGs.BaseTypes.Address) = transportLocation;
DynamicPort(Microsoft.XLANGs.BaseTypes.TransportType) = transportType;
.csharpcode, .csharpcode pre
{
font-size: small;
color: black;
font-family: consolas, “Courier New”, courier, monospace;
background-color: #ffffff;
/*white-space: pre;*/
}
.csharpcode pre { margin: 0em; }
.csharpcode .rem { color: #008000; }
.csharpcode .kwrd { color: #0000ff; }
.csharpcode .str { color: #006080; }
.csharpcode .op { color: #0000c0; }
.csharpcode .preproc { color: #cc6633; }
.csharpcode .asp { background-color: #ffff00; }
.csharpcode .html { color: #800000; }
.csharpcode .attr { color: #ff0000; }
.csharpcode .alt
{
background-color: #f4f4f4;
width: 100%;
margin: 0em;
}
.csharpcode .lnum { color: #606060; } |
| |
| 13. Create a Port with a Dynamic binding and add a Send Shape to the orchestration to send the ESBRequest message to the Recipient. |
|
| |
| 14. Add a Message Assignment Shape to the orchestration with the following code to create the Outbound message and set the dynamic port properties. |
// Create message
OutboundMessage.Body = xmlDoc;
OutboundMessage(*) = InboundMessage(*);
// Call the Itinerary helper to advance to the next step
hasMoreSteps = itinerary.Itinerary.HasNextService();
itinerary.Itinerary.Advance(OutboundMessage, itineraryStep.ItineraryStep);
itinerary.Itinerary.Write(OutboundMessage);
.csharpcode, .csharpcode pre
{
font-size: small;
color: black;
font-family: consolas, “Courier New”, courier, monospace;
background-color: #ffffff;
/*white-space: pre;*/
}
.csharpcode pre { margin: 0em; }
.csharpcode .rem { color: #008000; }
.csharpcode .kwrd { color: #0000ff; }
.csharpcode .str { color: #006080; }
.csharpcode .op { color: #0000c0; }
.csharpcode .preproc { color: #cc6633; }
.csharpcode .asp { background-color: #ffff00; }
.csharpcode .html { color: #800000; }
.csharpcode .attr { color: #ff0000; }
.csharpcode .alt
{
background-color: #f4f4f4;
width: 100%;
margin: 0em;
}
.csharpcode .lnum { color: #606060; } |
| |
| 15. Add a Decide shape with the rule “hasMoreSteps” |
| |
| 16. Create a Correlation Type and a Correlation Set for the itinerary. |
|
| |
| 17. Create a Port with a Direct binding and add a Send Shape (with the Correlation Set) to the orchestration to send the Outbound message back to the MessageBox database. |
|
| |
| 18. Add an Exception handler to the Main scope to catch all the exceptions. (You can also have exception handlers on other scopes) |
| |
| 19. Add a Message Assignment Shape to the Exception handler with the following code to create a Fault Message. You can add multiple messages to the FaultMessage. |
// Trace
System.Diagnostics.Trace.WriteLine("[RecipientListService] Exception:" + ex.Message);
// Create FaultMessage
FaultMessage = Microsoft.Practices.ESB.ExceptionHandling.ExceptionMgmt.
CreateFaultMessage();
// Set Fault Message Properties
FaultMessage.Body.FaultCode = "2111";
FaultMessage.Body.FaultDescription = "Exception";
FaultMessage.Body.FailureCategory = "Routing Failure";
FaultMessage.Body.FaultSeverity = Microsoft.Practices.ESB.ExceptionHandling.
FaultSeverity.Critical;
// Add message
Microsoft.Practices.ESB.ExceptionHandling.ExceptionMgmt.AddMessage
(FaultMessage, InboundMessage);
.csharpcode, .csharpcode pre
{
font-size: small;
color: black;
font-family: consolas, “Courier New”, courier, monospace;
background-color: #ffffff;
/*white-space: pre;*/
}
.csharpcode pre { margin: 0em; }
.csharpcode .rem { color: #008000; }
.csharpcode .kwrd { color: #0000ff; }
.csharpcode .str { color: #006080; }
.csharpcode .op { color: #0000c0; }
.csharpcode .preproc { color: #cc6633; }
.csharpcode .asp { background-color: #ffff00; }
.csharpcode .html { color: #800000; }
.csharpcode .attr { color: #ff0000; }
.csharpcode .alt
{
background-color: #f4f4f4;
width: 100%;
margin: 0em;
}
.csharpcode .lnum { color: #606060; } |
| |
| 20. Create a Port with a Direct binding and add a Send Shape to the orchestration to send the FaultMessage message back to the MessageBox database. |
|
| |
| 21. Right click on the BizTalk project and click in the Menu on the Properties item. Click on the signing tab to create Strong Name Key. |
| |
| 22. Click on the Deployment tab to configure the Deployment properties and set the Application Name. |
| |
| 23. Right click on the BizTalk project and select Build to create the assembly. |
| |
| 24. Right click on BizTalk project and click on Deploy to deploy the Orchestration. |
| |
| 25. In the BizTalk Administration Console go to the created application and configure the Bindings of the orchestration and start the application. |
| |
How a Custom Itinerary Service can be used in an Itinerary
The following steps describe what must be done so that the Custom Itinerary Service can be used in the Itinerary Designer in Visual Studio.
| 1. Close Visual Studio |
| |
| 2. In the BizTalk Administration Console double click on the orchestration and copy the name and the assembly properties. |
|
| |
| 3. Open the esb.config from the ESB Toolkit as an Administrator |
| Location: C:\Program Files (x86)\Microsoft BizTalk ESB Toolkit |
| |
| 4. Add a new itineraryService entry in the itineraryServices section. |
<itineraryService id="1000" name="CustomItineraryService" type="ESB.ItineraryServices. CustomItineraryService, ESB.ItineraryServices, Version=1.0.0.0, Culture=neutral, PublicKeyToken=05d61ea6aa409780" scope="Orchestration" stage="None"/>
|
| 5. Open Visual Studio as an Administrator and open the ESB solution |
| |
6. Right click on the ESB solution select Add / New Project.
|
| 7. In the “Add New Project” PopUp window select BizTalk ESB Itinerary Designer. Give it a name and click on the OK button. |
|
| |
| 8. In Solution Explorer, right-click the ItineraryLibrary project, point to Add, and then click New Itinerary. |
| |
9. From the Toolbox, drag an Itinerary Service model element to the design surface.
In the Properties select:
– Itinerary Service Extender: Orchestration|Orchestration Extender
– Service Name: RecipientListService |
|
| |
| 10. Add a Resolver to the Itinerary Service and set the necessary properties. (Location, map, etc.) |
|
| |
| 11. Connect the Itinerary Service to an OnRamp and validate the itinerary. |
| |
Conclusion
It’s not very complicated to create a Custom Itinerary Service using a BizTalk Orchestration but there is not much documentation on MSDN. It is shortly described but the documentation is not complete. There are some other blogs on the internet and the %u200bMicrosoft BizTalk ESB Toolkit includes the “Scatter-Gather” sample that you can install and run.
You can download the Custom Itinerary Orchestration Service and the sample itinerary here:
Creating a Custom Itinerary Orchestration Service for the Recipient List pattern


