by community-syndication | Jun 7, 2013 | BizTalk Community Blogs via Syndication
Earlier this week, we announced the public preview of Windows Azure BizTalk Services (WABS). The responses so far has been quite positive. Within a short amount of time, we have reached the initial capacity that we planned to auto-approve. While we were clearly not expecting such phenomenal response, it is a good problem for us to have. We are in the process of manually clearing out the pending queue. Meanwhile, if you want to speed this up for your subscription, drop an email to [email protected] with a brief note on what you are intending to do. We shall try to take that up in priority. Please continue to use the support forum on MSDN for any other issues.
Some of you have also expressed some troubles in creating a new BizTalk Service. We have documented elaborate steps to provision a new BizTalk Service, but we see that most of the feedback so far has been to do with the dependencies / pre-requisites. So, in this post, we will look at what they are and some of the things you need to take care of.
BizTalk Service has the following main dependencies, listed below in the order in which you encounter in the create wizard:
- Tracking Database
- Access Control Service
- Monitoring Store
- SSL Certificate
Of the above, the ACS and the SSL certificates are pre-requisites that must be created before you try to create your BizTalk Service.
Figure 1 BizTalk Service and its dependencies
Tracking Database
As BizTalk Service receives and processes messages, it emits information that helps keep track of the various processing of the messages and allows you to troubleshoot any issues. This information is written to a SQL Azure Database, which we refer to as Tracking Database. For most of you, the easiest way to specify this would be to select the option to “Create a new SQL Database Instance” in the create wizard.
When this option is specified, you can choose the name of the database, the server and the credentials. I usually select an existing SQL Server but you could create a new one as well.
Access Control Services
All requests to BizTalk Service, whether it is deploy of a new bridge, agreement or posting a message, requires a valid token issued by Access Control Service (ACS). Thus, an ACS namespace needs to be associated with a BizTalk Service. You can read more about how ACS works in general here. In a nutshell, the client application will fetch a token from ACS by specifying certain credentials. The client will then present this token to BizTalk Service for authorization. BizTalk Service will determine if this is a valid token or not. The trust between BizTalk Service and the ACS namespace needs to be establish for this – and is achieved through a symmetric token signing key. All this is taken care of when the BizTalk Service is created.
However, as a pre-requisite, you must first create an Access Control Namespace and provide this in the create wizard. Creating a new ACS namespace is as easy as selecting a namespace, a region and a subscription:
To be more precise, when a BizTalk Service is created, the following will be created in the associated ACS Namespace:
- A relying party application for itself
- A default service identity with the name “owner” that clients can use to fetch a token
- A default rule to stamp the various claims required for the default service identity. BizTalk Service uses 3 claims: Manage, Listen and Send.
- A token signing key
To do the above, BizTalk Service requires a Management Service account with a password credential type. By default, when you create an ACS namespace, a default management service account called “ManagementClient” is already created for you. You can look that up from the ACS Management portal.
You need to retrieve the password and specify that in the BizTalk Service create wizard:
Monitoring Store
BizTalk Service uses an Azure Storage Account to write system monitoring information like Performance counters, trace files, as well as all the archived messages, which you can enable in certain scenarios. Again, the easiest way to specify this would be to select the option to “Create a new storage account”. You can then specify a name for your storage account.
NOTE: The name of the storage account must be between 3 and 24 characters and can contain only lowercase letters and numbers.
SSL Certificate
The BizTalk Service endpoint is securing using SSL/TLS. An X509 certificate with a private key in PKCS#12 format (.pfx file) is used to authenticate the service to the client. If you have your own custom domain name, you will also likely to have your own certificate issued by your trusted CA. For those of us who like to use BizTalk Service for testing or development purpose, a self-signed certificate can be used as well. A (self-signed) certificate can easily be created using the makecert.exe utility that comes with Windows SDK and Visual Studio. Here is an example:
makecert.exe -r –pe -n “CN=servicename.biztalk.windows.net” -e “01/01/2015” -ss my
NOTE: Your certificate should not have an expiry period of more than 5 years.
The certificate above can then be exported in .pfx format along with the private key. For that, you can use either certutil.exe, or the UI tool certmgr. I prefer certmgr as it is easier for me to browse and specify the inputs. Because a private key will need to be exported, a password needs to be specified when you export the certificate.
Once you have the above, you can specify that in the create wizard of BizTalk Service.
And that is the last step required for creating BizTalk Service. Once you complete the wizard, the creation of BizTalk Service will start.
One last thing…
As mentioned above, the BizTalk Service endpoint is secured using SSL/TLS and Access Control Service. For SSL to work, your client machines, from where you will either deploy apps or send messages to, will need to trust the SSL certificate that you have specified. For that, import the certificate to the “Trusted Root Certificate Authorities” store. NOTE: You do not need to share the private key for this. You could export a key without the private key.
To fetch a token from ACS, you need to specify an identity claim. As mentioned above, we create a default service identity called “owner”. You can retrieve the password for this identity from the Access Control Management portal. You will need that when you deploy your applications from Visual Studio or when you register your service in the BizTalk Portal. By default, we use the same password as that of your ACS management service account. But, you can always go ahead and change that. Or, you could create an entirely new identity – it is entirely your call. Just make sure you update /define the necessary Rules to stamp the right ACS claims.
Summary
This post tries to provide a brief summary of the dependencies of BizTalk Service. Hopefully, it will take care of some of the pain points you are facing while signing up and creating a new BizTalk Service. We are always looking for feedback. So, keep sending them across – either as comments to this post, or in the support forum.
Thanks!
The BizTalk Team
Blog Post by: BizTalk Blog
by community-syndication | Jun 5, 2013 | BizTalk Community Blogs via Syndication
One of the most commonly asked about and requested “features” of the BizTalk ESB Toolkit is the ESB Management Portal. I say “features” because I think we sometimes forget that this is just a sample application, and not something that is production ready. So the task I’ve undertaken is to not only make the necessary modifications to make the portal production ready, but also to add a few features. In an upcoming post I’ll review the changes made to prep the portal for production, but for now, I will share the new features I’ve been working on.
Itinerary Tracking/Monitoring
Possibly my favorite feature of the ESB Toolkit is the BAM activity that comes with the Itinerary engine. As we strive for better intelligence and instrumentation of our solutions, having this low hanging fruit available seems like an easy win. To begin collecting basic metrics of your itineraries, only two steps are required:
- Deploy the BAM Activity Definition. This is described in the ESB Toolkit installation guide:
Install BAM itinerary tracking activity definition. BAM itinerary tracking can be used to track the progress and eventual completion of itineraries as they advance through various steps. The BAM definition file (Microsoft.BizTalk.ESB.BAM.Itinerary.xml) is located in the BAM folder in the installation directory and can be installed using the Bm.exe tool. Use the following command as an example.
Bm.exe deploy-all -DefinitionFile:"C:\Program Files\Microsoft BizTalk ESB Toolkit 2.1\Bam\Microsoft.BizTalk.ESB.BAM.Itinerary.xml"
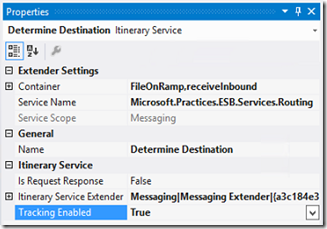
- Enable tracking on your Itinerary shapes. This is as simple as setting the “Enable Tracking” property on each Itinerary Service in the Itinerary Designer to “True”.
Now you have some basic tracking information being collected for your Itinerary. However, there is no way out of the box to view this tracking data other than the BAM Portaluntil now. By simple adding a few components to the ESB Portal web application, and simply querying the BAMPrimaryImport and EsbItineraryDb databases, we can now see tracking information for our itineraries. Here is what the new pages look like (at least these early “beta” versions):
List of Itineraries
This is a list of all the Itineraries in the EsbItineraryDb, providing a simple inventory of my itinerary-based processes. The chart just shows what is possible in terms of easy reporting

View of Instances for a selected Itinerary Type

Details of each step of a selected Itinerary Instance

Notice the links here for each step. We can drill down even further to view any Tracked Messages in DTA, as well as view the Fault (something we already have with the portal out of the box). Here you can see I’ve enabled DTA tracking for just the after-port-processing message:

and I get a message body in the ESB Portal for that one message.

The great thing about this is that no changes are necessary to accommodate new itineraries. Just enable tracking on your Itinerary Services before you deploy, and it will automatically show up.
SSO Application Configuration Management
I’m sure more than a few of us have used SSO as a configuration store for BizTalk solutions. I grew increasingly annoyed that I had to use a separate tool to manage those key-value pairs, not to mention that the tools available didn’t work very well. So, I also added SSO Configuration management to this modified ESB Portal. Very simple and straightforward, but being able to do all of this in one place I feel is a big value-add. One note on this functionality was the creation of a SSO WCF service to give the portal access to the configuration data in the SSO database. This service not only make these portal pages possible, but provide a way for non-BizTalk applications to use SSO as a configuration store without a requirement to execute on a BizTalk Server or a server licensed to run SSO dll’s.
View SSO Configuration Applications
Notice how only my custom SSO configurations show upanything native to BizTalk is filtered out.

View/Edit SSO Configuration Application

Obviously I’ve got some clean-up work to do on the UIbeing a BizTalk-person, my front-end skills are rusty to say the least! I hope this gives you some ideas on what is possible when you combine the power of Itinerary-based processing using the ESB Toolkit with some enhancements to the ESB Portal.
Cheers,
Dan


