by community-syndication | Apr 11, 2013 | BizTalk Community Blogs via Syndication
The Microsoft Team has just announced the release of the very first Cumulative Update For BizTalk 2013.
But an even more surprising news is that it is available using Microsoft Update!… This is the very first time a BizTalk Update can be obtained with Microsoft Update, as before it had to be done by downloading it manually through the hotfix download. An amazing improvement if you ask me, making it a whole lot easier for administrators.
The update will still be available through the hotfix download though.
The Content of the Cumulative Update
The very first CU for BizTalk 2013 brings 3 fixes:
- User cannot perform certain database-related operations in BizTalk Server 2013
- BAM tools cannot be configured in a multi-node BizTalk Server 2013 environment
- The vertical scroll bar on the target schema does not work correctly when you use Visual Studio to design a BizTalk Server 2013 map
How to install using Microsoft Update
The following steps are applicable if you have Microsoft Update enabled in the machine where BizTalk Server is installed.
- Log into a server where BizTalk Server is already installed, and Microsoft Update is enabled
- Check for windows update
- Notice available fixes for BizTalk Server under optional updates
- Select the update and install
(Perform the above operations in each of the BizTalk nodes)
The original announcement can be found here.
by community-syndication | Apr 10, 2013 | BizTalk Community Blogs via Syndication
Recently Microsoft added Backup Services (Preview) in which you can invoke the cloud
as part of your backup strategy, whether it be offsite secondaries etc.
You may have heard of Microsoft’s StorSimple which involved dropping a 2RU or 4RU
Hardware device into a customer’s rack in a Datacenter somewhere which is no easy
feat.
The reason why I’m liking the Azure Backup Services approach is that it’s a software
based solution.
Storage costs for Backups are cheaper and this is a feasible approach for backups.
The other cool thing is that – if I need fast access to my backups in the cloud, then
I can spin up a ’configured’ VM in Azure (access to the same Backup Vault) and access
the backups. No need to copy them down on premise first.
Let’s get Cracking
The elements that make this Azure Backup Services work are:
1. Azure Recovery Services Backup Services – with a Backup
Vault created.
2. On Premise (or anywhere else for that matter) Server with the Backup Services
Agent installed (currently Win2012, Win2008R2 are targeted platforms for
the Agent).
(Currently the BackupServices APIs are only planned to be used from these Agents and
not our own code.yet!)
3. A management certificate:
1. X509, Pub/Private keys installed in the local machine certificate store in the
OnPrem Server.
2. Public Key (*.CER file) uploaded to Azure Backup Services (this is different to
the Subscription Certificates you may already have up in Azure)
The certificate can be self signed and must have: 2048 (or greater) key length,
expire within 3 years.
(if your cert fails these requirements it will either fail to upload, or fail to be
recognised – we’re dealing with Preview here folks)
1. Creating the Vault
Login to the Azure Portal (activate the Backup Services Preview feature if you haven’t
done so already) and select Recovery Services
– Add a new Backup Vault with your details. It’s point a click stuff
here, no thinking yet.
2. Create the Management Certificate for Backup Services
There’s a few different ways to do this, makecert.exe is
the easiest way I find as follows:
(run from an elevated cmd prompt if required)
————————————-
C:\>makecert
Error: Please either specify the outputCertificateFile or -ss option
Usage: MakeCert [ basic|extended options] [outputCertificateFile]
Basic Options
-sk <keyName> Subject’s key container name;
To be created if not present
-pe
Mark generated private key as exportable
-ss <store> Subject’s certificate
store name that stores the output
certificate
-sr <location> Subject’s certificate store location.
<CurrentUser|LocalMachine>. Default to ‘CurrentUser’
-# <number> Serial Number from
1 to 2^31-1. Default to be unique
-$ <authority> The signing authority of the certificate
<individual|commercial>
-n <X509name> Certificate subject X500 name
(eg: CN=Fred Dews)
-?
Return a list of basic options
-!
Return a list of extended options
C:\>makecert.exe -r -pe -n CN=MicksBreezeAzureBackups -ss my -sr localmachine
-eku 1.3.6.1.5.5.7.3.2 -e 12/31/2015 -len 2048 “MicksBreezeAzureBackups.cer”
——————————————————–
* you should be able to see this Cert in the MachineCertStore on the local machine
as follows: *
The *.cer file will be on the local file system ready for uploading
3. Uploading the Certificate (*.CER) file to the Azure Portal
From the Azure Portal -> Recovery Services -> Upload Management Certificate
If all goes well, you’ll have success
You should be able to see your certificate details in the Backup Services – click
on your newly created empty BackupVault.
Now we’re ready to get onto the Server Side
3. Configuring and Registering the OnPremise Server to the Backup Vault.
3.1 Download the Agent from Backup Services
Click on the Download Agent Link from within Backup Services and
choose your selection:
Here I selected the first option – “Agent for Windows Server 2012 and System
Center 2012 SP1..”
Download the Agent (approx 17MB) and install.
This should go smoothly.
3.2 Registering the Server
Launch the Agent (if havent done so already) after the above installation completes.
(mine is empty)
3.2.2 Click on Register Server
(Configure a Proxy if you need to, this is for HTTP/HTTPs traffic)
Your certificate should come up in the list that you created earlier – if it doesnt
ensure that both the Private + Public keys are installed AND the Cert is in the Local
Machine Store. Then rerun this step.
Select the Vault details as follows in the Agent
(I’ve hidden my subscription ID here)
You’re 2 worlds are almost connected now, we have the Vault + the Server just about
done.
Click Next to move onto the Encryption Settings
Select a Passphrase and bear in mind that each new Server you add
which wants to restore/read the backup information from another server, will need
the same Passphrase.
Click the magic button REGISTER
This is also reflected on the Backup Services Portal under Servers as follows:
4. Configuring Backing – using the Windows Azure Backup & Throttling
(this is very simple and similar to Windows Backup)
What files are we backing up – click on Schedule Backup
I’ve selected a small folder on the System for the purpose of the demo
Select a Time – Currently limited to a max of 3 times a day per Server.
The COOOOOL THING is click on Change Properties – and here we can
configure Throttling.
– complete the Wizard to create your first backup schedule – well done!
You’ll now notice the Windows Azure Backup shell has a Backup
Now option on the right hand side.
I selected this and ran the Backup Now ’wizard’ in which I could also specify Throttling
for this backup.
At this stage you can also go back to the Backup Services Portal and see an entry
in the Protected Items there as well.
5. Powershell Commands – it goes without saying that there’s a ton of powershell
commands to script alot of what we did above.
Digging into PowerShell we find that the commands fall under ’OnlineBackup’ as follows
– notice MSOnlineBackup
If I simply run a Get-OBJob command we get back some reasonable info
around data transferred etc.
Happy Backuping!!!! Great new Service.
Blog Post by: Mick Badran
by community-syndication | Apr 10, 2013 | BizTalk Community Blogs via Syndication
After I provisioned a Windows Azure Virtual Machine, which was based on the BizTalk Server 2013 Beta image from the Gallery, I configured the BizTalk Backup job.
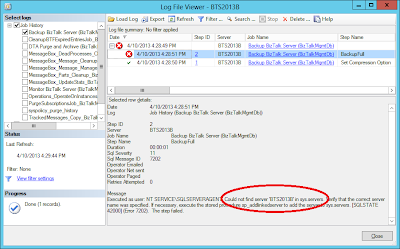
Normally it is enough to just apply the file locations of the Full backup and the Log backup and to Enable the job, but when I did this, I noticed in the History of the job, that the job failed.
The error I got was ‘Could not find server BTS2013B in sys.servers’, where BTS2013B is the name that I assigned to the Virtual Machine.
I checked the sys.servers table and retrieved the servername. Both showed something else than the expected name BTS2013B, namely WIN-QMPGBU8OQOK. Apparently this is the original name of the Windows installation on the VM.
To fix this problem I ran the following statements in SQL Server Management Studio,
EXEC sp_dropserver ‘WIN-QMPGBU8OQOK’;
EXEC sp_addserver ‘BTS2013B’, ‘local’;
Afterwards I saw that the server name is still WIN-QMPGBU8OQOK, but in sys.servers, the field data_source is now BTS2013B, which is enough for the BizTalk Backup job to run properly.
The only thing left is to restart the SQL Server service and then the BizTalk Backup job runs fine!


