by community-syndication | Aug 6, 2010 | BizTalk Community Blogs via Syndication
[Source: http://geekswithblogs.net/EltonStoneman]
In my previous post, Cloud Services and Command-Query Separation: Part 2, I walked through a sample Command-Query Separated service bus solution using readily available cloud services for communication. In this one, I’ll look at some of the implications of shifting systems integration to the cloud, compared to an on-premise ESB. The focus here is mainly on Amazon Web Services, but I’ll cover Azure with a dedicated sample project.
Cost & Non-Functional Requirements
If an ESB is core to your system landscape, it needs to be reliable and scalable. With a BizTalk-based solution you get this built-in with the architecture, but it doesn’t come cheaply. For a minimally-resilient enterprise-grade solution you’ll need at least two BizTalk servers in a group running against a SQL Server cluster on two nodes; for DR you’d need the same again in a separate data centre. Buying all the hardware and licenses could take you to %u00a3100K, not allowing for ongoing operating, maintenance and site costs.
In comparison the cloud solution is likely to be far more reliable at a far lower cost. Both AWS and Azure have multiple data centres around the globe, with redundancy levels you couldn’t realistically achieve in a private data centre. Scalability is a given for the queuing and storage services – you just use them as much as you need, and the service scales to cope. If you’re hosting the service provider nodes in the cloud too – either as a Windows Azure service, or within an Amazon EC2 instance – then they can be configured to automatically scale just as easily.
Cost-wise, there’s no comparison. For the AWS services used in the sample, the “free tier” means if you’re sending up to 100,000 messages a month on SQS with up to 1Gb total payload, and using less than 1Gb of storage on SimpleDB then there are no charges at all. The next level up incurs monthly costs (at time of writing) of around %u00a30.20 for an additional 100,000 messages with 1Gb payload, and %u00a30.30 per Gb of data in SimpleDB.
With the roughest calculation, you could push 10,000,000 messages through SQS, and use 100Gb storage on SimpleDB EVERY MONTH FOR 160 YEARS before approaching %u00a3100K in costs. Of course the BizTalk and cloud solutions are not comparable in terms of the functionality they offer, but for certain scenarios they can be compared as they may be used in similar ways.
Security and Interoperability
Cloud services are based on interoperable standards – typically SOAP and REST – and are published on publicly-available endpoints. Azure has clever tricks to navigate firewalls for WCF bindings, and AWS uses standard HTTPS endpoints. To make an internal service publicly available you need to configure DMZs, domain names and firewalls, and sign up for ongoing vigilance against attack.
In AWS, transport-level security on the endpoints is supported by message-level security, with every request containing a signature built using the sender’s secret key to verify that the content has not been tampered with. AWS also lets you secure or deny services to a specific list of AWS user accounts, so you can limit use of your queues and data stores to business partners. It’s fairly simple to interact with AWS services in an iPhone app.
On-premise gives you more options for tailoring your solution. For example, you may have a secure, interoperable entry point to the ESB, but between ESB and service providers the communication is private so you could standardise on efficient WCF over TCP/IP, using IPSec to prevent any machines other than the ESB nodes accessing the service providers. Calling services with an iPad is likely to be more of a challenge.
Time to Market
Or Time to Release, depending on your scenario. Starting from zero, you can be up and running with a simple cloud service bus with less than a day’s effort. Assuming you’re exposing existing functionality then you could conceivably have a pilot project deployed for testing in the cloud within a week. Adding new services is as simple as adding a fa%u00e7ade over existing code, to act as a handler when a known type of message request is received. Business partners can use your test environment with no special effort, and when you go live, decommissioning the test environment is just a case of deleting the queues and data stores with a few API calls.
On-premise, all the delivery times go up. Development, deployment and testing of a basic ESB solution – even if you use BizTalk and the ESB Toolkit as a starting point – is likely to be closer to a month than a week. The contract-first nature of BizTalk means adding a new service or changing an existing one requires deployment of ESB artifacts as well as the new service provider – this not a negative, but it does add to the effort required.
Performance
In terms of latency, the cloud solution is never going to perform as well as on-premise. Pushing an ESB request and response through the BizTalk message box may add 0.5 seconds of latency, but calling out to the web is going to be double or quadruple that. That network latency in fetching a large query response could make the solution unworkable for end clients, compared to the LAN option.
The reverse may be true for globalised organisations which have their data centres in one region. While the on-premise solution needs to negotiate the WAN, the cloud solution has the option to push out to edge nodes, with independent queues and data stores residing in the nearest region to the consumer. In this scenario the cloud solution is likely to have the lower latency.
In terms of processor power and scaling up to meet demand, the cloud solution can provide that more-or-less instantly, with no service disruption and with a linear cost increase. Scaling an on-premise solution will always take longer to commission, for scaling up there will be downtime for the upgraded nodes and scaling out will mean cost spikes.
Limitations
In the cloud world, you currently have to live with limitations that will seriously affect your design. SQS allows maximum message sizes of 8Kb, which is entirely tiny, but should be a size you can cope with for service requests and responses. You may have to give more consideration to serialization than you normally would, using JSON or Protocol Buffers rather than bloated XML.
The BizTalk solution will happily deal with XML messages in the hundreds of megabytes, but to do so efficiently it needs to be tuned to favour large messages over throughput.
Governance
This is where the cloud option does really poorly. One of the key advantages of BizTalk and the ESB Toolkit is that I can navigate UDDI and get a list of all available services and their endpoints; then I can navigate the endpoint WSDL and see what the service contract is, or I can look up the XSD in BizTalk. The service and contract lookups can be wrapped into a custom tool, giving you a real-time ESB navigator which is fairly trivial to build.
In the sample cloud service bus there’s no separate catalogue of services or contracts. Services exist as long as there is a subscriber for a particular type of message; request and response contracts may be explicit in .NET classes, but across the bus they’re just strings of text with no option to validate them. For a robust cloud solution, governance needs to be in from the start, which is likely to mean some custom operations services which can be queried to get that service catalogue and contracts.
by community-syndication | Aug 6, 2010 | BizTalk Community Blogs via Syndication
Hi all
Today I exported an MSI file from my development machine and wanted to import the
MSI file on our test environment.
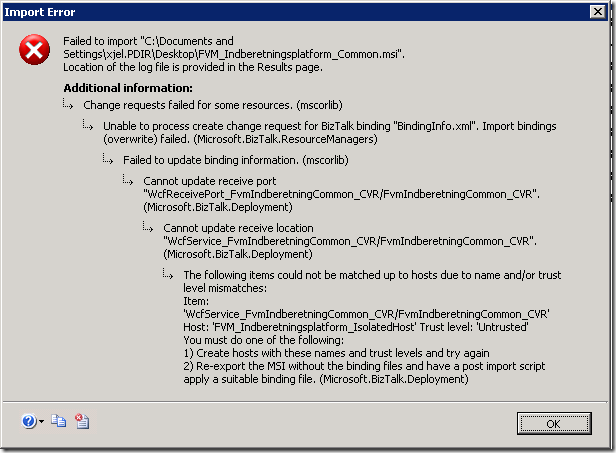
I got this error, though:
Change requests failed for some resources. (mscorlib)
Unable to process create change request for BizTalk binding "BindingInfo.xml".
Import bindings (overwrite) failed. (Microsoft.BizTalk.ResourceManagers)
Failed to update binding information. (mscorlib)
Cannot update receive port "WcfReceivePort_FvmIndberetningCommon_CVR/FvmIndberetningCommon_CVR".
(Microsoft.BizTalk.Deployment)
Cannot update receive location "WcfService_FvmIndberetningCommon_CVR/FvmIndberetningCommon_CVR".
(Microsoft.BizTalk.Deployment)
The following items could not be matched up to hosts due to name and/or trust level
mismatches:
Item: ‘WcfService_FvmIndberetningCommon_CVR/FvmIndberetningCommon_CVR’ Host: ‘FVM_Indberetningsplatform_IsolatedHost’
Trust level: ‘Untrusted’
You must do one of the following:
1) Create hosts with these names and trust levels and try again
2) Re-export the MSI without the binding files and have a post import script apply
a suitable binding file. (Microsoft.BizTalk.Deployment)
Now, the error message is pretty easy to understand. What had me baffled was, that
the host exists and it IS untrusted. So there is no mismatch and the two ideas as
to what to fix don’t seem to apply to my situation.
It turned out that the issue was that after creating the needed host and host instances,
I had forgotten to add the necessary Receive Hander on the appropriate adapter for
the receive location. But the error message doesn’t say anything about that – it just
says that I need to create the host with the right trust level.
So, this post is just to let you know that there is another reason for the error message
than what the error message states.
—
eliasen
by community-syndication | Aug 6, 2010 | BizTalk Community Blogs via Syndication
Looking for BizTalk Server 2009 Training in Europe? QuickLearn’s partner www.Bouvet.no has invited John Callaway to teach several BizTalk classes in the remainder of 2010.
John Callaway will be teaching:
- September 6th – BizTalk Developer Immersion
- October 11th – BizTalk Developer Deep Dive
- November 29th – BizTalk Developer Immersion
- December 6th -BizTalk Expert Series: ESB 2.0
View all of QuickLearn’s BizTalk Server 2009 Training
by community-syndication | Aug 6, 2010 | BizTalk Community Blogs via Syndication
In this post I like to show all table operations possible with WCF-SQL Adapter. The WCF based SQL Adapter can be used to connect BizTalk applications to SQL Server. WCF-SQL Adapter is part of BizTalk Server Adapter Pack 2.0, but can also be downloaded separately. To work with the adapter you will need to install the WCF LOB Adapter SDK SP2 before installing this adapter. Something that is overlooked easily, which also accounts for the fact that this adapter is offered as a supplement to BizTalk Server 2009. You must have a valid license for the BizTalk Server in order to use the SQL adapter and be eligible for support and to receive updates.
Important to note here are the supported operating systems:
- Windows Server 2003 Service Pack 2
- Windows Server 2008
- Windows Vista
- Windows XP Service Pack 3
- Windows XP SP3
- Windows Server 2003 SP2
- Windows Server 2003 R2
- Windows Server 2008
- Windows Vista
- and required is .NET 3.5 SP1.
The Adapter Metadata wizard is supplied through WCF LOB Adapter SDK and necessary to generate schema’s through Visual Studio .NET.
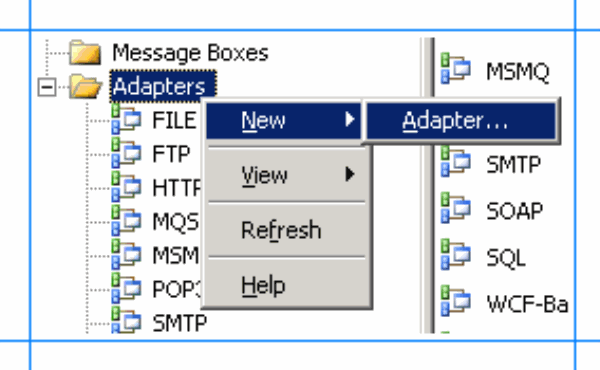
The SQL adapter can be used in BizTalk either as a WCF-Custom port or a WCF-SQL port. If you want to use the SQL adapter through a WCF-Custom port, you do not need to add the WCF-Custom port to the BizTalk Server Administration console, because the WCF-Custom port is added to the BizTalk Server Administration console by default. However, if you want to use the SQL adapter through a WCF-SQL port, you must first add the WCF-SQL adapter to the BizTalk Server Administration console. To add the WCF-SQL Adapter you need to start the BizTalk Server Administration Console and than perform the following steps:
1. In the console tree, expand the BizTalk Group, expand Platform Settings, and then click Adapters.
2. Right-click Adapters, point to New, and click Adapter.
3. In the Adapter Properties dialog box, specify a name for the adapter and from the Adapter list, select WCF-SQL.
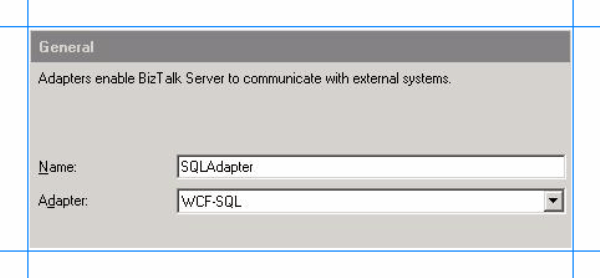
4. Click Ok.
Having the adapter in place you can use it for your solutions. You can download sample from Microsoft related SQL Adapter through BizTalk Adapter Pack 2.0 samples. There you will find the Performing Operations on Tables sample that shows how to perform operations on tables in SQL Server, but this only shows you the select operation (i.e. download is called SelectTable.exe).
To perform operations on SQL Server by using the WCF-SQL adapter with BizTalk Server, you must perform a set of design-time and run-time tasks using Visual Studio and BizTalk Server Administration console respectively. These high level tasks to create a message based solution are:
- Create BizTalk project, and generate schema.
- Create messages instances.
- Build and deploy the BizTalk project.
- Configure the application.
- Start the application.
Downloaded sample executes the SELECT operation on the EMPLOYEE table in a SQL Server database. This sample performs the following operations:
- Picks up the request message to execute the SELECT operation from a predefined file location.
- Sends the request to the SQL Server database to perform the operation.
- Receives the response from the SQL Server database and copies the response at another predefined file location.
Download sample contains code and sqlscript is provided to create the database. I like to show all the CRUD operations (i.e. CREATE, REQUEST, UPDATE and DELETE). You can create the database using SQL Server Management Studio and load/execute the script (2005 or 2008 found in SelectTable solution sqlscripts folder). Other step to perform is creating a BizTalk project.
BizTalk Project and generate schema (’s)
First, we need the XML schemas, which represent our data source. By installing the WCF LOB Adapter SDK SP2, you will have a metadata browser built into Visual Studio. NET at your disposal. You can access this from a BizTalk project by right-clicking the project, choosing Add then Generated Items and selecting Consume Adapter Service.
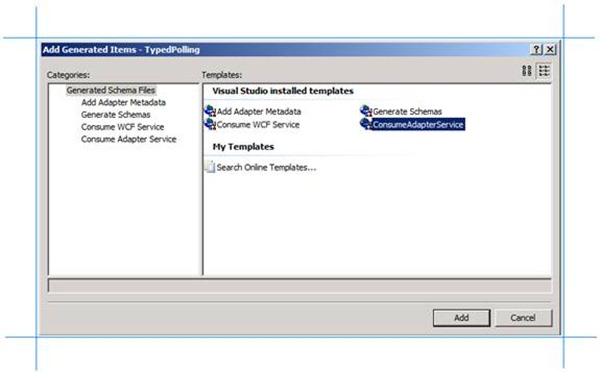
This action opens a new window that provides us the interface to connect to, browse, and select database objects for service interaction. The very first thing we need to do here is choose the sqlBinding as the service binding, and then configure a connection string. The simplest working connection string consists of an Initial Catalog value for the database, and a valid Server name entry. Note that the adapter now uses a connection string in the form of a URI instead of the traditional Data Source=;Initial_Catalog=;User_ Id=;Password= style.

Once a satisfactory connection string is defined, the Connect button can be clicked to establish an active connection to the target database. If the connection is successful, one see the category browser with a set of database object categories.
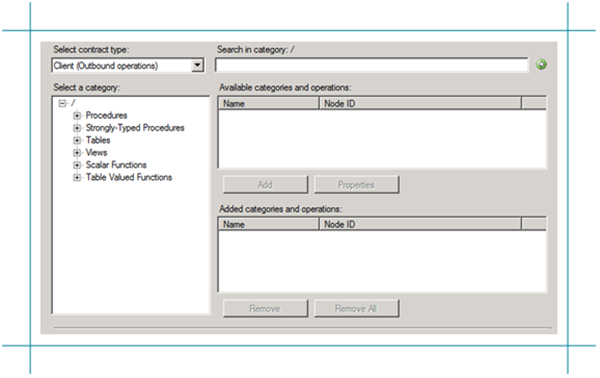
On the root “/” character a range of un-typed generic functions are displayed, which can be exploited. Click on tables and you will see a number of Tables, select Employee.
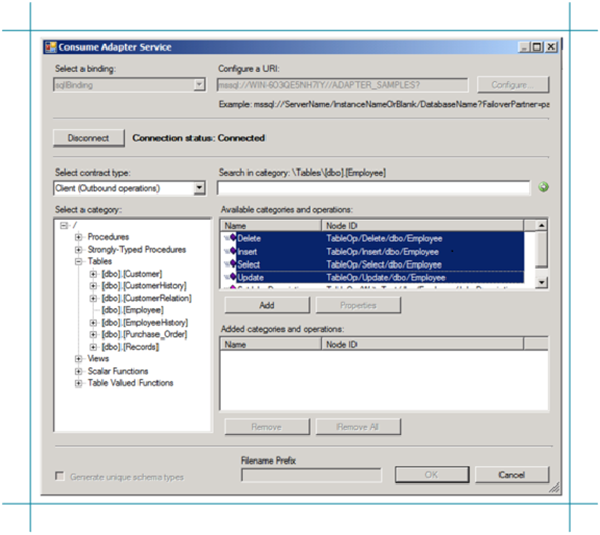
Click the Delete, Insert, Select and Update statement in available categories and operations. Click the Add button to add the operations.

After clicking the Ok button at the bottom, schema (and a single binding file) is added to our associated BizTalk project in Visual Studio.NET.
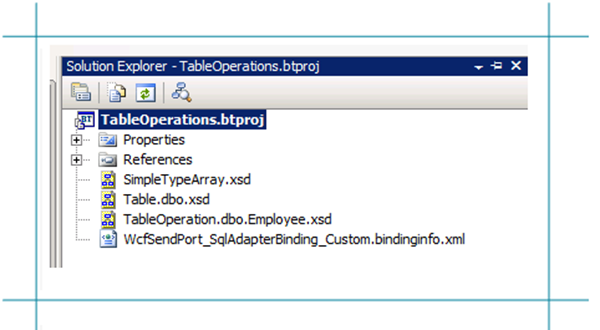
The binding can be used later, when solution is deployed and ports have to be configured for SQL Server (i.e. Send Port).
Create message instances
Next step is to generate messages from generated schema, which can be routed from Recieve location in Receive Port to a send port with WCF-SQL Adapter (messaging based solution). Generating the first message is easy, as you can right click on the TableOperation.dbo.Employee.xsd and select Generate Instance and an instance of top element is created (i.e. delete).
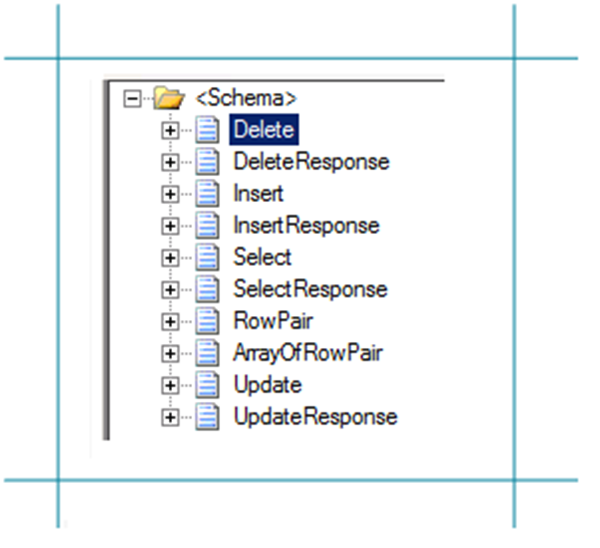
You will get a instance of message as depicted below:
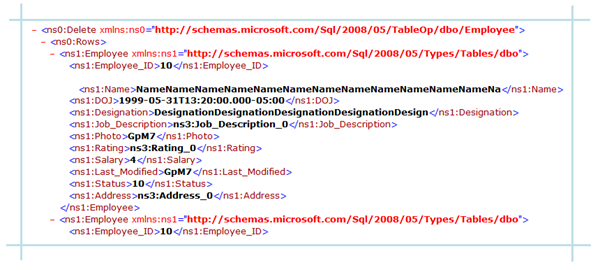
By opening up the TableOperation.dbo.Employee.xsd in file-editor you can move the next operation to top, so you can then in Visual Studio generate the next instance for an operation or you can use XML-Editor inside Visual Studio (closing schema, right click and select open with and then select XML Editor) to move elements around. In end you will have four xml instance for TableOperations, save to file as xml (type all files, encoding UTF-8!).
Select:
<ns0:Select xmlns:ns0=”http://schemas.microsoft.com/Sql/2008/05/TableOp/dbo/Employee%22>
<ns0:Columns></ns0:Columns>
<ns0:Query></ns0:Query>
</ns0:Select>
Insert:
<ns0:Insert xmlns:ns0=”http://schemas.microsoft.com/Sql/2008/05/TableOp/dbo/Employee%22>
<ns0:Rows>
<ns1:Employee xmlns:ns1=”http://schemas.microsoft.com/Sql/2008/05/Types/Tables/dbo%22>
<ns1:Employee_ID></ns1:Employee_ID>
<ns1:Name></ns1:Name>
<ns1:DOJ></ns1:DOJ>
<ns1:Designation></ns1:Designation>
<ns1:Job_Description></ns1:Job_Description>
<ns1:Photo></ns1:Photo>
<ns1:Rating></ns1:Rating>
<ns1:Salary></ns1:Salary>
<ns1:Last_Modified></ns1:Last_Modified>
<ns1:Status></ns1:Status>
<ns1:Address></ns1:Address>
</ns1:Employee>
</ns0:Rows>
</ns0:Insert>
Update:
<ns0:Update xmlns:ns0=”http://schemas.microsoft.com/Sql/2008/05/TableOp/dbo/Employee%22>
<ns0:Rows>
<ns0:RowPair>
<ns0:After>
<ns1:Employee_ID xmlns:ns1=”http://schemas.microsoft.com/Sql/2008/05/Types/Tables/dbo%22></ns1:Employee_ID>
<ns1:Name xmlns:ns1=”http://schemas.microsoft.com/Sql/2008/05/Types/Tables/dbo%22></ns1:Name>
<ns1:DOJ xmlns:ns1=”http://schemas.microsoft.com/Sql/2008/05/Types/Tables/dbo%22></ns1:DOJ>
<ns1:Designation xmlns:ns1=”http://schemas.microsoft.com/Sql/2008/05/Types/Tables/dbo%22></ns1:Designation>
<ns1:Job_Description xmlns:ns1=”http://schemas.microsoft.com/Sql/2008/05/Types/Tables/dbo%22></ns1:Job_Description>
<ns1:Photo xmlns:ns1=”http://schemas.microsoft.com/Sql/2008/05/Types/Tables/dbo%22></ns1:Photo>
<ns1:Rating xmlns:ns1=”http://schemas.microsoft.com/Sql/2008/05/Types/Tables/dbo%22></ns1:Rating>
<ns1:Salary xmlns:ns1=”http://schemas.microsoft.com/Sql/2008/05/Types/Tables/dbo%22></ns1:Salary>
<ns1:Last_Modified xmlns:ns1=”http://schemas.microsoft.com/Sql/2008/05/Types/Tables/dbo%22></ns1:Last_Modified>
<ns1:Status xmlns:ns1=”http://schemas.microsoft.com/Sql/2008/05/Types/Tables/dbo%22></ns1:Status>
<ns1:Address xmlns:ns1=”http://schemas.microsoft.com/Sql/2008/05/Types/Tables/dbo%22></ns1:Address>
</ns0:After>
<ns0:Before>
<ns1:Employee_ID xmlns:ns1=”http://schemas.microsoft.com/Sql/2008/05/Types/Tables/dbo%22></ns1:Employee_ID>
<ns1:Name xmlns:ns1=”http://schemas.microsoft.com/Sql/2008/05/Types/Tables/dbo%22></ns1:Name>
<ns1:DOJ xmlns:ns1=”http://schemas.microsoft.com/Sql/2008/05/Types/Tables/dbo%22></ns1:DOJ>
<ns1:Designation xmlns:ns1=”http://schemas.microsoft.com/Sql/2008/05/Types/Tables/dbo%22></ns1:Designation>
<ns1:Job_Description xmlns:ns1=”http://schemas.microsoft.com/Sql/2008/05/Types/Tables/dbo%22></ns1:Job_Description>
<ns1:Photo xmlns:ns1=”http://schemas.microsoft.com/Sql/2008/05/Types/Tables/dbo%22></ns1:Photo>
<ns1:Rating xmlns:ns1=”http://schemas.microsoft.com/Sql/2008/05/Types/Tables/dbo%22></ns1:Rating>
<ns1:Salary xmlns:ns1=”http://schemas.microsoft.com/Sql/2008/05/Types/Tables/dbo%22></ns1:Salary>
<ns1:Last_Modified xmlns:ns1=”http://schemas.microsoft.com/Sql/2008/05/Types/Tables/dbo%22></ns1:Last_Modified>
<ns1:Status xmlns:ns1=”http://schemas.microsoft.com/Sql/2008/05/Types/Tables/dbo%22></ns1:Status>
<ns1:Address xmlns:ns1=”http://schemas.microsoft.com/Sql/2008/05/Types/Tables/dbo%22></ns1:Address>
</ns0:Before>
</ns0:RowPair>
</ns0:Rows>
</ns0:Update>
Delete:
<ns0:Delete xmlns:ns0=”http://schemas.microsoft.com/Sql/2008/05/TableOp/dbo/Employee%22>
<ns0:Rows>
<ns1:Employee xmlns:ns1=”http://schemas.microsoft.com/Sql/2008/05/Types/Tables/dbo%22>
<ns1:Employee_ID></ns1:Employee_ID>
<ns1:Name></ns1:Name>
<ns1:DOJ></ns1:DOJ>
<ns1:Designation></ns1:Designation>
<ns1:Job_Description></ns1:Job_Description>
<ns1:Photo></ns1:Photo>
<ns1:Rating></ns1:Rating>
<ns1:Salary></ns1:Salary>
<ns1:Last_Modified></ns1:Last_Modified>
<ns1:Status></ns1:Status>
<ns1:Address></ns1:Address>
</ns1:Employee>
</ns0:Rows>
</ns0:Delete>
Build and deploy the BizTalk project
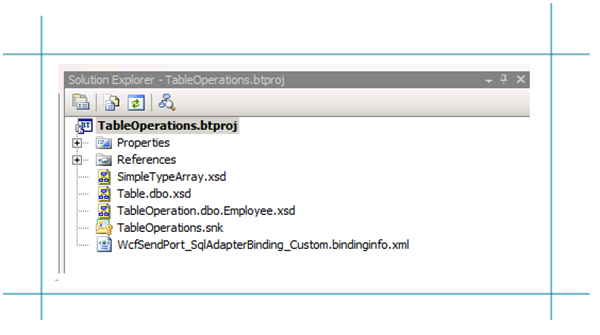
Only schemas are required for a messaging only scenario with WCF-SQL Adapter to perform operations on SQL Server. Therefore after assigning a strong name and application name to BizTalk project it can be build and deployed.
Configure the application
After solution has been deployed it is time to configure the ports. FILE ports are easy and focus here will be configuring the WCF-SQL Send Port. Through BizTalk Management Console one can browse to SelectTable application and right click the application and select Import Bindings and navigate to file called WcfSendPort_SqlAdapterBindings_Custom.bindinginfo.xml, select and click Open. You will notice that a Send Port will be created automatically.
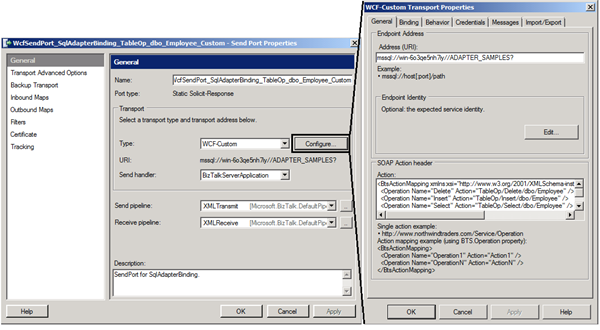
If you look at created send port and configuration you will notice that everything is there. I can tell that this will not work for all the operations as I experience the following error described in this blog post: Why does the Adapter say ’Action is not understood’ even though I am using the binding file generated by the ’Consume Adapter Service’ wizard? I choose to delete three operations and create three similar send ports based on first generated send port. Next steps are setting filters on WCF-Send Port and File Send Port. Configuration is as follows:
|
Port Name
|
Type
|
Filter
|
|
RcvPortTableOperations
|
FILE
|
|
|
SndDeleteOperation
|
WCF-SQL
|
BTS.MessageType == http://schemas.microsoft.com/Sql/2008/05/TableOp/dbo/Employee#Delete
|
|
SndInsertOperation
|
WCF-SQL
|
BTS.MessageType == http://schemas.microsoft.com/Sql/2008/05/TableOp/dbo/Employee#Insert
|
|
SndSelectOperation
|
WCF-SQL
|
BTS.MessageType == http://schemas.microsoft.com/Sql/2008/05/TableOp/dbo/Employee#Select
|
|
SndUpdateOperation
|
WCF-SQL
|
BTS.MessageType == http://schemas.microsoft.com/Sql/2008/05/TableOp/dbo/Employee#Update
|
|
SndOperationResponse
|
FILE
|
BTS.MessageType == http://schemas.microsoft.com/Sql/2008/05/TableOp/dbo/Employee#SelectResponse
OR
BTS.MessageType == http://schemas.microsoft.com/Sql/2008/05/TableOp/dbo/Employee#SelectResponse
OR
BTS.MessageType == http://schemas.microsoft.com/Sql/2008/05/TableOp/dbo/Employee#SelectResponse
OR
BTS.MessageType == http://schemas.microsoft.com/Sql/2008/05/TableOp/dbo/Employee#SelectResponse
|
Start the application
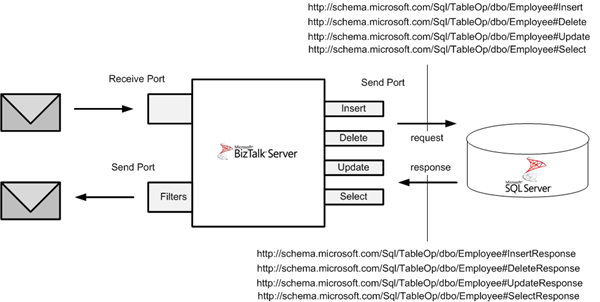
In the end your messaging solutions can be depicted as below. After configuration you can start BizTalk application.
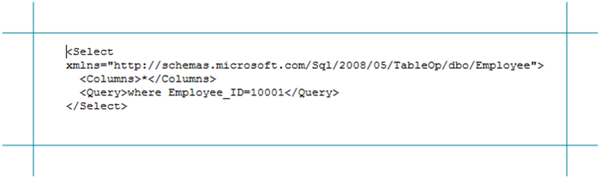
Select Operation:
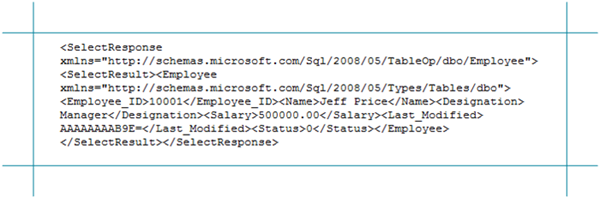
Response:
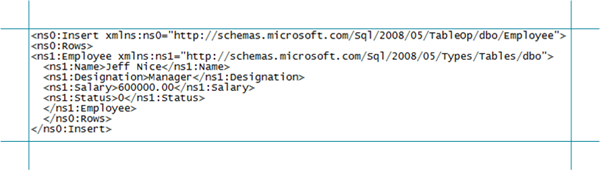
Insert Operation:
Response:
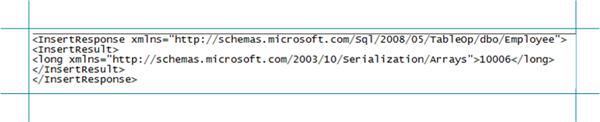
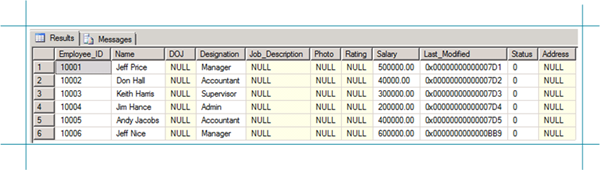
Results so far if you query Employee Table are:
Update Operation:
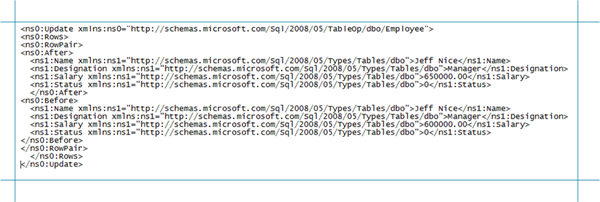
Response:

Result after update if you query Employee Table again are:
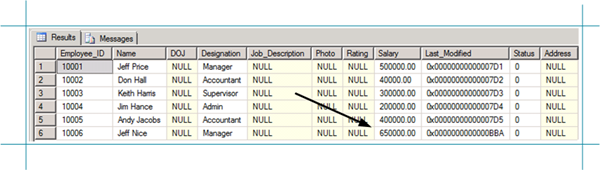
Last operation will be delete.
Delete Operation:
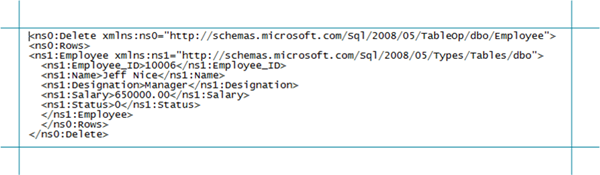
Response:

Result after delete if you query Employee Table again are:
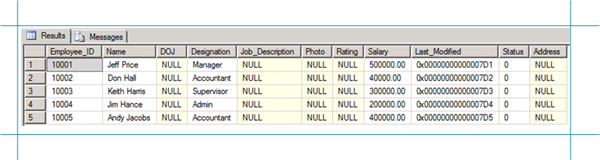
I hope with this post I was able to show all operations (CRUD) on table. The sample from MSDN shows only SELECT operation and here I have extended on that, showing all operations and how to setup WCF-SQL Adapter and steps to do, before you can execute all operations on a SQL Table.
Cheers!
Technorat: BizTalkBizTalk Server 2009
by community-syndication | Aug 6, 2010 | BizTalk Community Blogs via Syndication
The Bing API allows you to get results from multiple sourcetypes, one of them being the Translation SourceType.
More Info on the API can be found here.
The SDK comes with some nice samples and can be found here.
As a practise we are going to do a query from a BizTalk Pipeline component to translate a field configured by an XPath.
In design we need to define a source language, destination language and the XPath to the field we will translate.
TranslationLanguage is just an enum to facilitate configuration in pipeline design time.
private Helper.TranslationLanguage _SourceLang;
private Helper.TranslationLanguage _DestLang;
private string _XPath;
public Helper.TranslationLanguage SourceLanguage
{ get; set; }
public Helper.TranslationLanguage DestinationLanguage
{ get; set; }
public string XPath
{ get; set; }
Next we modify the Execute function of the component to call the Tranlate method we will define further on, to modify the message.
A good way to do this is by using the XPathMutatorStream. More info on XPathMutatorStream can be found here.
IBaseMessage Microsoft.BizTalk.Component.Interop.IComponent Execute(IPipelineContext pContext, IBaseMessage pInMsg)
{
IBaseMessage biztalkMessage = pInMsg;
XmlReader reader = XmlReader.Create(pInMsg.BodyPart.Data);
XPathCollection xpaths = new XPathCollection();
xpaths.Add(this._XPath);
ValueMutator mutator = new ValueMutator(handleXpathFound);
pInMsg.BodyPart.Data = new XPathMutatorStream(reader, xpaths, mutator);
return pInMsg;
}
private void handleXpathFound(int matchIdx, Microsoft.BizTalk.XPath.XPathExpression matchExpr, string origVal, refstring finalVal)
{
finalVal = Helper.Translate(SourceLanguage, DestinationLanguage, origVal);
}
Finally we’ll send a request to the Bing API using the XML protocols ( we are BizTalk Developpers after all … ).
We build the query using the arguments provided and return the translation:
public static string Translate(TranslationLanguage SourceLang,
TranslationLanguage DestLang, string text)
{
LoadLanguages();
HttpWebRequest request = BuildRequest(_Languages[SourceLang],
_Languages[DestLang], text);
try
{
HttpWebResponse response = (HttpWebResponse)request.GetResponse();
XmlDocument document = new XmlDocument();
document.Load(response.GetResponseStream());
XmlNamespaceManager nsmgr = new XmlNamespaceManager(document.NameTable);
nsmgr.AddNamespace(“tra”, “http://schemas.microsoft.com/LiveSearch/2008/04/XML/translation”);
return document.DocumentElement.SelectSingleNode(“./tra:Translation/
tra:Results/tra:TranslationResult”, nsmgr).InnerText;
}
catch (WebException ex)
{
throw new ApplicationException(“Web Error while translating”,ex);
}
}
static HttpWebRequest BuildRequest(string SourceLang, string DestLang, string text)
{
string requestString = “http://api.bing.net/xml.aspx?”
+ “AppId=” + AppId
+ “&Query=” + text
+ “&Sources=Translation”
+ “&Version=2.2”
+ “&Translation.SourceLanguage=” + SourceLang
+ “&Translation.TargetLanguage=” + DestLang;
HttpWebRequest request = (HttpWebRequest)HttpWebRequest.Create(
requestString);
return request;
}
Time to test: Create a BizTalk project with
A schema for testing:
A pipeline with our new component. We define the xpath to the Value Record, the source and destinationlanguage. I created pipelines to translate to Dutch and French from English:
Deploy in BiZtalk, create Receiveport with Receivelocation, 2 Sendports with a filter on the Receiveportname and our pipeline to translate to French and Dutch.
Drop a test message:
<ns0:TestTranslatorSchema
xmlns:ns0=“http://TestTranslator.TestTranslatorSchema“>
<Value>What language is this written in?</Value>
</ns0:TestTranslatorSchema>
And observe the results:
<ns0:TestTranslatorSchema
xmlns:ns0=“http://TestTranslator.TestTranslatorSchema“>
<Value>Quelle langue c’est écrit ?</Value>
</ns0:TestTranslatorSchema>
<ns0:TestTranslatorSchema
xmlns:ns0=“http://TestTranslator.TestTranslatorSchema“>
<Value>In welke taal is dit geschreven?</Value>
</ns0:TestTranslatorSchema>
Korneel Vanhie, CODit
by community-syndication | Aug 5, 2010 | BizTalk Community Blogs via Syndication
The Windows Azure AppFabric LABS August Release is live as of August 5th, 2010. This release is a major update to Access Control. It’s available in our LABS environment: http://portal.appfabriclabs.com.
For more details please see Justin Smith’s Blog entry
The Windows Azure AppFabric Team
by community-syndication | Aug 5, 2010 | BizTalk Community Blogs via Syndication
Get a complete overview of BizTalk server 2009 developer capabilities and toolsets with QuickLearn’s new self-paced course: BizTalk Developer Fundamentals.
This brand new course provides an introduction to developing applications with BizTalk Server 2009. New-to-product developers will learn how-to work with Visual Studio and BizTalk developer tools to jumpstart their BizTalk projects.
The BizTalk Developer Fundamentals Training includes an overview of:
- Creating BizTalk Schemas
- Creating BizTalk Maps & Functoids
- Message BizTalk Routing & Ports
- Building BizTalk Pipelines
- Building BizTalk Orchestrations
The subscription to the BizTalk Developer Fundamentals training includes:
- 60-days of access to video presentations and demos
- 15 hours of lab time
- Online Support
View all of QuickLearn’s BizTalk Server 2009 Training

by community-syndication | Aug 5, 2010 | BizTalk Community Blogs via Syndication
Thanks to all the attendees of my end of day session on MEF yesterday. Here’s
the code.
MEFDemo.zip
(78.36 KB)
BTW – the problem I had with the bi-directional Import/Export was that I was calling
SatisfyImportsOnce – not ComposeParts. SIO of course only satisfies the imports
on the object in question – so this makes sense 🙂

Check out my new book on REST.
by community-syndication | Aug 5, 2010 | BizTalk Community Blogs via Syndication
In previous posts I’ve described how we can use SO-Aware to centralize the configuration of WCF services avoiding the need of maintaining complex configuration files across services and clients. The mechanism is enabled by a custom WCF service host which…(read more)

by community-syndication | Aug 5, 2010 | BizTalk Community Blogs via Syndication
I’ve blogged in the past about the VS 2010 Productivity Power Tool Extensions – a free set of Visual Studio 2010 extensions that provide some nice additional functionality.
You can read my previous blog posts about it here and here. In today’s post I’m going to briefly highlight a few small, but nice, code editor capabilities that are enabled when you install the free extensions (and which I didn’t highlight in my previous blog posts).
Ctrl+Click “Go to Definition”
One of the small, but useful, features that I find myself using a lot with the extensions is the "Ctrl + Click” go to definition feature.
For those of you who haven’t tried it, it enables you to quickly navigate to the definition of a member or type within your code. You can accomplish the same behavior out of the box with Visual Studio by right-clicking on a member/type and then choosing the “Go to Definition” context menu item – or by moving your cursor over a type/member and then pressing the F12 key. But for some reason I’ve found the Ctrl+Click gesture provided by the VS 2010 Power Tool Extensions more natural and faster to use (since for my keyboard the F12 key requires a split-second extra finger move to use – whereas the control key is always in easy reach).
To try out the “Ctrl+Click” behavior, just hold down the “Ctrl” key and use your mouse to hover over a type or member in your code. When the extension is enabled you’ll find that this causes a hyperlink to appear under each type/member you hover over:
Clicking the hyperlink will immediately navigate you to the definition of the type/member within your code:

Note that the “go-to-definition” feature in VS can also be used on a type that you don’t have source access to. For example, like with the DbSet<T> collection I used in my EF “code-first” blog post yesterday:

When you click a type referenced from a binary library, VS will automatically generate a class definition based on the signature compiled into the assembly:

Triple Click Selection
Another one of the “small but useful” features provided with the power tool extensions that I find myself using a lot is the “triple click” feature.
Today with VS you can double-click on a word to automatically select it:

When the “Triple Click” extension is enabled you can now also triple-click on a line to automatically select the entire line:

This behavior has been supported in Word for awhile. Until I saw that there was a power tools extension for it I didn’t actually realize that VS didn’t already do it by default. Well – now you can.
“Alt Up/Down Arrow” Line Movement
Another “small but useful” feature provided by the power tool extensions is the ability to easily move lines of code up/down within the editor.
Simply select either a single line of code, or a block of multiple lines of code, within the editor:
Then hold down the “alt” key, and press either the up or down arrow on your keyboard. This will cause the editor to move the selected code up or down within the editor (without you having to copy/paste or move anything around manually):

This is another one of those features that Word has had for awhile – and which is nice to now have in VS.
Column Guides
Column guidelines allow you display a vertical band within the code editor. This is useful to help identify the maximum size a single line of text should be within your code (for example: to avoid wrapping when printing it out).
The power tool extensions enable you to add a column guide pretty easily. Just cursor over in your code editor to where you want the guideline to be (note: you can see the exact line column count at the bottom of the editor):

Then right-click and choose the “Guidelines->Add Guideline” menu command:

This will then cause VS to show a column guide-line in all code editor windows at that column width – making it easier to see when you’ve written code or a comment that wraps beyond that:

If you want to remove a guideline, you need to move your editor cursor to be at the same column width as the guideline. You can then right-click and use the “Guidelines->Remove Guideline” command to remove it.
Extensions Update
In case you missed it, the Visual Studio team last week made a minor update to the VS 2010 Productivity Power Tool Extensions to fix a few bugs and performance issues that people reported with the last release.
Sean has a blog post with more details about the update here. The update included fixes for:
- Poor performance with Solution Navigator searches on large projects. In this revision, we’ve made some optimizations to the search algorithm. Search will also now only be initiated after two characters are typed in the search box.
- Items in Solution Folders were not sorted. In this revision, they are sorted alphabetically.
- Invoking Quick Access could cause a crash on some machine configurations. This issue has been resolved in the current revision.
- Ctrl+1 & Ctrl+2 were not configurable in the Solution Navigator, which blocked the ability to type @ on some keyboards. This revision provides the Edit.ShowSolutionNavigatorPopupForSelection & Edit.ShowSolutionNavigatorPopupForFile commands which can be rebound using Tools => Options => Environment => Keyboard.
If you have a previous build of the Power Tool Extensions installed you use the “Tools->Extension Manager” menu command, select the power tools extension and then click the “update” button to upgrade to the latest build.
Summary
If you haven’t tried out the VS 2010 Productivity Power Tool Extensions yet, I’d encourage you to give it a try. It includes some nice additional functionality which can help save you keystrokes and time as you work within Visual Studio. I’ve only covered a few of the features in this post and my previous two posts – there are a lot more cool things in there that I haven’t blogged about yet.
You can also now enable/disable each individual feature within the extensions pack – allowing you to selectively choose what you want to use. Use the “Tools->Options” menu command, and navigate to the “Power Productivity Tools” tree-view item to enable/disable individual features.
Hope this helps,
Scott
P.S. In addition to blogging, I am also now using Twitter for quick updates and to share links. Follow me at: twitter.com/scottgu