by community-syndication | Sep 8, 2010 | BizTalk Community Blogs via Syndication
Last month we released a beta of the Microsoft Web Farm Framework. The Microsoft Web Farm Framework is a free product we are shipping that enables you to easily provision and mange a farm of web servers. It enables you to automate the installation and configuration of platform components across the server farm, and enables you to automatically synchronize and deploy ASP.NET applications across them. It also supports integration with load balancers – and enables you to automate updates across your servers so that your site/application is never down or unavailable to customers (it can automatically pull servers one-at-a-time out of the load balancer rotation, update them, and then inject them back into rotation).
The Microsoft Web Farm Framework is a 1 MB download, and can be installed on IIS 7 and above. It is available for free. You can download the first preview of this beta here: x86 / x64.
Why Is the Web Farm Framework Useful?
Running a web farm requires you to provision and manage multiple servers. Running a web farm involves (among other things):
- Installing IIS, ASP.NET and all of the core platform components on the servers
- Installing and configuring custom IIS modules (UrlRewite, Media Services, etc)
- Configuring IIS Application Pools and Sites
- Setting up SSL certificates for things like HTTPs endpoints
- Copying and synchronizing the appropriate sites/applications/content across the various boxes
- Coordinating the various web servers with a HTTP load balancer to distribute load
Administrators and developers managing a web farm today often perform a lot of manual steps to do the above (which is error prone and dangerous), or write a lot of custom scripts to automate it (which is time consuming and hard). Adding new servers or making configuring or application changes can often be painful and time-consuming.
The Microsoft Web Farm Framework makes this process much easier, and enables you to manage web farms in a completely automated way. Best of all, it is really easy to setup and use.
Using Web Farm Framework to Provision and Scale a Web Farm
The Microsoft Web Farm Framework enables you to easily define a “Server Farm” that you can add any number of servers into. Servers participating in the “Server Farm” will then be automatically updated, provisioned and managed by the Web Farm Framework.
What this means is that you can install IIS (including modules like UrlRewrite, Media Services, etc), ASP.NET, and custom SSL certificates once on a primary server – and then the Web Farm Framework will automatically replicate and provision the exact same configuration across all of the other web servers in the farm (no manual or additional steps required).
You can then create and configure an IIS Application Pool and a new Site and Application once on a primary server – and the Web Farm Framework will automatically replicate and provision the settings to all of the other web servers in the farm. You can then copy/deploy an ASP.NET application once on the primary server – and the Web Farm Framework will automatically replicate and provision the changes to all of the web servers in the farm (no manual or additional steps required).
The Web Farm Framework eliminates the need to manually install/manage things across a cluster of machines. It handles all of the provisioning and deployment for you in a completely automated way.
Load Balancer Integration
In addition to making it easy to provision/deploy servers and applications, the Web Farm Framework also includes load balancer integration. Specifically, the Web Farm Framework can integrate with an HTTP load balancer so that as web servers in the farm are updated with changes, they can be automatically pulled out of a load balancer rotation, updated, and then added back in. The Web Farm Framework can also optionally update the machines one at a time – so that you always have servers available to handle heavily load. This enables you to keep your site always available during updates – without you having to write any manual scripts to control or manage the update roll-out.
The current beta of the Web Farm Framework includes built-in support for the IIS Application Request Routing (ARR) service (which supports automatic load balancing of HTTP requests across multiple machines in a web-farm). The Web Farm Framework makes it really easy to integrate your web farm of servers with ARR for load-balancing, and includes the support to automatically pull a server out of rotation as it is being updated, and then have it added back into rotation once the update is done.
The final Web Farm Framework release will enable extensibility with other load-balancing technologies as well – enabling the same ability to automatically pull/inject servers from a load balancing rotation as they are updated.
Scenario Walkthrough: Setting up and Provisioning a Web Farm
Let’s walkthrough a simple scenario where we want to setup and manage a server farm made up of two web servers. We’ll call these two web-servers the “DemoPrimary” and “DemoSeconday” servers. We’ll use a third “DemoController” machine to coordinate and manage the web farm. DemoController doesn’t technically need to be a separate machine – but makes it easier to understand the various roles in the walkthrough.
Installing the Web Farm Framework
We’ll begin by installing the current beta of the Microsoft Web Farm Framework using the Microsoft Web Platform Installer on our “DemoController” machine. It works with any machine that has IIS 7 (and above) installed.
Creating and Provisioning a Web Farm
Once the Microsoft Web Farm Framework is installed, you’ll find a new “Server Farm” node listed within the left-hand tree view of the IIS Admin Tool on the “DemoController” machine. If you right-click on this “Server Farm” node you’ll see an option to “Create Server Farm”

Selecting this option will bring up a “Create Server Farm” dialog – and allow us to configure and setup a farm of machines that we want to manage together.
We’ll name the new server farm we want to create “DemoFarm”, and indicate that we want to automatically provision all of the servers in the farm (by checking the “Provision Server Farm” option in the dialog). We’ll also indicate that we want to make it available for load-balancing with the IIS Application Request Routing (ARR) load-balancer:

When we click the “Next” button the wizard will bring up an “Add Servers” dialog that allows us to specify the servers we want to have in the web farm. We can add any number of servers at the time of first setup. We can also come back and add more servers to the server farm later. When you add more servers to the farm later, the Web Farm Framework will automatically provision and update them to have the latest changes (allowing us to easily add additional capacity at any time).
For this walkthrough we’ll add our two servers – “DemoPrimary” and “DemoSeconday” to our server farm. We’ll start by adding the “DemoPrimary” machine. We’ll select the “Primary Server” checkbox in the dialog – which will indicate that its role is to act as the primary server that the other servers in the farm will replicate:

Once we add the “DemoPrimary” server we’ll also add the “DemoSecondary” server to the farm.

When we click the “Finish” button the Web Farm Framework will connect to the servers we’ve added to the farm and automatically provision the appropriate management software on them for us (no need for us to install anything manually – the web farm framework will automatically install its management service on the target machines). Clicking the “servers” tab in the “Server Farm” node in the IIS Admin tool always provides an up-to-date view of the provisioning and deployment operations happening across all the farm (you can also filter it by individual server if you want):

At this point we are completely done configuring our web farm. We now have a working, automated, web farm enabled.
We have setup our web farm for automated provisioning and synchronization/replication. If we were to create sites or application pools on the “DemoPrimary” web server, or install or update applications on it, they would be automatically replicated/synchronized on the “DemoSeconday” server. This is also true for any web platform components we install. We do not need to manually install or configure anything on any additional secondary servers we add to the farm. The Web Farm Framework will automate keeping them synchronized with our Primary Server – and enable us to manage the entire farm of servers as a group.
Managing a Web Farm
Clicking on the “DemoFarm” sub-node within the IIS Admin Tool enables us to manage, track and configure our server farm:
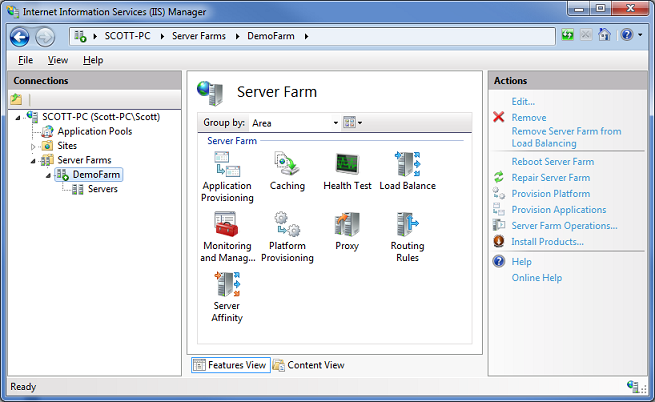
The view above combines the settings of both the Web Farm Framework, as well as the Application Request Routing capability of IIS (which adds load-balancing and cache management support).
You can click on the “Servers” sub-node of “DemoFarm” to see how the servers within the web farm are doing, if they are currently performing any deployment/provisioning operations, and if any errors have occurred on them. If any provisioning/deployment errors have occurred anywhere in the farm, you can drill down to detailed tracing to see what they were.
Platform Provisioning using the Web Farm Framework
The Web Farm Framework enables you to easily add more platform components to your server-farm machines at anytime by using the “Platform Provisioning” icon above. This integrates our Microsoft Web Platform Installer technology, and enables you to easily install platform components on all of your web farm machines. It also allows you to easily check for any version differences in platform components between your primary and secondary machines in the farm.
Below we can add “ASP.NET MVC 2” to the server farm configuration:

Notice that the “Enable Platform Provisioning” checkbox is selected – this will ensure that products we add to the list are automatically provisioned across all of the servers in the farm. By default the Web Farm Framework will update each server in the farm one-by-one, and take it out of the load-balancer rotation while it does it, and then automatically add it back into the load balancer rotation once it is complete (ensuring your site never goes down). The Web Farm Framework will even handle scenarios where a server reboot is necessary – and complete the provisioning step and re-add the server back to rotation once the reboot is done.
Application Provisioning using the Web Farm Framework
The Web Farm Framework enables you to easily deploy and replicate/synchronize Sites, Applications, Content and Settings across a Web Farm. It uses the Microsoft Web Deploy technology to enable application deployment in an automated fashion (no manual steps required for both adding new applications and updating existing ones).
By default, the Web Farm Framework will automatically synchronize the Sites, Applications, Content and Settings we’ve configured on our “DemoPrimary” server to our “DemoSeconday” server (and any other web-servers we later add to the server farm). We can use any application deployment mechanism we want to create and copy the application up onto the “DemoPrimary” machine. This means we could use FTP/SFTP or the Microsoft Web Deploy framework to deploy the sites/content to “DemoPrimary”. It also means any web applications that use a custom MSI installer or custom batch-file/powershell script to deploy applications onto our “DemoPrimary” will also work.
The benefit of supporting any deployment mechanism is that you can leverage any of the existing application/site/app-pool deployment approaches you already use with IIS to update your primary server – and then use the Web Farm Framework to automatically have the installed application/site/content automatically replicated across the other machines in the web-farm. This makes it easier to integrate the Microsoft Web Farm Framework into your existing deployment workflows.
If you click the “Application Provisioning” icon in the IIS admin tool you can specify the synchronization frequency with which you want the servers in the web-farm to check for application/site/content updates (by default it happens every 30 seconds).
You can also optionally specify any additional Microsoft Web Deploy providers you want to use to copy custom settings across machines in the web-farm. For example, if you want a custom registry setting copied – you can enable that. If you want to set a custom NTFS security ACL – you can enable that. If you want to copy/register a COM object – you can enable that. If you’ve built your own custom “FooProvider” to do some custom stuff – you can enable that too.
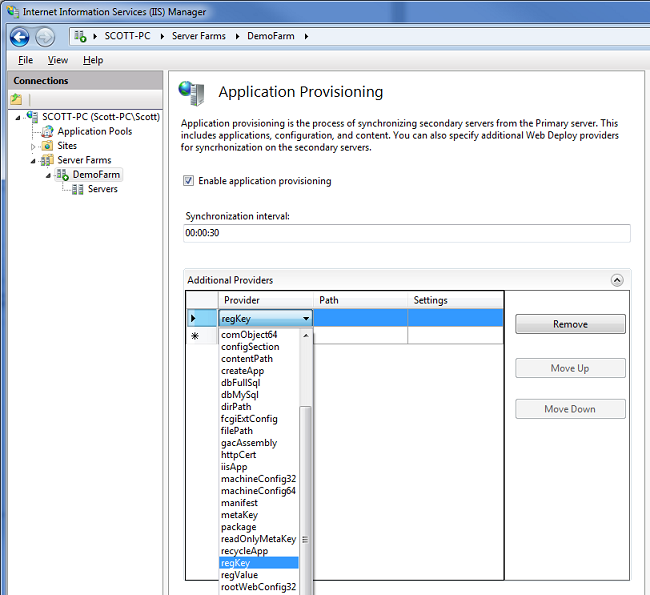
When you make changes or updates to applications on your primary server, the Web Farm Framework will automatically synchronize and copy them to the other servers in the server-farm for you. No manual steps required.
Running Operations and Managing the Server Farm
The Web Farm Framework includes some built-in management infrastructure that allows you to check on the health of a server, and track its status. You can also use a product like Microsoft System Center (or any custom monitoring software or scripts you have) to monitor the server status within the farm. If you are using ARR for load-balancing, it also supports a bunch of monitoring and load-balancing settings that allow you to dynamically shift loads across the farm based on server performance and available utilization.
The Web Farm Framework also supports a “Server Farm Operations” task link within the IIS Admin Tool (on the right-hand side of the tool) that you can use to easily run commands across the server farm. For example, we could flash a command to all the servers in the web farm to ensure that a “MyCustomWindowsService” is started and running using the screen below:

You can also fully automate tasks using PowerShell scripts.
Summary
You can take advantage of the Microsoft Web Farm Framework to simplify the provisioning and deployment of your web server infrastructure – both the servers themselves, as well as the web applications and sites you run on top of them. It enables a smoother continuous deployment workflow. It also makes it easy to seamlessly scale your infrastructure by adding servers to it without additional management overhead. Best of all it is available at no extra cost and works with all editions of Windows Server.
Click here to learn more about the Microsoft Web Farm Framework. You can download a beta of the Microsoft Web Farm Framework here.
Hope this helps,
Scott
P.S. In addition to blogging, I am also now using Twitter for quick updates and to share links. Follow me at: twitter.com/scottgu
by community-syndication | Sep 7, 2010 | BizTalk Community Blogs via Syndication
|
We have new premium content for AppFabric server. This sample and the document are just what customers need to start using AppFabric Server to manage a .NET4 WCF Workflow service. Customers have been asking about versioning and security, and those are two features of the sample. The sample is released via the TechNet Wiki and this gives the community the opportuntiy to expand the solution and fix the code and doc as needed.
On the wiki:
http://social.technet.microsoft.com/wiki/contents/articles/appfabric-reference-implementation-managing-the-lifecycle-of-a-workflow-service.aspx
The Visual Studio solution is at MSDN Code Gallery
http://code.msdn.microsoft.com/AppFabricRefImpl
Namaste!
|
Synopsis
The Starter Kit is designed to be a reference implementation; a secondary objective is to provide sample code that developers could use to manage the life-cycle of the .NET 4 Workflow Services on Windows Server AppFabric. It does this by providing a complete client-side application that enables design of .NET Windows Workflow Services outside of the Visual Studio IDE; deployment of these Services from the Client to the AppFabric server; versioning of the deployed service definitions; and finally management of Service Instances in a custom monitoring console. Additionally this document provides the instructions for setup, a tour of the features and implementation highlights.
The features enabled via the starter kit are:
• Re-hosting the designer to provide a design experience that’s fully integrated into the line-of-business application
• Handling deployment from design tool to the Windows Server AppFabric
• Managing the published versions of the customer’s workflow designs
• Securing access to designed workflows
• Executing and controlling instances of custom workflows from the product
• Reporting on business metrics collected from a workflow service instance’s execution
• Troubleshooting and diagnosing issues.
by community-syndication | Sep 7, 2010 | BizTalk Community Blogs via Syndication
New standard the UDDI was announced several years ago [see the history in Wikipedia]. The UDDI future was promising. I was sure for that. I thought, the future is for Web-services [WS], and it is. Isn’t that mean, we need services to search Web-services in internet, some Registries/Catalogs of the Web-services?
How we could find the WS in internet? Google Search was not effective in this; it is still not effective now. By any means, the UDDI idea should win; all WS-s should work with UDDI Registers. There was no way to live without UDDI. WS-s should be everywhere and to find the right one we should use the UDDI. We thought so.
The big companies started to invest in UDDI: IBM, Microsoft, SAP, and more. Smart people were writing UDDI standard, developers were writing UDDI systems. Big companies announced about public UDDI Registers in internet. Future was without clouds.
What happens after this? Several years ago Microsoft, IBM closed they UDDI Registers in internet. Now there aren’t big public UDDI Registers. We have some but they are miserable. Seems, nobody wants to publish the WS-s in these Registers.
Why the UDDI Registers are not popular as Google or Yahoo Search?
This all resembles to me the “pre-google” days, while each new site must be “promoted” into the search engines. We could register a new site in some engines without problems, in some engines only with payment or registration. Then the Google was born. Google is gathering new sites by itself and automatically included them to the Google register. Explicit procedures were changed to implicit, automatic procedures.
Maybe the same was happened with the Registers for WS-s?
But what was happened, the most of the WS-s did not want to be “promoted”. Most of the WS-s are created for the limited user audience. Those users know all information about the WS, its address, its meta-information (Wsdl, Wsd-s, bindings, etc.). Moreover it is unlikely anybody outside of the circle of the trusted users could access this information.
There were other reasons that let the UDDI standard go down.
One of the reasons was the standard itself. It was not simple, nor clear, nor easy to use standard. Creators make it all-embracing (maybe creators thought so) and designed in smallest details, big and clumsy. It was popular in these years creating internet standards in such fashion; include in standards all and everything. Standards of those years were set apart as monolithic and huge. Standards tended to include all knowledge of specific area. Of course, they were not as large as monster-standards like EDI or HL7. But they were not as laconic and segmented as modern standards (for example, the family of the WS-* standards).
But the most negative factor was the fact the UDDI was substituted by other more advanced technologies. Now most of the Web-services show the meta-information on the predefined URL. All Wsdl-s, Xsd-s, and bindings are placed together with Web-service not in specialized Registers. In this way the Web-service makes itself independent, self-describing. User didn’t have to search the WS meta-information somewhere else. Users need to know only the URI (address) of the WS. It is not wise to use UDDI Registers to store only addresses. UDDI Registers are too complex, too overloaded with unused functionality for this simple task.
As a result the UDDI standard and UDDI services are now used only in small, narrow areas. For example, the UDDI service is used in the Microsoft BizTalk Server (see ESB Toolkit 2.0). Web-service Register has to be in the ESB, because the whole idea of ESB is based on principle, that user is publishing messages in ESB and the Bus knows what services should process the messages, knows all addresses, knows all format transformations.
But if we are returning to the generic case of the Web-service, all we need to know is the address of this WS.
UDDI let us find the WS by key words as it is in the Yahoo Directories. It happens this feature is not a user requirement at all.
The UDDI standard in the niche standard not universal so far.
by community-syndication | Sep 7, 2010 | BizTalk Community Blogs via Syndication
Recently I asked you to vote on topics you want to see on endpoint.tv. Coming in at #3 was this question on how to Unit Test WF4 Workflows.
Because Workflows range from very simple activities to long and complex multi-step processes this can be a very challenging. I found after writing many activities that I began to see opportunities to create a library of test helpers which became the WF4 Workflow Test Helper library.
In this post I’ll show you how you can test a simple workflow using one of the helpers from the library.
Testing Activity Inputs / Outputs
If you have a simple activity that returns out arguments and does not do any long-running work (no messaging activities or bookmarks) then the easiest way to test it is with WorkflowInvoker.
The Workflow we are testing in this case contains an activity that adds two Int32 in arguments and returns an out argument named sum
The easiest way to test such an activity is by using Workflow Invoker
[TestMethod]

public void ShouldAddGoodSum()

{

    var output = WorkflowInvoker.Invoke(new GoodSum() {x=1, y=2});


    Assert.AreEqual(3, output["sum"]);

}
While this test is ok it assumes that the out arguments collection contains an argument of type Int32 named “sum”. There are actually several possibilities here that we might want to test for.
- There is no out argument named “sum” (names are case sensitive)
- There is an argument named “sum” but it is not of type Int32
- There is an argument named “sum” and it is an Int32 but it does not contain the value we expect
Any time you are testing out arguments for values you have these possibilities. Our test code will detect all three of these cases but to make it very clear exactly what went wrong I create a test helper called AssertOutArgument.
Now let’s consider what happens if you simply changed the name of the out argument from “sum” to “Sum”. From the activity point of view “Sum” is the same as “sum” because VB expressions are not case sensitive.
But our test code lives in the world of C# where “Sum” != “sum”. When I make this change the version of the test that uses Assert.AreEqual gets this error message
Test method TestProject.TestSumActivity.ShouldAddBadSumArgName threw exception:
System.Collections.Generic.KeyNotFoundException: The given key was not present in the dictionary.
If you have some amount of experience with Workflow and arguments you know that the out arguments are a dictionary of name/value pairs. This exception simply means it couldn’t find the key – but what key?
Using WorklowTestHelper
- Download the binaries for WorkflowTestHelper
- Add a reference to the WorkflowTestHelper assemblies
- Add a using WorkflowTestHelper statement
To use AssertOutArgument we change the test code to look like this
[TestMethod]

public void ShouldAddGoodSumAssertOutArgument()

{

    var output = WorkflowInvoker.Invoke(new GoodSum() { x = 1, y = 2 });


    AssertOutArgument.AreEqual(output, "sum", 3);

}
Now the error message we get is this
AssertOutArgument.AreEqual failed. Output does not contain an argument named <sum>.
Wrong Type Errors
What if you changed the workflow so that “sum” exists but it is the wrong type? To test this I made “sum” of type string and changed the assignment activity expression to convert the result to a string.
The Assert.AreEqual test gets the following result
Assert.AreEqual failed. Expected:<3 (System.Int32)>. Actual:<3 (System.String)>.
This is ok but you do look twice – Expected:<3 then Actual:<3 but then you notice the types are different.
AssertOutArgument is more explicit
AssertOutArgument.AreEqual failed. Wrong type for OutArgument <sum>. Expected Type: <System.Int32>. Actual Type: <System.String>.
Summing It Up
AssertOutArgument covers three things, make sure the arg exists, make sure it is the correct type and make sure it has the correct value. Of course there is much more to the WF4 Workflow Test Helper that I will cover in future posts.
by community-syndication | Sep 7, 2010 | BizTalk Community Blogs via Syndication
Today we are excited to have a major announcements about SO-Aware : Our Visual Studio plug-in and a preconfigured SO-Aware Virtual Image. SO-Aware VPC As Pablo announced last week , now you can download a virtual pc image with SO-Aware Express fully installed…(read more)
by community-syndication | Sep 7, 2010 | BizTalk Community Blogs via Syndication
A few months ago I blogged about some Web Camp events that Microsoft is sponsoring around the world. These events provide a great way to learn about ASP.NET 4, ASP.NET MVC 2, and Visual Studio 2010. The events are free and the feedback from people attending them has been great. We are working to setup many more web camps around the world in the months ahead.
This Friday (September 10th) we’ll be holding a free web camp in Los Angeles. Phil Haack, Jon Galloway, and James Senior will all be presenting at the event – so it will be really good.
Details on the Los Angeles Web Camp can be found here. We just got additional space so some extra seats are now available. They are filling up fast, though, and will be sold out soon. Learn more and register here if you want to grab them and attend.
Hope this helps,
Scott
P.S. In addition to blogging, I am also now using Twitter for quick updates and to share links. Follow me at: twitter.com/scottgu
by community-syndication | Sep 7, 2010 | BizTalk Community Blogs via Syndication
The BizTalk User Community in Australia & New Zealand have come together to present a community event around BizTalk Server 2010. The event will be a Saturday event in many cities around Australia and New Zealand showcasing the new features of BizTalk Server 2010. The day will consist of short talks about the new feature and then hands on labs to allow you first hand experience with the new features.
For details on the Hands on Day in your city please visit www.biztalksaturday.com
Hope to see you at one of the Hands on Days
Bill Chesnut
by community-syndication | Sep 7, 2010 | BizTalk Community Blogs via Syndication
In our last installment, we learned the basics of how to use DictionaryAdapter to use an interface to access loosely structured data. This time, we’re going to show a somewhat more complex scenario than simple properties. Consider the following:
        static void Main(string[] args)
        {
            var dict = new Dictionary<string, object>()
                {
                    { "UserId", 1234567 },
                    {
                        "UserName", new Dictionary<string,object>()
                        {
                            { "UserFirstName", "Tim" },
                            { "UserLastName", "Rayburn" }
                        }
                    }
                };
        }
As you can see, we’ve nested dictionaries this time, where the UserName key has a value of another dictionary, with two keys itself. The simplest model for this is to simple add another interface, IUserName, which represents this nested data. Here is a look at that code:
    public interface IUserData
    {
        [Key("UserId")]
        int Id { get; set; }

        [Key("UserName")]
        IUserName Name { get; set; }
    }

    public interface IUserName
    {
        [Key("UserFirstName")]
        string FirstName { get; set; }

        [Key("UserMiddleName")]
        string MiddleName { get; set; }

        [Key("UserLastName")]
        string LastName { get; set; }
    }
So lets see how DictionaryAdapter (it’s called DA by its friends, which if you’re still reading at this point you clearly are) so lets see how DA handles this scenario. We’d hope that something like this would work:
        static void Main(string[] args)
        {
            var dict = new Dictionary<string, object>()
                {
                    { "UserId", 1234567 },
                    {
                        "UserName", new Dictionary<string,object>()
                        {
                            { "UserFirstName", "Tim" },
                            { "UserLastName", "Rayburn" }
                        }
                    }
                };

            var data = new DictionaryAdapterFactory().GetAdapter<IUserData>(dict);

            Console.WriteLine(data.Name.FirstName);
        }
Does it? Nope. Why? Let’s look at the details:
System.InvalidCastException was unhandled
  Message=Unable to cast object of type 'System.Collections.Generic.Dictionary`2[System.String,System.Object]' to type 'Part2.IUserName'.
  Source=Part2.Part2.IUserData.DictionaryAdapter
  StackTrace:
       at Part2.UserDataDictionaryAdapter.get_Name()
       at Part2.Program.Main(String[] args) in C:\source\BlogPosts\DictionaryAdapterIsLove\Part2\Program.cs:line 32
       at System.AppDomain._nExecuteAssembly(RuntimeAssembly assembly, String[] args)
       at System.AppDomain.ExecuteAssembly(String assemblyFile, Evidence assemblySecurity, String[] args)
       at Microsoft.VisualStudio.HostingProcess.HostProc.RunUsersAssembly()
       at System.Threading.ThreadHelper.ThreadStart_Context(Object state)
       at System.Threading.ExecutionContext.Run(ExecutionContext executionContext, ContextCallback callback, Object state, Boolean ignoreSyncCtx)
       at System.Threading.ExecutionContext.Run(ExecutionContext executionContext, ContextCallback callback, Object state)
       at System.Threading.ThreadHelper.ThreadStart()
  InnerException:
I have to give credit where credit is due, this make pretty darned clear what the problem is. Our nested dictionary is not, itself, being wrapped so when DA tries to retrieve it and cast it to IUserName it, obviously, cannot.
That’s great Tim but how do I fix that?
Enter behaviors. Dictionary adapter has an abstraction over anything that modifies how it does its work called Behaviors. You can create behaviors for all sorts of things, but one of them is Property Getting. To modify this behavior you need to do two things:
- Create a class which implements the IDictionaryPropertyGetter interface.
- Modify your request to the Factory to request your DA use that behavior.
If we take a peek at IDictionaryPropertyGetter you will see the following definition:
    public interface IDictionaryPropertyGetter : IDictionaryBehavior
    {
        object GetPropertyValue(IDictionaryAdapter dictionaryAdapter, string key, object storedValue, PropertyDescriptor property, bool ifExists);
    }
As you can see this isn’t terribly complex. But you’ll also notice that it implements IDictionaryBehavior, so lets take a peek at that shall we?
    public interface IDictionaryBehavior
    {
        int ExecutionOrder { get; }
    }
Again, not very complex at all. So we need a class that will implement both of these, and which will examine the propertyDescriptor parameter to determine if the requested Type is itself an interface which is not assignable from the type of storedValue but that storedValue is assignable from IDictionary. If those conditions are met, we can create another DictionaryAdapter to adapt to the new interface. Here is a simple example of that class :
    public class NestedDictionaryGetterBehavior : IDictionaryPropertyGetter
    {
        public object GetPropertyValue(IDictionaryAdapter dictionaryAdapter, string key, object storedValue, PropertyDescriptor property, bool ifExists)
        {
            if (property.PropertyType.IsAssignableFrom(storedValue.GetType()))
            {
                return storedValue;
            }

            if (property.PropertyType.IsInterface && IsDictionary(storedValue.GetType()))
            {
                return dictionaryAdapter.This.Factory.GetAdapter(property.PropertyType, storedValue as IDictionary);
            }

            return storedValue;
        }

        public int ExecutionOrder
        {
            get { return 0; }
        }

        private bool IsDictionary(Type type)
        {
            return typeof(IDictionary).IsAssignableFrom(type);
        }
    }
As you can see, some code, but not lots of code. Our example should skip the first if statement and go into the second one, returning the new DictionaryAdapter. Now we need to do step 2, modify our original request to the Factory to add our behavior. Here is what the code looks like once we’ve done that:
        static void Main(string[] args)
        {
            var dict = new Dictionary<string, object>()
                {
                    { "UserId", 1234567 },
                    {
                        "UserName", new Dictionary<string,object>()
                        {
                            { "UserFirstName", "Tim" },
                            { "UserLastName", "Rayburn" }
                        }
                    }
                };

            var data = new DictionaryAdapterFactory()
                .GetAdapter(typeof(IUserData),
                dict,
                new DictionaryDescriptor().AddBehavior(new NestedDictionaryGetterBehavior())) as IUserData;

            Console.WriteLine(data.Name.FirstName);
            Console.ReadLine();
        }
Now, that gets a little tedious to do every time, and I can assure you that Craig Neuwirt hates tedious. As such, DictionaryAdapter will look for any attributes on your interface which implement IDictionaryBehavior and add them for you automatically. So with a very simple refactoring of our class:
public class NestedDictionaryGetterBehavior : Attribute, IDictionaryPropertyGetter
We can then modify our interface:
    [NestedDictionaryGetterBehavior]
    public interface IUserData
    {
        [Key("UserId")]
        int Id { get; set; }

        [Key("UserName")]
        IUserName Name { get; set; }
    }
And move back to a very simple DictionaryAdapterFactory request:
var data = new DictionaryAdapterFactory().GetAdapter<IUserData>(dict);
And I think that’s enough for this time.
by community-syndication | Sep 6, 2010 | BizTalk Community Blogs via Syndication
Simplifying publishing of the Workflow definitions
Typically Business Analysts (IT Pro) own the process of creating Workflow definitions while publishing this definition, particularly to production environments, is relegated to IT/Production Systems Staff. While this approach is acceptable in many commercial establishments, there is also the need for corporations with relatively smaller IT Org footprint to handover responsibility of publishing and managing Workflow definitions to the IT Pros.
SharePoint Server makes it possible for IT Pros and Business Analysts to seamlessly design and ‘activate’ Workflow definitions with ‘one-click’ http://technet.microsoft.com/en-us/library/cc262348.aspx; IT industry expects similar experiences to publish definitions while using .NET4 based Windows Workflow (WF) applications. IT Pros abhor the use of the Workflow Designer within Visual Studio 2008 and consequently, the re-hosted Workflow Designer Application (see this link for more on re-hosting Workflow Designer) with the ‘one-click’ publish function is required. Increasingly, developers are looking for samples to jump start the implementation of the ‘one-click’ publication of Workflow definitions to Windows Server AppFabric. This blog entry addresses this need.
Without this ‘one-click’ approach the publishing process (deploying Workflow definitions from a re-hosted Workflow Designer), is very tedious. Requiring manual file copy; creating the package on the re-hosted Designer; importing the package and running the configuration steps on the remote AppFabric Server. Another advantage of automating the process is that it is less prone to potential errors due to the manual steps. Investing in this ‘one-click’ feature will pay off in multiple ways for a long time.
Scenario
For this blog post, we define a scenario wherein an ISV Developer is building a Workflow Studio that re-hosts the Windows Workflow Designer. The ‘one-click’ method leverages Microsoft’s Web Deployment Framework to publish XAMLX Workflow definitions from the Workflow Studio to the designated Windows Server AppFabric Server (with IIS role enabled).
The Workflow Studio is a lightweight equivalent to the Visual Studio 2010 Workflow Designer experience. This Workflow Studio includes the ‘one-click’ publishing method in addition to other features that are required to manage the definition once deployed to the AppFabric Server.
Solution
Overview
One key requirement for performing the remote publishing of the Workflow definition is that the Workflow Studio Application needs to provide the IIS Server’s URI/location along with user account credentials. This is illustrated in the graphic below.
The other ‘steps’ in developing the ‘one-click’ method are presented below.
Step 1: Publish local project as an application on the remote IIS Server
Web Deploy is used to publish the project as an application on the IIS Server. The code below leverages the Web Deploy API to perform the remote publishing actions. This action synchronizes a project directory ‘source’ (e.g., Workflow Studio) with a destination application hosted on the target IIS Server. The source in this scenario is the Workflow Studio’s Workflow project directory containing XAMLX,.config files and supporting .NET assemblies. The destination is the remote IIS Server. Also required is a reference to Microsoft.Web.Deployment.dll in order to use the Web Deploy API in the Workflow Studio Application code. This assembly is available at %program files%/IIS/Microsoft Web Deploy/.
In scenarios where the IIS Server does not provide a trusted certificate, there is the need to provide a delegate to enable the Workflow Studio deployment code to trust any certificate from the server. The ‘one-click’ Publish operation in the Workflow Studio is very similar to that provided by Visual Studio 2010 via the Web Deploy command line switch: -allowUntrusted.
1: using System.Net;
2: ServicePointManager.ServerCertificateValidationCallback = (s, c, chain, err) =>
3: {
4: return true;
5: };
In preparing the Web Deploy DeploymentObject for synchronization, some options are required to be set and these are: DeploymentBaseOptions, DeploymentProviderOptions and the DeploymentSyncOptions.
DeploymentBaseOptions define host information and DeploymentProviderOptions define provider info and key attribute data. The DeploymentSyncOptions provide settings for customizing the actions of the synchronization itself. The web deployment synchronization involves creating a Deployment Object from a source of information (project, website, application, app pool etc.) and synchronizing this info to a destination object. The source in this case is the project we want to publish as an IIS application on the server.
In the code sample below, we start by configuring the DeploymentBaseOptions for the source as well as the Destination. Setting TempAgent to true enables this synchronization operation to run from a temporary, “on demand” installation of Web Deploy. This is handy for cases where the Web Deploy Remote Agent Service may not be installed at the destination. Two notes: there are different Authentication Type settings used and the choice depends on needs of the destination; and the second is the string used for destinationBaseOptions.ComputerName which is the path to the Web Deployment handle and this is the Web deploy installation default.
Note: Web Deploy supports over 30 different providers out-of-the-box. These providers supply a useful set of tools that address a wide array of synchronizing needs. Resources that can be synchronized include: web sites, applications, content folders and files, databases, registry keys, assemblies in the GAC and more. A custom provider is built for this ‘one-click’ Application and is covered detail in the following section.
After creating the DeploymentBaseOptions, we create the DeploymentProviderOptions for the source and destination, setting the WellKnownProvider and Path for each. We use the IisApp WellKnownProvider because it will be able to use the project folder to create/update a copy of it as an IIS Application at the destination. The path of the source’s DeploymentProviderOptions points to the project’s directory, and the path for the destination’s DeploymentProviderOptions direct the IisApp Provider to the website and application that will be the target of this sync.
Next DeploymentSyncOptions are created, setting DoNotDelete switch to true. The DoNotDelete switch is important; this leaves any un-matching files at the destination alone. Without this setting turned on, these files would be deleted during the sync which is detrimental to this and follow-on projects.
With all knobs for the synchronization created; the Deployment Object, created, is configured with the source information. We call a SyncTo operation on this Object, passing in the Destination and Sync options. The return value of this Operation is a structure that contain information useful to provide the status on the publish process to the IT Pro.
1: DeploymentBaseOptions sourceBaseOptions = new DeploymentBaseOptions()
2: {
3: ComputerName = "localhost";
4: TempAgent = true;
5: };
6:
7: string deploymentServer = Server;
8: DeploymentBaseOptions destinationBaseOptions = new DeploymentBaseOptions()
9: {
10: ComputerName = "https://SERVER.COM:8172/msdeploy.axd";
11: UserName = Username;
12: Password = Password;
13: AuthenticationType = "Basic";
14: };
15:
16: if (deploymentServer.Equals("localhost"))
17: {
18: destinationBaseOptions.ComputerName = "localhost";
19: destinationBaseOptions.AuthenticationType = "NTLM";
20: }
21:
22: DeploymentProviderOptions sourceProviderOptions = new DeploymentProviderOptions("IisApp");
23: sourceProviderOptions.Path = @"C:\projectDirectory";
24:
25: DeploymentProviderOptions destinationProviderOptions = new DeploymentProviderOptions("IisApp");
26: destinationProviderOptions.Path = "Default Web Site/ExampleApp";
27:
28: DeploymentObject projectSourceObject = DeploymentManager.CreateObject(
29: sourceProviderOptions,
30: sourceBaseOptions);
31:
32: DeploymentSyncOptions syncOptions = new DeploymentSyncOptions();
33: syncOptions.DoNotDelete = true;
34:
35: DeploymentChangeSummary results = projectSourceObject.SyncTo(
36: destinationProviderOptions,
37: destinationBaseOptions, syncOptions);
38:
39: if (results.Errors > 0)
40: {
41: MessageBox.Show(
42: String.Format("Publish Failed. {0} errors. {1} warnings.",
43: results.Errors, results.Warnings), "Publish Failed",
44: MessageBoxButton.OK, MessageBoxImage.Error);
45: }
46: else
47: {
48: MessageBox.Show(
49: String.Format("Publish Succeeded. Added {0} objects. Deleted {1} objects. Updated {2} objects. Transferred {3} bytes.",
50: results.ObjectsAdded, results.ObjectsDeleted, results.ObjectsUpdated, results.BytesCopied), "Publish Succeeded",
51: MessageBoxButton.OK, MessageBoxImage.Information);
52:
53: System.Diagnostics.Process.Start("http://" + deploymentServer + "/" + dirName + "/" + System.IO.Path.GetFileName(fileNames[0]));
54: }
The above synchronization is a quick sample that does the job, which can be modified in a number of ways to suit your deployment needs. For your reference, there are a few links at the end of this post to elaborate on the MSDeploy API scenarios.
Step 2: Enable Net.Pipe Protocol
Since these Workflow Services are hosted in Windows Server AppFabric, each application requires the net.pipe protocol enabled so that AppFabric can manage instances of the published service.
These changes are required to be applied on the server at applicationHost.config file (%windows%\ System32\inetsrv\config\ ). In order to modify these settings, a Deployment Object is created using the Application on the Server, add the DeploymentSyncParameter that will set the Enabled Protocols and Synchronize this Object to the Application on the Server. Here another Publish is being processed using Web Deploy, using Provider AppHostConfig and DeploymentSyncParameter is added to the Deployment Object before the Sync.
1: DeploymentObject iisAppObject = DeploymentManager.CreateObject(
2: DeploymentWellKnownProvider.AppHostConfig,
3: "Default Web Site/WorkflowApplication",
4: destinationBaseOptions);
5:
6: DeploymentSyncParameter protocolParameter =
7: new DeploymentSyncParameter("EnableProtocols",
8: string.Empty, string.Empty,
9: string.Empty);
10:
11: protocolParameter.Add(
12: new DeploymentSyncParameterEntry(
13: DeploymentSyncParameterEntryKind.DeploymentObjectAttribute,
14: @"application", "application/@enabledProtocols", string.Empty));
15:
16: protocolParameter.Value = @"http,net.pipe";
17:
18: iisAppObject.SyncParameters.Add(protocolParameter);
19:
20: DeploymentProviderOptions destinationOptions = new DeploymentProviderOptions(
21: DeploymentWellKnownProvider.AppHostConfig);
22:
23: destinationOptions.Path = "Default Web Site/WorkflowApplication";
24:
25: iisAppObject.SyncTo(
26: destinationOptions, destinationBaseOptions, new DeploymentSyncOptions());
Summary
Earilier in this post, we have demonstrated the ease with which we are able to provide the re-hosted Workflow Designer client, a lightweight application that handles a complicated remote publishing process, in a relatively simple manner. Overall, we achieved the ‘one-click’ publication of the Workflow definitions.
References
Below are a compilation of resources that could be useful as you build these interesting features on the re-hosted Workflow Designer.
1. Microsoft.Web.Deployment Namespace
2. Web Deploy Command Line Reference
3. Web Deploy Providers
4. Web Deployment Tool Official Forum on IIS.net
5. Server Manager Class
6. ASP.NET Configuration File Hierarchy and Inheritance
7. “MSDeploy API Scenarios”, James Coo
8. “..connection to a IIS server with self-issued certificate ..“, Kateryna Rohonyan
9. “MSDeploy Custom Provider Take 1”, Sayed Ibrahim Hashimi
10. “Writing Extensible Providers for WebDeploy V1 RTM”, Web Deploy Team Blog
11. “Search your configuration sections in web.config files using IIS 7.0 APIs”, CarlosAg
12. “How to read/write administration.config”, Kanwaljeet Singla

by community-syndication | Sep 5, 2010 | BizTalk Community Blogs via Syndication
The next Auckland Connected Systems User Group meeting is set for Thursday the 23th of September at 5:30pm. Presentation starts at 6:00pm. This month we have a member of the famous BizTalk and Windows Server AppFabric Customer Advisory Team (http://blogs.msdn.com/b/appfabriccat) presenting about the best practices and patterns around building BizTalk Server solutions. Don’t forget to […]