Question for you EDI gurus out there
What does the star represent?
What does the star represent?
I’ve got SOA on the brain lately. I’m in the process of writing a book on building service-oriented solutions using BizTalk Server 2006 R3 (due out right around the product release), and, trying to organize a service review board at my company. Good times.
So what’s a “service review board”? It’s a chance to look at […]
After working for the past couple of months to get this setup, I can now announce that Stargate Global Consulting (http://www.stargateglobalconsulting.com) is partnering with Quicklearn (http://www.quicklearn.com) to deliver advanced BizTalk training in Australia.
To launch the partnership Stargate is bring one of the Quicklearn instructors to Australia to deliver the Quicklearn BizTalk Deep Dive course at the end of July (week of the 28th).
For more information and to register follow this link: http://www.stargateglobalconsulting.com.au/biztalk_training.aspx

The PDC 2005 was the best conference I ever attended. Seeing WF and WCF for the first time, as well as the DSL Tools and lots of other stuff, plus the several contacts I did while there, helped understand what was to come in technology, and this help |create|it| prepare for this future.
 I am also attending this year’s PDC2008, where a lot is expected, for example, in what regards Microsoft’s approach to Cloud Computing. BizTalk Services is sure to be there, as well as BizTalk "Oslo", Live Mesh and other initiatives like SQL Data Services. Just check the session list, full of vague descriptions so as to not spoil the surprise, and you’ll realize this has the right ingredients to be a great conference again.
I know of several other (Portuguese) people who are attending, and if you can, try to be there. The PDC2008 is about future technologies, and it’s the Microsoft conference to attend this year.
Microsoft has published a few days ago a new guide around optimization of BizTalk Server performance. This is a lengthy guide (over 200 pages), but it has a lot of very interesting information, some of which you can’t find anywhere else, and there’s always something to learn. Highly recommended. You can download it here.
A second recommendation is a little tool that is very helpful in gathering information about a BizTalk installation, and which also gives you a report about your installation. A little like the BizTalk Best Practices Analyzer, only deeper and with more information. It’s MsgBoxViewer, and you can download version 9.20.3 here.
The ASP.NET MVC team is in the final stages of finishing up a new "Preview 4" release that they hope to ship later this week. The Preview 3 release focused on finishing up a lot of the underlying core APIs and extensibility points in ASP.NET MVC. Starting with Preview 4 this week you’ll start to see more and more higher level features begin to appear that build on top of the core foundation and add nice productivity.
There are a bunch of new features and capabilities in this new build – so much in fact that I decided I needed two posts to cover them all. This first post will cover the new Caching, Error Handling and Security features in Preview 4, as well as some testing improvements it brings. My next post will cover the new AJAX features being added with this release as well.
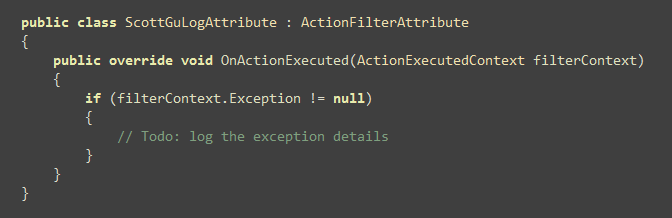
Action Filter Attributes are a useful extensibility capability in ASP.NET MVC that was first added with the "Preview 2" release. These enable you to inject code interceptors into the request of a MVC controller that can execute before and after a Controller or its Action methods execute. This enables some nice encapsulation scenarios where you can easily package-up and re-use functionality in a clean declarative way.
Below is an example of a super simple "ScottGuLog" filter that I could use to log details about exceptions raised during the execution of a request. Implementing a custom filter class is easy – just subclass the "ActionFilterAttribute" type and override the appropriate methods to run code before or after an Action method on the Controller is invoked, and/or before or after an ActionResult is processed into a response.

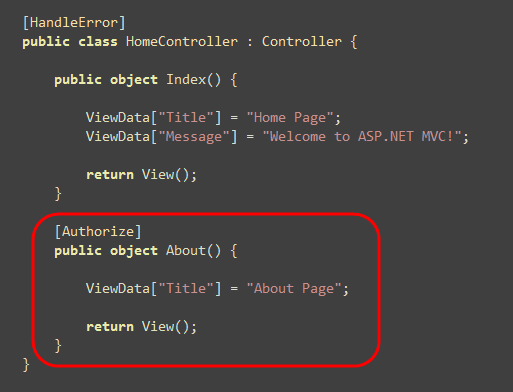
Using a filter within a ASP.NET MVC Controller is easy – just declare it as an attribute on an Action method, or alternatively on the Controller class itself (in which case it will apply to all Action methods within the Controller):
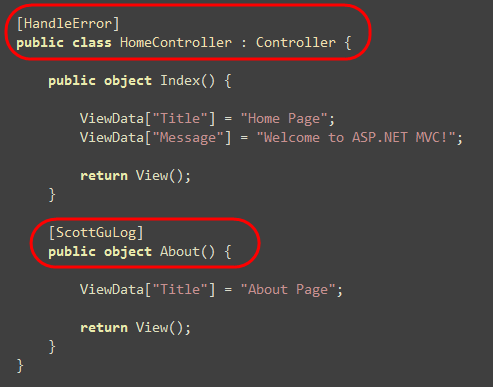
Above you can see an example of two filters being applied. I’ve indicated that I want my "ScottGuLog" to be applied to the "About" action method, and that I want the "HandleError" filter to be applied to all Action methods on the HomeController.
Previous preview releases of ASP.NET MVC enabled this filter extensibility, but didn’t ship with pre-built filters. ASP.NET Preview 4 now includes several useful filters for handling output caching, error handling and security scenarios.
The [OutputCache] filter provides an easy way to integrate ASP.NET MVC with the output caching features of ASP.NET (with ASP.NET MVC Preview 3 you had to write code to achieve this).
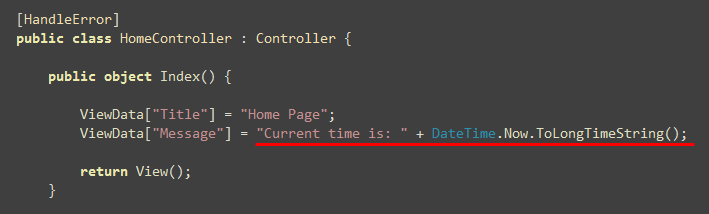
To try this out, modify the "Message" value set within the "Index" action method of the HomeController (created by the VS ASP.NET MVC project template) to display the current time:
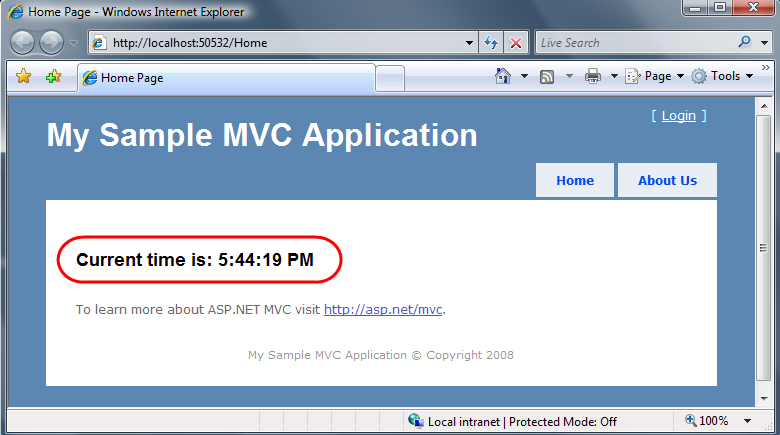
When you run your application you’ll see that a timestamp updates each time you refresh the page:
We can enable output caching for this URL by adding the [OutputCache] attribute to the our Action method. We’ll configure it to cache the response for a 10 second duration using the declaration below:
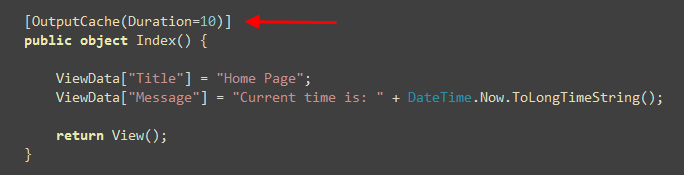
Now when you hit refresh on the page you’ll see that the timestamp only updates every 10 seconds. This is because the action method is only being called once every 10 seconds – all requests between those time intervals are served out of the ASP.NET output cache (meaning no code needs to run – which makes it super fast).
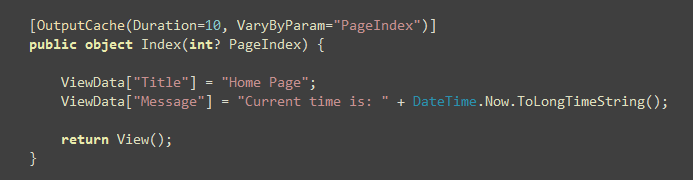
In addition to supporting time duration, the OutputCache attribute also supports the standard ASP.NET output cache vary options (vary by params, headers, content encoding, and custom logic). For example, the sample below would save different cached versions of the page depending on the value of an optional "PageIndex" QueryString parameter, and automatically render the correct version depending on the incoming URL’s querystring value:
You can also integrate with the ASP.NET Database Cache Invalidation feature – which allows you to automatically invalidate the cache when a database the URL depends on is modified (tip: the best way to-do this is to setup a CacheProfile section in your web.config and then point to it in the OutputCache attribute).
The [HandleError] filter provides a way to declaratively indicate on a Controller or Action method that a friendly error response should be displayed if an error occurs during the processing of a ASP.NET MVC request.
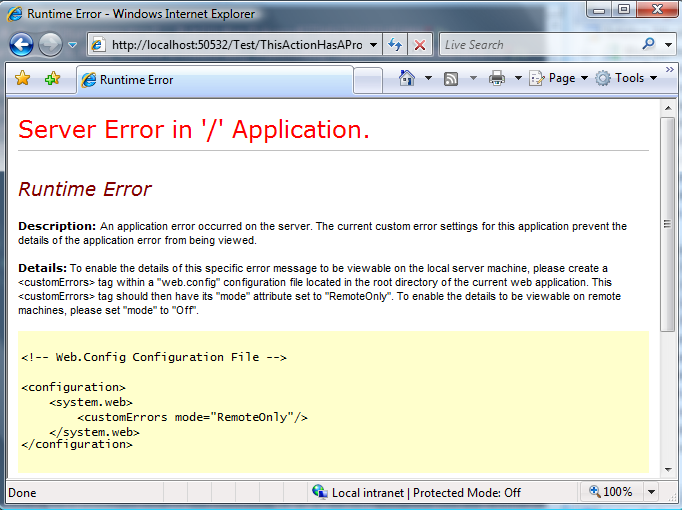
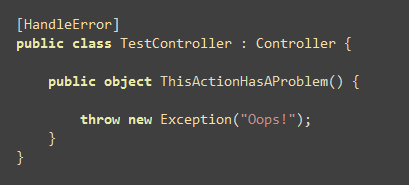
To try this out, add a new "TestController" to a project and implement an action method that raise an exception like below:

By default when you point your browser at this URL, it will display a default ASP.NET error page to remote users (unless you’ve gone in and configured a <customErrors> section in your web.config file):
We can change the HTML error displayed to be a more friendly end-user message by adding a [HandleError] attribute to either our Controller or to an Action method on our Controller:
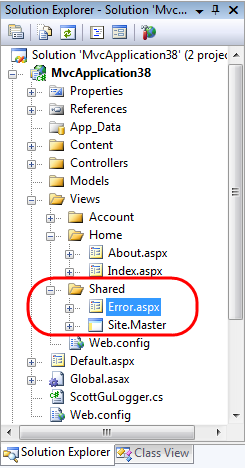
The HandleError filter will catch all exceptions (including errors raised when processing View templates), and display a custom Error view response when they occur. By default it attempts to resolve a View template in your project called "Error" to generate the response. You can place the "Error" view either in the same directory as your other Controller specific views (for example: \Views\Test for the TestController above), or within the \Views\Shared folder (it will look first for a controller specific error view, and then if it doesn’t find one it will look in the shared folder – which contains views that are shared across all controllers).
Visual Studio now automatically adds a default "Error" view template for you inside the \Views\Shared folder when you create new ASP.NET MVC Projects starting with Preview 4:
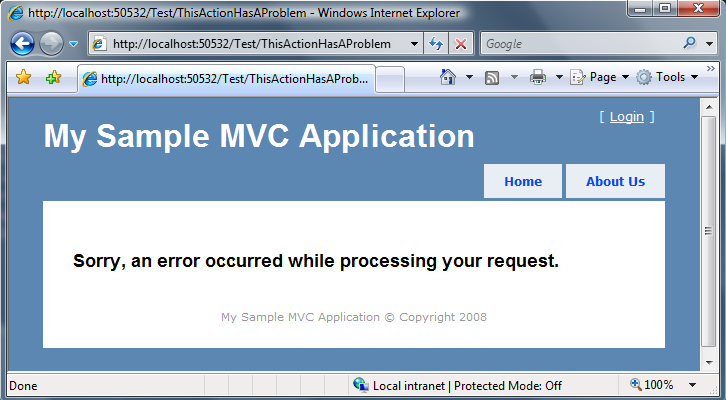
When we add a [HandleError] attribute to our TestController, this will by default show remote users an html error page like below (note that it picks up the master page template from the project so that the error message is integrated into the site). You can obviously go in and customize the Error view template to display whatever HTML and/or friendlier customer error message you want – below is simply what you get out of the box:
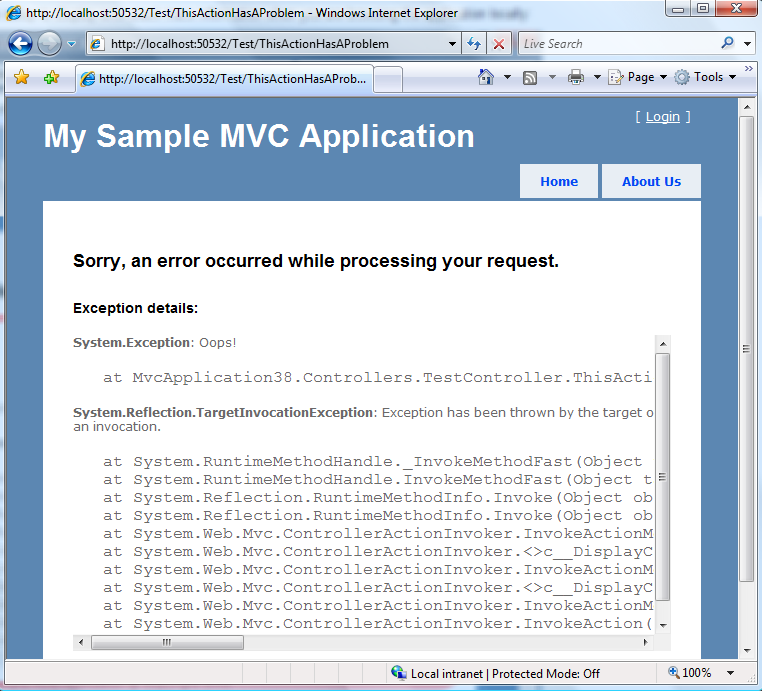
To help developers, the default Error view template provided by the new project template in Visual Studio is written to display additional error stack trace information when you are browsing the application locally:
You can turn this off either by deleting the code from the Error view template, or by setting <customErrors> to "off" inside your web.config file.
By default the [HandleError] filter will catch and handle all exceptions that get raised during the request. You can alternatively specify specific exception types you are interested in catching, and specify custom error views for them by specifying the "ExceptionType" and "View" properties on [HandleError] attributes:
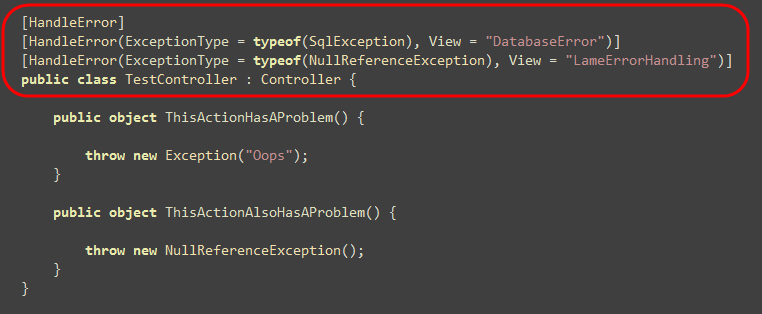
In the code above I’m choosing to display custom error views for SqlExceptions and NullReferenceExceptions. All other exceptions will then use the default "Error" view template.
The [Authorize] filter provides a way to declaratively control security access on a Controller or Action method. It allows you to indicate that a user must be logged in, and optionally require that they are a specific user or in a specific security role in order to gain access. The filter works with all types of authentication (including Windows as well as Forms based authentication), and provides support for automatically redirecting anonymous users to a login form as needed.
To try this out, add an [Authorize] filter to the "About" action in the HomeController created by default with Visual Studio:
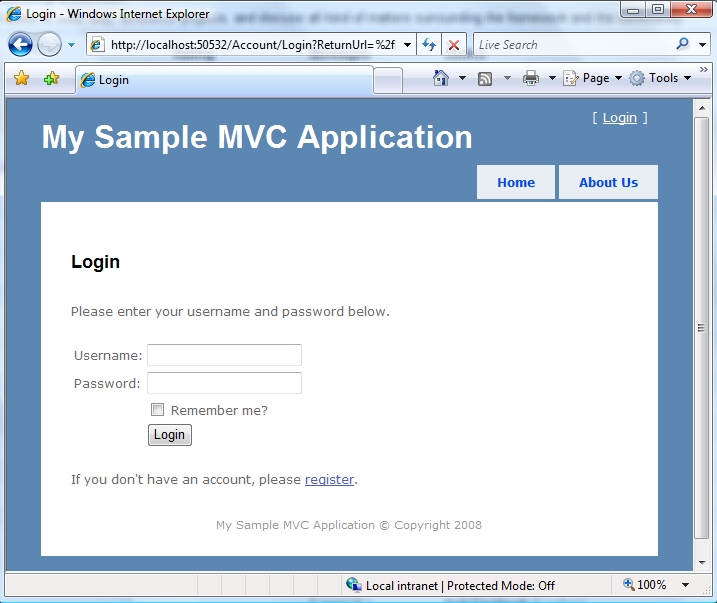
Declaring an [Authorize] attribute like above indicates that a user must be logged into the site in order for them to request the "About" action. When non-logged-in users attempt to hit the /Home/About URL, they will be blocked from gaining access. If the web application is configured to use Windows based authentication, ASP.NET will automatically authenticate the user using their Windows login identity, and if successful allow them to proceed. If the web application is configured to use Forms based authentication, the [Authorize] attribute will automatically redirect the user to a login page in order to authenticate (after which they’ll have access):
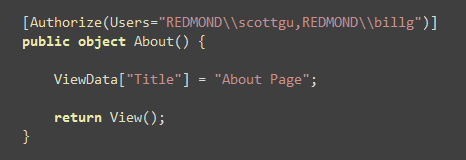
The [Authorize] attribute optionally allows you to grant access only to specific users and/or roles. For example, if I wanted to limit access to the "About" action to just myself and Bill Gates I could write:
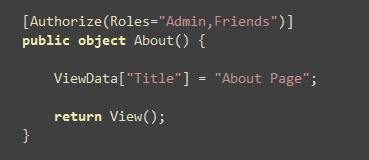
Typically for all but trivial applications you don’t want to hard-code user names within your code. Instead you usually want to use a higher-level concept like "roles" to define permissions, and then map users into roles separately (for example: using active directory or a database to store the mappings). The [Authorize] attribute makes it easy to control access to Controllers and Actions using a "Roles" property:
The [Authorize] attribute does not have a dependency on any specific user identity or role management mechanism. Instead it works against the ASP.NET "User" object – which is extensible and allows any identity system to be used.
I mentioned above that the [Authorize] attribute can be used with any authentication or user identity management system. You can write or use any custom login UI and/or username/password management system you want with it.
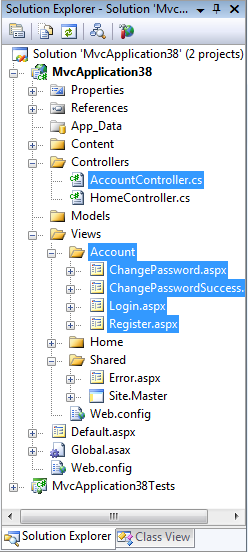
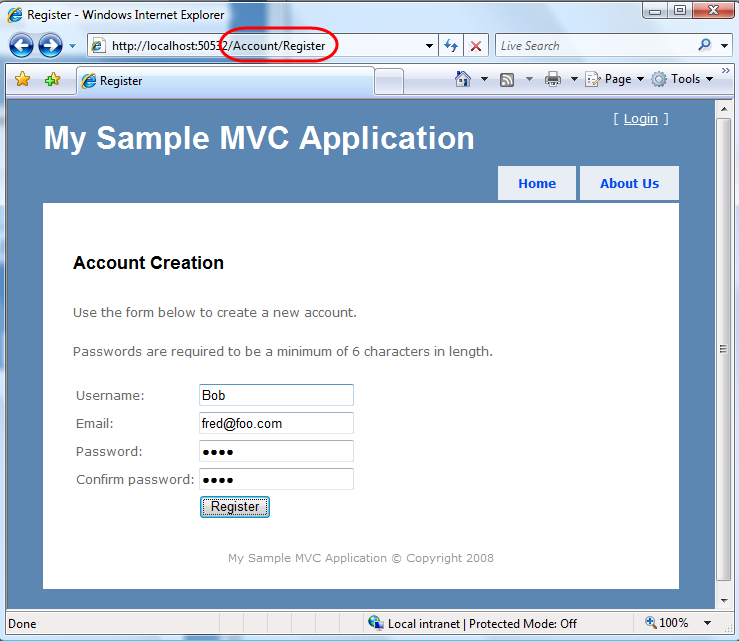
To help you get started, though, the ASP.NET MVC Project Template in Visual Studio now includes a pre-built "AccountController" and associated login views that implement a forms-authentication membership system with support for logging in, logging out, registering new users, and changing passwords. All of the views templates and UI can be easily customized independent of the AccountController class or implementation:
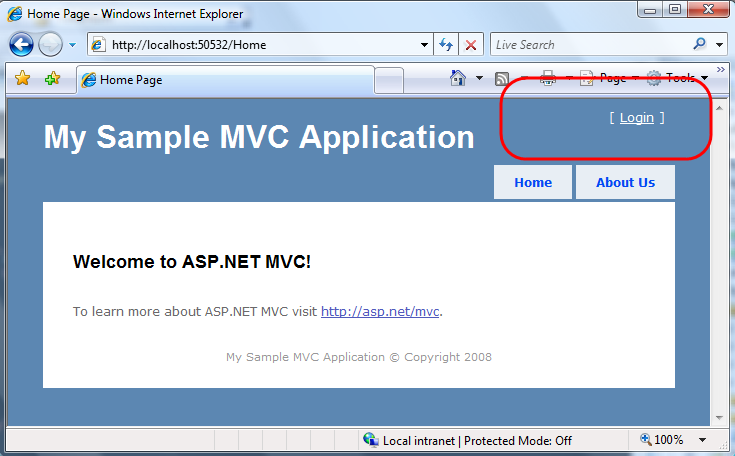
The Site.master template also now includes UI at the top-right that provides login/logout functionality. When using forms-based authentication it will prompt you to login if you are not currently authenticated:
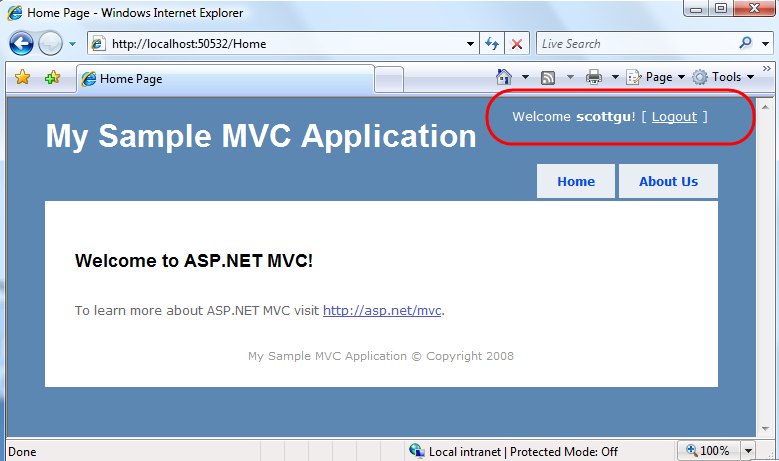
And it displays a welcome message along with a logout link if you are authenticated on the site:
Clicking the Login link above takes users to a Login screen like below that they can use to authenticate:
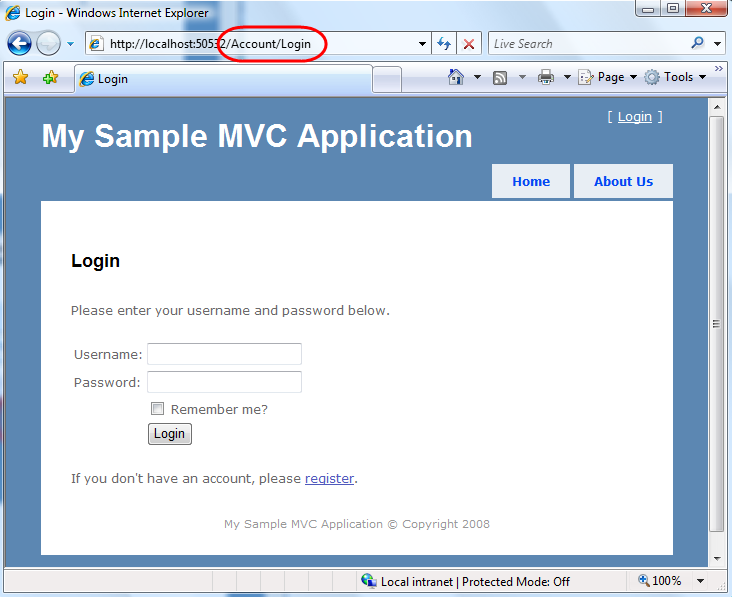
New users can click the register link to create new accounts:
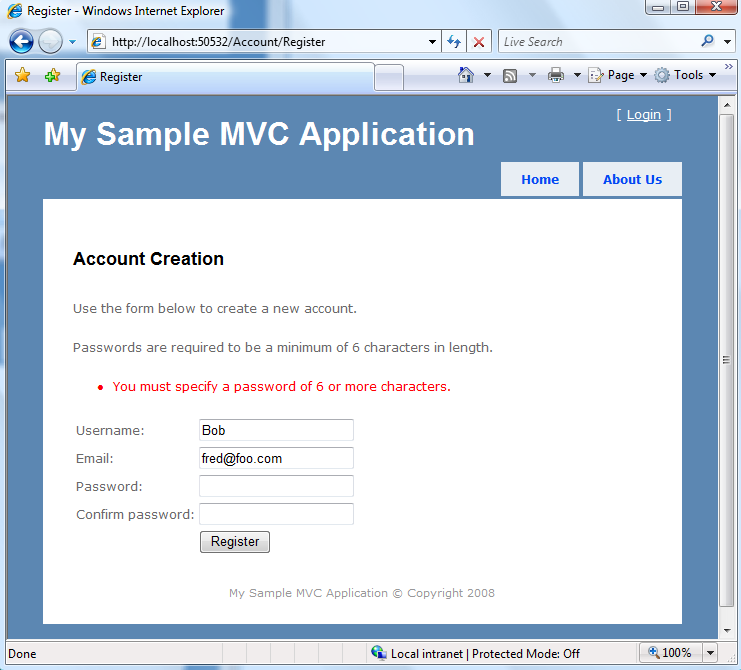
Error handing and error display is also built-in:
The AccountController class that is added to new projects uses the built-in ASP.NET Membership API to store and manage user credentials (the Membership system uses a provider API allowing any back-end storage to be plugged-in, and ASP.NET includes built-in providers for Active Directory and SQL Server). If you don’t want to use the built-in Membership system you can keep the same AccountController action method signatures, View templates, and Forms Authentication ticket logic, and just replace the user account logic within the AccountController class. For the next ASP.NET MVC preview release we are planning to encapsulate the interaction logic between the AccountController and the user identity system behind an interface – which will make it easier to plug-in your own user storage system (without having to implement a full membership provider) as well as to easily unit test both it and the AccountController.
Our hope is that this provides a nice way for people to quickly get started, and enable them to have a working end to end security system as soon as they create a new project.
One last improvement to touch on in this first preview 4 post is some improvements being made on the Controller class that allow you to more easily unit test the TempData collection. The TempData property allows you to store data that you want to persist for a future request from a user. It has the semantic of only lasting one future request (after which it is removed). It is typically used for MVC scenarios where you want to perform a client-side redirect to change the URL in the browser, and want a simple way to store scratch data.
With previous ASP.NET MVC Previews you had to mock objects in order to test the TempData collection. With Preview 4 you no longer need to mock or setup anything. You can now add and verify objects within the Controller’s TempData collection directly within your unit tests (for example: populate a controller’s TempData property before calling its action method, or verify that the action updated the TempData after the action returned). The actual storage semantics of the TempData collection is now encapsulated within a separate TempDataProvider property.
Hopefully the above post provides a quick look at a number of the new features and changes coming with ASP.NET MVC Preview 4. My next post on ASP.NET MVC Preview 4 will cover the new AJAX functionality that has been added, and demonstrate how to take advantage of it.
Hope this helps,
Scott

This weekend I took the plunge, literally, and participated in my first sprint triathlon here in Minneapolis. I won't say it was pretty, or that I did excellent, but I feel pretty good about my effort and the results. Mostly I was hoping to just finish, but I did have the goal of being done in under 2 hours. Like I said, not really looking to win any medals. 🙂
The swim went a little worse than expected with me getting doused in the face over and over with water and struggling to get into a groove with my stroke and breathing. So I struggled for what seemed like a long time, but it ended up only being about 18 minutes which was shorter than I expected. I then made my way to my bike and got my gear on. I was definitely moving slow at this point but got my shoes, shirt and helmet on and thought I'd just head out. Of course, I dropped some of my energy jelly beans and had to scoop them up, but after that the bike was good. I finished up the 15 mile ride in about 50 minutes with no troubles at all. The biking was never a worry for me and even though I might not be super fast, I knew I could finish and probably in reasonable time.

My transition to the run was pretty simple as I traded my helmet for a running hat and added my running bib then headed out onto the trail. I have a hard time estimating my pace when I'm running in a crowd so I had no idea how I was doing until I finished, but I knew it was tough to keep going and I didn't feel like I could be going a lot faster. I finished the 3.1 mile run in about 27 minutes which is a decent 5k for me even without having swum and run beforehand.
So my total time ended up being just under 1 hour 45 minutes which was even better than I'd hoped for. I LOVED the experience and I'll definitely be doing another one soon. I definitely liked it much better than doing longer distance running (a half marathon has been my longest so far) and the variety during training is definitely more interesting for me. I've got a lot of work to do on my swimming, but I'm actually looking forward to it.

I just pushed all the source code for my BizTalk 2006 PipelineTesting library
to GitHub. I’ll keep this
public repository updated whenever I make any changes to the library, so if you’re
interested in keeping track of the code or forking it, this should make it a lot easier.
You can find the clone URL for the new repository is: git://github.com/tomasr/pipelinetesting.git
Enjoy!
 BizTalk
After the more than normal pain in getting this done for my previous
post, I decided to post the fruits of my labour (not labor that my wife tells
me about watermellons and men wouldn’t know the first thing about birth….I’m not
about to do the pepsi challenge on that :))
– this is a stock standard Web.Config for a MOSS install NOT a plain WSS install (there’s
about 3 lines different from a plain WSS install to a MOSS install – mainly anything
that references SharePoint.Publishing….)
Grab this and these are the changes that WORK!
Enjoy!
>
Cheers,
Mick.
“Could not load file or assembly ‘System.Web.Silverlight, Version=2.0.5.0,
Culture=neutral, PublicKeyToken=31bf3856ad364e35’ or one of its dependencies.”
You’re starting to Roll your sleeves up and get dirty with Silverlight 2 Beta 2, load
up some of the Silverlight Blueprint
for SharePoint Samples, run the installer (it’s great that most of these examples
have an installer) and Boom! you get the above error!!!
Here’s a list I’ve compiled to get Silverlight working – I’m currently running this
on Win2008 IIS7
(1) Install WSS SP1/MOSS SP1 on your SharePoint box if you haven’t
already. You need the SP1 to support .NET 3.5 calls through SharePoint – my guess
is that these tell SharePoint not to intercept the calls and let them go to their
rightful owners.
(2) Create a ‘dummy’ site collection on a test Web Application –
e.g. http://localhost:81 – This is so you can see
all the changes to the web.config that are made through the installation process,
in isolation. By keeping this separate to your usual web.config, you’ll be able to
merge changes at a later date.
(3) Install the Silverlight 2 Beta 2 runtime and other developer bits – From http://Silverlight.net – VS2008
Developer Bits and just the runtime
if you want from here
(4) Do one installation of a Silverlight for BluePrint Sample – the
installer creates a ‘virtual directory’ under your Web Site called ClientBin where
the various Silverlight 2 files go (*.js, *.XAP). This is a handy install so you can
see what the directory execution settings are required to make this work through SharePoint.
i.e. Execute permissions only. Take note of this directory.
(5) Add a IIS MIME type – With Silverlight 2 beta 2 – there is a
new file type added which is a *.XAP file type. IIS by default doesn’t
know how to encode/translate or send these files down over the wire.
Add a mime type of: Extention: xap Mime Type: application/x-silverlight-app to
your IIS Test Web Site
(6) Make Web.Config changes – there’s a whole series of Web.Config
changes to be made to your SharePoint Web Application to support AJAX/.NET 3.5 and
now Silverlight…. fortunately other hard working folks have done this for you!!!!
🙂 Bless their cotton socks! – grab the Feature
that makes the modifications from here (** NB: you want the 3.5 config
feature)
You’re almost done…….. 🙂
(7) EXCEPT for the error above!!! After much inspection of your system,
you’ll realise that you *don’t* have that DLL (on a clean install). The Silverlight
Ninja will know that this is from Silverlight 2 Beta 1 and not found in the Beta 2
kits!! Yay team!
The System.Web.Silverlight.dll is found in the Silverlight
2 beta 1 SDK – so download that puppy, extract out the DLL and either GAC it,
or add it to your BIN directory on your SharePoint site. (I added
it to my BIN directory – as I reckon when SL2 is released, this problem would have
been resolved)
(**UPDATED: Due to how painful that was, I decided to package
up the DLL for you – HERE**)
Here are the Compiled Files – FOR SL2 BETA 2 – they WORK!! 🙂
(I grabbed the Blueprint Hello World Web Part and updated to work)
1. Silverlight Web Part DLL
2. Silverlight *.XAP updated for Beta 2, copy straight to the *sub-directory*
under your client BIN
3. Sample SharePoint Web.Config with all the changes! 🙂