by community-syndication | Mar 16, 2007 | BizTalk Community Blogs via Syndication
So after many hours of downloading I’ve acquired the March CTP for Orcas and have
it running both at home and at work under Virtual PC 2007. I decided to jump
into LINQ as I’m entirely jazzed about this but one of my first few experiments with
it, while a little unorthodox, has me scratching my head a bit.
Consider if you will the following code, which retrieves a list of all files in the
root folder of the C drive and then, using LINQ, selects a set of them at random using
the FlipACoin method. Then I iterate through the list, outputing the contents
of the results of my query … or so I thought.
               1:

              using System;
               2:

              using System.Linq;
               3:

              using System.Collections.Generic;
               4:

              using System.Text;
5:
               6:

              namespace TestConsole07
7: {
               8:

              class Program
9: {
               10:

              static Random rnd = new Random();
11:
               12:

              static

              void Main(string[]

args)
13: {
14: var myList =
15: from f in System.IO.Directory.GetFiles(@"C:\")
16: where FlipACoin()
17: select System.IO.Path.GetFileName(f);
18:
19: Console.WriteLine();
20: Console.WriteLine("First Loop");
21: Console.WriteLine("-----------");
22: foreach (string loopFile in myList)
23: {
24: Console.WriteLine(loopFile);
25: }
26:
27: Console.WriteLine();
28: Console.WriteLine("Second Loop");
29: Console.WriteLine("-----------");
30: foreach (string loopFile in myList)
31: {
32: Console.WriteLine(loopFile);
33: }
34:
35: Console.WriteLine();
36: Console.WriteLine("Press Enter To Exit");
37: Console.ReadLine();
38: }
39:
               40:

              static

              bool FlipACoin()
41: {
               42:

              return rnd.Next() >

(int.MaxValue / 2);
43: }
44: }
45: }
.csharpcode-wrapper, .csharpcode-wrapper pre {
background-color: #f4f4f4;
border: solid 1px gray;
cursor: text;
font-family: consolas, ‘Courier New’, courier, monospace;
font-size: 8pt;
line-height: 12pt;
margin: 20px 0px 10px 0px;
max-height: 200px;
overflow: auto;
padding: 4px 4px 4px 4px;
width: 97.5%;
}
.csharpcode-wrapper pre {
border-style: none;
margin: 0px 0px 0px 0px;
overflow: visible;
padding: 0px 0px 0px 0px;
}
.csharpcode, .csharpcode pre, .csharpcode .alt {
background-color: #f4f4f4;
border-style: none;
color: black;
font-family: consolas, ‘Courier New’, courier, monospace;
font-size: 8pt;
line-height: 12pt;
overflow: visible;
padding: 0px 0px 0px 0px;
width: 100%;
}
.csharpcode pre {
margin: 0em;
}
.csharpcode .alt {
background-color: white;
}
.csharpcode .asp {
background-color: #ffff00;
}
.csharpcode .attr {
color: #ff0000;
}
.csharpcode .html {
color: #800000;
}
.csharpcode .kwrd {
color: #0000ff;
}
.csharpcode .lnum {
color: #606060;
}
.csharpcode .op {
color: #0000c0;
}
.csharpcode .preproc {
color: #cc6633;
}
.csharpcode .rem {
color: #008000;
}
.csharpcode .str {
color: #006080;
}
When this code is executed, what happens is very odd. Here is the output from
a sample run:
First Loop
———-
AUTOEXEC.BAT
eula.1033.txt
install.ini
install.res.1033.dll
MSDOS.SYS
NTDETECT.COM
ntldr
pagefile.sys
sde.bmp
SDE_VSD.MSI
unicows.dll
Second Loop
———–
boot.ini
CONFIG.SYS
install.exe
install.ini
install.res.1033.dll
NTDETECT.COM
SDE_VSD.MSI
unicows.dll
Press Enter To Exit
Notice that despite the fact that I’m iterating over the same list each time, the
files listed as different. This means that each time I begin to iterate over
the list the LINQ “query” is being executed again, and a new set of values are being
returned from FlipACoin.
I can undoubtedly say this wasn’t what I expected, but what I can’t seem to determine
is if this is a feature of LINQ or if this is a bug. My first response would
be bug, but that is because whenever I believe I’ve expressed my intent clearly and
don’t get the response I expect, I call that a bug.
What do you think? Is this just a cool feature that won’t come up very often?
Or is this a dent in the armor of LINQ?
by community-syndication | Mar 16, 2007 | BizTalk Community Blogs via Syndication
When it comes to testing your BizTalk applications, NUnit and BizUnit are often used. Where NUnit is a unit-testing framework for .NET languages, BizUnit can be used for testing your BizTalk 2004/2006 solutions. This article describes which tools need to be installed and helps you to setup your first test project.
What is NUnit
As stated, NUnit is a unit-testing framework for .NET languages. The test cases you create with BizUnit are added to and executed from the NUnit user interface. The results from the test runs can be viewed in NUnit as well.
What is BizUnit
The test cases you need to test your BizTalk solutions are created with BizUnit. Although you need to create a Class library in Visual Studio to be able to have the test cases executed, most of the test case creation is done with XML files. With these XML files you can prepare your test environment, execute your tests and cleanup your test environment. You can setup tests for the following adapters: FILE, HTTP, SOAP, MSMQ, MQSeries and POP3. Further BizUnit allows you to perform multiple kinds of validation and load data in the context. It’s also possible to query the EventLog.
What do you need to install
The two most recent BizTalk versions are supported by NUnit and BizUnit.
For testing BizTalk 2004 applications you need to install:
For testing BizTalk 2006 applications you need:
Install both tools keeping the defaults for the installation directories.
The sample orchestration
For this article I created an orchestration that will be tested. I have a simple scenario which contains the following steps:
- receive a message on a file location
- log to the EventLog that the message is received
- send the message to another file location
- log to the EventLog that the message is sent
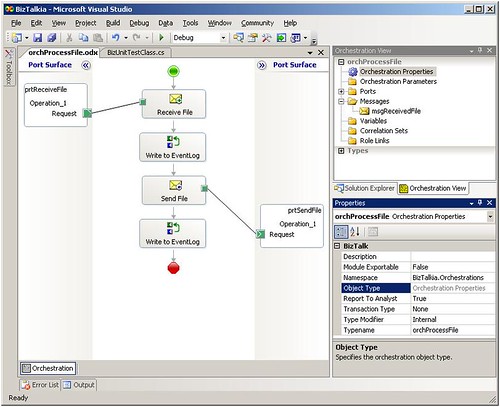
The orchestration looks as follows:
Fig. 1 – The orchestration which will be tested
Setting up your test environment
During the setup of a test project a number of artifacts is created. Since it is convenient to have everything at one place, we need a folder structure which will contain all these artifacts. For this sample this structure looks as follows:
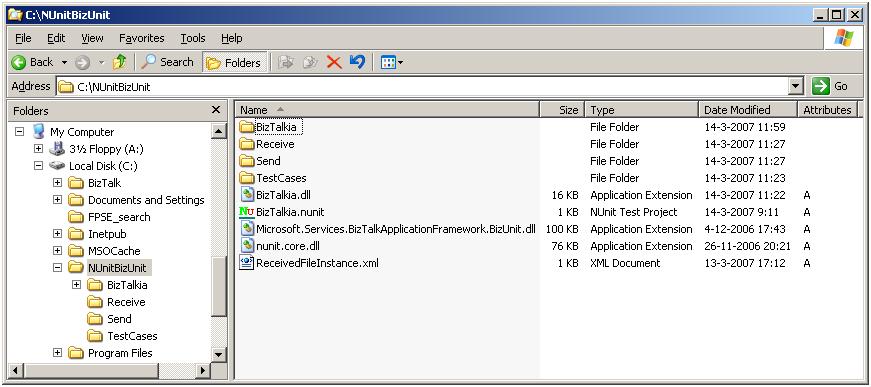
Fig. 2 – Folder structure of the test environment
The C:\NUnitBizUnit folder contains:
- BizTalkia folder (Visual Studio solution which contains the sample BizTalk project and test project)
- Receive folder (Receive file Location for the orchestration)
- Send folder (Send file location for the orchestration)
- TestCases (test case configuration files)
- BizTalkia.dll (the Test project assembly which we will create in Visual Studio)
- BizTalkia.nunit (NUnit project file for this sample)
- Microsoft.Services.BizTalkApplicationFramework.BizUnit.dll (referenced from BizTalkia.dll)
- nunit.core.dll (referenced from BizTalkia.dll)
- ReceivedFileInstance.xml (used to kick off the orchestration)
At this moment you might not yet be familiar with all the artifacts mentioned above, but most of them will be explained in this article.
Create a Test project in Visual Studio
We need a C# Class library project, which will contain the Test project. It must have references to the following binaries:
- C:\Program Files\NUnit-Net-2.0 2.2.9\bin\nunit.core.dll
- C:\Program Files\NUnit-Net-2.0 2.2.9\bin\nunit.framework.dll
- C:\Program Files\Microsoft Services\BizUnit 2.2\bins\ Microsoft.Services.BizTalkApplicationFramework.BizUnit.dll
- C:\Program Files\Microsoft Services\BizUnit 2.2\bins\ Microsoft.Services.BizTalkApplicationFramework.BizUnit.MQSeriesSteps.dll (only in case you will have to test MQSeries) .
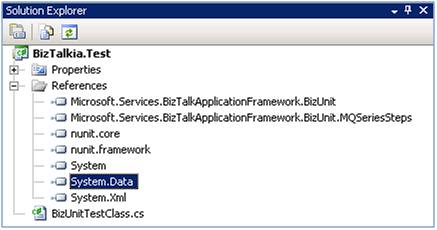
Fig. 3 – Solution Explorer with newly added references and class
The Class library has a class file which will hold the test code. The following code can be used as a template for the class file:
using NUnit.Framework;
using Microsoft.Services.BizTalkApplicationFramework.BizUnit;
namespace <namespace>
{
[TestFixture]
public class <class name>
{
[Test]
public void <method name>()
{
BizUnit bizunit = new BizUnit(@”<location/name configuration file>”);
bizunit.RunTest();
}
}
}
Replace <namespace> by a namespace that suits you. I add my test projects to the same solution which contains my BizTalk project(s). So I derive the namespace for my test project from the namespaces I use for my BizTalk project.
Also replace <class name> with a convenient and descriptive name. Both the class names and method names will show up in NUnit.
The code in my sample project looks as follows:
namespace BizTalkia.Test
{
using System;
using System.Collections.Generic;
using System.Text;
using NUnit.Framework;
using Microsoft.Services.BizTalkApplicationFramework.BizUnit;
[TestFixture]
public class BizUnitTestClass
{
[Test]
public void Test_01_SubmitFile()
{
BizUnit bizunit = new BizUnit(@”.\TestCases\BizTalkia.Test.SubmitFile.xml”);
bizunit.RunTest();
}
[Test]
public void Test_02_CheckFileReceived()
{
BizUnit bizunit = new BizUnit(@”.\TestCases\BizTalkia.Test.CheckFileReceived.xml”);
bizunit.RunTest();
}
[Test]
public void Test_03_CheckSentFileExists()
{
BizUnit bizunit = new BizUnit(@”.\TestCases\BizTalkia.Test.CheckSentFileExists.xml”);
bizunit.RunTest();
}
}
}
As you see there is one class with 3 methods. Each method defines a test case. These test cases are described below. You are free in creating more than one class, as long as each class is public and has the [TestFixture] attribute. Each method must be public as well and must have the attribute [Test]. The methods are numbered from 01 to 03. This is necessary, since otherwise in NUnit the methods will show up alphabetically, which will process your test cases in the wrong order. Further you see that each method refers to a test case configuration file of its own.
Build the test project
Now that we have described the class library the test project can be build.
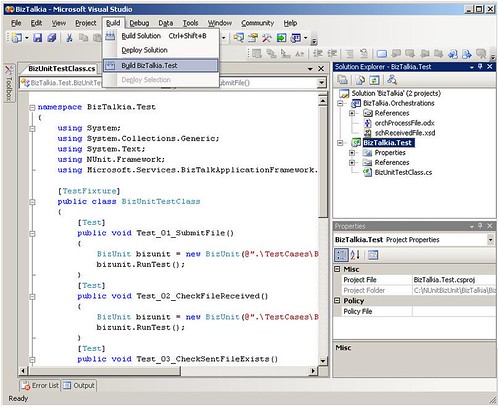
Fig. 4 – Build the test project
The assembly needs to be copied to the C:\NUnitBizUnit folder, along with its references.
Test case configuration files
The test case configuration files (which are stored in C:\NUnitBizUnit\TestCases) define the test cases. Before going into detail, first let’s have a look at the structure of the configuration files. We therefore use the first test case configuration file of this sample, namely BizTalkia.Test.SubmitFile.xml.
<TestCase testName=”BizTalkia.Test”>
<TestSetup>
<TestStep assemblyPath=”” typeName=”Microsoft.Services.BizTalkApplicationFramework.BizUnit.FileDeleteMultipleStep”> <Directory>C:\NUnitBizUnit\Send</Directory>
<SearchPattern>{*}.xml</SearchPattern>
</TestStep>
</TestSetup>
<TestExecution>
<TestStep assemblyPath=”” typeName=”Microsoft.Services.BizTalkApplicationFramework.BizUnit.FileCreateStep”> <SourcePath>C:\NUnitBizUnit\ReceivedFileInstance.xml</SourcePath> <CreationPath>C:\NUnitBizUnit\Receive\InFile.xml</CreationPath> </TestStep>
</TestExecution>
<!– Test cleanup: test cases should always leave the system in the state they found it –>
<TestCleanup>
</TestCleanup>
</TestCase>
This test case file has a TestSetup, TestExecution and a TestCleanup node. The goals of these nodes are obvious: the TestSetup node is used for setting/preparing up your test environment, the TestExecution node contains all your test steps and the TestCleanup node is used for cleaning up your test environment. The TestSetup and TestCleanup nodes are optional.
Each of the nodes can contain one or more test steps. Check the BizUnit documentation for the available test steps.
Submitting a file
Since SubmitFile is my first test case, inside the TestSetup node some cleanup of the test environment is done. In this case any existing files in a particular folder are deleted. Therefore the FileDeleteMultipleStep test step is used.
The sample orchestration is kicked off by submitting a file on a File Receive Location. In the TestExecution node I use the FileCreateStep test step to have a file created in a particular folder. The SourcePath node is used to determine which file is used as a template for the file that needs to be created. With the CreationPath node I determine where a copy of the file mentioned in the SourcePath node will be placed. So actually a file copy is done. The CreationPath node should contain the path to your Receive Location as it is configured in BizTalk.
Check if the file is received
Now that we have taken care of instantiating the orchestration, let’s check if the orchestration really has received the file. The orchestration writes an EventLog entry to confirm that a file is received. Therefore in the next test case we query the EventLog to check if the orchestration did write that EventLog entry. The code in the Expression shape that writes to the EventLog looks as follows:
// Write to EventLog
System.Diagnostics.EventLog.WriteEntry(“BizTalkia”, “File received”, System.Diagnostics.EventLogEntryType.Information, 1);
In test case file CheckFileReceived.xml we query the EventLog. Since this test case does not need setup or cleanup of the test environment, the nodes TestSetup and TestCleanup are left out. Quering of the EventLog is done with the EventLogCheckStep test step.
<TestCase testName=”BizTalkia.Test”>
<TestExecution>
<TestStep assemblyPath=”” typeName=”Microsoft.Services.BizTalkApplicationFramework.BizUnit.EventLogCheckStep”> <DelayBeforeCheck>10</DelayBeforeCheck> <!– Optional, seconds to delay performing check –>
<Machine>BIZTALK2006</Machine>
<EventLog>Application</EventLog>
<Source>BizTalkia</Source>
<Type>Information</Type>
<EventId>1</EventId>
<FailIfFound>True</FailIfFound>
</TestStep>
</TestExecution>
</TestCase>
The DelayBeforeCheck node is used to set the number of seconds to wait, before the EventLog is queried. This way you give BizTalk some time to retrieve the message and write to the EventLog. The FailIfFound node is used to determine if the test case should fail, in case that the EventLog entry is not found. The other nodes are used to query the EventLog.
Although the test case does not query the actual message which is written to the EventLog (“File received”), also this can be queried with a regular expression validation.
Check if the file is sent
The orchestration now should send the message to another file location. With BizUnit we can check if a file exists in a certain folder. This test is done in test case file CheckSentFileExists.xml.
<TestCase testName=”BizTalkia.Test”>
<TestExecution>
<TestStep assemblyPath=”” typeName=”Microsoft.Services.BizTalkApplicationFramework.BizUnit.FilesExistStep”> <Timeout>3000</Timeout>
<DirectoryPath>.\Send</DirectoryPath>
<SearchPattern>*.xml</SearchPattern>
<ExpectedNoOfFiles>1</ExpectedNoOfFiles>
</TestStep>
</TestExecution>
</TestCase>
In this test case BizTalk is given some time (by means of the Timeout node) to send out the message, before the existance of the file is checked.
With the DirectoryPath node and the SearchPattern node we determine where and what we are looking for.
So far the description of the test cases and steps.
Creating a NUnit project
Most of the work is done by now. NUnit works with project files which contain references to the assemblies which contain the test project.
The image below shows the NUnit interface with the dialog to create a new project file.
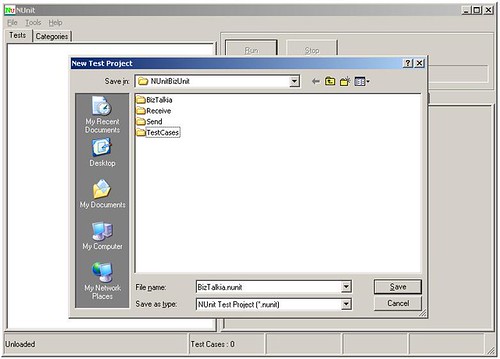
Fig. 5 – Create a new NUnit project
The NUnit project is stored in C:\NUnitBizUnit. Test projects assemblies must be added to the project. This can be done by navigating in the menu to Project, Edit In the dialog that appears select the Assemblies tab page, click Add Assembly to add the assembly.
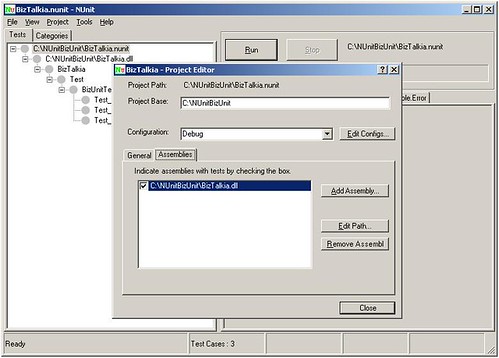
Fig. 6 – Add the assembly
Run the test
The test environment is now set up and ready to run the test! In the Tree view you see the structure of the assembly. By selecting (the class) BizUnitTestClass and clicking Run, all underlying tests are executed. The bullets can have the following colors:
- gray: not yet executed
- green: tested successfully
- yellow: test not run
- red: tested unsuccessfully
The test results can be viewed on the tab pages.
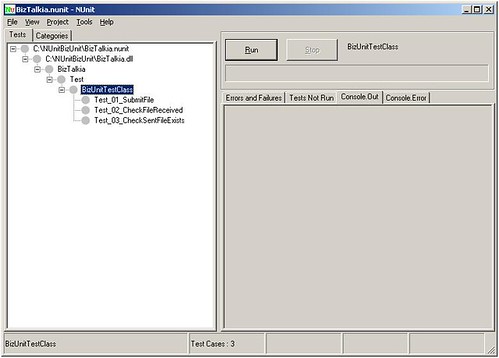
Fig. 7 – NUnit project before run
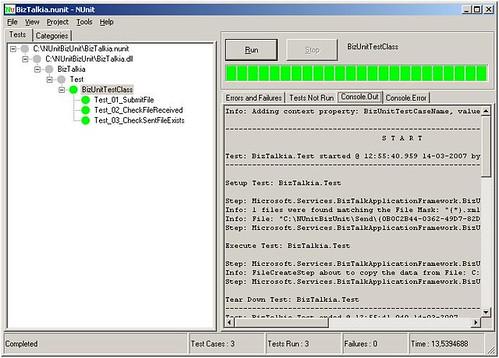
Fig. 8 – NUnit project after (successful) run
Conclusion
Both NUnit and BizUnit are still under development. So bugs become solved and functionality is added. In this article I wanted to give you a quick start with using NUnit and BizUnit.
Hopefully I succeeded in that goal. Please feel free to give any comments.
by community-syndication | Mar 15, 2007 | BizTalk Community Blogs via Syndication
Well I’m making my way back from the MVP Summit and we got to spend nearly 2 days
bending the ears of the BizTalk product team – the correct term now is The
Connected Services Division (CSD) which includes todays technologies of: BizTalk,
WF, WCF, .NET Framework and Orcas – so all these things are just ‘going’
to work going forward.
Here’s the things that I’m allowed to talk about….
MVP Summit Day 1 – Registration
-
for the previous 4 days I had been skiing up and around Whistler in some fantastic
snow with my cousin. What an experience!!! First time there.
-
Seattle, cold and raining but it’s fantastic to be here as there’s a buzz in the air.
A thought did cross my mind of “How are we going to have a conversation at this Summit
if there are more than 1 MVP in the room?” – if you’ve ever been ‘lucky’ enough to
have 3 or more MVPs in a room….I’m sure you’d be able to finish all your lunch before
you could get a word in edgeways.
-
Met up with some great fellow BizTalk MVPs (Alan Smith and Charles Young). Charles
and I worked together when I was back in the UK and it’s great to hear that he’s stalking
his 12 yr old daughter boyfriend and the deeply troubled when the words “I love you”
came out during a phone call he was listening in on. 🙂 – looks like I’ve got all
that ahead of me 🙂
-
Caught up with MVP Borty and
the crew and we went to our APAC regional dinner that evening.
-
One of the highlights of dinner was all the Korean MVPs did a Taekwondo demonstration
(I’m sure it’s on YouTube by now) of breaking boards. There was also some karaoke
going on in Japanese (I think) – this one guy was great. It was sort of a ‘Red Faces’
night. We then crashed the Windows Mobile MVP Party at Gamesworks…..get’s fuzzy
from there
MVP Summit Day 2 – KeyNote + Joint Sessions
-
what an experience! Bill Gates gives a keynote on MS and all things, then opens up
the keynote to 1 hour of Q&A to all the MVPs.
-
Bill copped a couple of Salvos from MVPs (who I reckon wouldnt be MVPs next year 🙂
but in true Bill style put his poker face on and smiled and answered the questions.
Not flustered at all.
-
The group all called him “Bill”, some called him “Mr Gates” and the Japanese MVPs
called him “Mr. Bill” during all the Q&A.
-
He fielded questions like “What’s your favourite product?”, “What hasnt performed…”.
Something that sticks out in my mind is when a guy came to the microphone and thanked
Bill for enabling him to have a career in computers so he could provide for his family
(I’m thinking where’s the question..). He then says “while cleaning out the garage
he came across a computer manual that his dad had when he was 8” – the manual as it
turned out was the very first manual for the pre-cursor to MSDos that Bill’s then
company had created. You could even get Bill on a support number in there! (I’m thinking
that’s gotta be worth a fair bit) The MVP then ASKED BILL TO SIGN his book!!!! Bill
couldnt refuse and $$ just turned into $$$$$ for the book – very funny.
Gotta dash to catch a plane – more soon.
by community-syndication | Mar 15, 2007 | BizTalk Community Blogs via Syndication
Today was the final day of the MVP summit. I had a great time! It’s always great to
meet a people face to face, and during the last couple of days I got to finally meet
in person Scott
Colestock, Harry
Pierson, Gregory
van der Wiele (the only other user of my PipelineTesting library I know of!), Alan
Smith, Jesus
Rodriguez, Mick
Badran, Abhilash
M.S., Steve Swartz and a lot of other people.
We also got the chance to interact a lot with the product teams; not only with the
BizTalk team but also from other teams within the Connected Systems Division, particularly
during last night’s dinner. I’d like to take the opportunity to publicly thank Marjan
Kalantar (Community Program Manager for BizTalk Server) and Clemens
Vasters for putting together a great set of sessions for us and taking fantastic
care of us while visiting at Microsoft!
Technorati
tags:
MVP
Summit

by community-syndication | Mar 15, 2007 | BizTalk Community Blogs via Syndication
The future is bright – setting up Tokens that are visible across ‘The Cloud’ is already done!
http://sts.labs.live.com – shared token
http://relay.labs.live.com – shared relay
services
We get access to these services typically through WCF and various channels and behavior
options going fwd.
What this means for us – less code and if your client and server application/service are
behind firewalls at different locations.
net.relay://…..
So I think in ‘yesterdays terms’ we called the relay service – http tunnelling 
With these services we get Policy and Metadata exchange such that if any settings
change on the service, then the client is automatically re-authed and prompted for
Tokens.
Go and check out the labs here – very cool stuff!


