Recently, a client asked me for help rectifying some existing logic apps in their environment because their resource had left the company. Not only to rectify the project but to put it in a better shape and use all good best practices.
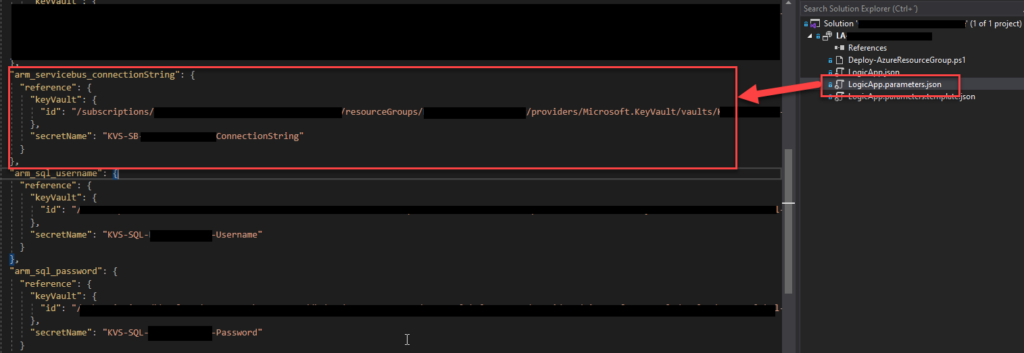
One of the tasks we decided to do was reference secrets in Key Vault for the deployment process, whether through CI/CD or directly through Visual Studio. We had administrator access to the Key Vault in the dev environment, so we were able to easily create those secrets and reference them in the Logic App parameter file, for example, an Azure Service Bus connection string. For those who are not aware, we can archive that by using the code below:
The problem was that when we tried to deploy the solution through Visual Studio, we got the following error:
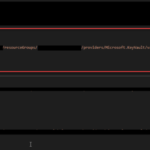
Logic app visual studio deployment Multiple error occurred: Forbidden,Forbidden,Forbidden. Please see details.
Without any more detail. After some analysis, we realized that the number of Forbidden words in the messages matched the number of key vault secrets we were trying to reference. When we commented on them all and only left one, then we got an error message with more detail:
The secret of KeyVault parameter ‘name’ cannot be retrieved. Http status code: ‘Forbidden’. Error message: ‘Access denied to first party service. Caller: name=ARM;tid=;appid=… Vault:;location=’. Please see https://aka.ms/arm-keyvault for usage details.
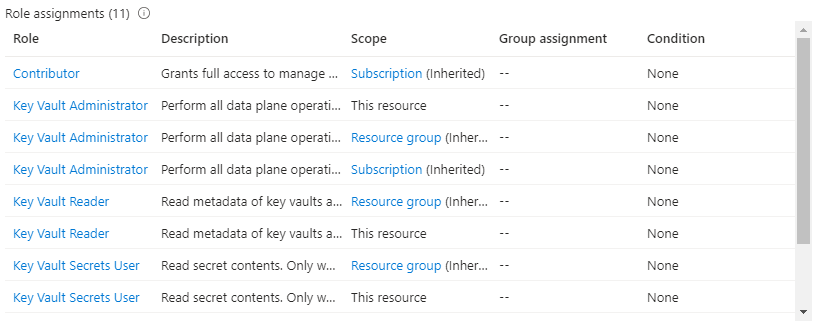
Initially, I thought that was a Key Vault access permission issue, even though I was a Key Vault administrator. However, sometimes, we also need some RBAC permission. In the end, I ended up giving Administrator, Reader, and Secret User permission access at the key vault, resource group, and subscription level:
Still, I was getting the same error!
Cause
When you are developing a Logic App Consumption, this is, in fact, an ARM template project and an ARM template deployment. So, when we reference a Key Vault secret in the LogicApp.parameters.json file, we are referencing a secure parameter that will be used during the ARM template deployment.
The problem is that to be able to access the key vault by the resource manager, you need to change the access policy to allow Azure Resource Manager for template deployment.
You can see this on the official documentation here:
When you need to pass a secure value (like a password) as a parameter during deployment, you can retrieve the value from an Azure Key Vault. To access the Key Vault when deploying Managed Applications, you must grant access to the Appliance Resource Provider service principal. The Managed Applications service uses this identity to run operations. To successfully retrieve a value from a Key Vault during deployment, the service principal must be able to access the Key Vault.
Solution
To solve this issue is quite very simple:
Sign in to the Azure Portal.
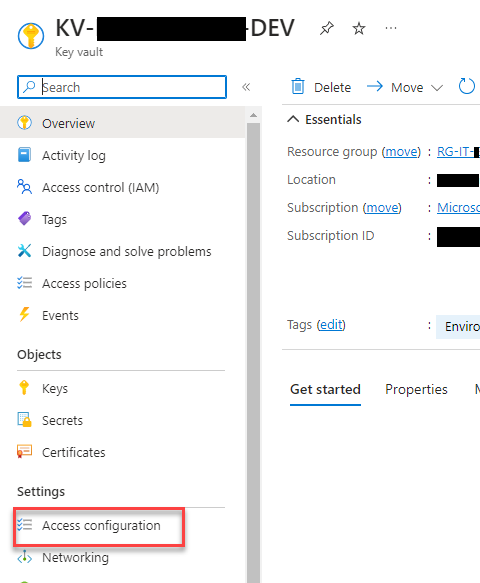
Open your key vault. Enter key vaults in the search box or select Key vaults.
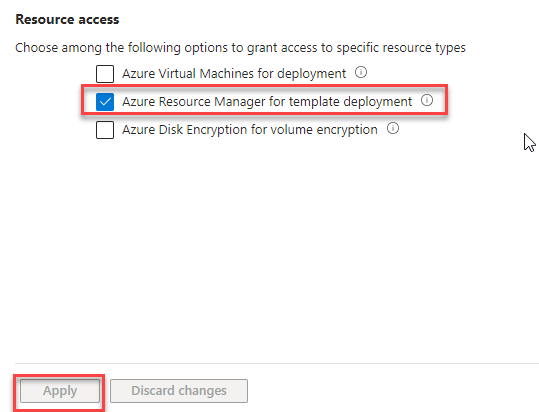
On the Key Vault, select Access configuration under the Settings section
Select Azure Resource Manager for template deployment under Resource access. Then, select Apply.
Now, you will be able to successfully reference the Key Vault secure parameter and deploy the Logic App Consumption solution from Visual Studio.
Hope you find this helpful! So, if you liked the content or found it useful and want to help me write more, you can buy (or help me buy) my son a Star Wars Lego!
Author: Sandro Pereira
Sandro Pereira lives in Portugal and works as a consultant at DevScope. In the past years, he has been working on implementing Integration scenarios both on-premises and cloud for various clients, each with different scenarios from a technical point of view, size, and criticality, using Microsoft Azure, Microsoft BizTalk Server and different technologies like AS2, EDI, RosettaNet, SAP, TIBCO etc.
He is a regular blogger, international speaker, and technical reviewer of several BizTalk books all focused on Integration. He is also the author of the book “BizTalk Mapping Patterns & Best Practices”. He has been awarded MVP since 2011 for his contributions to the integration community.
View all posts by Sandro Pereira
A few days ago, Luis Rigueira created a Kusto query to identify all Logic Apps Consumptions that use SQL V1 actions and triggers that will soon be deprecated (end of March 2024). The query also tries to identify all actions that are using those actions/triggers. This query actually works decently if a Logic App has actions or triggers in the first level (not inside if, switch, scope’s, and do on), but if we have Logic App with nested actions, which is quite common, then that query tries as a best effort to identify those actions – it will identify all Logic Apps, but it will not provide the name of the actions. The reason why is because it is quite difficult to loop to all the logic app definitions (JSON) with a Kusto query.
Don’t get me wrong. That query is awesome for you to identify all Logic Apps that we need to address to fix those actions. Now, if we need to identify all actions with that “problem” to estimate the work involved better, then that Kusto query will not be the best option. To solve this problem, we decided to create a PowerShell script that not only identifies all Logic Apps Consumption using SQL V1 actions and triggers but also identifies the names of those actions and triggers for you, providing a good report that you can use to plan and estimate your work.
# Function to extract actions recursively
function Get-ActionsAndTriggers {
    param (
        $node
    )
    $actionsAndTriggers = @()
    foreach ($key in $node.psobject.Properties.Name) {
        if ($node.$key.type -eq "ApiConnection") {
            if ($node.$key.inputs.path -like "*/datasets/default*" -and $node.$key.inputs.host.connection.name -like "*sql*") {
                $actionsAndTriggers += $key
            }
        } elseif ($node.$key -is [System.Management.Automation.PSCustomObject]) {
            $actionsAndTriggers += Get-ActionsAndTriggers -node $node.$key
        }
    }
    return $actionsAndTriggers
}

# Retrieve all Logic Apps within the subscription
$logicApps = Get-AzResource -ResourceType Microsoft.Logic/workflows

# Iterate through each Logic App and extract actions and triggers
foreach ($logicApp in $logicApps) {
    # Retrieve Logic App definition
    $logicAppDefinition = Get-AzResource -ResourceId $logicApp.ResourceId -ExpandProperties

    # Extract actions and triggers from the Logic App definition
    $allActionsAndTriggers = Get-ActionsAndTriggers -node $logicAppDefinition.Properties.Definition.triggers
    $allActionsAndTriggers += Get-ActionsAndTriggers -node $logicAppDefinition.Properties.Definition.actions

    # Display the Logic App name if filtered actions and triggers were found
    if ($allActionsAndTriggers.Count -gt 0) {
        Write-Host "Logic App: $($logicApp.Name) - RG: $($logicApp.ResourceGroupName)" -ForegroundColor Red
        # Display the list of filtered actions and triggers
        Write-Host "Filtered Actions and Triggers:"
        $allActionsAndTriggers
        Write-Host ""
    }
}
The great thing about this script is that it also identifies all nested actions (actions inside other actions like If, Scopes, Switch, and so on)
If you are wondering, can we do the same and identify all using SQL V2 actions and triggers? Don’t worry, we have your back covered, check the download section. In fact, with small changes to this script you can use for all types of connectors.
Download
THESE COMPONENTS ARE PROVIDED “AS IS” WITHOUT WARRANTY OF ANY KIND.
You can download the PowerShell script to identify all SQL V1 actions and triggers inside Logic Apps Consumption from GitHub here:
If you want to identify SQL V2 actions and triggers, then download this script from GitHub:
Huge thanks to Luis Rigueira for working with me on these scripts.
Hope you find this helpful! So, if you liked the content or found it useful and want to help me write more, you can help us buy a Star Wars Lego for my son!
Author: Sandro Pereira
Sandro Pereira lives in Portugal and works as a consultant at DevScope. In the past years, he has been working on implementing Integration scenarios both on-premises and cloud for various clients, each with different scenarios from a technical point of view, size, and criticality, using Microsoft Azure, Microsoft BizTalk Server and different technologies like AS2, EDI, RosettaNet, SAP, TIBCO etc.
He is a regular blogger, international speaker, and technical reviewer of several BizTalk books all focused on Integration. He is also the author of the book “BizTalk Mapping Patterns & Best Practices”. He has been awarded MVP since 2011 for his contributions to the integration community.
View all posts by Sandro Pereira
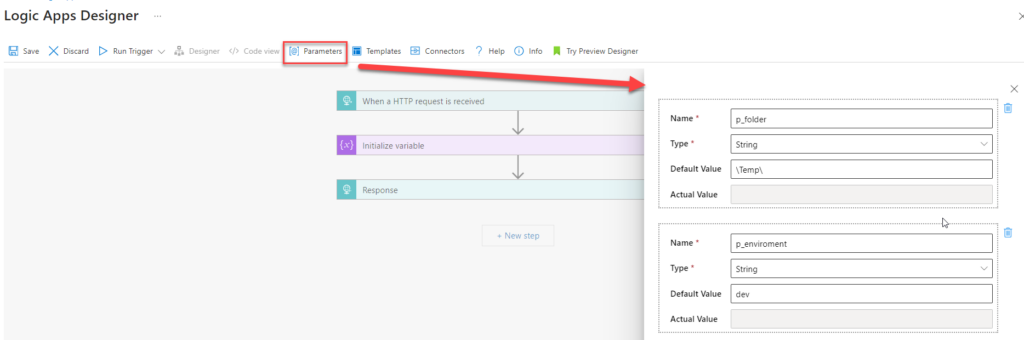
In Azure Logic Apps, you can abstract values that might change in workflows across development, test, and production environments by defining parameters. A Logic App parameter stores values that can be reused throughout a Logic App workflow. These parameters allow for a more flexible and maintainable configuration of logic apps, making it easier to update values without changing the actual workflow’s logic.
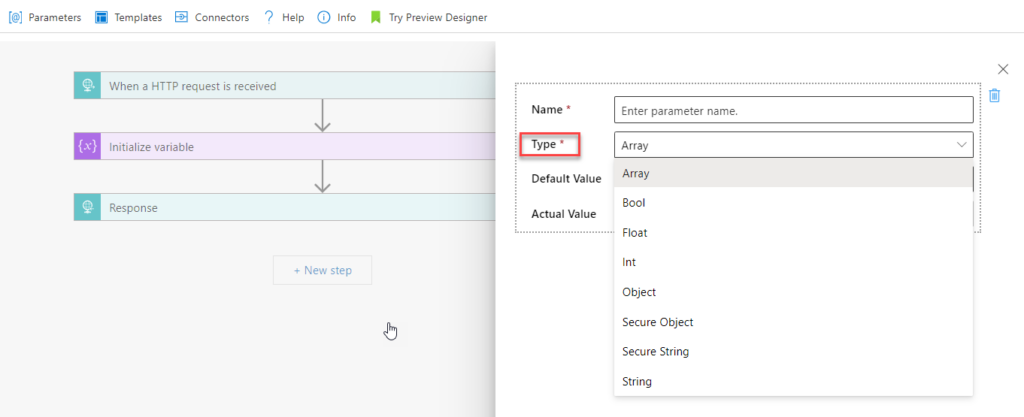
Parameters can store various types of data, such as strings, secure strings, boolean, arrays, or any other data that might need to be used multiple times within the Logic App or may change based on the environment (development, test, production, etc.). They can also be defined at deployment time using CI/CD pipelines.
By using parameters, you can easily update these values in one place without needing to edit the logic in multiple actions or triggers throughout the app.
In practice, you define parameters in the Logic App’s definition and can then use them in expressions or directly in actions throughout the app. When the Logic App is deployed or executed, these parameters are evaluated and used accordingly. This approach helps you manage and deploy Logic Apps across different environments, making the workflows more dynamic and easier to configure.
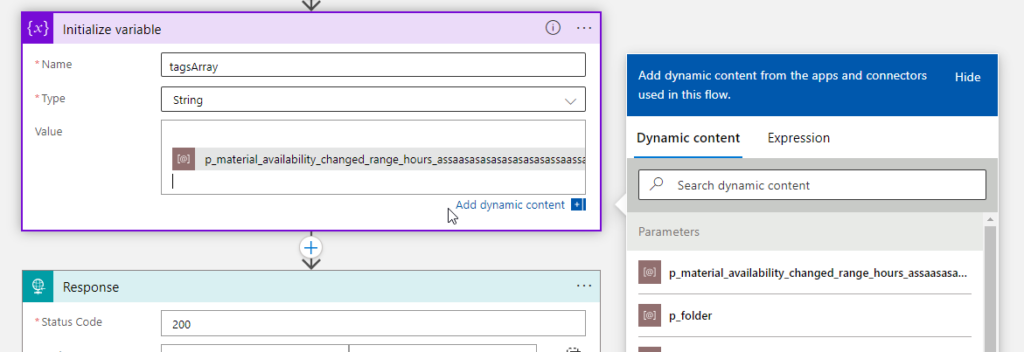
The funny fact about parameters is that they are probably the only Logic App “component” that doesn’t have a size limit regarding the name. For example:
Logic App Consumption name has a maximum limit of 80 characters.
Logic App Standard Workflow name has a maximum limit of 43 characters
A trigger or action name has a maximum limit of 80 characters.
and so on.
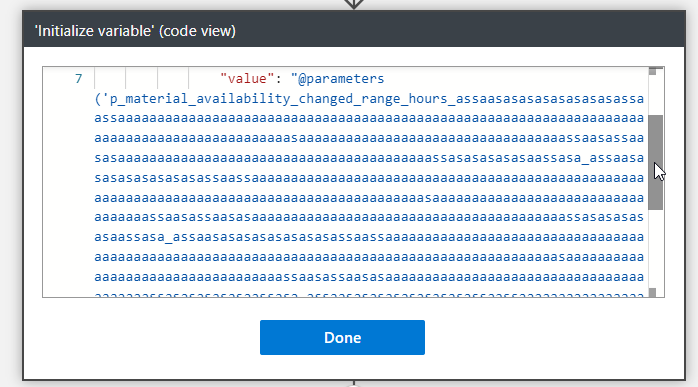
But the Logic App parameter name is unlimited! To prove that and for fun, I have created a parameter with this name:
To be honest, I think this is crazy! They should fix this and set up a limit because giving that amount of power to developers (and I’m adeveloper, too) is insane, we can do some nasty stuff!
To lazy to read? We’ve got you covered! Check out our video version of this content!
Hope you find this helpful! If you enjoyed the content or found it useful and wish to support our efforts to create more, you can contribute towards purchasing a Star Wars Lego for my son!
Author: Sandro Pereira
Sandro Pereira lives in Portugal and works as a consultant at DevScope. In the past years, he has been working on implementing Integration scenarios both on-premises and cloud for various clients, each with different scenarios from a technical point of view, size, and criticality, using Microsoft Azure, Microsoft BizTalk Server and different technologies like AS2, EDI, RosettaNet, SAP, TIBCO etc.
He is a regular blogger, international speaker, and technical reviewer of several BizTalk books all focused on Integration. He is also the author of the book “BizTalk Mapping Patterns & Best Practices”. He has been awarded MVP since 2011 for his contributions to the integration community.
View all posts by Sandro Pereira
I don’t know the reason why two products from the same family – Azure Integration Services – have completely different behaviors while converting XML to JSON, but that is the current reality. It is a fact! API Management and Logic Apps have different behaviors while applying this conversion, and that is one of the main reasons that I decided to create an Azure Function to convert XML into JSON, to keep the consistency between these two products.
While using API Management, we can use the xml-to-json policy to convert a request or response body from XML to JSON. However, when dealing with XML namespaces and prefixes, which is quite normal when working with XML messages, the policy has, in my opinion, a strange conversion behavior:
It converts the prefixes that in XML are represented by prefix:MyField into prefix$MyField. In order words, it replaces the colon character (:) with the dollar character ($).
Let’s take this XML sample in order for you to see the upcome result of that xml-to-json policy:
Now, if we take the same XML payload and try to convert it inside Logic Apps using the json() expression that returns the JSON type value or object for a string or XML. In this case, using, for example, the following expression:
In this case, the json() expression does not replace the colon character (:) with the dollar character ($) in the prefixes. It’s maintaining, which I think is the correct behavior.
To lazy to read? We’ve got you covered! Check out our video version of this content!
Hope you find this helpful! So, if you liked the content or found it useful and want to help me write more, you can help us buy a Star Wars Lego for Sandro’s son!
Author: Sandro Pereira
Sandro Pereira lives in Portugal and works as a consultant at DevScope. In the past years, he has been working on implementing Integration scenarios both on-premises and cloud for various clients, each with different scenarios from a technical point of view, size, and criticality, using Microsoft Azure, Microsoft BizTalk Server and different technologies like AS2, EDI, RosettaNet, SAP, TIBCO etc.
He is a regular blogger, international speaker, and technical reviewer of several BizTalk books all focused on Integration. He is also the author of the book “BizTalk Mapping Patterns & Best Practices”. He has been awarded MVP since 2011 for his contributions to the integration community.
View all posts by Sandro Pereira
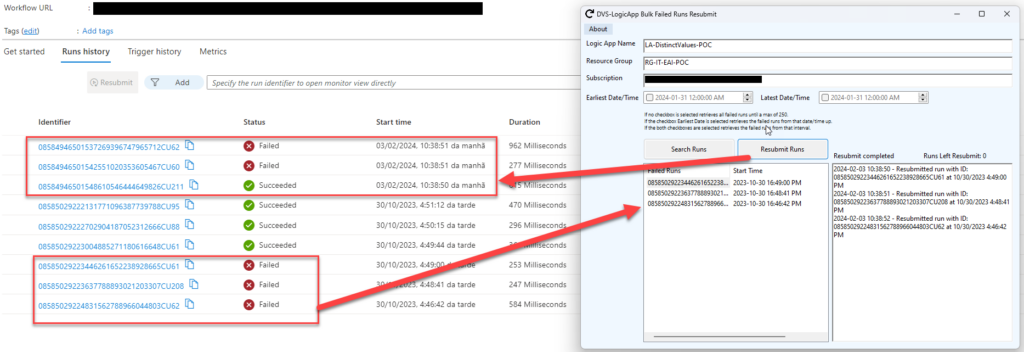
Last week, we posted a Logic App, Best Practices, Tips, and Tricks, about the ability to resubmit multiple runs at once and how that process can be a tedious and sometimes complicated process. Luckily for us, new features appeared recently, and that process was somehow minimized. Nevertheless, a little confused.
At the time we were investigating those capabilities, we were finalizing the development of a tool to achieve that goal. Since this tool had already been developed, we decided to make it available.
This is a simple .NET Windows application that allows you to easily resubmit multiple Logic App Consumption runs at once.
To archive that, you need to be already authenticated on your Azure Portal, and you need to provide the following parameters:
Logic App name;
Resource Group;
and Subscription ID;
Optionally, you can select a DateTime range to filter the failed runs you need to resume.
If you don’t select a range, all failed runs until a max of 250 will be presented.
Where can I download it?
You can download the complete Logic App Consumption Bulk Failed Runs Resubmit tool source code here:
Hope you find this helpful! So, if you liked the content or found it useful and want to help me write more, you can buy (or help me buy) my son a Star Wars Lego!
Thanks to my team member Luís Rigueira for being the mentor of this idea.
Author: Sandro Pereira
Sandro Pereira lives in Portugal and works as a consultant at DevScope. In the past years, he has been working on implementing Integration scenarios both on-premises and cloud for various clients, each with different scenarios from a technical point of view, size, and criticality, using Microsoft Azure, Microsoft BizTalk Server and different technologies like AS2, EDI, RosettaNet, SAP, TIBCO etc.
He is a regular blogger, international speaker, and technical reviewer of several BizTalk books all focused on Integration. He is also the author of the book “BizTalk Mapping Patterns & Best Practices”. He has been awarded MVP since 2011 for his contributions to the integration community.
View all posts by Sandro Pereira
Welcome again to another BizTalk Server to Azure Integration Services blog post. In my previous blog post, I discussed how to send zipped messages or files. Today, we will discuss a classic requirement in BizTalk Server solutions: How do we migrate Dynamic Ports?
It is not that hard to find BizTalk Server solutions/processes that need to send messages to partners, but in some cases, based on the type of the message or the content of these messages, in runtime, we need to define the port configurations or communication channels. Classic examples of those scenarios are:
Sending an email notification or the message through email. In runtime, we will specify all the properties of that channel, like To, CC, From, SMTP server, and authentication.
Sending a file to a partner FTP, where in runtime, we will define what the partner is and set up all the properties of that channel, like FTP Server, authentication, folder, and file name.
In BizTalk Server, we can archive that to all adapters. Basically, in BizTalk Server, there are two ways to define what communication we will be using in runtime:
The first option, and the most common option, is to use BizTalk Server Dynamic ports.
The second, and less used, is a combination of Message Box direct bound ports and filters on send ports, basically routing.
Implementing the BizTalk Server solutions
Using dynamic ports.
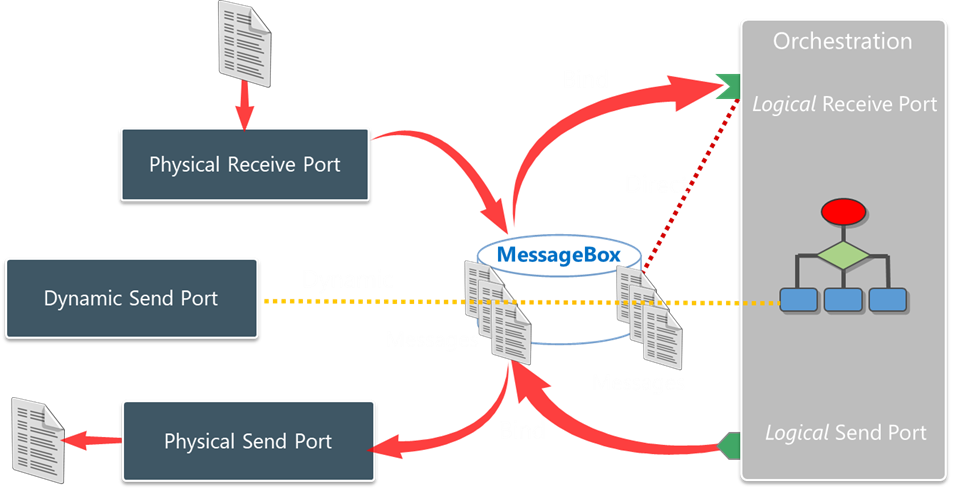
A BizTalk Server dynamic port is a type of port used in Microsoft BizTalk Server to send messages to various destination endpoints without having to pre-configure the specific address details in the port configuration. Unlike static ports, where the address is fixed and known at design time, dynamic ports allow BizTalk to decide at runtime where to send the message based on the message context or other runtime considerations.
Key aspects of BizTalk Server dynamic ports include:
Runtime Resolution: The destination address and transport properties of a dynamic port are set at runtime using message context properties. This allows for a high degree of flexibility in message routing.
Adaptability: Dynamic ports are particularly useful in scenarios where the destination endpoints may change frequently or when messages need to be routed to multiple endpoints based on the content of the message or business rules.
Orchestration Support: Normally, this type of port is used inside BizTalk orchestrations, where the orchestration can set the destination of the message dynamically based on logic implemented within the orchestration.
Dynamic ports are an essential feature for complex integration scenarios where the destination of messages cannot be determined upfront and may vary based on the message itself or the outcome of business processes.
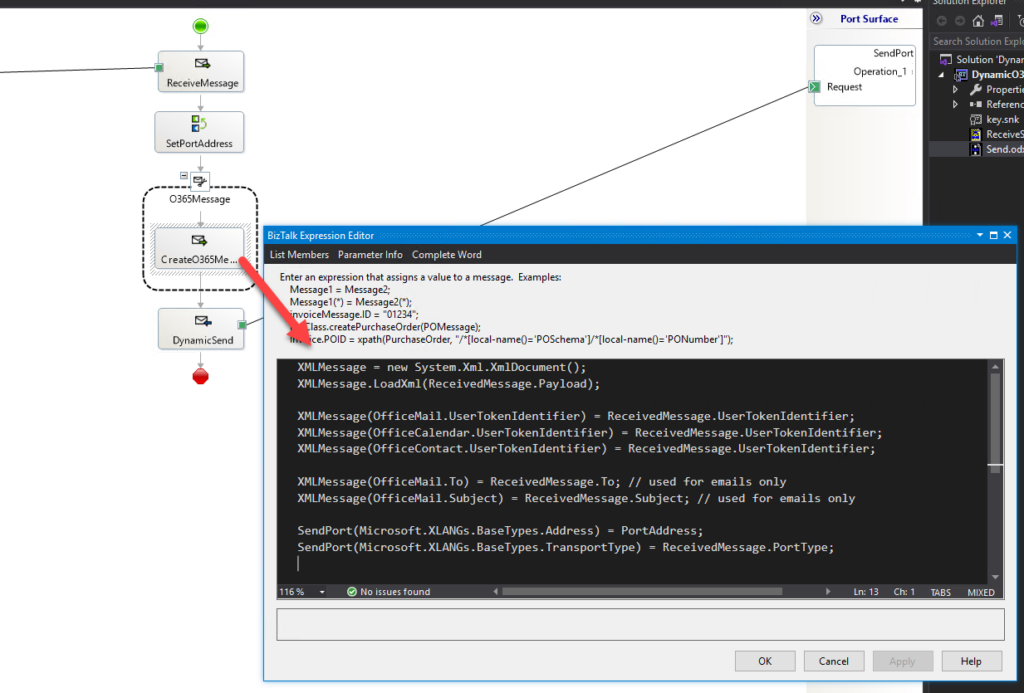
And basically, this is how it looks our BizTalk Server solution inside the orchestration:
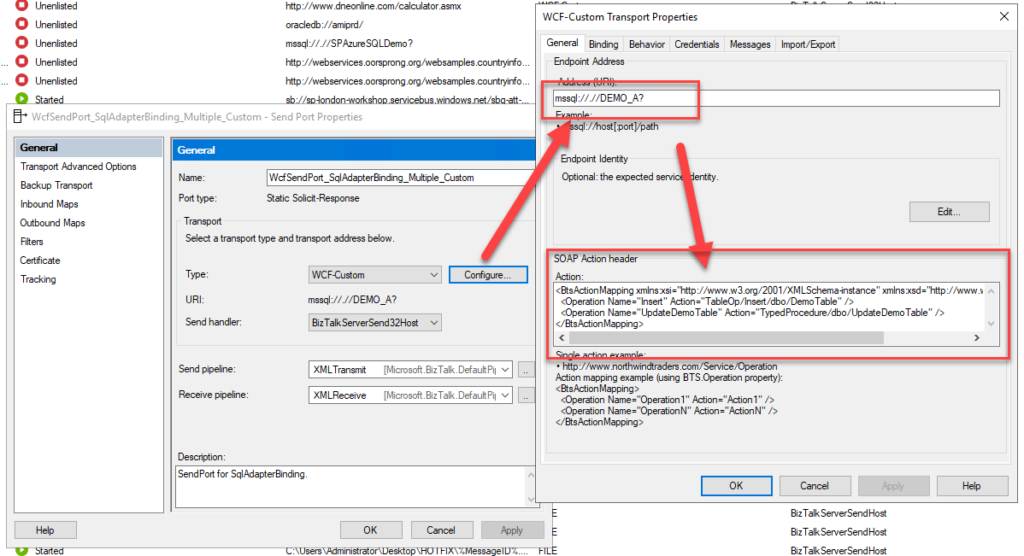
We will configure the adapter properties in the context of the message. And, of course, those properties will change based on the adapter we use. For example, this is for connecting to a SQL database:
There are also ways to create a static port with dynamic behavior, but I will leave that for another day.
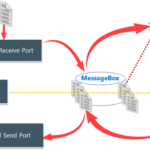
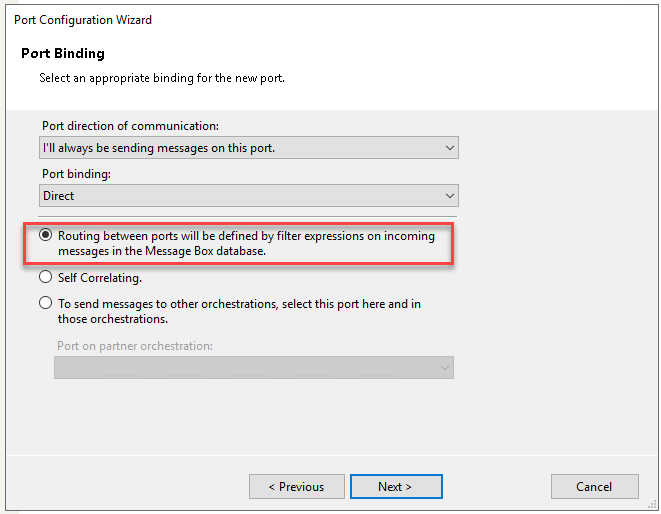
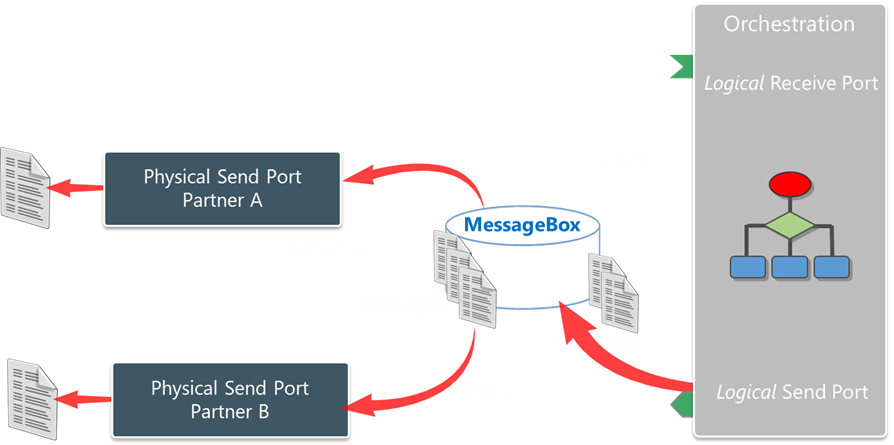
Using a combination of Message Box direct bound ports and filters.
Now, some adapters can be quite difficult to configure in runtime, like the SQL Adapter. So, in order to minimize that developer effort and to better maintain the port configuration and security. We can apply the same principles without using Dynamic ports.
In this approach, we will replace that Dynamic port by:
Several physical send ports are configured for each partner and system we will want to exchange messages.
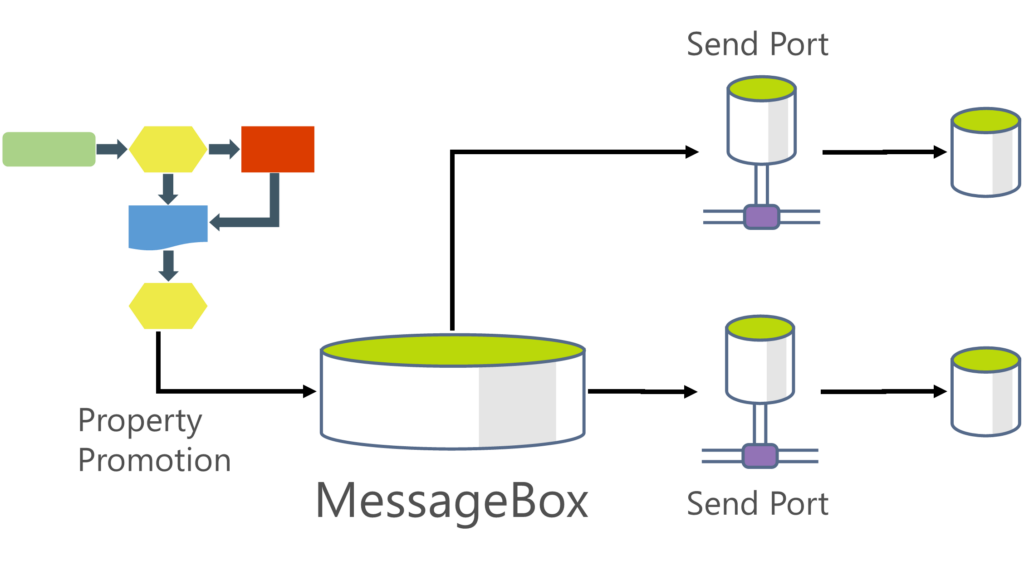
On the orchestration, the logical port, instead of using a dynamic port binding, will use a Message Box direct bound, which means we will be publishing the messages directly to the BizTalk Server Message Box – this is the database where all pub-sub magic of BizTalk Server happens.
In the orchestration, it will be important to promote some kind of metadata to the context of the message that will allow us to identify and subscribe the messages to each partner or system.
Finally, on each physical send port, we need to apply a filter to subscribe to those messages.
The real case scenario where I added to implement this approach was on a client where we had several processes running, and depending on which internal company inside the organization that messages were related to, we had to communicate with a different database, but all those databases were equal.
The challenge
The biggest challenge in implementing this type of requirements in Azure Integration Services is that, with the exception of a few connectors like the HTTP connector, connectors don’t allow us in runtime to set up the configurations of the channel dynamically. Instead, we need to have an API Connection already established. If you use BizTalk nomenclature, we can only use physical ports without dynamic behavior!
You can say: Hey Sandro, we can dynamically configure the TO, email body, CC, and other properties in the Outlook connector, for example.
Yes, you can. But you cannot dynamically define the FROM! You can use the SQL connector, but you cannot in runtime, define which SQL Server you will be using.
So, how can we migrate this to Azure Integration Services?
Building the Logic App Consumption Solution
As I always say, there are many ways to achieve the same goal. Here I’m going to present one that I think is an elegant one. But depending on the requirements, or if this communication is One-way send communication (doesn’t require a response) or two-way (request-response), you will find different approaches.
If it is a one-way send communication, you will find a solution in one of my previous blog posts: Migrating BizTalk Platform one-way routing solutions. But today, we are going to address a most complex scenario, which is the one I present above, in which we need to communicate with different equal databases. How do we migrate those scenarios if SQL Connector doesn’t allow us to specify the server dynamically?
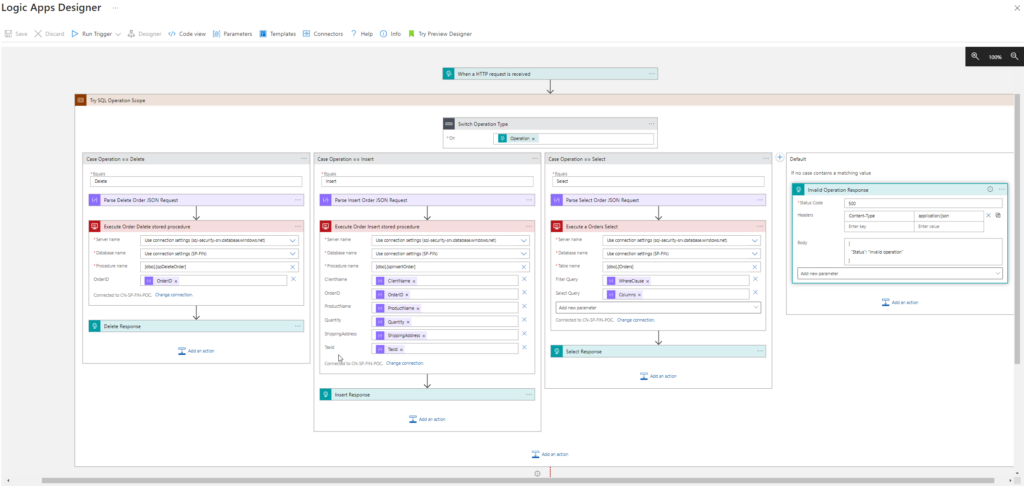
The solution I will present will be inspired by the SQL Server ports in BizTalk Server, where we specify what is the SQL Server, the database, authentication, and many other properties of that channel in order for us to perform that communication but also what are the operations we will be doing on that database.
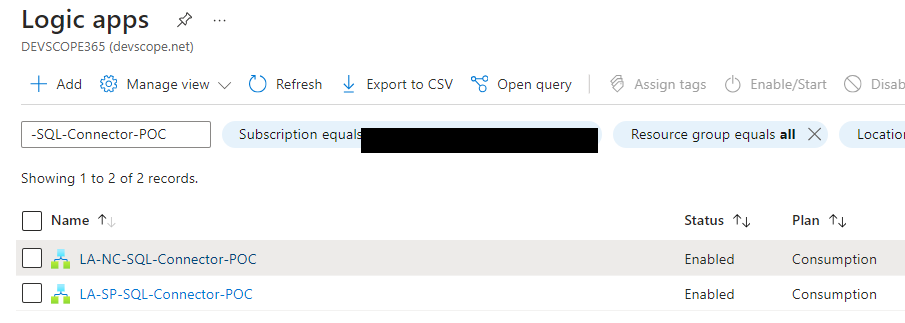
So, to start this solution migration we will be creating two or more Logic Apps that will act as the BizTalk Server SQL Send Port. I have called them:
LA-NC-SQL-Connector-POC
And LA-SP-SQL-Connector-POC
These Logic Apps will have:
A Request – When a HTTP request is received trigger.
And based on the operation we will define, we will perform the corresponding SQL operation.
Of course, each Logic App is configured with a different SQL Server database, but they will implement the same business logic.
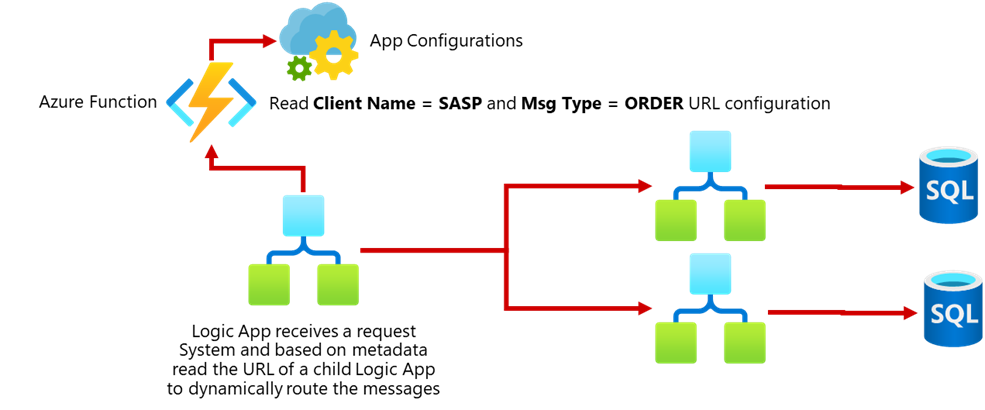
Now that we have our “SQL Server custom connector” or “SQL Server ports,” we need to create the main process to use them dynamically based on the context of the message.
I call this process LA-ProcessOrderRequests-POC. Now, knowing that:
The only connector that really allows us to configure dynamically is the HTTP connector.
This is a request-response communication, so we cannot use the Service Bus to route these messages. (we may, but it will be complex and expensive)
And that our “SQL Server custom connector” or “SQL Server ports” Logic Apps are triggered by HTTP calls.
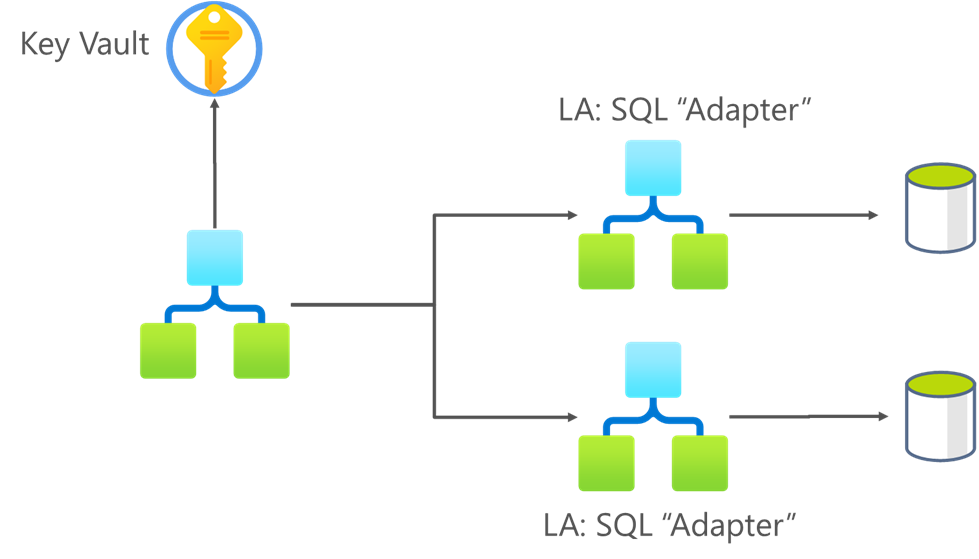
We need to find a place to store those trigger URLs in order to fetch those In runtime based on some metadata of the message, in the context of the message, or in the body, and route them inside the Logic App. For this, we could use:
Or, because those URLs contain some secrets, to increase security, we could use Azure Key Vault to store that information.
In this sample, we decided that the following payload will be received by the main Logic App:
Based on the company, it will read a secret from Key Vault that contains the URL of the child Logic App.
The secrets name convention is composed of static and dynamic data and, in our case, will always be “LA–URL
If we successfully retrieve the URL from Key Vault we will route the request to the correct database.
Otherwise, we will send an error message back to the system.
And this is how we bring some BizTalk Server out-of-the-box capabilities to Azure. And also why it is important for you to have a good knowledge of BizTalk Server to perform those migrations.
I hope you find these architecture samples useful, and stay tuned for more BizTalk Server to Azure Integration Services.
Hope you find this helpful! So, if you liked the content or found it useful and want to help me write more, you can buy (or help me buy) my son a Star Wars Lego!
Author: Sandro Pereira
Sandro Pereira lives in Portugal and works as a consultant at DevScope. In the past years, he has been working on implementing Integration scenarios both on-premises and cloud for various clients, each with different scenarios from a technical point of view, size, and criticality, using Microsoft Azure, Microsoft BizTalk Server and different technologies like AS2, EDI, RosettaNet, SAP, TIBCO etc.
He is a regular blogger, international speaker, and technical reviewer of several BizTalk books all focused on Integration. He is also the author of the book “BizTalk Mapping Patterns & Best Practices”. He has been awarded MVP since 2011 for his contributions to the integration community.
View all posts by Sandro Pereira
Welcome again to another BizTalk Server to Azure Integration Services blog post, this time on my personal blog post. Today, we will address a common scenario and requirement in Enterprise Integration solutions that are quite simple to accomplish with BizTalk Server solutions: How do we validate XML messages before executing the business logic or processing them?
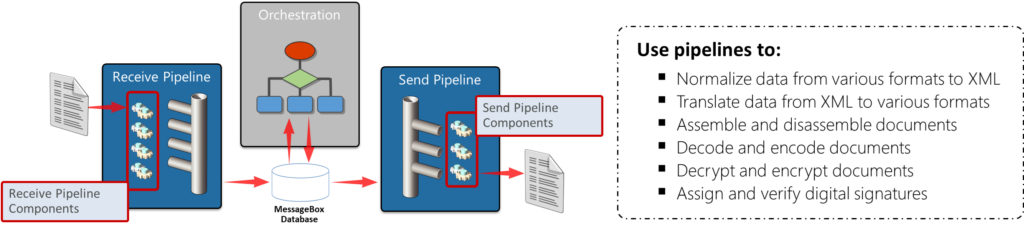
For simplicity, let’s assume that the BizTalk Server internally processes only XML messages, which is not completely true. That means that when we receive a message through an adapter specified in a specific receiving location, the first thing we need to do is normalize data from various formats to XML. For that, we will need to use a BizTalk Server artifact called Pipeline.Pipelines are software components that can process messages, either as the messages are received or just before they are sent out through a send port. A pipeline divides processing into categories of work called processingstages and specifies the sequence in which each stage of work is performed. Each stage of a pipeline contains one or more pipeline components (Microsoft .NET objects or COM objects) that can be configured to work with the specific requirements of the messaging solution or orchestrated business process.
In this particular case, we are interested in using a Receive Pipeline to validate messages against known schema(s). The Receive Pipeline is composed of four stages. Each of the four stages in a receive pipeline performs a specific function and can contain only components specified for use in that stage. Each receive pipeline stage can contain up to 255 components, which will all be executed in order, with the exception of the disassemble stage, in which only one component will execute. The four stages are as follows:
Decode: This stage is used for components that decode or decrypt messages. For example, there is a built-in MIME/SMIME decoder pipeline component that can be used to decode MIME-encoded messages. Custom components for this stage could include a component to decode a compressed (zipped) file before further processing.
Disassemble: Use this stage if you need to parse or disassemble the inbound message. The components within this stage probe the message to see if the message format is recognized, and then, if the message format is recognized, one of the components disassembles the message. Tasks performed in this stage include conversions of flat-file messages to XML format and splitting of messages. In order for property promotion to occur, an appropriate (flat-file or XML) disassembler must be specified at this stage.
Validate: In this stage, messages are validated against a collection of schemas. Pipelines process only messages that conform to the schemas specified in this component, if present. If a message whose schema is not associated with any component in the pipeline is received by the pipeline, the message is not processed. Depending on the adapter, the message is either suspended or an error is issued to the sender. This stage runs once per message created by the Disassemble stage. The built-in validate component can be used in this stage as well as in other stages.
Resolve Party: In this stage, the certificate associated with the sender’s security identifier (SID) is mapped to the corresponding configured BizTalk Server party. If the message was digitally signed, the component uses the signature to look up a Microsoft Windows® identity in the BizTalk Server 2010 Configuration database. If the message carries the authenticated SID of a Windows user, this identity is used. If neither mechanism succeeds, the sender is assigned a default anonymous identity. Party resolution is an important feature for managing trading partner relationships. Not all adapters support party resolution.
In simpler terms, BizTalk Pipelines are the helpful assistants that take care of the stuff coming into BizTalk, tidy it up, and hand it over to other parts of the system so everything runs smoothly. They’re like the backstage crew making sure the show (or data flow) goes on without a hitch.
BizTalk Server solution: Create a custom receive pipeline to validate messages against known schema(s)
Of course, as always, there are multiple ways to accomplish this solution. But one of the most simple and elegant solutions to achieve this is by:
Create a custom receive pipeline that contains at least these two out-of-the-box components:
The XML Disassembler pipeline component in the Disassemble stage. In this scenario, its primary function will be to promote the content properties from individual document levels to the message context.
Then, the XML Validator pipeline component in the Validate stage. This component validates the message against the specified schema or schemas, and if the message does not conform to these schemas, the component raises an error, and Messaging Engine places the message in the suspended queue.
Assuming that we already have created our BizTalk Server project and our schema representing this simple message:
 Sandro
 Pereira
 1978-04-04
 Portugal
 4415
Where all fields are mandatory, with the exception of ZipCode, which is optional. Also, DateOfBirth is a xs:date. The rest are simple strings.
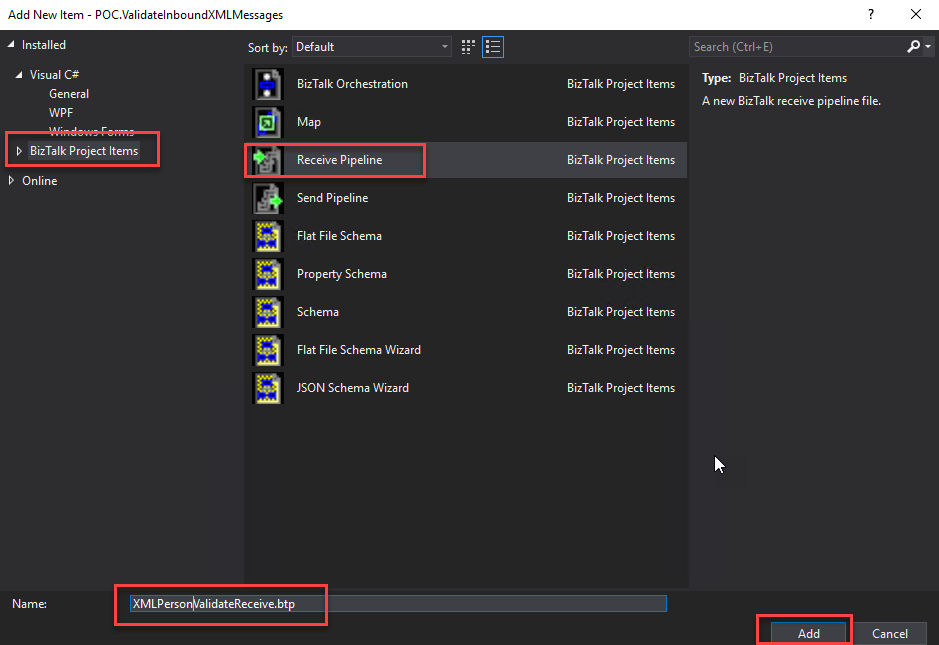
In order to accomplish our requirements inside the BizTalk Server, we just need in our solution to create a custom receive pipeline. To do so, we need to:
Right-click on the project name and select the option Add > New Item…
On the Add New Item window, on the left tree, select BizTalk Project Items and then select Receive Pipeline. Give it a proper name and click Add.
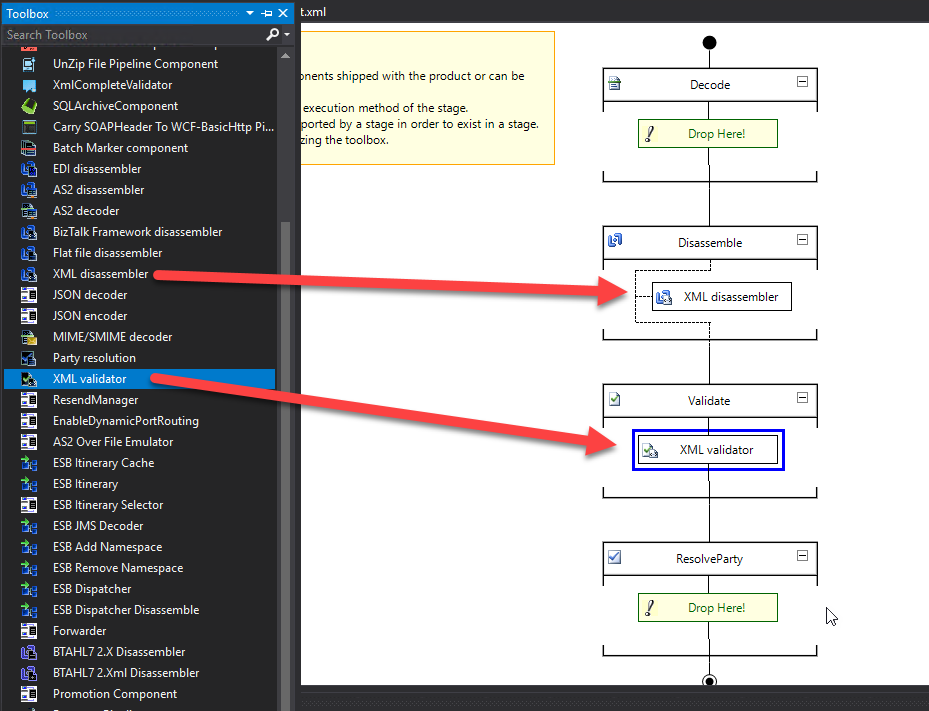
From the Toolbox, drag and drop the XML Disassembler pipeline component in the Disassemble stage and the XML Validator pipeline component in the Validate stage.
In this scenario, we will leave the default configuration of the XML Disassembler pipeline component.
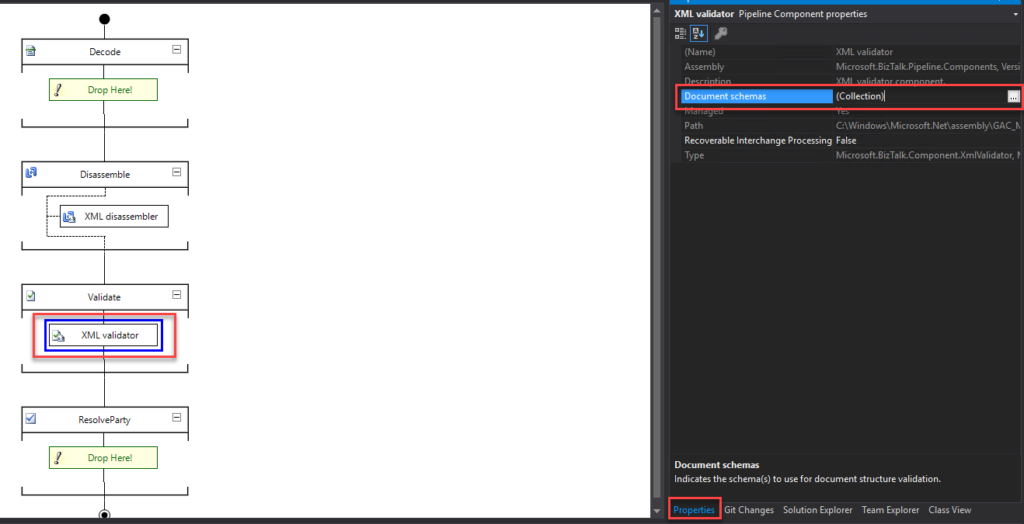
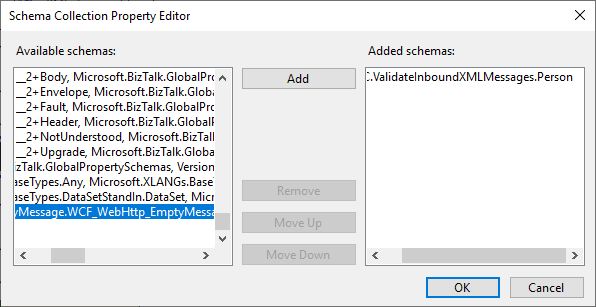
Now, select the XML Validator pipeline component, and in the Properties windows (normally present on the right side of the Visual Studio Editor), click on the three dots (…) of the Document schemas property.
On the Shema Collection Property Editor window, on the Available schemas panel, select your schema, in this case, Person, and then click Add. Click OK.
Save your pipeline. Build your project and deploy it. That’s it!
Now, when you deploy the solution into your BizTalk Server environment and configure a physical receive port and location associating this receive pipeline you have created, what happens is that:
If the port receives a Person XML, it will deeply validate the instance of that message against the schema, and if the message does not conform to these schemas, the component will raise an error.
If we receive any other type of XML message, the port will consume them without deeply validating the instance against the schema since it is not a Person.
The challenge
This is a common request that we will find in many solutions, and it is fully supported inside Logic Apps. It is not in the same way as BizTalk Serve since we do not have a concept of Receive Ports and Receive Location in Logic App or any other service in Azure, but it is still fairly easy to accomplish.
The main challenge here is that depending on which type of Logic App you will use, we will have different approaches:
If we use Consumption to have XML “premium” capabilities, we need to have an Integration Account to store the schemas and perform validation (and many other features). However, this will have an additional cost.
If we use Standard, we already have built-in XML capabilities, and for these requirements, we will not need an Integration Account.
The good news is that BizTalk Server Schemas are fully supported in Logic Apps, both Consumption and Standard, so we don’t need to worry about generating or recreating them. We can just copy them from our BizTalk Server solution and use them in our Azure Integration Service (AIS) solution.
Building the Logic App Consumption Solution
In this Proof-of-Concept (POC), first, we need to copy our schema to our Integration Account. If you don’t have one, you can create it by:
In the Azure portal search box, enter Integration accounts, and select Integration accounts.
Under Integration accounts, select Create.
On the Create an integration account pane, provide the following information about your integration account like, Subscription, Resource Group, Integration Account Name, Pricing Tier, Storage account, and so on.
When you’re done, select Review + create.
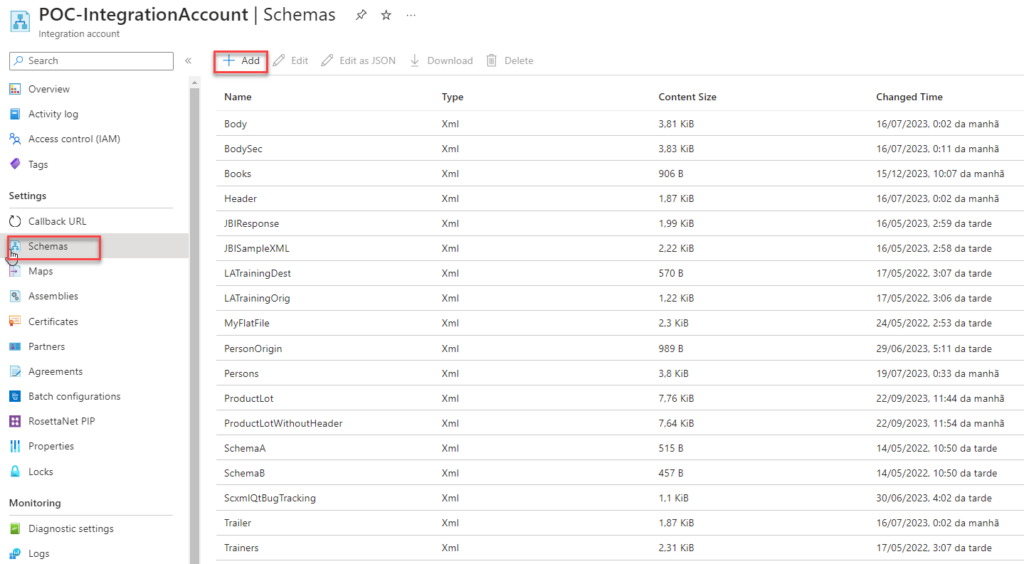
To import the schema into our Integration Account, we need to:
Access the integration account, and under the Settings section, select Schemas and then click + Add.
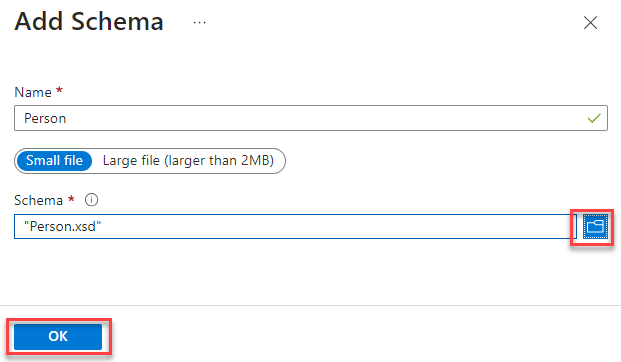
On the Add Schema panel, browse for our XML Schema, leave the default settings, and click OK.
Now that we have our schema, the next thing we need to do is create our Logic App that will act as our BizTalk Server Receive Pipeline. To accomplish that, you need to:
On the Azure Portal, create a new Logic App Consumption and give it a proper name, in our case: LA-SA-XMLValidation-POC.
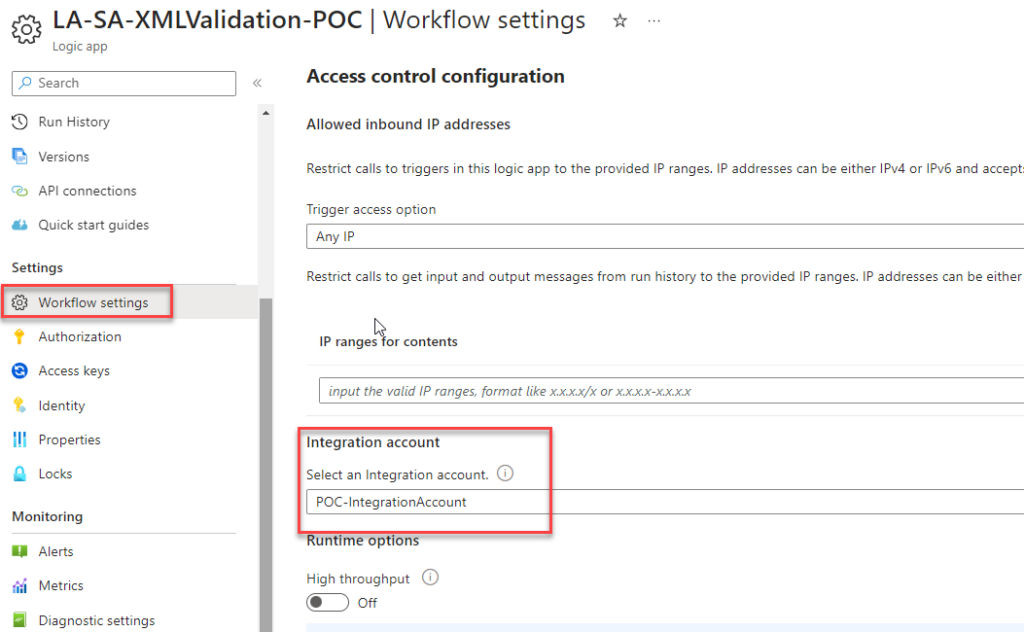
Before we start to create our logic, we first need to associate the Integration account with this Logic App by selecting Workflow settings under the Settings section. In the Integration account property, select your Integration account.
Click Save.
Now, click on the Logic App designer under the Development Tools section. From the Templates, select Blank Logic App.
Note: We could use any connector as input, like File or OneDrive, but for simplicity of this POC, we will use the Request.
For the trigger, select Request > When a HTTP request is received trigger and leave it as default.
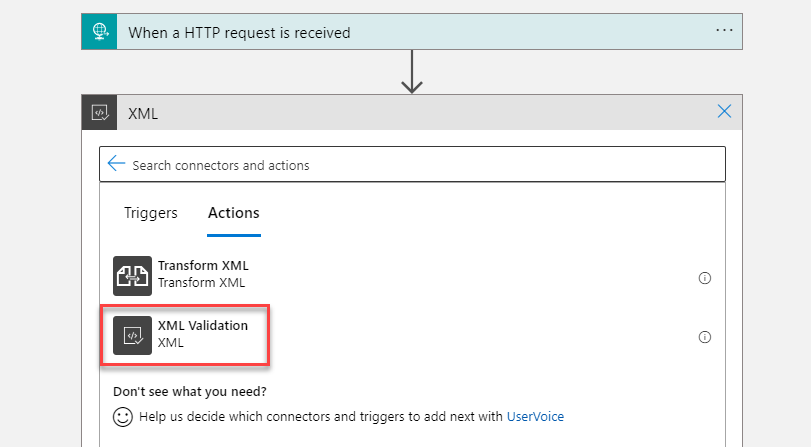
Next, click on + New step, select the XML connector, and then the XML Validation action.
On the XML validation action, perform the following configurations:
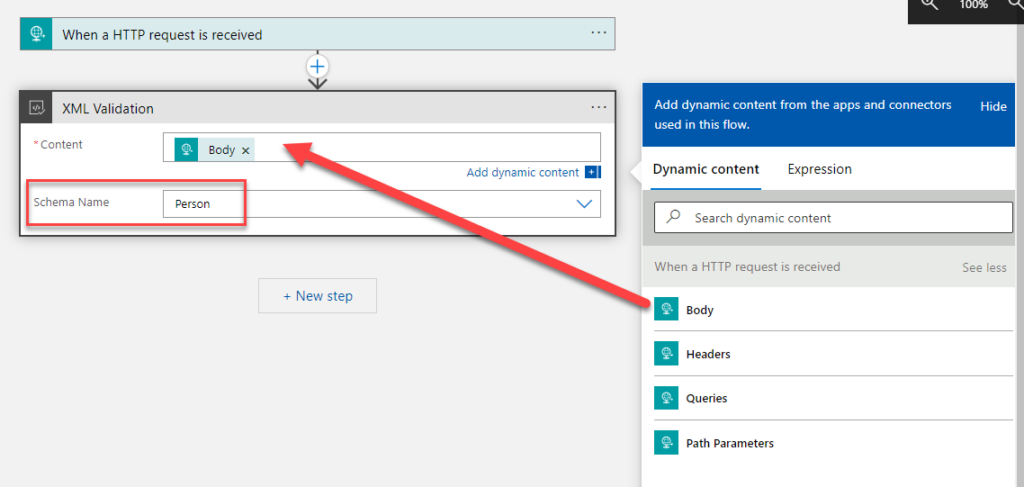
On the Content property, set it to be the body of the When a HTTP request is received trigger.
On the Schemaname property, select the correct schema from your integration account. In our case, Person.
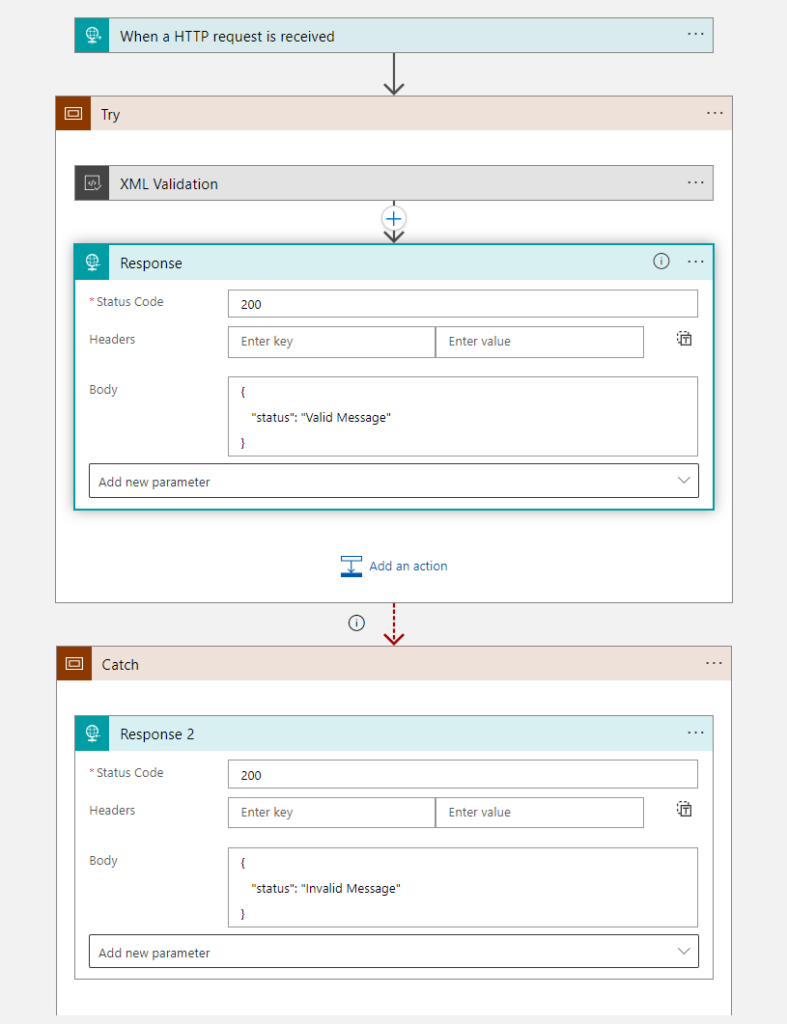
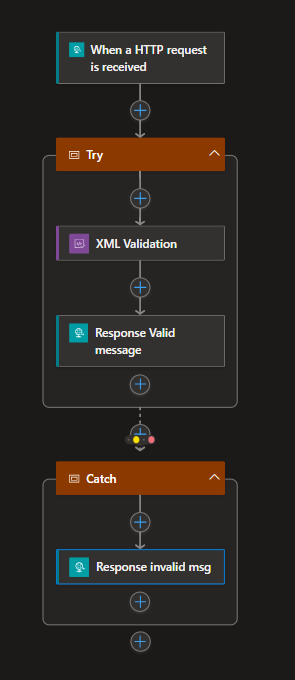
And, of course, now you need to implement your business logic or call a child Logic App.
I endup creating a try-catch statement just to prove this functionality.
Now, you just need to test your solution.
Building the Logic App Standard Solution
Making the same solution in Standard will be easier since Logic App Standard already has out-of-the-box support for XML Schemas and maps. We just need to add them to our logic app resource. Once again, the BizTalk Server XML Schemas will be fully supported, so we just need to copy them from our BizTalk Server solution.
Let’s create our Logic App Standard Solution. To do that, you need the following:
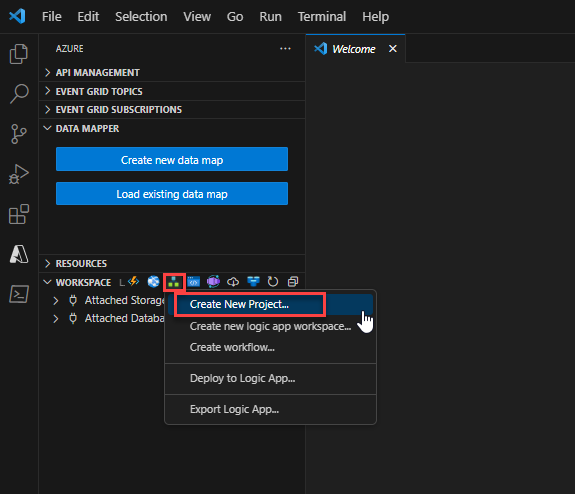
In Visual Studio Code, close all open folders.
In the Azure window, on the Workspace section toolbar, from the Azure Logic Apps menu, select Create New Project.
Define the folder of the project or browse to the location where you created your project folder, select that folder, and continue.
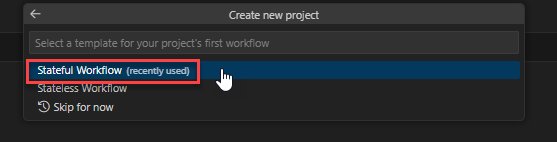
From the templates list that appears, select either Stateful Workflow or Stateless Workflow. This example selects Stateful Workflow.
Provide a name for your workflow and press Enter. This example uses LA-XMLValidation-POC as the name.
From the Visual Studio Activity Bar, open the Explorer pane if it is not already open.
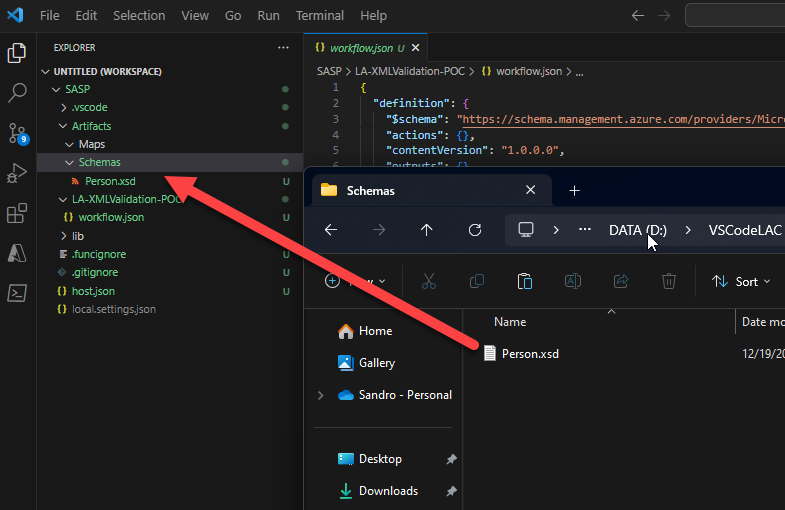
Now, the first thing we will do is add our Schema to our project. To do that, you need to:
Access the project folder using File Explorer, enter the Artifacts > Schemas folder, and copy the schema into this folder. And you will automatically see it on the Visual Studio Code Explorer.
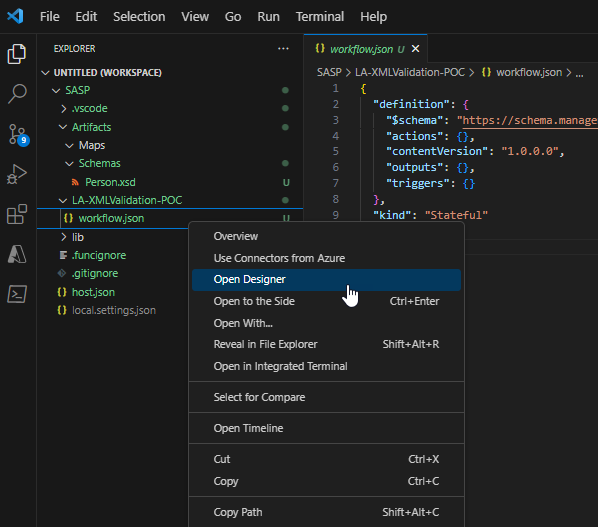
Now, we need to create the business logic of our Logic App.
Right-click on our LA-XMLValidation-POC workflow.json file and select Open Designer.
And we are going to implement the same business logic we did with Consumption.
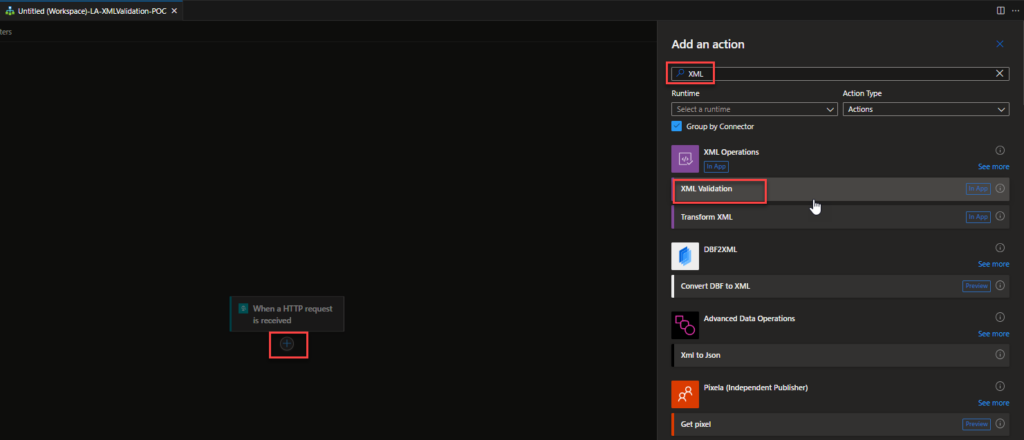
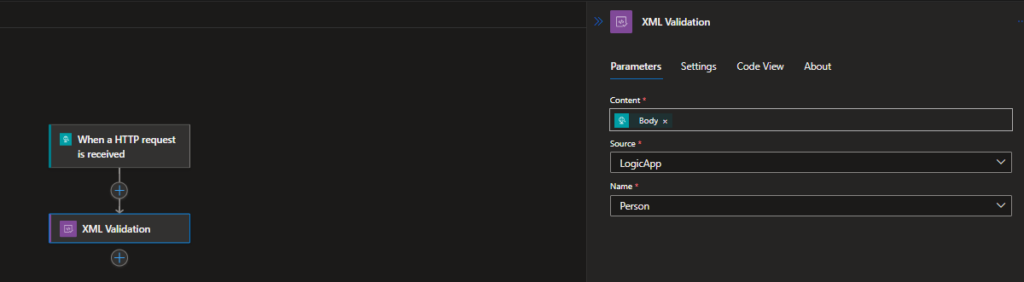
Start adding a Request > When a HTTP request is received trigger and leave it as default.
Next, click on + Add an action, select the XML connector, and then the XML Validation action.
On the XML validation action, perform the following configurations:
On the Content property, set it to be the body of the When a HTTP request is received trigger.
On the Source property, leave LogicApp.
On the Schemaname property, select the correct schema from your project. In our case, Person.
And, of course, now you need to implement your business logic or call a child Logic App.
I endup creating a try-catch statement just to prove this functionality.
Now, you just need to test your solution.
I hope you find these architecture samples useful, and stay tuned for more BizTalk Server to Azure Integration Services.
Hope you find this helpful! So, if you liked the content or found it useful and want to help me write more, you can buy (or help me buy) my son a Star Wars Lego!
Author: Sandro Pereira
Sandro Pereira lives in Portugal and works as a consultant at DevScope. In the past years, he has been working on implementing Integration scenarios both on-premises and cloud for various clients, each with different scenarios from a technical point of view, size, and criticality, using Microsoft Azure, Microsoft BizTalk Server and different technologies like AS2, EDI, RosettaNet, SAP, TIBCO etc.
He is a regular blogger, international speaker, and technical reviewer of several BizTalk books all focused on Integration. He is also the author of the book “BizTalk Mapping Patterns & Best Practices”. He has been awarded MVP since 2011 for his contributions to the integration community.
View all posts by Sandro Pereira
Last week, I was helping a client start their footprint on Azure by deploying our very first services: an Azure Function and a few Logic Apps Consumption. Because this was the first introduction to Azure to this client, we decided for a start small and get bigger approach. So, they have created a pay-per-use subscription and gave me access to it.
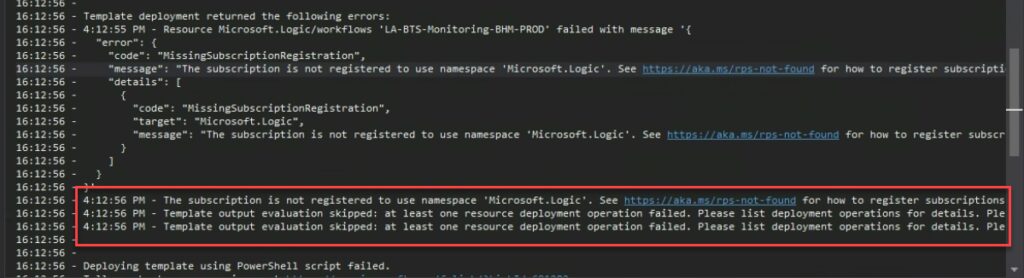
If we didn’t find any issue deploying our Azure Function, the same cannot be said for the Logic Apps. And when we were trying to deploy it from Visual Studio, the same solution that we had deployed without issue in other subscriptions, we were surprised to encounter the following error:
The subscription is not registered to use namespace ‘Microsoft.Logic’. See https://aka.ms./rps-not-found for how to register subscriptions.
Causes
Basically, this error means that the service you are trying to use is not currently registered in your Azure subscription.
You can change this at any point by allowing or prohibiting using specific namespace (services) in our Azure Subscription. Of course, as with everything in Azure, you need permissions on the subscription to execute these actions.
Solutions
The solution to this problem is quite simple to accomplish. You just need to:
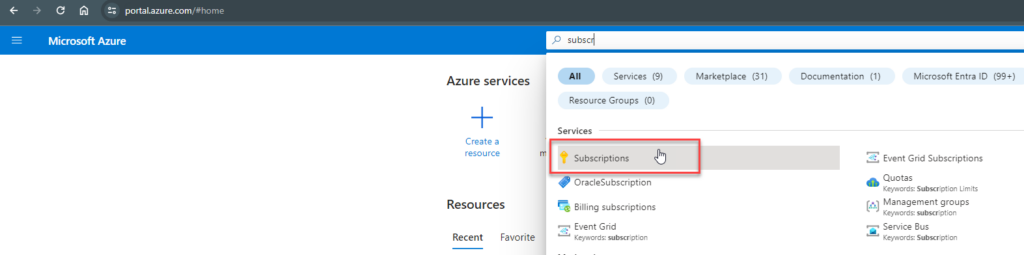
From the list of subscriptions page, select the subscription you want to use for registering the resource provider.
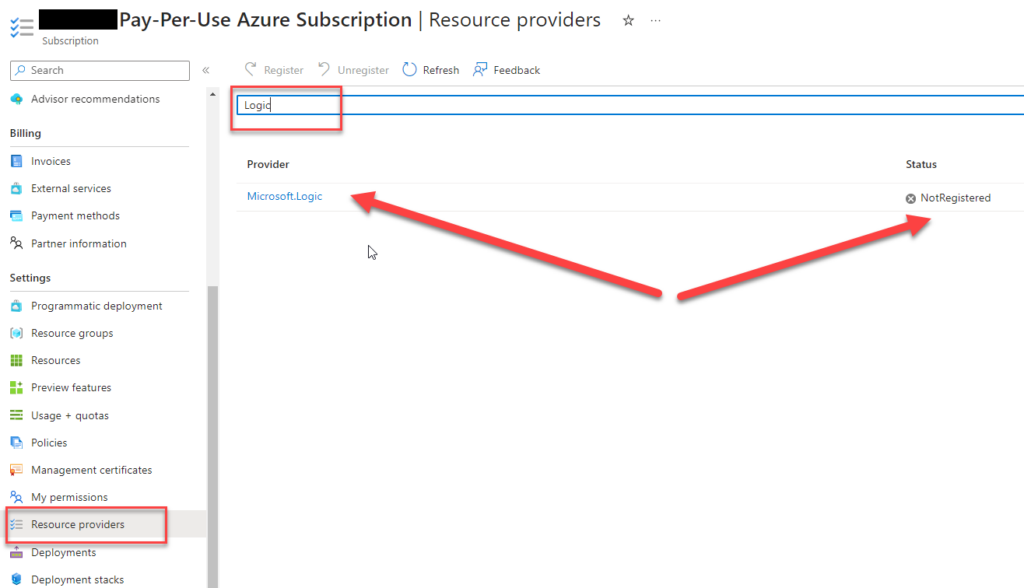
On the Subscription page, from the left menu, select the Resource providers option under the Settings section.
On the Resource providers page, on the search type Logic.
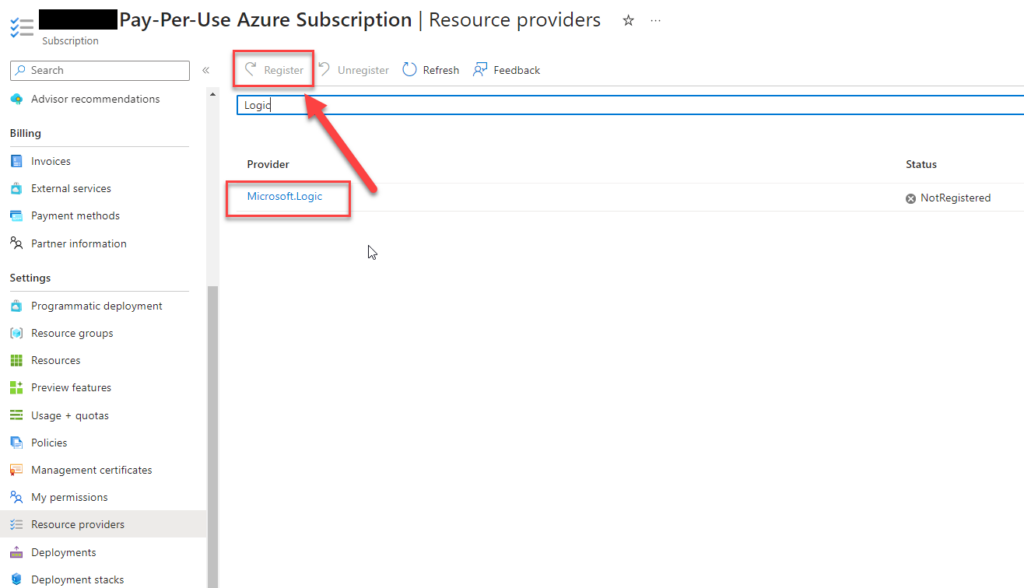
Click on the Microsft.Logic row, and that will enable the Register button. Click on the Register button.
After you click register, the provider will be registered, and you should be able to use the Logic App Service.
After these steps, we were able to deploy our Logic Apps from Visual Studio.
Hope you find this helpful! So, if you liked the content or found it helpful and want to help me write more content, you can buy (or help buy) my son a Star Wars Lego!
Author: Sandro Pereira
Sandro Pereira lives in Portugal and works as a consultant at DevScope. In the past years, he has been working on implementing Integration scenarios both on-premises and cloud for various clients, each with different scenarios from a technical point of view, size, and criticality, using Microsoft Azure, Microsoft BizTalk Server and different technologies like AS2, EDI, RosettaNet, SAP, TIBCO etc.
He is a regular blogger, international speaker, and technical reviewer of several BizTalk books all focused on Integration. He is also the author of the book “BizTalk Mapping Patterns & Best Practices”. He has been awarded MVP since 2011 for his contributions to the integration community.
View all posts by Sandro Pereira
For 2024, I have challenged my team to every Friday to publish a fact about the technologies we work on every day. The base rules will be:
This has to be an easy-to-read post.
The fact can be virtually everything: a tip, a best practice, a workaround, an opinion, a fact, a tool, and so on.
And this will be the first one! But before we start I feel I need to explain the featured image of this series of posts! For fun, I asked ChatGPT to generate a 16:9 picture with the following context:
Three male friends on a Friday night at a pub:
The first man with a beard is drinking beer (Luis Rigueira).
The second man is bald and has no beard. He is drinking wine. (me)
And the third man has glasses, he doesn’t have a beard, and he is drinking Coke soda. (Diogo Formosinho)
This was the end result:
Now, the fun part: by mistake, I misspelled beer and wrote bear – that is the reason for the bear in the picture if you are wondering :)… but we decided to call him “the traitor” (he knows who he is!!)
Now, to start this series of blog posts, I have selected this fact: if you need to perform an XML Schema validation using the Integration Account, please remember that the Integration Account doesn’t support nested schemas, at least yet! The beauty of Azure is that everything changes at a fast pace, and new features arrive almost every day.
The import element inside XML Schemas is used to add multiple schemas with different target namespaces to a document. This allows us, for example, to create common objects that are reused inside several schemas.
For example, this XML payload:
  Sandro
  Pereira
  1978-04-04

    Porto
    1
It has two objects: the Person and the Address. If we open the Person Schema, we realize that there is an importation for the Address Schema inside:
If you have this scenario in your hands, unfortunately, I have to tell you that the Integration Account doesn’t support it. And you will end up with the following error:
The provided schema content is not valid. If the schema has any references, please upload the referenced schemas to the Integration Account first. The compilation of schema failed with error: ‘The ‘http://POC.ValidateInboundXMLMessages.Address:Address’ element is not declared.’.
How can we fix this? Well, this is a subject for another blog post and not for a Friday Fact!
Hope you find this helpful! So, if you liked the content or found it useful and want to help me write more, you can buy (or help me buy) my son a Star Wars Lego!
Author: Sandro Pereira
Sandro Pereira lives in Portugal and works as a consultant at DevScope. In the past years, he has been working on implementing Integration scenarios both on-premises and cloud for various clients, each with different scenarios from a technical point of view, size, and criticality, using Microsoft Azure, Microsoft BizTalk Server and different technologies like AS2, EDI, RosettaNet, SAP, TIBCO etc.
He is a regular blogger, international speaker, and technical reviewer of several BizTalk books all focused on Integration. He is also the author of the book “BizTalk Mapping Patterns & Best Practices”. He has been awarded MVP since 2011 for his contributions to the integration community.
View all posts by Sandro Pereira
Christmas is just around the corner, which means that here at home, it’s a crazy and funny period for the kids (actually for the whole family since we love Christmas!). They started asking for us to put up the Christmas decorations really early, and they already wrote a letter to Santa with their requests.
I don’t know about you, but here, Santa exists! I love playing with this idea, and although my oldest daughter is no longer a believer, the younger ones are… even though they say that Santa Claus last year was their father :). I tell them that there are many children around the world and Santa Claus cannot be everywhere at the same time, and in order for no child to be without present, they ask for the help of all fathers. We are Santa’s helpers, like the elves!
Because they are always asking if Santa had already received the letters, if he understood the requests, if he needed some help… and I always told them that Santa would send magic SMSs to all fathers (modern technology) if he had any problem or when he was able to read the letter. That worked for a while (2 years :))… but now they are asking to see the SMSs. No matter how much I say they are magical SMS that only Dad can see, they beg to see… To solve this problem, I activated my geek side and thought, why not create a Logic App that sends me SMSs with personalized messages from Santa Claus!
Azure has a service called Azure Communication Services that allows you to send SMS (along with other functionalities). Still, unfortunately, this service was not eligible for my MVP subscription, nor was it available for free accounts with credits. It has to be on an enterprise or pay-per-use subscription. This way, I was not able to test these services. However, there is another third-party connector that you can connect inside Logic Apps and use to send SMSs: the Twilio Connector.
Before you start creating the Logic App, you need to :
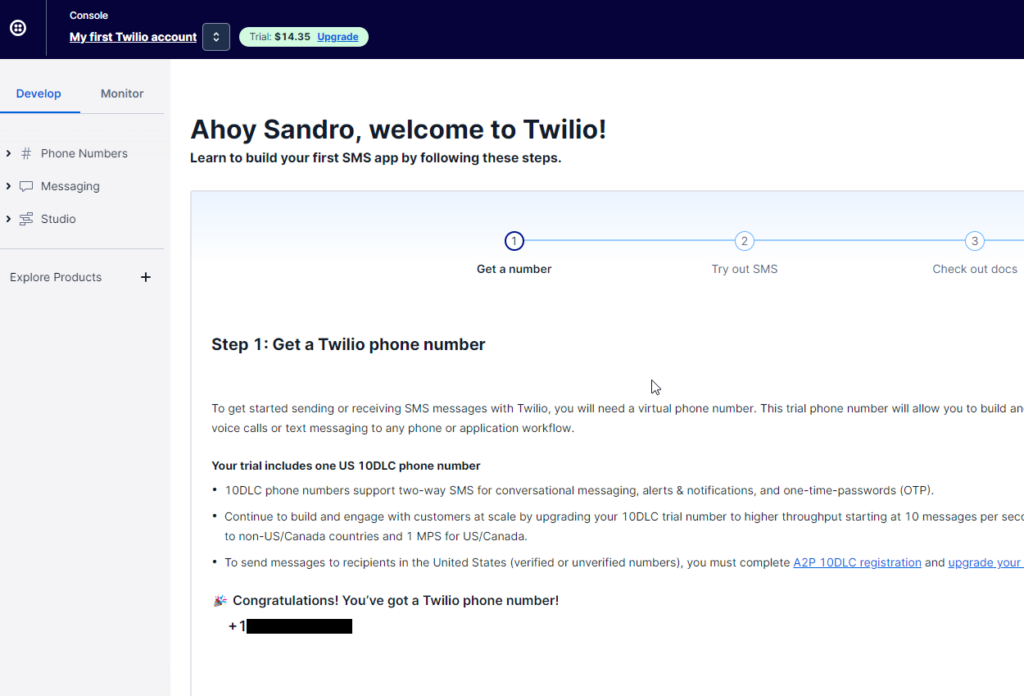
You have the option to Start for free (you will have $15 to test this service)
After you register, you will have access to your Twilio Console, where you can get a number.
This is a US number, but that is perfect for me. If my kids see a foreign number, it will be more credible. Santa Claus lives on the North Pole.
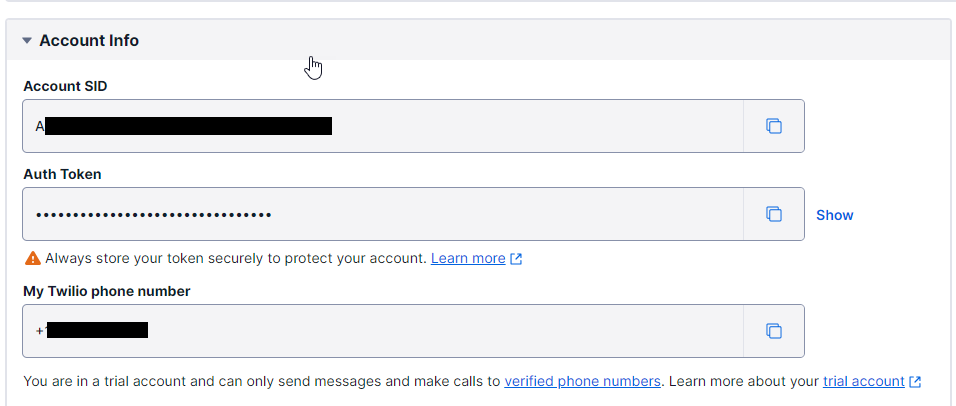
You also have access to your Account info. You will need this information to configure the connector inside the Logic App.
Now that we have configured our Twilio account let us create our Santa Claus Logic App. To do that, you need to:
Access the Azure Portal and create a Logic App.
For simplicity, we will use a Logic App Consumption and name it LA-Santa-Claus-POC
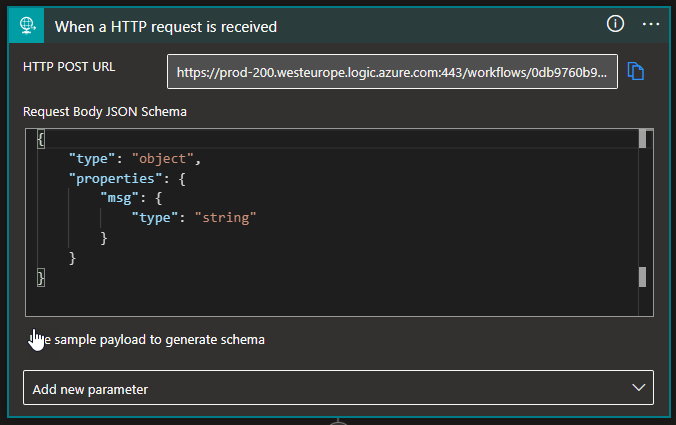
For the trigger, we will use a Request > When a HTTP request is received. The Logic App will receive the following payload:
{
    "msg": "This is the SMS"
}
In order to be easier to map these values in the Twilio connector, on the Request > When a HTTP request is received trigger:
Click on Use sample payload to generate schema
Copy the JSON above and click Done.
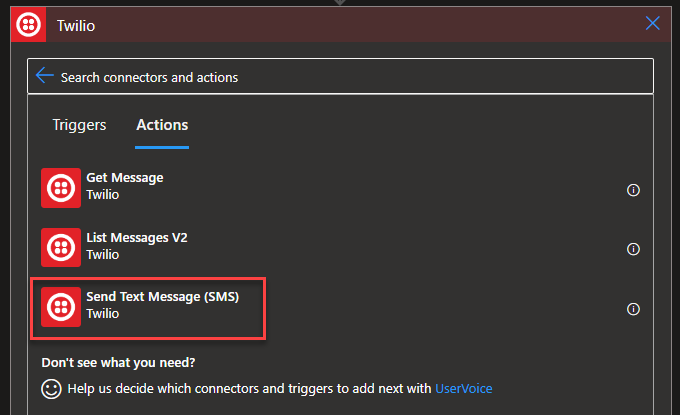
Click on the + New step, and from the search text box, type Twilio and select the Twilio connector followed by the Send Text Message (SMS) action.
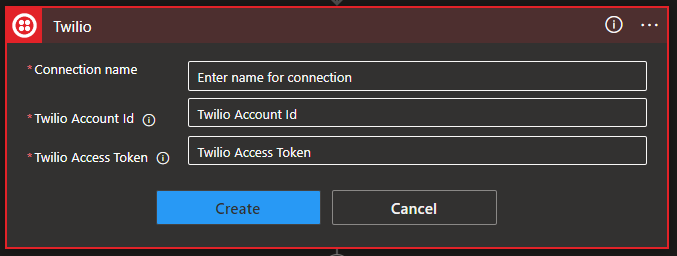
The first thing you need to do is to configure the Twilio connector by setting the:
Connection name
Twilio Account Id and Access Token > These two you can be then on your Twilio Console.
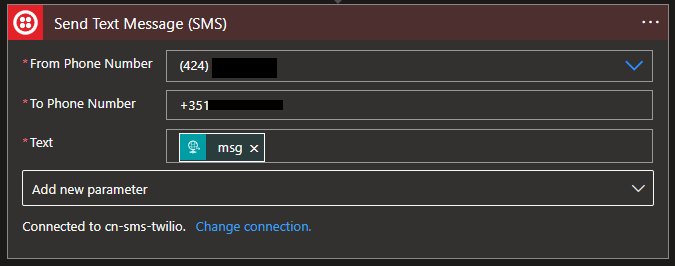
Once you configure the connector, then we need to:
From the combo box From Phone Number property, select the Twilio number.
On the To Phone Number, add your phone number.
And on the Text property, map the message from the request: triggerBody()?[‘msg’]
And Save your Logic App.
Simple as that!
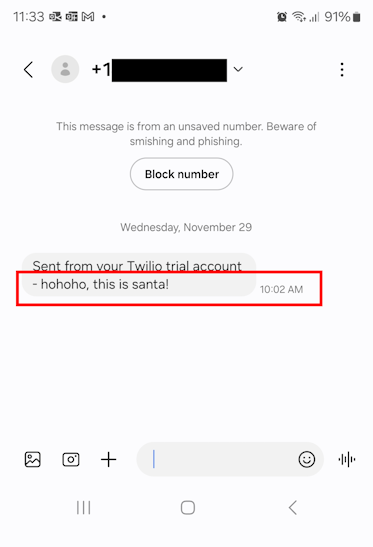
Now, if you test your Logic App you will notice that you will have a new SMS from Santa Claus!
I don’t know about you, but I will have fun with my kids tonight!
Hope you find this helpful! So, if you liked the content or found it helpful and want to help me write more content, you can buy (or help buy) my son a Star Wars Lego!
Author: Sandro Pereira
Sandro Pereira lives in Portugal and works as a consultant at DevScope. In the past years, he has been working on implementing Integration scenarios both on-premises and cloud for various clients, each with different scenarios from a technical point of view, size, and criticality, using Microsoft Azure, Microsoft BizTalk Server and different technologies like AS2, EDI, RosettaNet, SAP, TIBCO etc.
He is a regular blogger, international speaker, and technical reviewer of several BizTalk books all focused on Integration. He is also the author of the book “BizTalk Mapping Patterns & Best Practices”. He has been awarded MVP since 2011 for his contributions to the integration community.
View all posts by Sandro Pereira