Recently, a client asked me for help rectifying some existing logic apps in their environment because their resource had left the company. Not only to rectify the project but to put it in a better shape and use all good best practices.
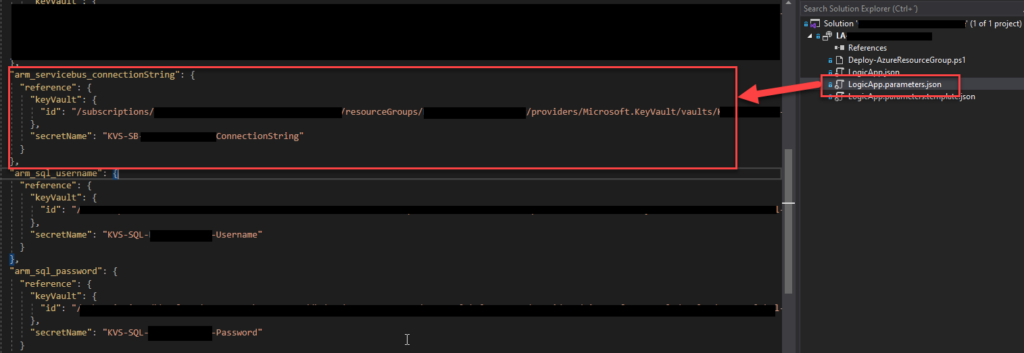
One of the tasks we decided to do was reference secrets in Key Vault for the deployment process, whether through CI/CD or directly through Visual Studio. We had administrator access to the Key Vault in the dev environment, so we were able to easily create those secrets and reference them in the Logic App parameter file, for example, an Azure Service Bus connection string. For those who are not aware, we can archive that by using the code below:
The problem was that when we tried to deploy the solution through Visual Studio, we got the following error:
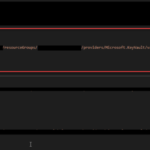
Logic app visual studio deployment Multiple error occurred: Forbidden,Forbidden,Forbidden. Please see details.
Without any more detail. After some analysis, we realized that the number of Forbidden words in the messages matched the number of key vault secrets we were trying to reference. When we commented on them all and only left one, then we got an error message with more detail:
The secret of KeyVault parameter ‘name’ cannot be retrieved. Http status code: ‘Forbidden’. Error message: ‘Access denied to first party service. Caller: name=ARM;tid=;appid=… Vault:;location=’. Please see https://aka.ms/arm-keyvault for usage details.
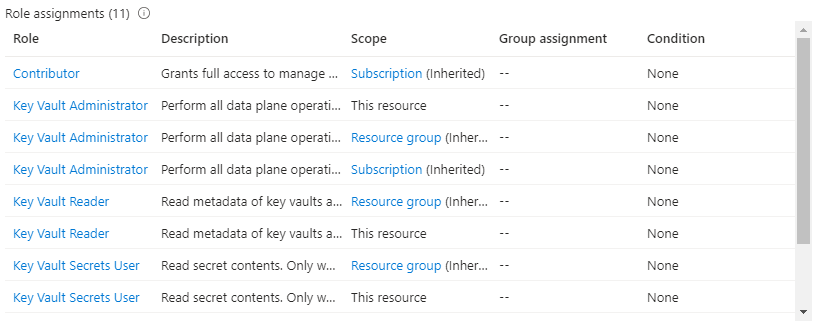
Initially, I thought that was a Key Vault access permission issue, even though I was a Key Vault administrator. However, sometimes, we also need some RBAC permission. In the end, I ended up giving Administrator, Reader, and Secret User permission access at the key vault, resource group, and subscription level:
Still, I was getting the same error!
Cause
When you are developing a Logic App Consumption, this is, in fact, an ARM template project and an ARM template deployment. So, when we reference a Key Vault secret in the LogicApp.parameters.json file, we are referencing a secure parameter that will be used during the ARM template deployment.
The problem is that to be able to access the key vault by the resource manager, you need to change the access policy to allow Azure Resource Manager for template deployment.
You can see this on the official documentation here:
When you need to pass a secure value (like a password) as a parameter during deployment, you can retrieve the value from an Azure Key Vault. To access the Key Vault when deploying Managed Applications, you must grant access to the Appliance Resource Provider service principal. The Managed Applications service uses this identity to run operations. To successfully retrieve a value from a Key Vault during deployment, the service principal must be able to access the Key Vault.
Solution
To solve this issue is quite very simple:
Sign in to the Azure Portal.
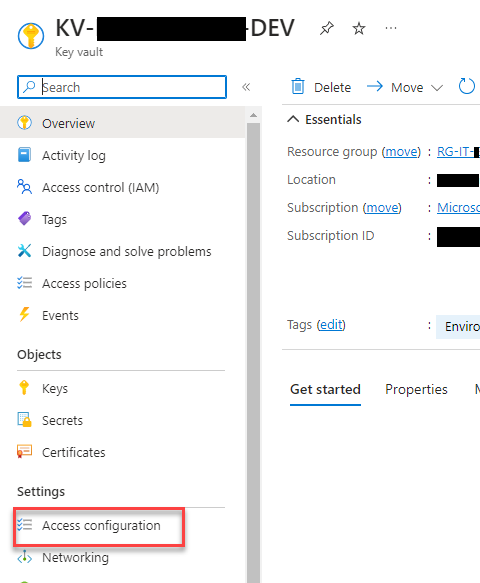
Open your key vault. Enter key vaults in the search box or select Key vaults.
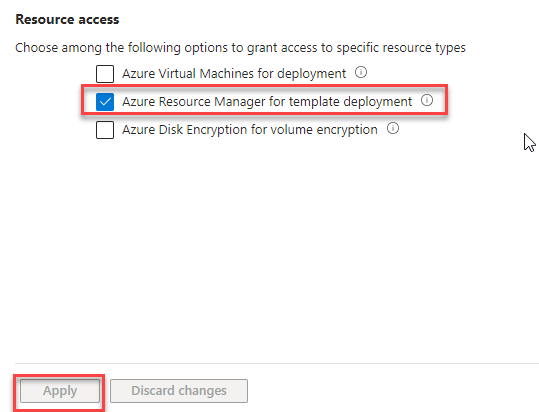
On the Key Vault, select Access configuration under the Settings section
Select Azure Resource Manager for template deployment under Resource access. Then, select Apply.
Now, you will be able to successfully reference the Key Vault secure parameter and deploy the Logic App Consumption solution from Visual Studio.
Hope you find this helpful! So, if you liked the content or found it useful and want to help me write more, you can buy (or help me buy) my son a Star Wars Lego!
Author: Sandro Pereira
Sandro Pereira lives in Portugal and works as a consultant at DevScope. In the past years, he has been working on implementing Integration scenarios both on-premises and cloud for various clients, each with different scenarios from a technical point of view, size, and criticality, using Microsoft Azure, Microsoft BizTalk Server and different technologies like AS2, EDI, RosettaNet, SAP, TIBCO etc.
He is a regular blogger, international speaker, and technical reviewer of several BizTalk books all focused on Integration. He is also the author of the book “BizTalk Mapping Patterns & Best Practices”. He has been awarded MVP since 2011 for his contributions to the integration community.
View all posts by Sandro Pereira
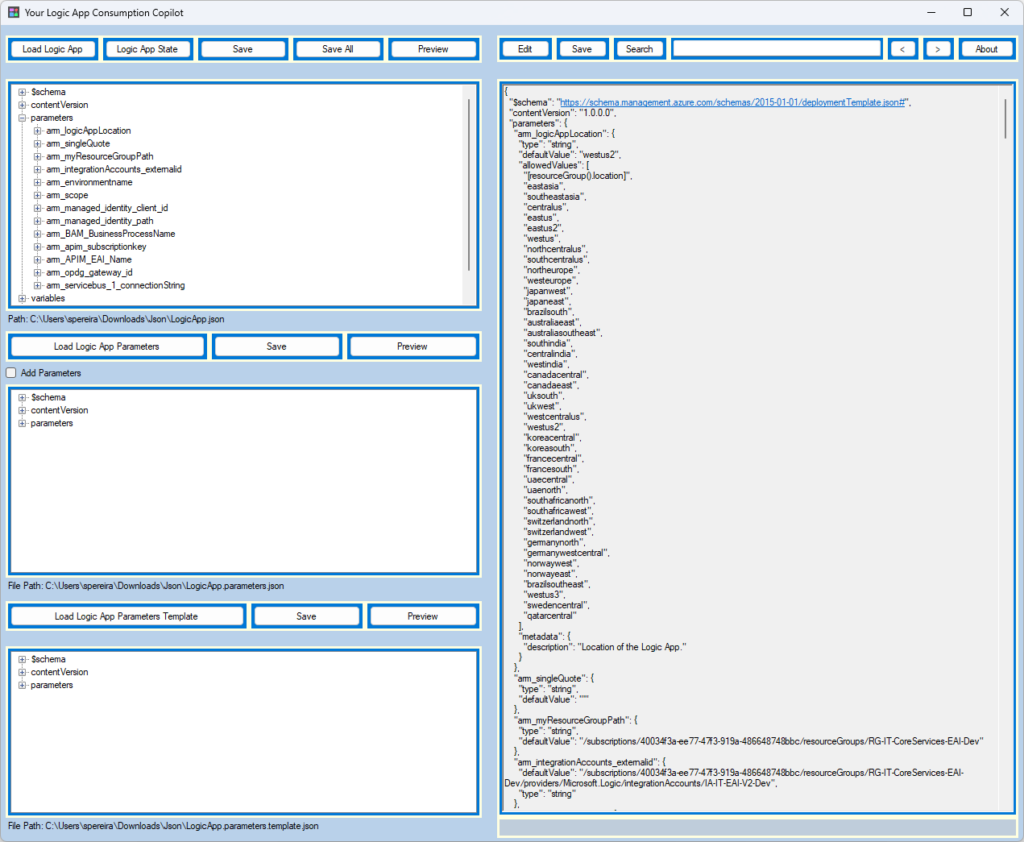
I initially called this tool Logic App Consumption DevBuddy, but then my dear friend Mike Stephenson told me that I should call it Copilot, and I liked the idea.
Copilot is a term that these days is generally bound to Microsoft AI that is present on almost all of Microsoft’s applications and experiences, including Microsoft 365, Windows 11, Edge, or Bing, and that can assist users and optimize their work, such as generating text and tables in Word, summarizing and drafting emails in Outlook. However, the primary definition of a Copilot is a qualified pilot who assists or relieves the pilot but is not in command.
Well, Logic App Consumption Copilot doesn’t have AI involved behind the scenes but is able to optimize and expedite the developers’ work while building Logic Apps Consumption.
While developing Logic Apps Consumption with Visual Studio, there are certain tasks, mainly tasks related to the ARM template configuration and CI/CD, that are very annoying and time-consuming, such as:
Add new ARM parameters.
Add new Logic App (workflow) parameters.
Configure ARM parameters for CI/CD and Visual Studio deployment.
Add new Logic Apps to our ARM template.
And many more.
The reason these tasks are time-consuming is that most of them cannot be done inside the Logic App design, and they need to be performed manually in the JSON definition, which leads us, at least to me, to remember all the time to:
Where to put them (place)?
ARM parameters are easy to know, but Logic App (workflow) parameters are more tricky.
What is the correct code definition?
The code for ARM parameters and Logic App (workflow) parameters is the same, but Variables are different, such as defining the Logic App’s initial state.
Does it already exist? And so on.
These are basically the reasons I decided, with the help of my team at DevScope, to create the Logic App Consumption Copilot tool. This is a .NET Windows application assistant named Copilot, designed to enhance productivity for developers who frequently create Logic Apps Consumptions. This tool can help automate routine tasks such as creating new ARM or Logic App (workflow) parameters, setting ARM parameters for CI/CD and Visual Studio deployment, and many more.
On this first version, Logic App Consumption Copilot has the following capabilities:
Create new ARM parameters and automatically propagate them to the following files:
LogicApp.parameters.json (for Visual Studio Deployment).
LogicApp.parameters.template.json (for CI/CD).
Enforce ARM parameters naming convention.
Create new Logic App (workflow) parameters in a specific Logic App.
Add new black Logic Apps or a new Logic App based on an existing template.
Enforce Logic App (workflow) naming convention.
Search inside the ARM template definition.
Define the Initial Status of a Logic App.
What’s next?
We just released V1, but we are already working on the next version of the tool, and these are the items already on the backlog:
Adjust some UI functionalities.
Edit values in a better way.
Add Logic App (workflow) parameters referring to ARM parameters.
Improve the Logic App Initial Status functionality.
Please go ahead and provide us feedback or submit a GitHub change request.
Download
You can download the Logic App Consumption Copilot tool from GitHub here:
If you liked the content or found it helpful and want to help me write more content, you can buy (or help buy) my son a Star Wars Lego!
Author: Sandro Pereira
Sandro Pereira lives in Portugal and works as a consultant at DevScope. In the past years, he has been working on implementing Integration scenarios both on-premises and cloud for various clients, each with different scenarios from a technical point of view, size, and criticality, using Microsoft Azure, Microsoft BizTalk Server and different technologies like AS2, EDI, RosettaNet, SAP, TIBCO etc.
He is a regular blogger, international speaker, and technical reviewer of several BizTalk books all focused on Integration. He is also the author of the book “BizTalk Mapping Patterns & Best Practices”. He has been awarded MVP since 2011 for his contributions to the integration community.
View all posts by Sandro Pereira
In this blog post and tutorial, what we pretend to do is to create a Logic App, in this case, a Logic App Consumption, that sends reports through Log Analytics using an Azure Function to retrieve the data dynamically.
To do this, first, we need to understand a few things. First, what is theLog Analytics Workspace?
Log Analytics Workspace
A Log Analytics workspace is a unique environment for logging data from Azure Monitor and other Azure services, such as Microsoft Sentinel and Microsoft Defender for Cloud. Each workspace has its own data repository and configuration but might combine data from multiple services. It is also a centralized place where you can store, collect, and analyze data from various sources.
Think of it as a tool that helps you keep track of everything happening across your Azure environment. It allows you to perform advanced analytics and visualize data in real-time to help you identify and troubleshoot issues quickly. You can also use it to create custom queries and alerts, set up automation tasks, and integrate with other Azure services to get even more insights into your data. Overall, the log analytics workspace is a powerful tool that helps you stay on top of your Azure environment and ensure everything runs smoothly.
As explained above, we can create custom queries to retrieve data from Azure resources, such as Logic Apps, and how does that work?
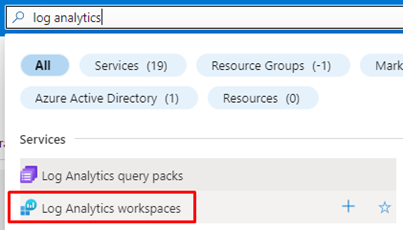
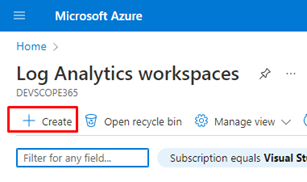
First of all, you need to create a Log Analytics Workspace. For that:
Search for Log Analytics in the search bar in Azure Portal and click on Log Analytics workspaces.
And next, click on Create.
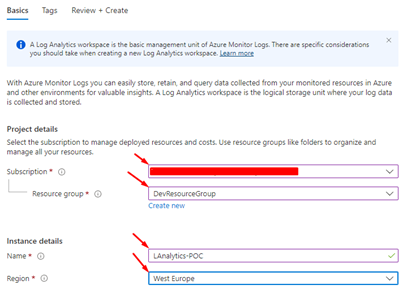
After this, populate the fields with the more appropriate information for your scenario, like the Name, Resource group, and Region, then click Review and Create.
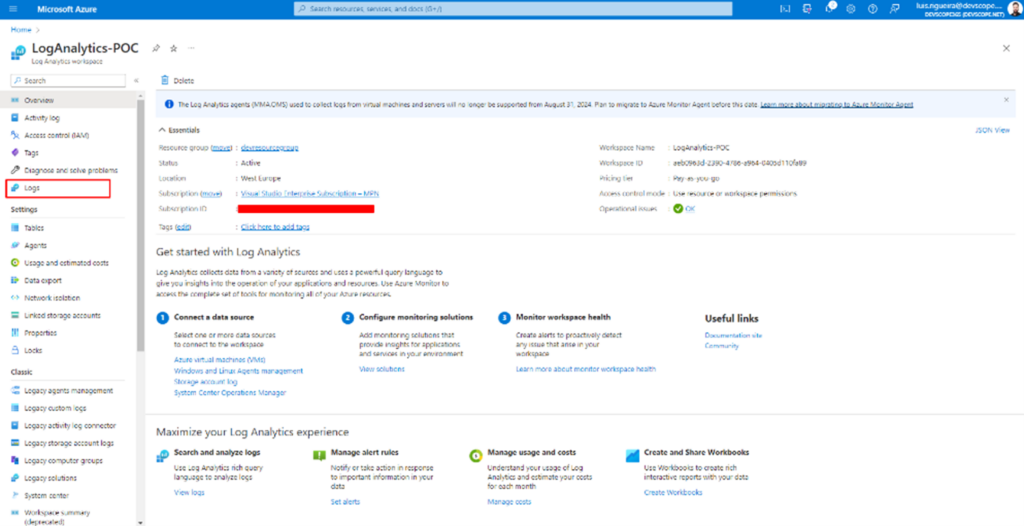
You should have this once the resource creation is finished, and this is your Log Analytics Workspace.
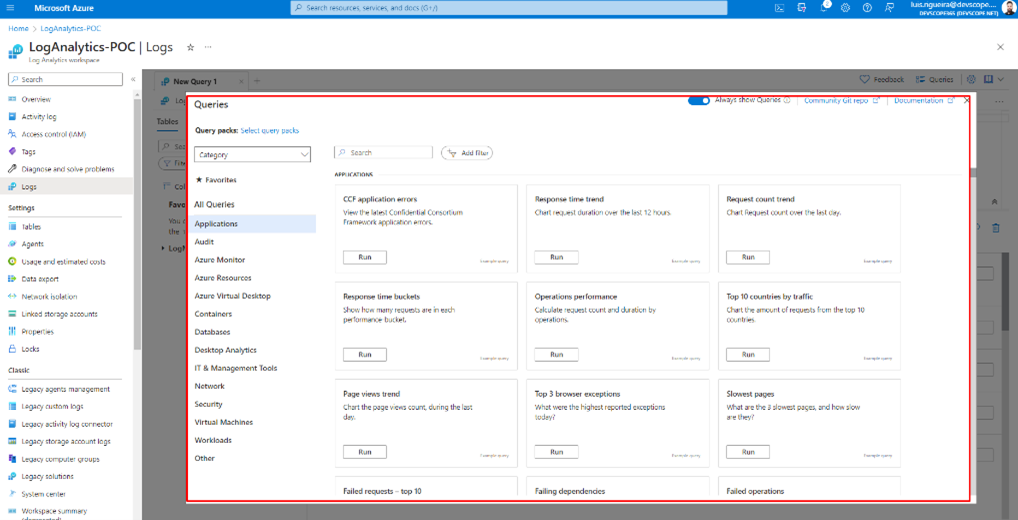
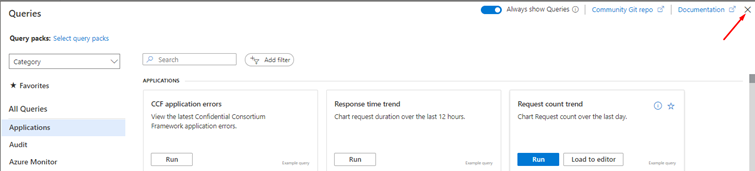
And if you click on Logs, it will open a panel that works via queries.
Some of them are already built-in queries, but if you click on the X.
You will have a panel where you can write your own queries. And they work based on a scope. For example, you can apply this query to your resource group as you can apply your query to your Logic App. You also have a time range to apply the query to events that happened in the timespan you have defined.
But about queries on Azure Log Analytics, how do they work?And how to write them?
In Log Analytics on the Azure portal, queries are used to search and analyze the data that has been collected in the Log Analytics workspace. Think of queries as a way to ask questions about your data, such as, How many times did this event occur? or What was the average response time for this API? Once you write a query, the Log Analytics workspace will return the results in a table format, which you can use to gain insights and make data-driven decisions.
To write a query in Log Analytics on the Azure portal, you will use a query language called Kusto Query Language (KQL). And what is Kusto Query Language (KQL)?
Kusto Query Language (KQL) is a query language used in Azure Data Explorer, Azure Monitor, and Log Analytics for querying large datasets. KQL is a simple yet powerful language that allows you to search, analyze, and visualize data in a flexible way. KQL has a SQL-like syntax but also supports many features that are specific to Azure services, such as functions for querying JSON data, time-series data, and hierarchical data.
Some of the key features of KQL include:
Support for querying structured, semi-structured, and unstructured data
Built-in functions for working with dates, strings, arrays, and other data types
Support for aggregations, joins, and subqueries
Ability to query data in real-time
Integration with Azure services for data collection, storage, and visualization
KQL is a powerful tool that can help you gain insights and make data-driven decisions, especially when dealing with large datasets in Azure.
Here is an example of KQL:
AzureDiagnostics
| where Category == "LogicAppWorkflowRuntime" and WorkflowName == "my-logic-app"
| where OperationName == "WorkflowRunStarted" or OperationName == "WorkflowRunCompleted"
| project WorkflowName, OperationName, StartTime, EndTime, Status, Message
This query will:
Search for all events in the AzureDiagnostics table where the Category is LogicAppWorkflowRuntime, and the WorkflowName is my-logic-app.
It will then filter the results only to include events where the OperationName is either WorkflowRunStarted or WorkflowRunCompleted.
The project operator is used to select specific columns to include in the results. In this case, the query will return each event’s WorkflowName, OperationName, StartTime, EndTime, Status, and Message.
| is the pipe operator, which connects the different parts of the query together.
This query can help you monitor the performance and status of your Logic App by tracking when workflows are started and completed, as well as any associated error messages or status codes. You can run this query in Azure Log Analytics or Azure Monitor to gain insights into your logic app’s performance and troubleshoot any issues that arise.
How to configure a Logic App to send data to the Log Analytics workspace
So, now you have an idea of how it works, but, as we explained before, Azure Log Analytics collects the events from various Azure Resources, so to make this possible, we need to create a connection between the Resource we want to collect data from, and the Azure Log Analytics.
To do that, let’s create a Logic App, and in doing so, do not forget to use the same Resource Group and Region you have your Azure Log Analytics stored, and give the Logic App a name that makes sense to you and implement the desired business logic.
Do not forget: Start using Proper names from day one!
Or access to an existing Logic App.
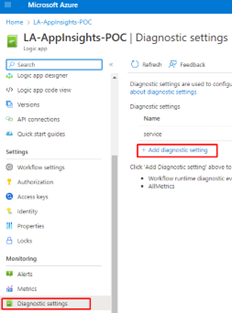
Next, click Diagnostic Settings and + Add diagnostic setting on your Logic App.
Give a name to your Diagnostic setting name, and check the boxes:
allLogs
AllMetrics
and Send to Log Analytics Workspace
Next, choose the subscription where your Log Analytics Workspace is created and choose your Log Analytics Workspace, the one we just created.
And from now on, this Logic App will send data to the Log Analytics!
Create a Logic App to create a report from Log Analytics Workspace
To do that, we need to:
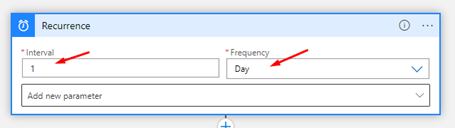
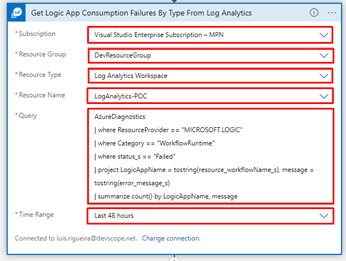
Create a new Logic App and add a Recurrence trigger and set the following configurations:
Choose the Interval as 1 and the Frequency Day
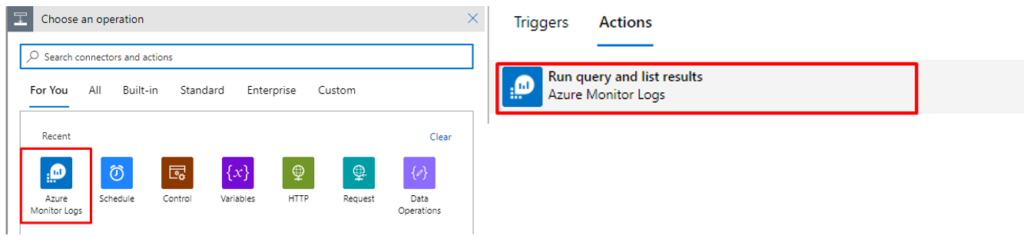
Next, choose the operation Azure Monitor Logs and the Action – Run query and list results.
Next, you will have some fields to populate, like:
Subscription
Resource Group
Resource Type
Resource Name
Query
Time Range
This is the query we will be using:
AzureDiagnostics
| where ResourceProvider == "MICROSOFT.LOGIC"
| where Category == "WorkflowRuntime"
| where status_s == "Failed"
| project LogicAppName = tostring(resource_workflowName_s), message = tostring(error_message_s)
| summarize count() by LogicAppName, message
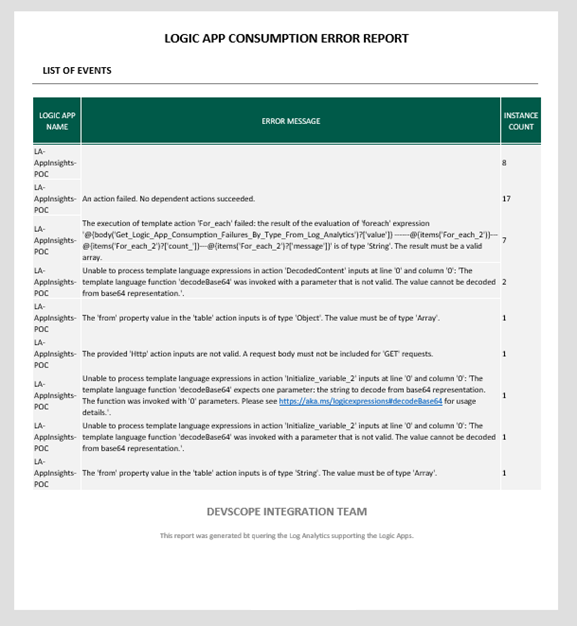
In our case, we are dealing with a Logic App that has given us some errors already.
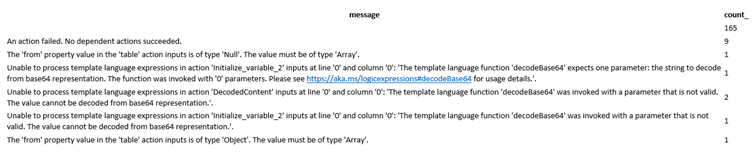
This is the raw output from the query if we run our logic app:
{
"statusCode": 200,
"headers": {
"Pragma": "no-cache",
"Transfer-Encoding": "chunked",
"Vary": "Accept-Encoding",
"Cache-Control": "no-store, no-cache",
"Set-Cookie": "ARRAffinity=eac69d9633b62a80172d43feba694263b4d9fccb8b9d953b364b8fc058f6e946;Path=/;HttpOnly;Secure;Domain=azuremonitorlogs-we.azconn-we-002.p.azurewebsites.net,ARRAffinitySameSite=eac69d9633b62a80172d43feba694263b4d9fccb8b9d953b364b8fc058f6e946;Path=/;HttpOnly;SameSite=None;Secure;Domain=azuremonitorlogs-we.azconn-we-002.p.azurewebsites.net",
"x-ms-request-id": "e8945bb2-f438-4ee9-9b22-58ae9971e462",
"Strict-Transport-Security": "max-age=31536000; includeSubDomains",
"X-Content-Type-Options": "nosniff",
"X-Frame-Options": "DENY",
"Timing-Allow-Origin": "*",
"x-ms-apihub-cached-response": "false",
"x-ms-apihub-obo": "false",
"Date": "Mon, 13 Mar 2023 12:47:12 GMT",
"Content-Type": "application/json; charset=utf-8",
"Expires": "-1",
"Content-Length": "2536"
},
"body": {
"value": [
{
"LogicAppName": "LA-AppInsights-POC",
"message": "",
"count_": 8
},
{
"LogicAppName": "LA-AppInsights-POC",
"message": "An action failed. No dependent actions succeeded.",
"count_": 17
},
{
"LogicAppName": "LA-AppInsights-POC",
"message": "The execution of template action 'For_each' failed: the result of the evaluation of 'foreach' expression '@{body('Get_Logic_App_Consumption_Failures_By_Type_From_Log_Analytics')?['value']} ------@{items('For_each_2')}---@{items('For_each_2')?['count_']}---@{items('For_each_2')?['message']}' is of type 'String'. The result must be a valid array.",
"count_": 7
},
{
"LogicAppName": "LA-AppInsights-POC",
"message": "Unable to process template language expressions in action 'DecodedContent' inputs at line '0' and column '0': 'The template language function 'decodeBase64' was invoked with a parameter that is not valid. The value cannot be decoded from base64 representation.'.",
"count_": 2
},
{
"LogicAppName": "LA-AppInsights-POC",
"message": "The 'from' property value in the 'table' action inputs is of type 'Object'. The value must be of type 'Array'.",
"count_": 1
},
{
"LogicAppName": "LA-AppInsights-POC",
"message": "The provided 'Http' action inputs are not valid. A request body must not be included for 'GET' requests.",
"count_": 1
},
{
"LogicAppName": "LA-AppInsights-POC",
"message": "Unable to process template language expressions in action 'Initialize_variable_2' inputs at line '0' and column '0': 'The template language function 'decodeBase64' expects one parameter: the string to decode from base64 representation. The function was invoked with '0' parameters. Please see https://aka.ms/logicexpressions#decodeBase64 for usage details.'.",
"count_": 1
},
{
"LogicAppName": "LA-AppInsights-POC",
"message": "Unable to process template language expressions in action 'Initialize_variable_2' inputs at line '0' and column '0': 'The template language function 'decodeBase64' was invoked with a parameter that is not valid. The value cannot be decoded from base64 representation.'.",
"count_": 1
},
{
"LogicAppName": "LA-AppInsights-POC",
"message": "The 'from' property value in the 'table' action inputs is of type 'String'. The value must be of type 'Array'.",
"count_": 1
},
{
"LogicAppName": "LA-Monitoring-Telemetry",
"message": "",
"count_": 2
},
{
"LogicAppName": "LA-Monitoring-Telemetry",
"message": "An action failed. No dependent actions succeeded.",
"count_": 3
},
{
"LogicAppName": "LA-Monitoring-Telemetry",
"message": "The 'from' property value in the 'table' action inputs is of type 'Null'. The value must be of type 'Array'.",
"count_": 1
}
]
}
}
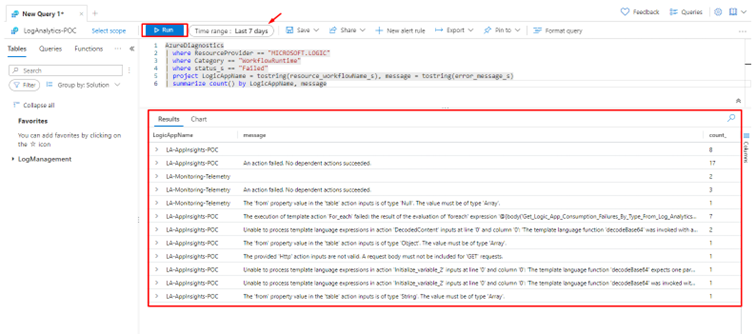
If we use this same query in our Log Analytics Workspace, we get these results:
As you can see, we have a report of the Last 7 days with data including the Logic App Name, the error message, and the count.
This is useful in situations where you or your company or the project you are working on is dealing with a lot of data, and you need to know what Failed, where it Failed, and how many times it Failed. So, since we can query this information in the Log Analytics Workspace, we can do the same in our Logic App, as we explained before, using the Azure Monitor Logs and the Action – Run query and list results.
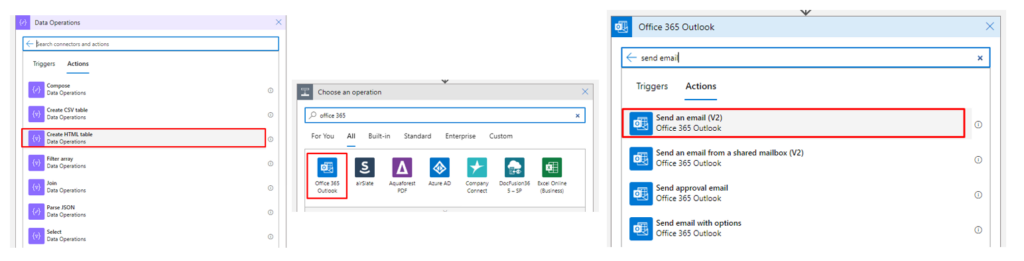
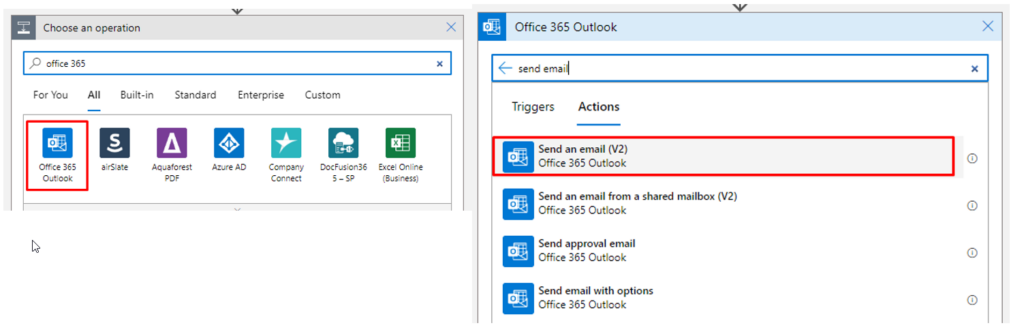
Now going back to our Logic app, we have two options, send this report as an HTML table as it is using a Data Operation – Create HTML Table, and then send an email with this information.
And what you will receive is something like this (in this example, we are not counting with the Logic App Name)
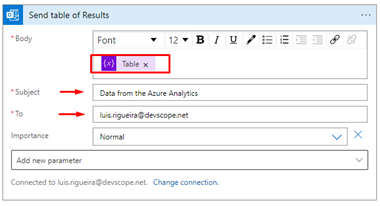
But this data delivery seems a bit old-fashioned, so why not create something more appealing? Something to be presented in the Body of an email like this:
And to achieve this, what we have done was to use an already HTML base document and an Azure Function to map the Rows into an HTML table. (we are not going to address this topic in this tutorial)
Finally, in our Logic App, we may want to validate if the query got results or if it is empty and then send an email with the report.
On the body of the email, add the Variable containing the HTML template (and the Azure Function call result), and add a subject and an email.
Save the Logic App once it is finished.
And now you will get the report from Log Analytics Workspace!
Remember that, for example, if you set the recurrence as daily and the query also is looking for events that have occurred in the last 24 hours, you might not have an email to present since the condition prevents it from sending the email if the Body is null, but this also means there are no flaws in your logic apps, which is always nice!
Thanks to my team member Luís Rigueira for helping me realize and implement this idea.
Hope you find this useful! So, if you liked the content or found it useful and want to help me write more content, you can buy (or help buy) my son a Star Wars Lego!
Author: Sandro Pereira
Sandro Pereira lives in Portugal and works as a consultant at DevScope. In the past years, he has been working on implementing Integration scenarios both on-premises and cloud for various clients, each with different scenarios from a technical point of view, size, and criticality, using Microsoft Azure, Microsoft BizTalk Server and different technologies like AS2, EDI, RosettaNet, SAP, TIBCO etc.
He is a regular blogger, international speaker, and technical reviewer of several BizTalk books all focused on Integration. He is also the author of the book “BizTalk Mapping Patterns & Best Practices”. He has been awarded MVP since 2011 for his contributions to the integration community.
View all posts by Sandro Pereira
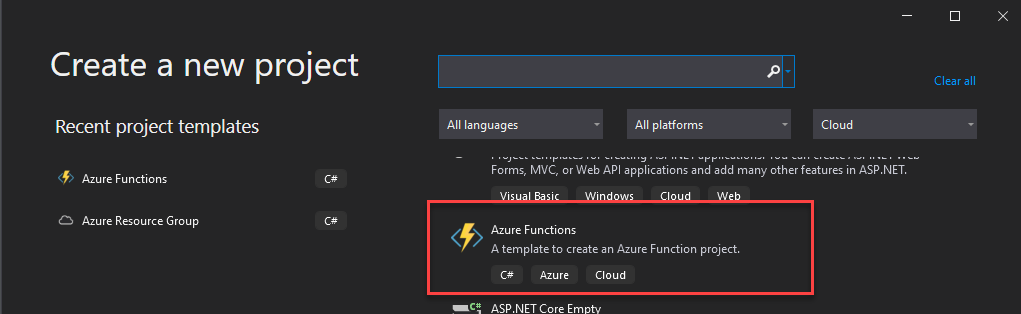
Unfortunately, until this date, there isn’t available an Azure Logic Apps Tools for Visual Studio Extension for Visual Studio 2022, which means that we still need to use Visual Studio 2019 to create Logic App Consumption projects with Visual Studio.
An opposite to other Azure Services like Azure Functions that have a dedicated Azure Function project Template:
There isn’t a Logic App Consumption Visual Studio project template. Instead, we need to use the Azure Resource Group project template, and inside we will select that it will be applying a Logic App template.
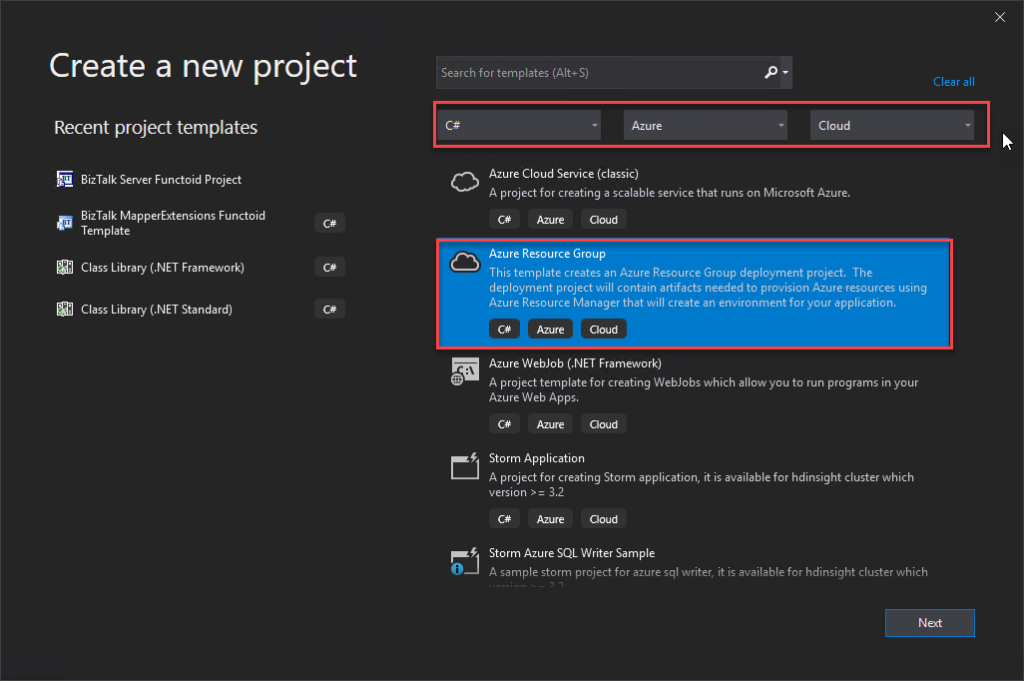
Creating a Visual Studio Logic App Consumption project
The Logic Apps designer integrates with the current Azure Resource Group project. That saying, you will not find any Logic App template in the list of templates. Instead, we need to create an Azure Resource Group project to get started, and to do that, we need:
Open Visual Studio, and on the Create a new project panel, select C# -> Azure -> Cloud, or search for Azure Resource Group:
From the list of project templates, select the Azure Resource Group template.
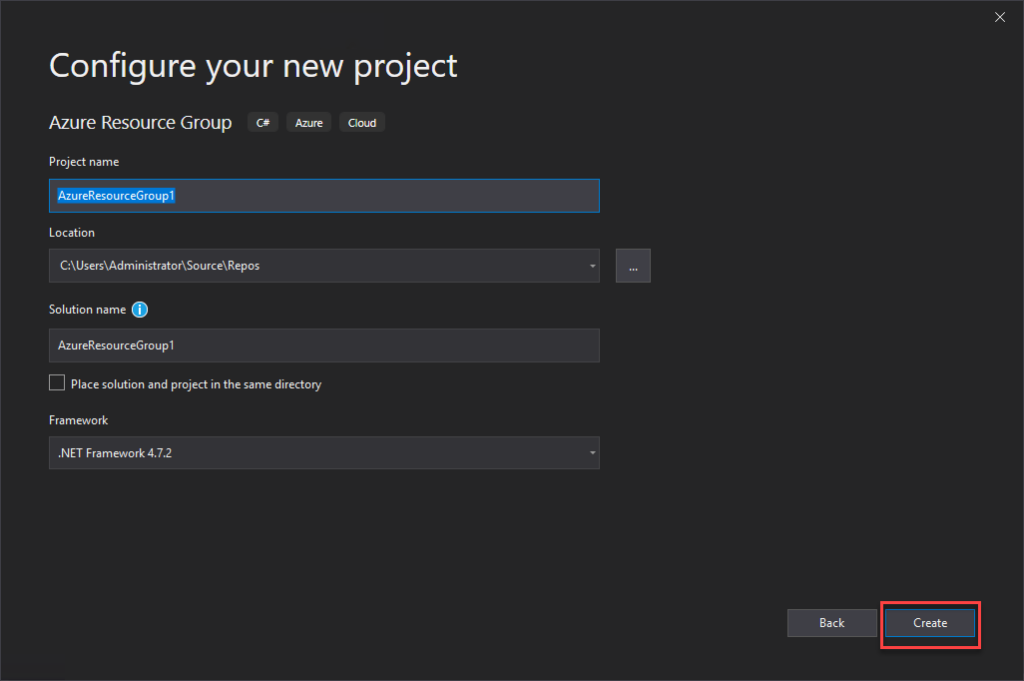
On the Configure your new project panel, give a proper Project name, Location, and Solution name. Leave the Framework as .NET Framework 4.7.2 and select Create.
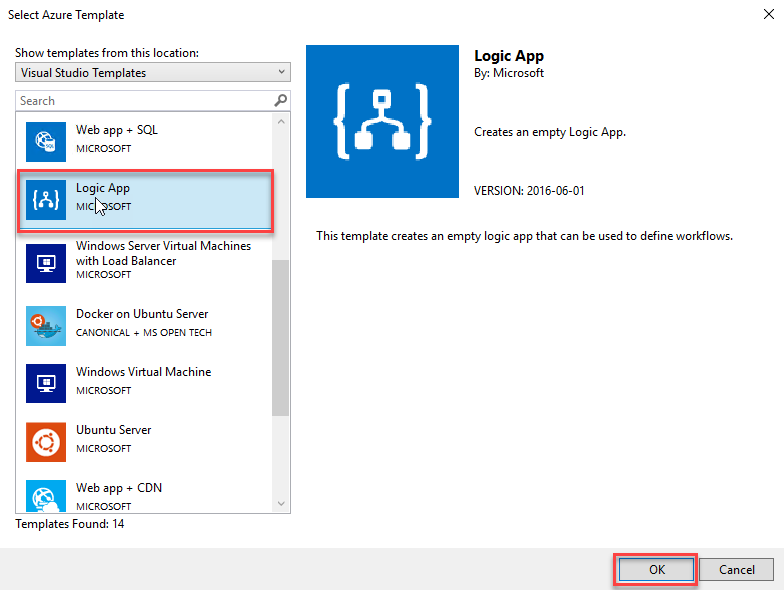
Finally, on the Select Azure Template panel, from the Visual Studio Templates list, select the Logic App template and select OK.
This will create an empty Visual Studio Logic App solution. Now on the Visual Studio solution:
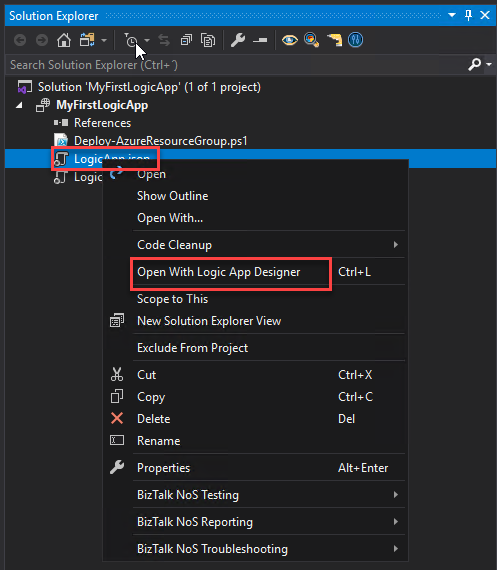
Right-click on the LogicApp.json file and select Open With Logic App Designer.
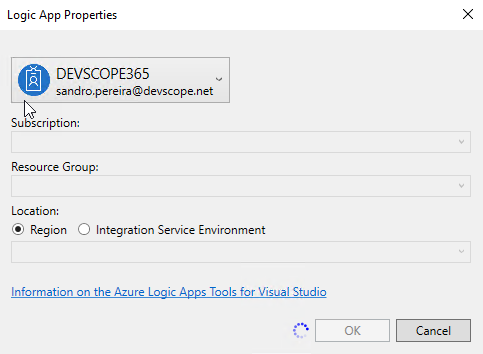
This will open a Logic App Properties window, where you need to:
Define the credentials to authenticate on the Azure subscription.
Define the Subscription and Resource Group where you want to create these resources.
Define if you want the Location to be in the same Region or in an Integration Service Environment (ISE) – be aware the ISE is being deprecated.
And then select OK.
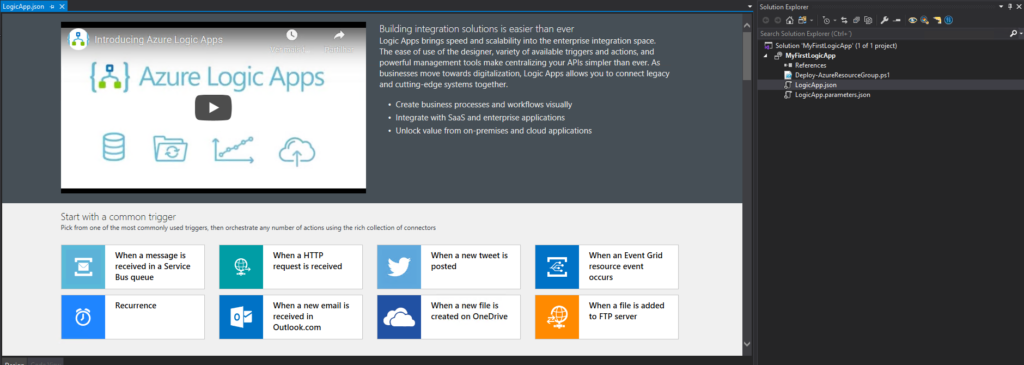
This will embed the Logic App designer inside the Visual Studio.
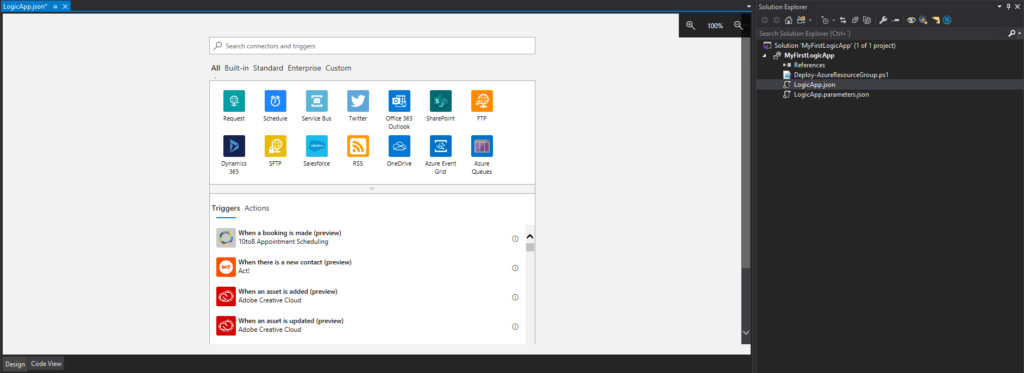
Now you need to select a common trigger, a template, or use a blank Logic App to start creating your business process.
Hope you find this helpful! So, if you liked the content or found it helpful and want to help me write more content, you can buy (or help buy) my son a Star Wars Lego!
Author: Sandro Pereira
Sandro Pereira lives in Portugal and works as a consultant at DevScope. In the past years, he has been working on implementing Integration scenarios both on-premises and cloud for various clients, each with different scenarios from a technical point of view, size, and criticality, using Microsoft Azure, Microsoft BizTalk Server and different technologies like AS2, EDI, RosettaNet, SAP, TIBCO etc.
He is a regular blogger, international speaker, and technical reviewer of several BizTalk books all focused on Integration. He is also the author of the book “BizTalk Mapping Patterns & Best Practices”. He has been awarded MVP since 2011 for his contributions to the integration community.
View all posts by Sandro Pereira
In my last blog post – Logic Apps and DocuSign integration – I explain how you can create and dynamically populate a contract using an HTTP input and then use the DocuSign connector to complete the workflow! Today we are going to see another DocuSign integration capability.
By default, and as I mentioned in my last post, once the document is completed and signed by both parties, all participants will receive an email informing them that All signers completed Complete with DocuSign and with an available link for them to access and view the document.
However, the signed document will live and will be available on the DocuSign platform, which is probably not ideal, typically, we would like to store it internally, if it is personal, in our local drive or dropbox, in an organization inside SharePoint or CRM for example.
So, the main questions are: Is it possible to automate this part of the process? and if yes, how?
And yes, it is possible, and this is what we will address in this blog post! For simplicity, we will be using Dropbox as our archive system.
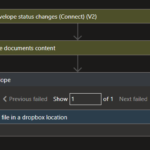
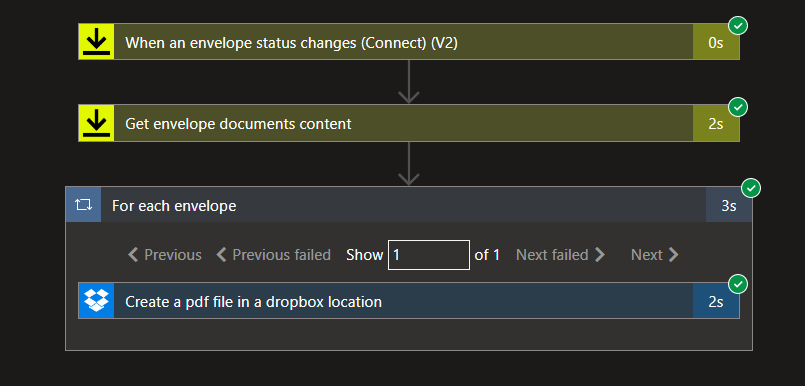
Before we start to explain all the steps you need to do to implement this logic, let me tell you that what you usually expect to see in the Logic App workflow will be typically like this:
Where the:
Logic App will be triggered once the status of the envelope change to Completed.
From there, we will make an additional call to Get the envelope documents’ content.
And then create a file on Dropbox.
That will create a for each action since the structure of the response is an array despite only containing one row.
I don’t like this approach for several reasons:
We are making an unnecessary external call to DocuSign – the Get envelope documents content call.
It is less performant. The processing time of the Logic App can go from 3 to 5 seconds:
We can do way better! and do the same in less than 2 seconds. So here we are going to explain the “intermedium” approach. For simplicity, I won’t implement the “advanced” approach that only contains two actions!
So, to archive a signed document, what we need to do is:
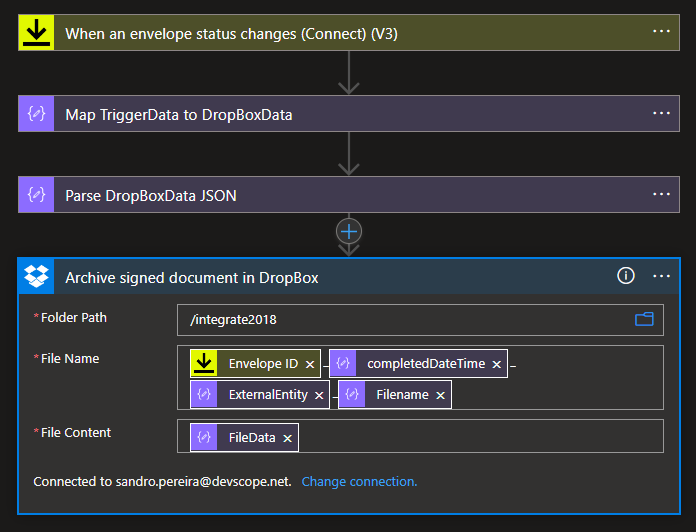
Create a new Logic App, let’s call it: LA-ProcessDocuSignSignedDocuments-POC.
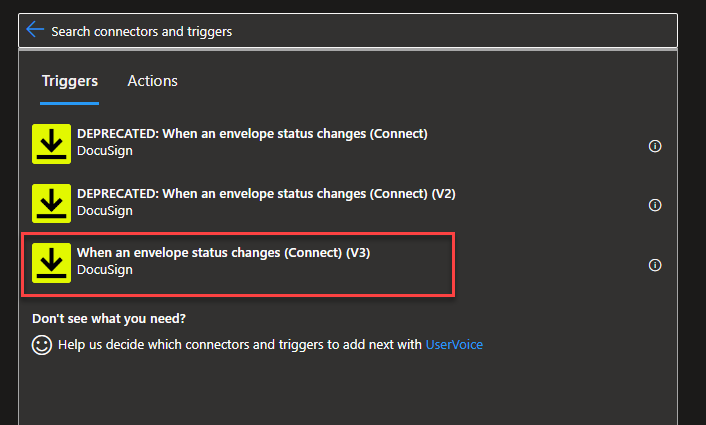
On the Search connectors and triggers box, type DocuSign, select the DocuSign connector, and then select the When an envelope status changes (Connect) (V3) trigger.
On the When an envelope status changes (Connect) (V3) trigger, we need to:
On the Account property from the combo box, select the account to use.
On the Connect name property, type a name that correctly describes your connector, for example, Process Document Signed.
On the Envelope Status property from the combo box, select the envelope-completed option.
Note: if you use V2 of this action, the Envelope event property value will be Completed and not envelope-completed.
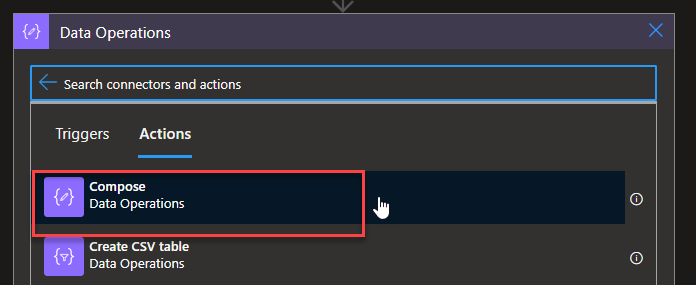
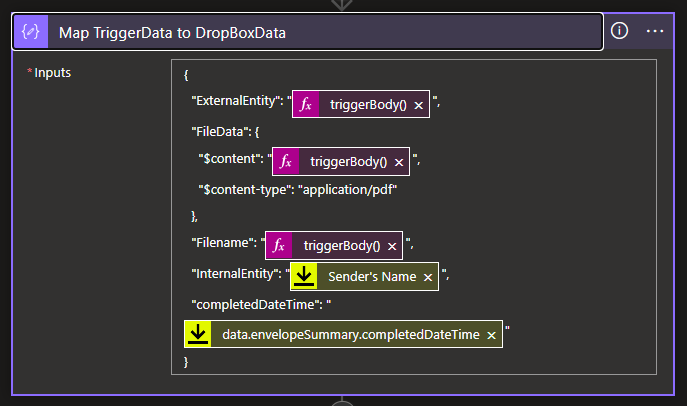
Click on + New step to add a new action. From the search textbox, type Data Operations and then select Data Operations – Compose action.
On the Compose action, we need to add the following input value:
Here, we are extracting only the necessary pieces of information that the trigger will provide to us and creating a simple JSON message with all the information we will need to create the file in our Dropbox according to the rules we specify. For example:
The expression triggerBody()?[‘data’]?[‘envelopeSummary’]?[‘recipients’]?[‘signers’][0]?[‘name’] will contain the name external entity/person that signed the document.
The expression triggerBody()?[‘data’]?[‘envelopeSummary’]?[‘sender’]?[‘userName’] will contain the name internal entity/person that signed the document – in this sample, my name.
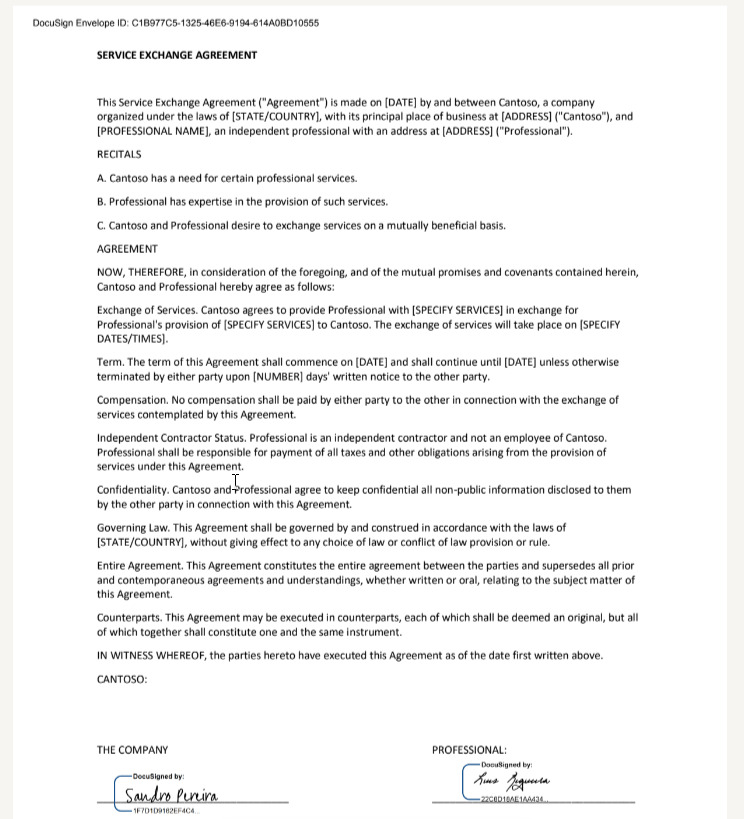
The expression triggerBody()?[‘data’]?[‘envelopeSummary’]?[‘envelopeDocuments’][0]?[‘name’] will contain the original name of the file we add on DocuSign – in our case, SERVICE EXCHANGE AGREEMENT.pdf.
The tricky part was the File data to be added to the Dropbox. If we send only the bytes that are available on the PDFBytes property, a file will be created on our Dropbox, but it will be corrupted, and we cannot open it. So we need to create a structure with content type and content information.
Now, continue our Logic App workflow. Let us:
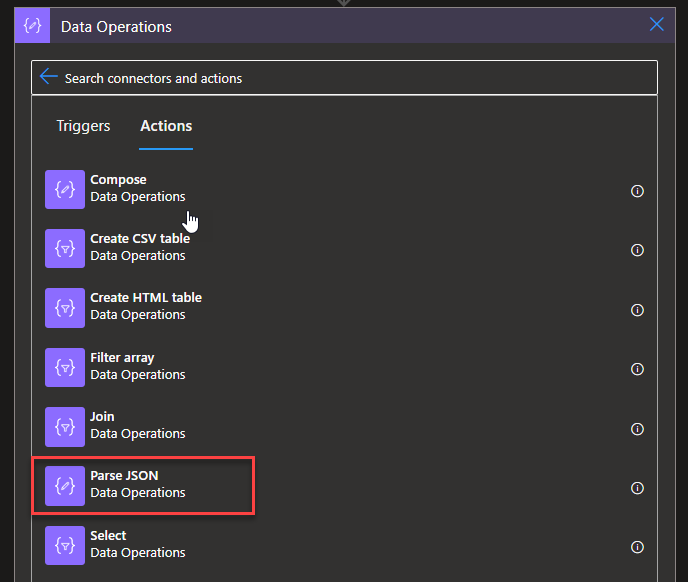
Click on + New step to add a new action. From the search textbox, type Data Operations and then select Data Operations – Parse JSON action.
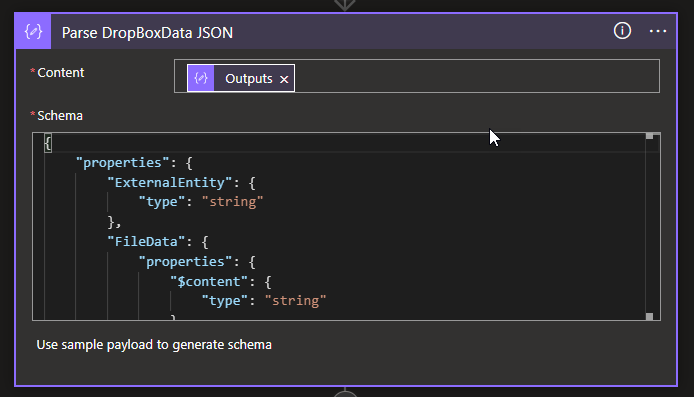
On the Parse JSON action, we need to:
On the Content property, set the value to the Output property of the previous Compose action, in our case, the Map TriggerData to DropBoxData.
Note: This will tokenize the properties of the JSON message we created earlier, and that will allow us to easily used them in the following action.
Note: these two actions, the Compose, and the Parse JSON, are optional. We could not use them and configure all the properties of the next action with expressions – this will be the “advanced” approach!
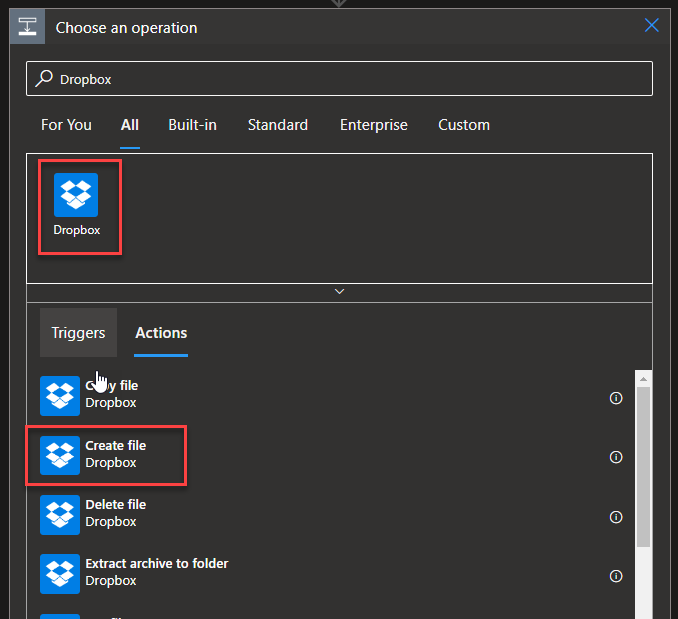
Click on + New step to add a new action. From the search textbox, type DropBox and then select Dropbox – Create file action.
On the Create file action, we need to:
On the Folder Path property, define the path inside dropbox to where to store the file.
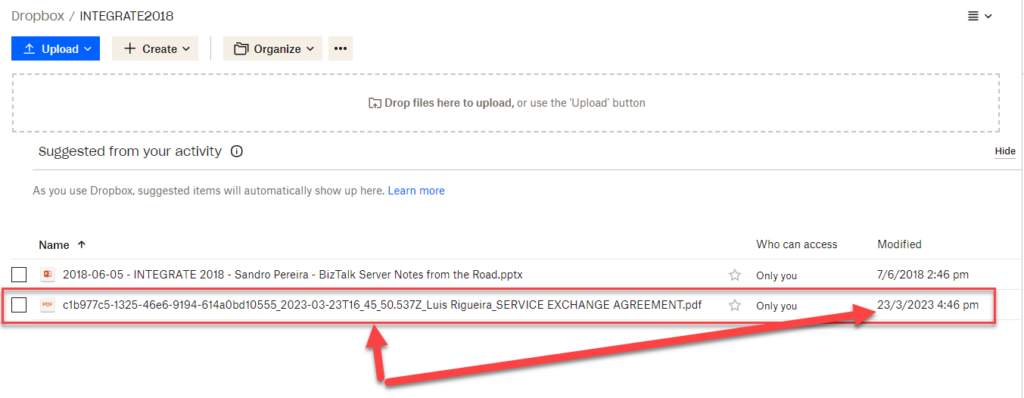
On the File Name property, we want the file to have the following naming convention:
___
So for that, we need to define this property with the following expression:
On the File Content property, set the value to the FileData property of the previous Parse JSON action, in our case, the Parse DropBoxData JSON.
Finally, save your Logic App.
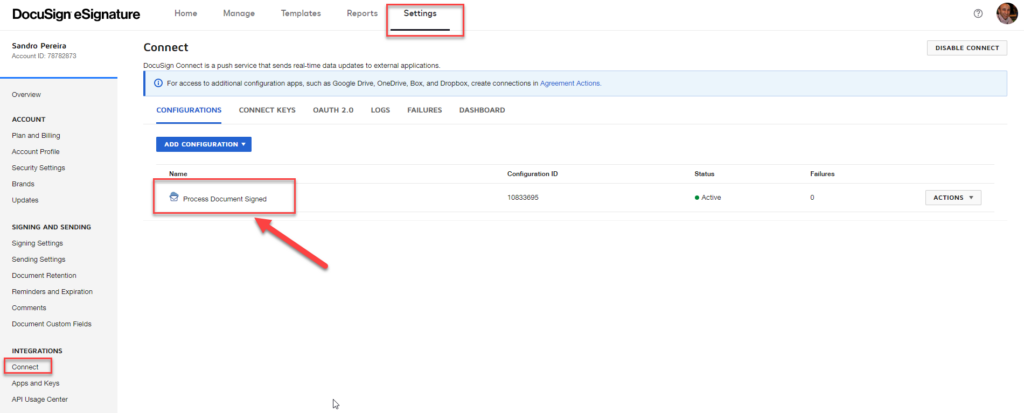
By clicking saving, this will also create in DocuSign platform a Connect configuration with the name you used on the trigger, in our example, Process Document Signed. You can see this by:
On the top menu, select Settings. From there, in the left tree, select the Connect option under Integrations.
Now, for these “intermedium” and “advanced” approach to work we need to do a small trick on the connection inside DocuSign. To do that, we need to:
Select the Process Document Signed connection.
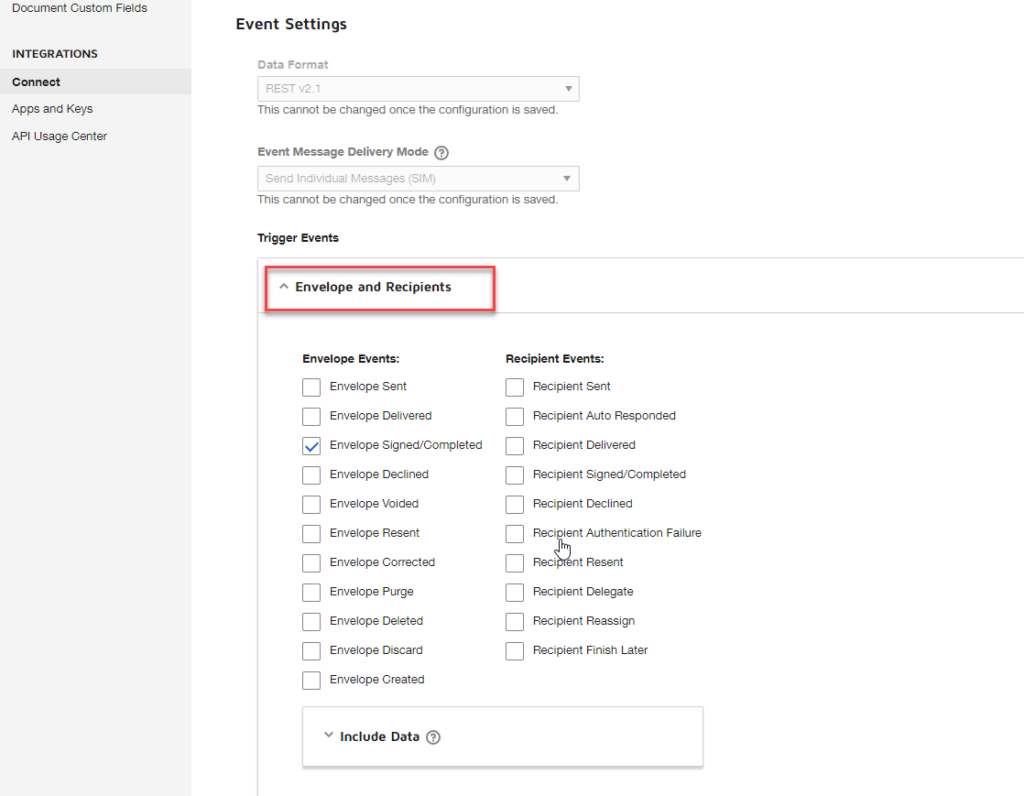
On the Edit Custom Configuration page, scroll down to the option Trigger Events under Event Settings, and expand the Envelope and Recipients panel.
And then expand the Include Data panel and make sure you select the following options:
Custom Fields
Documents
Extensions (optional)
Recipients
Tabs (optional)
Click Save Configuration in the top right corner on the Edit Custom Configuration page
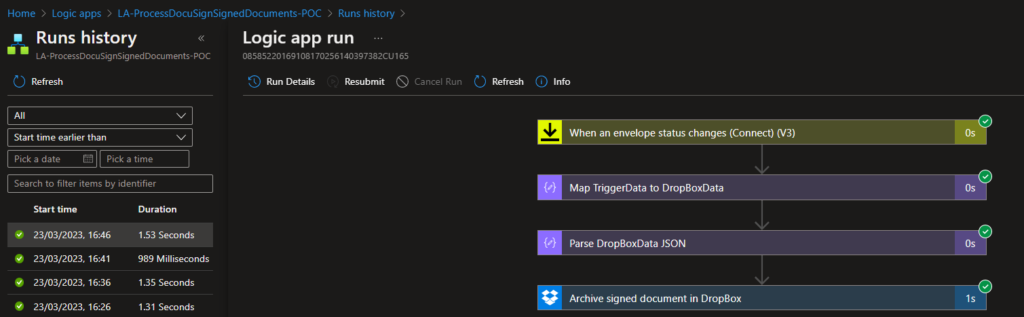
Now to test it, we need to start by executing the Logic App we create yesterday, in order to generate a new document (aka envelope) to be signed.
Once both parties sign the document, our Logic App will be triggered:
And a file will be added in our Dropbox:
And, to be sure, if you click on it, you will the the document signed by Luis and me.
Now, have you notice on the picture above the execution time of this approach? All of them in less than a 2 seconds!
Credits
Once again, a big thanks to my team member Luis Rigueira for participating in this proof-of-concept!
Hope you find this helpful! So, if you liked the content or found it helpful and want to help me write more content, you can buy (or help buy) my son a Star Wars Lego!
Author: Sandro Pereira
Sandro Pereira lives in Portugal and works as a consultant at DevScope. In the past years, he has been working on implementing Integration scenarios both on-premises and cloud for various clients, each with different scenarios from a technical point of view, size, and criticality, using Microsoft Azure, Microsoft BizTalk Server and different technologies like AS2, EDI, RosettaNet, SAP, TIBCO etc.
He is a regular blogger, international speaker, and technical reviewer of several BizTalk books all focused on Integration. He is also the author of the book “BizTalk Mapping Patterns & Best Practices”. He has been awarded MVP since 2011 for his contributions to the integration community.
View all posts by Sandro Pereira
A few months ago, I wrote two blog posts about How to get the Error Message with Logic App Try-Catch, which you can find it here:
Of course, in this series of posts, we are addressing Logic App Consumption. We can actually implement the same strategy for Logic App Standard, but the APIs will be different – this is something that I will write about in the future.
Nevertheless, when I published the second part of this series, I mentioned that we could actually use a no code-low code approach using a Logic App to perform the same operation we were doing by code inside an Azure Function. And that got curiosity by some of my readers to question me if I was doing a thirty-part addressing that scenario. Well, it took some time, but here it is!
What we pretend to do here is to create a generic Logic App Consumption that can dynamically catch the actual error message and action inside a run from another Logic App. This means that we will discard generical errors like “An action failed. No dependent actions succeeded.” which don’t tell us anything about what really happened during the workflow, only that a subsequent child action failed, and dig deeper to find the real error behind that.
The Logic App will receive the same inputs of the Azure Function that we described in the previous post:
Subscription Id;
Resource name;
Logic App name;
Run id;
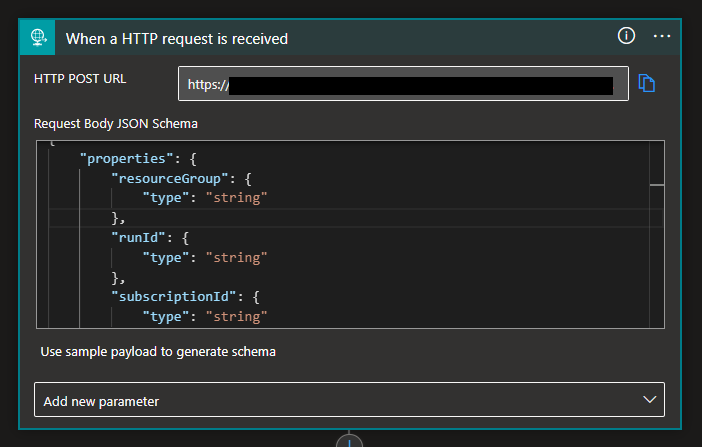
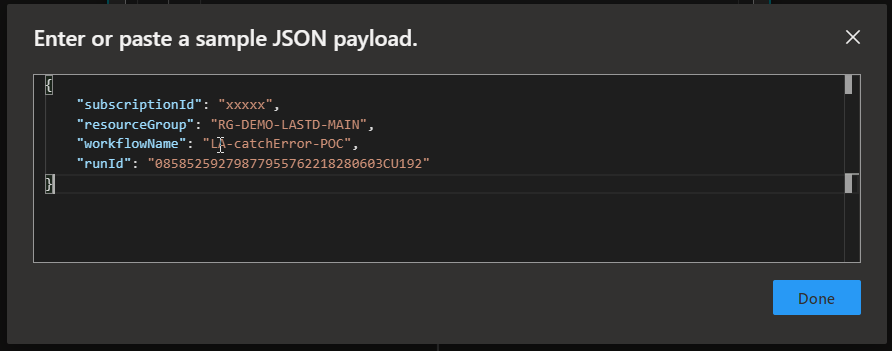
But in this case, in a JSON format using the Request > When a HTTP Request is received trigger.
Of course, to do this, after we add the trigger, we need to click on Use sample payload to generate schema.
And paste the above JSON sample for the editor to generate the JSON schema
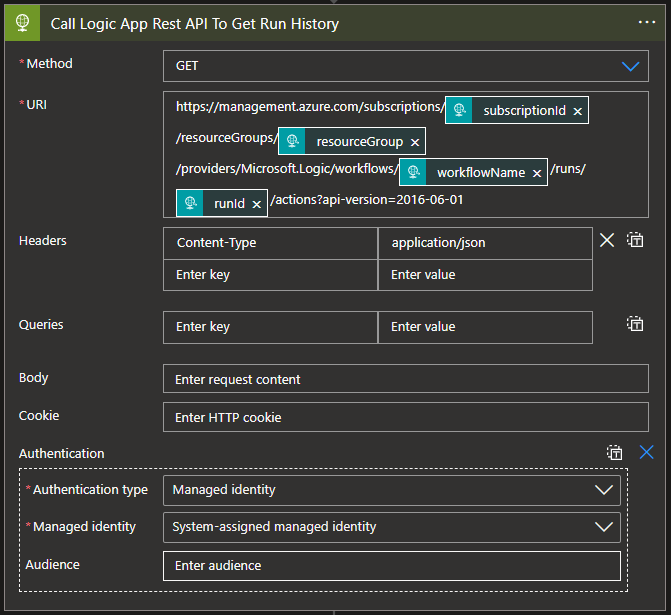
The next step we are going to do is to invoke the Azure Logic App REST API in order to get the run history:
GET https://management.azure.com/subscriptions/{subscriptionId}/resourceGroups/{resourceGroupName}/providers/Microsoft.Logic/workflows/{workflowName}/runs/{runName}/actions?api-version=2016-06-01
We are going to do that by creating a new HTTP action.
Of course, we need to:
Specify the Method parameter to be GET.
On the URL parameter, copy the URL described above and replace:
{subscriptionId} by the token subscriptionId present in the trigger
{resourceGroupName} by the token resourceGroup present in the trigger
{workflowName} by the token workflowName present in the trigger
{runName} by the token runId present in the trigger
On the Headers parameter, add the following header:
Content-Type: application/json
On the Authentication type, we will use Managed identity to dynamically generate the OAuth token necessary to invoke the Azure Logic App REST API.
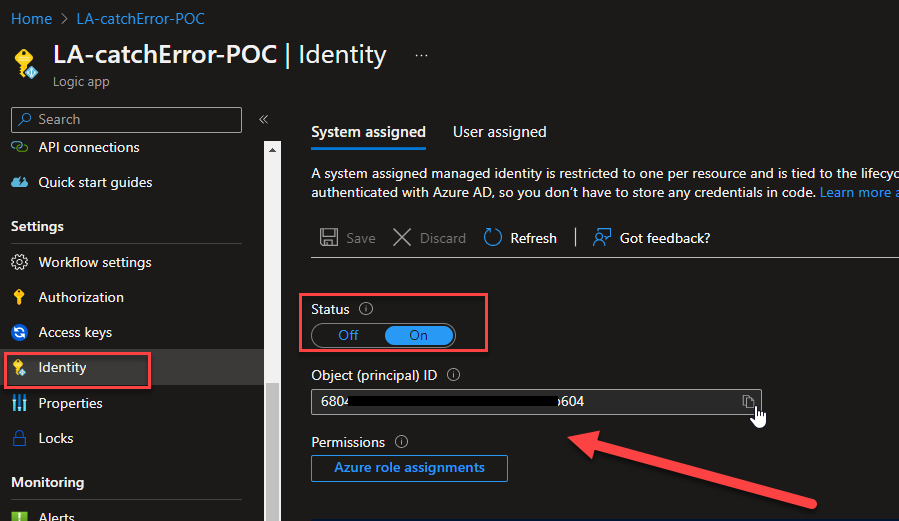
Managed identities in Azure Logic Apps are an authentication mechanism that allows the workflow to access other services without having the user define the credentials for those services inside the workflow actions.
Of course, to use it, we need to go to our Logic App resource and enable managed identity by:
On your LogicApp, from the left menu, go to the Identity option present in the Settings group, and once there, on the Status property, click on On, this will generate an Object (principal) ID.
Later on, we will be setting the correct permissions.
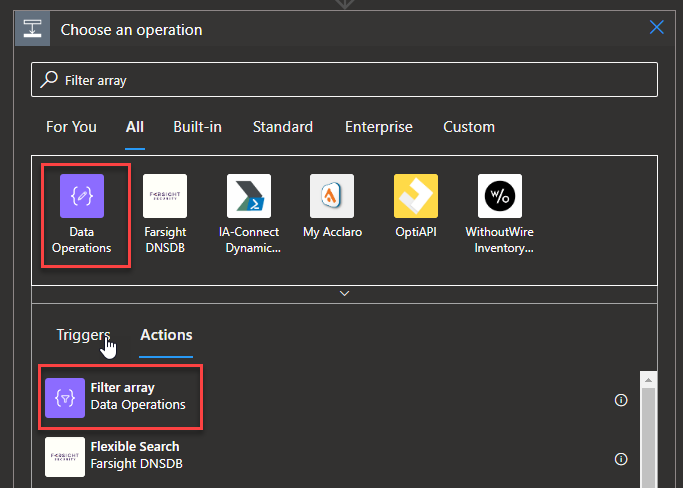
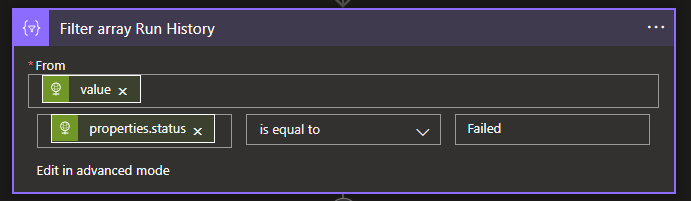
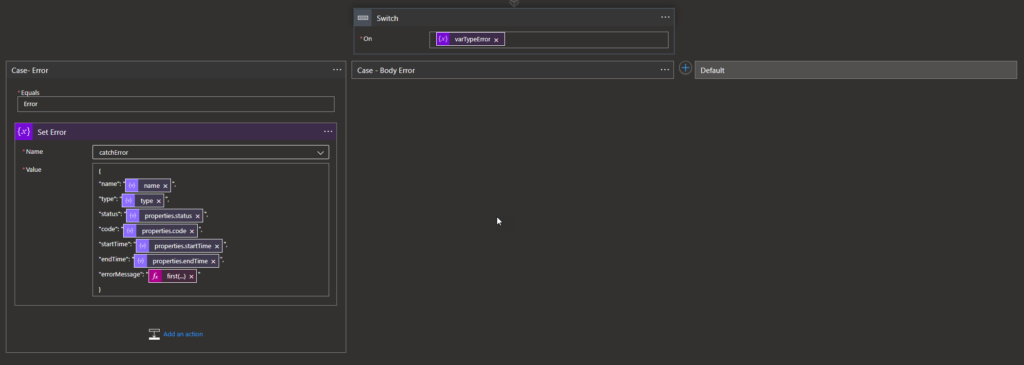
Getting back to our Logic App, now that we have an action to invoke the Azure Logic App REST API to get the run history, we are going to use a Filter Array action to filter the action with the status equal to Failed like we describe in the first blog on this series:
Select Add an action.
In the search box, enter Filter array, and from the result panel, select the Data Operations, Filter array action
And provide the following information:
on the From property, place the following expression:
Note: that ‘Call_Logic_App_Rest_API_To_Get_Run_History‘ is the name of the previous HTTP action, so you need to adjust this value to your scenario
on the condition property, on the left textbox, place the following expression:
item()?[‘properties’]?[‘status’]
Note: this is always equal
Leave the operator as is equal to, and on the right textbox, place the following value:
So, in this last action, we will create an array object for all actions that contain the property status equal to Failed. However, that can also have the generic error that we need to discard to archive that we are going to create a For each action to travel that array and find the correct error:
As I mentioned in the last post, depending on the scenario and actions you are using, the error information may be in different places and structures of the JSON in the run history:
Usually, we have inside the properties a structure call error that has the error message inside the message property: action[“properties”][“error”][“message”]
But sometimes, this error structure doesn’t exist – the HTTP action is a good example of this – and we need to get uri information on the outputsLink structure: action[“properties”][“outputsLink”][“uri”], to invoke that URL to get to correct error message.
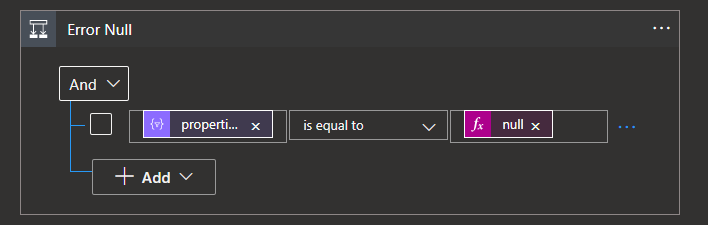
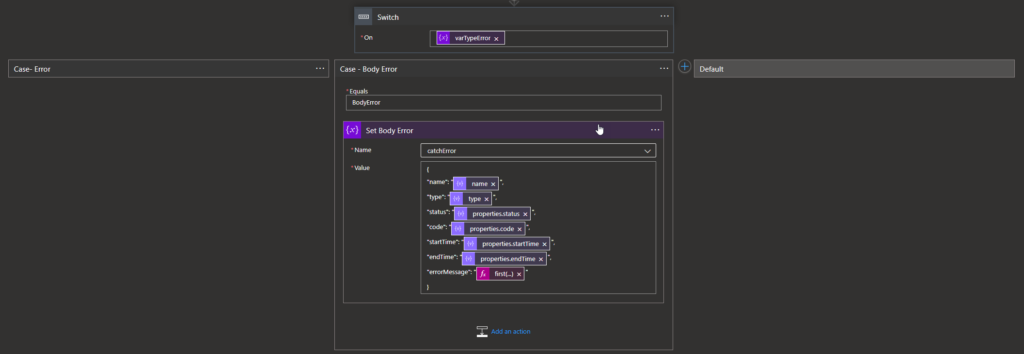
These are different behaviors that we need to handle inside our workflow. Therefore, we will add another Action, this time a Condition with the following configuration:
Items(‘For_each_Filter_Array_Run_History’)[‘properties’]?[‘error’] is equal to null
As you see in the picture below.
What does this mean? It means that if inside the properties of the JSON, the object error is null (does not exist):
Then the Logic App goes through the true side of the condition, and there we need to implement the logic to get and invoke the URI to get the error details
Otherwise, If it is false and indeed the properties-error contains an object error, then it goes through the False side of the condition, meaning we can grab the error message from there.
True branch
Let’s focus on the True side of the condition. As we mentioned above, the details of the error information will not be present directly in the run history. Instead, we will have something like this:
The status is Failed, but there are no error message details to present in this situation, so the error must be somewhere else, and indeed it is. The error, in this case, is present as a URL, in the object uri, so if we follow this link and paste it into a browser, this is what we receive in our sample:
{"error":{"code":"AuthorizationFailed","message":"The authentication credentials are not valid."}}
That means for us to get the correct error message, we have to get that link and perform another HTTP call, and this is exactly what we are going to do with the next action:
So, on the true branch of the condition, add a new HTTP action with the following configuration:
Set the Method property as GET.
Set the URI property to be dynamic using the output of the filter array:
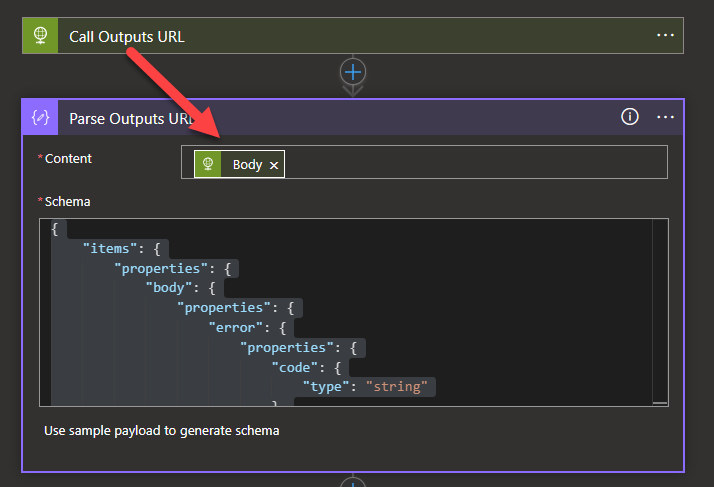
But unfortunately, even the response that comes from this URI with the error detail can appear in different ways. We have already found two scenarios:
The error can appear in this time of structure:
{
  "statusCode": 404,
  "headers": {
    "Pragma": "no-cache",
    "x-ms-failure-cause": "gateway",
    "x-ms-request-id": "XXXXXXX",
    "x-ms-correlation-request-id": "XXXXXX",
    "x-ms-routing-request-id": "XXXXXX",
    "Strict-Transport-Security": "max-age=31536000; includeSubDomains",
    "X-Content-Type-Options": "nosniff",
    "Cache-Control": "no-cache",
    "Date": "Fri, 03 Feb 2023 12:19:12 GMT",
    "Content-Length": "302",
    "Content-Type": "application/json; charset=utf-8",
    "Expires": "-1"
  },
  "body": {
    "error": {
      "code": "InvalidResourceType",
      "message": "The resource type 'workflows' could not be found in the namespace 'Microsoft.Logic' for api version '2016-06-01''. The supported api-versions are '2015-02-01-preview,2015-08-01-preview,2016-06-01,2016-10-01,2017-07-01,2018-07-01-preview,2019-05-01'."
    }
  }
}
And sometimes like this:
[
  {
    "name": "Condition",
    "startTime": "2023-02-06T10:21:38.4195084Z",
    "endTime": "2023-02-06T10:21:38.4195084Z",
    "trackingId": "fd8b62ec-4745-4e85-84b4-da57b8e8b8c2",
    "clientTrackingId": "08585259279877955762218280603CU192",
    "code": "BadRequest",
    "status": "Failed",
    "error": {
      "code": "InvalidTemplate",
      "message": "Unable to process template language expressions for action 'Condition' at line '0' and column '0': 'The template language function 'startsWith' expects its first parameter to be of type string. The provided value is of type 'Null'. Please see https://aka.ms/logicexpressions#startswith for usage details.'."
    }
  }
]
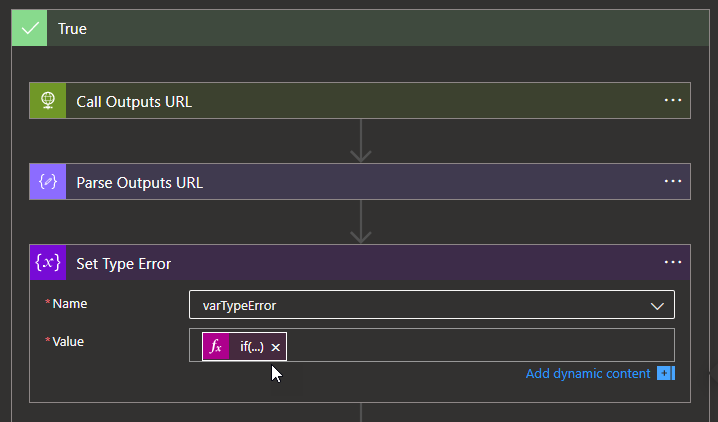
For that reason, and in order to try to provide the best detail possible, we decide to create a variable to set up the type of error we are dealing with:
First, we add a Parse JSON action to parse the response of the previous HTTP Call using the following schema:
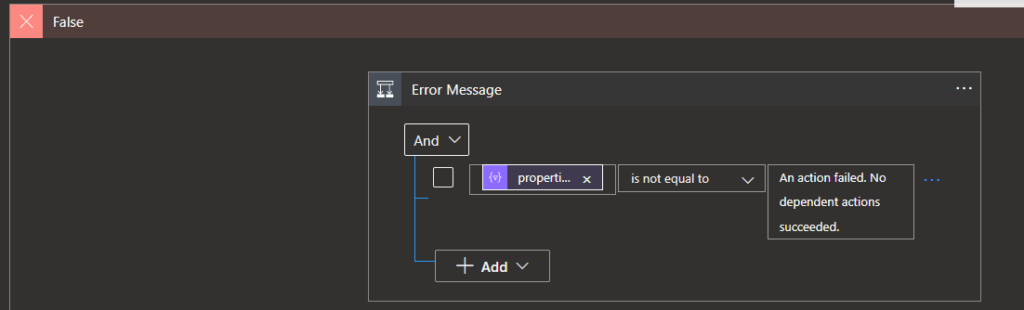
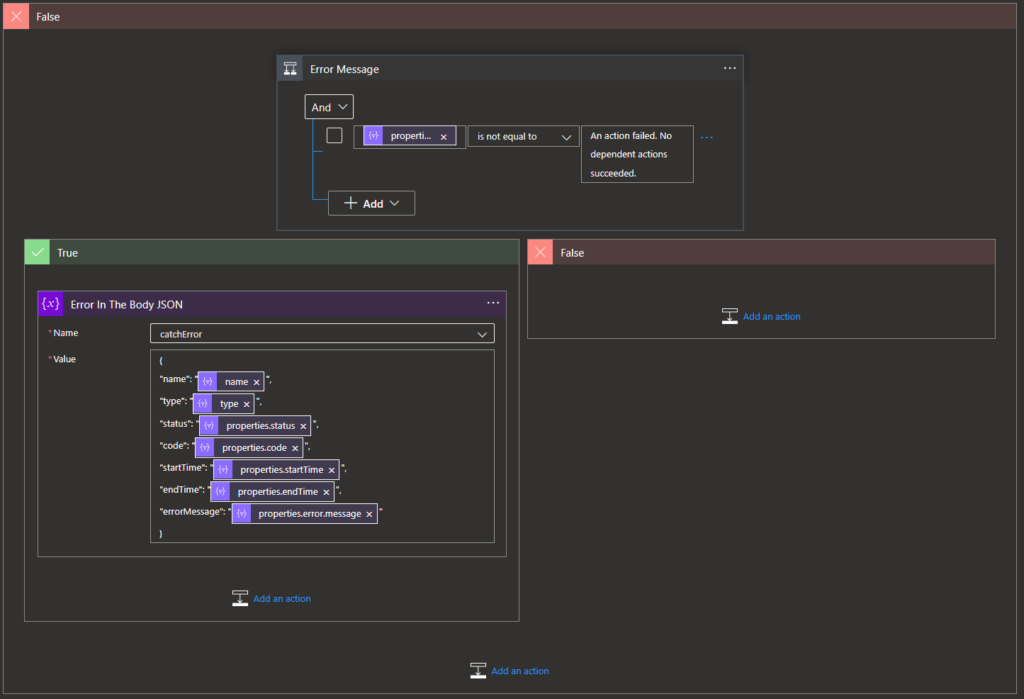
Now, let’s focus on the False side of the condition. As we mentioned previously, in this scenario, we must carefully discard the following generic messages that can appear: An action failed. No dependent actions succeeded.
To do that, we will be adding a Condition with the following configuration:
items(‘For_each_Filter_Array_Run_History’)?[‘properties’]?[‘error’]?[‘message’] is not equal to An action failed. No dependent actions succeeded.
If the error is the generic one, it will ignore it, and it will go to the next error in the error history. Note: if we have this generic error message, we will always have two Failed actions – we will always want the other detail because it is there that we will have the real error detailed message.
If the error is not the generic one, then we are going to define the output message in our support variable using the following expression:
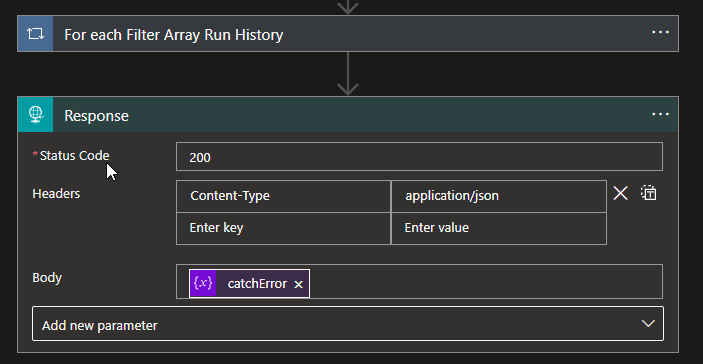
To finalize, we just need to add the Response action with the following configuration:
Set the Status Code as 200
Add the following header in the Headers properties:
Content-Type: application/json
Set the Body property with that value of our output message variable that we used previously
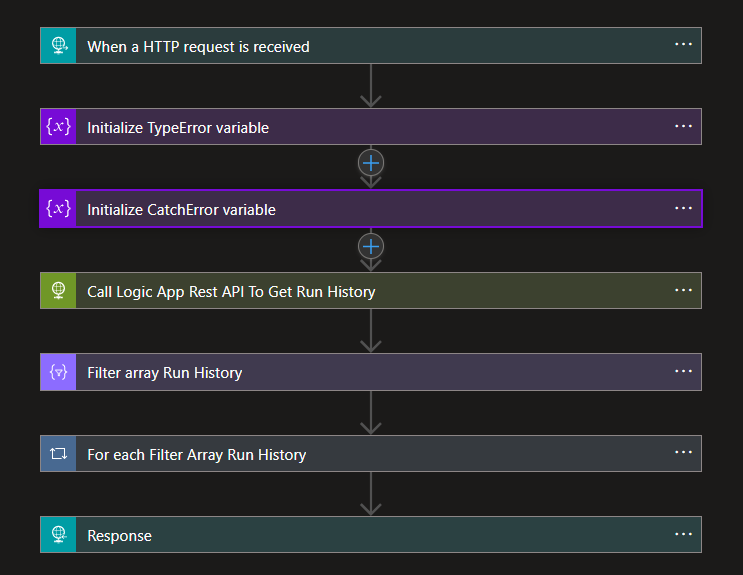
In the end, our Logic App will look like this:
To finalize and for this to work properly, we need to configure the Logic App managed identity and permissions.
Configure the Logic App managed identity and permissions
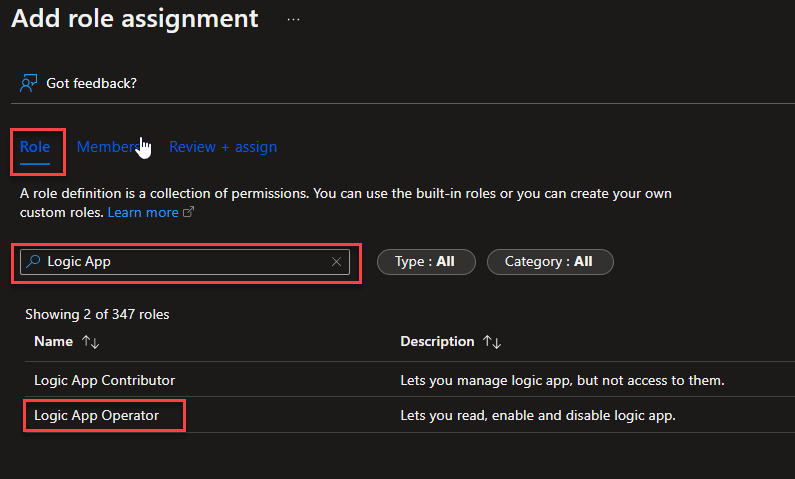
We already described in the beginning that we need to enable the managed identity, but in order for this Logic App to be able to extract the error information from other Logic App run histories, we need to give to that managed identity the Logic App Operator role in each resource group that contains the Logic App from which we want to access and read the run history.
For this last step:
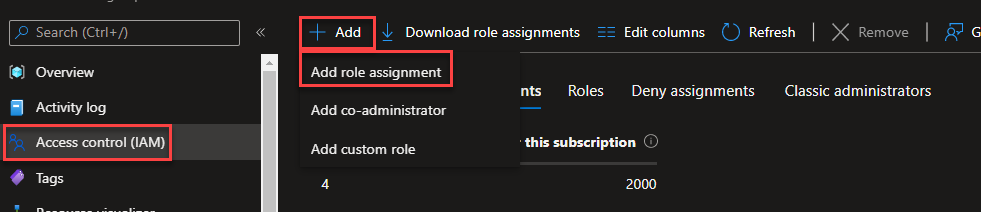
On the Azure Portal, access the Resource Group that has our Logic App from where we want to grab the correct error message.
On the Resource Group page, select the option Access control (IAM).
On the Access control (IAM) panel, click Add > Add role assignment
On the Add role assignment page, on the Role tab, search for Logic App and then select the option Logic App Operator, and then click Next.
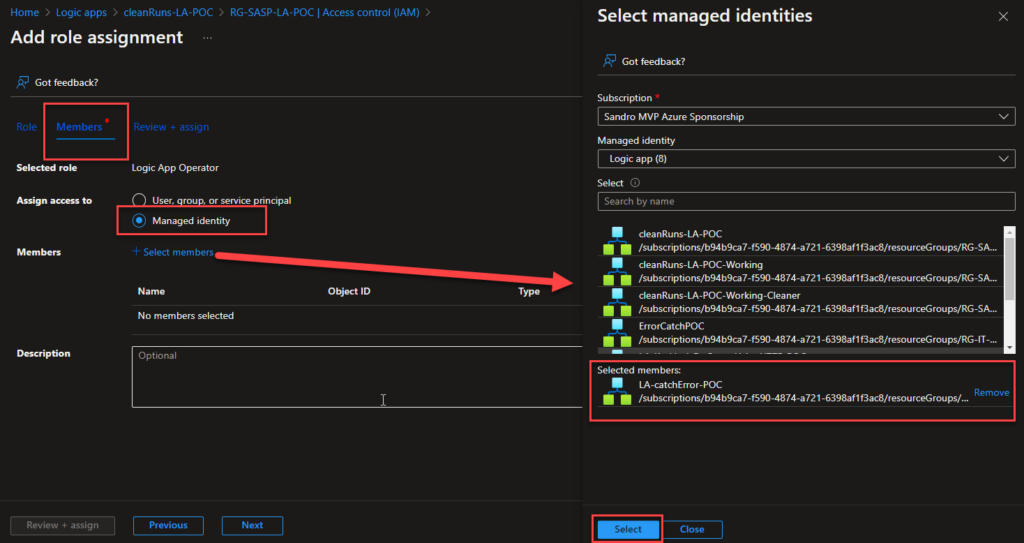
On the Members tab, select the Assign access to be Managed identity, and from the Members:
Select your subscription on the subscription property.
On the Managed identity list of options, select our Logic App Catch Error
and on the Select property, select the managed identity of our function and then click Close.
Click on Review + Assign and then Review + Assign again.
We can now use this Generic Logic App to read the error detail inside our other Logic Apps.
Where can I download it
You can download the complete Azure Function source code here:
Credits
Kudu to my team member Luis Rigueira for participating in this proof-of-concept!
Hope you find this useful! So, if you liked the content or found it useful and want to help me write more content, you can buy (or help buy) my son a Star Wars Lego!
Author: Sandro Pereira
Sandro Pereira lives in Portugal and works as a consultant at DevScope. In the past years, he has been working on implementing Integration scenarios both on-premises and cloud for various clients, each with different scenarios from a technical point of view, size, and criticality, using Microsoft Azure, Microsoft BizTalk Server and different technologies like AS2, EDI, RosettaNet, SAP, TIBCO etc.
He is a regular blogger, international speaker, and technical reviewer of several BizTalk books all focused on Integration. He is also the author of the book “BizTalk Mapping Patterns & Best Practices”. He has been awarded MVP since 2011 for his contributions to the integration community.
View all posts by Sandro Pereira
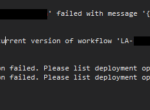
And yet another Logic App Consumption Deployment issue, and more to come! Like the previous posts, while trying to deploy an existing Logic App Consumption thru Visual Studio 2019 in our development environment, I got the following error message:
Resource Microsoft.Logic/workflows ‘LA-NAME’ failed with message ‘{ “error”: { “code”: “CannotDisableTriggerConcurrency”, “message”: “The trigger ‘When_one_or_more_messages_arrive_in_a_topic_(peek-lock)’ of current version of workflow ‘LA-NAME’ has concurrency runtime configuration specified. Trigger concurrency runtime configuration cannot be removed once specified.” } }’
This error happened because I tried to modify the Logic App Consumption Trigger from When one or more messages arrive in a topic (peek lock) to When one or more messages arrive in a topic (auto-complete).
Cause
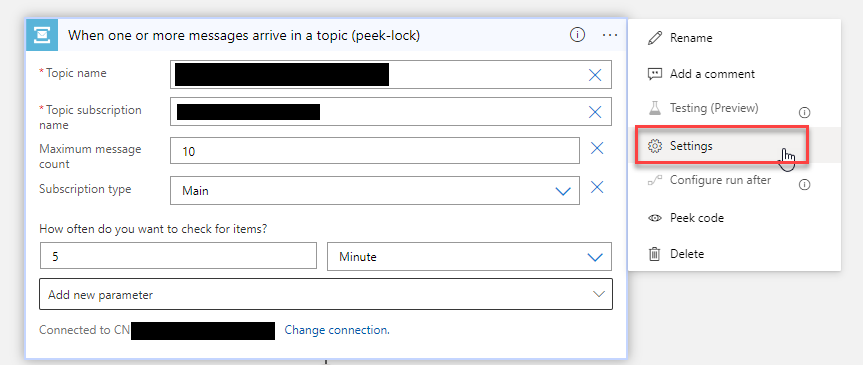
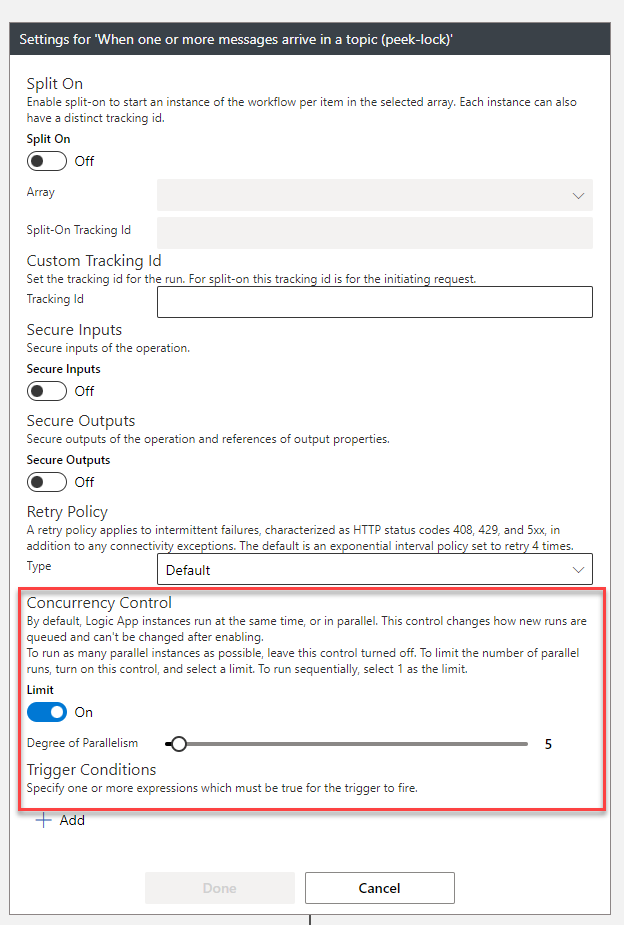
The cause of the problem is simple to understand based on the error message. The trigger of the currently deployed version of the Logic App has Concurrency Control settings enabled. We can validate that by:
Right-click on the 3 dots on the Trigger and select the Settings option.
On the Settings windows of the trigger, we can validate that the Concurrency Control option is enabled and defined to have a Degree of Parallelism of 5.
Saying that, and despite the cause of the problem being easy to understand, the reason why this happens is not that clear. Still, it seems for some internal reason in the Logic App Runtime, after you set up the trigger to have Concurrency Control enabled, you cannot revert that configuration. You cannot do it while trying to deploy a new version of the Logic App thru Visual Studio, nor go directly to the Azure Portal and perform the same actions.
From Azure Portal or Visual Studio (it doesn’t matter the tool you use), if you try to:
Update the existing trigger to disable the Concurrency Control option and try to save it. It doesn’t work.
Delete the current trigger and add a new one. It doesn’t work, either.
Again, this seems to be a limitation that exists at the moment in the Logic App Consumption Runtime – not sure at this point if you will have the same limitation/issue in Logic App Standard.
Solution
Fixing this issue is not that simple. We can’t fix it, but we can apply two workarounds:
Workaround 1: if you don’t need to keep the run history of the existing Logic App.
Workaround 2: if you need to keep the run history of the existing Logic App.
Workaround 1
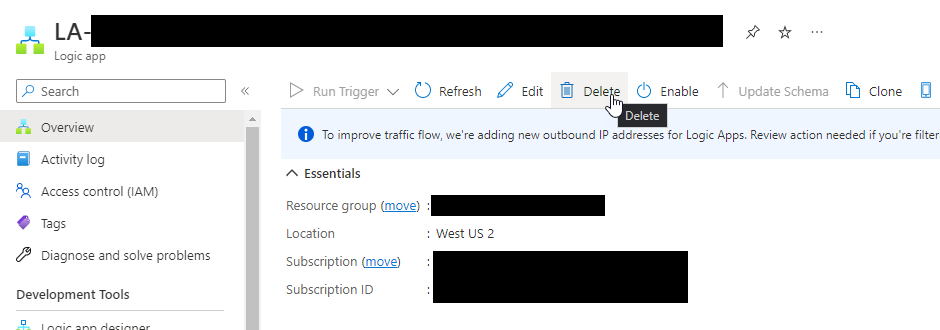
Delete from the Azure Portal the existing Logic App by selecting the Logic App and then, on the top menu, click the Delete option.
And then redeploy the Logic App.
This will solve the deployment problem, but again you will lose the run history.
Workaround 2
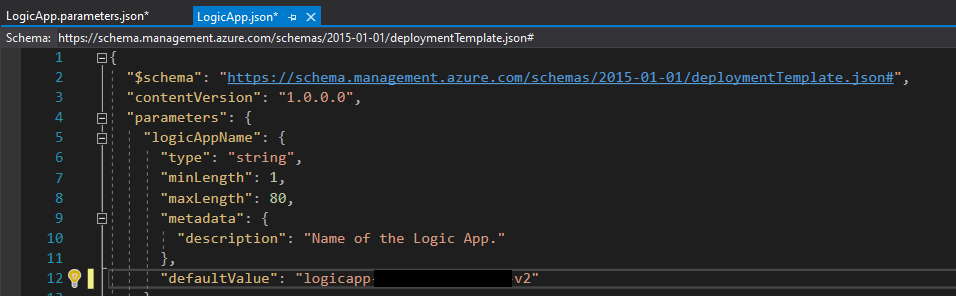
If you need to keep the run history, then unfortunately, the only option you have is to provide a different name to your Logic App, something like:
LA-NAME-V2
Make sure you change that, at least in the LogicApp.parameters.json file, but I suggest you change that also in the LogicApp.json file.
Just make sure you disable the “old” one – LA-NAME – and create a TAG specifying that it is deprecated.
After you validate everything is working fine and you don’t need the run history of the old one anymore, delete this Logic App to avoid confusion and to be simple to manage the overall solution.
Author: Sandro Pereira
Sandro Pereira lives in Portugal and works as a consultant at DevScope. In the past years, he has been working on implementing Integration scenarios both on-premises and cloud for various clients, each with different scenarios from a technical point of view, size, and criticality, using Microsoft Azure, Microsoft BizTalk Server and different technologies like AS2, EDI, RosettaNet, SAP, TIBCO etc.
He is a regular blogger, international speaker, and technical reviewer of several BizTalk books all focused on Integration. He is also the author of the book “BizTalk Mapping Patterns & Best Practices”. He has been awarded MVP since 2011 for his contributions to the integration community.
View all posts by Sandro Pereira
Like the previous post, while trying to deploy an existing Logic App Consumption thru Visual Studio 2019 in our development environment, I got the following error message:
Template deployment returned the following errors:
Error: Code=InvalidTemplate;
Message=Deployment template validation failed: ‘The template parameters ‘name-of-the-parameter’ in the parameters file are not valid; they are not present in the original template and can therefore not be provided at deployment time. The only supported parameters for this template are ‘list-of-parameters-present-in-the-LogicApp’. Please see https://aka.ms/arm-pass-parameter-values for usage details.’.
The deployment validation failed.
Cause
The cause of the problem is once again quite simple, and the error description is really good, not only describing the problem but providing the solution also.
In my case, the error says that “arm_ServiceBus_Subscription_A” doesn’t exist – is not valid – in the template parameter file that I’m using to deploy the Logic App Consumption thru Visual Studio. And it also says that the only supported parameters for this template are:
arm_ServiceBus_Subscription_ABC
arm_ServiceBus_Connection_Name
arm_ServiceBus_Connection_DisplayName
arm_ServiceBus_Topic
arm_LA_InitialState
…
Solution
Fixing this issue is simple, and you have three options that you need to choose according to your scenario:
Remove/delete this template parameter from the parameters file.
Rename this parameter to a valid one.
Or add this ARM parameter in the LogicApp.json file
Perhaps this last option is the most unlikely to happen since this would mean that you would have to change the code to include this parameter in some content or configuration of the actions or settings of the Logic App – what is the point of having an ARM parameter defined if you don’t really need it.
Author: Sandro Pereira
Sandro Pereira lives in Portugal and works as a consultant at DevScope. In the past years, he has been working on implementing Integration scenarios both on-premises and cloud for various clients, each with different scenarios from a technical point of view, size, and criticality, using Microsoft Azure, Microsoft BizTalk Server and different technologies like AS2, EDI, RosettaNet, SAP, TIBCO etc.
He is a regular blogger, international speaker, and technical reviewer of several BizTalk books all focused on Integration. He is also the author of the book “BizTalk Mapping Patterns & Best Practices”. He has been awarded MVP since 2011 for his contributions to the integration community.
View all posts by Sandro Pereira
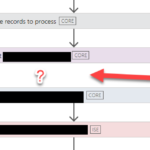
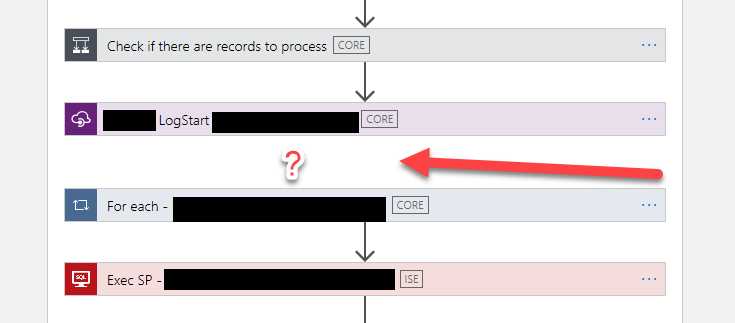
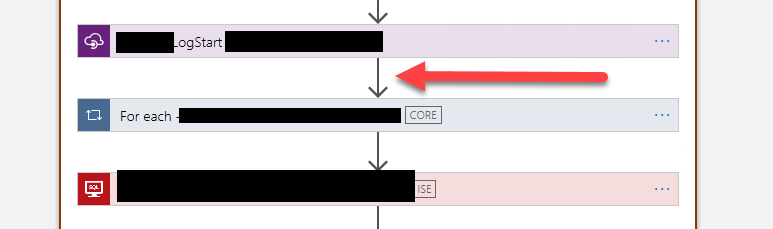
Today while developing an existing Logic App Consumption in Visual Studio 2019, yes, we still don’t have support for Visual Studio 2022, I realized that for some unknown reason, one of the actions, in my case a For each action, didn’t have the normal arrow – that indicates the precedence of the previous step in the Logic App designer as you can see in the picture above – for some unknown reason it evaporated:
I tried to re-order (or move) the For each action in the designer to see if I could fix this issue, without success. A good option that you should always try is to close that file and open it again to force a refresh on the designer – that solves many issues – but it didn’t do the trick on this issue.
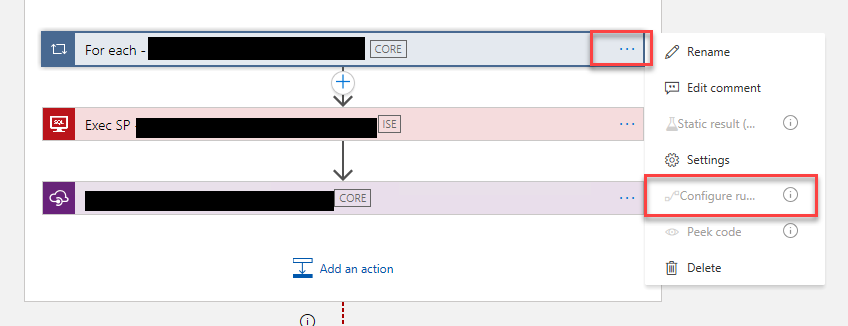
I couldn’t by Designer solve this issue because the property Configure run after settings were disabled:
I honestly don’t know what would happen if I tried to deploy this Logic App in this situation, but it shouldn’t be good. And this situation was causing me inconvenience when moving and reordering the actions. So I have no other option than try to fix it.
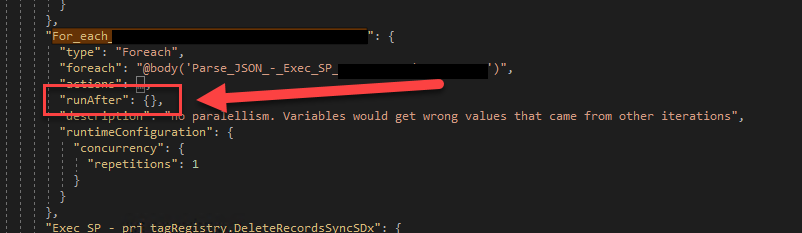
Cause
When inspecting the Code view, I realized that, again, for some unknown reason, the runAfter property was empty. The Logic App designer normally fills this value to run if the previous action Succeeded.
Solution
To fix this issue or behavior, we need to manually configure the runAfter property like:
Where the Name_Previous_Action is the name of the previous action on the workflow, the spaces in the action name are replaced by underscores.
After that, if you return to the designer, you will see everything back to normality:
Hope you find this useful! So, if you liked the content or found it useful and want to help me write more content, you can buy (or help buy) my son a Star Wars Lego!
Author: Sandro Pereira
Sandro Pereira lives in Portugal and works as a consultant at DevScope. In the past years, he has been working on implementing Integration scenarios both on-premises and cloud for various clients, each with different scenarios from a technical point of view, size, and criticality, using Microsoft Azure, Microsoft BizTalk Server and different technologies like AS2, EDI, RosettaNet, SAP, TIBCO etc.
He is a regular blogger, international speaker, and technical reviewer of several BizTalk books all focused on Integration. He is also the author of the book “BizTalk Mapping Patterns & Best Practices”. He has been awarded MVP since 2011 for his contributions to the integration community.
View all posts by Sandro Pereira
I had the pleasure of being invited a few weeks ago by my friend – and now Microsoft Principal Product Manager – Azure Logic Apps – Kent Weare to record a special episode on Logic Apps Development Tips and Tricks on his YouTube channel.
First of all, if you are unaware of his YouTube channel and you like or are interested in Azure Integration Services, I suggest you follow his channel, which is full of fantastic content. You can check and follow his channel here: https://www.youtube.com/@KentWeare
In this episode, we are going to discuss some of the most basic and important Logic Apps development best practices, tips, and tricks:
Naming Conventions, which will include Logic App, Action, and Connectors naming conventions
Error Handling and how to retrieve the error message inside Logic Apps
For Each Parallelism
Fixing API Connections and why you should care about this.
and comparing Logic Apps (Standard) and Azure Logic Apps (Consumption)
You can see the full episode here: https://www.youtube.com/watch?v=cLzplA1xVaM&t=479s
Let me know what you think about these Best practices, tips, and tricks or what you would like to be addressed in my series of blogs about this topic.
You can check all my tips and tricks here:
And of course, stay tuned for more Logic App Best practices, Tips, and Tricks.
Author: Sandro Pereira
Sandro Pereira lives in Portugal and works as a consultant at DevScope. In the past years, he has been working on implementing Integration scenarios both on-premises and cloud for various clients, each with different scenarios from a technical point of view, size, and criticality, using Microsoft Azure, Microsoft BizTalk Server and different technologies like AS2, EDI, RosettaNet, SAP, TIBCO etc.
He is a regular blogger, international speaker, and technical reviewer of several BizTalk books all focused on Integration. He is also the author of the book “BizTalk Mapping Patterns & Best Practices”. He has been awarded MVP since 2011 for his contributions to the integration community.
View all posts by Sandro Pereira