by Sandro Pereira | May 20, 2019 | BizTalk Community Blogs via Syndication
Until now we have seen some default functionalities, except for the last sample, done in a different way and with small improvements with PowerShell:
- How can we easily export a binding file from a BizTalk Application?
- How can we easily export a binding file from a specify assembly?
- Using the fully qualified name (FQName) of the assembly.
- Using only the assembly name
From now on we will deep dive in this topic, addressing some useful unsupported scenarios, which are impossible to be addressed using the out-of-the-box tools BizTalk Server Administration Console or even with the BTSTask command-line tool included with BizTalk Server.
- How can we easily export a binding file from a list of assemblies?
- How can we easily export a binding file from a Receive Port?
- How can we easily export a binding file from a Send Port?
- And many more
Today’s blog post will be about: How to Export BizTalk Server Receive Port Binding with PowerShell.
This functionality should be something that should exist in the BizTalk Server Administration Console; in some cases, we can achieve this in the developing phase using the Visual Studio while we generate the schemas for LOB system, for example:
- In the Solution Explorer, right-click a BizTalk project, point to Add, and then click Add Generated Items.
- In the Add Generated Items… – <BizTalk ProjectName> dialog box, in the Templates section, click Consume Adapter Service and then click Add
- You should then select the binding you want to use, configure the parameters and the operations you want to do
Along with the LOB Schemas, this will also generate the binding files for the receive port or send port.
Why we don’t have this option in the BizTalk Server Administration Console for me is unclear, it should be there since day one in my opinion.
So, again, the question that we may ask is: Is there any way that we can easily accomplish this? The response is yes, again, all of this can be fully automated using, for example, PowerShell scripts.
Like the previous samples, we could fully automate this Binding generation for each environment, but once again let’s keep it simple and address what is mandatory and easily forgotten. With this PowerShell sample, we will be able to generate a binding file for a specific assembly name which is deployed in my BizTalk Server environment. The script will perform the following tasks:
- Generate a Binding file for 3 environments DEV, QA and PRD
- Changing the NT Group Name for each different environment
- Generate a specific Receive Port deployed in your environment
function bts-receive-port-exportbindings([string]$bindingFilePath, [string]$appName, [string]$portName, [boolean]$generateDiffEnvBindings)
{
    $portRen = $portName.Replace(" ", "")

    $taskParams = ” ExportBindings /Destination:$bindingfilePath$appName.$portRen.BindingInfo.xml /ApplicationName:$appName ”
    #First version: $p = [diagnostics.process]::start(“BTSTask.exe”, $taskParams)
    Start-Process "BTSTask.exe" $taskParams -Wait

    $xml = (Get-Content "$bindingfilePath$appName.$portRen.BindingInfo.xml")
    foreach($RemoveModuleRef in $xml.BindingInfo.ModuleRefCollection.ModuleRef)
    {
        $xml.BindingInfo.ModuleRefCollection.RemoveChild($RemoveModuleRef)
    }
    foreach($RemoveSendPort in $xml.BindingInfo.SendPortCollection.SendPort)
    {
        $xml.BindingInfo.SendPortCollection.RemoveChild($RemoveSendPort)
    }
    foreach($RemoveReceivePort in $xml.BindingInfo.ReceivePortCollection.ReceivePort)
    {
        if($RemoveReceivePort.Name -ne $portName)
        {
            $xml.BindingInfo.ReceivePortCollection.RemoveChild($RemoveReceivePort)
        }
    }
    $xml.Save("$bindingfilePath$appName.$portRen.BindingInfo.xml")

    if($generateDiffEnvBindings)
    {
        $xml.Save("$bindingfilePath$appName.$portRen.QA.BindingInfo.xml")
        $xml.Save("$bindingfilePath$appName.$portRen.PRD.BindingInfo.xml")
    }
}

THIS POWERSHELL IS PROVIDED “AS IS”, WITHOUT WARRANTY OF ANY KIND.
You can download the full script from here: Export BizTalk Server Receive Port Binding with PowerShell
The post BizTalk Bindings Exportation: How to Export BizTalk Server Receive Port Binding with PowerShell appeared first on BizTalk360.
by Sandro Pereira | May 20, 2019 | BizTalk Community Blogs via Syndication
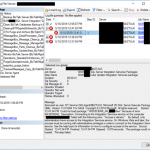
Last blog post I wrote about an “Access is denied” error while trying to connect with SQL Server Integration Services (SSIS). Today’s post is about the same problem but in a different situation/context, of course with a different cause and solution, this time I got this error while trying to execute a SQL Server Job to run the BAM_AN_<name>View and BAM_DM_<name> to import BAM data to Analysis Server and maintaining the BAMPrimaryImport BAM tables:
Date 5/10/2019 12:41:03 PM
Log Job History (BAM <name> SQL Server Integration Services Packages)
Step ID 1
Server localhost
Job Name BAM <name> SQL Server Integration Services Packages
Step Name BAM <name> Cube Update Integration Services package
Duration 00:00:01
Sql Severity 0
Sql Message ID 0
Operator Emailed
Operator Net sent
Operator Paged
Retries Attempted 0
Message
Executed as user: NT ServiceSQLAgent$BIZTALK. Microsoft (R) SQL Server Execute Package Utility Version 13.0.5264.1 for 64-bit Copyright (C) 2016 Microsoft. All rights reserved. Started: 12:41:04 PM Could not load package “MSDBBAM_AN_<name>View” because of error 0xC00160AE. Description: Connecting to the Integration Services service on the computer “localhost” failed with the following error: “Access is denied.” By default, only administrators have access to the Integration Services service. On Windows Vista and later, the process must be running with administrative privileges in order to connect to the Integration Services service. See the help topic for information on how to configure access to the service. Source: Started: 12:41:04 PM Finished: 12:41:04 PM Elapsed: 0.016 seconds. The package could not be loaded. The step failed.

To better contextualize this issue, I got this error after:
- I give permissions to my user to connect to SSIS (see how in my previous blog post)
- I successfully created the SQL JOB to import and maintain BAM data, so I was able to navigate in SSIS to select the correct packages
Cause
Again, the description says that by default, only administrators have access to the Integration Services service. On Windows Vista and later, the process must be running with administrative privileges to connect to the Integration Services service. That, in other words, means:
- insufficient rights to connect to SSIS.
And the reason behind that is that the tasks are by default running under (Run as) SQL Server Agent Service Account that is typically a different user that the user that is configuring/creating the importation Jobs. Usually, it will run under a service account or NT Service like: “NT SERVICEMSSQLSERVER” or in my case “NT ServiceSQLAgent$BIZTALK” and this may not have access to SSIS.

Solution
The solution to this issue is:
- to give permission to the SQL Server Agent Service Account
- or for better control, you should set up a Proxy Account to run SSIS packages.
To set up a Proxy Account to run SSIS packages you should:
- Note: I will assume that there a Login for the user is already created/configured in SQL Server and that will also have access to BAMPrimaryImport database;
- The first step is to create the credentials which will be then used in the Proxy Account. To do this, we need to:
- In SQL Server Management Studio, click on Security and then right click on Credentials, click on New Credential…

-
- On the New Credential window
- Put a Credential name. You can put the same name as the domain name or a meaningful name. In my case, I add “BAM Import Account”
- Click on Identity, which will open the Select User or Group window to ensure you select the correct user or Group;
- And then you will need to put in the password for the Domain account you selected and confirm the password in another text box

-
-
- Then click Ok to create your new Credential
- The second step will be creating a proxy to be used within the SQL Server Agent. To do that you should:
- In SSMS, click on SQL Server Agent, then Proxies and then SSIS Package Execution.
- Right-click and select New Proxy…

-
- On the New Proxy account window
- Give your Proxy a meaningful name, in my case, “BAM Proxy”
- Under Credential Name select the credential you should use to execute the packages, in my case, “BAM Import Account”
- And activate the following subsystems from the list:
- “SQL Server Integration Services Package”

-
-
- Then click Ok to create your new Proxy.
- The third and final step is to associate this proxy on your job execution. To do that you should:
- In SSMS go to SQL Server Agent, right click on the BAM importation Jobs and select Properties
- Select the steps tab and for edit all the steps that are executing the SSIS packages
- On the “Run as” combo box, you will now be able to see the Proxy created earlier. Select that option. And click OK.

Now, and assuming that you configured adequately, if you manually run the job, or wait for the next scheduled execution, it will run successfully… we hope.
The post BizTalk Server 2016 and SQL Server Integration Services (SSIS) 2016: Connecting to the Integration Services service on the computer “localhost” failed with the following error: “Access is denied.” – PART II: Could not load package BAM_AN_<name> appeared first on SANDRO PEREIRA BIZTALK BLOG.
by Sandro Pereira | May 19, 2019 | BizTalk Community Blogs via Syndication
Let’s stay on the topic of my last blog post “BizTalk Server 2016 and SQL Server Integration Services (SSIS) 2016” and described another issue that I recently faced while trying to connect with SQL Server Integration Services (SSIS): “Access is denied“. The full error description was:
TITLE: Connect to Server
——————————
Cannot connect to localhost.
——————————
ADDITIONAL INFORMATION:
Failed to retrieve data for this request. (Microsoft.SqlServer.Management.Sdk.Sfc)
For help, click: http://go.microsoft.com/fwlink?ProdName=Microsoft%20SQL%20Server&LinkId=20476
——————————
Connecting to the Integration Services service on the computer “localhost” failed with the following error: “Access is denied.”
By default, only administrators have access to the Integration Services service. On Windows Vista and later, the process must be running with administrative privileges in order to connect to the Integration Services service. See the help topic for information on how to configure access to the service.
For help, click: http://go.microsoft.com/fwlink/?LinkId=506689
——————————
Connecting to the Integration Services service on the computer “localhost” failed with the following error: “Access is denied.”
By default, only administrators have access to the Integration Services service. On Windows Vista and later, the process must be running with administrative privileges in order to connect to the Integration Services service. See the help topic for information on how to configure access to the service.
——————————
BUTTONS:
OK
——————————
Cause
Well, the description says that by default, only administrators have access to the Integration Services service. On Windows Vista and later, the process must be running with administrative privileges in order to connect to the Integration Services service. However, I was a local administrator and a BizTalk Administrator
But still, the cause is clear: insufficient rights to connect to SSIS. When using SQL Server 2012 or later, when a user without enough rights attempts to connect to an instance of Integration Services on a remote server, the server responds with an “Access is denied” error message. You can avoid this error message by ensuring that users have the required DCOM permissions.
Solution
So, to solve this issue, you should:
- Open Component Services; from a Run dialog, you can enter “dcomcnfg“, with Administrator permissions.
- On the left-hand tree, navigate to Component Services | Computers | My Computer | DCOM Config.
- Find “Microsoft SQL Server Integration Services 13.0“, right-click and select “Properties“
- On the Properties windows, select the “Security” tab and for each type of permission click “Edit” and add an appropriate AD group or user.
- Select “Allow” to all options.

Once you have completed, you will be required to restart the SSIS service.
- From the start menu, navigate to the “SQL Servers Configuration Manager“, right-click on “SQL Server Integration Services“, and “Restart“.
The post BizTalk Server 2016 and SQL Server Integration Services (SSIS) 2016: Connecting to the Integration Services service on the computer “localhost” failed with the following error: “Access is denied.” appeared first on SANDRO PEREIRA BIZTALK BLOG.
by Sandro Pereira | May 15, 2019 | BizTalk Community Blogs via Syndication
On the last blog post and PowerShell sample we addressed, for the first time in the series of posts, a way to aggregate several binding exportations in a unique binding file based on a list of assemblies with fully qualified names (FQName):
- How can we easily export a binding file from a list of assemblies?
- By fully qualified name (FQName);
Today’s blog post will be similar, but instead of using the FQName, we will be using the assembly name only: How to Export BizTalk Server Resource Bindings from a List of Assembly Names with PowerShell
In other words, instead of generating a specific binding file for each resource: Receive Port, Send Port or Assembly, we will be generating a unique binding file that will include all of this information so it can easily be handled.
Recapping also the samples we have shared until now:
- How can we easily export a binding file from a BizTalk Application?
- How can we easily export a binding file from a specify assembly?
- Using the fully qualified name (FQName) of the assembly.
- Using only the assembly name
- How can we easily export a binding file from a Receive Port?
- How can we easily export a binding file from a Send Port?
- And many more
And to unveil the last chapter of this series that we will be publishing soon:
- How can we easily export a binding file from a list of Receive Ports and/or Send Ports?
Just like the previous samples, we could fully automate this Binding generation for each environment, but once again let’s keep it simple and address what is mandatory and easily forgotten. With this PowerShell sample, we will be able to generate a unique binding file for a list of specific assemblies deployed in my BizTalk Server environment. The script will perform the following tasks:
- Generate a Binding file for 3 environments DEV, QA and PRD
- Changing the NT Group Name for each different environment
- Generate a unique binding file, instead of having separated binding files for each assembly
function bts-list-resource-exportbindings-by-assembly-name([string]$bindingFilePath, [string]$appName, [string]$listAssemblyName, [boolean]$generateDiffEnvBindings)
{
    #splits all the assemblies by |
    $list = $listAssemblyName.Split("|")
    $finalBinding = (Get-Content "C:TempTemplateBindingInfo.xml")
    $moduleRefNode = $finalBinding.SelectSingleNode("BindingInfo/ModuleRefCollection")
    $sendPortNode = $finalBinding.SelectSingleNode("BindingInfo/SendPortCollection")
    $receivePortNode = $finalBinding.SelectSingleNode("BindingInfo/ReceivePortCollection")
    $displayName = 'assemblyName'
    $appsList=New-Object System.Collections.ArrayList
    $assemblyListFQN = New-Object System.Collections.ArrayList
    $appsList = BTSTask.exe ListApp /ApplicationName:$appName
    #region Add FQN to list
    foreach($string in $appsList)
    {
        #region Get Assembly Fully Qualified Name
        $list = $listAssemblyName.Split("|")

        foreach($element in $list)
        {
            if($string.Contains('-'))
            {
                if($string.Split('-')[1].Split('"')[1] -eq "System.BizTalk:BizTalkAssembly")
                {
                    foreach($element in $list){
                        if($string.Split('-')[2].Split('"')[1].StartsWith($element))
                        {
                            if(!$assemblyListFQN.Contains($string.Split('-')[2].Split('"')[1])){
                                $assemblyListFQN.Add($string.Split('-')[2].Split('"')[1]);
                                #display name Set
                            }
                        }
                    }
                }
            }
        }
        #endregion
    }
    #endregion

    #loop assemblies
    foreach($string in $assemblyListFQN)
    {
        $dllName = $string.Substring(0, $string.IndexOf(','))
        $taskParams = ” ExportBindings /Destination:$bindingfilePath$appName.$dllName.BindingInfo.xml /AssemblyName:""$string"" ”
        Start-Process "BTSTask.exe" $taskParams -Wait

        $xml = (Get-Content "$bindingfilePath$appName.$dllName.BindingInfo.xml")

        foreach($moduleRef in $xml.BindingInfo.ModuleRefCollection.ModuleRef)
        {
            $node = $finalBinding.ImportNode(($moduleRef), $true);
            $moduleRefNode.AppendChild($node);
        }
        foreach($sendPort in $xml.BindingInfo.SendPortCollection.SendPort)
        {
            $node = $finalBinding.ImportNode(($sendPort), $true);
            $sendPortNode.AppendChild($node);
        }
        foreach($receivePort in $xml.BindingInfo.ReceivePortCollection.ReceivePort)
        {
            $node = $finalBinding.ImportNode(($receivePort), $true);
            $receivePortNode.AppendChild($node);
        }
    }
    $finalBinding.Save("$bindingfilePath$appName.BindingInfo.xml")

    #generate different Environments Bindings
    if($generateDiffEnvBindings)
    {
        $xml = (Get-Content "$bindingfilePath$appName.BindingInfo.xml")

        # QA Binding Info Generation
        $xml.SelectNodes("//Host") | % {
            if(!$_.Attributes['xsi:nil'].Value)
            {
                $_.NtGroupName = $global:qaNTGroupName
            }
        }
        $xml.Save("$bindingfilePath$appName.QA.BindingInfo.xml")

        # PRD Binding Info Generation
        $xml.SelectNodes("//Host") | % {
            if(!$_.Attributes['xsi:nil'].Value)
            {
                $_.NtGroupName = $global:prdNTGroupName
            }
        }
        $xml.Save("$bindingfilePath$appName.PRD.BindingInfo.xml")
    }
}

THIS POWERSHELL IS PROVIDED “AS IS”, WITHOUT WARRANTY OF ANY KIND.
To be honest, I think this is the less useful script because it is not that much practical use, and also it will have several limitations when we have several and different versions of the same published DLL. But, it can be very useful and practical in situations where we can guarantee that we have only one DLL version published in our environment.
You can download the full script from here: Export BizTalk Resource Bindings from a List of Assembly Names with PowerShell
The post BizTalk Bindings Exportation: How to Export BizTalk Server Resource Bindings from a List of Assembly Names with PowerShell appeared first on BizTalk360.
by Sandro Pereira | May 10, 2019 | BizTalk Community Blogs via Syndication
I’m back to writing! With so many talks in recent times and those who still come, and with it all the time necessary to prepare them; with so much work and new projects ongoing (thankfully); with 3 kids at home and recently married… it has been difficult to arrange a free time to concentrate on the writing. But I’m back, and for starting with a smooth topic that I like: “Errors and Warnings, Causes and Solutions” on a problem that actually I faced today while trying to connect with SQL Server Integration Services (SSIS): “The specified service does not exist as an installed service.”
Today, while I was trying to access SSIS from SQL Server 2016 Server, that host and support BizTalk Server 2016 I got the following and bizarre error:
TITLE: Connect to Server
——————————
Cannot connect to ..
——————————
ADDITIONAL INFORMATION:
Failed to retrieve data for this request. (Microsoft.SqlServer.Management.Sdk.Sfc)
For help, click: http://go.microsoft.com/fwlink?ProdName=Microsoft%20SQL%20Server&LinkId=20476
——————————
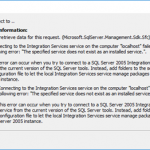
Connecting to the Integration Services service on the computer “localhost” failed with the following error: “The specified service does not exist as an installed service.”.
This error can occur when you try to connect to a SQL Server 2005 Integration Services service from the current version of the SQL Server tools. Instead, add folders to the service configuration file to let the local Integration Services service manage packages on the SQL Server 2005 instance.

Cause
This was bizarre because again I was trying to access to SSIS directly from SQL Server machine and I was sure that I had Integration Services installed and running on the server as I was able to confirm access to the services (services.msc).

I’m not a SQL Server specialist, but after careful research into the SSIS documentation it says:
“To connect directly to an instance of the legacy Integration Services Service, you have to use the version of SQL Server Management Studio (SSMS) aligned with the version of SQL Server on which the Integration Services Service is running. For example, to connect to the legacy Integration Services Service running on an instance of SQL Server 2016, you have to use the version of SSMS released for SQL Server 2016.”

That triggered some red lights on my head because:
- I knew that this was a recent installation and we were using a current version of SQL Server Management Studio (v17.9.1);
- and I also knew that for example during the BizTalk Server configuration we may face some issues configuring some features if we are using a recent version of SSMS, you should use a compatible and recommended version: SSMS 16.5.3.
Solution
So, to solve this issue, you should:
In my case, I was able to connect to SSIS without any problem from SSMS installed in BizTalk Server 2018 machine because I always installed from day one SSMS 16.5.3 on BizTalk Servers machines.
The post BizTalk Server 2016 and Install SQL Server Integration Services (SSIS) 2016: The specified service does not exist as an installed service appeared first on SANDRO PEREIRA BIZTALK BLOG.
by Sandro Pereira | May 1, 2019 | BizTalk Community Blogs via Syndication
Until now, we have been addressing single operations, like generating binding files for one Receive or Send Port port or a single Assembly. Some of these default operations can be achieved with out-of-the-box tools (BizTalk Server Administration Console or even with BTSTask command-line tool included with BizTalk Server), other more advanced scenarios extend the default functionalities:
- How can we easily export a binding file from a BizTalk Application?
- How can we easily export a binding file from a specify assembly?
- Using the fully qualified name (FQName) of the assembly.
- Using only the assembly name
- How can we easily export a binding file from a Receive Port?
- How can we easily export a binding file from a Send Port?
- And many more
From now on, we will be addressing some of the previous features described in this series of posts, but this time aggregating several operations for example:
- How can we easily export a binding file from a list of assemblies?
- By fully qualified name (FQName)
- By assembly names
- How can we easily export a binding file from a list of Receive Ports?
- How can we easily export a binding file from a list of Send Ports?
In other words, instead of generating a specific binding file for each resource: Receive Port, Send Port or Assembly, we will be generating a unique binding file that will include all this information, so it can easily be handled.
Today’s blog post will be about: How to Export BizTalk Server Resource Bindings from a List of Assemblies FQName with PowerShell.
Out-of-the-box, we can export a binding file for a specific assembly which is deployed in your BizTalk Server environment. But if you have 10 assemblies then you will be forced to generate them one by one and you will end up with:
- 10 different binding files that you can provide to your administration team
- Or manually merge them into one and provide them to your administration team
This manual intervention, besides being monotonous, boring and time-consuming is subject to many failures. So the normal question is, is there any way that we can improve this experience? And the response is yes, all of this can be fully automated using, for example, PowerShell scripts.
Like the previous samples, we could fully automate this Binding generation for each environment, but once again. let’s keep it simple and address what is mandatory and easily forgotten. With this PowerShell sample we will be able to generate a unique binding file for a list of specific assemblies deployed in my BizTalk Server environment. The script will take care of the following tasks:
- Generate a Binding file for 3 environments DEV, QA and PRD
- Changing the NT Group Name for each different environment
- Generate a unique binding file, instead of having separated binding files for each assembly
function bts-list-resource-exportbindings-by-assembly-fqname([string]$bindingFilePath, [string]$appName, [string]$listAssemblyFQName, [boolean]$generateDiffEnvBindings)
{
    $finalBinding = (Get-Content "C:TempBTSTemplateBindingInfo.xml")
    $moduleRefNode = $finalBinding.SelectSingleNode("BindingInfo/ModuleRefCollection")
    $sendPortNode = $finalBinding.SelectSingleNode("BindingInfo/SendPortCollection")
    $receivePortNode = $finalBinding.SelectSingleNode("BindingInfo/ReceivePortCollection")

    $list = $listAssemblyFQName.Split("|")

    foreach($element in $list)
    {
        $dllName = $element.Substring(0, $element.IndexOf(','))
        $taskParams = ” ExportBindings /Destination:$bindingfilePath$appName.$dllName.BindingInfo.xml /AssemblyName:""$element"" ”
        Start-Process "BTSTask.exe" $taskParams -Wait

        $xml = (Get-Content "$bindingfilePath$appName.$dllName.BindingInfo.xml")

        foreach($moduleRef in $xml.BindingInfo.ModuleRefCollection.ModuleRef)
        {
            $node = $finalBinding.ImportNode(($moduleRef), $true);
            $moduleRefNode.AppendChild($node);
        }
        foreach($sendPort in $xml.BindingInfo.SendPortCollection.SendPort)
        {
            $node = $finalBinding.ImportNode(($sendPort), $true);
            $sendPortNode.AppendChild($node);
        }
        foreach($receivePort in $xml.BindingInfo.ReceivePortCollection.ReceivePort)
        {
            $node = $finalBinding.ImportNode(($receivePort), $true);
            $receivePortNode.AppendChild($node);
        }
    }

    $finalBinding.Save("$bindingfilePath$appName.BindingInfo.xml")

    if($generateDiffEnvBindings)
    {
        $xml = (Get-Content "$bindingfilePath$appName.BindingInfo.xml")

        # QA Binding Info Generation
        $xml.SelectNodes("//Host") | % {
            $_.NtGroupName = $global:qaNTGroupName
        }
        $xml.Save("$bindingfilePath$appName.QA.BindingInfo.xml")

        # PRD Binding Info Generation
        $xml.SelectNodes("//Host") | % {
            $_.NtGroupName = $global:prdNTGroupName
        }
        $xml.Save("$bindingfilePath$appName.PRD.BindingInfo.xml")
    }
}

THIS POWERSHELL IS PROVIDED “AS IS”, WITHOUT WARRANTY OF ANY KIND.
You can download the full script from here: Export BizTalk Resource Bindings from List of Assemblies FQName with PowerShell
The post BizTalk Bindings Exportation: How to Export BizTalk Server Resource Bindings from a List of Assemblies FQName with PowerShell appeared first on BizTalk360.
by Sandro Pereira | Apr 30, 2019 | BizTalk Community Blogs via Syndication
Let’s go for the third PowerShell sample in a series of posts that, once again, I will be addressing some of the real case scenarios that we may face daily:
- How can we easily export a binding file from a BizTalk Application?
- How can we easily export a binding file for a specific assembly?
- Using the fully qualified name (FQName) of the assembly
- Using only the assembly name
- How can we easily export a binding file from a list of assemblies?
- How can we easily export a binding file from a Receive Port?
- How can we easily export a binding file from a Send Port?
- And many more
Today’s blog post will be about: How to Export BizTalk Server Resource Bindings by Assembly Name (instead of the FQName) with PowerShell.
This is extremely similar to the previous one, but instead of using the fully qualified name (FQName) of the assembly, we will be using only the assembly name. Nevertheless, this small change will have a significant technical impact on the way we can archive this goal.
Just for getting started, and for you to be aware, this is impossible to do out-of-the-box with the standard tools:
- BizTalk Server Administration Console
- Or even with BTSTask command-line tool included with BizTalk Server. This tool provides the option for you to export binding information to a .xml file by using the ExportBindings command:
- BTSTask ExportBindings /Destination: value [/GroupLevel] [/ApplicationName:value] [/AssemblyName:value ] | [/GlobalParties] [/Server:value] [/Database:value]
- /ApplicationName: Name of the application from which to export bindings.
- /AssemblyName: a Locally unique identifier (LUID) of the assembly from which to export bindings.
So, if you want to do something outside the box this is were the fun and challenges really start to appear and the question that we may ask is: Is there any way that we can accomplish this and at the same time improve the experience, similar to the previous examples? The response is that yes, all of this can be fully automated using, for example, PowerShell scripts.
Like the previous samples, we could fully automate this Binding generation for each environment, but once again, let’s keep it simple and address what is mandatory and easily forgotten. With this PowerShell sample, we will be able to generate a binding file for a specific assembly which is deployed in my BizTalk Server environment.
Generate a Binding file for 3 environments DEV, QA and PRD:
- Changing the NT Group Name for each different environment
- Generate a Binding file for each version of the assembly name found deployed
function bts-resource-exportbindings-by-assembly-name([string]$bindingFilePath, [string]$appName, [string]$assemblyName, [boolean]$generateDiffEnvBindings)
{
    $list= BTSTask.exe ListApp /ApplicationName:$appName

    $list |foreach {
	    if ($_ -like '*Resource:*')
        {
            if($_.Split('-')[1].Split('"')[1] -eq "System.BizTalk:BizTalkAssembly")
            {
                $varAssemblyFQName = $_.Split('-')[2].Split('"')[1]
                $verison = $_.Split('-')[2].Split('"')[1].Split("=")[1].Split(",")[0]
                if($varAssemblyFQName -like "*"+ $assemblyName + "*")
                {
                    $taskParams = ” ExportBindings /Destination:$bindingfilePath$appName.$assemblyName.$verison.BindingInfo.xml /AssemblyName:""$varAssemblyFQName"" ”
                    Start-Process "BTSTask.exe" $taskParams -Wait

                    if($generateDiffEnvBindings)
                    {
                        $xml = (Get-Content "$bindingfilePath$appName.$assemblyName.$verison.BindingInfo.xml")

                        # QA Binding Info Generation
                        $xml.SelectNodes("//Host") | % {
                            $_.NtGroupName = $global:qaNTGroupName
                        }
                        $xml.Save("$bindingfilePath$appName.$assemblyName.$verison.QA.BindingInfo.xml")

                        # PRD Binding Info Generation
                        $xml.SelectNodes("//Host") | % {
                            $_.NtGroupName = $global:prdNTGroupName
                        }
                        $xml.Save("$bindingfilePath$appName.$assemblyName.$verison.PRD.BindingInfo.xml")
                    }
                }
            }
        }
    }
}
THIS POWERSHELL IS PROVIDED “AS IS”, WITHOUT WARRANTY OF ANY KIND.
You can download the full script from here: Export BizTalk Server Resource Bindings by Assembly Name with PowerShell
The post BizTalk Bindings Exportation: How to Export BizTalk Server Resource Bindings by Assembly Name with PowerShell appeared first on BizTalk360.
by Sandro Pereira | Apr 23, 2019 | BizTalk Community Blogs via Syndication
This is the second PowerShell sample in a series of samples that I will do on this topic addressing some of the real case scenarios that we may face daily:
- How can we easily export a binding file from a BizTalk Application?
- How can we easily export a binding file from a specify assembly?
- How can we easily export a binding file from a list of assemblies?
- How can we easily export a binding file from a Receive Port?
- How can we easily export a binding file from a Send Port?
- And many more
Today’s blog post will be about: How to Export BizTalk Server Resource Bindings by Assembly FQ Name with PowerShell.
Exporting a BizTalk Server Application binding is, at first sight, a simple and quick task that can be done using the BizTalk Server Administration Console:
- Click Start, click All Programs, click Microsoft BizTalk Server 20xx, and then click BizTalk Server Administration
- In the console tree, expand BizTalk Server Administration, expand the BizTalk Group, and then expand Applications
- Right-click the application whose assembly is associated, and you want to export the bindings, or simply right-click on the Applications, point to Export, and then click Bindings…
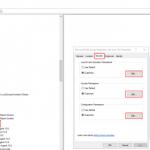
- On the Export Bindings page, in Export to file, type the absolute path of the .xml file to which to export the bindings
- Ensure that Export bindings from the select assembly is selected, and then click OK

But, again, even in all simple tasks we may encounter challenges that require us to perform some monotonous and boring manual operations that consume some of our precious time and are always subject to failures.
Once again, the steps that I described above only generate the binding files from that specific environment, maybe or normally this all start in development, but we also will need to generate the same bindings for production, and for that we normally need to open the binding file and replace/fix the differences for each different environment… which is normally a tedious operation. What we need to replace is mainly:
- The URI’s – it should be fixed but it is not mandatory you can fix them directly on the environment after you import the Binding if you know what you are doing
- The host instances – not mandatory if you have the same host and host instances names across all your different environments as best practices will tell you to do
- The NT Group Name associated in the Services (Orchestrations) – according to security best practices you shouldn’t use the same BizTalk Groups in different environments, so in this case, if you follow this best practice, you need mandatory to change these parameters in your binding file
Normally, everyone changes the URI’s but neglecting the other parameters may be causing problems during the Binding import.
- So, the question is: Is there any way that we can improve this experience? And the response is that yes, all of this can be fully automated by using, for example, PowerShell scripts.
Like the previous sample, we could fully automate this Binding generation for each environment, but once again, let’s keep it simple and address what is mandatory and easily forgotten. With this PowerShell sample for a specific assembly, with a fully qualified name, deployed in my BizTalk Server environment, I can easily:
- Generate a Binding file for 3 environments DEV, QA and PRD
- Changing the NT Group Name for each different environment
function bts-resource-exportbindings-by-assembly-fqname([string]$bindingFilePath, [string]$appName, [string]$assemblyFQName, [boolean]$generateDiffEnvBindings)
{
    $dllName = $assemblyFQName.Substring(0, $assemblyFQName.IndexOf(','))
    $taskParams = ” ExportBindings /Destination:$bindingfilePath$appName.$dllName.BindingInfo.xml /AssemblyName:""$assemblyFQName"" ”
    Start-Process "BTSTask.exe" $taskParams -Wait

    if($generateDiffEnvBindings)
    {
        $xml = (Get-Content "$bindingfilePath$appName.$dllName.BindingInfo.xml")

        # QA Binding Info Generation
        $xml.SelectNodes("//Host") | % {
            $_.NtGroupName = $global:qaNTGroupName
        }
        $xml.Save("$bindingfilePath$appName.$dllName.QA.BindingInfo.xml")

        # PRD Binding Info Generation
        $xml.SelectNodes("//Host") | % {
            $_.NtGroupName = $global:prdNTGroupName
        }
        $xml.Save("$bindingfilePath$appName.$dllName.PRD.BindingInfo.xml")
    }
}
THIS POWERSHELL IS PROVIDED “AS IS”, WITHOUT WARRANTY OF ANY KIND.
You can download the full script from here: Export BizTalk Server Resource Bindings by Assembly FQName with PowerShell
The post BizTalk Bindings Exportation: How to Export BizTalk Server Resource Bindings by Assembly FQ Name with PowerShell appeared first on BizTalk360.
by Lex Hegt | Apr 15, 2019 | BizTalk Community Blogs via Syndication
One of the components of BizTalk360 is a SQL Server database. This database is used for all kind of configuration like user permissions and all the monitoring settings. When that data got corrupted or lost, you would have to do all the configuration all over from scratch. To prevent this from happening, you should frequently take backups of that database. Besides creating manual backups, you can also have these backups being created automatically.
There are two different approaches to making automated backups of this database, both are shown below:
- Create a SQL Server Maintenance Plan
- Extend the Backup BizTalk Server job
The difference between these 2 methods is, that with the Maintenance Plan approach you’ll have a backup which is not in sync with the backup of your BizTalk databases, while with the latter option your BizTalk360 backup will be in sync with the BizTalk backups. This could make restoring your databases in one go easier.
In a previous post, Rochelle has already explained how to create a Maintenance Plan to take care of the BizTalk360 database backups. In this article, we’ll explain how to add the BizTalk360 database to the Backup BizTalk Server job.
Adding custom databases to the BizTalk Server Backup job
What we basically are going to do is using a feature from BizTalk Server. As you probably are aware of, BizTalk Server contains multiple databases and to be able to restore them in sync, the backup needs to be created in sync. The only by Microsoft supported way to create such backups, is by using the Backup BizTalk Server job, which is a SQL Server Agent job. You can read more about that topic in the below articles:
BizTalk users can extend the backup job with other databases which are considered important to the integrations which are deployed in BizTalk Server. This is exactly what we will be doing with the BizTalk360 database.
The process exists of the following steps:
- Prepare the BizTalk360 database
- Add the BizTalk360 database to the BizTalk Server backup job
- Start making backups
Let’s take these steps one by one and have that database added to the BizTalk Server backup job!
Prepare the BizTalk360 database
In this first step, we’ll make sure a table and some Stored Procedures will be created in the BizTalk360 database. The table which becomes created is called MarkLog. You will find this table in all the databases which are being backed up via the BizTalk Server backup job.
Perform below steps to create that table and the needed Stored Procedures:
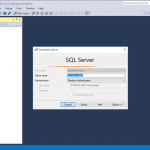
- Open SQL Server Management Studio and connect to the SQL Server instance which contains the BizTalk360 database

- Click Open File, navigate to folder C:Program Files (x86)Microsoft BizTalk Server 2016Schema and select query Backup_Setup_All_Tables.sql
- From the Databases dropdown, select the BizTalk360 database
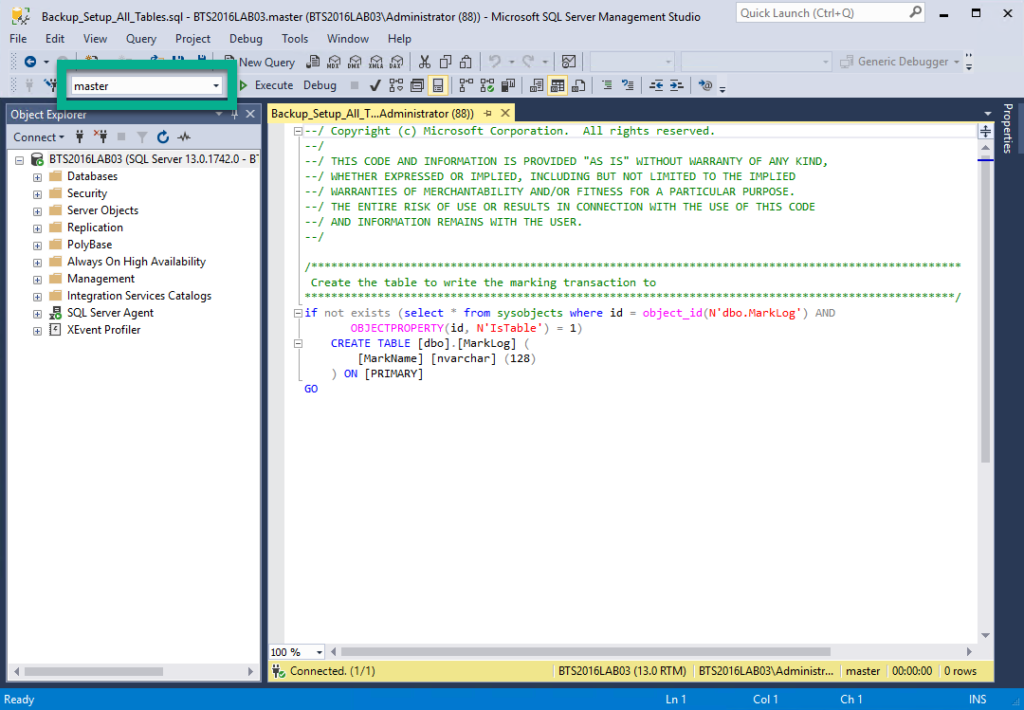
- Click the Execute button or hit F5 to execute the script. If the database has been created successfully, you can proceed with the next step
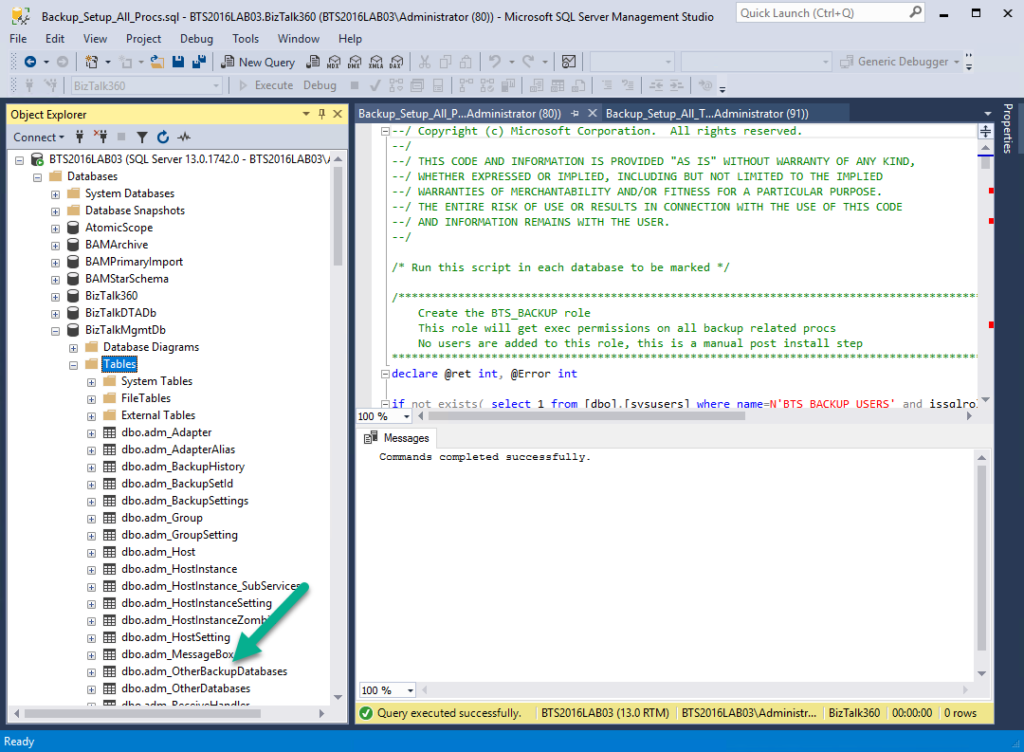
- Click Open File, navigate to folder C:Program Files (x86)Microsoft BizTalk Server 2016Schema and select query Backup_Setup_All_Procs.sql
- If not yet selected, select the BizTalk360 database from the Databases dropdown
- Click the Execute button or hit F5 to execute the script
If both SQL scripts have been executed successfully, an important part of the configuration has been completed. The BizTalk360 database is ready and in the next step, it will be added to the BizTalk Server backup job!
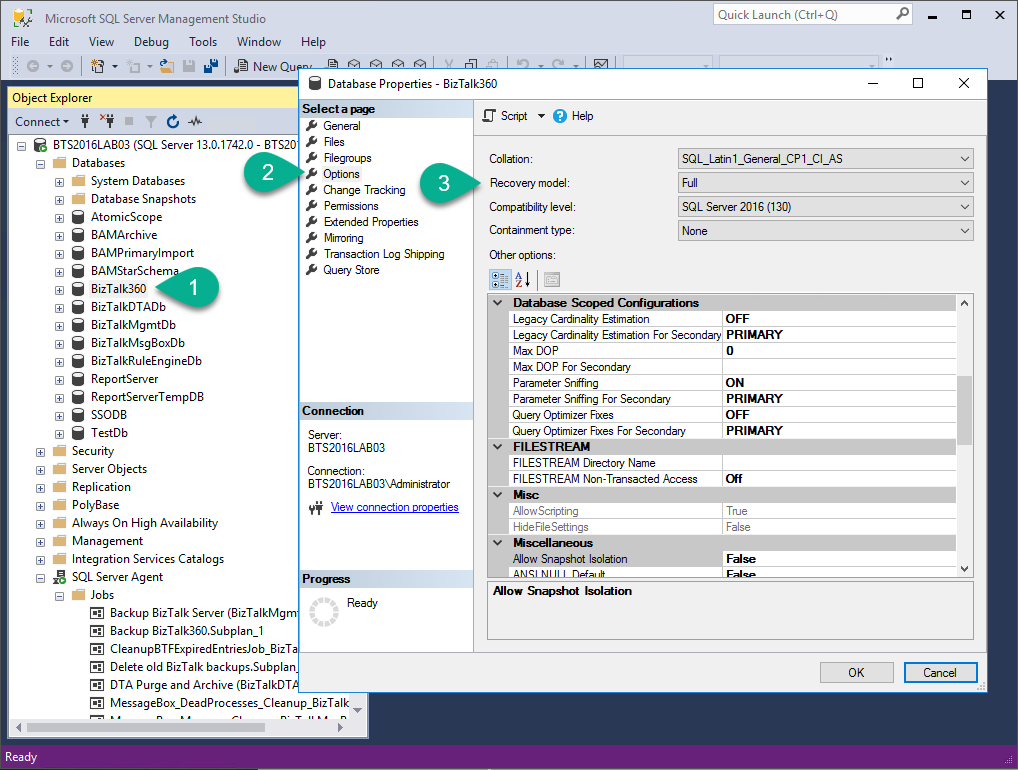
Important: Ensure yourself that the BizTalk360 is in Full Recovery Model, otherwise the backup will fail! You can check this by:
- Right-click the database then select Properties
- Select Options
- Check if the Recovery Model is set to Full
Add the BizTalk360 database to the BizTalk Server backup job
In the previous step, we prepared the BizTalk360 database to be able to be backed up by the BizTalk Server backup job. In this step, we’ll make sure that that database becomes added to a table in BizTalk Server’s management database, which will make sure that the database will be picked up by the BizTalk Server backup job.
Follow below steps, to make sure that the BizTalk360 database will be picked up by the BizTalk Server backup job:
- In SQL Server Management Studio, connect to the SQL Server instance which contains the BizTalkMgmtDb
- In the Object Explorer, expand the Databases, BizTalkMgmtDb, Tables and find the dbo.adm_OtherBackupDatabases table
- Right-click that table and, from the menu that appears, select Edit Top 200 Rows. As you are in Edit mode, you can add a new row which will contain the information about the BizTalk360 database.
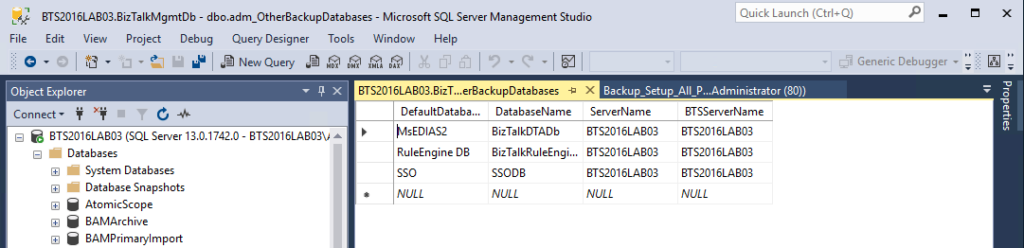
- In the last row, which now only shows NULL values, enter below values
- DefaultDatabase: BizTalk360
- DatabaseName: BizTalk360
- ServerName: <Name of the SQL Server Instance which contains the BizTalk360 database>
- BTSServerName: <Name of the SQL Server Instance which contains the BizTalk360 database>
- Hit Enter to save the record in the table
The BizTalk360 database is now part of the BizTalk Server backup job. The last step we need to do is forcing a full backup, to make sure that also incremental backups can be created.
Start making backups
We are almost there; we have seen how the BizTalk360 database has been prepared to accommodate the BizTalk Server backup job. In the previous step, we have added the BizTalk360 database to the BizTalk Server backup job. In this last step, we will force a full backup, to make sure that after that, also incremental backups can be created. By default, a full backup will be created once every 24 hours; Incremental backups will be created, by default, every 15 minutes.
Perform below steps to force a full backup:
- In SQL Server Management Studio, under the BizTalkMgmtDb, expand Programmability and expand Stored Procedures
- Scroll through the Stored Procedures until you have found sp_ForceFullBackup
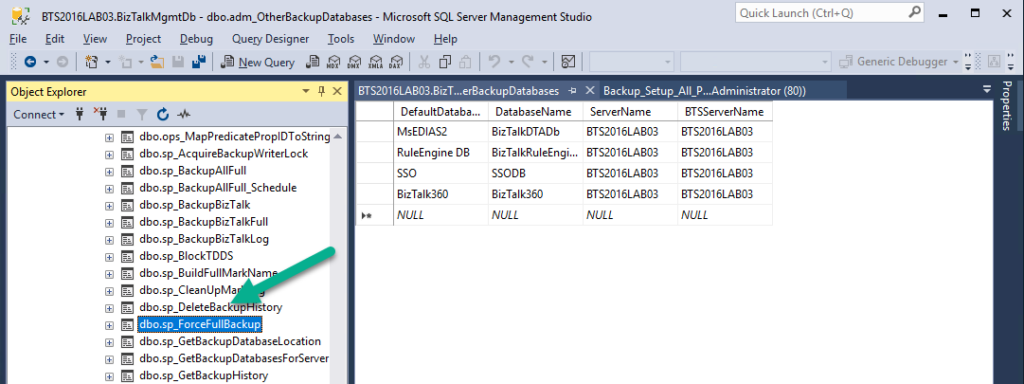
- Right-click that Stored Procedure and, from the menu that appears, select Execute Stored Procedure… As the Stored Procedures doesn’t need any parameter values, just click OK
- If the Stored Procedure has been executed successfully, the next time the BizTalk Server backup job runs, it will perform a full backup
There are a couple of ways to check whether the backups are really being created. You can:
- Check the output of the BizTalk Server backup job (in SQL Server Management Studio)
- Check if the backup files have been created (in Windows Explorer)
Check the output of the BizTalk Server backup job
To perform this check, perform these steps:
- In SQL Server Management Studio, you need to navigate to the SQL Server instance which contains the BizTalk Server backup job
- Next, expand SQL Server Agent
- Right-click the Backup BizTalk Server job and select View History

Check if the backup files have been created
To check the availability of the backup files, you firstly need to check where these files are located. Follow the below steps, to find that location and then check the actual location:
- In SQL Server Management Studio, you need to navigate to the SQL Server instance which contains the BizTalk Server backup job
- Next, expand SQL Server Agent
- Double-click the Backup BizTalk Server job
- In the Job Properties dialog which appears, under Select a Page, select Steps

- Now, under Job step list, double click BackupFull
- In the Job Step Properties dialog, at Command, scroll to the right to find the backup path
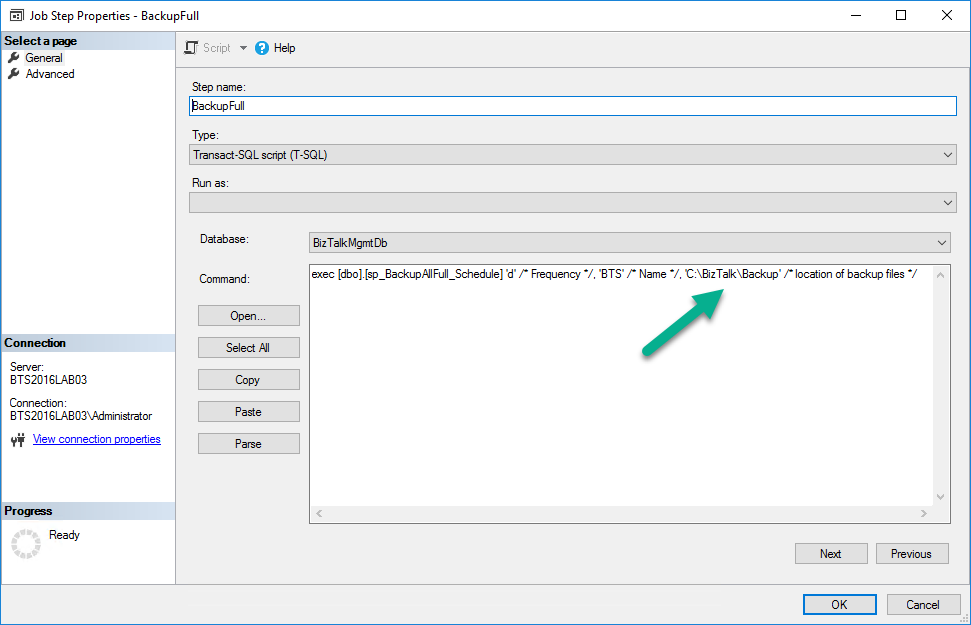
- Copy the backup path and close all dialog screens
- Next, open a Windows Explorer and paste the backup path in the Address bar
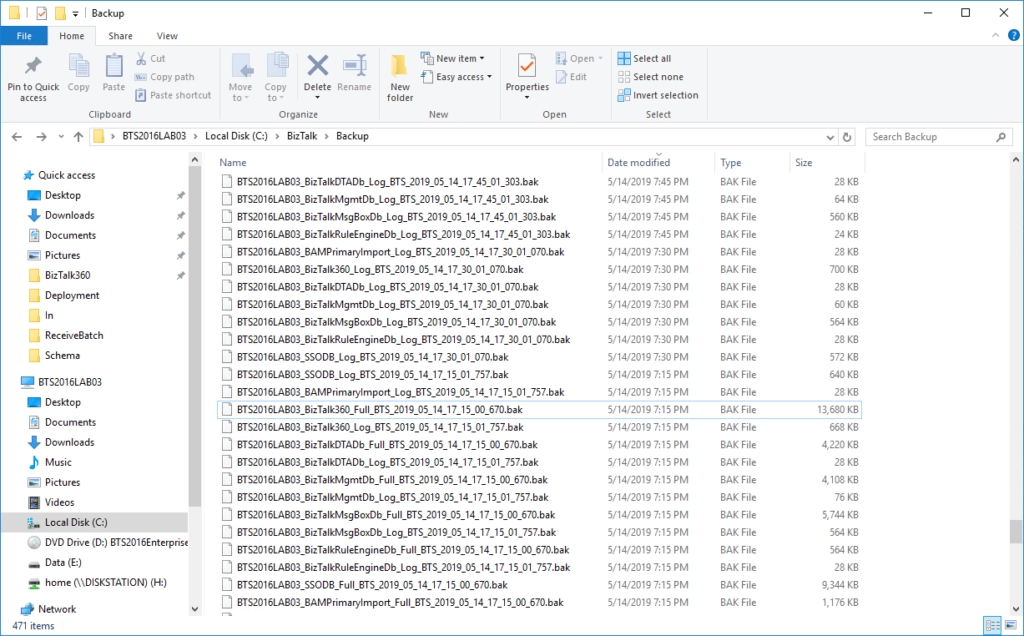
Now the backup files should show. Although we only checked the backup path for the full backup files, this folder might also contain the backup files of the incremental backups.
Conclusion
The BizTalk360 database contains valuable information about, amongst others, your monitoring configuration and the people who have access to BizTalk360. If in case of a disaster, you need to easily restore a backup of your BizTalk360 database, you need to have a recent backup of that database. The BizTalk Server backup job creates such backups. In this article, we have seen how to extend the BizTalk Server backup job to incorporate the backup of the BizTalk360 database.
The post Backup your BizTalk360 database via the BizTalk Backup job appeared first on BizTalk360.
by Sandro Pereira | Apr 11, 2019 | BizTalk Community Blogs via Syndication
This will be the first blog post in a series of articles that I will do on this topic addressing some of the real case scenarios that we may face daily:
- How can we easily export a binding file from a BizTalk Application?
- How can we easily export a binding file from a specific assembly?
- How can we easily export a binding file from a list of assemblies?
- How can we easily export a binding file from a Receive Port?
- How can we easily export a binding file from a Send Port?
- And many more
The today blog post will be about: How can we easily export a binding file from a BizTalk Application?
Exporting a BizTalk Server Application binding is, at first sight, a simple and quick task that can be done using the BizTalk Server Administration Console:
- Click Start, click All Programs, click Microsoft BizTalk Server 20xx, and then click BizTalk Server Administration
- In the console tree, expand BizTalk Server Administration, expand the BizTalk Group, and then expand Applications
- Right-click the application whose bindings you want to export, point to Export, and then click Bindings…
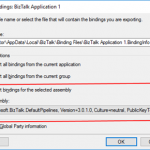
- On the Export Bindings page, in Export to file, type the absolute path of the .xml file to which to export the bindings
- Ensure that Export all bindings from the current application is selected, and then click OK
But even in simple tasks, we may encounter challenges that require us to perform some monotonous and boring manual operations that consume some of our precious time and are always subject to failures.
The steps that I described above only generate the binding files from that specific environment, maybe or normally this all start in development, but we also will need to generate the same bindings for production and for that we normally need to open the binding file and replace/fix the differences for each different environment… which is normally a tedious operation. What we need to replace is mainly:
- the URI’s – it should be fixed, but it is not mandatory. If you know what you are doing, you can fix them directly on the environment after you import the Binding
- the host instances – not mandatory, if you have the same host and host instances names across all your different environments (as best practices will tell you to do)
- the NT Group Name associated in the Services (Orchestrations) – according to securities best practices you shouldn’t use the same BizTalk Groups in different environments, so in this case, if you follow this best practices, you need to change these parameters in your binding file
Normally, everyone changes the URI’s but neglecting the other parameters may be causing problems during the Binding import.
So, the question is: Is there any way that we can do to improve this experience? And the response is that yes, all of this can be fully automated by using, for example, PowerShell scripts.
Again, I could fully automate this Binding generation for each environment, but let’s keep it simple and address what is mandatory and easily forgotten. In this sample let’s see how I can easily:
- Generate a Binding file for 3 environments DEV, QA and PRD:
- Changing the NT Group Name for each different environment;
function bts-application-exportbindings([string]$bindingFilePath, [string]$appName, [boolean]$generateDiffEnvBindings)
{
    $taskParams = ” ExportBindings /Destination:$bindingfilePath$appName.BindingInfo.xml /ApplicationName:$appName ”
    #First version: $p = [diagnostics.process]::start(“BTSTask.exe”, $taskParams)
    Start-Process "BTSTask.exe" $taskParams -Wait

    if($generateDiffEnvBindings)
    {
        $xml = (Get-Content "$bindingfilePath$appName.BindingInfo.xml")

        # QA Binding Info Generation
        $xml.SelectNodes("//Host") | % {
            $_.NtGroupName = $global:qaNTGroupName
        }
        $xml.Save("$bindingfilePath$appName.QA.BindingInfo.xml")

        # PRD Binding Info Generation
        $xml.SelectNodes("//Host") | % {
            $_.NtGroupName = $global:prdNTGroupName
        }
        $xml.Save("$bindingfilePath$appName.PRD.BindingInfo.xml")
    }
}

bts-application-exportbindings 'C:tempBTS' 'BizTalk Application 1' $True
THIS POWERSHELL IS PROVIDED “AS IS”, WITHOUT WARRANTY OF ANY KIND.
You can download the full script from here: Export BizTalk Server Application Bindings with PowerShell
The post BizTalk Bindings Exportation: How to Export BizTalk Server Application Bindings with PowerShell appeared first on BizTalk360.


