by BizTalk Team | Mar 8, 2017 | BizTalk Community Blogs via Syndication
With the recent release of BizTalk Server 2016 we are happy to announce that the developer image of BizTalk Server 2016 is licensed for free to use in your test and development scenarios. BizTalk Server 2016 is Microsoft’s latest release of the new hybrid integration software.
With BizTalk Server 2016, customers can automate mission critical business processes, leverage support for latest first party platforms and gain newer capabilities within the BizTalk Administration console. With this release, customers also have the flexibility to adopt a hybrid approach by choosing to connect to SaaS applications through Azure Logic Apps, or running BizTalk Server on Azure leveraging full support in production environments.
Azure Logic Apps is another core part of Microsoft’s Hybrid Integration Platform, that allows you to rapidly connect to numerous SaaS and enterprise applications, enable business to business communication and leverage the power of other Azure services like Functions, Cognitive Services, Machine Learning and many more. BizTalk Server 2016 is the first version to take full advantage of this hybrid integration story, with an out of the box adapter to connect directly to Azure Logic Apps. This opens up numerous hybrid and cloud integration scenarios – all from the comfort of using your on-premises BizTalk Server 2016.
BizTalk Server 2016 also provides support to many of the first party Microsoft platforms such as Windows Server 2016, Office 2016, Visual Studio 2015 and SQL Server 2016. In addition, it provides the ability to run your Enterprise Integration Solution in the cloud leveraging the AlwaysOn and Availability groups through SQL Server 2016 to achieve high available environments in Azure on IaaS.
Please follow this link to sign up for Visual Studio Dev Essentials and download BizTalk Server 2016 Developer edition for free today.

by Sandro Pereira | Mar 3, 2017 | BizTalk Community Blogs via Syndication
Pop quiz. How many times did you hear “BizTalk is dead”?
- Never.
- Once or twice
- Hundred times.
- I stopped counting…
If you agreed with the last two statements, this post and tool are definitely for you (because BizTalk is alive and well, even better, it has never been so good!). If you agreed with the first two, well, you’re a new kid on block but you’re still on time to learn this amazing platform.
You might have just realized that BizTalk360 is my main sponsor and once again I need to say to BizTalk360 team, THANK YOU! for the incredible work they have done.
I decided to go one-step further and request for more. What better way to this “blog premiere” than to distribute through the magnificent BizTalk Server community some amazing prizes… So, I decided to convince my sponsor to provide me some licenses of their products and good news… I GOT IT!!
The first contest I have 1 FREE PRODUCTION BRONZE LICENSE OF BIZTALK360 to give away, courtesy of BizTalk360.

Contest: “BizTalk360 License”
What do you need to do to participate in this contest?
All you have to do is sign-up for the Free 14 days trial version and activate the license in one or more of your BizTalk Environments (could be dev box, QA or Production)
Closing date: March 31th, 2017.
Terms of participation
What are the rules?
- Once you have activated your trial license, simply email the trial license code to my email address [email protected] with the subject line: “Contest – BizTalk360 License”.
- Along with that information, please provide your first and last name and your country.
Award
One contestant will win:
- 1 FREE PRODUCTION BRONZE LICENSE OF BIZTALK360
The award will be distributed by lottery and the license will be sent to the winner through email by BizTalk360.
Good luck!
PS: If you have never heard about BizTalk360 (possible only if you are a new kid in the BizTalk worldJ) you can glance through the product features here https://www.biztalk360.com/one-platform-biztalk-server/.
Author: Sandro Pereira
Sandro Pereira lives in Portugal and works as a consultant at DevScope. In the past years, he has been working on implementing Integration scenarios both on-premises and cloud for various clients, each with different scenarios from a technical point of view, size, and criticality, using Microsoft Azure, Microsoft BizTalk Server and different technologies like AS2, EDI, RosettaNet, SAP, TIBCO etc. He is a regular blogger, international speaker, and technical reviewer of several BizTalk books all focused on Integration. He is also the author of the book “BizTalk Mapping Patterns & Best Practices”. He has been awarded MVP since 2011 for his contributions to the integration community. View all posts by Sandro Pereira
by Gautam | Feb 26, 2017 | BizTalk Community Blogs via Syndication
Do you feel difficult to keep up to date on all the frequent updates and announcements in the Microsoft Integration platform?
Integration weekly update can be your solution. It’s a weekly update on the topics related to Integration – enterprise integration, robust & scalable messaging capabilities and Citizen Integration capabilities empowered by Microsoft platform to deliver value to the business.
If you want to receive these updates weekly, then don’t forget to Subscribe!
On-Premise Integration:
Cloud and Hybrid Integration:
- BizTalk Developer at Experis, Conway, Arkansas
- BizTalk Developer at Anchor Point Technology Resources, Indianapolis, Indiana
- BizTalk Developer at TekParters, Medley, FL, US
- BizTalk Consultant at Capgemini, Jersey City, New Jersey
- BizTalk Developer at CACI, International, Arlington, VA, US
- BizTalk Developer at CTS, Inc. Atlanta, GA, US
- BizTalk Developer at Hiring Ideas, Dallas, TX, US
- Developer – BizTalk WellMed – San Antonio, TX or Telecommute, UnitedHealth Group, San Antonio, TX, US
Feedback
Hope this would be helpful. Please feel free to let me know your feedback on the Integration weekly series.
by Lex Hegt | Feb 22, 2017 | BizTalk Community Blogs via Syndication
Part 2 – Advanced setup
This is an article in a series of 2 about the BizTalk Deployment Framework (BTDF). This open source framework is often used to create installation packages for BizTalk Applications. More information about this software can be found here CodePlex.
With this series of articles, we aim to provide a useful set of hands-on documentation about the framework.
The series consists of the following parts:
- Part 1 – Introduction and basic setup
- Part 2 – Advanced setup (this article)
- Introduction
- Custom Targets
- Conditions
- Host Groups
- Executing third party executables
- Tips and Tricks
- Conclusion
Introduction
In the first part of this series we have seen how you can setup a BizTalk Deployment-project, add artefacts to the project, how you can deploy variable settings for other DTAP environments and how you can generate distributable MSI packages.
In this second article we’ll show somewhat more advanced topics like Custom Targets, Conditions, Host Groups and we’ll see how you can run third party executables from within your deployment. We’ll finish with a couple of Tips and Tricks.
Custom Targets
To be able to customize your deployments, the BizTalk Deployment Framework uses a concept called Custom Targets. These Custom Targets allow you to execute commands during certain phases of the deployment. We will describe a couple of Custom Targets and show how you can use them later on as well. The currently available Custom Targets are shown below.
Adding Custom Targets to your Deployment project
Before describing the Custom Targets, let’s first have a quick look on how to add Custom Targets to your Deployment project.
To keep your Deployment project nicely organized, it is a good idea to keep all the custom targets you will be using grouped together below all the BizTalk artefacts you will deploy. So the Custom Targets will be added at the end of your Deployment project.
Below is a picture which shows where the CustomRedist target is added to the Deployment project. This target was actually already added to the project during creation of the Deployment project.
As you can see, you can simple type the text <Target Name=”…”></Target> and at the ellipsis, provide the name of the Custom Target you will be going to use. Everything you want to perform during the execution of the target, can be entered between the start tag and the end tag. We’ll see examples of the kind of commands which can be performed later in this article.
CustomRedist
This target becomes executed right after BTDF has finished copying files. So this is the ideal moment if you would like for example to add additional files to the MSI package, which will be copied to the installation folder on deployment.
Below you have a sample in which a folder becomes created and some files are copied to that folder:
    <MakeDir Directories="$(RedistDir)SQLScripts" />
    <CreateItem Include="SQLScripts*.*">
          <Output TaskParameter="Include" ItemName="SQLScripts" />
    </CreateItem>
    <Copy DestinationFolder="$(RedistDir)SQLScripts%(RecursiveDir)" SourceFiles="@(SQLScripts)"/>
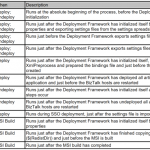
CustomDeployTarget and CustomPostDeployTarget
The CustomDeployTarget target runs just before Deployment has started, while the CustomPostDeployTarget target runs directly after Deployment has finished. Either can be used if you want to deploy additional stuff. Later we’ll describe how these targets are used to run third party executables, but you might also use these targets to create for example an EventLog source.
CustomUndeployTarget and CustomPostUndeployTarget
The CustomUndeployTarget target runs just before any undeployment has been performed, while the CustomPostUndeployTarget target runs right after the undeployment has taken place. These targets can be used if you would like to clean up stuff after undeployment. You can think of that as cleaning any created files during deployment. All just to be sure that you keep your environment nice and clean.
Conditions
The concepts of Conditions can be used in both Bindingfiles as in the BTDF project file. With Bindingfiles this might be used to create different ports in different environments.
In the BTDF project file this feature can become used when for example, you want to execute certain targets only in certain environments.
As applying Conditions is almost the same for both kind of files, let’s just have a look at the latter one.
Let’s assume that we want to execute an .exe file only for the Test and Production environment. To be able to execute certain targets just for certain environments, you need to do the following:
– Add an Environment variable to your BTDF Settings file
– Add the variable to your BTDF project file
– Add a filter to the CustomPostDeployTarget
Add an Environment variable to your BTDF Settings file
From Visual Studio open the SettingFileGenerator.xml file in Excel and add a variable called Environment. Each environment will get a unique value. Below picture shows a setting file which is extended with such a setting and contains unique values for all environments, namely DEV, SDEV, TEST and PROD.
Add the variable to your BTDF project file
To be able to use the Environment variable, you need to do the following:
• Open the Deployment.btdfproj file and look for an ItemGroup which contains the value PropsFromEnvSettings. Typically this settings contains the values SSOAppUserGroup and SSOAppAdminGroup.
• Add a semicolon and the new variable Environment. Afterwards the ItemGroup will look like below.
    <ItemGroup>
      <PropsFromEnvSettings Include="SsoAppUserGroup;SsoAppAdminGroup;Environment" />
    </ItemGroup>
Add a filter to the CustomPostDeployTarget
In the final step you’ll arrange that the step which executes the .exe file only gets executed in case you’re deploying on the TEST or PROD environment. Navigate to the target called CustomPostDeployTarget and add the condition: $(Environment)==’TEST’ OR $(Environment)==’PROD’ to it.
When you’ve done that, the target will look as follows:
    <Target Name="CustomPostDeployTarget" Condition="$(Environment)=='TEST' OR $(Environment)=='PROD'">
        <MakeDir Directories="$(RedistDir)SQLScripts" />
        <CreateItem Include="SQLScripts*.*">
                <Output TaskParameter="Include" ItemName="SQLScripts" />
        </CreateItem>
        <Copy DestinationFolder="$(RedistDir)SQLScripts%(RecursiveDir)" SourceFiles="@(SQLScripts)"/>
    </Target>
Now, when you save the project file, create an MSI and execute that MSI, the CustomPostDeployTarget will only be executed when you are deploying to the Test or the Production environment.
Host Groups
In most cases a BizTalk application uses only a couple of Host Instances. After a deployment it is a good practice to restart all relevant Host Instances. BTDF enables you to achieve this by using an BizTalkHosts ItemGroup. If you omit this ItemGroup, all Host Instances will be restarted.
You can put such an ItemGroup in the BTDF-project file. To keep the project file nicely organized you can consider to have that ItemGroup below the BizTalk artefacts you are deploying.
    <ItemGroup>
        <BizTalkHosts Include="SendHost;ReceiveHost;OrchestrationHost" />
    </ItemGroup>
As you can see, you can easily add multiple hosts by using semicolons between the separate hosts.
Executing third party executables
The BizTalk Deployment Framework enables you to execute third party executables. Below you find brief examples to show what you can achieve with this capability.
Executing SQL Server scripts
Say you have a custom database which is used by your BizTalk solution and this database needs to be extended with additional tables and stored procedures. Without using the BizTalk Deployment Framework, you would need to run the necessary SQL Server scripts on each environment by hand. This is a time-consuming and error-prone task which can be automated with BTDF.
To be able to execute SQL Server commands, you need to execute an executable called sqlcmd. Below you find an example on how to execute SQL scripts:
<Target Name="CustomPostDeployTarget">
<Exec Command="sqlcmd -S $(SQLServer) -i"SQLScripts<Name of T-SQL deploy script>"" />
</Target>
As you can see, you can simply add an Exec command to the deployment target.
For all the ins and outs on deploying SQL Server scripts, check this article on TechNet Wiki.
Create BizTalk360 alerts
Another example of running third party executables is the creation of BizTalk360 alarms. Normally you’ll have to do this manually after each deployment of a new or changed BizTalk application. This too can be a time-consuming and error prone task. By using BTDF and a tool called BT360Deploy, you can automate the creation of alarms during the deployment of you BizTalk application.
In the picture here above, you have an example of the output of BT360Deploy. More information on BT360Deploy can be found on CodePlex.
Tips and Tricks
We’ll end this article by providing you with a couple of Tips and Tricks
Do not automatically start the Application after deployment
BTDF allows you to automatically start the deployed BizTalk application, i.e. start all ports and orchestrations after deployment. Although that sounds like a convenient feature, especially in Dev and Test environments, your BizTalk administrator probably prefers that you leave the just deployed BizTalk application not started on Production environments. The reason for this is that in this way the BizTalk Administrator has better control over the moment when the BizTalk application must be activated.
Consider (not) restarting Host Instance
We have seen that BTDF can restart the Host Instance(s) after deployment. But in case you use scripting for unattended deployment of multiple BizTalk applications at the same time, you don’t want the Host Instances restarted after each deployment package as this is a waste of time and resources. In that case, you remove the ItemGroup that contains the BizTalkHosts. Instead you set the SkipHostInstancesRestart property in the first PropertyGroup of the project file to True:
<SkipHostInstancesRestart>False</SkipHostInstancesRestart>
ItemGroups per artefact
To keep your BTDF project file organized, it is preferable that you use separate ItemGroups for all the separate types of artefacts you will be deploying.
  <ItemGroup>
    <Schemas Include="Kovai.BTDF.Schemas.dll">
      <LocationPath>..$(ProjectName).Schemasbin$(Configuration)</LocationPath>
    </Schemas>
    <Schemas Include="Kovai.BTDF.MoreSchemas.dll">
      <LocationPath>..$(ProjectName).MoreSchemasbin$(Configuration)</LocationPath>
    </Schemas>
  </ItemGroup>

  <ItemGroup>
    <Transforms Include=" Kovai.BTDF.Maps.dll ">
      <LocationPath>..$(ProjectName).Mapsbin$(Configuration)</LocationPath>
    </Transforms>
    <Transforms Include=" Kovai.BTDF.MoreMaps.dll ">
      <LocationPath>..$(ProjectName).MoreMapsbin$(Configuration)</LocationPath>
    </Transforms>
  </ItemGroup>

  <ItemGroup>
    <Orchestrations Include=" Kovai.BTDF.Orchestrations.dll ">
      <LocationPath>..$(ProjectName).Orchestrationsbin$(Configuration)</LocationPath>
    </Orchestrations>
    <Orchestrations Include=" Kovai.BTDF.MoreOrchestrations.dll ">
      <LocationPath>..$(ProjectName).MoreOrchestrationsbin$(Configuration)</LocationPath>
    </Orchestrations>
  </ItemGroup>
Conclusion
In a series of 2 articles we have seen quite a lot of the capabilities of the BizTalk Deployment Framework. In part 1 we started with pointing out the advantages of using BTDF over the out-of-the-box capabilities of BizTalk Server and we created a simple Deployment project which showed how to setup a deployment with basic artefacts like Schemas, Maps and Orchestrations. We extended this project by creating variables to be used for environment specific settings like URL’s of endpoints.
In part 2 we have seen some more advanced features like Conditions and Host Groups. We have also seen how we can run third party executables to automate your deployment as far as possible and to decrease the amount of manual and error prone labour as much as possible.
Still there are much more possibilities with BTDF which we did not discuss. For example, you can also use it to create virtual directories, deploy SSO settings, create EventLog Event Sources, create Registry keys etc. etc. etc..
It must be clear by now that the BizTalk Deployment Framework is a very powerful framework that can be used with straight forward to complex deployments. So when you are already familiar with the framework and are using it for the deployment of standard BizTalk artefacts, why not expand your experience with BTDF and start deploying less common artefacts like SQL scripts. When you do that properly, your BizTalk Administrator might become your new best friend!
Happy deploying!
Author: Lex Hegt
Lex Hegt works in the IT sector for more than 25 years, mainly in roles as developer and administrator. He works with BizTalk since BizTalk Server 2004. Currently he is a Technical Lead at BizTalk360. View all posts by Lex Hegt

by Gautam | Feb 19, 2017 | BizTalk Community Blogs via Syndication
Do you feel difficult to keep up to date on all the frequent updates and announcements in the Microsoft Integration platform?
Integration weekly update can be your solution. It’s a weekly update on the topics related to Integration – enterprise integration, robust & scalable messaging capabilities and Citizen Integration capabilities empowered by Microsoft platform to deliver value to the business.
If you want to receive these updates weekly, then don’t forget to Subscribe!
On-Premise Integration:
Cloud and Hybrid Integration:
Feedback
Hope this would be helpful. Please feel free to let me know your feedback on the Integration weekly series.
by Steef-Jan Wiggers | Feb 14, 2017 | BizTalk Community Blogs via Syndication
BizTalk Server is able to communicate with the outside world, leveraging the Azure Service Bus Relay, Queues and/or Topics/Subscriptions. The latter is indirect one-way messaging (brokered) through listening to a specific subscription, in a topic or service bus queue. Through the relay, you can have direct two-way messaging. This capability can help in scenarios where you do not want to expose your ERP system like SAP or other directly to the cloud connected system. You might also have invested in a BizTalk solution and like to have an easy access to the cloud yet do not want to change the systems. The other benefit of using the relay is that you do not have to move your BizTalk installation into another zone like the DMZ to be closer to the outside world.
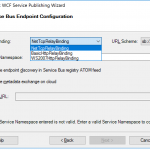
Other means of access to BizTalk can be indirect through the Logic App adapter (new with BizTalk Server 2016) or directly by exposing a BizTalk endpoint (WCF-BasicHttp, WsHttp or WebHttp) in IIS, accessible through reverse proxy. The latter is also possible using the BizTalk WCF Service Publishing Wizard that will extend the reach of the service to the Service Bus.
In this blog post, we’ll be discussing on securing a BizTalk endpoint that uses the BasicHttpRelay or NetTcpRelay i.e. a BizTalk endpoint configured with these WCF Bindings. Extending an endpoint using WCF Publishing Wizard doesn’t add extra capability, yet more complexity as the endpoint will be exposed internally through the chosen binding, however, to the Service Bus one of the relay bindings has to be selected (see picture below).
To be able to have an endpoint exposed to Azure Service Bus, you will need a namespace in your subscription. To setup a Service Bus Namespace is straightforward — in the Azure Market Place, select Service Bus and click Create. Specify a name i.e. that’s the namespace, choose a suitable price plan and specify the Resource Group and Location (regional data center).
In the picture above, you can clearly see what each price plan offers in terms of capacity, features and message size. This Azure service and others are very transparent in their costs and capability by vividly showing the options in pricing tiers.
Scenario
Our scenario to explain how to secure a relay configured BizTalk endpoint will be as follows:
- A receive location will be configured with a given address and security details from the Service Bus Namespace
- The endpoint will be hosted through BizTalk and registered in the Service Bus Namespace EnterpriseA
- API Management Instance will have an API that will connect through one of its operations to the relay endpoint
- A client can call the MyAPI order operation
The Service Bus Namespace credentials are abstracted away in the API management and not known to the MyAPI user. The MyAPI user will have to provide an API Key to be able to call the operation Order. The MyAPI can be further secured by applying OAuth 2.0 or OpenID, which we will not discuss in this blog.
Setting up BizTalk Endpoint with Relay binding
BizTalk Server started providing support to the Azure Service Bus with SB-messaging, WCF-BasicHttpRelay and NetTcpRelay adapters. The relay, as mentioned earlier, supports two-way messaging, and that will be the adapter we will use to build our scenario. The configuration of the relay in BizTalk is straight forward. You create a Receive Port, add a Receive Location, select the appropriate binding i.e. BasicHttpRelay or NetTcpRelay and configure.
The key aspects of the configuration are the address, which is the namespace of your service name to be placed in the standard DNS. servicebus.windows.net followed by the name of your endpoint at the end. And security, where we specify the security mode, client security (authentication type), and connection information i.e. SAS key, which can be obtained through Shared Access Policies tied to our Service Bus namespace.
Once we configured our adapter and enabled the ReceiveLocation, the endpoint will be registered in Service Bus Namespace.
The endpoint is available, however, not visible or discoverable through the Azure Portal. To see if the endpoint is up, we use ServiceBus360 or we could use the Service Bus Explorer.
Provisioning API Management
API Management is an Azure Service, which can be provisioned through the Azure Portal. The service provides an API gateway i.e. you can publish API’s to external and internal consumers. You can also provide a gateway to backend services hosted in your data center like a BizTalk endpoint (hosted in a Receive Location, or actually the Host Instance). The features API Management provides are:
- API documentation and an interactive console (developer portal)
- Throttle, rate limit and quota of APIs
- Monitor API health
- Support modern formats like JSON and REST to existing APIs
- Connect to APIs hosted anywhere on the Internet or on-premises and publish globally
- Gain analytic insights of APIs that are being used
- Management of your service (API Management instance) via the Azure portal, REST API, PowerShell, or Git repository
In this blog post, I will demonstrate some of the features mentioned above in relation to securing BizTalk endpoints.
To create an API Management Service, you can select API Management in the Azure Portal and click Create. Specify a name i.e. that’s the name of your API Management instance, choose a suitable pricing tier, specify the Resource Group, Organization Name, Administrator Email and Location (regional data center).
Again, in the picture above, you can clearly see what each price plan offers in terms of capacity, features and scale. The provision of your API Management service i.e. instance can take some time (30 minutes or more).
Securing the relay binding with API Management
Our first step is to open up the Publisher Portal by clicking Publisher Portal in our API Management Service. In the Publisher Portal, we can click Add API and specify a Web API name, the Service URL of our relay endpoint, which we like to secure. We place our API in Starter Product, which is an existing default product what limits us in 5 calls/minute up to a maximum of 100 calls/week. For demo purposes, this is sufficient. More on products, read Microsoft docs How to create and publish a product in Azure API Management.
The second step is adding an operation to the just defined API, which will be a REST type of operation i.e. POST on our endpoint i.e. the relay endpoint that is hosted by BizTalk. The endpoint for this operation will be the following https://enterprisea.servicebus.windows.net/myendpoint/order.
The API and its operation have been defined and the final step will be setting a policy on our operation. Policies in API Management are where a lot of the magic happens, like converting JSON to XML or vice versa, applying CORS, or set HTTP headers. The latter is what we need to set a pre-generated SAS token (using Shared Access Signatures, enter the token in a CDATA tag). We could ask the client of our API to set these headers, however we then devalue the strength of API management and enforce the client to provide the SAS-key. In that case the client needs to know the Service Namespace credentials, which is not what we want. With API Management, we can enforce other authentication strategies or just simply let the client use our API and provide only an API-Key. We will discuss this in testing the endpoint through API Management.
In the policy, we will set the Authorization header for accessing our relay endpoint and we will need a SAS-token. Now the SAS-Key needs to be generated by us and put into the set-header name policy as shown below.
<policies>
        <inbound>
                <set-header name="Authorization" exists-action="skip">
                        <value><![CDATA[SharedAccessSignature sr=https%3a%2f%2fenterprisea.servicebus.windows.net&sig=E26706kmlcrFlkdP%2bgcFqalfKRAxzO2Ht%2flz8BhuGaqQ%3d&se=1484788588&skn=RootManageSharedAccessKey]]></value>
                        <!-- for multiple headers with the same name add additional value elements -->
                </set-header>
                <base />
        </inbound>
        <backend>
                <base />
        </backend>
        <outbound>
                <base />
        </outbound>
        <on-error>
                <base />
        </on-error>
</policies>
The SAS-token will have a validity of a certain period of days or months, which at some point need to be refreshed in the policy. Fortunately, you can use a tool from Sandro Dimattia to obtain the token for a certain amount of time i.e. the Time To Live (TTL, see also Protecting your Azure Event Hub using Azure API Managment). We will further discuss this later on the considerations concerning the refreshing of the token.
Our API is now ready to be tested. It is already published and available, because we placed our API in the Starter Product, which is published and protected by default. Note that a custom product is not published by default.
Testing the endpoint through API Management
Testing of an API can easily be done in the Developer Portal of our API Management instance. In the Azure Portal, we click Developer Portal where we click on the API menu item (top bar) and select our API. The API has only one operation, which is Order. We will try it out and add a header to indicate the content type for the payload, and our request body (which the format our BizTalk endpoint is expecting).
When we hit Send we will be sending the following over the wire:
POST https://enterprisea.azure-api.net//Order HTTP/1.1
Host: enterprisea.azure-api.net
Ocp-Apim-Trace: true
Ocp-Apim-Subscription-Key: ••••••••••••••••••••••••••••••••
Content-Type: text/xml

<ns0:Request xmlns:ns0="http://EnterpriseA.Schemas.Orders">
<ID>123</ID>
<Description>My Product Description</Description>
<Quantity>1</Quantity>
<Price>100</Price>
</ns0:Request>
We receive the following response:
<strong>Response status</strong>
202 Accepted
<strong>Response latency</strong>
6033 ms
<strong>Response content</strong>
Transfer-Encoding: chunked
Strict-Transport-Security: max-age=31536000
Ocp-Apim-Trace-Location: https://apimgmtstigjqylbzcvt5mdi.blob.core.windows.net/apiinspectorcontainer/LghnyTlQR3qEhFUmXwPlsQ2-24?sv=2015-07-08&sr=b&sig=ewuBua9VTrXtwrrOmMeCdm5uA54uBtqB9FO2CjSVOl8%3D&se=2017-01-19T17%3A21%3A14Z&sp=r&traceId=1d50bac0dc28414a8cc1d46281e03e41
Date: Wed, 18 Jan 2017 17:21:20 GMT
Content-Type: application/xml; charset=utf-8

<ns0:Response xmlns:ns0="http://EnterpriseA.Schemas.Orders">
        <ID>123</ID>
        <Status>Ok</Status>
        <Error>
                <Code>0</Code>
                <Description>No Error</Description>
        </Error>
</ns0:Response>
We can also click on Trace to investigate deeper what happens behind the scenes i.e. beyond the API endpoint https://enterprisea.azure-api.net//Order. When we hit inbound we can inspect the call to the relay endpoint.
{ "configuration":
{ "api":
{ "from": "/",
"to":
{ "scheme": "https",
"host": "enterprisea.servicebus.windows.net",
"port": 443,
"path": "/myendpoint",
"queryString": "",
"query": {},
"isDefaultPort": true } },
"operation":
{ "method": "POST", "uriTemplate": "/Order" },
"user": { "id": "1",
"groups": [ "Administrators", "Developers" ] },
"product": { "id": "587f536c0c2a0e0060060001"
}
}
 }
As you can see this is interesting detail information. We see the host i.e. endpoint of our relay with port 443 i.e. HTTPS type of port, path (/myendpoint) and uriTemplate (/Order).
We can drill down further by click Backend in Trace and observe the details there. We see the complete URL (address) where the payload will be posted.
{
"message": "Request is being forwarded to the backend service.",
"request":
{ "method": "POST",
"url": "https://enterprisea.servicebus.windows.net/myendpoint/Order",
"headers":
[ { "name": "Ocp-Apim-Subscription-Key",
"value": "fd8f172f22bf405283f7796ed90c8eb1" },
{ "name": "Content-Length",
"value": "184" },
{ "name": "Content-Type",
"value": "text/xml" },
{ "name": "Authorization",
"value": "SharedAccessSignature sr=https%3a%2f%2fenterprisea.servicebus.windows.net&amp;amp;amp;amp;sig=E26806kmlcrFydP%2bgcFqalfKRAxzO2Ht%2flz8BhuGaqQ%3d&amp;amp;amp;amp;se=1484788588&amp;amp;amp;amp;skn=RootManageSharedAccessKey" }
,
{ "name": "X-Forwarded-For",
"value": "13.94.139.231"
}
]
}
}
We also can observer the API Key i.e. Ocp-Apim-Subcription-Key, Content-Type, the header with the SAS-Token, and an IP address, which is the Public Virtual IP (VIP) address of our APIM Instance where the request was initiated.
Note that if other developers want to test it, they will be required to subscribe to the Product and use a subscription key to access the APIs included in it. We can access it, since we created the Azure API Management and therefore we are administrator.
Considerations
BizTalk endpoints which are configured with the relay extend their reach or boundaries to Azure and such provide means of access to the outside world in a new way. Through the relay, two-way direct messaging can be facilitated with external parties. To further secure the endpoints, by not sharing the service bus credentials, we used API Management, which brings in a few aspects you have to bear in mind.
The first aspect is the availability of the BizTalk endpoints. They can extend as shown in this blog post, however they depend on the host instance under which the receive location runs. If the host is stopped, then the endpoint will become unavailable. You can mitigate this risk by having two instances of the BizTalk host and a Receive Location with the same address i.e. endpoint registered in the Azure Service Bus. And then there is the availability of the Service Bus and API Management, both are managed by Microsoft and fall under a SLA.
The second aspect is the quality of service, which has moved from BizTalk side to API Management. This means that you can implement security, rate limiting, throttling, and other service quality aspects at the API Management level by configuration using policies. This is a huge time saver, since on the BizTalk level you, for instance will have to build a custom behavior to support OAuth 2.0.
The third aspect I like to discuss, is the contract of the message you sent to the API. The actual contract is abstracted away as only the endpoint is visible as an operation in the API. Therefore, you still need to agree on the contract and format i.e. XML or JSON with your consumers. We have shown XML messages here, yet BizTalk supports JSON natively using the appropriate pipeline components.
The final aspect will be TTL of the token. As you have seen in this blog post you can create a SAS-token that has a validity based on how you set it using a tool. You do have to keep in mind when the token has almost expired you refresh the token. Moreover, you will need to have a certain SLA in place to ensure the service endpoint does not become unavailable.
Conclusion
This blog post has provided an overview on how to secure BizTalk endpoints exposed through WCF-Relay bindings, in particular we chose WCF-BasicHttpRelay. The NetTcp variant would not have been any different, other than on the protocol level. A BizTalk endpoint can be secured leveraging the relay and API Management, i.e. we can apply some quality of service aspects through API Management on our BizTalk hosted endpoint. BizTalk itself can host the actual service itself, which can be any type of service.
Using API Management, you can abstract the relay endpoint away from the consumers (clients), whitelist IP’s, cache response, monitor health, have support for OAuth 2.0, and many other aspects that are hard to accomplish with BizTalk itself when it comes to exposing endpoints to Azure. The other benefit is that you do not have to burden infrastructure guys to move BizTalk to another zone, or open up extra firewall ports, setup reverse proxies, and so on (see also a talk by Kent Weare API Management Part 1 – An Introduction to Azure API Management).
Call to action
If you like to further explore the technology that has been showcased in this blog I, would suggest to explore the following resources:
Author: Steef-Jan Wiggers
Steef-Jan Wiggers has over 15 years’ experience as a technical lead developer, application architect and consultant, specializing in custom applications, enterprise application integration (BizTalk), Web services and Windows Azure. Steef-Jan is very active in the BizTalk community as a blogger, Wiki author/editor, forum moderator, writer and public speaker in the Netherlands and Europe. For these efforts, Microsoft has recognized him a Microsoft MVP for the past 5 years. View all posts by Steef-Jan Wiggers
by Lex Hegt | Feb 13, 2017 | BizTalk Community Blogs via Syndication
This is an article in a series of 2 about the BizTalk Deployment Framework (BTDF). This open source framework is often used to create installation packages for BizTalk Applications. More information about this software can be found here CodePlex. With these series of articles, we aim to provide a useful set of hands-on documentation about the framework.
The series consists of the following parts:
- Part 1 – Introduction and basic setup (this article)
- Introduction
- BizTalk out-of-the-box capabilities
- Top reasons to use BTDF
- Setting up a BTDF-project
- Conclusion
- Part 2 – Advanced setup
Introduction
In this first part, we will shortly discuss the shortcomings of the deployment packages which can be created with the out-of-the-box capabilities of BizTalk Server and introduce you to the benefits of BTDF. Further this article will show you how you can create a BTDF-project for the deployment of basic BizTalk artifacts like Schema’s, Maps and Orchestrations and how you can deploy variable settings for other DTAP environments. We will end this article with showing you how you can generate distributable MSI packages.
BizTalk out-of-the-box capabilities
Microsoft BizTalk Server comes with capabilities to create deployment packages. However, the MSI packages you create with the out-of-the-box features of BizTalk Server have some shortcomings which lead to deployments that are time consuming and error-prone. The main reasons for this are:
- The packages can only contain URI’s of Endpoints (Receive Locations and Send Ports) of a single DTAP environment. So DTAP promotion from the same package is not possible.
- Only deployment of BizTalk artifacts is possible. So if you need, for example, to create and populate database tables, this cannot be automated.
Top reasons to use BTDF
As you’ll imagine, BTDF has eliminated these shortcomings, because of which the framework has been widely adopted. Below you’ll find a list which contains a number of reasons why you could use this framework:
- Deploy complex BizTalk solutions containing BizTalk artifacts but also for example SSO settings, ESB itineraries and SQL Server scripts, with no human intervention
- Consolidate all of your environment-specific configuration and runtime settings into one, easy-to-use Excel spreadsheet
- Maintain a single binding file that works for all deployment environments
- Make automated deployment a native part of the BizTalk development cycle, then use the same script to deploy to your servers
Setting up a BTDF-project
After you have downloaded and installed BTDF on your Development box, you can start with setting up your BTDF-project. To get that working, you need to take the following steps:
- Add a BTDF project to your BizTalk solution
- Add BizTalk artifacts to the BTDF project
- Deploy from Visual Studio
- Generate a master PortBinding file
- Apply Environment Specific Settings
- Generate a MSI
Add a BTDF project to your BizTalk solution
Firstly, you need to open a BizTalk solution in Visual Studio and perform the following steps:
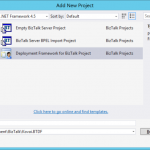
- Right-click the Solution Explorer and select Add/New Project…
- In the dialog that opens, in the left hand pane, navigate to BizTalk Projects
- In the right pane, select Deployment Framework for BizTalk Project, give the project the name Deployment and click the OK button to continue the creation of the project.
In the screen that follows you can configure which artifacts you want to deploy. Perform the following:
- Double-click on the text True after Deploy Settings into SSO. It will be set to False
- Uncheck the check mark ‘Write properties to the project file only when…’
- Click the Create Project button
After the project has been created, you’ll get a small dialog box, which states that you need to edit the file Deployment.btdfproj to configure your specific deployment requirements. And that’s exactly what we are going to do in a couple of minutes! For now, just click the OK button.
Although the aforementioned project file is shown in the left part of the screen, the Solution Explorer does not yet show the newly created Deployment project. To have the project shown up there, you need to manually add the project file and some other files to the solution in a Solution folder.
Perform the following actions to add the Deployment project to the solution:
- Right-click on the Solution Explorer, select Add/New Solution Folder, enter Deployment and hit the Enter key
- Right-click on the Deployment folder, select Add/Existing Item… and in the dialog box that appears double-click the folder Deployment
- Select all the files and click on the Add button
The Deployment project is now added to your BizTalk solution and that project in the Solution Explorer looks like below.
Note: Take care that it is important to name that solution folder Deployment, otherwise Visual Studio won’t be able to find the Deployment.btdfproj file.
Add BizTalk artifacts to the BTDF project
Now we have the Deployment project in place, we are going to add some basic BizTalk artifacts to the Deployment project. To start we’ll add the following types of artifacts:
- Schemas
- Maps
- Orchestrations
To keep the Deployment project file nicely organized, we will create an ItemGroup for each type of artifact. As we start with 3 types of artifacts, we’ll end up having 3 ItemGroups. Probably it will be clear by now that ItemGroups can be used to organize the artifacts you want to deploy. An ItemGroup is an element from MSBuild which is used by BTDF. Besides ItemGroups, you will also find PropertyGroups within the BTDF project file. PropertyGroups are used to organize all kind of parameters which can be used during deployment. Think of this for example of the name of the project, but also which kind of artifacts need to be deployed.
The project file already contains an ItemGroup for deploying schemas. We will use this as a template for our own purposes.
Follow below instructions to add schemas, maps and orchestrations to the deployment project.
- In the Deployment project file, search for the ItemGroup that is used for deploying Schemas. It contains the text ‘<Schemas Include=”YourSchemas.dll”>’.
- Replace ‘YourSchemas.dll’ with the name of the DLL which contains your schemas
- The line with the ‘<LocationPath>’ tag, must contain the path where the DLL resides
The ItemGroup will now look like below:
  <ItemGroup>
    <Schemas Include="Kovai.BTDF.Schemas.dll">
      <LocationPath>..$(ProjectName).Schemasbin$(Configuration)</LocationPath>
    </Schemas>
  </ItemGroup>
Next we’ll prepare deployment of the BizTalk Maps.
- Below the ItemGroup to deploy Schemas, create a new ItemGroup to deploy Maps. Therefore, you can copy/paste below XML:
  <ItemGroup>
    <Schemas Include="Kovai.BTDF.Schemas.dll">
      <LocationPath>..$(ProjectName).Schemasbin$(Configuration)</LocationPath>
    </Schemas>
  </ItemGroup>
Now we are going to prepare deployment of the BizTalk Orchestrations.
- Below the ItemGroup to deploy Maps, create a new ItemGroup to deploy Orchestrations. Therefore, you can copy/paste this XML:
<ItemGroup>
    <Orchestrations Include=" Kovai.BTDF.Orchestrations.dll ">
      <LocationPath>..$(ProjectName).Orchestrationsbin$(Configuration)</LocationPath>
    </Orchestrations>
  </ItemGroup>
If you have multiple projects of for example orchestrations, you can simple copy/paste the <Orchestrations>…</Orchestrations> block and provide it with the correct Include-parameter and location path. Of course, this also works the same for other types of artifacts like schemas, maps, pipelines etc.
Deploy from Visual Studio
We now have deployment for some basic artifacts in place, so let’s deploy the BizTalk solution and see what happens:
- Right-click the solution (in the solution Explorer) and select Build Solution
- When the solution is built without errors, you can deploy the solution, therefore just click the little green arrow in the upper left are of Visual Studio:
If everything runs like expected the Kovai.BTDF application is created and the schemas, the map and the orchestration will be deployed properly, but you’ll end up with the following error:
Could not enlist orchestration ‘Kovai.BTDF.Orchestrations.BizTalk_Orchestration1,Kovai.BTDF.Orchestrations, Version=1.0.0.0, Culture=neutral, PublicKeyToken=72ff5decf00d3ffb’. Could not enlist orchestration ‘Kovai.BTDF.Orchestrations.BizTalk_Orchestration1’. All orchestration ports must be bound and the host must be set.
This is due to the fact that the orchestration Orchestration1 contains ports which will have to be configured and bound in the BizTalk Administration Console. Let’s just do that and afterwards export the Binding file into your Deployment project.
- Open the BizTalk Server Administration Console and navigate to the BizTalk application called BTDF
- Right-click the application and click Configure. The following screen appears:
- Select a Host in the designated dropdown box
- Create a Receive Port and a Receive Location (use the FILE adapter) and bind it to rcvPort
- Create a Send Port (use the FILE adapter) and bind it to sndPort
- Click the OK button
- Right-click the application again and click .. and in the dialog box that appears, click Start again. The application should now be started properly
Generate a master PortBinding file
We now have a running BizTalk application which includes bindings between the deployed orchestration and a couple of ports. In the next step we will make these bindings available to our deployment project. Therefore, we need to export the bindings.
Again Right-click the application Kovai.BTDF and now select Export/Bindings…
- Click on the ellipsis button (…), navigate to your Deployment project, select xml, click the OK button and confirm that you want to overwrite the existing file
- Switch to Visual Studio and notice that you are prompted with the following message:
- Click Yes to reload the PortBindingsMaster.xml file
- Open PortBindingsMaster.xml and notice that it contains the bindings you created earlier
Apply Environment Specific Settings
For just local deployments you now have the basics in place. However, in most scenarios you will have to deploy your BizTalk solution(s) to multiple DTAP environments. In that case, the addresses of your Receive Locations and Send Ports will differ between environments. BTDF facilitates this by providing a XML file which can be edited in Microsoft Excel.
Maintaining DTAP environments
That XML file, named SettingsFileGenerator.xml, can contain columns for each DTAP environment to which you have to deploy your BizTalk solution. Below you find a screen shot of how such a file looks like by default.
As you can see, there are columns for multiple environments; Local Development, Shared Development, Test and Production. You are free to rename the values in the existing columns, or add/remove columns.
Maintaining environment specific settings
In the spreadsheet there currently are 2 settings defined; SsoAppUserGroup and SsoAppAdminGroup. You can add more settings in the first column and give them values for the different environments in the following columns. If the value is the same for two or more environments, you could enter a value in the column Default Values, as this value will be used in case no value is entered for one or more environments.
The screenshot below shows a Settings file that now contains values for the addresses of the Receive Location and the Send Port. As you can see, there are Default values entered and the columns for Local Development and Shared Development are left empty, so while deploying to those environments, the Default values will be used.
To be able to use for example the SP_Address variable from the settings file in the PortBindingsMaster, you need to open the PortBindingsMasterFile.xml file, navigate to the Send Port which should use the addresses and replace the current address with ${SP_Address}.
So before that part of the PortBindingsMaster.xml file looks like this:
    <SendPort Name="SendPort2" IsStatic="true" IsTwoWay="false" BindingOption="1">
      ...
      <PrimaryTransport>

<Address>C:BizTalkKovai.BTDFOut%MessageID%.xml</Address>

      ...
    </SendPort>
After the change the XML will look like below:
<SendPort Name="SendPort2" IsStatic="true" IsTwoWay="false" BindingOption="1">
      ...
      <PrimaryTransport>

<Address>${SP_Address}%MessageID%.xml</Address>

      ...
    </SendPort>
Generate a MSI
So far, we have only done deployments through Visual Studio. When we have to deploy our BizTalk solutions to non-development servers, we do that by installing MSI’s. BTDF is also able to generate MSI’s. Besides the BizTalk artifacts which need to be deployed, these MSI’s can also contain custom components, binding files for your entire DTAP environment and all kind of custom scripts, which can also be started during deployment.
Generating a MSI is done from Visual Studio, just choose one of below steps to generate a MSI:
- Click on the below button in the toolbar
- In the Visual Studio menu, select Tools/Deployment Framework for BizTalk/Build Server Deploy MSI
Both options will provide you with a MSI which you can use to deploy the BizTalk application throughout your DTAP environment.
Conclusion
In this first article we have seen how the BizTalk Deployment Framework differs from the out-of-the-box capabilities of BizTalk Server and described the benefits of BTDF. We’ve also setup a simple deployment project in an existing BizTalk solution and shown how you can add some basic BizTalk artifacts to that project. Further we have seen how we can create different settings for, for example, Receive Location addresses and how they become deployed to multiple environments. Finally, we’ve seen deployment from Visual Studio and we’ve generated a MSI based on the BTDF project.
Explore best practices for deploying BizTalk Server 2016 from Sandro Pereira’s Whitepaper.
In the next article, we’ll get familiar with amongst others Custom Targets, Conditions and see how we can run third party executables to automatically deploy non-standard artifacts like SQL Server scripts or even automatically create BizTalk360 alerts from within your deployment project!
Check out the 2nd article of the series here.
Author: Lex Hegt
Lex Hegt works in the IT sector for more than 25 years, mainly in roles as developer and administrator. He works with BizTalk since BizTalk Server 2004. Currently he is a Technical Lead at BizTalk360. View all posts by Lex Hegt

by Gautam | Feb 12, 2017 | BizTalk Community Blogs via Syndication
Are you struggling to keep up to date on all the frequent updates and announcements in the Microsoft Integration platform?
Integration weekly update can be your solution. It’s a weekly update on the topics related to Integration – enterprise integration, robust & scalable messaging capabilities and Citizen Integration capabilities empowered by Microsoft platform to deliver value to the business.
If you want to receive these updates weekly, then don’t forget to Subscribe!
On-Premise Integration:
Cloud and Hybrid Integration
Feedback
Hope this would be helpful. Please feel free to let me know your feedback on the Integration weekly series.
by Saranya Ramakrishnan | Feb 10, 2017 | BizTalk Community Blogs via Syndication
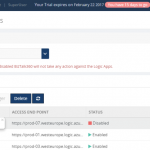
Azure Logic Apps play a vital role in an integration platform. Keeping this in mind, we introduced ‘Azure Logic Apps Monitoring’ in BizTalk360 Version 8.1. In Version 8.3, we implemented ‘Azure Logic Apps Operations’ capability to improve the ease of use for users using Logic Apps and BizTalk360. With this functionality, users can Operate, Manage and Monitor Azure Logic App(s) from a single place. When you see a threshold violation of Logic Apps, you can rectify the problem from the BizTalk360 UI itself. You can save time to log in to the Azure Portal and manage your Logic Apps.
All the user needs to do to configure Logic Apps Operations capability is to add the Azure subscription in BizTalk360 UI and enable it for monitoring and operation. BizTalk360 also provides an option to work on multiple subscriptions simultaneously. Therefore, by adding the subscription in BizTalk360, users can view the list of available Logic Apps in that subscription along with its name, Access End Point, the current Status (Enabled or Disabled), Last Run, and other details such as Resource Group, Location, Run and Trigger history details and Success/Failure Run count.
Features of Logic Apps Operations
Enable/Disable Logic Apps: From BizTalk360 UI, users can enable/disable the Logic Apps that reflects the corresponding Logic App in the Azure Subscription. You can initiate bulk operations — enable/disable multiple Logic Apps in a single click.
Run Trigger: User can also trigger the Logic App action from the BizTalk360 UI. This action also supports the bulk operations.
Delete Logic Apps: User can delete single or multiple Logic Apps through a single click from BizTalk360 UI.
Note: The Azure Portal UI allows to operate (Enable/Disable, Delete, Run Trigger) on only one Logic App at a time, whereas from BizTalk360 UI user can initiate bulk operation (select multiple logic apps) in a single click.
Run and Trigger History details
Data like History and Runs are huge when it comes to real time scenarios/production use. For each Logic App, Run and Trigger history will maintain the last 30 records. The history details will be displayed in both list and graphical View.
List View
- Start and End time of Run/Trigger. Here the time format and time zone is based on user profile configuration.
- Run/Trigger status such as succeeded/failed, running/skipped/aborted
- Duration of each Run and Trigger
Graphical View
We have simplified the UI view of your Logic Apps details and redefined Runs and Trigger history into Graphical representations. With the graphical view, it becomes easy for the users to navigate and identify the date and time tracking.
The graphical view chart shows Logic Apps Runs in the “Y” axis and Date in the “X” axis. All basic graph operations such as zoom, hover are available in the graphical view. Additionally, you can print/download the chart.
Success and Failure Run count
Based on colour coding, you can know the Success and Failure Run counts instantly within the detail window of your Logic App.
Trigger and Action Status
Users can see the actual design of the Logic App in the Details View, say when it should be trigger and which actions are to be performed.
E.g : Trigger ‘When_a File_Is_created ’ ; Action – Email_File .
Licensing
If you are an existing user of BizTalk360, and using the Platinum tier license, you just need to upgrade to BizTalk360 Version 8.3 to use this feature. For customers using other licensing tier, if you would like to use/try this feature, please send an email to [email protected] to customize your license.
If you are new to BizTalk360 and like to explore the Logic Apps Operations capability, you can get started with the 14 day free trial of BizTalk360.

by Sandro Pereira | Feb 7, 2017 | BizTalk Community Blogs via Syndication
To finalize this series of posts about how to check what BizTalk Server <version> Cumulative Updates are installed in your Servers with PowerShell:
We just need to talk about BizTalk Server 2013 to cover the last 4 versions of the product. And I know some environments that still are running in this version, for this reason, it is still a valid and quite useful script.
This script is very similar to the script that I created for BizTalk Server 2010 because, in earlier versions, such as BizTalk Server 2010 and 2013, there were dedicated versions for BizTalk Server and BizTalk Adapter Pack. This has changed since BizTalk Server 2013 R2 where Microsoft decide to create Cumulative Updates for BizTalk Server, Adapter Pack, and Accelerators in a single resource and part of a single download.
PowerShell to check what BizTalk Server 2013 Cumulative Updates are installed in your Servers with PowerShell: This is a simple script that allows you to configure the template name of the cumulative updates, that will change from version to version, and will give you the list of all BizTalk Server 2013 cumulative updates installed on your machine:
This is the list of BizTalk Server 2013 Cumulative Update installed in this machine: BTS2013LAB01
- Microsoft BizTalk Server 2013 CU1
- Microsoft BizTalk Server 2013 CU2

This is the list of BizTalk Server 2013 Adapter Pack Cumulative Update installed in this machine: BTS2013LAB01
- BizTalk Adapter Pack 2013 CU1
The sample script (the link to the full script is available at the end of this post):
#Name template for BizTalk Server CU's for BizTalk Server 2013 (normally they are "Microsoft BizTalk Server 2013 CU#")
$CUNameTemplate = 'Microsoft BizTalk Server 2013 CU'

#The Wow6432 registry entry indicates that you're running a 64-bit version of Windows.
#It will use this key for 32-bit applications that run on a 64-bit version of Windows.
$keyResults = Get-ChildItem -path HKLM:SOFTWAREWow6432NodeMicrosoftWindowsCurrentVersionUninstall -Recurse -ErrorAction SilentlyContinue | where { $_.Name -match $CUNameTemplate}

if($keyResults.Count -gt 0)
{
 write-host "This is the list of BizTalk Server 2013 Cumulative Update installed in this machine: $env:computername"
}
else
{
 write-host "There is the no BizTalk Server 2013 Cumulative Update installed in this machine: $env:computername"
}

foreach($keyItem in $keyResults)
{
 if ($keyItem.GetValue("DisplayName") -like "*$CUNameTemplate*")
 {
 write-host "-" $keyItem.GetValue("DisplayName").ToString().Substring(0,$keyItem.GetValue("DisplayName").ToString().IndexOf(" CU")+4)
 }
}

...

#Name template for BizTalk Server Adapter Pack CU's for BizTalk Server 2013 (normally they are "BizTalk Adapter Pack 2013 CU#")
$CUNameTemplate = 'BizTalk Adapter Pack 2013 CU'

#The Wow6432 registry entry indicates that you're running a 64-bit version of Windows.
#It will use this key for 32-bit applications that run on a 64-bit version of Windows.
$keyResults = Get-ChildItem -path HKLM:SOFTWAREWow6432NodeMicrosoftWindowsCurrentVersionUninstall -Recurse -ErrorAction SilentlyContinue | where { $_.Name -match $CUNameTemplate}

...
THIS SQL SCRIPT IS PROVIDED “AS IS”, WITHOUT WARRANTY OF ANY KIND.
 Check all BizTalk 2013 Cumulative Updates installed in server with PowerShell (3 KB)
Microsoft | TechNet Gallery
Author: Sandro Pereira
Sandro Pereira lives in Portugal and works as a consultant at DevScope. In the past years, he has been working on implementing Integration scenarios both on-premises and cloud for various clients, each with different scenarios from a technical point of view, size, and criticality, using Microsoft Azure, Microsoft BizTalk Server and different technologies like AS2, EDI, RosettaNet, SAP, TIBCO etc. He is a regular blogger, international speaker, and technical reviewer of several BizTalk books all focused on Integration. He is also the author of the book “BizTalk Mapping Patterns & Best Practices”. He has been awarded MVP since 2011 for his contributions to the integration community. View all posts by Sandro Pereira
