We all know that debatching should be done in the receive pipeline, I’ve yet to see any really good scenarios where you shouldn’t, but I know there is some (debatching in the orchestration can give you a huge performance loss in BizTalk).
So, I am the admin, and I rarely do development (after all, drag and drop development isn’t challenging enough for me).
I sometimes use BizTalk to help me do some jobs I’d rather not do manually. Like inserting something in a database if I have a million rows in an XML message, or if just want to play drag and drop with my kids. And I came into a case where debatching an XML file was essential for me and my kids in order to have some fun (the oldest 2 and 4 years, they need a little challenge). I looked at a few articles on the internet and none of them were really “easy to understand”. So I decided to make one on my own. Let’s just put this post in the “DevOps” category. In this example I’m using VS 2013 and BizTalk 2013 R2.
- Create a new BizTalk Project (I called mine “SimpleDebatching“) but you can name it anything you want, it won’t impact any other code in this tutorial
- Right click your project in the “Solution Explorer” and choose “Add” and “New item…“
- Click once on “Schema” and add a friendly name to it. I called mine “Orders“
- Rename the “Root” name into “Order“.
- Right click the root name “Order” and choose “Insert Schema Node” and “Child Field Element“
- Do step 5 a total of four times with the following names “orderId“, “orderDate“, “orderPrice” and “orderStatus“
- If you now open the schema we named “Orders” and expand all the elements it will look like this

- And now a pet on your back, you’re doing great
- Now that we’ve come so far we need to understand the meanings of an envelope, people will trick you and tell you some technical ways of it.. Don’t mind them. its like any envelope, it has something in it, one or multiple papers/records.
- In the “Solution Explorer” right click the project and choose “Add” and “New Item…“
- Again, click once on “Schema” and give it a friendly name. In this case I called it “OrdersEnvelope“
- The “Schema Editor” pops up and we can see the root name is… “root“.
- Rename the root name into “OrderEnvelope“
- Right click “OrderEnvelope” and choose “Insert Schema Node“, and choose “Child Record”
- Name this child record “Orders“
- Get a cup of Coffee…
- Right Click the node “Orders” and choose “Insert Schema Node“, and choose “Any Element“
- Now click once on the “<Schema>” and take a look at the “Properties” window
- Locate the option “Envelope” change this from “(Default)” to “Yes” (do this for the “OrdersEnvelope” schema)
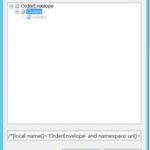
- Now go to the root node (OrderEnvelope) in the “OrdersEnvelope” schema and look at the “Properties” window again, find the “Body XPath“
- click the “magic/ellipse” button and drill till you see “Orders”
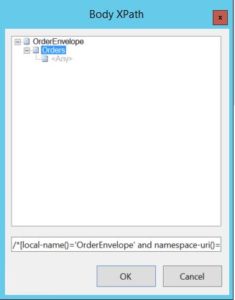
- Choose “Orders” and click “OK“.
- Pooof, and your schema “OrderEnvelope” is updated with the correct XPath
- Look at your self, and understand we still haven’t written one sentence of code..
- Go back to the “Solution Explorer” and right click the solution “SimpleDebatching“, choose “Add” and “New Item” and pick the “Receive Pipeline” name this “ReceiveAndDebatch“
- The Pipeline Component “drag and drop windows” appears.
- Expand the “Toolbox” windows and drag the “XML Disassembler” and drop it on the “Disassembler in the main window
- Click the newly added XML Disassembler and look at the properties window and find “Document Schema” click the ellipse button and locate your document schema “Orders”
- When you find this, click on it and hit the “Add” button, you will see the schema moving from the left window to the right
- Click “OK“
- Do the same with “Envelope Schema” but locate the “OrdersEnvelope” schema instaed
- Click “Add” and “OK“
- Now in order for us to deploy this code to BizTalk we need to do a few things
- Look at the “Solution Explorer” and right click the “Solution” Choose “Properties“
- In the “Properties window” that appear click “Deployment“
- Update the “Application Name” to “SimpleDebatching“
- Now we need to sign our assembly, so click the “Signing” and tick the box that says “Sign the assembly“
- From the drop down choose “<new…>” and create a new key
- Hit “CTRL+S” to save it
- Now back in the “Solution Explorer” right click it and choose “Deploy“
- Your code will now be deployed to your environment
- Open “BizTalk Administration Console” and locate your application “SimpleDebatching“
- Create a new Receive Port and name it “ReceiveDebatchPort“
- Create a receive location for this Receive Port and anme it “ReceiveDebatchLocation“
- Update the receive pipeline to your newly created recive pipeline “ReceiveAndDebatch“
- Create a new send port and name it “SendDebatch“
- Update the send pipeline to “XMLTransmit“
- Add a filter to your Receive Port by chooseing “BTS.ReceivePortName” and the value “ReceiveDebatchPort“
- Now restart your host instance and start the application.
- You can create a test message by generating an instance from the schema “OrdersEnvelope“
- Replace the “<any>” tag with a generated instance from the “Orders” schema (the more you add, the more records)
- Put the file in the in folder and see what happens.

So, you’ve done it, made a cool application, with drag and drop.. no coding.
Thanks for The help Erik Thue. 🙂 the best BT Dev in Bouvet