This is another in a series of posts I’m doing that cover some of the new ASP.NET MVC 3 features:
- Introducing Razor (July 2nd)
- New @model keyword in Razor (Oct 19th)
- Layouts with Razor (Oct 22nd)
- Server-Side Comments with Razor (Nov 12th)
- Razor’s @: and <text> syntax (Dec 15th)
- Implicit and Explicit code nuggets with Razor (Dec 16th)
- Layouts and Sections with Razor (Today)
In today’s post I’m going to go into more details about how Layout pages work with Razor. In particular, I’m going to cover how you can have multiple, non-contiguous, replaceable “sections” within a layout file – and enable views based on layouts to optionally “fill in” these different sections at runtime. The Razor syntax for doing this is clean and concise.
I’ll also show how you can dynamically check at runtime whether a particular layout section has been defined, and how you can provide alternate content (or even an alternate layout) in the event that a section isn’t specified within a view template. This provides a powerful and easy way to customize the UI of your site and make it clean and DRY from an implementation perspective.
What are Layouts?
You typically want to maintain a consistent look and feel across all of the pages within your web-site/application. ASP.NET 2.0 introduced the concept of “master pages” which helps enable this when using .aspx based pages or templates. Razor also supports this concept with a feature called “layouts” – which allow you to define a common site template, and then inherit its look and feel across all the views/pages on your site.
I previously discussed the basics of how layout files work with Razor in my ASP.NET MVC 3: Layouts with Razor blog post. Today’s post will go deeper and discuss how you can define multiple, non-contiguous, replaceable regions within a layout file that you can then optionally “fill in” at runtime.
Site Layout Scenario
Let’s look at how we can implement a common site layout scenario with ASP.NET MVC 3 and Razor. Specifically, we’ll implement some site UI where we have a common header and footer on all of our pages. We’ll also add a “sidebar” section to the right of our common site layout.
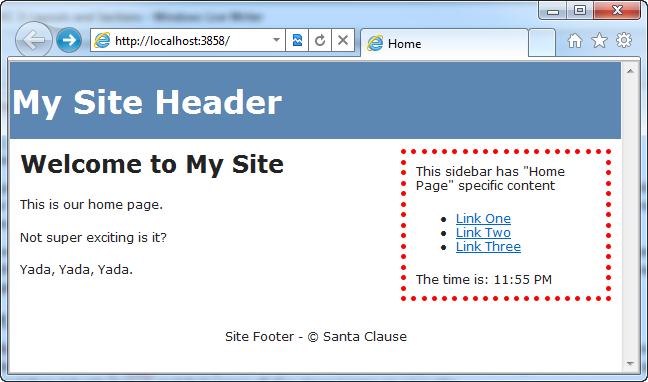
On some pages we’ll customize the SideBar to contain content specific to the page it is included on:

And on other pages (that do not have custom sidebar content) we will fall back and provide some “default content” to the sidebar:

We’ll use ASP.NET MVC 3 and Razor to enable this customization in a nice, clean way.
Below are some step-by-step tutorial instructions on how to build the above site with ASP.NET MVC 3 and Razor.
Part 1: Create a New Project with a Layout for the “Body” section
We’ll begin by using the “File->New Project” menu command within Visual Studio to create a new ASP.NET MVC 3 Project. We’ll create the new project using the “Empty” template option:

This will create a new project that has no default controllers in it:

Creating a HomeController
We will then right-click on the “Controllers” folder of our newly created project and choose the “Add->Controller” context menu command. This will bring up the “Add Controller” dialog:

We’ll name the new controller we create “HomeController”. When we click the “Add” button Visual Studio will add a HomeController class to our project with a default “Index” action method that returns a view:

We won’t need to write any Controller logic to implement this sample – so we’ll leave the default code as-is.
Creating a View Template
Our next step will be to implement the view template associated with the HomeController’s Index action method. To implement the view template, we will right-click within the “HomeController.Index()” method and select the “Add View” command to create a view template for our home page:

This will bring up the “Add View” dialog within Visual Studio.

We do not need to change any of the default settings within the above dialog (the name of the template was auto-populated to Index because we invoked the “Add View” context menu command within the Index method).
When we click the “Add” Button within the dialog, a Razor-based “Index.cshtml” view template will be added to the \Views\Home\ folder within our project. Let’s add some simple default static content to it:

Notice above how we don’t have an <html> or <body> section defined within our view template. This is because we are going to rely on a layout template to supply these elements and use it to define the common site layout and structure for our site (ensuring that it is consistent across all pages and URLs within the site).
Customizing our Layout File
Let’s open and customize the default “_Layout.cshtml” file that was automatically added to the \Views\Shared folder when we created our new project:

The default layout file (shown above) is pretty basic and simply outputs a title (if specified in either the Controller or the View template) and adds links to a stylesheet and jQuery. The call to “RenderBody()” indicates where the main body content of our Index.cshtml file will merged into the output sent back to the browser.
Let’s modify the Layout template to add a common header, footer and sidebar to the site:

We’ll then edit the “Site.css” file within the \Content folder of our project and add 4 CSS rules to it:

And now when we run the project and browse to the home “/” URL of our project we’ll see a page like below:

Notice how the content of the HomeController’s Index view template and the site’s Shared Layout template have been merged together into a single HTML response.
Below is what the HTML sent back from the server looks like:

Part 2: Adding a “SideBar” Section
Our site so far has a layout template that has only one “section” in it – what we call the main “body” section of the response.
Razor also supports the ability to add additional "named sections” to layout templates as well. These sections can be defined anywhere in the layout file (including within the <head> section of the HTML), and allow you to output dynamic content to multiple, non-contiguous, regions of the final response.
Defining the “SideBar” section in our Layout
Let’s update our Layout template to define an additional “SideBar” section of content that will be rendered within the <div id=”sidebar”> region of our HTML. We can do this by calling the RenderSection(string sectionName, bool required) helper method within our Layout.cshtml file like below:

The first parameter to the “RenderSection()” helper method specifies the name of the section we want to render at that location in the layout template. The second parameter is optional, and allows us to define whether the section we are rendering is required or not. If a section is “required”, then Razor will throw an error at runtime if that section is not implemented within a view template that is based on the layout file (which can make it easier to track down content errors). If a section is not required, then its presence within a view template is optional, and the above RenderSection() code will render nothing at runtime if it isn’t defined.
Now that we’ve made the above change to our layout file, let’s hit refresh in our browser and see what our Home page now looks like:

Notice how we currently have no content within our SideBar <div> – that is because the Index.cshtml view template doesn’t implement our new “SideBar” section yet.
Implementing the “SideBar” Section in our View Template
Let’s change our home-page so that it has a SideBar section that outputs some custom content. We can do that by opening up the Index.cshtml view template, and by adding a new “SiderBar” section to it. We’ll do this using Razor’s @section SectionName { } syntax:

We could have put our SideBar @section declaration anywhere within the view template. I think it looks cleaner when defined at the top or bottom of the file – but that is simply personal preference.
You can include any content or code you want within @section declarations. Notice above how I have a C# code nugget that outputs the current time at the bottom of the SideBar section. I could have also written code that used ASP.NET MVC’s HTML/AJAX helper methods and/or accessed any strongly-typed model objects passed to the Index.cshtml view template.
Now that we’ve made the above template changes, when we hit refresh in our browser again we’ll see that our SideBar content – that is specific to the Home Page of our site – is now included in the page response sent back from the server:

The SideBar section content has been merged into the proper location of the HTML response :

Part 3: Conditionally Detecting if a Layout Section Has Been Implemented
Razor provides the ability for you to conditionally check (from within a layout file) whether a section has been defined within a view template, and enables you to output an alternative response in the event that the section has not been defined. This provides a convenient way to specify default UI for optional layout sections.
Let’s modify our Layout file to take advantage of this capability. Below we are conditionally checking whether the “SideBar” section has been defined without the view template being rendered (using the IsSectionDefined() method), and if so we render the section. If the section has not been defined, then we now instead render some default content for the SideBar:

Note: You want to make sure you prefix calls to the RenderSection() helper method with a @ character – which will tell Razor to execute the HelperResult it returns and merge in the section content in the appropriate place of the output. Notice how we wrote @RenderSection(“SideBar”) above instead of just RenderSection(“SideBar”). Otherwise you’ll get an error.
Above we are simply rendering an inline static string (<p>Default SideBar Content</p>) if the section is not defined. A real-world site would more likely refactor this default content to be stored within a separate partial template (which we’d render using the Html.RenderPartial() helper method within the else block) or alternatively use the Html.Action() helper method within the else block to encapsulate both the logic and rendering of the default sidebar.
When we hit refresh on our home-page, we will still see the same custom SideBar content we had before. This is because we implemented the SideBar section within our Index.cshtml view template (and so our Layout rendered it):
Let’s now implement a “/Home/About” URL for our site by adding a new “About” action method to our HomeController:

The About() action method above simply renders a view back to the client when invoked. We can implement the corresponding view template for this action by right-clicking within the “About()” method and using the “Add View” menu command (like before) to create a new About.cshtml view template.
We’ll implement the About.cshtml view template like below. Notice that we are not defining a “SideBar” section within it:

When we browse the /Home/About URL we’ll see the content we supplied above in the main body section of our response, and the default SideBar content will rendered:
The layout file determined at runtime that a custom SideBar section wasn’t present in the About.cshtml view template, and instead rendered the default sidebar content.
One Last Tweak
Let’s suppose that at a later point we decide that instead of rendering default side-bar content, we just want to hide the side-bar entirely from pages that don’t have any custom sidebar content defined. We could implement this change simply by making a small modification to our layout so that the sidebar content (and its surrounding HTML chrome) is only rendered if the SideBar section is defined. The code to do this is below:

Razor is flexible enough so that we can make changes like this and not have to modify any of our view templates (nor make change any Controller logic changes) to accommodate this. We can instead make just this one modification to our Layout file and the rest happens cleanly. This type of flexibility makes Razor incredibly powerful and productive.
Summary
Razor’s layout capability enables you to define a common site template, and then inherit its look and feel across all the views/pages on your site.
Razor enables you to define multiple, non-contiguous, “sections” within layout templates that can be “filled-in” by view templates. The @section {} syntax for doing this is clean and concise. Razor also supports the ability to dynamically check at runtime whether a particular section has been defined, and to provide alternate content (or even an alternate layout) in the event that it isn’t specified. This provides a powerful and easy way to customize the UI of your site – and make it clean and DRY from an implementation perspective.
Hope this helps,
Scott
P.S. In addition to blogging, I am also now using Twitter for quick updates and to share links. Follow me at: twitter.com/scottgu