Recently, a client asked me for help rectifying some existing logic apps in their environment because their resource had left the company. Not only to rectify the project but to put it in a better shape and use all good best practices.
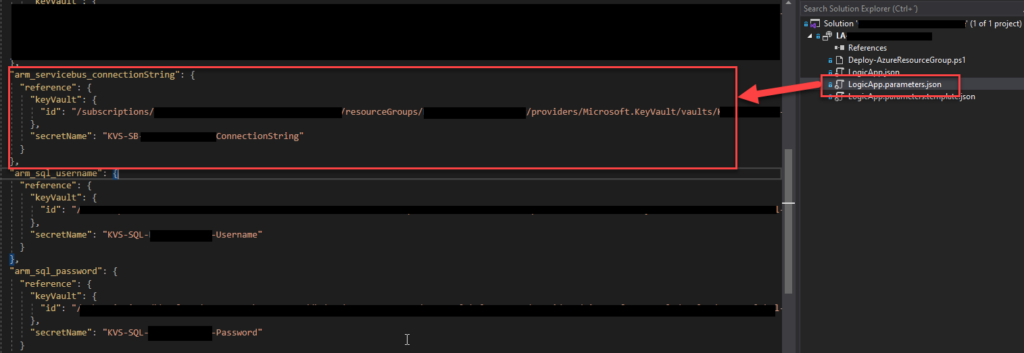
One of the tasks we decided to do was reference secrets in Key Vault for the deployment process, whether through CI/CD or directly through Visual Studio. We had administrator access to the Key Vault in the dev environment, so we were able to easily create those secrets and reference them in the Logic App parameter file, for example, an Azure Service Bus connection string. For those who are not aware, we can archive that by using the code below:
The problem was that when we tried to deploy the solution through Visual Studio, we got the following error:
Logic app visual studio deployment Multiple error occurred: Forbidden,Forbidden,Forbidden. Please see details.
Without any more detail. After some analysis, we realized that the number of Forbidden words in the messages matched the number of key vault secrets we were trying to reference. When we commented on them all and only left one, then we got an error message with more detail:
The secret of KeyVault parameter ‘name’ cannot be retrieved. Http status code: ‘Forbidden’. Error message: ‘Access denied to first party service. Caller: name=ARM;tid=;appid=… Vault:;location=’. Please see https://aka.ms/arm-keyvault for usage details.
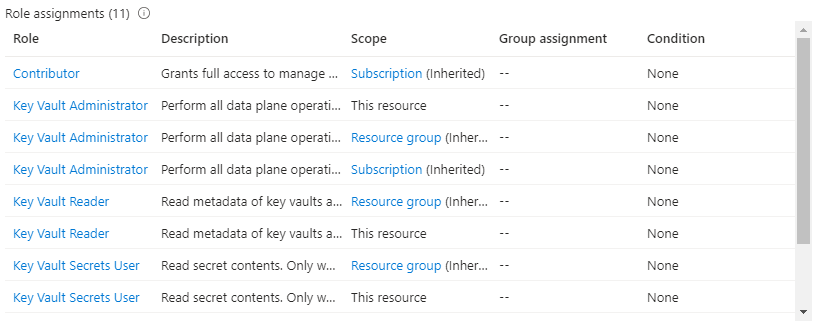
Initially, I thought that was a Key Vault access permission issue, even though I was a Key Vault administrator. However, sometimes, we also need some RBAC permission. In the end, I ended up giving Administrator, Reader, and Secret User permission access at the key vault, resource group, and subscription level:
Still, I was getting the same error!
Cause
When you are developing a Logic App Consumption, this is, in fact, an ARM template project and an ARM template deployment. So, when we reference a Key Vault secret in the LogicApp.parameters.json file, we are referencing a secure parameter that will be used during the ARM template deployment.
The problem is that to be able to access the key vault by the resource manager, you need to change the access policy to allow Azure Resource Manager for template deployment.
You can see this on the official documentation here:
When you need to pass a secure value (like a password) as a parameter during deployment, you can retrieve the value from an Azure Key Vault. To access the Key Vault when deploying Managed Applications, you must grant access to the Appliance Resource Provider service principal. The Managed Applications service uses this identity to run operations. To successfully retrieve a value from a Key Vault during deployment, the service principal must be able to access the Key Vault.
Solution
To solve this issue is quite very simple:
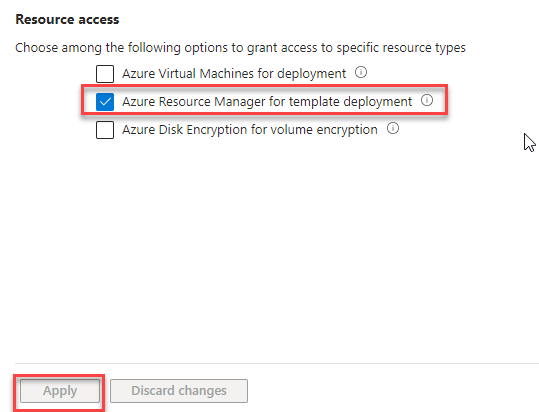
Sign in to the Azure Portal.
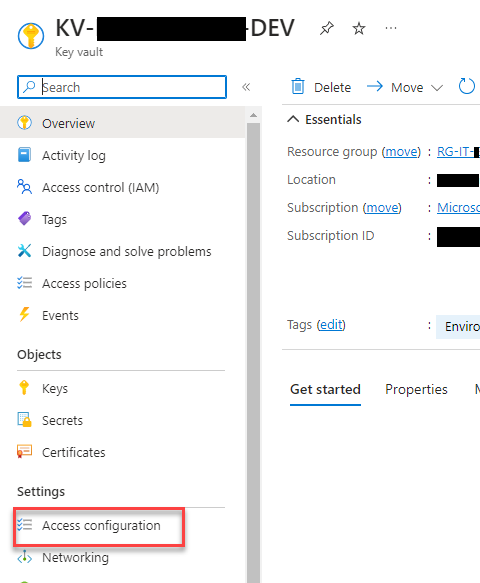
Open your key vault. Enter key vaults in the search box or select Key vaults.
On the Key Vault, select Access configuration under the Settings section
Select Azure Resource Manager for template deployment under Resource access. Then, select Apply.
Now, you will be able to successfully reference the Key Vault secure parameter and deploy the Logic App Consumption solution from Visual Studio.
Hope you find this helpful! So, if you liked the content or found it useful and want to help me write more, you can buy (or help me buy) my son a Star Wars Lego!
Author: Sandro Pereira
Sandro Pereira lives in Portugal and works as a consultant at DevScope. In the past years, he has been working on implementing Integration scenarios both on-premises and cloud for various clients, each with different scenarios from a technical point of view, size, and criticality, using Microsoft Azure, Microsoft BizTalk Server and different technologies like AS2, EDI, RosettaNet, SAP, TIBCO etc.
He is a regular blogger, international speaker, and technical reviewer of several BizTalk books all focused on Integration. He is also the author of the book “BizTalk Mapping Patterns & Best Practices”. He has been awarded MVP since 2011 for his contributions to the integration community.
View all posts by Sandro Pereira
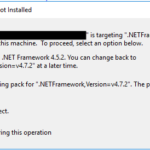
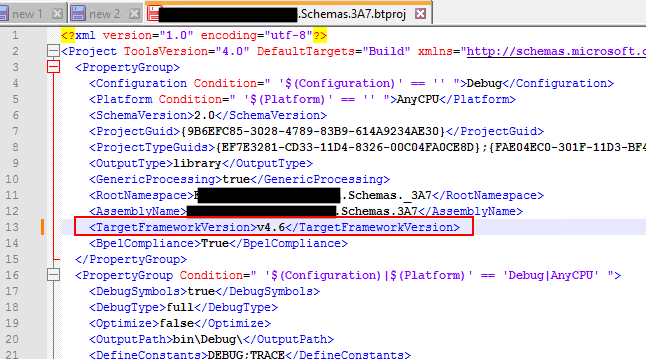
Yesterday while I was trying to configure a new BizTalk Server RosettaNet project in a client, I found a curious new error/issue while copying the BizTalk Server solution into the client development environment. After I copied the project to the development environment, I tried to open the BizTalk Server Visual Studio solution, and I got the following warning:
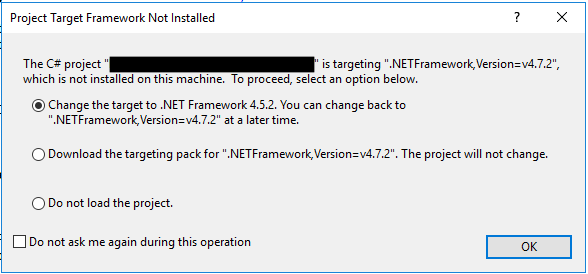
The C# project “ is targeting “.NETFramework, Version=v4.7.2”, which is not installed on this machine. To proceed, select an option below.
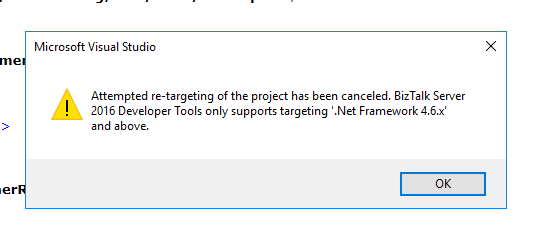
Knowing that we didn’t have .NET Framework 4.7.2, I chose the first option, but we endup getting the following error:
Attempted re-targeting of the project has been canceled. BizTalk Server 2016 Developer Tools only supports targeting ‘.Net.Framework 4.6.x’ and above.
Cause
This error/issue first happened because I thought our environment (client environment) was already using BizTalk Server 2020, and I developed the project locally using that version. BizTalk Server 2020 uses .NET Framework 4.7.3 or above by default. This was not the case. Our environment is still BizTalk Server 2016, and that is why when I tried to open the BizTalk Server Visual Studio solution, it asked me to re-target the project.
Normally, we don’t have a problem doing this if we can move from a previous version to a higher version, like, for example, from BizTalk Server 2016 to BizTalk Server 2020. In this case, it was a downgrade, and I don’t really know why he presented me with 4.5.2 instead of 4.6, which is the “official” version of BizTalk Server 2016.
Nevertheless, I was not able to do it or workaround this directly on Visual Studio.
Solution
To solve this issue is quite very simple:
Go to the project folder and open the *.btproj file with Notepad or Notepad++
And change the TargetFrameworkVersion from 4.7.2 to 4.6.
After these steps, I was able to open the BizTalk Server Visual Studio solution in our dev environment.
Hope you find this helpful! So, if you liked the content or found it useful and want to help me write more, you can buy (or help me buy) my son a Star Wars Lego!
Author: Sandro Pereira
Sandro Pereira lives in Portugal and works as a consultant at DevScope. In the past years, he has been working on implementing Integration scenarios both on-premises and cloud for various clients, each with different scenarios from a technical point of view, size, and criticality, using Microsoft Azure, Microsoft BizTalk Server and different technologies like AS2, EDI, RosettaNet, SAP, TIBCO etc.
He is a regular blogger, international speaker, and technical reviewer of several BizTalk books all focused on Integration. He is also the author of the book “BizTalk Mapping Patterns & Best Practices”. He has been awarded MVP since 2011 for his contributions to the integration community.
View all posts by Sandro Pereira
Today while I was developing a new BizTalk Server solution that communicates with the Oracle database, I encountered a familiar issue that I forgot to document in the past:
Microsoft.ServiceModel.Channels.Common.MetadataException: The assembly required for type mapping not found.
That forced me to once again lose time not only to remember but to find how I could solve this.
Cause
This error happens when you try to call an Oracle Procedure, function, or package that contains User-Defined Types or UDTs. The UDTs can be present in the following artifacts:
Interface tables and interface views containing UDT columns.
Database tables and views containing UDT columns.
Packages, stored procedures, and functions containing UDT parameters.
Oracle UDTs help represent complex entities as a “single” object that can be shared among the applications.
BizTalk Server supports Oracle UDTs, but unlike what happens with SQL Server, which natively supports these types, in Oracle, we need to configure some more properties and generate a UDT DLL.
When this error occurs, two things may happen or maybe the reason:
You forgot to configure, in the Schema generation, the following properties:
GeneratedUserTypesAssemblyFilePath
GeneratedUserTypesAssemblyKeyFilePath
Or you forgot in runtime (aka receive location or send port) to configure the following property:
userAssembliesLoadPath
Solution
To solve this issue, we need to guarantee to perform the following steps:
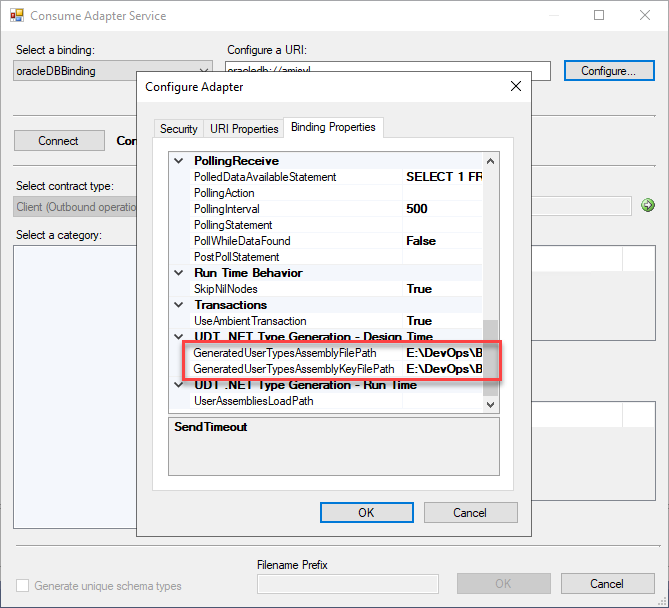
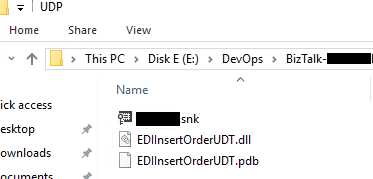
It is necessary to create a signed assembly (DLL) of the User-Defined Types (UDTs) created in Oracle and that correspond to those interpreted by the WCF-Oracle Adapter. To do this, when creating the schemas from the Consume Adapter Service option, these assemblies must be created specifying:
On the GeneratedUserTypesAssemblyFilePath property, we need to provide a full path and name of the DLL that the wizard will create for us.
And on the GeneratedUserTypesAssemblyKeyFilePath property, the strong name key (.snk) path that the wizard will use to sign the DLL.
Both these properties are present in the UDT .NET Type Generation – Design Time section of the Binding Properties.
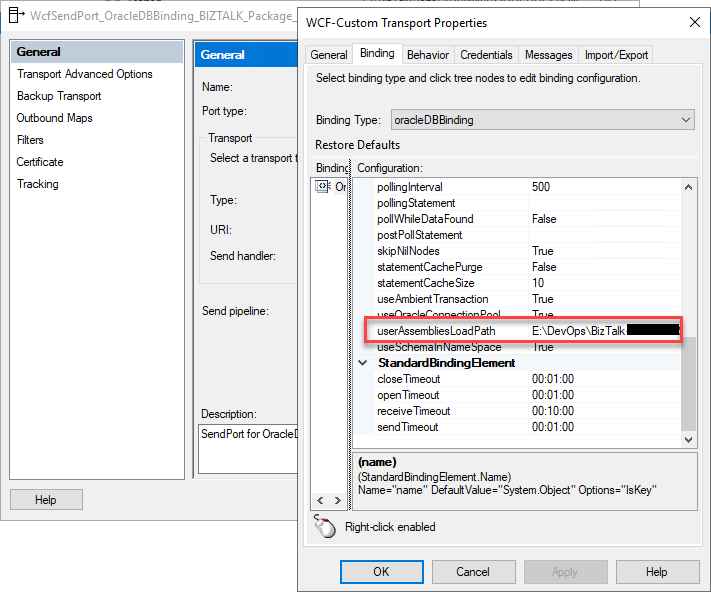
Once again, this will create for us a UDT DLL on the path we define and that we need to use in runtime:
Once we deploy our schemas and create the receive location or send port, we then need to make sure that we configure the following property with the path to the UDT DLL:
userAssembliesLoadPath
Notice: even if you deploy the UDT DLL to GAC (what is advisable), you still need to configure the path to the UDT DLL in this property,
After these steps, you can successfully communicate with Oracle using an Oracle Procedure, function, or package that contains User-Defined Types.
Hope you find this helpful! So, if you liked the content or found it useful and want to help me write more, you can buy (or help me buy) my son a Star Wars Lego!
Author: Sandro Pereira
Sandro Pereira lives in Portugal and works as a consultant at DevScope. In the past years, he has been working on implementing Integration scenarios both on-premises and cloud for various clients, each with different scenarios from a technical point of view, size, and criticality, using Microsoft Azure, Microsoft BizTalk Server and different technologies like AS2, EDI, RosettaNet, SAP, TIBCO etc.
He is a regular blogger, international speaker, and technical reviewer of several BizTalk books all focused on Integration. He is also the author of the book “BizTalk Mapping Patterns & Best Practices”. He has been awarded MVP since 2011 for his contributions to the integration community.
View all posts by Sandro Pereira
A few days ago, Luis Rigueira created a Kusto query to identify all Logic Apps Consumptions that use SQL V1 actions and triggers that will soon be deprecated (end of March 2024). The query also tries to identify all actions that are using those actions/triggers. This query actually works decently if a Logic App has actions or triggers in the first level (not inside if, switch, scope’s, and do on), but if we have Logic App with nested actions, which is quite common, then that query tries as a best effort to identify those actions – it will identify all Logic Apps, but it will not provide the name of the actions. The reason why is because it is quite difficult to loop to all the logic app definitions (JSON) with a Kusto query.
Don’t get me wrong. That query is awesome for you to identify all Logic Apps that we need to address to fix those actions. Now, if we need to identify all actions with that “problem” to estimate the work involved better, then that Kusto query will not be the best option. To solve this problem, we decided to create a PowerShell script that not only identifies all Logic Apps Consumption using SQL V1 actions and triggers but also identifies the names of those actions and triggers for you, providing a good report that you can use to plan and estimate your work.
# Function to extract actions recursively
function Get-ActionsAndTriggers {
    param (
        $node
    )
    $actionsAndTriggers = @()
    foreach ($key in $node.psobject.Properties.Name) {
        if ($node.$key.type -eq "ApiConnection") {
            if ($node.$key.inputs.path -like "*/datasets/default*" -and $node.$key.inputs.host.connection.name -like "*sql*") {
                $actionsAndTriggers += $key
            }
        } elseif ($node.$key -is [System.Management.Automation.PSCustomObject]) {
            $actionsAndTriggers += Get-ActionsAndTriggers -node $node.$key
        }
    }
    return $actionsAndTriggers
}

# Retrieve all Logic Apps within the subscription
$logicApps = Get-AzResource -ResourceType Microsoft.Logic/workflows

# Iterate through each Logic App and extract actions and triggers
foreach ($logicApp in $logicApps) {
    # Retrieve Logic App definition
    $logicAppDefinition = Get-AzResource -ResourceId $logicApp.ResourceId -ExpandProperties

    # Extract actions and triggers from the Logic App definition
    $allActionsAndTriggers = Get-ActionsAndTriggers -node $logicAppDefinition.Properties.Definition.triggers
    $allActionsAndTriggers += Get-ActionsAndTriggers -node $logicAppDefinition.Properties.Definition.actions

    # Display the Logic App name if filtered actions and triggers were found
    if ($allActionsAndTriggers.Count -gt 0) {
        Write-Host "Logic App: $($logicApp.Name) - RG: $($logicApp.ResourceGroupName)" -ForegroundColor Red
        # Display the list of filtered actions and triggers
        Write-Host "Filtered Actions and Triggers:"
        $allActionsAndTriggers
        Write-Host ""
    }
}
The great thing about this script is that it also identifies all nested actions (actions inside other actions like If, Scopes, Switch, and so on)
If you are wondering, can we do the same and identify all using SQL V2 actions and triggers? Don’t worry, we have your back covered, check the download section. In fact, with small changes to this script you can use for all types of connectors.
Download
THESE COMPONENTS ARE PROVIDED “AS IS” WITHOUT WARRANTY OF ANY KIND.
You can download the PowerShell script to identify all SQL V1 actions and triggers inside Logic Apps Consumption from GitHub here:
If you want to identify SQL V2 actions and triggers, then download this script from GitHub:
Huge thanks to Luis Rigueira for working with me on these scripts.
Hope you find this helpful! So, if you liked the content or found it useful and want to help me write more, you can help us buy a Star Wars Lego for my son!
Author: Sandro Pereira
Sandro Pereira lives in Portugal and works as a consultant at DevScope. In the past years, he has been working on implementing Integration scenarios both on-premises and cloud for various clients, each with different scenarios from a technical point of view, size, and criticality, using Microsoft Azure, Microsoft BizTalk Server and different technologies like AS2, EDI, RosettaNet, SAP, TIBCO etc.
He is a regular blogger, international speaker, and technical reviewer of several BizTalk books all focused on Integration. He is also the author of the book “BizTalk Mapping Patterns & Best Practices”. He has been awarded MVP since 2011 for his contributions to the integration community.
View all posts by Sandro Pereira
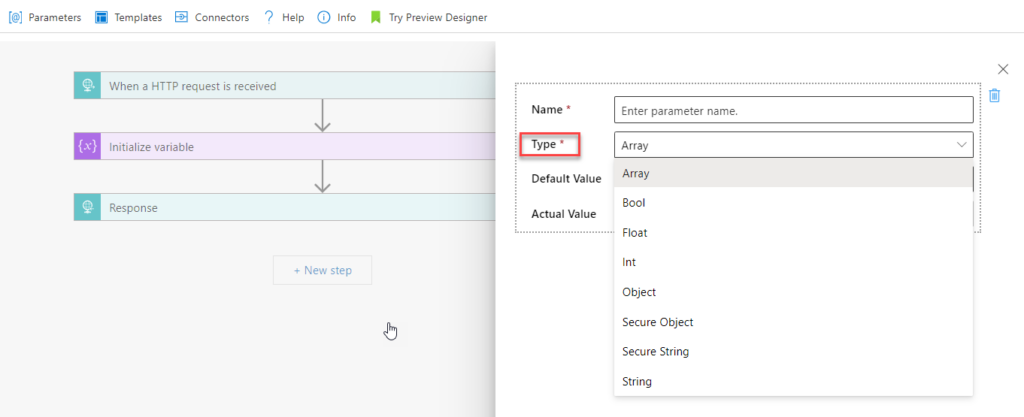
In Azure Logic Apps, you can abstract values that might change in workflows across development, test, and production environments by defining parameters. A Logic App parameter stores values that can be reused throughout a Logic App workflow. These parameters allow for a more flexible and maintainable configuration of logic apps, making it easier to update values without changing the actual workflow’s logic.
Parameters can store various types of data, such as strings, secure strings, boolean, arrays, or any other data that might need to be used multiple times within the Logic App or may change based on the environment (development, test, production, etc.). They can also be defined at deployment time using CI/CD pipelines.
By using parameters, you can easily update these values in one place without needing to edit the logic in multiple actions or triggers throughout the app.
In practice, you define parameters in the Logic App’s definition and can then use them in expressions or directly in actions throughout the app. When the Logic App is deployed or executed, these parameters are evaluated and used accordingly. This approach helps you manage and deploy Logic Apps across different environments, making the workflows more dynamic and easier to configure.
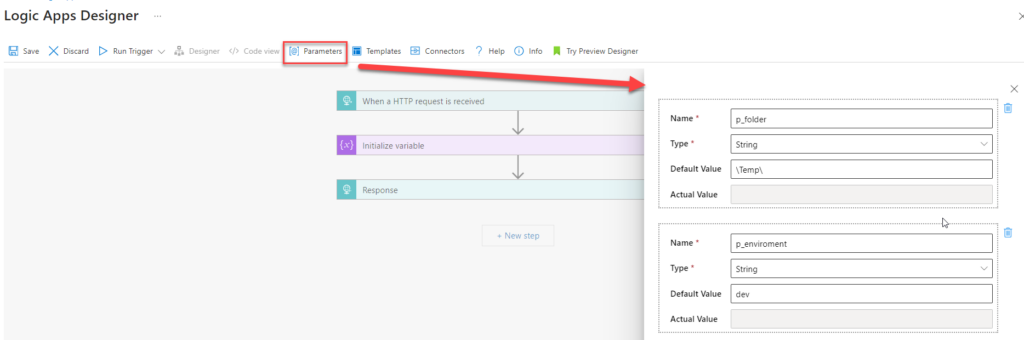
The funny fact about parameters is that they are probably the only Logic App “component” that doesn’t have a size limit regarding the name. For example:
Logic App Consumption name has a maximum limit of 80 characters.
Logic App Standard Workflow name has a maximum limit of 43 characters
A trigger or action name has a maximum limit of 80 characters.
and so on.
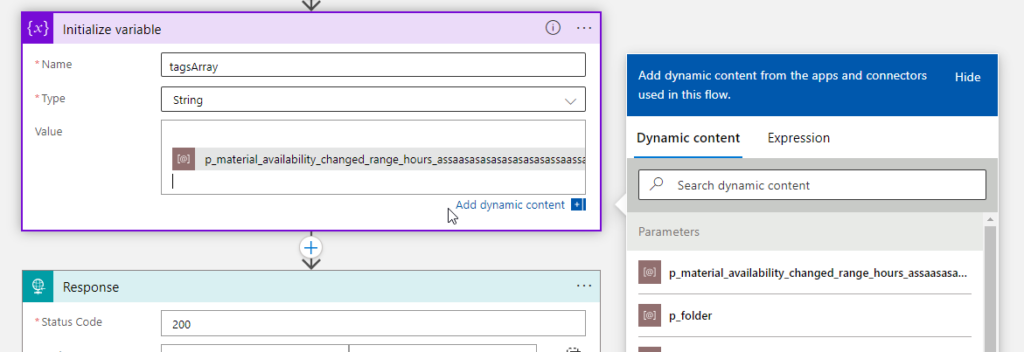
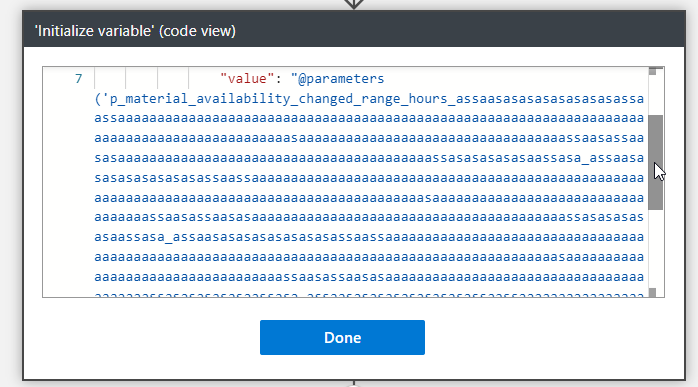
But the Logic App parameter name is unlimited! To prove that and for fun, I have created a parameter with this name:
To be honest, I think this is crazy! They should fix this and set up a limit because giving that amount of power to developers (and I’m adeveloper, too) is insane, we can do some nasty stuff!
To lazy to read? We’ve got you covered! Check out our video version of this content!
Hope you find this helpful! If you enjoyed the content or found it useful and wish to support our efforts to create more, you can contribute towards purchasing a Star Wars Lego for my son!
Author: Sandro Pereira
Sandro Pereira lives in Portugal and works as a consultant at DevScope. In the past years, he has been working on implementing Integration scenarios both on-premises and cloud for various clients, each with different scenarios from a technical point of view, size, and criticality, using Microsoft Azure, Microsoft BizTalk Server and different technologies like AS2, EDI, RosettaNet, SAP, TIBCO etc.
He is a regular blogger, international speaker, and technical reviewer of several BizTalk books all focused on Integration. He is also the author of the book “BizTalk Mapping Patterns & Best Practices”. He has been awarded MVP since 2011 for his contributions to the integration community.
View all posts by Sandro Pereira
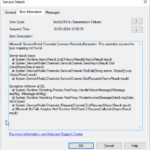
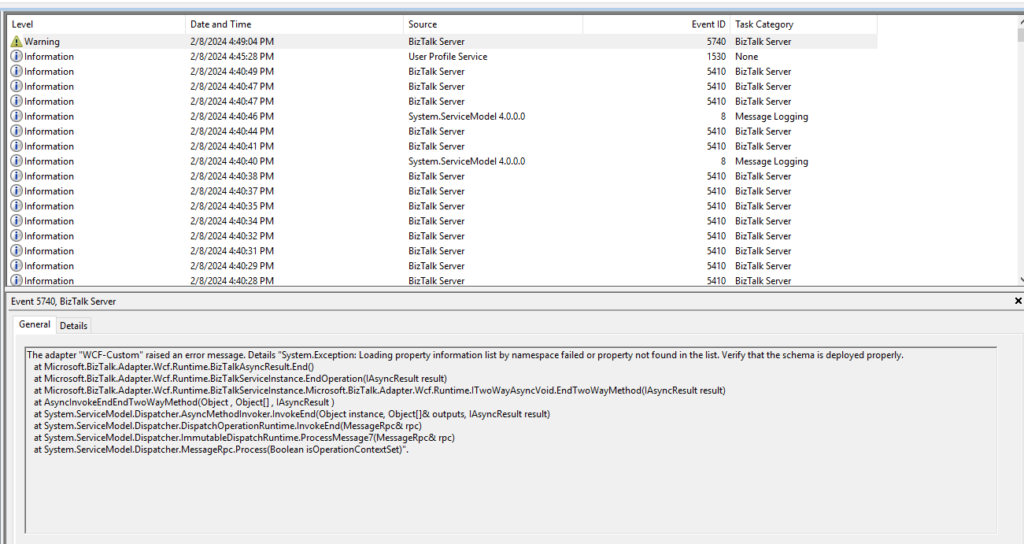
A client reported to me an error that we were getting in our BizTalk Server production environment this week. We had deployed a new orchestration and a new SAP receive port to handle a new partner, something we had done several times with success, but this time, we were getting the following warning each time we sent a message from SAP to BizTalk Server:
The adapter “WCF-Custom” raised an error message. Details “System.Exception: Loading property information list by namespace failed or property not found in the list. Verify that the schema is deployed properly.
at Microsoft.BizTalk.Adapter.Wcf.Runtime.BizTalkAsyncResult.End() at Microsoft.BizTalk.Adapter.Wcf.Runtime.BizTalkServiceInstance.EndOperation(IAsyncResult result) at Microsoft.BizTalk.Adapter.Wcf.Runtime.BizTalkServiceInstance.Microsoft.BizTalk.Adapter.Wcf.Runtime.ITwoWayAsyncVoid.EndTwoWayMethod(IAsyncResult result) at AsyncInvokeEndEndTwoWayMethod(Object , Object[] , IAsyncResult ) at System.ServiceModel.Dispatcher.AsyncMethodInvoker.InvokeEnd(Object instance, Object[]& outputs, IAsyncResult result) at System.ServiceModel.Dispatcher.DispatchOperationRuntime.InvokeEnd(MessageRpc& rpc) at System.ServiceModel.Dispatcher.ImmutableDispatchRuntime.ProcessMessage7(MessageRpc& rpc) at System.ServiceModel.Dispatcher.MessageRpc.Process(Boolean isOperationContextSet)”.
First, it was strange to be logged as a warning since the BizTalk Server did not receive or process the message.
Also, the message can be misleading because the “error” message says Verify that the schema is deployed properly. These types of errors typically indicate that the schema or specific schema versions are not deployed in the environment, although when that happens, the error message clearly specifies the schema name and version, which is not the case in this error message.
Cause
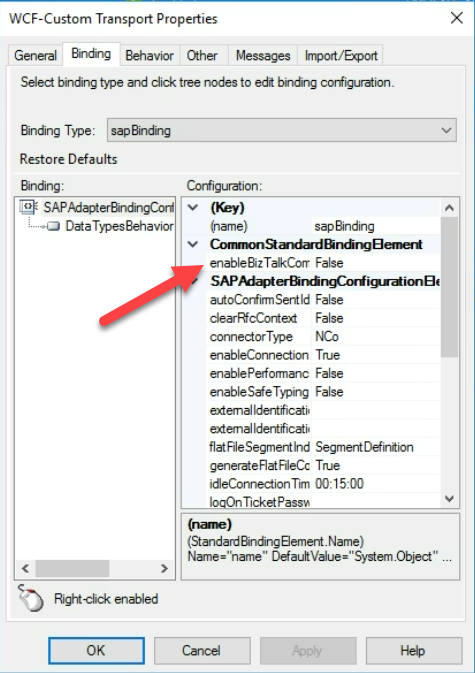
Official documentation states that the following exception is encountered while receiving an IDOC with the EnableBizTalkCompatibilityMode binding property set to true. And if the binding property EnableBizTalkCompatibilityMode is set to true, you must add the BizTalk property schema DLL for the SAP adapter as a resource in your BizTalk application, that is, the application in which your project is deployed.
However, our receive location didn’t have the EnableBizTalkCompatibilityMode set to true. Instead, it was set to false.
With a lack of better ideas, we decided to try to apply the same solution and add the BizTalk property schema DLL for the SAP adapter as a resource in your BizTalk application, and it solved all of our problems,
Solution
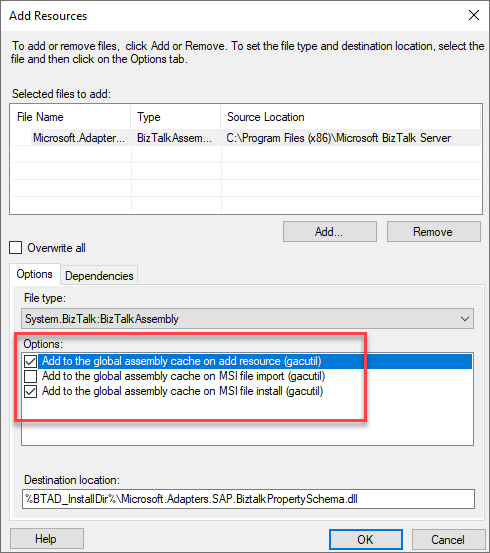
So, to solve this issue, we need to add BizTalk property schema DLL for the SAP adapter called Microsoft.Adapters.SAP.BiztalkPropertySchema.dll as a resource in our BizTalk application. This DLL can be found Microsoft BizTalk Adapter Pack folder that normally is under:
: Program FilesMicrosoft BizTalk Adapter Packbin
or in BizTalk Server 2020 under:
:Program Files (x86)Microsoft BizTalk Server
You must perform the following tasks to add this assembly as a resource in your BizTalk application:
Start the BizTalk Server Administration console.
In the console tree, expand BizTalk Group, expand Applications, and then the application to which you want to add a BizTalk assembly.
Expand Applications and the application to which you want to add a BizTalk assembly.
Right-click Resources, point to Add, and then click BizTalk Assemblies.
Click Add, navigate to the folder containing the BizTalk assembly file, select the BizTalk assembly file, and then click Open.
In Options, specify the options for installing the BizTalk assembly to the GAC, and then click OK.
Hope you find this helpful! So, if you liked the content or found it useful and want to help me write more, you can buy (or help me buy) my son a Star Wars Lego!
Author: Sandro Pereira
Sandro Pereira lives in Portugal and works as a consultant at DevScope. In the past years, he has been working on implementing Integration scenarios both on-premises and cloud for various clients, each with different scenarios from a technical point of view, size, and criticality, using Microsoft Azure, Microsoft BizTalk Server and different technologies like AS2, EDI, RosettaNet, SAP, TIBCO etc.
He is a regular blogger, international speaker, and technical reviewer of several BizTalk books all focused on Integration. He is also the author of the book “BizTalk Mapping Patterns & Best Practices”. He has been awarded MVP since 2011 for his contributions to the integration community.
View all posts by Sandro Pereira
Another day, another BizTalk Server Pipeline Component! Today, I decided to release a brand new component called the Remove XML Empty Nodes Pipeline Component.
For those who aren’t familiar with it, the BizTalk Pipeline Components Extensions Utility Pack project is a set of custom pipeline components (libraries) with several custom pipeline components that can be used in receiving and sending pipelines. Those pipeline components provide extensions of BizTalk’s out-of-the-box pipeline capabilities.
Remove XML Empty Nodes Pipeline Component
As the name mentions, the Remove XML Empty Nodes Pipeline Component is a pipeline component that can be used to remove empty nodes present in an XML message. You can use this component in any stage of a receive or send pipeline.
This component has a single property that requires you to setup:
DisableRemoveBOM (boolean): This allows you to enable or disable the process of removing empty nodes from an XML message.
How to install it
As always, you just need to add these DLLs on the Pipeline Components folder that in BizTalk Server 2020 is by default:
Like all previous, to use the pipeline component, I recommend you create generic or several generic pipelines that can be reused by all your applications and add this pipeline component in any required stage of a send or receive pipeline.
Download
THIS COMPONENT IS PROVIDED “AS IS” WITHOUT WARRANTY OF ANY KIND.
You can download the Remove XML Empty Nodes Pipeline Component from GitHub here:
Hope you find this helpful! So, if you liked the content or found it useful and want to help me write more, you can help us buy a Star Wars Lego for Sandro’s son!
Author: Sandro Pereira
Sandro Pereira lives in Portugal and works as a consultant at DevScope. In the past years, he has been working on implementing Integration scenarios both on-premises and cloud for various clients, each with different scenarios from a technical point of view, size, and criticality, using Microsoft Azure, Microsoft BizTalk Server and different technologies like AS2, EDI, RosettaNet, SAP, TIBCO etc.
He is a regular blogger, international speaker, and technical reviewer of several BizTalk books all focused on Integration. He is also the author of the book “BizTalk Mapping Patterns & Best Practices”. He has been awarded MVP since 2011 for his contributions to the integration community.
View all posts by Sandro Pereira
Time to get back to BizTalk Server and publish new resources on this amazing product and also return to one of my old pet projects: the BizTalk Pipeline Components Extensions Utility Pack.
Today, I decided to create a brand new component called the Send File To a Date-Based Structure Encoder Pipeline Component.
For those who aren’t familiar with it, the BizTalk Pipeline Components Extensions Utility Pack project is a set of custom pipeline components (libraries) with several custom pipeline components that can be used in receiving and sending pipelines. Those pipeline components provide extensions of BizTalk’s out-of-the-box pipeline capabilities.
Send File To a Date-Based Structure Encoder Pipeline Component
The Send File To a Date-Based Structure Encoder Pipeline Component is a pipeline component that can be used in a send pipeline, as the name mentioned inside the Encode stage, and it allows you to send an outbound file to a dynamic folder path organized by date tree:
yyyyMMdd
In other words, you will define the base path on the adapter URI, and then this component will use that base path to add a dynamic structure inside that path based on the date.
This component doesn’t require any property configuration.
How to install it
As always, you just need to add these DLLs on the Pipeline Components folder that in BizTalk Server 2020 is by default:
Like all previous, to use the pipeline component, I recommend you create generic or several generic pipelines that can be reused by all your applications and add the pipeline component in the Encode stage. The component can be used only on the send pipelines.
Download
THIS COMPONENT IS PROVIDED “AS IS” WITHOUT WARRANTY OF ANY KIND.
You can download Send File To a Date-Based Structure Encoder Pipeline Component from GitHub here:
Hope you find this helpful! So, if you liked the content or found it useful and want to help me write more, you can help us buy a Star Wars Lego for Sandro’s son!
Author: Sandro Pereira
Sandro Pereira lives in Portugal and works as a consultant at DevScope. In the past years, he has been working on implementing Integration scenarios both on-premises and cloud for various clients, each with different scenarios from a technical point of view, size, and criticality, using Microsoft Azure, Microsoft BizTalk Server and different technologies like AS2, EDI, RosettaNet, SAP, TIBCO etc.
He is a regular blogger, international speaker, and technical reviewer of several BizTalk books all focused on Integration. He is also the author of the book “BizTalk Mapping Patterns & Best Practices”. He has been awarded MVP since 2011 for his contributions to the integration community.
View all posts by Sandro Pereira
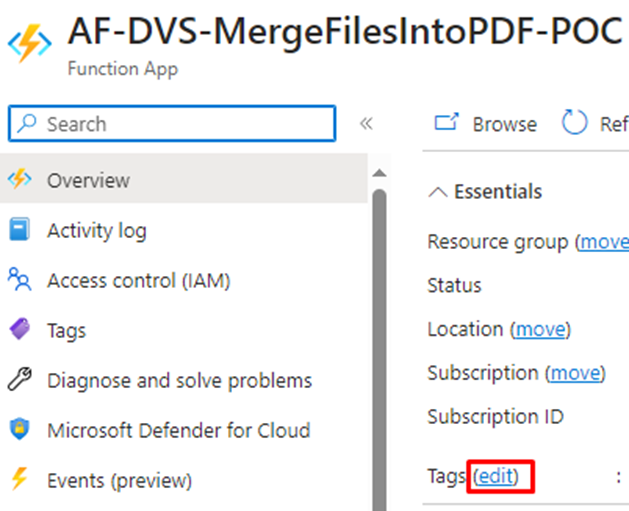
Have you ever wondered how to add tags to yourFunction App through Visual Studio?
Let’s break it down, but first, here’s a quick overview of how you would do it in the Azure Portal:
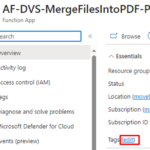
On your Function App overview page, under the Essentials information on the left, you’ll find “Tags” with an “Edit” button next to it.
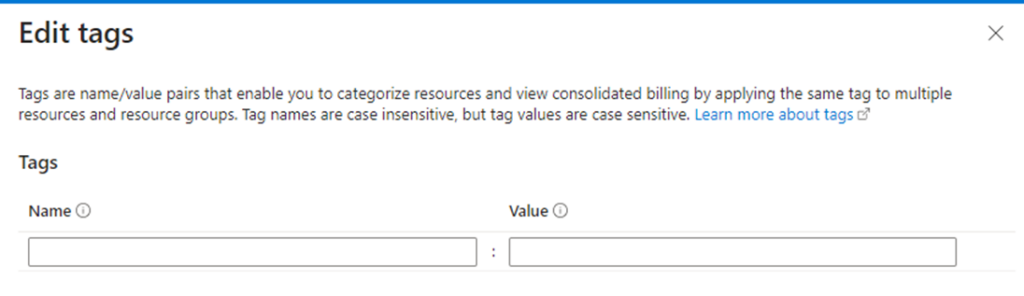
Clicking on it allows you to add new tags to your function app. These tags essentially function as meta tags, consisting of key and value pairs, such as Name and Value.
But why do I need tags? You might be wondering.
Overall, tags offer a flexible and customizable way to manage and govern resources in Azure, enabling better organization, cost management, monitoring, and governance across your environment.
Organization and Categorization: Tags allow you to categorize and organize resources based on different criteria, such as department, project, environment (e.g., production, development), or cost center. This makes it easier to locate and manage resources, especially in larger deployments with numerous resources.
Cost Management: Tags can be used for cost allocation and tracking. By assigning tags to resources, you can easily identify the costs associated with specific projects, teams, or departments. This helps in budgeting, forecasting, and optimizing resource usage to control costs effectively.
Monitoring and Reporting: Tags provide metadata that can be used for monitoring and reporting purposes. You can use tags to filter and aggregate data in monitoring tools, allowing you to gain insights into resource usage, performance, and operational trends across different categories.
Access Control and Governance: Tags can also be leveraged for access control and governance purposes. By tagging resources based on their sensitivity, compliance requirements, or ownership, you can enforce policies, permissions, and compliance standards more effectively.
Now that we already describe the importance of tags and how you can add them from the Azure Portal, let’s dive into it with Visual Studio:
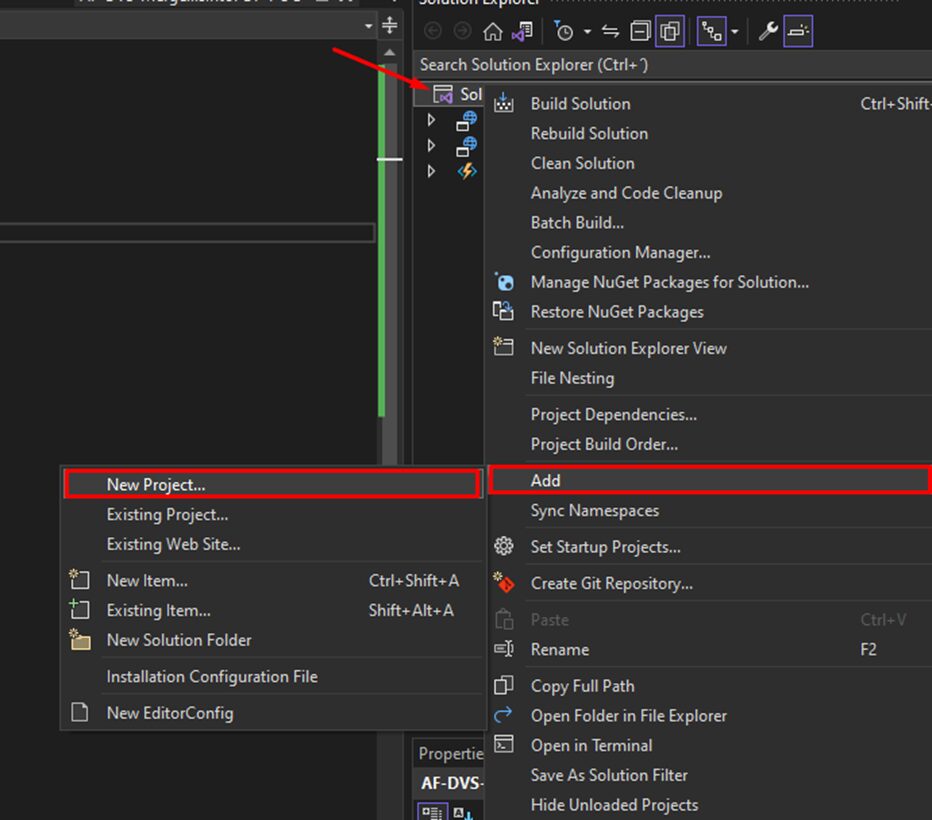
After you’ve published your Azure Function, or if you’re working with an existing published one, head over to the Solution Explorer and right-click on your solution.
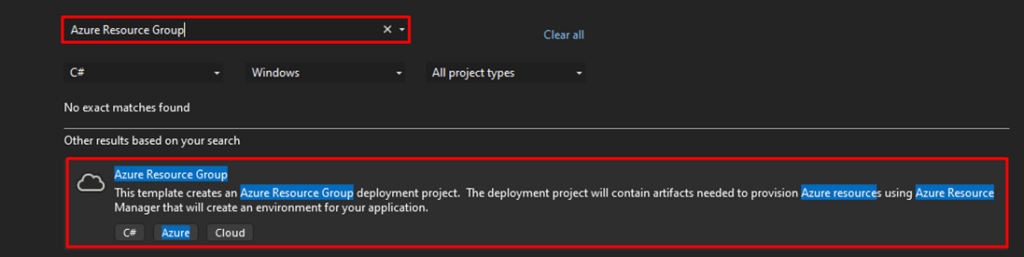
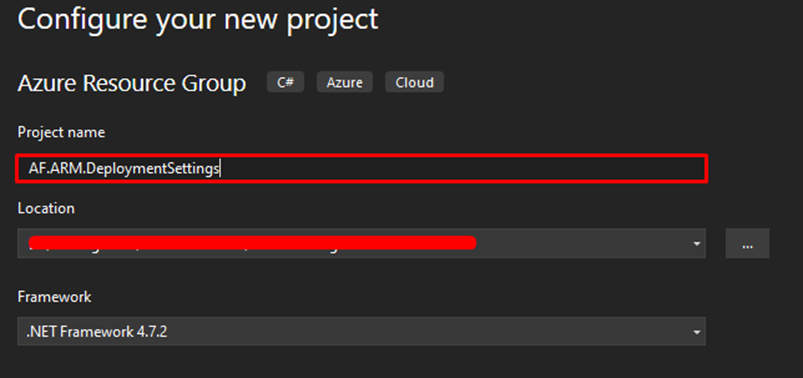
From there, go to Add -> New Project. Now, search for Azure Resource Group and give it a double click.
You’ll be prompted to name your project. You can leave the location as is since it’s the project you’re currently working on. Click on Create once you’re done.
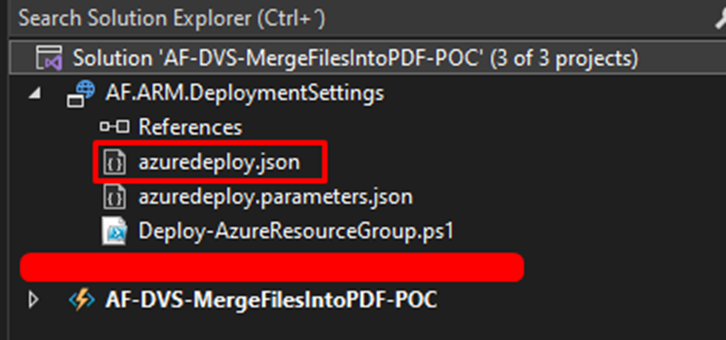
Now, in the Solution Explorer, you’ll spot a new project. Inside, you’ll find two .json files:
azuredeploy.json
azuredeploy.parameters.json
The file we’re interested in is azuredeploy.json. Double-click on it and replace its content with the provided JSON. Don’t forget to customize it with the tags you need and also your Function App Name. For now, let’s use these tags for our proof of concept:
Back in the Solution Explorer, right-click on the project you’ve just created and select Deploy -> New.
You’ll then need to choose your subscription and resource group. Finally, hit Deploy.
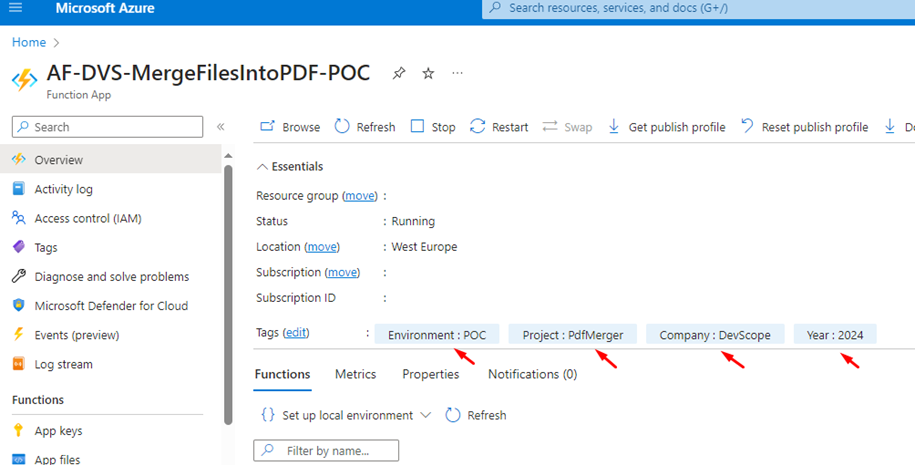
Once the deployment finishes smoothly without any errors, it’s time to inspect your Function App. You’ll notice that all your tags are now displayed on the Function App overview page.
Adding tags to your function app through Visual Studio provides a streamlined way to organize, manage, and govern your resources in Azure by categorizing resources based on criteria such as environment, project, company, etc.
Tags facilitate easier navigation and management, particularly in complex deployments. Moreover, tags play a crucial role in cost allocation, monitoring, reporting, and access control, offering valuable insights and enhancing governance across your environment.
While both methods, Visual Studio and the Azure Portal, offer ways to manage tags for resources like functionapps, for simple solutions that don’t require having multiple environments, there are certain advantages to using VisualStudio for this task:
Automation and Consistency: Visual Studio allows you to automate the deployment of resources along with their tags using Infrastructure as Code (IaC) principles. This ensures consistency across deployments and reduces the chance of human error compared to manually adding tags in the Azure Portal.
Version Control: When managing your Azure resources through Visual Studio, you can maintain version control over your infrastructure code. This means you can track changes to your tags along with other resource configurations, making it easier to revert to previous versions if needed.
Integration with Development Workflow: For teams that primarily work within Visual Studio for development tasks, integrating tag management into the development workflow streamlines processes. Developers can manage both code and resource configurations in a unified environment, enhancing collaboration and efficiency.
Scalability: Visual Studio is well-suited for managing tags across multiple resources or environments. With the ability to define and deploy resource templates containing tags programmatically, scaling tag management becomes more manageable, especially in large-scale deployments.
Consolidated Management: Using Visual Studio for tag management allows you to centralize the configuration of tags alongside other resource settings. This consolidated approach simplifies overall resource management, providing a single interface for configuring and deploying resources and their associated tags.
It is important to note that the choice between VisualStudio and the Azure Portal ultimately depends on your specific requirements, preferences, and existing workflows. While Visual Studio offers certain advantages for tag management, the Azure Portal provides a user-friendly interface that may be more accessible for simple or ad-hoc tag assignments. This way, organizations should evaluate their needs and capabilities to find the most suitable approach for managing tags in their Azure environment.
Of course, in the end, the best solution is to use CI/CD pipelines to accomplish this task.
Hope you find this helpful! If you enjoyed the content or found it useful and wish to support our efforts to create more, you can contribute towards purchasing a Star Wars Lego for Sandro’s son!
I don’t know the reason why two products from the same family – Azure Integration Services – have completely different behaviors while converting XML to JSON, but that is the current reality. It is a fact! API Management and Logic Apps have different behaviors while applying this conversion, and that is one of the main reasons that I decided to create an Azure Function to convert XML into JSON, to keep the consistency between these two products.
While using API Management, we can use the xml-to-json policy to convert a request or response body from XML to JSON. However, when dealing with XML namespaces and prefixes, which is quite normal when working with XML messages, the policy has, in my opinion, a strange conversion behavior:
It converts the prefixes that in XML are represented by prefix:MyField into prefix$MyField. In order words, it replaces the colon character (:) with the dollar character ($).
Let’s take this XML sample in order for you to see the upcome result of that xml-to-json policy:
Now, if we take the same XML payload and try to convert it inside Logic Apps using the json() expression that returns the JSON type value or object for a string or XML. In this case, using, for example, the following expression:
In this case, the json() expression does not replace the colon character (:) with the dollar character ($) in the prefixes. It’s maintaining, which I think is the correct behavior.
To lazy to read? We’ve got you covered! Check out our video version of this content!
Hope you find this helpful! So, if you liked the content or found it useful and want to help me write more, you can help us buy a Star Wars Lego for Sandro’s son!
Author: Sandro Pereira
Sandro Pereira lives in Portugal and works as a consultant at DevScope. In the past years, he has been working on implementing Integration scenarios both on-premises and cloud for various clients, each with different scenarios from a technical point of view, size, and criticality, using Microsoft Azure, Microsoft BizTalk Server and different technologies like AS2, EDI, RosettaNet, SAP, TIBCO etc.
He is a regular blogger, international speaker, and technical reviewer of several BizTalk books all focused on Integration. He is also the author of the book “BizTalk Mapping Patterns & Best Practices”. He has been awarded MVP since 2011 for his contributions to the integration community.
View all posts by Sandro Pereira