by Sandro Pereira | Jul 2, 2018 | BizTalk Community Blogs via Syndication
I’m back with “Errors and Warnings, Causes and Solutions” and this time targeting developers – BizTalk Deploy operation failed – that work until late and they are a bit tired… believe me, It’s never a good recipe!
Today will I was deploying a BizTalk Server Solution from Visual Studio I had a rookie problem that, because I was tired, I took 20 minutes to find out the problem:
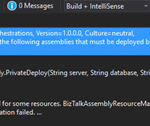
Severity Code Description Project File Line
Error Assembly “Finance.Orchestrations, Version=1.0.0.0, Culture=neutral, PublicKeyToken=d149e7c1ed8e238f” references the following assemblies that must be deployed before deploying this assembly:
Assembly “Staging.Orchestrations, Version=1.0.0.0, Culture=neutral, PublicKeyToken=d149e7c1ed8e238f”.
Deploy operation failed…
At Microsoft.BizTalk.Deployment.BizTalkAssembly.PrivateDeploy(String server, String database, String assemblyPathname, String applicationName)…
…

… a rookie problem that if you read carefully the error message you will know the problem.
Cause
Basically, this is a dependency problem… “Finance.Orchestrations” assembly references certain “Staging.Orchestrations” artifacts, and for this reason, this last assembly (Staging.Orchestrations) must be deployed before deploying the assembly that references these artifacts (Finance.Orchestrations).
When you deploy BizTalk assembly you must ensure that any referenced assembly is deployed first. BizTalk actually, helps you out, by enforcing that “deployment rule” by not letting you applying adding resource action without deploying all its references and that is the reason why this error is happens
Although I’m almost sure that I had deployed all the resources – common schemas, maps, and orchestrations – that was being consumed in this BizTalk Solution. When I decide to check if they were actually deployed in the environment, I found out that they weren’t… again a rookie mistake.
Solution
The solution to this problem is easy, make sure that all the dependencies are deployed before you deploy your solution.
In my case, I deployed the “Staging.Orchestrations” assembly and then I was able to indeed deploy the “Finance.Orchestrations”.
Author: Sandro Pereira
Sandro Pereira lives in Portugal and works as a consultant at DevScope. In the past years, he has been working on implementing Integration scenarios both on-premises and cloud for various clients, each with different scenarios from a technical point of view, size, and criticality, using Microsoft Azure, Microsoft BizTalk Server and different technologies like AS2, EDI, RosettaNet, SAP, TIBCO etc. He is a regular blogger, international speaker, and technical reviewer of several BizTalk books all focused on Integration. He is also the author of the book “BizTalk Mapping Patterns & Best Practices”. He has been awarded MVP since 2011 for his contributions to the integration community. View all posts by Sandro Pereira

by Sandro Pereira | Jul 1, 2018 | BizTalk Community Blogs via Syndication
It seems like yesterday that I announce my first award, back them as a BizTalk Server MVP, but it’s been 8 years and a half on this amazing program. On 1st January 2011 I joined this amazing group of technicians and since then I was re-award in:
- 2012, again as BizTalk Server MVP,
- From 2013 to 2015, I was rebranded as Microsoft Integration MVP
- In 2017, Integration become part of Azure category, so I was award as Azure MVP
- And in middle of 2017, I was Award in two categories, Azure and Visio MVP
And today, with all the same pride, honor and enthusiasm than the first time, I’m delighted to share that the most expected email arrived once again and that I was renewed as a Microsoft Azure MVP (Microsoft Most Valuable Professional). This is my 8th straight year on the MVP Program, an amazing journey, and experience that, again, started in 2011, and that gave me the opportunity, and still does, to travel the world for speaking engagement, share the knowledge, and to meet the most amazing and skilled people in our industry.

As usual, I would like to thank:
First to my wife Fernanda, and my kids Leonor, Laura and now my new baby José (for all the “confusion and madness” they bring into my life), and to all members of my beautiful family… THANKS for all the support during these last years! You guys are my inspiration!
To my MVP Lead Cristina Herrero
The Microsoft Integration Team and Azure Teams like Paul Larson, Mandi Ohlinger, Dan Rosanova, Jon Fancey, Kevin-Lam and Kent Weare; Microsoft Portugal: Paulo Mena, Luís Calado, Ivo Ramos, Ricardo Jesus, Pedro Santos and all other Microsoft employees involved;
To DevScope (my company) and all my coworkers: no names here because all of them are amazing professionals – what an amazing team they are – we have 4 amazing MVP at DevScope, one Microsoft Regional Director, and one former MVP, WOW!! So, thanks for all the support given.
To all my fellow Microsoft Azure (Integration) MVP’s: Nino Crudele, Steef-Jan Wiggers, Saravana Kumar, Mikael Håkansson, Johan Hedberg, Tomasso Groenendijk, Salvatore Pellitteri, Richard Seroter, Stephen W. Thomas, Mick Badran, Michael Stephenson, Bill Chesnut, Thomas Canter, Mattias Lögdberg, Sam Vanhoutte, Glenn Colpaert, Howard S. Edidin, Martin Abbott, Leonid Ganeline, Dan Toomey, Wagner Silveira and Eldert Grootenboer for the support in this program.
Special thanks to all my blog readers, friends and of course to BizTalk and Azure/Integration Community – there are so many that I don’t want to mention names, so I don’t take the risk to forget someone.
And finally, to my Blog sponsor BizTalk360 and all their team for the amazing support and partnership.
It’s a big honor to be in the program and I’m looking forward to another great year!
Author: Sandro Pereira
Sandro Pereira lives in Portugal and works as a consultant at DevScope. In the past years, he has been working on implementing Integration scenarios both on-premises and cloud for various clients, each with different scenarios from a technical point of view, size, and criticality, using Microsoft Azure, Microsoft BizTalk Server and different technologies like AS2, EDI, RosettaNet, SAP, TIBCO etc. He is a regular blogger, international speaker, and technical reviewer of several BizTalk books all focused on Integration. He is also the author of the book “BizTalk Mapping Patterns & Best Practices”. He has been awarded MVP since 2011 for his contributions to the integration community. View all posts by Sandro Pereira

by Sandro Pereira | Jun 30, 2018 | BizTalk Community Blogs via Syndication
I don’t know exactly why but maybe because I’m always talking about BizTalk Server on every major event my friends have a tendency to say that I love my server and I live on my personal island:


Don’t get me wrong I do really love BizTalk Server and I don’t mind talking about the product, It’s something I do with pleasure because I talk about something I do really like but the main reason I talk every single time about BizTalk Server in major events is because the organizers ask me to speak about BizTalk Server – and I will never say no to that regardless of whether I would like or not to talk about other topics.
But despite that BizTalk Server is not the only tool I like, in fact, as I spoke about in my last talk in INTEGRATE 2018, you should use the best tool to address each particular problem, and me being an Integrator Magician, I do like other tools like API Management, Service Bus, Event Hubs, Logic Apps, Azure Functions, Power BI, PowerApps and Flows for example.
So, in response to one of my dear friends – Kent Weare – that normally say that I’m a server lover I created this my new sticker: “I Love My Flow”. Why, for two reasons:
- obvious to annoy and play around with Kent – I know that he is happy with this;
- but mostly because I love Flow and I think it has huge potential to be used in certain scenarios both in Enterprise or Personal context
The sticker has 3 similar variations but my favorite one is the first:


Hope you enjoy! In the download, you will find the sticker in vector format that you can use as you wish. My next task will be to print the sticker so I can offer in my next Flow speaking engagement.
Special thanks to my two coworkers at DevScope: António Lopes, the designer, and creator behind my idea.
You can download BizMan, The BizTalk Server SuperHero sticker from:
 I Love My Flow Sticker (2,6 MB)
Microsoft | TechNet Gallery
Author: Sandro Pereira
Sandro Pereira lives in Portugal and works as a consultant at DevScope. In the past years, he has been working on implementing Integration scenarios both on-premises and cloud for various clients, each with different scenarios from a technical point of view, size, and criticality, using Microsoft Azure, Microsoft BizTalk Server and different technologies like AS2, EDI, RosettaNet, SAP, TIBCO etc. He is a regular blogger, international speaker, and technical reviewer of several BizTalk books all focused on Integration. He is also the author of the book “BizTalk Mapping Patterns & Best Practices”. He has been awarded MVP since 2011 for his contributions to the integration community. View all posts by Sandro Pereira
by Sandro Pereira | Jun 26, 2018 | BizTalk Community Blogs via Syndication
Yesterday, June 25, 2016, BizTalk Server team released the new BizTalk Server 2016 Feature Pack 3, again, this only can be applied to BizTalk Server 2016, the previous versions of the product don’t support FP and there is nothing on the roadmap to support them. This FP was announced in Integrate 2018 London event and it will include:
- 3 brand new Office365 adapters:
- Office 365 Mail Adapter: will allow you to consume (read, mark as read or delete) Outlook e-mail messages through one-way BizTalk Server receive locations or send email messages through one-way static or dynamic send ports.
- Office 365 Calendar Adapter: that will allow you to get future calendar events through one-way BizTalk Server receive locations or create calendar events through one-way static or dynamic send ports. Personally, I still need to find a good case story for this adapter but is better have than don’t have nothing.
- Office 365 Contact Adapter: that will allow you to create contacts through one-way static or dynamic send ports. Again, still need to find a good case story for this adapter.
- Support for Authentication with Azure AD and OAuth using Microsoft Enterprise Single Sign-On – This feature is included, but only consumed by the new Office 365 adapters
- And compliance with:
- US government accessibility standard
- FIPS and GDPR privacy standards
- Compatibility with SQL Server 2016 SP2: You now can deploy multiple databases per instance of an Availability Group.
And I couldn’t wait for trying it out!
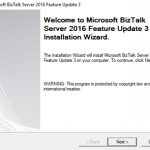
Microsoft BizTalk Server 2016 Feature Pack 3: Step-by-step Installation Instructions
After you download the Microsoft BizTalk Server 2016 Feature Pack 3 You should:
- Run the downloaded .EXE file – BTS2016-KB4103503-ENU.exe – from your hard drive.
- In the “Welcome to Microsoft BizTalk Server 2016 Feature Update 3 Installation Wizard” screen, click “Next”

- In the “License agreement” screen, select the option “I accept the terms of this license agreement” and then click “Next”

- In the “Ready to Install”, it will be provided a list of products that will be enhanced, you should click “Next” to continue with the installation.

- The BizTalk Server 2016 Feature Pack 3 installation will prompt a window with the list of services that will be restarted during the installation process, click “Yes” to continue with the installation.

- The installation process may take some minutes to complete, and you probably see some “background” windows to appear and to be completed.
- Important: you should wait until the “Installation Wizard has completed” screen to appear
- In the “Installation Wizard has completed” screen, click “Finish”

Note: BizTalk Server 2016 Feature Pack 3 doesn’t request for you to restart BizTalk Server machine after you finish the FP3 installation process. But I normally like to restart once the installation is complete (this is optional).
Once the installation is complete, you will be able to see and use the new features:

Note: Microsoft BizTalk Server 2016 Feature Update 3 comes with CU5, so once you install this FP you are also updating your BizTalk Server environment with the latest cumulative update. This is not optional.
Author: Sandro Pereira
Sandro Pereira lives in Portugal and works as a consultant at DevScope. In the past years, he has been working on implementing Integration scenarios both on-premises and cloud for various clients, each with different scenarios from a technical point of view, size, and criticality, using Microsoft Azure, Microsoft BizTalk Server and different technologies like AS2, EDI, RosettaNet, SAP, TIBCO etc. He is a regular blogger, international speaker, and technical reviewer of several BizTalk books all focused on Integration. He is also the author of the book “BizTalk Mapping Patterns & Best Practices”. He has been awarded MVP since 2011 for his contributions to the integration community. View all posts by Sandro Pereira
by Sandro Pereira | Jun 17, 2018 | BizTalk Community Blogs via Syndication
Following my last blog post on how to “Processing Feedback Evaluations (paper) automagically with SmartDocumentor OCR, Logic Apps, Azure Functions & Power BI”, I mention that you can try the solution yourself, at least part of the solution – the most important part – by sending an email with your survey to [email protected] with the following subject “SmartDocumentorSurvey“ and that I had a very simple Microsoft Flow listening to this mailbox that:
- Extracts the attachment;
- Sends it to SmartDocumentor OCR
- Send file to an on-premise folder;
- And notifies you that the file was received;
In this post I will explain you can you use Microsoft Flow to easily extend any existing product, in my case, how I was able to easily extend SmartDocumentor OCR without me being an expert on that product – this DevScope team is super busy to spend to much time with me explaining me everything – jokes apart, I intension don’t want there help the product should be easy to use without requiring too much knowledge and I also want to see and try how people can easily extend and interact with the product in different ways.
For example, in this particular case we actually didn’t need any Flow because SmartDocumentor has the capability to listen to an Email but in that case, I confess that my knowledge of SmartDocumentor product and its tools are a little reduce and I will probably need the help for my coworkers to teach me how to do it. Nevertheless, I had my demo working in two different receive processing points (or locations):
- Directly from the Scan device that I used on all my presentation demos;
- Or thru a receiving folder.
I knew how to change that receive folder, I knew how I can easily connect and extract attachments using Microsoft Flow and I knew a very stupid and simple way to send that file to an “On-premise” folder using Flow… so, for me, it was a simple math operation: 1+1+1=solution!
As Logic Apps, the beauty of using Microsoft Flow’s is that provides almost all Logic Apps capabilities, once it runs on top of Logic Apps, it is part of my Office365 subscription and there for it provides a very simplify and robust way to also extend the capabilities of my OCR software but also by being very cheaper and fast to implement without requiring too much technical knowledge.
Flow’s to the help: The Solution
In order to be able to extend SmartDocumentor OCR receive processing points (or locations) with Microsoft Flow, we need to create a Flow and for that, we need to:

- On the “Create a flow from blank”, select “Create from blank” to start the process of creating an empty Flow

- On the Flow designer, on the Trigger event enter “Gmail” and select the option “Gmail – When a new email arrives”

- We want that all the email received with the “Subject: SmartDocumentorSurvey” will trigger this flow, so on the Gmail Trigger configuration:
- Confirm that “Inbox” is configured in the “Label” property
- Specify the filter, in my case all email that has the “Subject” equal to “SmartDocumentorSurvey”
- And confirm that “Include Attachments” property is set to “Yes”

- Add the next step by clicking “+New step” button and then choose the “Add an action” option

After we receive the email we want to store/save the Survey attachment file on a specific folder where SmartDocumentor is listening, and there are several ways to archive this:
- The most common will be using the File System connector that allows you to connect to any File Systems on your local or network machines using the On-Premises Data Gateway but this is also the most technical option which needs you to configure an On-Premises Data Gateway
- Another option is to make use of Dropbox desktop client, that runs on Windows, Mac, or Linux operating systems and gives you access to your Dropbox directly through a folder on your hard drive. The advantages of this approach are that:
- You don’t need any technical skills (no need to configure an On-Premises Data Gateway) and all users knows or are familiar will Dropbox;
- We can easily store files in Dropbox using Flow;
- And once synchronize to your local machine running SmartDocumentor, SmartDocumentor will peak that file and process it (deleting that file from the folder and from Dropbox) – and there isn’t too much latency on the file synchronization, Dropbox client is actually really good.
Because we want to keep this really simple and familiar to Business users we will go with the Dropbox approach, so for that, we will need to:
- On the “Choose an action” window, enter “Dropbox” and select the trigger “Dropbox – Create file”

- On the Dropbox action configuration:
- Specify the folder in with you want to store the file, in my case: “/publicdemos/smartdocumentorsurvey”
- On the “File Name” property, select from the list of tokens the “Name” token from the “When a new email arrives” trigger
- On the “File Name” property, select from the list of tokens the “Content” token from the “When a new email arrives” trigger

-
- Because we can have multiple attachments on a specific email, the Flow designer will automatically place this “Dropbox – Create file” inside a Loop that will iterate thru each attachment.
The last step we want is to notify the user that is testing the SmartDocumentor Survey solution that his email was received and is being processed, to do that we need to:
- Add the next step by clicking “+New step” button and then choose the “Add an action” option
- On the “Choose an action” window, enter “Gmail” and select the trigger “Gmail – Send email”

- On the Gmail action configuration:
- On the “To” property, select from the list of tokens the “From” token from the “When a new email arrives” trigger
- On the “Subject” property, specify the email subject, in my case: “SmartDocumentor submitted document”
- On the “Body” property, we will specify the name of the file we are processing as well as the URL where you can consult the Survey Report. So, we are combining static text with some tokens provide from previous actions as you will see in the picture below.

-
- Again, because we can have multiple attachments on a specific email, the Flow designer will again automatically place this “Gmail – Send email” action inside a Loop that will iterate thru each attachment.
At the end the flow will look like this:

And once is triggered:
- It will copy the attachment to a Dropbox folder that is being synchronized, with the use of the Dropbox desktop client, to our local SmartDocumentor server;
- SmartDocumentor OCR will process this survey picture and it will do the process that was described in my previous post;
- And finally, will send an email to the user that is testing this SmartDocumentor OCR solution

I intentional want to keep this a first simple as possible, so there are some limitations in current approach:
- You can send multiple form pictures in attach but you shouldn’t send any other type of pictures in attach (that aren’t surveys). Again, I can easily create some flow rules to validate but I didn’t implement nothing like that.
- Avoid sending email signature with pictures, the process will work but it ends up having some SmartDocumentor and Logic Apps runs with failure (didn’t implement these type of validations but it is possible)
I will improve this approach in the future, stay tuned!
Author: Sandro Pereira
Sandro Pereira lives in Portugal and works as a consultant at DevScope. In the past years, he has been working on implementing Integration scenarios both on-premises and cloud for various clients, each with different scenarios from a technical point of view, size, and criticality, using Microsoft Azure, Microsoft BizTalk Server and different technologies like AS2, EDI, RosettaNet, SAP, TIBCO etc. He is a regular blogger, international speaker, and technical reviewer of several BizTalk books all focused on Integration. He is also the author of the book “BizTalk Mapping Patterns & Best Practices”. He has been awarded MVP since 2011 for his contributions to the integration community. View all posts by Sandro Pereira
by Sandro Pereira | Jun 15, 2018 | BizTalk Community Blogs via Syndication
For years, paper forms have been the preferred way for people, enterprises and/or event organizers to collect data in their offices (coffee breaks or launch), in the field (inventory, equipment inspections,…) or in events. Although we are entering a Paperless era, in which the use of paper is progressively being eliminated, there are several situations in which the use of paper is still the best or a good option. Either because it is still a requirement or obligation (by legal documents) or just cheaper and more practical.
One of these scenarios can be found at Events Feedback Evaluations forms and, although it is quite simple and quick to create this kind of forms using, for example, Microsoft Forms or alternatively services like SurveyMonkey, let us be honest and analyze the facts:
- Internet access at events is usually very poor or limited and despite almost all our mobile devices have data access, if we are outside our country, in my case outside Europe, data roaming it is still quite expensive;
- Alternatively, we can send/receive an email later to evaluate the event but more likely most of the attendees will ignore it and we will end up receiving little or no feedback at all.
So, at least in my opinion, paper is still one of the best options to perform Evaluations forms and I already used this strategy in some of my last events that I organized: Oporto Global Integration Bootcamp inserted into the Global Integration Bootcamp initiative created by the Microsoft Community and supported by Microsoft, TUGA IT 2017, … and and if they are a little tired or sleepy – let be honest, it happens in all events – you can always distract a little and wake up again by filling the form
The main problem in having Evaluations forms in a physical paper is: How can we easily convert paper in data to generate additional value? How can we perform operations on it and easily gain insights?

There are plenty of OCR solutions/software’s in the market – most of them are still very expensive – that can easily scan the documents from different devices and process them using algorithms to analyze and extract the data with high confidence. Some even allow the users to manually review the extracted data from the documents before they are integrated into different information systems that normally tend to be the file system or databases.

However, neither of them is prepared to connect and integrate with all of the new technologies/SaaS products/data analysis platforms that appear at today’s frantic pace, like Power BI. If you are lucky, some of these products may also allow you to “easily” extend the product to connect to another system through their custom extensibility model systems but that normally means costs and time to develop some additional connector.
In order to solve these problems for my previous events, in which I wanted to have the evaluations forms to be processed in real-time, i.e., as the attendees handed in the forms, the results were presented in a public Power BI dashboard in a matter of seconds. I end up creating a solution composed of several products and technologies (choosing what I think to be the best tool for a particular problem) composed by:
- DevScope SmartDocumentor OCR that, not also allowed me to extract the data from my Survey documents (actually it can process any king do documents like Invoices or Expenses) and easily integrate with other systems, but also to intelligently set my OCR streams (flows), defining:
-
- Different receive processing points (or locations), like Email, FTP, File Share or directly from scanner devices;

-
-
- Create/test my recognition templates and review/ validate the data which is gathered;

-
- By default, SmartDocumentor exports data and documents to multiple Enterprise Resource Planning (ERP), Customer Management (CRM) or Document Management (ECM) like Windows system files, SharePoint, Office 365, Azure and/or SQL Server. But also, enabled me to connect and send the metadata, XML or JSON, through any kind of HTTP service, and we can delegate this process/tasks to other more smart, powerful and easy to change services like Logic Apps. Of course we can connect to any other system through its extensibility model systems, for example, I could even extend SmartDocumentor by using a PowerShell provider that would enable me to execute PowerShell scripts.

- Azure Logic Apps that provided a very simple, fast and powerful way to implement scalable integrations workflows in the cloud with an uncounted number of connectors across the cloud and on-premises, the list is growing day by day. This will allow us to quickly integrate across different services and protocols but also modify and change quickly the integration flows without requiring to modify and deploy traditional custom code – which normally require having technical human resources (like C# developer) and probably additional costs involved – not anymore with Logic Apps – changes can be performed in a matter of seconds without worrying about if your custom extension broke some product compatibility or affecting other existing OCR processes;

- Azure Functions to run custom snippets of C# to support Logic Apps flow and perform advanced JSON to JSON transformations;
- And finally, Power BI to create interactive data visualization (dashboards and reports)

The solution
SmartDocumentor: to process and extract metadata from paper
Well, I am not going to explain in details how the solution is implemented inside DevScope’s SmartDocumentor for it is not the point of this article, and if you want to know more about it, you can always contact me. However, let me contextualize you in other for you to have the full picture of the problem and the solution:
- SmartDocumentor OCR flow will be listening in two receive processing points (or locations):
- Share Folder – for testing purposes without having the need to have a scanner device;
- and directly from the scanner device – real case scenario.
- We can then specify if:
- We want to review any documents that are being processed to see if the data recognition is performed according to what we intended;
- Or we can create rules based on SmartDocumentor confidence recognition rate, for example:
- If there is a >=90% confidence that the data from the Survey where correctly recognize, skip the review process and integrate directly the document;
- Otherwise, if recognition confidence rate is <90% deliver the document to the review station for a person to validate and them Integrate the document;
- Or, in my case, because I already have confidence in the process, and is quite tested, we can configure the process to skip the review station step and directly integrate the document. This will also allow you… yes you, the reader, to test this implementation as you will see at the end of this article.
- After receiving and extract the data from the documents (paper), SmartDocumentor will send the metadata to a Logic App HTTP endpoint.

Power BI to deliver interactive data visualization (dashboards and reports)
Regarding Power BI, Logic Apps Power BI connector only accepts you to use streaming datasets (this has advantages and some disadvantages that we will see further on), that allows you to easily build real-time dashboards by pushing data into the REST API endpoint. To create your streaming datasets, you should access to Power BI with your account:
- Select your ‘Workspace à Datasets’, and then on the top right corner click ‘+ Create’ and then ‘Streaming dataset’

- In the ‘New streaming dataset’, select ‘API’ and then click ‘Next’
- In the second ‘New streaming dataset’, give a name to your dataset: “FeedbackForm” and then add the following elements:
- SpeakerName (Text) – represents the name of the speaker that is obtained in the evaluation form according to the session.
- ContentMatureFB (Number) – a value between 1 and 9 that is obtained in the evaluation form
- GoodCommunicatorFB (Number) – a value between 1 and 9 that is obtained in the evaluation form
- EnjoySessionFB (Number) – a value between 1 and 9 that is obtained in the evaluation form
- MetExpectationsFB (Number) – a value between 1 and 9 that is obtained in the evaluation form
- SpeakerAvrg (Number) – A simple average calculation (sum all the above metrics divide by 4)
- WhoAmI (Text) – represents the type of attendee you are (developer, architect, …) that is obtained in the evaluation form
- SpeakerPicture (Text) – picture of the speaker according to the session that is that is obtained in the evaluation form.

- And because we want to create interactive reports in order to have more insights from the event. We need to enable ‘Historic data analysis’ and then click ‘Create’

Limitations: Unfortunately, streaming dataset is meant to be used for real-time streaming and is a little limited in terms of want we can do with it. For example, it doesn’t allow you to combine different sources, like a “table” that can correlate speaker to get their pictures, or to make aggregations of metrics like “Speaker average”. Which means that we need to send all of this information from Logic Apps.
Azure Function to apply JSON transformations (Content Enricher, Content Filter & Name-Value Transformation Patterns)
To solve and bypass these streaming dataset limitations we use an Azure Function inside Logic App that not only transforms the JSON message received from SmartDocumentor with the Evaluation metadata but also add missing information – Content Enricher Pattern. It is very common when we want to exchange messages between different systems or applications, that the target system requires more information than the source system can provide. In this case, the source system (paper) will not send the Name of the speaker, the speaker average metric and the picture of the speaker, but our target system (Power BI) expects that information.

But also, to apply a transformation pattern – Content Filter – that not only removes unnecessarily data elements but it is also used to simplify the structure of the message, i.e., ‘flattens’ the hierarchy into a simple list of elements that can be more easily understood and processed by other systems.

And finally transform a name-value pair (NVP), key-value pair (KVP), field–value pair, attribute–value pair or even Entity-Attribute-Value model (EAV) data representation that is widely used into a to more Hierarchical Schema.

To do that we create a “GenericWebHook-CSharp” function that accepts the name-value pair JSON message, which was originally sent by SmartDocumentor OCR, and generate a friendlier message.
#r "Newtonsoft.Json"
using System;
using System.Net;
using Newtonsoft.Json;
using Newtonsoft.Json.Linq;
public static async Task&lt;object&gt; Run(HttpRequestMessage req, TraceWriter log)
{
log.Info($"Webhook was triggered!");
string jsonContent = await req.Content.ReadAsStringAsync();
dynamic data = JsonConvert.DeserializeObject(jsonContent);
string speakerName = string.Empty;
string speakerPicture = string.Empty;
int pos = 0;
for (int i = 5; i &lt;= 8; i++)
{
if (!String.IsNullOrEmpty(data[i]["Value"].Value))
{
pos = i;
break;
}
}
switch (pos)
{
case 5:
speakerName = "Ricardo Torre";
speakerPicture = "http://blog.sandro-pereira.com/wp-content/uploads/2017/03/RicardoTorre.png";
break;
case 6:
speakerName = "José António Silva e Pedro Sousa";
speakerPicture = "http://blog.sandro-pereira.com/wp-content/uploads/2017/03/JosePedro.png";
break;
case 7:
speakerName = "João Ferreira";
speakerPicture = "http://blog.sandro-pereira.com/wp-content/uploads/2017/03/JoaoFerreira.png";
break;
case 8:
speakerName = "Sandro Pereira";
speakerPicture = "http://blog.sandro-pereira.com/wp-content/uploads/2017/03/Sandro-Pereira.png";
break;
default:
speakerName = "Unknown";
speakerPicture = "http://blog.sandro-pereira.com/wp-content/uploads/2017/03/devscope.png";
break;
}
int result = 0;
decimal avrg = (decimal)((int.TryParse(data[9]["Value"].Value, out result) ? result : 0) + (int.TryParse(data[10]["Value"].Value, out result) ? result : 0) + (int.TryParse(data[11]["Value"].Value, out result) ? result : 0) + (int.TryParse(data[12]["Value"].Value, out result) ? result : 0)) / 4;
JObject eval =
new JObject(
new JProperty("SpeakerName", speakerName),
new JProperty("SpeakerPicture", speakerPicture),
new JProperty("ContentMatureFB", data[9]["Value"].Value),
new JProperty("GoodCommunicatorFB", data[10]["Value"].Value),
new JProperty("EnjoySessionFB", data[11]["Value"].Value),
new JProperty("MetExpectationsFB", data[12]["Value"].Value),
new JProperty("SpeakerAvrg", avrg),
new JProperty("WhoAmI", data[30]["Value"].Value));
log.Info($"Webhook was Complete!");
return req.CreateResponse(HttpStatusCode.OK, new
{
MsgEval = eval
});
}
Notice that for example in the following transformation rule:
...
speakerName = "Sandro Pereira";
speakerPicture = "http://blog.sandro-pereira.com/wp-content/uploads/2017/03/Sandro-Pereira.png";
...
We are transforming the selected session in the Evaluation form to the name of the speaker and his picture. Why the picture URL? Well, as mentioned before, Power BI streaming dataset has some limitation in what we can do by default. So, in order for us to be able to present the speaker picture in the Power BI report and/or dashboard, we are forced to send a public picture URL (in this case it is stored in my blog) as an input of our dataset.
For the same reason, because we cannot make a new measure derived from the others when using streaming dataset, instead we need to send it as an input of our dataset and in order for us to calculate the average performance of a speaker, we will be using this basic formula:
...
decimal avrg = (decimal)((int.TryParse(data[9]["Value"].Value, out result) ? result : 0) + (int.TryParse(data[10]["Value"].Value, out result) ? result : 0) + (int.TryParse(data[11]["Value"].Value, out result) ? result : 0) + (int.TryParse(data[12]["Value"].Value, out result) ? result : 0)) / 4;
...
The output of the function will be again another JSON message this time something like this:
{
“MsgEval”: {
“SpeakerName”: “Nino Crudele”,
“SpeakerPicture”: “https://blog.sandro-pereira.com/wp-content/uploads/2017/05/Nino-Crudele.png”,
“ContentClearFB”: “8”,
“GoodCommunicatorFB”: “8”,
“EnjoySessionFB”: “8”,
“MetExpectationsFB”: “8”,
“GainedInsightFB”: “8”,
“SpeakerAvrg”: 8.0,
“WhoAmI”: “Other;Consultant;”
}
}
Logic Apps to create an integration process flow
The missing piece: Logic App! The tool that allows us to transform a product – in this case, SmartDocumentor OCR software – that in principle like all product seemed closed and limited in terms of features into a product without frontiers/fences. Again, we all know that normally these type of products (OCR) have extensibility model systems that allow you to extend the product with your personal requirements – like SmartDocumentor also does – but this normally means you need to have developer skills that probably will cost you time and money, or additional cost to customize the product according to your needs, something we want to avoid and we will be able to archive using Logic Apps or similar tools/products.
The beauty of using Logic App is that provides us a very simplified, robust, scalable, not expensive and fast way to extend the capabilities of my SmartDocumentor OCR software and integrate with an uncounted number of Cloud and on-premises applications or/and systems.
In order to integrate SmartDocumentor OCR with Power BI, we need to create a Logic App that:
- Accept a JSON through an HTTP Post. For that, we use a ‘Request / Response – Manual’ trigger. And in this case, because we don’t need to have friendly tokens to access the elements of the message, we don’t specify a JSON Schema.

- Call an Azure Function to transform the original SmartDocumetor OCR JSON message to the expected JSON message to send to Power BI. For that, we use an ‘Azure Functions’ action, specifying the function that we created previously.

- After that, we use a ‘Parse JSON’ action, only to allow us to parse JSON content into friendly tokens (something like a quick alias to the fields) for being easily consumed in other actions of the process.

- In the last step of the Logic App: we push the data into the Power BI streaming dataset created earlier by using the new ‘Power BI’ Connector. To do this we need to:
- Add a ‘+New step’, ‘Add an action’, and then enter ‘Power BI’ into the search box. Select “Add row to streaming dataset” from the actions list.
- Select the name of the workspace and then the name of the streaming dataset
- The next step is to select the Table titled “RealTimeData”
- And finally, map the input data fields with the friendly tokens generated in the ‘Parse JSON’ action

Of course, we could have more logic inside, for example, validate if you attendees, or you guys while testing, are filling all the required element and based on that rules perform some actions, but my intention, in this case, was to make and keep the process as simple as possible, normally as we explain earlier we could perform validation on the SmartDocumentor review station but again we can easily add additional validation in the Logic App without any problem.
The final result
After saving the Logic App and process the Evaluation forms with SmartDocumentor OCR directly from the scanner or thru the file system, the result is this beautiful and interactive report that we can present in a monitor during the breaks of our events:

You may now under, “What do we need to do to extend the process for archiving the messages?”
That is extremely simple, just edit and change the Logic App by adding, for example, a Dropbox, OneDrive or File Connector into your process, configure it and save it! It is that easy!
How can you test the solution?
Of course, it is impossible for you to test the entire process, unfortunately, we cannot submit the paper via web… at least yet. But you can try part of this solution because by assuming that we already have the paper digitalized/scanned and we only want to try the SmartDocumentor OCR and the integration process.
So, if you want to try the solution, you need to:
- Download the Evaluation form (survey) – PNG format – here: https://blog.sandro-pereira.com/wp-content/uploads/2017/04/SpeaketForm_2017-0.png
- Open the form picture in your favorite image editor (Paint or Paint.NET) and just paint your choices, something like this.
- Again, be sure you fill all the necessary fields: session, each rate (only on time) and about you because I didn’t add any type of validation and I’m skyping the Review Sation step
- You don’t need to fill your name, email, company or phone
- You can send multiple form pictures in attach but don’t send any other type of pictures in attach. Again, I can easily create some flow rules to validate but I didn’t implement nothing like that.
- Avoid sending email signature with pictures, the process will work but it end up having some Logic Apps runs with failure (didn’t implement these type of validations but it is possible)

- Email your form attached to [email protected] with the following subject “SmartDocumentorSurvey“
- Wait a few minutes, because I have a very simple Microsoft Flow (we will address this process later on in another blog post) listening to this mailbox that:
- Extracts the attachment
- Sends it to SmartDocumentor OCR
- And notifies you that the file was received
- Check your email and access to this public link to see the results: https://app.powerbi.com/view?r=eyJrIjoiZmQyNDM4YmItN2ZkYS00NzEwLThlYWYtMGQxMjQ3ZDI5ZGE2IiwidCI6IjA5ZTI1MWRjLTVlODctNDhiZi1iNGQyLTcxYjAxYWRiOTg0YSIsImMiOjh9
- Unfortunately, due cache policies, updates to reports or visuals to which a Publish to web link points can take approximately half an hour to be visible to users – this is a Power BI limitation/cache policy – because the link is for a public Power BI report you may only see the results reflected, in the worst scenario, after more or less half an hour.
Author: Sandro Pereira
Sandro Pereira lives in Portugal and works as a consultant at DevScope. In the past years, he has been working on implementing Integration scenarios both on-premises and cloud for various clients, each with different scenarios from a technical point of view, size, and criticality, using Microsoft Azure, Microsoft BizTalk Server and different technologies like AS2, EDI, RosettaNet, SAP, TIBCO etc. He is a regular blogger, international speaker, and technical reviewer of several BizTalk books all focused on Integration. He is also the author of the book “BizTalk Mapping Patterns & Best Practices”. He has been awarded MVP since 2011 for his contributions to the integration community. View all posts by Sandro Pereira

by Sandro Pereira | Jun 13, 2018 | BizTalk Community Blogs via Syndication
Trigger your Microsoft Flows by pressing a physical button, known as a Flic Button or Flic Smart Button provide by Shortcut Labs is quite a simple task. I was impressed by how easy and fast it was to set up and put it working, it was literally 5 minutes!
And then you can use it for fun: “Wake Up Kent Weare” (the example we will be using here) or for more realistic and interested scenarios like pressing a Flic button to track your working hours (1 click to start tracking, double-click to stop tracking), block your calendar for next next hour, count visitors at an event, notify me if I have a visitor, save geographical locations, or how is your day/are you happy with the service (one click for happy, double-click for unhappy – if you have only one button)
Of course, to do that we need to have:
- A physical Flic Smart Button

- And downloaded Flic’s Android or iOS mobile app, that you will need to use it to pair one or more Flic Buttons.

After you download the Flic mobile app, to configure the Flic Button you need to:
- Make sure that your mobile has Bluetooth activated;
- Open the Flic mobile app from your mobile phone, sign in with your credentials using Facebook, or by creating your Flic Account;
- Once you login in the app, on the phone tab, click “Add Flic to Phone” at the bottom of the screen

- Once the “Searching for Flics” screen appears, take or physical button an click it once to pair it with the mobile application

- Once the “Pairing complete!” screen appears, your button will be successfully paired with your phone. Click “Finish” to complete.

- And a button will be added to the “Phone” tab

Now that the physical button is pair with our mobile phone, we need to configure the Flic’s events that the button will be triggering. For each button we can specify 3 types of events:
- click (one quick press)
- double-click (two quick presses)
- hold (one long press)
To accomplish that you need to:
- Press the “My Flic” button present in the “Phone” tab
- This will open the button configuration screen, there you should:
- Change the button name
- And then configure one or all the 3 trigger events
- In our case, we will configure the “Click” trigger event to be able to trigger a Microsoft Flow. For that, we need to click on the “Click” option

- On the “Click” trigger event list screen, select “Tools” category option

- And on the “Tools” category list screen, select “Flow” option

- On the Flow screen you may or may not select to include GPS location and then you need to click “SAVE ACTION” button

And our button will now be properly configured to trigger a Microsoft Flow once someone click (one time) the physical button

Now the only thing that is missing is for us to create a Flow that will be associated with this trigger event to fire up a Flow process.
Once again, this demo is entitled “Wake Up Kent Weare” and will be just for fun to try to annoy the dear friend Kent Weare and try to wake him up at 4 AM US (9 AM Portugal), if he didn’t forget to disable email notifications at night, simply by clicking on a button. To do that we need to:
- Sign into Microsoft Flow.
- You can create one flow from scratch
- or by typing “flic” into the search box and select one of the several templates provided by Flow team.
- Click “My flows” option on the menu and then click “+ Create from blank” to create a Flow from scratch.

- On the “Create a flow from blank”, click “Create from blank” to start the process of creating an empty Flow

- On the Flow designer, on the Trigger event enter “Flic” and select the option “Flic – When a Flic is pressed”

- On the Flic Trigger configuration
- On “the Flic button” combo box, select the button we add create on the Mobile App earlier
- And on the “Events” combo box, select “click” event that was the only one that we have configured
(of course, the first time you use this trigger, it will ask for permissions and you need to provide the authentication to your Flic account)

- Add the next step by clicking “+New step” button and then choose the “Add an action” option

- On the “Choose an action” window, enter “Outlook” and select the trigger “Office 365 Outlook – Send an email”

- On the Send an email action configuration, you need to specify
- The address of the recipient on the “To” property field
- The subject of the email on the “Subject” property field
- And the body of the email on the “Body” property field

- Be sure you give a proper name to your Flow, mine will be “Wake Up Kent Weare” and save it
Now… PRESS THE BUTTON! PRESS THE BUTTON!
The Flow was successfully triggered once I press the button

However, the result was not what I expected 🙂

Author: Sandro Pereira
Sandro Pereira lives in Portugal and works as a consultant at DevScope. In the past years, he has been working on implementing Integration scenarios both on-premises and cloud for various clients, each with different scenarios from a technical point of view, size, and criticality, using Microsoft Azure, Microsoft BizTalk Server and different technologies like AS2, EDI, RosettaNet, SAP, TIBCO etc. He is a regular blogger, international speaker, and technical reviewer of several BizTalk books all focused on Integration. He is also the author of the book “BizTalk Mapping Patterns & Best Practices”. He has been awarded MVP since 2011 for his contributions to the integration community. View all posts by Sandro Pereira
by Sandro Pereira | Jun 13, 2018 | BizTalk Community Blogs via Syndication
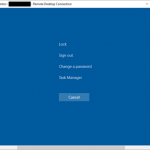
This post is just for sake of my mental sanity because I’m always forgetting the keystroke combination to perform a CTRL-ALT-DEL thru Remote Desktop on an Azure Virtual Machine because if you press a CTRL-ALT-DEL key combination it will perform that command in your local machine – maybe now next time I will remember it, otherwise I know were to look.
To bring up the Windows Security dialog box for the Remote Desktop Session Host (RD Session Host) (provides the same functionality as pressing CTRL+ALT+DEL on the local computer) you need to use the following keystroke combination: CTRL + ALT + END.

While researching, once again, I found out another very useful shortcut:
- ALT+PRINT SCREEN will place a snapshot of the active window, within the client, on the clipboard
To know more about other possible shortcuts please see Remote Desktop Services Shortcut Keys
Author: Sandro Pereira
Sandro Pereira lives in Portugal and works as a consultant at DevScope. In the past years, he has been working on implementing Integration scenarios both on-premises and cloud for various clients, each with different scenarios from a technical point of view, size, and criticality, using Microsoft Azure, Microsoft BizTalk Server and different technologies like AS2, EDI, RosettaNet, SAP, TIBCO etc. He is a regular blogger, international speaker, and technical reviewer of several BizTalk books all focused on Integration. He is also the author of the book “BizTalk Mapping Patterns & Best Practices”. He has been awarded MVP since 2011 for his contributions to the integration community. View all posts by Sandro Pereira
by Sandro Pereira | May 29, 2018 | BizTalk Community Blogs via Syndication
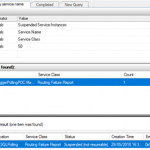
One of the annoying thing with working with Direct Bound Ports in Orchestrations, in especially, MessageBox direct bound ports that allow us to easily implement decouple publish-subscribe design patterns, is that you may get a situation in which you get a lot of Routing Failure Report Instances in the state Suspended (not resumable).
: BizTalk Group by Service name Routing Failure Report")
The error-handling properties facility allows us to automated handling of messaging failures as an alternative to the traditional (now default) behavior of placing failed messages in the Suspended queue. This automated handling routes an error message to any subscribing routing destination, such as a send port or orchestration. The error message is a clone of the original message with all previously promoted properties now demoted and with selected properties related to the specific messaging failure promoted to the message context.
Normally the easy way to implement this is to create a Send Port with the following filter:
- ErrorReport.ErrorType = “FailedMessage”
Nevertheless, because we are using an orchestration with Direct Bound Ports, the orchestration will receive a PersistenceException that you can handle inside our business flow, however, is also create a Routing Failure Report Instance in the state Suspended (not resumable) without any ErrorReport property promoted
: BizTalk Routing Failure Report Property Promotions")
So, we cannot easily automate this kind of instances.
An alternative solution to automate this task is, inside the Error Handler, invoke a helper class library that deletes all these instances once they occur in controlled fashion way:
...
using (PowerShell PowerShellInstance = PowerShell.Create())
{
    StringBuilder pscript = new StringBuilder();
    pscript.AppendLine(@"[STRING]$SQLInstance = get-wmiobject MSBTS_GroupSetting -namespace rootMicrosoftBizTalkServer | select-object -expand MgmtDbServerName");
    pscript.AppendLine(@"[STRING]$BizTalkManagementDb = get-wmiobject MSBTS_GroupSetting -namespace rootMicrosoftBizTalkServer | select-object -expand MgmtDbName");
    pscript.AppendLine(@"[STRING]$BizTalkGroup = ""$SQLInstance"" + "":"" + ""$BizTalkManagementDb""");
    pscript.AppendLine(@"[ARRAY]$suspendedMessages = get-wmiobject MSBTS_ServiceInstance -namespace 'rootMicrosoftBizTalkServer' -filter '(ServiceStatus=32 and ServiceClass=64 and ServiceName like ""<name_of_our_orchestration>"")'");
    pscript.AppendLine(@"foreach ($msgSuspended in $suspendedMessages){");
    pscript.AppendLine(@"$msgSuspended.InvokeMethod(""Terminate"",$null)}");

    PowerShellInstance.AddScript(pscript.ToString());
    PowerShellInstance.Invoke();
}
...
How to check terminate Suspended (not resumable) Routing Failure Report Instances with PowerShell
Using PowerShell is a good option to delete all of this kind of messages, you can send a report and delete or just simply delete it. Windows PowerShell is a Windows command-line shell designed especially for system administrators and can be used by BizTalk administrators to help them in automating repetitive tasks or tasks that are time-consuming to perform manually.
Because was controlling the error inside the main orchestration I don’t have the need of additional report, so this is a simple script will allow you to delete all Routing Failure Report Instances suspended with the state Suspended (not resumable) from your BizTalk Server environment:
#Get all Suspended (not resumable) Routing Failure Report Instances
[ARRAY]$suspendedMessages = get-wmiobject MSBTS_ServiceInstance -namespace 'rootMicrosoftBizTalkServer' -filter '(ServiceStatus=32 and ServiceClass=64)'

foreach ($msgSuspended in $suspendedMessages)
{
    $msgSuspended.InvokeMethod("Terminate",$null)
}
THIS POWERSHELL SCRIPT IS PROVIDED “AS IS”, WITHOUT WARRANTY OF ANY KIND.
Terminate Suspended (not resumable) Routing Failure Report Instances PowerShell (2 KB)
Microsoft | TechNet Gallery
Author: Sandro Pereira
Sandro Pereira lives in Portugal and works as a consultant at DevScope. In the past years, he has been working on implementing Integration scenarios both on-premises and cloud for various clients, each with different scenarios from a technical point of view, size, and criticality, using Microsoft Azure, Microsoft BizTalk Server and different technologies like AS2, EDI, RosettaNet, SAP, TIBCO etc. He is a regular blogger, international speaker, and technical reviewer of several BizTalk books all focused on Integration. He is also the author of the book “BizTalk Mapping Patterns & Best Practices”. He has been awarded MVP since 2011 for his contributions to the integration community. View all posts by Sandro Pereira

by Sandro Pereira | May 25, 2018 | BizTalk Community Blogs via Syndication
INTEGRATE (formerly known as BizTalk Summit) is the primary conference for professionals working in the Microsoft Integration Space and once again is back to London. From June 4 to 6, 25 speakers – 11 MVPs and 14 Microsoft PM – will address the entire Microsoft Integration Platform landscape on topics like BizTalk Server, Logic Apps, Service Bus, Event Grid, Event Hubs, Microsoft Flow, API Management, Azure Functions and many more.
And once again I will be there delivering a session – since the first BizTalk Summit event, I’m a constant presence as a speaker at these events – about BizTalk Server! And if you are wondering why I don’t speak about other integration topics the reasons are:
- The organization team specific ask me to talk about BizTalk Server…
- … and I really love to speak about BizTalk Server so I couldn’t refuse! I have plenty of other events to speak about other topics hehe

From June 4 to 6, and our MVP Sandro Pereira is one of the guest speakers for the sixth year in a row. Following the last event in Seattle, DevScope joins Integrate once again as a Silver Sponsor.
About my session
After receiving a huge amount of positive feedback regarding my previous talk last year: “BizTalk Server Fast & Loud” I fill a little pressure to continues to match the attendee expectations… almost! Because I’m confident that you will enjoy! Why wouldn’t you enjoy? In this session, I will address real cases that happen to all of us daily.
Session Name: BizTalk Server: Lessons from the Road

Abstract: The session will cover small pieces of stories with practical real examples from the field to address certain scenarios/requirements. See real techniques being used in some of the most important features of BizTalk Server, some of them are out-of-the-box capabilities others are custom extensions been made on the platform. Topics include BizTalk migration strategy, content-based routing techniques, Mapping, JSON support, BizTalk administration tips, extending BizTalk out-of-the-box capabilities and many more.
Content is not all you get from this event…
Content is hugely important, and as you read previously, this event will address the entire Microsoft Integration Platform landscape… but that’s not all!
This will also be an amazing opportunity to Network, Connect, and Reconnect with Colleagues. Meet some of the people you have been following on Twitter and blogs and network with them and others who are interested in the same things you are. To hang out with the smartest people you know – and I’m not talking about the speakers or Microsoft PM’s! I’m talking about you guys! – last year were 400 attendees from over 150 companies across 25+ countries attending the event, so imagine the experience that all of us have combined!

The knowledge and experience of all the attendees, speakers and product group members at these events is unreal!!! You will not find an opportunity like this every day.
So, this event is a huge opportunity for you to:
- Get insight and answers to your questions from these real-world experts: attendees, MVP’s and/or Microsoft PM’s;
- Know and became friends of people you are interested or that you follow for social media: again, maybe there are attendees, MVP’s and/or Microsoft PM’s
- I have to say that in this last 8 year I was able to meet and became good friends of several amazing people and all of that because of this type of events and all post-event activities like coffee breaks, dinner with speakers, …
- Build your personal Business Networking and it is also a good opportunity for Partnerships… and new opportunities
And finally: Refresh and recharge and have some fun!
DevScope is sponsoring INTEGRATE 2018 event
I’m extremely happy to announce that, for the second consecutive time, DevScope is also joining this event as a sponsor. The first time was in INTEGRATE 2017 USA and now it will be the first time in London event.
I’m extremely happy for that for several reasons:
- It is the only Portuguese company sponsoring the biggest Microsoft Integration focused event in the world.
- It shows the commitment that my company has in the Integration landscape.
- But we are also one of the unique partners that, not only can support you in the Integration landscape challenges but also in other Microsoft key areas like BI/Power BI, SharePoint, Dynamics and of course Azure.
- which show not only the diversity present in our team but also its quality that can be proven by the diverse certifications and distinctions attributed to our professionals

Fill free to contact DevScope at [email protected] if you want to know more about us, what we do and/or how can we help you and your business.
INTEGRATE 2018 Registration
You are still on time to register for the conference here.

Author: Sandro Pereira
Sandro Pereira lives in Portugal and works as a consultant at DevScope. In the past years, he has been working on implementing Integration scenarios both on-premises and cloud for various clients, each with different scenarios from a technical point of view, size, and criticality, using Microsoft Azure, Microsoft BizTalk Server and different technologies like AS2, EDI, RosettaNet, SAP, TIBCO etc. He is a regular blogger, international speaker, and technical reviewer of several BizTalk books all focused on Integration. He is also the author of the book “BizTalk Mapping Patterns & Best Practices”. He has been awarded MVP since 2011 for his contributions to the integration community. View all posts by Sandro Pereira


: BizTalk Group by Service name Routing Failure Report")
: BizTalk Routing Failure Report Property Promotions")


