
by Sandro Pereira | Oct 2, 2018 | BizTalk Community Blogs via Syndication
BizTalk Pipeline Components Extensions Utility Pack community project for BizTalk Server 2016 got a new update and now it has another new component that you can use in your custom BizTalk Server pipelines: Carry SOAPHeader To WCF-BasicHttp Pipeline Component.
Carry SOAPHeader To WCF-BasicHttp Pipeline Component
The Carry SOAPHeader To WCF-BasicHttp is a pipeline component for BizTalk Server which can be used in a send pipeline and is intended to carry forward the received custom SOAP Header to the outgoing message, in other words:
- This component will read the Custom SOAPHeader from the Message Context Properties
- The custom header name will be defined on the component configuration and we can read it from the target “http://schemas.microsoft.com/BizTalk/2003/SOAPHeader”
- and will configure this custom header in the OutboundCustomHeaders property used by the WCF-BasicHTTP Adapter.
The OutboundCustomHeaders property is used if you want to specify the custom SOAP headers for outgoing messages. When this property is used, the property must have the <headers> element as the root element. All of the custom SOAP headers must be placed inside the <headers> element
- If the custom SOAP header value is an empty string, you must assign <headers></headers> or <headers/> to this property
This component is useful if you are implementing CBR operations on legacy service (SOAP – .asmx) using the new WCF-Adapters in BizTalk Server. Notice that the SOAP adapters, still present in BizTalk Server 2016, are obsolete and discontinued.
To use this pipeline component in your projects you just copy the “CarrySOAPHeader.dll” file into “Pipeline Components“ folder that exists in BizTalk Server Installation directory: “..Program Files (x86)Microsoft BizTalk Server <version>Pipeline Components” on every server.
You do not need to add a custom pipeline component to be used by the BizTalk Runtime to the Global Assembly Cache (GAC).
What is BizTalk Pipeline Components Extensions Utility Pack?
BizTalk Pipeline Components Extensions Utility Pack is a set of custom pipeline components (libraries) with several custom pipeline components that can be used in received and sent pipelines, which will provide an extension of BizTalk out-of-the-box pipeline capabilities.

The project is available on BizTalk Server Open Source Community repository on GitHub (https://github.com/BizTalkCommunity) and everyone can contribute with new pipeline components that can be extended or improve the existing BizTalk Server capabilities.
At the moment it is only available for BizTalk Server 2016 but it will soon be compiled and available for previous versions of the product.
Where to download it?
You can download BizTalk Pipeline Components Extensions Utility Pack from GitHub here:
 BizTalk Pipeline Components Extensions Utility Pack
GitHub
Author: Sandro Pereira
Sandro Pereira lives in Portugal and works as a consultant at DevScope. In the past years, he has been working on implementing Integration scenarios both on-premises and cloud for various clients, each with different scenarios from a technical point of view, size, and criticality, using Microsoft Azure, Microsoft BizTalk Server and different technologies like AS2, EDI, RosettaNet, SAP, TIBCO etc. He is a regular blogger, international speaker, and technical reviewer of several BizTalk books all focused on Integration. He is also the author of the book “BizTalk Mapping Patterns & Best Practices”. He has been awarded MVP since 2011 for his contributions to the integration community. View all posts by Sandro Pereira

by Sandro Pereira | Sep 26, 2018 | BizTalk Community Blogs via Syndication
A few days ago, I publish the first version of the community project BizTalk Pipeline Components Extensions Utility Pack for BizTalk Server 2016. Today I please to announce that a new pipeline component was added to this project: Multi-Part Message Attachments Zipper Pipeline Component.
This was an old component that I had published in the past for BizTalk Server 2006/2006 R2/2009 and 2010 that I now updated and improved to BizTalk Server 2016 with the help with my internal team at DevScope, in special, Pedro Almeida.
What is BizTalk Pipeline Components Extensions Utility Pack?
BizTalk Pipeline Components Extensions Utility Pack is a set of custom pipeline components (libraries) with several custom pipeline components that can be used in received and sent pipelines, which will provide an extension of BizTalk out-of-the-box pipeline capabilities.

Multi-Part Message Attachments Zipper Pipeline Component
The BizTalk Multi-Part Message Attachments Zipper is a pipeline component for BizTalk Server which can be used in a send pipeline and is intended to replace all attachments of a multi-part message for its zipped equivalent.
The capabilities are similar to those available in compression software such as WinZip or 7-zip:
- Attachments Compression – Extracts, in a send pipeline, all message parts include in a multi-part message that is not included in the message body (Message Body Part = False), compresses it and attaches the compressed attachment back to the message.
- This component requires one configuration that is the FileExtension where you can specify if you want for example a .zip or .gz file.
No compression/decompression software needs to be installed in the BizTalk Server machines.
To use this pipeline component in your projects you just copy the “PipelineComponentMultipartMsgZipAttach.dll” file into “Pipeline Components“ folder that exists in BizTalk Server Installation directory: “..Program Files (x86)Microsoft BizTalk Server <version>Pipeline Components” on every server.
You do not need to add a custom pipeline component to be used by the BizTalk Runtime to the Global Assembly Cache (GAC).
The project is available on BizTalk Server Open Source Community repository on GitHub (https://github.com/BizTalkCommunity) and everyone can contribute with new pipeline components that can extend or improve the existing BizTalk Server capabilities.
At the moment it is only available for BizTalk Server 2016 but it will soon be compiled and available for previous versions of the product.
Where to download?
You can download BizTalk Pipeline Components Extensions Utility Pack from GitHub here:
BizTalk Pipeline Components Extensions Utility Pack
GitHub
Author: Sandro Pereira
Sandro Pereira lives in Portugal and works as a consultant at DevScope. In the past years, he has been working on implementing Integration scenarios both on-premises and cloud for various clients, each with different scenarios from a technical point of view, size, and criticality, using Microsoft Azure, Microsoft BizTalk Server and different technologies like AS2, EDI, RosettaNet, SAP, TIBCO etc. He is a regular blogger, international speaker, and technical reviewer of several BizTalk books all focused on Integration. He is also the author of the book “BizTalk Mapping Patterns & Best Practices”. He has been awarded MVP since 2011 for his contributions to the integration community. View all posts by Sandro Pereira
by Sandro Pereira | Sep 25, 2018 | BizTalk Community Blogs via Syndication
PIP name specified does not match the PIP specification, this is the last RosettaNet error that tries to make my life a little bit difficult.
Fortunately, to date, Microsoft documentation has significantly improved, moving to DOCS was a good approach and community members now have the availability to help to improve the product documentation. Nevertheless, there are still some topics that the existing the documentation is obsolete, scarce or simply non-existent. One of these topics is Microsoft BizTalk Accelerator for RosettaNet.
I was receiving this error on the PublicResponderProcess orchestration, for those who are not familiar with Microsoft BizTalk Accelerator for RosettaNet (BTARN), this is a default artifact developer by Microsoft that compose a BizTalk Solution that handles PIP messages:
- When a responder receives a request message, BTARN routes the request message from the public-process orchestration, to the private-process orchestration, to the line-of-business (LOB) program. The responder requires the response service content from the LOB program to generate a RosettaNet response message back to the initiator. Many of the elements in the response message are populated using the values from the request message. As a result, you can incorporate a map in the responder private-process orchestration to help the LOB program generate the response service-content message in the required format.
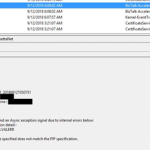
The difficult part is to “debug”/track these errors to understand what and why this is happening. The full error message in the event log was:
Source module:
PublicResponderProcess
Correlation information:
PIP Code : 3C4
PIP Version : V01.00
PIP InstanceID : 922731_20180912T050751
SourcePartnerName :
DestinationPartnerName:
Description:
Public Responder could not send an Async exception signal due to internal errors bellow:
RNIF Exception detail:-
Error code:UNP.SHDR.VALERR
Error Number:2005
Description: PIP name specified does not match the PIP specification.
: PIP name specified does not match the PIP specification")
Note: this same error can occur in previous or new versions of BizTalk Server.
Cause
Again, it was difficult to understand all the internal behaviors developed by Microsoft for BTARN but basically, when you receive a PIP message you will end up receiving 4 parts:
- The Preamble:
- All RosettaNet messages must have a Preamble. It is specified with a DTD that is common across all messages.
- The Preamble section of the MIME message contains elements that are global to the RosettaNet service and others that are common to the Service Header and Service Content; for example, the message standard and version used in the message.
<Preamble xmlns="http://schemas.microsoft.com/biztalk/btarn/2004/Preamble_MS_V02_00.dtd">
    <standardName>
        <GlobalAdministeringAuthorityCode>
            RosettaNet
        </GlobalAdministeringAuthorityCode>
    </standardName>
    <standardVersion>
        <VersionIdentifier>
            V02.00
        </VersionIdentifier>
    </standardVersion>
</Preamble>
- The Delivery Header
- The delivery header is new in RNIF 2.0 and facilitates the routing of messages through hubs. It contains the following attributes:
- Elements for the sending and receiving of trading partner identities
- Message date and time stamp
- Globally unique tracking ID
<DeliveryHeader xmlns="http://schemas.microsoft.com/biztalk/btarn/2004/DeliveryHeader_MS_V02_00.dtd">
    <isSecureTransportRequired>
        <AffirmationIndicator>
            Yes
        </AffirmationIndicator>
    </isSecureTransportRequired>
    <messageDateTime>
        <DateTimeStamp>
            20180912T050743.000Z
        </DateTimeStamp>
    </messageDateTime>
    <messageReceiverIdentification>
        <PartnerIdentification>
            <GlobalBusinessIdentifier>
                xxxx
            </GlobalBusinessIdentifier>
        </PartnerIdentification>
    </messageReceiverIdentification>
    <messageSenderIdentification>
        <PartnerIdentification>
            <GlobalBusinessIdentifier>
                yyyyy
            </GlobalBusinessIdentifier>
        </PartnerIdentification>
    </messageSenderIdentification>
    <messageTrackingID>
        <InstanceIdentifier>
            922730_20180912T050744**00**
        </InstanceIdentifier>
    </messageTrackingID>
</DeliveryHeader>
-
- The Service Header is specified with a DTD that is common across all messages. A separate DTD and/or XML schema for each message validates the body of the messages.
- The Service Header helps identify the following items:
- The PIP
- The activity and the action to which the message belongs
- The PIP instance
- Information about the sender of the message
- Information about the recipient of the message
- The date and time at which the message was sent
- Whether the message is a Test message or a Production message
- Whether the sender is to be treated as an “unknown partner”
- The Service Header format is fixed and independent of the specifics of the message contained in the payload. However, the Service Content could change based on the variance in the business content.
<ServiceHeader xmlns="http://schemas.microsoft.com/biztalk/btarn/2004/ServiceHeader_MS_V02_00.dtd">
    <ProcessControl>
        <ActivityControl>
            <BusinessActivityIdentifier>
                Notify Of Invoice Reject
            </BusinessActivityIdentifier>
            <MessageControl>
                <fromRole>
                    <GlobalPartnerRoleClassificationCode>
                        Invoice Reject Provider
                    </GlobalPartnerRoleClassificationCode>
                </fromRole>
                <fromService>
                    <GlobalBusinessServiceCode>
                        Invoice Reject Provider Service
                    </GlobalBusinessServiceCode>
                </fromService>
                <Manifest>
                    <numberOfAttachments>
                        <CountableAmount>
                            0
                        </CountableAmount>
                    </numberOfAttachments>
                    <ServiceContentControl>
                        <ActionIdentity>
                            <GlobalBusinessActionCode>
                                Invoice Reject Notification Action
                            </GlobalBusinessActionCode>
                        </ActionIdentity>
                    </ServiceContentControl>
                </Manifest>
                <toRole>
                    <GlobalPartnerRoleClassificationCode>
                        Invoice Reject Receiver
                    </GlobalPartnerRoleClassificationCode>
                </toRole>
                <toService>
                    <GlobalBusinessServiceCode>
                        Invoice Reject Receiver Service
                    </GlobalBusinessServiceCode>
                </toService>
            </MessageControl>
        </ActivityControl>
        <GlobalUsageCode>
            Test
        </GlobalUsageCode>
        <pipCode>
            <GlobalProcessIndicatorCode>
                3C4
            </GlobalProcessIndicatorCode>
        </pipCode>
        <pipInstanceId>
            <InstanceIdentifier>
                922730_20180912T050744
            </InstanceIdentifier>
        </pipInstanceId>
        <pipVersion>
            <VersionIdentifier>
                V01.00
            </VersionIdentifier>
        </pipVersion>
        <KnownInitiatingPartner>
            <PartnerIdentification>
                <GlobalBusinessIdentifier>
                    XXXXXX
                </GlobalBusinessIdentifier>
            </PartnerIdentification>
        </KnownInitiatingPartner>
    </ProcessControl>
</ServiceHeader>
- And the Service Content
- Service Content is specified in individual PIPs. Each PIP has one or more business actions that are described by means of individual DTDs or schema.
- The payload part of a RosettaNet Business Message—that is, the actual business content—is a message in XML format.
: PIP name specified does not match the PIP specification - Message Parts")
For this problem, the things you need to know about the PublicResponderProcess orchestration is that:
- It will call a method “GetRuntimeConfig” on the “GetRNConfig” shape that will get the process/agreement configuration;
rnConfig = Microsoft.Solutions.BTARN.ConfigurationManager.RuntimeConfigGenerator.GetRuntimeConfig
  (destinationPartyID, sourcePartyID, pipCode, pipVersion,
    false, true
 );
- And it will call a method “IsActionMessageValid” on the “ValidateMessage” shape that will validate if the message received a match to any process/agreement active in the system
rnConfig.IsActionMessageValid( inRNIFMessage, out exceptionInfo );
-
- This last method calls an additional method call “ValidateActionServiceHeader”, here a piece of the code:
...
if (propertyValue != base.GetPIPConfigValue("PIP_Name"))
{
   str = str + StringResources.GetString(StringResourceIDNames.rtcV11InvalidPipName);
}
...
-
-
- “GetPIPConfigValue(“PIP_Name”)” comes from the RosettaNet process

-
-
- The other comes from the Service Header message part in the BusinessActivityIdentifier element
- Both need to be equal – case sensitive!
My problem was that:
- the RosettaNet process name was: Notify of Invoice Reject
- and the Service Header was: Notify Of Invoice Reject
Solution
To solve this issue you must.
- Ensure that the process name is equal to the BusinessActivityIdentifier element in the Service Header message part
Author: Sandro Pereira
Sandro Pereira lives in Portugal and works as a consultant at DevScope. In the past years, he has been working on implementing Integration scenarios both on-premises and cloud for various clients, each with different scenarios from a technical point of view, size, and criticality, using Microsoft Azure, Microsoft BizTalk Server and different technologies like AS2, EDI, RosettaNet, SAP, TIBCO etc. He is a regular blogger, international speaker, and technical reviewer of several BizTalk books all focused on Integration. He is also the author of the book “BizTalk Mapping Patterns & Best Practices”. He has been awarded MVP since 2011 for his contributions to the integration community. View all posts by Sandro Pereira
by Sandro Pereira | Sep 23, 2018 | BizTalk Community Blogs via Syndication
Last Friday while checking the Twitter I found a twitter from Jon Levesque asking if someone had a sample on how to took SQL data table results and passed a markdown-formatted table into an Approval Request. By coincidence, two week ago, I was helping a colleague of mine doing something similar, in that case, it was just adding a well formatted table with the results of an SQL expression to a notification email. Two different but similar scenarios.
To be able to create this simple proof-of-concept you should:
- Access the Flow portal: https://flow.microsoft.com/ and sign in with your account
- In flow.microsoft.com, select “My flows” in the top navigation bar, and then select “+ Create from blank” to create a Flow from scratch.
- On the “Create a flow from blank”, select “Create from blank” to start the process of creating an empty Flow
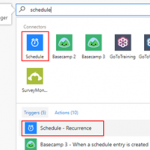
Because this is a simple POC and it supposed to be a notification email we will be using the Scheduler trigger to start the Flow from time to time. For that you need:
- On the Flow designer, on the Trigger event enter “Schedule” and select the option “Schedule – Recurrence”

- For this POC, we want to receive a notification on a daily, so on the Schedule Trigger configuration set the:
- “Interval” property as “1”
- And the “Frequency” property has “Day”

- Add the next step by clicking the “+New step” button and then choose the “Add an action” option

- On the “Choose an action” window, enter “SQL Server” and select the action “SQL Server – Execute a SQL query”

| Note: |
| This can be a different action like, get rows or execute a stored procedure. |
-
- After you connect to the proper SQL Server and database, on the Execute a SQL query action configuration:
- On the “query” property, type
SELECT [Id],
       [Name],
       [Age],
       [Nacionality]
FROM [dbo].[Persons]

- Add the next step by clicking the “+New step” button and then choose the “Add an action” option
- On the “Choose an action” window, enter “Variables” and select the action “Variables – Initialize variable”

-
- On the Variable action configuration:
- On the “Name” property, type “lines”
- On the “Type” property, specify the type as “String”
- On the “Value” property leave it blank

| Note: |
| Initialize variable needs to be performed on Top Level, in other words, outside any cycle operation (Do Until or For Each). Initialize variable inside cycles are not permitted. |
- Add the next step by clicking the “+New step” button and then choose the “Add an action” option
- On the “Choose an action” window, enter “Variables” and select the action “Variables – Append to string variable”

-
- On the Variable action configuration:
- On the “Name” property, select “lines” variable
- On the “Value” property type
<tr>
<td style="border:1px solid black; border-collapse: collapse;">@{items('Apply_to_each')?['Name']}</td>
<td style="border:1px solid black; border-collapse: collapse;">@{items('Apply_to_each')?['Nacionality']}</td>
</tr>

| Note: |
| @{items(‘Apply_to_each’)?[‘Name’]} and @{items(‘Apply_to_each’)?[‘Nacionality’]} are inserted and selected from the list of “Execute a SQL query” action tokens |
- Because we can have multiple rows retrieved from SQL Server, the Flow designer will automatically place this “Variable – Append to string variable” inside a Loop that will iterate thru each SQL row.

Now that we have our SQL rows partially well formatted in a markdown-formatted table, what we need to do is create our notification/Approval Request email. To do that we need:
- Add the next step by clicking the “+New step” button and then choose the “Add an action” option
- On the “Choose an action” window, enter “Office 365 Outlook” and select the action “Office 365 Outlook – Send an email”

- On the Office 365 Outlook action configuration:
- On the “To” property, type the email for which you want to send the email
- On the “Subject” property, type the subject of the email
- On the “Body” property, type:
<h1>Summary</h1>
<table style="border:1px solid black; border-collapse: collapse;">
@{variables('lines')}
</table>
by www.devscope.net

| Note: |
| @{variables(‘lines’)} is inserted and selected from the list of “Variables” tokens |
Now the final trick for you to receive this type of email:

instead of this:

On the Office 365 Outlook action configuration you need to:
- Click on “Show advanced options”.

- And on the “Show advanced options”:
- On the “Is HTML” property, select “Yes”

Author: Sandro Pereira
Sandro Pereira lives in Portugal and works as a consultant at DevScope. In the past years, he has been working on implementing Integration scenarios both on-premises and cloud for various clients, each with different scenarios from a technical point of view, size, and criticality, using Microsoft Azure, Microsoft BizTalk Server and different technologies like AS2, EDI, RosettaNet, SAP, TIBCO etc. He is a regular blogger, international speaker, and technical reviewer of several BizTalk books all focused on Integration. He is also the author of the book “BizTalk Mapping Patterns & Best Practices”. He has been awarded MVP since 2011 for his contributions to the integration community. View all posts by Sandro Pereira
by Sandro Pereira | Sep 21, 2018 | BizTalk Community Blogs via Syndication
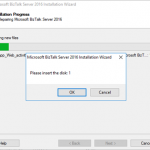
A funny error I found out on December 4, 2017, that I’m now recovering from my backlog to be published. While trying to repair a BizTalk Server 2016 installation on a virtual machine I got this annoying, funny and strange error: Please insert the disk: 1.
Microsoft BizTalk Server 2016 Installation Wizard
Please insert the disk: 1

and regardless of what I did back then, like running the execution file as an administrator, I was getting this error every time I was trying to repair the BizTalk Server installation.
And what I did back then was:
- Attach the BizTalk Server ISO file in the DVD drive of Virtual Machine that was running in the Hyper-V;
- And execute the installation file from the DVD drive of the VM;
Cause
Unfortunately, this message may appear if you are trying to repair the product from the CD/DVD drive and the reason is not clear for me.
I don’t know if this error occurred by the fact that in the original installation the ISO that was locally on the machine or it is just a coincidence.
Solution
The solution, however, is very simple:
- Copy content of the BizTalk Server 2016 ISO to the local hard drive of the Virtual Machine – but I believe that this can be the same to other BizTalk Server versions;
- And execute from the local Hard Drive the BizTalk Server setup file has an Administrator;
By doing that you will definitely solve the “Please insert the disk: 1” issue and you will be able to repair the existing installation.
Author: Sandro Pereira
Sandro Pereira lives in Portugal and works as a consultant at DevScope. In the past years, he has been working on implementing Integration scenarios both on-premises and cloud for various clients, each with different scenarios from a technical point of view, size, and criticality, using Microsoft Azure, Microsoft BizTalk Server and different technologies like AS2, EDI, RosettaNet, SAP, TIBCO etc. He is a regular blogger, international speaker, and technical reviewer of several BizTalk books all focused on Integration. He is also the author of the book “BizTalk Mapping Patterns & Best Practices”. He has been awarded MVP since 2011 for his contributions to the integration community. View all posts by Sandro Pereira

by Sandro Pereira | Sep 20, 2018 | BizTalk Community Blogs via Syndication
Finally, my latest whitepaper has been published: “BizTalk Server and GDPR“! After doing several GDPR assessments and talked a little about this topic on INTEGRATE 2018 London event I thought this should be the next logical step considering that this is a topic that has worried a lot of BizTalk Server customers, and still worries, and in a more general way all organizations regardless of whether they use or not BizTalk Server.

In a general way, BizTalk Server is GDPR compliant – in fact Microsoft Product group announced in INTEGRATE2018 London Event that one of the features of BizTalk Server 2016 Feature Pack 3 (FP3) was FIPS and GDPR privacy standards compliant, but that was just a marketing strategy since, in its most simplistic form, BizTalk Server is a messaging broker, which doesn’t capture or store any type of data on its system other than for the time needed to complete business processes and to connect and route messages to their target systems. However, because you can process messages and/or communicate with systems that contain sensitive data (personal data) you must have some good practices in BizTalk Server Applications to comply with GDPR. So, in other words, BizTalk Server is GDPR compliant but your BizTalk Applications may not be.
What to expect about BizTalk Server and GDPR whitepaper
BizTalk Server is part of complex enterprise IT environment, we also need to guarantee that these BizTalk Server environments are GDPR compliant. This white paper intends to provide key points on how you can archive and deploy secure integrations in BizTalk Server, and how you can ensure and/or help organizations for this complex middle piece, become GDPR compliant.
This whitepaper will cover the impact of the new regulations and what needs to be done with a focus exclusively on BizTalk Server environments.
Where I can download it
The whitepaper is completely free and you can download it here:
I would like to take this opportunity also to say thanks to Lex Hegt for helping me reviewing this whitepaper especially for the incredible work of him correcting my horrible English and in this way make the document and my thoughts being readable.
I hope you enjoy reading this paper and any comments or suggestions are welcome.
You can also find, download and enjoy several other free whitepapers of my own here:
Author: Sandro Pereira
Sandro Pereira lives in Portugal and works as a consultant at DevScope. In the past years, he has been working on implementing Integration scenarios both on-premises and cloud for various clients, each with different scenarios from a technical point of view, size, and criticality, using Microsoft Azure, Microsoft BizTalk Server and different technologies like AS2, EDI, RosettaNet, SAP, TIBCO etc. He is a regular blogger, international speaker, and technical reviewer of several BizTalk books all focused on Integration. He is also the author of the book “BizTalk Mapping Patterns & Best Practices”. He has been awarded MVP since 2011 for his contributions to the integration community. View all posts by Sandro Pereira

by Sandro Pereira | Sep 13, 2018 | BizTalk Community Blogs via Syndication
Some time ago I wrote a blog post on how to Process Feedback Evaluations (paper) automagically with SmartDocumentor OCR, Logic Apps, Azure Functions and Power BI, at that point there weren’t so many of the functionalities that we have at the moment both on Logic Apps and Microsoft Flow: like concept of variables, Case operations, more expressions an so on. I will not address here in this blog post if can we redesign to be different or better. The question I raise and will address here is: can we do the same with Microsoft Flow, instead of using Logic Apps?
And the reason I ask this question is that Microsoft Flow is more targeted to Business Users which fits perfectly with scenarios in which we want to extend a product to fit each business users’ requirements/scenarios. If you have an Office365 you can use Microsoft Flow and you will have 2,000 runs per month, so you don’t need to pay extra for using Logic Apps, you can instead use Microsoft Flow.
And the answer is: Yes, you can!
The problem and scenario will be exactly the same: How can we easily convert paper in data to generate additional value? How can we perform operations on it and easily gain insights?

But in this case, to solve this problem, in which I wanted to have the evaluations forms to be processed in real-time, i.e., as the attendees handed in the forms, the results were presented in a public Power BI dashboard in a matter of seconds, we will be using:
- DevScope SmartDocumentor OCR that, not also allowed me to extract the data from my documents and easily integrate with other systems, but also to intelligently set my OCR streams (flows), defining:
- Different receive locations, like FTP, file or directly from scanner devices;
- Create/test my recognition templates and review/ validate the data which is gathered;
- But also, enabled me to connect and send the metadata, XML or JSON, through any kind of HTTP service, I could even extend it by using a PowerShell provider that would enable me to execute a PowerShell script.
- Microsoft Flow that allows all type of Business Users to create and automate workflows across multiple applications and services without the need for developer help in a very simple and fast way. These automated workflows are called flows.
- And finally, Power BI to create interactive data visualization (dashboards and reports)

Processing Feedback Evaluations: The solution
SmartDocumentor: to process and extract metadata from paper
Again, I’m not going to explain in details how the solution is implemented inside DevScope’s SmartDocumentor for it is not the point of this article, and if you want to know more about it, you can always contact me. However, let me contextualize you:
- SmartDocumentor OCR flow will be listening in two receive locations: Share Folder and directly from the scanner device;
- After receiving and extract the data from the scanned documents (paper), SmartDocumentor will send the metadata to a Microsoft HTTP endpoint.

- Inside the SmartDocumentor processes, we optional can specify if we want to review the documents – SmartDocumentor Review Station – before you sent to the Microsoft Flow (or any other system).

Power BI to deliver interactive data visualization (dashboards and reports)
Regarding Power BI, Microsoft Flow Power BI connector (is the same of the Logic Apps connector) only accepts you to use streaming datasets (this has advantages and some disadvantages that we will see further on), that allows you to easily build real-time dashboards by pushing data into the REST API endpoint. To create your streaming datasets, you should access to Power BI with your account:
- Select your ‘Workspace à Datasets’, and then on the top right corner click ‘+ Create’ and then ‘Streaming dataset’

- In the ‘New streaming dataset’, select ‘API’ and then click ‘Next’
- In the second ‘New streaming dataset’, give a name to your dataset: “FeedbackForm” and then add the following elements:
- SpeakerName (Text) – represents the name of the speaker that is obtained in the evaluation form according to the session.
- ContentMatureFB (Number) – a value between 1 and 9 that is obtained in the evaluation form
- GoodCommunicatorFB (Number) – a value between 1 and 9 that is obtained in the evaluation form
- EnjoySessionFB (Number) – a value between 1 and 9 that is obtained in the evaluation form
- MetExpectationsFB (Number) – a value between 1 and 9 that is obtained in the evaluation form
- SpeakerAvrg (Number) – A simple average calculation (sum all the above metrics divide by 4)
- WhoAmI (Text) – represents the type of attendee you are (developer, architect, …) that is obtained in the evaluation form
- SpeakerPicture (Text) – picture of the speaker according to the session that is that is obtained in the evaluation form.

- And because we want to create interactive reports in order to have more insights from the event. We need to enable ‘Historic data analysis’ and then click ‘Create’
Unfortunately, streaming dataset is meant to be used for real-time streaming and is a little limited in terms of want we can do with it. For example, it doesn’t allow you to combine different sources, for example, a “table” that can correlate speaker to get their pictures, or to make aggregations of metrics like “Speaker average”. Which means that we need to send all of this information from Microsoft Flow.
Microsoft Flow to create an integration process flow
At the beginning of this article, I told that one of the advantages of Microsoft Flow is that allows Business Users to create and automate workflows across multiple applications and services without the need for developer help. So, for this example, I will try to abstract from the fact that I am a developer and “try” to implement as if I were a business user: no custom code is allowed!
Microsoft Flow it will be the component that will allow us to extend a product (OCR software) that, as all products, are limited to certain features and capabilities to be able to communicate with a huge range of SaaS applications that appear all day on the market.
In order to integrate SmartDocumentor OCR with Power BI, we need to create a Microsoft Flow that:
- Accept a JSON through an HTTP Post. For that, we use a ‘Request – When a HTTP request is received’ trigger.

-
- And, because we do have friendly tokens to access the elements of the message, we will use a sample of the JSON message to be able to generate the correct JSON Schema. For that you should:
- From the trigger configuration box, select the option “Use sample payload to generate schema” and past the above sample:
[
{
“Key”: “RecognitionRating”,
“Value”: “100”
},
{
“Key”: “RecognitionStatus”,
“Value”: “Final”
}
]
-
-
- To generate the JSON schema, click “Done”

- Next, we need to create the following support variables, that we will use to store the data extracted from the SmartDocumentor JSON message – that is a Name/value typed message – to be sent to Power BI dataset:
| Name |
Type |
Initial Value |
| count |
Integer |
0 |
| speakerName |
String |
|
| Picture |
String |
|
| ContentClear |
String |
|
| GoodCommunicator |
String |
|
| EnjoySession |
String |
|
| MetExpectation |
String |
|
| whoAmI |
String |
|
-
- For that, we need to add a ‘+New step’, ‘Add an action’ and then enter Variables’ into the search box. Select “Variables – Initialize variable” from the actions list.

-
- And repeat the same task for all the variables.
Note: Unfortunately, to the date, there is still no way to create multiple variables using a single shape. In my opinion, this could and should be made as a table approach instead of the existing approach.
Now that we have all our variables that we need to store the information that we need to extract from the SmartDocumentor JSON message, we need to start extracting based on the Evaluation form. The first part of the form is: “What session are you evaluating”:

and for us to find out what session is being selected so we can “map” the speaker and picture name we need to look for the keys “S1”, “S2”, “S3” and “S4” and see which on them is filled. To do that we need to:
- Add a ‘+New step’, ‘… More’ and then select ‘Add a switch case’

-
- On the “On” property of the switch condition configuration, select from the list of tokens the “Key” token from the “When a HTTP request is received” trigger

-
- Because this is a Key/Value messages with multiple records, the Flow designer will automatically place this switch condition inside a Loop that will iterate thru each key/value pair.
- In the first case, let rename it ‘Case S1’ branch configuration:
- On the “Equals” property, type “S1”
- And then add a new condition by selecting ‘… More’ and then select ‘Add a condition’
- On the ‘Yes’ branch
- Choose the “Add an action” option and on the “Choose an action” window, enter “Variables” and select the trigger “Variables – Set variable”
- And set the “Picture” variable to the desired value
- Do the same steps this time to set the “speakerName” variable
- Leave the ‘No’ branch as it is

- Add 3 more new Case branches and repeat the same steps, this time configuring the values to look for “S2”, S3” and “S4”.
The second part of the form is: “What is my evaluation”:

To extract this information, and because we already have a Switch case condition in place, what we need to do is:
- Create 4 new different branches in the Switch case condition, one for each question – “Q1”, “Q2”, “Q3” and “Q4” – and then:
- On the “Equals” property, type “Q1”
- And then Choose the “Add an action” option and on the “Choose an action” window, enter “Variables” and select the trigger “Variables – Set variable”
- And set the “ContentClear” variable to the rate provided by selecting from the list of tokens the “Value” token from the “When a HTTP request is received” trigger
- Do the same steps for
- “Q2” to set the variable “GoodCommunicator”
- “Q3” to set the variable “EnjoySession”
- “Q4” to set the variable “MetExpectation”

Finally, the last section is about “Who am I”

This is probably the more complicated section. Here, we basically want to travel from a range of position and if this is selected we append to a string separated by a comma, something like “Developer; Student”. To do that we need to:
- On the Default branch, add a new condition by selecting ‘… More’ and then select ‘Add a condition’
- In the condition expression, select “Edit in advanced mode” and then type the condition to treat the key/name pair if “count” variable is >13 and less or equal with 28
@and(greater(variables('count'), 13),lessOrEquals(variables('count'), 28))

-
- On the ‘Yes’ branch
- We need to check if “tag” is selected or not. If yes set we need to add to the “whoAmI”, otherwise we don’t do nothing. To do that we need an extra if condition: Add a new condition by selecting ‘… More’ and then select ‘Add a condition’
- On “Choose a value” property select the “Key” token from the “When a HTTP request is received” trigger.
- On the condition set “Is not equal to”
- And in the other “Choose a value” property leave it empty

-
-
- However, to set properly the “whoAmI” variable we need another additional condition to check if the “whoAmI” variable is empty or not. If empty set the “whoAmI” variable with the value, otherwise append to the existing value a comma and the new value. To do that we need to:
- Add a new condition by selecting ‘… More’ and then select ‘Add a condition’
- On “Choose a value” property select the “whoAmI” token from the “Variable” context.
- On the condition set “Is not equal to”
- And in the other “Choose a value” property leave it empty
- On the “Yes” condition, choose the “Add an action” option and on the “Choose an action” window, enter “Variables” and select the trigger “Variables – Set variable”
- And set the “whoAmI” variable to the desired value – select the “Key” token from the “When a HTTP request is received” trigger.
- And on the “No” condition, choose the “Add an action” option and on the “Choose an action” window, enter “Variables” and select the trigger “Variables – append to string variable”
- And set the “whoAmI” variable to the desired value – select the “Key” token from the “When a HTTP request is received” trigger.

- Finally, after the Switch case condition, and just before finishing the “Apply to each” cycle
- Choose an action” window, enter “Variables” and select the trigger “Variables – Increment variable”
- On the “Name” property select the “count” variable
- And on the “Value” set as 1

To finalize the entire process, we just need to:
- Calculate the rate average – the sum of all question results divided by the number of questions.
- And send it to Power BI
To accomplished that we need to:
- Add a ‘+New step’, ‘Add an action’ and then enter “Variables” into the search box. Delect the trigger “Variables – Initialize variable”
- On the “Name” property select the “SpeakerAvrg” variable
- On the type property set to be Integer
- And in the Value property, from the context dialogue box, select “Expression” tab and set the following expression:
int(div(add(add(int(variables('ContentClear')), int(variables('GoodCommunicator'))) , add(int(variables('EnjoySession')), int(variables('MetExpectation')))),4))

- In the last step of the Logic App: we push the data into the Power BI streaming dataset created earlier by using the new ‘Power BI’ Connector. To do this we need to:
- Add a ‘+New step’, ‘Add an action’, and then enter ‘Power BI’ into the search box. Select “Add row to streaming dataset” from the actions list.
- Select the name of the workspace and then the name of the streaming dataset
- The next step is to select the Table titled “RealTimeData”
- And finally, map the properties with the different variables tokens has in the picture

Give a proper name to the flow and save it
The end result
After saving the Microsoft Flow and process the Evaluation forms, the result is this beautiful and interactive report that we can present in a monitor during the breaks of our events:

Author: Sandro Pereira
Sandro Pereira lives in Portugal and works as a consultant at DevScope. In the past years, he has been working on implementing Integration scenarios both on-premises and cloud for various clients, each with different scenarios from a technical point of view, size, and criticality, using Microsoft Azure, Microsoft BizTalk Server and different technologies like AS2, EDI, RosettaNet, SAP, TIBCO etc. He is a regular blogger, international speaker, and technical reviewer of several BizTalk books all focused on Integration. He is also the author of the book “BizTalk Mapping Patterns & Best Practices”. He has been awarded MVP since 2011 for his contributions to the integration community. View all posts by Sandro Pereira

by Sandro Pereira | Sep 11, 2018 | BizTalk Community Blogs via Syndication
I finally started and published the first version of the sibling BizTalk project Mapper Extensions UtilityPack for BizTalk Server 2016: BizTalk Pipeline Components Extensions Utility Pack
What is BizTalk Pipeline Components Extensions Utility Pack?
BizTalk Pipeline Components Extensions Utility Pack is a set of custom pipeline components (libraries) with several custom components that can be used in received and sent pipelines, which will provide an extension of BizTalk out-of-the-box pipeline capabilities.

What’s to expect in this version?
Content-Based Routing Pipeline Components
CBR IDoc Operation Promotion Encode component (CBRIdocOperationPromotionEncode)
- Content-Based Routing Component to promote IDOC Operation property.
- This component requires one configuration that is the MessageType string to be ignored. Then it will take the last string (word) from the MessageType Message Context Property and promote it to the Operation Message Context Property.
- This component is to be used on the Encode stage of BizTalk Server Send Pipelines and to be used exclusively on Send Ports.
CBR Operation Promotion Encode component (CBROperationPromotionEncode)
- Content-Based Routing Component to promote Operation property.
- This component doesn’t require any configuration. Then it will take the value (word) which lies ahead of the cardinal (#) from the MessageType message context property and promote it to the Operation Message Context Property.
- This component is to be used on the Encode stage of BizTalk Server Send Pipelines and to be used exclusively on Send Ports.
The project is available on BizTalk Server Open Source Community repository on GitHub (https://github.com/BizTalkCommunity) and everyone can contribute with new pipeline components that can extend or improve the existing BizTalk Server capabilities.
At the moment it is only available for BizTalk Server 2016 but it will soon be compiled and available for previous versions of the product.
Special thanks to my team coworker at DevScope: Pedro Almeida for helping me on this project.
Deploying Pipeline Components
All the .NET pipeline component assemblies (native and custom) must be located in the Pipeline Components folder to be executed by the server. If the pipeline with a custom component will be deployed across several servers, the component’s binaries must be present in the specified folder on every server.
You do not need to add a custom pipeline component to be used by the BizTalk Runtime to the Global Assembly Cache (GAC).
To know more about Deploying Pipeline Components, please see: Deploying Pipeline Components
Where to download?
You can download BizTalk Pipeline Components Extensions Utility Pack from GitHub here:
BizTalk Pipeline Components Extensions Utility Pack
GitHub
Author: Sandro Pereira
Sandro Pereira lives in Portugal and works as a consultant at DevScope. In the past years, he has been working on implementing Integration scenarios both on-premises and cloud for various clients, each with different scenarios from a technical point of view, size, and criticality, using Microsoft Azure, Microsoft BizTalk Server and different technologies like AS2, EDI, RosettaNet, SAP, TIBCO etc. He is a regular blogger, international speaker, and technical reviewer of several BizTalk books all focused on Integration. He is also the author of the book “BizTalk Mapping Patterns & Best Practices”. He has been awarded MVP since 2011 for his contributions to the integration community. View all posts by Sandro Pereira
by Sandro Pereira | Sep 10, 2018 | BizTalk Community Blogs via Syndication
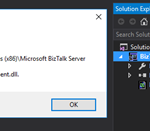
Sometimes errors seem to find me, sometimes it fills that I’m chasing errors! And because someone did something that you shouldn’t do, configuring the build folder of a Functoid project to be <BizTalk Server installation folder>Developer ToolsMapper Extensions directory, I got a new and strange error while trying to open a BizTalk map inside Visual Studio: Microsoft BizTalk Mapper Unable to load wrapper. Here is the full error message:
Microsoft BizTalk Mapper
Unable to load wrapper <BizTalk Server installation folder>Developer ToolsMapper ExtensionsMicrosoft.BizTalk.Interop.Agent.dll

Of course, at that time I was quite curious to know the cause of this problem because I didn’t do anything wrong, just building a custom Functoid project and a few minutes before I actually was working in a map and I was able to open without any kind of problems.
Cause
When you build a project, by default any kind of project it will add the project assemblies as well as the dependencies to the binDebug – again this is the default behavior.
In this case, by changing this behavior in a Custom Functoid project to the <BizTalk Server installation folder>Developer ToolsMapper Extensions directory, was causing the problem, because it was adding not only the custom Functoid assembly but also some BizTalk internal assemblies, in this case the Microsoft.BizTalk.Interop.Agent.dll, that are incompatible with the internal BizTalk Mapper wrapper.

Note: BizTalk Server installation folder>Developer ToolsMapper Extensions directory is where Visual Studio BizTalk project looks for custom functoids to be added to the Toolbox.
Solution
Once again, the solution is simple, you should delete all the unnecessary assemblies, especially the internal ones of the product.
Once you delete all the unnecessary assemblies, in this case, the Microsoft.BizTalk.Interop.Agent.dll, and I also advise to delete all the ones that are selected on the above picture, the Unable to load wrapper problem will be solved and you can once again open the BizTalk Mapper without any kind of problems inside Visual Studio
Author: Sandro Pereira
Sandro Pereira lives in Portugal and works as a consultant at DevScope. In the past years, he has been working on implementing Integration scenarios both on-premises and cloud for various clients, each with different scenarios from a technical point of view, size, and criticality, using Microsoft Azure, Microsoft BizTalk Server and different technologies like AS2, EDI, RosettaNet, SAP, TIBCO etc. He is a regular blogger, international speaker, and technical reviewer of several BizTalk books all focused on Integration. He is also the author of the book “BizTalk Mapping Patterns & Best Practices”. He has been awarded MVP since 2011 for his contributions to the integration community. View all posts by Sandro Pereira
by Sandro Pereira | Sep 3, 2018 | BizTalk Community Blogs via Syndication
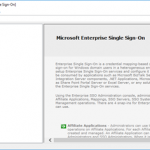
Have you ever noticed that your SSO Administration Console tool doesn’t open in BizTalk Server 2016? Fortunately for Microsoft BizTalk Server team this tool is not heavily used by the customer, nevertheless, this is an existing and valid tool that needs to be working properly.
What is this tool?
You can install the Enterprise Single Sign-On (SSO) Administration component as a stand-alone feature. This is useful if you need to administer the SSO system remotely. The hardware and software requirements are the same as for a typical Enterprise SSO installation.
After you install the administration component, you must use either ssomanage.exe or the SSO Administration MMC snap-in to specify the SSO server that will be used for management. Both processes are included in the procedure that follows.
Of course, with this tool, SSO Administration, you can do more than just configure the SSO server that will be used for management. Using the Enterprise SSO Administration console, administrators can easily manage Affiliate Applications, Mappings, SSO Servers, SSO System and also perform Password Management operations. There are 4 snap-ins for Enterprise SSO that administrators can use.
- Affiliate Applications – Administrators can use this to perform administrative operations on Affiliate Applications. For each Affiliate Application, mappings can be created and managed. An Affiliate Application can be created by SSO Affiliate Administrators and SSO Administrators. When it is defined, the administrator can optionally specify an Application Administrators account that contains users who can perform administrative operations on that Affiliate Application. In addition, an Application Users account must be specified that contains Windows domain users for whom mappings can be created. Other operations such as enabling or disabling Affiliate Applications, configuring SSO tickets for the Affiliate Application, and enabling or disabling mappings can also be performed by administrators using this snap-in.
- Password Management – Administrators can use this snap-in to perform administrative operations on Password Synchronization Adapters and Password Filters. Administrative operations need to be performed by the SSO Administrators. A filter rule can also be defined within an Adapter configuration. Once an Adapter or Filter is created, an administrator can associate Affiliate Applications with the Adapter or Filter so that the synchronization and filter rules defined are applied to that application.
- Servers – Administrators can build a list of SSO Servers to perform certain administrative operations and to view their status. Within an SSO system, an administrator can also perform a discovery process to automatically discover and add all the SSO Servers within the SSO system.
- System – Administrators can view SSO System level settings. These settings are stored in the centralized SSO Credential Database. Modifying these settings will apply to all SSO Servers that are using this SSO Credential Database. In addition, administrators can manage the Master Secret Server and perform tasks such as generate, backup and restore the secret. The system-level administrative operations can be performed only by the SSO Administrators.

However, SSO Administration shortcut that points to the Microsoft.EnterpriseSingleSignOn.StartMMC.exe executable file is not working properly in BizTalk Server 2016.
Cause
The reason why this problem is happening is that with BizTalk Server 2016 there is a bug and the installation wizard doesn’t create all the necessary keys in the Register.
Also, if you look at the properties of the “SSO Administration” shortcut, this is pointing to the Microsoft.EnterpriseSingleSignOn.StartMMC.exe executable file. I don’t know the reason why Microsoft decided to create this strategy but in reality, this executable file is just “an easy way” (or dummy way) to open the “ENTSSO.msc”, normally present in the “C:Program FilesCommon FilesEnterprise Single Sign-On” folder and this executable reads the “ENTSSO.msc” installation path from the Register:
…
key = Registry.LocalMachine.OpenSubKey(@"SoftwareMicrosoftENTSSO");
object obj2 = key.GetValue("InstallPath") as string;
…
string str2 = """ + str + "entsso.msc"";
ProcessStartInfo startInfo = new ProcessStartInfo("mmc.exe") {
    Arguments = str2
};
Process.Start(startInfo);
…
However, this is the aspect of the keys within BizTalk Server 2016:

Solution
The solution is easy, and you have very different ways to do it.
If you want to open the SSO Administration snap-in, you can:
- Go to the Enterprise Single Sign-On installation folder
- Normally, “C:Program FilesCommon FilesEnterprise Single Sign-on”
- And directly execute the “ENTSSO.msc” (double click)
If you want to fix the SSO Administration shortcut to work properly, you can:
- Open the Register
- And on the HKWY_LOCAL_MACHINESOFTWAREMicrosoftENTSSO add
- the following string: InstallPath
- with the value: C:Program FilesCommon FilesEnterprise Single Sign-On
BizTalk Server 2016: PowerShell to fix the SSO Administration Console
Because in a normal situation there are more keys (strings) present in the Register. I decided to create a simple PowerShell script that you can use to fix all these bugs and put everything working normally again:
...
Set-ItemProperty -Path $registryPath -Name InstallPath -Value "C:Program FilesCommon FilesEnterprise Single Sign-On"
Set-ItemProperty -Path $registryPath -Name ProductCode -Value "{F89B22BC-2768-4237-B300-5CFA52D9AC84}"
...
THIS POWERSHELL IS PROVIDED “AS IS”, WITHOUT WARRANTY OF ANY KIND.
BizTalk Server 2016: PowerShell to fix the SSO Administration Console (2 KB)
Microsoft | TechNet Gallery
Author: Sandro Pereira
Sandro Pereira lives in Portugal and works as a consultant at DevScope. In the past years, he has been working on implementing Integration scenarios both on-premises and cloud for various clients, each with different scenarios from a technical point of view, size, and criticality, using Microsoft Azure, Microsoft BizTalk Server and different technologies like AS2, EDI, RosettaNet, SAP, TIBCO etc. He is a regular blogger, international speaker, and technical reviewer of several BizTalk books all focused on Integration. He is also the author of the book “BizTalk Mapping Patterns & Best Practices”. He has been awarded MVP since 2011 for his contributions to the integration community. View all posts by Sandro Pereira

: PIP name specified does not match the PIP specification")
: PIP name specified does not match the PIP specification - Message Parts")


