A client called me this week to help with their BizTalk Server production environment. BizTalk was not running, and they needed to know the reason why. Quickly, while we investigated the issue, we saw on the BizTalk Server administration console the following error:
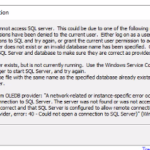
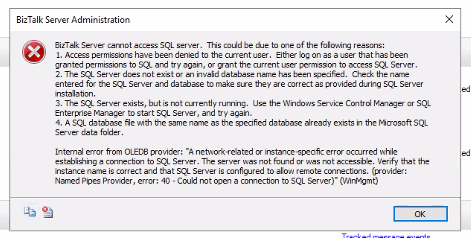
BizTalk Server cannot access SQL Server. This could be due to one of the following reasons:
Access permissions have been denied to the current user. Either log on as a user that has been granted permissions to SQL and try again, or grant the current user permission to access SQL Server.
The SQL Server does not exist, or an invalid database name has been specified. Check the name entered for the SQL Server and database to make sure they are correct as provided during SQL Server installation.
The SQL Server exists, but is not currently running. Use the Windows Service Control Manager or SQL Enterprise Manager to start SQL Server, and try again.
A SQL database file with the same name as the specified database already exists in the Microsoft SQL Server data folder.
Internal error from OLEDB provider: “A network-related or instance-specific error occurred while establishing a connection to SQL Server. The server was not found or was not accessible. Verify that the instance name is correct and that SQL Server is configured to allow remote connections. (provider: Named Pipes Provider, error: 40 – Could not open a connection to SQL Server)” (WinMgmt)
Cause
In this case, the error message clearly specifies perfect paths to troubleshoot and fix the issue. We knew that the first two and the last one didn’t fit our issue because SQL Server exists, and now one has changed access permission.
So, we immediately focus on point number three: The SQL Server exists, but is not currently running. We had the SQL Server Management Console open, and it appeared to be running, but when we checked the services, we realized that the SQL Server (BIZTALK) was not running but Starting.
But any attempt on our part to quickly try to get the service running was futile. Even restarting the machine was unsuccessful.
This SQL Server behavior surprised me – to be clear, at this point, we knew that this was not a BizTalk Server issue but a SQL Server issue that was affecting BizTalk Server – and that forced me to investigate one of the obvious reasons that everyone says they monitor, but… the free space on the hard drive! And guess what? We had 0 free space on C drive.
And that was the main reason for this issue in our case.
Solution
So, to solve this issue, we had to:
First, of course, the quick win approach was to free some space on the hard drive – we were able to clean 5GB.
Then, start the SQL Server (BIZTALK) service and dependencies again. After freeing up disk space, we didn’t find any issues in getting this started.
And, of course, we asked the IT team to increase the C drive with extra disc space.
Hope you find this helpful! So, if you liked the content or found it useful and want to help me write more, you can buy (or help me buy) my son a Star Wars Lego!
Author: Sandro Pereira
Sandro Pereira lives in Portugal and works as a consultant at DevScope. In the past years, he has been working on implementing Integration scenarios both on-premises and cloud for various clients, each with different scenarios from a technical point of view, size, and criticality, using Microsoft Azure, Microsoft BizTalk Server and different technologies like AS2, EDI, RosettaNet, SAP, TIBCO etc.
He is a regular blogger, international speaker, and technical reviewer of several BizTalk books all focused on Integration. He is also the author of the book “BizTalk Mapping Patterns & Best Practices”. He has been awarded MVP since 2011 for his contributions to the integration community.
View all posts by Sandro Pereira
After the release of our Azure Function to Apply XSLT Transformations, it is now time for another Azure Function under the same context: an Azure Function to Apply Liquid Transformations.
As in the previous transformation function, you can ask the same questions: Can we accomplish the same with default capabilities inside Logic Apps or Azure API Management?
Using Azure Integration Services, we can easily apply liquid transformations:
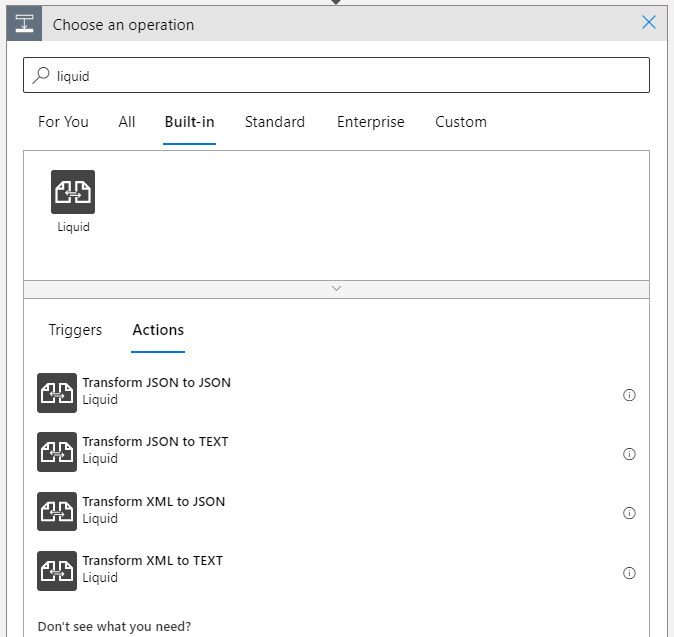
If we are using Logic App Consumption we can use in conjugation with an Integration Account the following actions associated with the Liquid connector:
Transform JSON to JSON
Transform JSON to TEXT
Transform XML to JSON
Transform XML to TEXT
If we are using Logic App Standard it already provides out-of-the-box support for applying Liquid transformations (using the same Liquid connector) without the Integration Account need.
Or, if you are using API Management, we can make use of the set-body policy to apply a Liquid transformation (any input format to any input format) in the request or response body.
new body value as text
Once again, our main objective in creating this function was to use it inside Logic Apps Consumption to avoid needing an Integration Account. But that we will address later on in another blog post.
What does this Azure Function do?
The ApplyLiquidTransformation function allows you to execute Liquid transformations using DotLiquid to dynamically convert a payload into another payload format. To use this function, you must set up an Azure Storage Account and a container to store the liquid files. The following transformation types are supported:
Apply the following transformations on JSON payloads
JSON to JSON
JSON to XML
JSON to CSV
JSON to plain text
and so on
Apply the following transformations on XML payloads
XML to JSON
XML to XML
XML to CSV
XML to plain text
and so on
Apply the following transformations on CSV messages
CSV to JSON
CSV to XML
CSV to CSV
CSV to plain text
and so on
To trigger this function, you need to:
In the Body, send one of the following payloads: JSON, XML, or CSV.
You should specify the following mandatory headers:
Content-Type as text/xml (or application/xml), application/json or text/csv.
LiquidFileName with the name of the liquid file present in the storage account.
Optionally, you can set the following header:
Output-Content-Type: this will specify the outcome (response) content-type. The default value is application/json.
CSVDelimiterChar: If you specify the Content-Type header as text/csv, then you need to specify the delimiter char of the CSV file. For example: ;
Once again, our main objective in creating this function was to use it inside Logic Apps Consumption to avoid needing an Integration Account. But that we will address later on in another blog post. However, it can be used in other scenarios.
Where can I download it?
You can download the complete Azure Functions source code here:
Hope you find this helpful! So, if you liked the content or found it useful and want to help me write more, you can buy (or help me buy) my son a Star Wars Lego!
Thanks to my team member Luís Rigueira for helping me realize and implement this idea.
Credits also to these two projects and authors:
Author: Sandro Pereira
Sandro Pereira lives in Portugal and works as a consultant at DevScope. In the past years, he has been working on implementing Integration scenarios both on-premises and cloud for various clients, each with different scenarios from a technical point of view, size, and criticality, using Microsoft Azure, Microsoft BizTalk Server and different technologies like AS2, EDI, RosettaNet, SAP, TIBCO etc.
He is a regular blogger, international speaker, and technical reviewer of several BizTalk books all focused on Integration. He is also the author of the book “BizTalk Mapping Patterns & Best Practices”. He has been awarded MVP since 2011 for his contributions to the integration community.
View all posts by Sandro Pereira
Last week, I was helping a client start their footprint on Azure by deploying our very first services: an Azure Function and a few Logic Apps Consumption. Because this was the first introduction to Azure to this client, we decided for a start small and get bigger approach. So, they have created a pay-per-use subscription and gave me access to it.
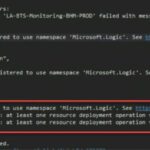
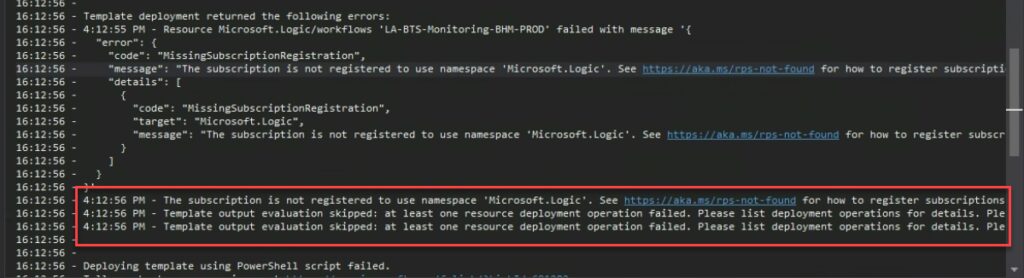
If we didn’t find any issue deploying our Azure Function, the same cannot be said for the Logic Apps. And when we were trying to deploy it from Visual Studio, the same solution that we had deployed without issue in other subscriptions, we were surprised to encounter the following error:
The subscription is not registered to use namespace ‘Microsoft.Logic’. See https://aka.ms./rps-not-found for how to register subscriptions.
Causes
Basically, this error means that the service you are trying to use is not currently registered in your Azure subscription.
You can change this at any point by allowing or prohibiting using specific namespace (services) in our Azure Subscription. Of course, as with everything in Azure, you need permissions on the subscription to execute these actions.
Solutions
The solution to this problem is quite simple to accomplish. You just need to:
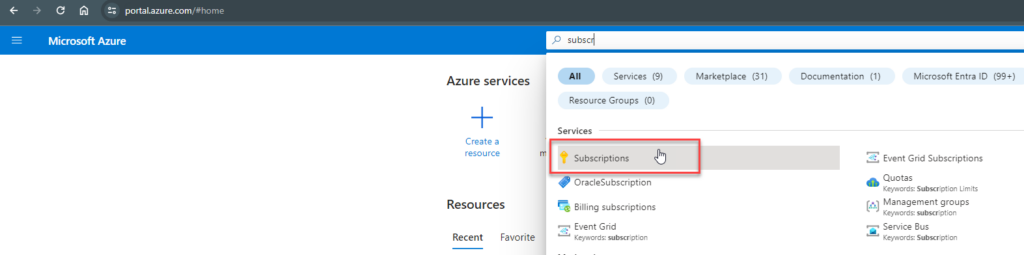
From the list of subscriptions page, select the subscription you want to use for registering the resource provider.
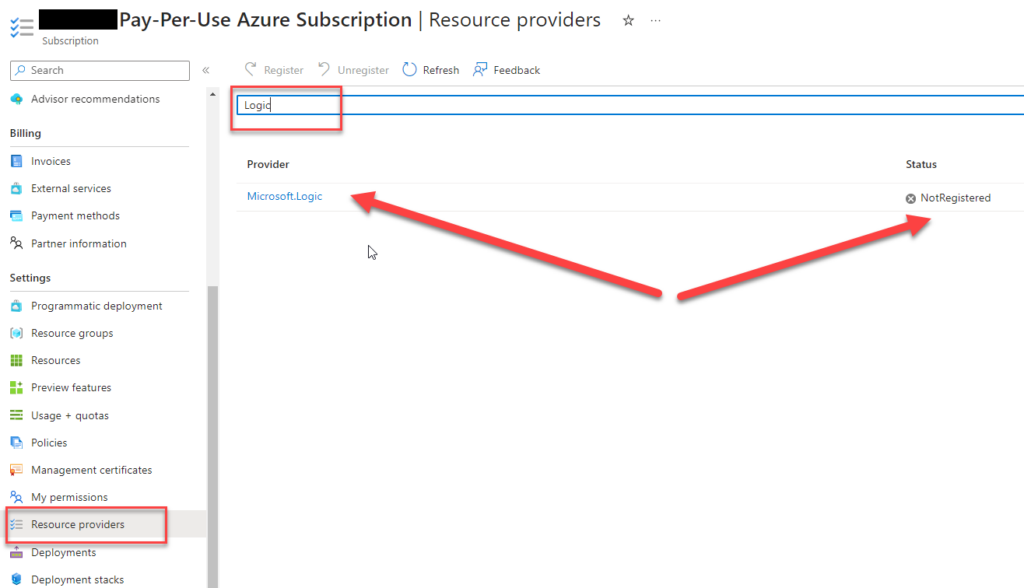
On the Subscription page, from the left menu, select the Resource providers option under the Settings section.
On the Resource providers page, on the search type Logic.
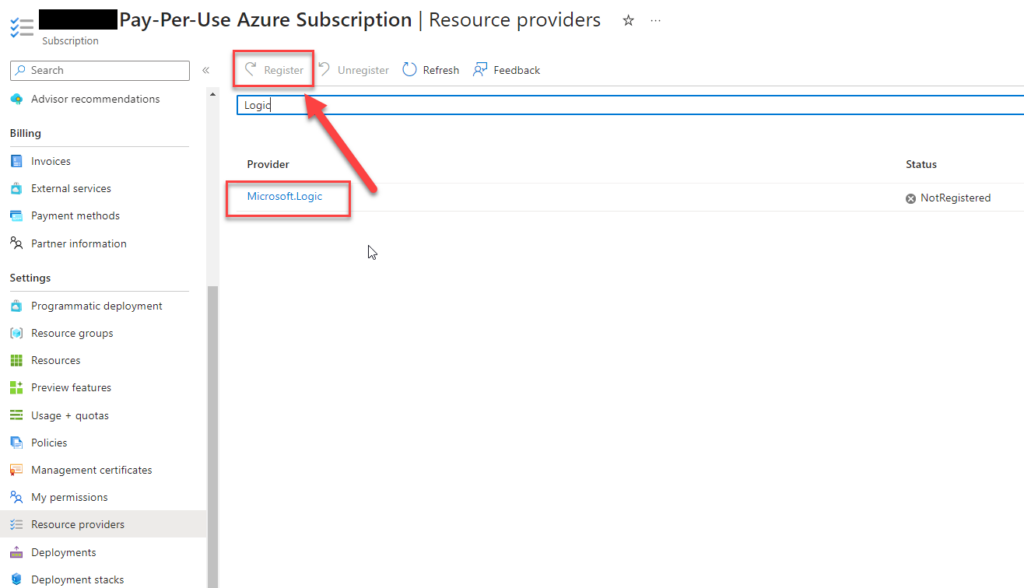
Click on the Microsft.Logic row, and that will enable the Register button. Click on the Register button.
After you click register, the provider will be registered, and you should be able to use the Logic App Service.
After these steps, we were able to deploy our Logic Apps from Visual Studio.
Hope you find this helpful! So, if you liked the content or found it helpful and want to help me write more content, you can buy (or help buy) my son a Star Wars Lego!
Author: Sandro Pereira
Sandro Pereira lives in Portugal and works as a consultant at DevScope. In the past years, he has been working on implementing Integration scenarios both on-premises and cloud for various clients, each with different scenarios from a technical point of view, size, and criticality, using Microsoft Azure, Microsoft BizTalk Server and different technologies like AS2, EDI, RosettaNet, SAP, TIBCO etc.
He is a regular blogger, international speaker, and technical reviewer of several BizTalk books all focused on Integration. He is also the author of the book “BizTalk Mapping Patterns & Best Practices”. He has been awarded MVP since 2011 for his contributions to the integration community.
View all posts by Sandro Pereira
It is always fun to return to one of my favorite topics: Errors and warnings, causes and solutions, this time on Azure. It was not a fun night yesterday! And all of that because of the nightmare that sometimes I needed to prepare our developer tools to be fit to develop Azure Services.
Some time ago, November 14, 2023, to be exact, Microsoft announced the global availability of Azure Functions supports .NET 8 in the isolated worker model. Support is available for Windows and Linux on the Consumption, Elastic Premium, and App Service plan hosting options.
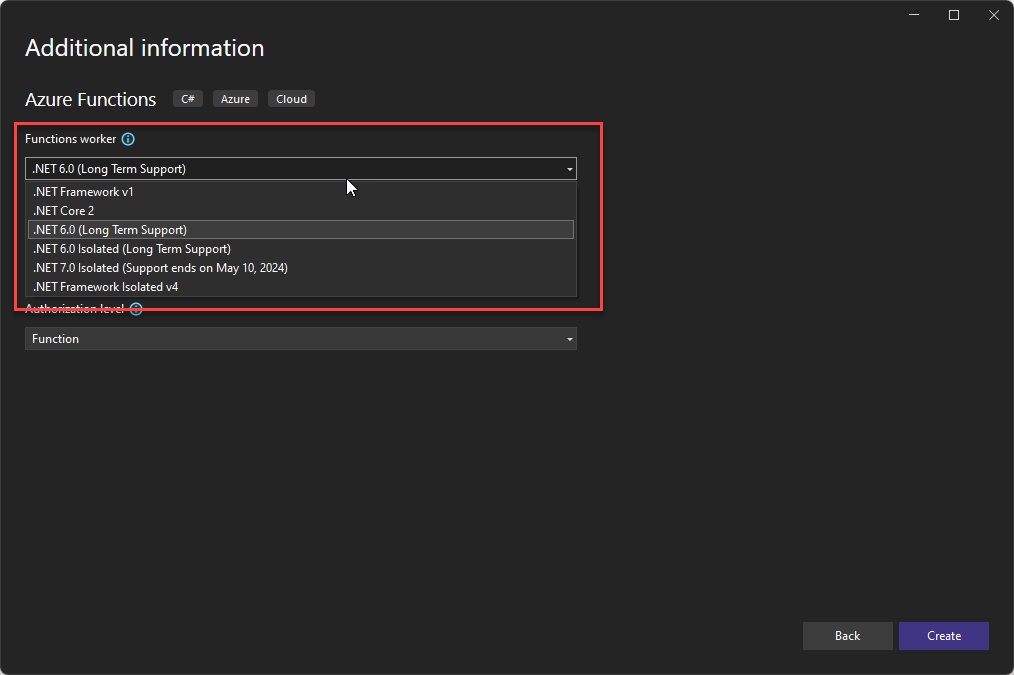
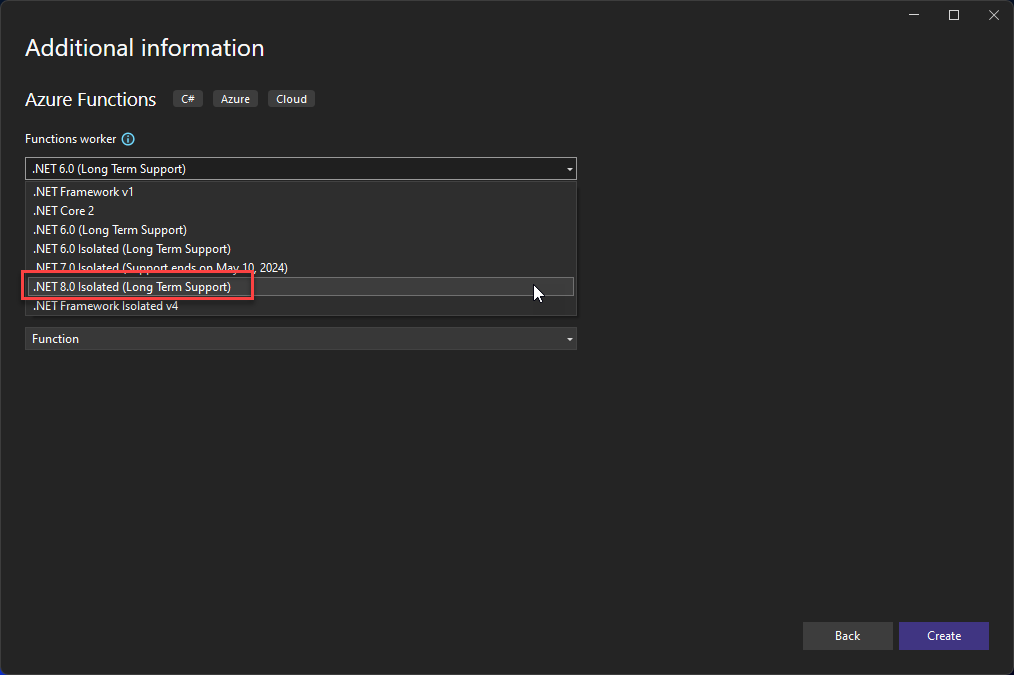
So, last night, I decided to create an Azure Function using .NET 8, and to my surprise, the .NET 8 Isolated (Long Term Support) Function worker was missing from the Azure Function project in Visual Studio 2022.
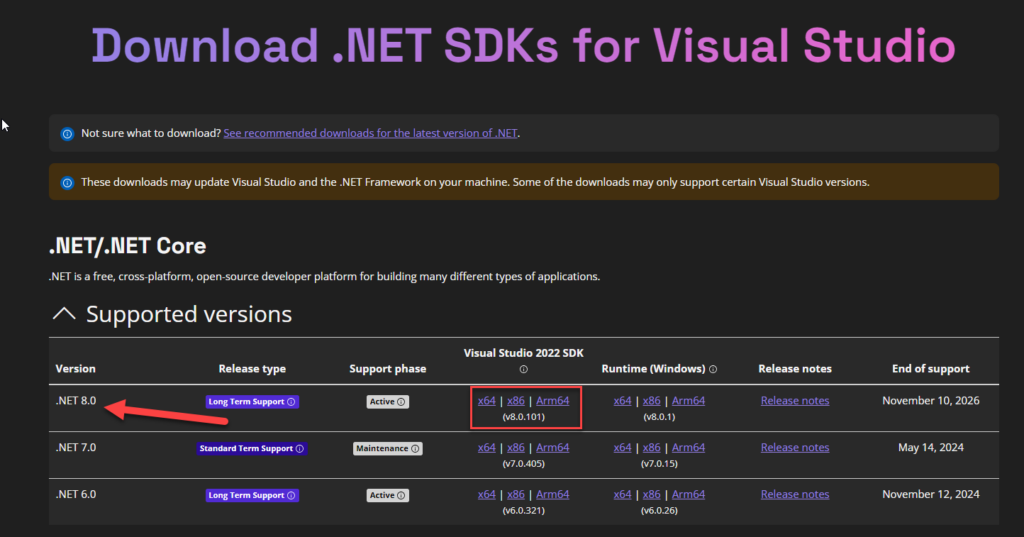
Of course, the first assumption I made was I didn’t have the .NET 8 installed. And, in fact, it wasn’t! So I went to the Download .NET SDKs for Visual Studio page and installed the .NET 8.0.
However, after installing and restarting everything, including the laptop, the .NET 8 Function worker was still missing from the Azure Function project in Visual Studio 2022.
Causes
The cause of this problem or behavior is related to having currently installed obsolete Azure Function tools and/or Visual Studio version on your machine.
Solutions
The solution to this problem is not quite as intuitive as we like it but nevertheless simple to accomplish once you know what to do.
To resolve this issue/behavior, you need to perform several steps.
Step 1: As I mentioned above, make sure you have installed in your machine the .NET 8.0 SDK.
Step 2: Visual Studio version matters! You need to upgrade your Visual Studio 2020 to version 17.8 or above. (I am not sure if the first version to support this Function Worker is 17.8, but I believe so). To upgrade Visual Studio you need to:
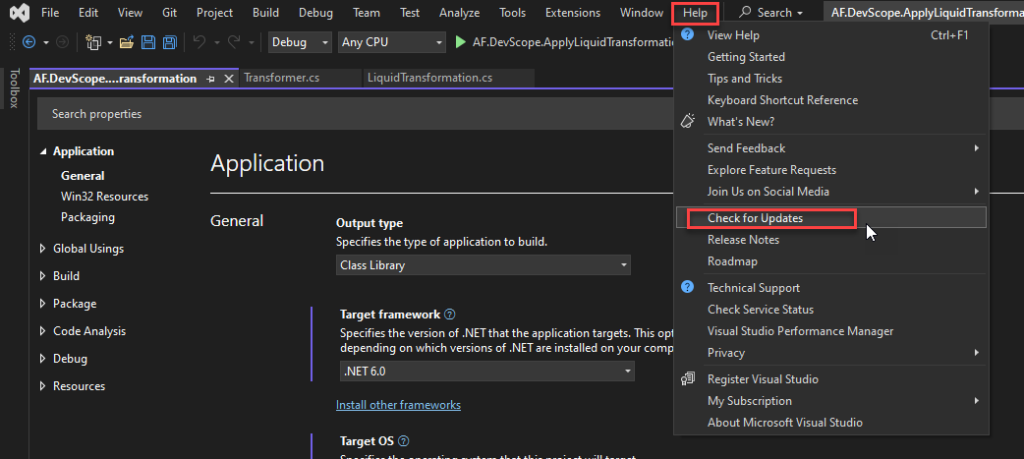
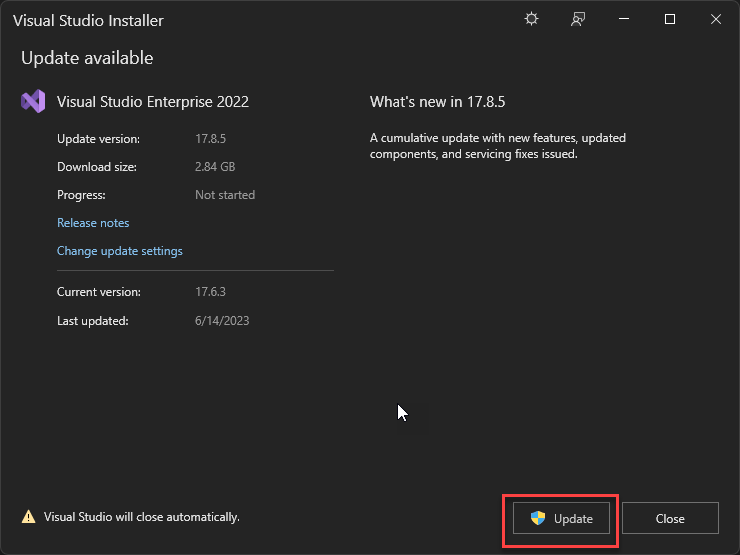
Open Visual Studio 2022 and access the following menu option: Help > Check for Updates.
In my case, I had an old version, 17.6.3, that does not support .NET 8.0 Function worker. Click Update.
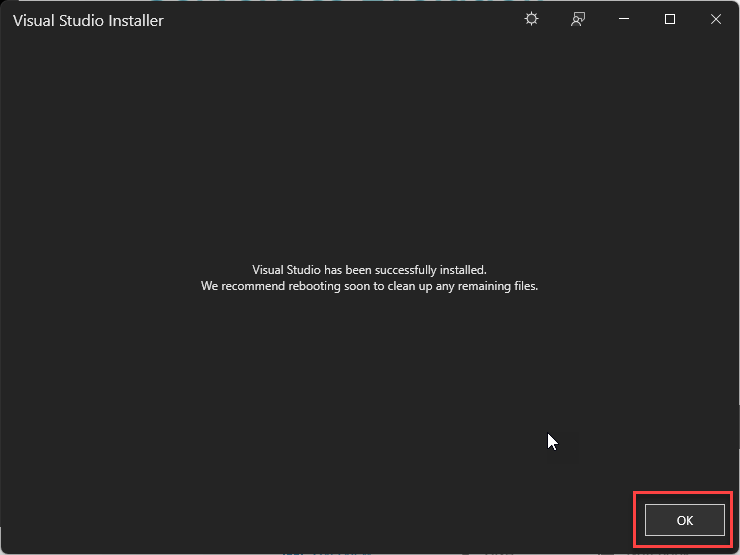
Once the update is complete, click OK.
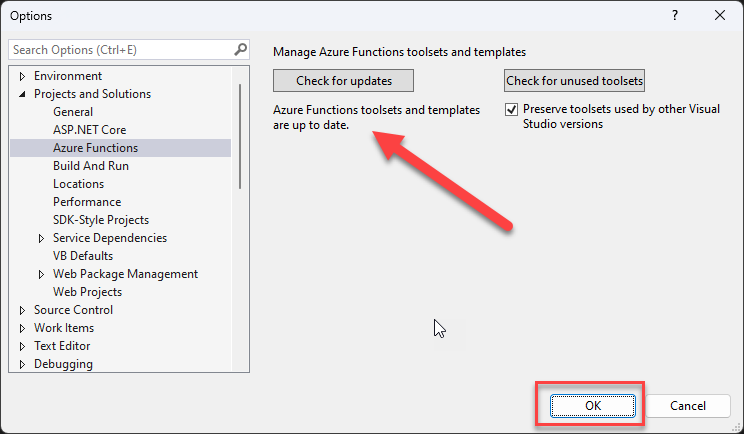
Step3: Install the latest Azure Functions toolsets and templates. After upgrading the Visual Studio, we also need to make sure that we have the latest Azure Functions toolsets and templates. To do that, we need to:
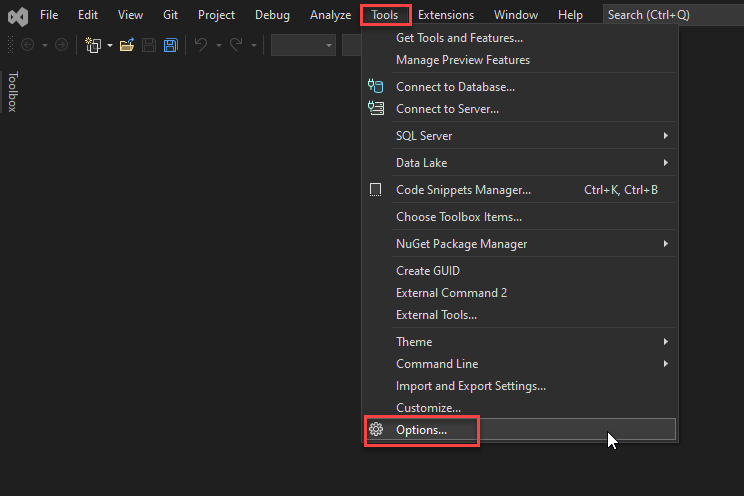
Open Visual Studio 2022 and access the following menu option: Tools> Options...
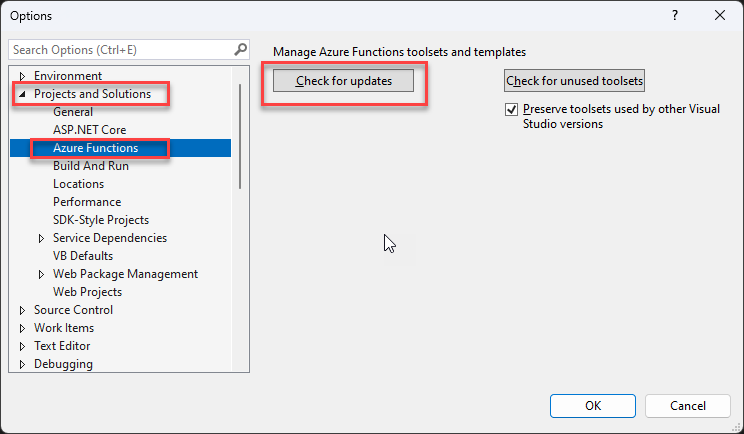
In the Options window, on the left menu three, select the option Projects and Solutions > Azure Functions. And then click Check for updates.
If it exists updates, click on Download & Install.
Once the version is installed or if there isn’t any update, a message will appear saying Azure Functions toolsets and templates are up to date. Click OK.
Close Visual Studio.
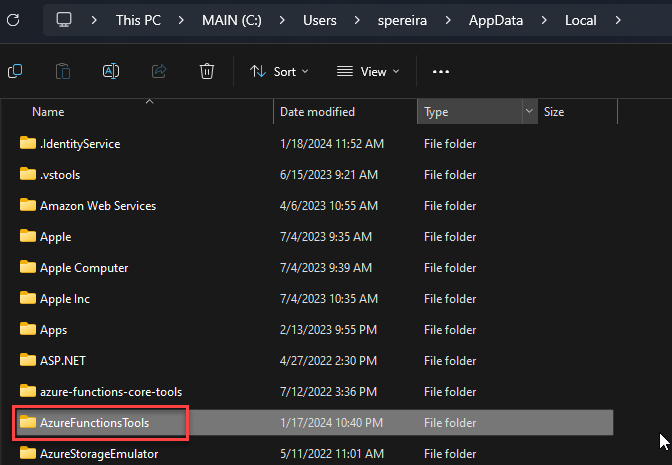
Step4: (optional but recommended) Remove AzureFunctionsTools folder from LocalAppData
Maybe this step is not required, but after all the failed attempts, this “recipe” worked, at least for me. That being said, I also recommend carrying out all the optional steps.
To accomplish this, you need to:
On the file system, access to: %LocalAppData%
And delete the AzureFunctionTools folder.
Step5: Restart the machine
I try to access Visual Studio before restarting the machine without success. Once I restarted everything, including the machine, I once again tried to access Visual Studio to create an Azure Function project, and the .NET 8 Isolated (Long Term Support) Function worker was finally available for me to use:
Hope you find this helpful! So, if you liked the content or found it helpful and want to help me write more content, you can buy (or help buy) my son a Star Wars Lego!
Author: Sandro Pereira
Sandro Pereira lives in Portugal and works as a consultant at DevScope. In the past years, he has been working on implementing Integration scenarios both on-premises and cloud for various clients, each with different scenarios from a technical point of view, size, and criticality, using Microsoft Azure, Microsoft BizTalk Server and different technologies like AS2, EDI, RosettaNet, SAP, TIBCO etc.
He is a regular blogger, international speaker, and technical reviewer of several BizTalk books all focused on Integration. He is also the author of the book “BizTalk Mapping Patterns & Best Practices”. He has been awarded MVP since 2011 for his contributions to the integration community.
View all posts by Sandro Pereira
For 2024, I have challenged my team to every Friday to publish a fact about the technologies we work on every day. The base rules will be:
This has to be an easy-to-read post.
The fact can be virtually everything: a tip, a best practice, a workaround, an opinion, a fact, a tool, and so on.
And this will be the first one! But before we start I feel I need to explain the featured image of this series of posts! For fun, I asked ChatGPT to generate a 16:9 picture with the following context:
Three male friends on a Friday night at a pub:
The first man with a beard is drinking beer (Luis Rigueira).
The second man is bald and has no beard. He is drinking wine. (me)
And the third man has glasses, he doesn’t have a beard, and he is drinking Coke soda. (Diogo Formosinho)
This was the end result:
Now, the fun part: by mistake, I misspelled beer and wrote bear – that is the reason for the bear in the picture if you are wondering :)… but we decided to call him “the traitor” (he knows who he is!!)
Now, to start this series of blog posts, I have selected this fact: if you need to perform an XML Schema validation using the Integration Account, please remember that the Integration Account doesn’t support nested schemas, at least yet! The beauty of Azure is that everything changes at a fast pace, and new features arrive almost every day.
The import element inside XML Schemas is used to add multiple schemas with different target namespaces to a document. This allows us, for example, to create common objects that are reused inside several schemas.
For example, this XML payload:
  Sandro
  Pereira
  1978-04-04

    Porto
    1
It has two objects: the Person and the Address. If we open the Person Schema, we realize that there is an importation for the Address Schema inside:
If you have this scenario in your hands, unfortunately, I have to tell you that the Integration Account doesn’t support it. And you will end up with the following error:
The provided schema content is not valid. If the schema has any references, please upload the referenced schemas to the Integration Account first. The compilation of schema failed with error: ‘The ‘http://POC.ValidateInboundXMLMessages.Address:Address’ element is not declared.’.
How can we fix this? Well, this is a subject for another blog post and not for a Friday Fact!
Hope you find this helpful! So, if you liked the content or found it useful and want to help me write more, you can buy (or help me buy) my son a Star Wars Lego!
Author: Sandro Pereira
Sandro Pereira lives in Portugal and works as a consultant at DevScope. In the past years, he has been working on implementing Integration scenarios both on-premises and cloud for various clients, each with different scenarios from a technical point of view, size, and criticality, using Microsoft Azure, Microsoft BizTalk Server and different technologies like AS2, EDI, RosettaNet, SAP, TIBCO etc.
He is a regular blogger, international speaker, and technical reviewer of several BizTalk books all focused on Integration. He is also the author of the book “BizTalk Mapping Patterns & Best Practices”. He has been awarded MVP since 2011 for his contributions to the integration community.
View all posts by Sandro Pereira
I usually like to see the positive side of things, even in adverse situations, so despite 2023, it has been a strange year, neither good nor bad, just weird. Perhaps the constant inflation of the cost of living and the continuous loss of civility in society have influenced this definition. I still find myself remembering the good and most important moments, both professional and personal.
Personal highlights…
5 years in a row with home renovations. The path to our dream house is not a fast run but a marathon instead :). This year, we have decided to renew all the bedroom wardrobes in our house and improve our pergola with lights to have family dinners on summer nights. Also, do some renovations on our AIRBNB house in Porto:
We made one of our dream trips: Walter Disney Paris!
And I was able to bring my wife on a “business trip” with a personal weekend as a bonus for her to know a different city and country: Gothenburg, Sweden.
Professional highlights…
Each year, I change, or I try to, how I contribute to the different communities so that it does not become tiring or monotonous. If 2021 and 2022 were years that I dedicated myself to speaking engagements at conferences and User Groups worldwide on topics like BizTalk Server, Logic Apps, and Power Automate, delivering a combined total of 31 sessions. Or in 2022, a year that I also focused on creating whitepapers, ending up publishing ten whitepapers that year.
This year, I decided to return to my roots and dedicate myself to writing more blog posts on my blog (117 new posts) – a personal record!:
2022: 77 new posts
2021: 77 new posts
2020: 92 new posts
2019: 43 new posts
2018: 70 new posts
2017: 63 new posts (migrate to a new blog)
2016: 50 new posts
2015: 79 new posts
2014: 52 new posts
2013: 79 new posts
2012: 102 new posts
2011: 61 new posts
As in BizTalk360 (13 new posts) and Serveless360 (42 new posts). Making an astonishing total of 172 blog posts, which means an average of 14.33 blog posts per month.
I also contribute to GitHub with samples, tools, and other types of resources.
But don’t get me wrong, I was still able to deliver 8 sessions (on-prem and remote) in several conferences and User Groups worldwide on topics like BizTalk Server, Logic Apps, and Power Automate:
Microsoft Integration Trends 2023 Webinar | March 2,9 and 16, 2023 | Online | Enterprise case studies on migrating BizTalk Server to Azure
INTEGRATE 2023 London | JUNE 5-7, 2023 | London, UK | BizTalk Server to Azure Integration Services migration
Azure Logic Apps Community Day 2023 | June 22, 2023 | Online | A walk in the park with the new Logic App Data Mapper
Integration Down Under | June 29, 2023 | Online | A walk in the park with the new Logic App Data Mapper
BizTalk to Azure – The Migration Journey event | September 28, 2023 | Gothenburg, Sweden | Elevating Integration – The Roadmap from BizTalk Server to Azure
BizTalk to Azure – The Migration Journey event | September 28, 2023 | Gothenburg, Sweden | Azure Integration in Action – BizTalk to Azure Transition Case Studies
CONNECTED Conference 2023 | November 15, 2023 | Online | API Management: Best practices, tips and tricks
Porto.DATA #90 Christmas edition – Lightning talks | December 19, 2023 | Online | A walk in the park with the new Logic App Data Mapper
Another thing that I started doing more often was publishing videos on my YouTube channel alongside my coworker, Luis Rigueira. We ended up publishing 14 new videos I especially like:
Finally, this was a year full of training. I was able to deliver 10 training courses (in person and online) focused on BizTalk Server and Azure Integration Services to several partners and organizations on topics like:
Logic App Training Course
Azure Integration Services Training Course
BizTalk Server Developing Training Course
BizTalk Server Administration Training Course
BizTalk Server Dev and Admin Training Course
Star Wars…
Finally, I couldn’t endup without speaking this. If you saw some of my speaking engagements, you notice that at the end I finish the session with this slide:
Well, my son (and me) is a Star Wars fan, and every time I go to the computer at night to write articles and blogs, prepare sessions, or travel to lectures, I tell him I will earn money for our LEGO! So, I decided to create this buy-me-a-coffee thing for those who like my community work and want to contribute.
We were not even close to raising the amount for the Millennium Falcon (not the biggest one, nor the small one :)), but I decided to tell him that we did it! And here he is, saying thank you to all the people who helped us achieve our goal!
The 2024 goal will be once again the LEGO Star Wars Millennium Falcon (75192) or Chewbacca (75371)!
For all of you…
Once again, thanks for following me, and for reading my blog, and I promise that I will continue to share my knowledge during 2024.
Author: Sandro Pereira
Sandro Pereira lives in Portugal and works as a consultant at DevScope. In the past years, he has been working on implementing Integration scenarios both on-premises and cloud for various clients, each with different scenarios from a technical point of view, size, and criticality, using Microsoft Azure, Microsoft BizTalk Server and different technologies like AS2, EDI, RosettaNet, SAP, TIBCO etc.
He is a regular blogger, international speaker, and technical reviewer of several BizTalk books all focused on Integration. He is also the author of the book “BizTalk Mapping Patterns & Best Practices”. He has been awarded MVP since 2011 for his contributions to the integration community.
View all posts by Sandro Pereira
Another Azure Function? Can we accomplish the same with default capabilities inside Logic Apps or Azure API Management? These may be, once again, the questions that you are asking yourself at the moment. Because if we are using Azure Integration Services, we can easily use:
If we are using Logic App Consumption we can use the Transform XML action in conjugation with an Integration Account.
If we are using Logic App Standard it already provides out-of-the-box support for applying XML transformations (using Transform XML action) without the Integration Account need.
Or, if you are using API Management, we can make use of the xsl-transform policy to apply an XSL transformation to XML in the request or response body.
Our main objective in creating this function was to use it inside Logic Apps Consumption to avoid needing an Integration Account. But that we will address later on in another blog post.
What does this Azure Function do?
The ApplyXSLTTransformation allows you to dynamically convert an XML payload into another XML, JSON, or any other format using XLST. To use this function, you must set up an Azure Storage Account and a container to store the XSLT files.
To trigger this function, you need to:
In the Body, send an XML payload
You should specify the following mandatory headers:
Content-Type as text/xml, or application/xml.
XsltFileName with the name of the xslt file present in the storage account.
Optionally, you can set the following header:
Output-Content-Type: this will specify the outcome (response) content-type. The default value is text/xml.
Once again, our main objective in creating this function was to use it inside Logic Apps Consumption to avoid needing an Integration Account. But that we will address later on in another blog post. However, it can be used in other scenarios.
Where can I download it?
You can download the complete Azure Functions source code here:
Hope you find this helpful! So, if you liked the content or found it useful and want to help me write more, you can buy (or help me buy) my son a Star Wars Lego!
Thanks to my team member Luís Rigueira for helping me realize and implement this idea.
Author: Sandro Pereira
Sandro Pereira lives in Portugal and works as a consultant at DevScope. In the past years, he has been working on implementing Integration scenarios both on-premises and cloud for various clients, each with different scenarios from a technical point of view, size, and criticality, using Microsoft Azure, Microsoft BizTalk Server and different technologies like AS2, EDI, RosettaNet, SAP, TIBCO etc.
He is a regular blogger, international speaker, and technical reviewer of several BizTalk books all focused on Integration. He is also the author of the book “BizTalk Mapping Patterns & Best Practices”. He has been awarded MVP since 2011 for his contributions to the integration community.
View all posts by Sandro Pereira
Why do we need this Azure Function? This may be the question that you are asking yourself at the moment. Because if we are using Azure Integration Services, we can easily use:
The json() expression that returns the JSON type value or object for a string or XML inside Logic Apps.
Or the xml-to-json policy that converts a request or response body from XML to JSON inside API Management.
Well, our main objective in creating this function was to be used in Azure API Management to overcome some non-conforming behaviors while converting XML to JSON of the xml-to-json policy, mainly if that XML contains prefixes.
As you may know, prefixes are used inside XML to prevent name conflicts. And when we use them, a namespace for the prefix must be defined. They will work as an abbreviation of the full XML namespace. The namespace declaration has the following syntax:
xmlns:prefix=”URI“.
allowing MyField to be written in this namespace as prefix:MyField rather than, say, {URI}MyField.
And in Enterprise Integration solutions, it is quite normal to see XML documents and Schemas using several prefixes.
Later in another blog post, we will explain the issue behind the decision to create this Azure Function in detail.
And what does this Azure Function do?
The ConvertXMLtoJSON Azure Function, as the name mentions, converts an XML payload to JSON. This function can be used to modernize APIs based on XML-only backend web services.
Once again, our main objective in creating this function was to be used in Azure API Management to overcome some non-conforming behaviors of the xml-to-json policy. However, it can be used in other scenarios.
Where can I download it?
You can download the complete Azure Functions source code here:
Hope you find this helpful! So, if you liked the content or found it useful and want to help me write more, you can buy (or help me buy) my son a Star Wars Lego!
Thanks to my team member Luís Rigueira for helping me realize and implement this idea.
Author: Sandro Pereira
Sandro Pereira lives in Portugal and works as a consultant at DevScope. In the past years, he has been working on implementing Integration scenarios both on-premises and cloud for various clients, each with different scenarios from a technical point of view, size, and criticality, using Microsoft Azure, Microsoft BizTalk Server and different technologies like AS2, EDI, RosettaNet, SAP, TIBCO etc.
He is a regular blogger, international speaker, and technical reviewer of several BizTalk books all focused on Integration. He is also the author of the book “BizTalk Mapping Patterns & Best Practices”. He has been awarded MVP since 2011 for his contributions to the integration community.
View all posts by Sandro Pereira
As the snowflakes gently settle (in theory because here in Porto, there is no snow!) and the jingle bells echo in the distance, we find ourselves at the magical juncture of the year where warmth (in theory again because it is cold), joy, and togetherness take center stage. It’s that time again when twinkling lights and festive cheers fill the air — yes, Christmas is here, and a New Year is just around the corner!
Thanks in advance for all the support and encouragement given throughout this year. We hope that the next year will be filled with new, distinct contributions. We will promise that we will continue to share knowledge, hoping that they can help someone.
May your holiday season be filled with moments of laughter, love, and shared joy with family and friends. As we bid farewell to 2023, we look forward to the adventures that await us in 2024 and remember the sage advice: “Start using proper names from day one!“. With a touch of intergalactic flair, we send our wishes for a Stellar Holiday Season and an Out-of-This-World New Year.
Let’s continue to reach for the stars and dream beyond the limits of the universe. May the Force be with you!
Greetings from Diogo, Luis, and Sandro!
Author: Sandro Pereira
Sandro Pereira lives in Portugal and works as a consultant at DevScope. In the past years, he has been working on implementing Integration scenarios both on-premises and cloud for various clients, each with different scenarios from a technical point of view, size, and criticality, using Microsoft Azure, Microsoft BizTalk Server and different technologies like AS2, EDI, RosettaNet, SAP, TIBCO etc.
He is a regular blogger, international speaker, and technical reviewer of several BizTalk books all focused on Integration. He is also the author of the book “BizTalk Mapping Patterns & Best Practices”. He has been awarded MVP since 2011 for his contributions to the integration community.
View all posts by Sandro Pereira
Last November 15, 2023, I had the pleasure of delivering a session about Azure API Management at the CONNECTED Conference 2023. This conference is one of the most important events on Microsoft Integration in German-speaking countries, and it has been a great honor for me to be invited to participate in the last few years.
My session was about API Management: Best Practices, Tips and Tricks where I talked about best practices and small tips and tricks that we can apply to our Azure Integration projects when using Azure API Management.
Session name: API Management: Best Practices, Tips and Tricks.
Abstract: Unleash the full potential of Azure API Management with this session focused on efficient integration building. Discover tips and tricks that empower developers to be more productive while adhering to best practices, resulting in reliable and effective integrations.
Today I have the pleasure of informing you that the session is now available online:
Hope you find this helpful! So, if you liked the content or found it helpful and want to help me write more content, you can buy (or help buy) my son a Star Wars Lego!
Author: Sandro Pereira
Sandro Pereira lives in Portugal and works as a consultant at DevScope. In the past years, he has been working on implementing Integration scenarios both on-premises and cloud for various clients, each with different scenarios from a technical point of view, size, and criticality, using Microsoft Azure, Microsoft BizTalk Server and different technologies like AS2, EDI, RosettaNet, SAP, TIBCO etc.
He is a regular blogger, international speaker, and technical reviewer of several BizTalk books all focused on Integration. He is also the author of the book “BizTalk Mapping Patterns & Best Practices”. He has been awarded MVP since 2011 for his contributions to the integration community.
View all posts by Sandro Pereira